USER MANUAL EL-1750PIII SHARP
ELECTRONIC PRINTING CALCULATOR
Notes for handling Lithium batteries:
CAUTION
Danger of explosion if battery is incorrectly replaced.
Replace only with the same or equivalent type recommended by the manufacturer.
Dispose of used batteries according to the manufacturer's instructions.
This equipment complies with the requirements of Directive 89/336/EEC as amended by 93/68/EEC.
To insure trouble-free operation of your SHARP calculator, we recommend the following:
- The calculator should be kept in areas free from extreme temperature changes, moisture, and dust.
- A soft, dry cloth should be used to clean the calculator. Do not use solvents or a wet cloth.
- Since this product is not waterproof, do not use it or store it where fluids, for example water, can splash onto it. Raindrops, water spray, juice, coffee, steam, perspiration, etc. will also cause malfunction.
- If service should be required, use only a SHARP servicing dealer, a SHARP approved service facility or SHARP repair service.
SHARP will not be liable nor responsible for any incidental or consequential economic or property damage caused by misuse and/or malfunctions of this product and its peripherals, unless such liability is acknowledged by law.
CONTENTS
Page
USING THE CALCULATOR FOR THE FIRST TIME 3
OPERATING CONTROLS 4
- INK ROLLER REPLACEMENT 8
PAPER ROLL REPLACEMENT 9
BATTERY REPLACEMENT 10
HOW TO CONNECT THE AC ADAPTOR (OPTION) 11
- ERRORS 12
- REPLACEMENT OF BATTERY FOR MEMORY PROTECTION 12
SPECIFICATIONS 14
- RESETTING THE UNIT 15
CALCULATION EXAMPLES 135
USING THE CALCULATOR FOR THE FIRST TIME
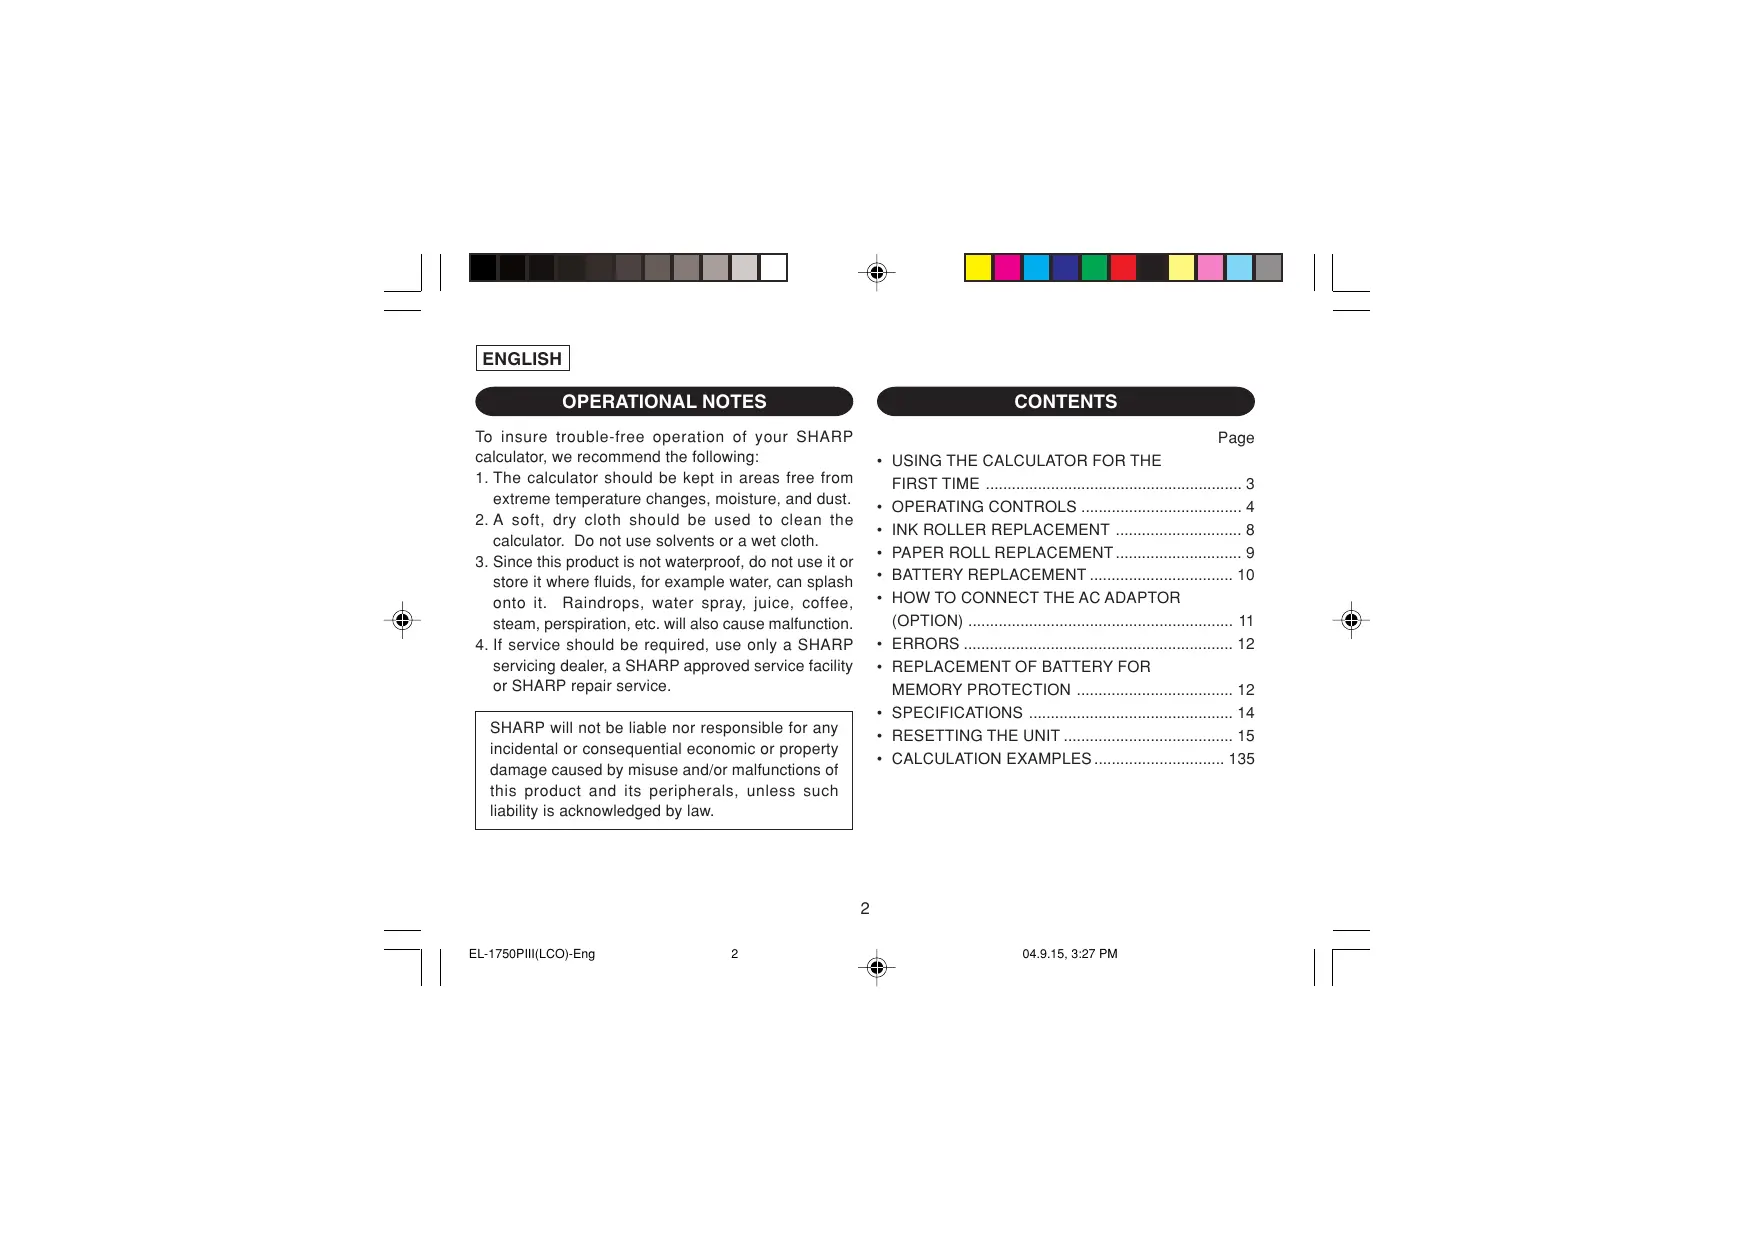
First, pull out the insulation sheet for the memory protection battery (installed for retaining the date/time/tax rate information). Reset the calculator to initialize the unit's state, then adjust the date and time before using the calculator.
Removing the insulation sheet, and resetting
- Pull out the insulation sheet for the memory protection battery.
- Press the RESET switch located on the back of the unit.
(See "RESETTING THE UNIT".)
- The clock starts from 00:00:00 a.m. on 1 January 2005.
Adjusting date and time
Example: In the case of 3:38 p.m. on 15 September 2004
| Operation | Display |
| RATE
GT • SET | |
| 15 · 9 · 2004 % | 15.09.2004 |
| 15 · 38 % | 15-38 00 |
| 0. |
(see "GRAND TOTAL / RATE SETTING MODE SELECTOR")
- When the adjustment is complete, the clock starts at 3:38:00 p.m.
OPERATING CONTROLS
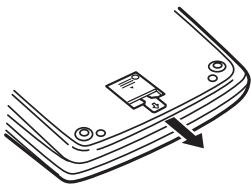
POWER SWITCH; PRINT / ITEM COUNT MODE SELECTOR:
"OFF": Power OFF
"·": Power ON. Set to the non print mode.
"P": Power ON. Set to the print mode.
"P·IC": Power ON. Set to the print and item count mode.
1) For addition or subtraction, each time + is pressed, 1 is added to the item counter, and each time - is pressed, 1 is subtracted.
- The count is printed when the calculated result is obtained.
- Pressing of * , / CE / CE clears the counter.
2) When the grand total/rate setting mode selector is in the ON position (GT), the counter will count the number of times that the calculation results have been stored in the grand total memory. To print and clear the count, press the GT key.
3) The memory item counter will count the number of times that the + key has been pressed in the addition.
Note: Each time the M- key is used in the subtraction, 1 will be subtracted from the count.
- The count is printed when the memory is recalled.
- Pressing of the *M key clears the counter.
Note: The counter has a maximum capacity of 3 digits (up to ± 999 ). If the count exceeds the maximum, the counter will recount from zero.

ROUNDING SELECTOR:
Example: Set Decimal Selector to 2.
$$
4 \div 9 = 0. 4 4 4 \dots , 5 \div 9 = 0. 5 5 5 \dots
$$
| 4÷9= | 5÷9= |
| ↑ | 0.45 | 0.56 |
| 5/4 | 0.44 | 0.56 |
| ↓ | 0.44 | 0.55 |
Note: The decimal point floats during successive calculation by the use of × or ÷ .
If the decimal selector is set to "F" then the answer is always rounded down (4).
RATE GRAND TOTAL / RATE SETTING MODE SELECTOR:
"GT": Grand Total
"": Neutral
"RATE SET": To set the date, time, and tax rate, set this switch at the "RATE SET" position.
Date:
- Enter in the order of day, month, and year, then press to complete the entry.
- Use to separate day, month, and year.
- When 12 is pressed, the number entered is evaluated and displayed as "date" if the value is within the following range; "Error" is displayed otherwise, and the previously set date is restored. Day: 1 - 31; Month: 1 - 12; Year: 2000 - 2099 (in 4 digits) or 00 - 99 (in 2 digits)
Time:
- Enter in the order of hour, minutes, then press to complete the entry. (There is no entry available for the seconds value. The clock starts at zero second.)
-
If the hour/minute digit is less than 10, it is not necessary to enter the first digit "0".
-
Use to separate hour and minute values.
- When 910 is pressed, the number entered is evaluated and displayed as "time" if the value is within the following range; "Error" is displayed otherwise, and the previously set time is restored. Hour: 0 - 23 (24-hour system for the hour entry), Minute: 0 - 59
Tax rate:
- Press % three times, enter the tax rate, followed by + .
- A maximum of 4 digits can be stored (decimal point is not counted as a digit).
- Only one rate can be stored. If you enter a new rate, the previous rate will be cleared.
F320A

DECIMAL / ADD MODE SELECTOR:
"3 2 0": Presets the number of decimal places in the answer.
"F": The answer is displayed in the floating decimal system.
"A": The decimal point in addition and subtraction entries is automatically positioned to the 2nd digit from the lowest digit of entry number. Use of the add mode permits addition and subtraction of numbers without entry of the decimal
point. Use of · , × and ÷ will automatically override the add mode and decimally correct answers will be printed.

CLOCK/CALENDAR KEY:
Each time this key is pressed, the mode switches.
Calculation mode Date display mode Clock display mode Calculation mode
- Use this key also to adjust date and time (see "GRAND TOTAL / RATE SETTING MODE SELECTOR").

PAPER FEED KEY

LAST DIGIT CORRECTION KEY

NON-ADD / SUBTOTAL KEY:
Non-add - When this key is pressed right after an entry of a number in the Print mode, the entry is printed on the left-hand side with the symbol "#". This key is used to print out numbers not subjects to calculation such as code, date, etc.
Subtotal - Used to get subtotal(s) of additions and/or subtractions. When pressed following the + or - key, the subtotal is printed with the symbol “ ” and the calculation may be continued.
By pressing this key even in the Non-print mode, the displayed number is printed without any symbol.
- When the POWER SWITCH; PRINT / ITEM COUNT MODE SELECTOR is set “ ”, “P” or “P·IC” position, and Date or Clock is displayed, press this key to print the displayed contents, including “#” symbol, from the left side of the paper roll.
Example:
Date printing
15·09·2004··
(In the case of 15 September 2004)
Clock printing
10·30······
(when the time is 10:30 a.m.)
18·25
(when the time is 6:25 p.m.)
- When the Date / Clock printing is complete, the Calculation mode is restored.

CLEAR / CLEAR ENTRY KEY
Press this key twice, followed by + , to print the set tax rate.

TOTAL KEY

EQUAL KEY
CHANGE SIGN KEY:
Changes the algebraic sign of a number (i.e., positive to negative or negative to positive).
\*M RECALL AND CLEAR MEMORY KEY
0M RECALL MEMORY KEY
TAX+ TAX-INCLUDING KEY
TAX- PRE-TAX KEY
AVG AVERAGE KEY:
Used to calculate the average.
GT GRAND TOTAL KEY
COST COST PRICE ENTRY KEY:
Press this key to enter the cost price.
SELL SELLING PRICE ENTRY KEY:
Press this key to enter the selling price.
MGN MARGIN ENTRY KEY:
Press this key to enter the margin.
DISPLAY SYMBOLS:
M : Appears when a number is in the memory.
:Appearswhenanumberisnegative.
G : Appears when a number is in the grand total memory.
E : Appears when an overflow or other error is detected.
TAX + : Appears when the total calculated includes tax.
TAX- : Appears when the total calculated excludes tax.
TAX : Appears when the tax rate is set.
- Although all available symbols are shown here for instruction purposes, these symbols will not appear on the screen simultaneously.
INK ROLLER REPLACEMENT
If printing is blurry even when the ink roller is in the proper position, replace the roller.
Ink roller: Type EA-772R
WARNING
APPLYING INK TO WORN INK ROLLER OR USE OF UNAPPROVED INK ROLLER MAY CAUSE SERIOUS DAMAGE TO PRINTER.
1) Set the power switch to OFF.
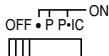
2) Remove the printer cover. (Fig. 1)
3) Hold the top of the ink roller and remove the roller by pulling it toward you and then upward. (Fig. 2)
4) Install the new ink roller in the correct position. Make sure that the roller is securely in place. (Fig. 3)
5) Put back the printer cover.
Fig. 1
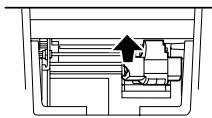
Fig. 2
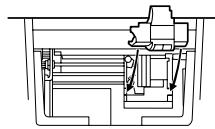
Fig. 3
Cleaning the printing mechanism
If the print becomes dull after long time usage, clean the printing wheel according to the following procedures:
1) Remove the printer cover and the ink roller.
2) Install the paper roll and feed it until it comes out of the front of the printing mechanism.
3) Put a small brush (like a tooth brush) lightly to the printing wheel and clean it by pressing
4) Put back the ink roller and the printer cover.
Note: Do not rotate the printing mechanism manually, this may damage the printer.
PAPER ROLL REPLACEMENT
Never insert paper roll if torn. Doing so will cause paper to jam.
Always cut leading edge with scissors first.
1) Insert the leading edge of the paper roll into the opening. (Fig. 1)
2) Turn the power on and feed the paper by pressing [Figs. 2]
3) Lift the attached metal paper holder up and insert the paper roll to the paper holder. (Fig. 3)

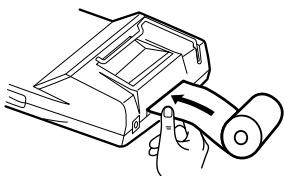
Fig. 1

Fig. 2
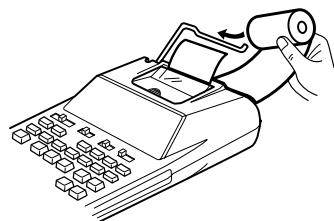
Fig. 3
DO NOT PULL PAPER BACKWARDS AS THIS MAY CAUSE DAMAGE TO PRINTING MECHANISM.
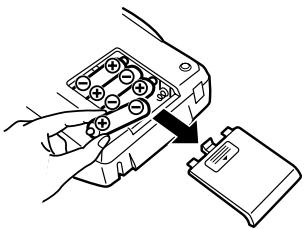
BATTERY REPLACEMENT
To Install or Replace Batteries — When the battery power becomes weak, printing may be halted, and displayed images may disappear. If such symptoms are observed, replace the batteries with new ones.
- Set the power switch to OFF.
- Remove the battery cover by sliding it in the direction of the arrow on the cover.
- Replace the batteries. Be sure that the "+" and - marks on the battery correspond to the + and - marks in the calculator. Always put back the 4 batteries at the same time.
- Put back the battery cover.
Battery: Manganese dry battery, size AA (or R6) × 4
- If the leaked electrolyte gets into eyes, wash off with clean water, and consult your doctor immediately.
- If the leaked electrolyte gets on your skin or clothes, wash off thoroughly with water.
- Remove batteries if not used for prolonged periods of time.
- Do not leave dead batteries in the unit.
- Do not mix new and used batteries and/or battery types.
HOW TO CONNECT THE AC ADAPTOR (OPTION)
This machine can also be operated on AC power by use of AC Adaptor. When the AC adaptor is connected to the calculator, the power source is automatically switched over from dry batteries to AC power source.
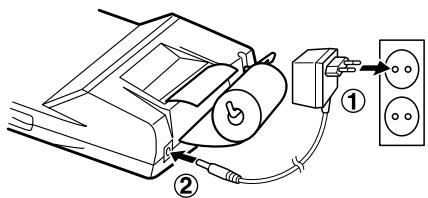
AC adaptor: Model EA-28A
Make sure that you turn the calculator's power off when connecting or disconnecting the AC adaptor. To connect the AC adaptor, follow steps ① and ②. To disconnect the AC adaptor, simply reverse the procedure.
CAUTION
Use of other than the AC adaptor EA-28A may apply improper voltage to your SHARP calculator and will cause damage.
ERRORS
There are several situations which will cause an overflow or an error condition. When this occurs, "E" will be displayed. The contents of the memory at the time of the error are retained.
If an "E 0." is displayed at the time of the error, "---" will be printed in red and [9]CE must be used to clear the calculator.
Also, in rare cases, printing may stop midway and the indication "E" appear on the display. This is not a malfunction but is caused when the calculator is exposed to strong electromagnetic noise or static electricity from an external source. Should this occur, press the _E key and then repeat the calculation from the beginning.
Error conditions:
- When the integer portion of an answer exceeds 12 digits.
- When the integer portion of the contents of the memory or grand total memory exceeds 12 digits. (Ex. ^*M 999999999999 + 1 + )
- When any number is divided by zero. (Ex. 5 ÷ 0 =
REPLACEMENT OF BATTERY FOR MEMORY PROTECTION
Time for battery replacement
Life of the memory protection battery is approximately 2,500 hours at 25^(77^) with no operation battery installed, and the AC adaptor not connected.
- When the memory protection battery is weak, the date/time setting is initialised (1/1/2005, 12:00:00 a.m.).
Verify the date/time setting in the date/clock display mode after replacing the operation battery or when connecting the AC adaptor with no operation battery installed.
If the date/time setting is modified or incorrect, promptly replace the memory protection battery with new one.
(The life of the pre-installed battery may be shorter than expected because of the time the calculator spends during shipment.)
Method of battery replacement
Use one lithium battery (CR2032).
Caution: Replacing the battery will clear the date and time settings, and the stored tax rate.
1) Set the power switch to the "OFF" position, and disconnect the AC adaptor.
2) Remove the battery cover on the back of the unit. (Fig. 1)
3) Remove the exhausted battery and install one new lithium battery. Wipe the battery well with a dry cloth and place the plus "+" side upward. (Fig. 2)
4) Replace the battery cover by reversing the removal procedure.
5) Press the RESET switch on the back of the unit (See "RESETTING THE UNIT").
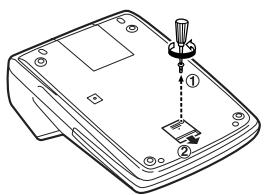
Fig. 1
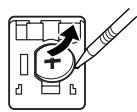
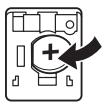
Fig. 2
After battery replacement
- Connect the AC adaptor, and set the power switch to the "ON" position.
Check that "0." is displayed. If "0." is not displayed, remove the battery, reinstall it, and check the display again.
- Readjust date, time, and tax rate settings.
- On the battery replacement date label found on the back of the unit, write down the month and year when the battery is replaced, as a reference for the next battery replacement.
Precautions on battery use
- Do not leave an exhausted battery in the equipment.
- Do not expose the battery to water or flame, and do not take it apart.
- Store batteries out of the reach of small children.
SPECIFICATIONS
| Operating capacity: | 12 digits |
| Power supply: | Operating:6V ≦ (DC): Manganese dry battery, size AA (or R6) × 4 AC: Local voltage with AC adaptor EA-28A (Option)Memory backup:3V ≦ (DC): (Lithium battery CR2032 × 1) |
| Memory Protection Battery lifespan: |
| About 2,500 hours (While at 25°C (77°F), no operating battery is installed, and the AC adaptor is not connected.) |
CLOCK SECTION
| Accuracy: | Within ±60 seconds per month average (at 25°C (77°F)) |
| Items to be displayed: | Day, month, year, hour, minute, second |
| Items to be printed: | Day, month, year, hour, minute |
| Time system: | 24-hour |
PRINTING SECTION
| Printer: | Mechanical printer |
| Printing speed: | Approx. 2 lines/sec.
(At temperature 25°C (77°F), when “741·9 + ” is printed. An AC adaptor EA-28A is used.
The printing speed will vary with the number of rows and the figure types to be printed.) |
| Printing paper: | 57mm (2-1/4") - 58mm (2-9/32") wide
80mm (3-5/32") in diameter (max.) |
| Operating temperature: | 0°C – 40°C (32°F – 104°F) |
| Power consumption: | 6V —— (DC): 1.8 W |
| Operating time: | Manganese dry battery, size AA (or R6) |
| Approx. 4,500 hours (in non-print mode, displaying 555'555 at 25°C (77°F) ambient temperature) |
| Operating time depends on the type of battery and type of use. |
| Dimensions: | 150 mm (W) × 230 mm (D) × |
| 51.5 mm (H) |
Weight:
Accessories:
(5-29/32" (W) × 9-1/16" (D) × 2-1/32" (H))
Approx. 530g (1.17 lb.) (with batteries)
1 lithium battery installed), 1 battery replacement date label (attached on the unit's back body), 1 paper roll, 1 ink roller (installed), manganese dry battery × 4 and operation manual
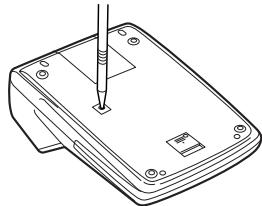
RESETTING THE UNIT
Strong impacts, exposure to electrical fields, or other unusual conditions may render the unit inoperative, and pressing the keys will have no effect. If this occurs, you will have to press the RESET switch on the bottom of the unit. The RESET switch should be pressed only when:
- an abnormal event occurs and all keys are disabled.
Notes:
- Pressing the RESET switch will clear the date and time settings, the tax rate setting, and the contents of memory.
- Use only a ballpoint pen to press the RESET switch. Do not use anything breakable or anything with a sharp tip, such as a needle.
After the RESET switch is pressed, connect the AC adaptor. Turn the power switch "ON" and check that "0." is displayed.
BEDIENUNGSHINWEISE
der 15. September 2004 ist)
"OFF": Mise hors tension.
6V (CC): 1,8 W
Premere Anything to be in the way of a word?
SIMBOLI DEL DISPLAY:
VÄLJAREFORDECIMAL/ ADDITIONSLAGE:
"320": Forinstalll antalet decimaler i svaret.
CORRECTIETOETS VOOR LAATSTE CIJFER

NIET-TOEVOEGEN / SUBTOTAAL TOETS:
MGN WINSTMARGE-INVOERTOETS:
TECLA DE SEM ADIÇÃO / SUBTOTAL:
- Set the decimal selector as specified in each example.
The rounding selector should be in the "5/4" position unless otherwise specified.
- The grand total/rate setting mode selector should be in the "·" position (off) unless otherwise specified.
- The print / item count mode selector should be in the "P" position unless otherwise specified.
- Press 912CE prior to beginning any calculation.
- If an error is made while entering a number, press 9% or and enter the correct number.
- After entering a value, press COST,SELL or MON to activate the Cost/Sell/Margin Calculation mode. In case of performing different calculation tasks, _CE9_CE. key must be pressed first to cancel the Cost/ Sell/Margin mode.
- Example procedures are listed in following manner unless otherwise specified.
EXAMPLE: In the case of 1:52:00 p.m. on 20 October 2005
B. 11.11 ÷ 77.77 = ①
$$
2 2. 2 2 \div 7 7. 7 7 = ②
$$
F320A

11.11
77.77

11.11
0.14285714285
11·11 ÷
77·77 =
0·14285714285 * ①
22.22

22·22 =
0·28571428571 * ②
22.22
692.7085
22·22 =
1·385·417* ②

PERCENT / PROZENT / POURCENTAGE / PERCENTAJES / PERCENTUALE / PROCENTRÄKNING / PERCENTAGE / PERCENTAGEM / PROSENTTI
A. 100 × 25% =
F320A
| 100 ×
25 % | 100. | 100·×
25·% |
| | 25·00 * |
| 25.00 | |
B. (123 ÷ 1368) × 100 =
F320A
| 123 | 123. | 123·÷ |
| 1368 | % | 1,368·% |
| | 8.99 * |
ITEM COUNT CALCULATION /
BERECHNUNG MIT DEM POSTENZÄHLER /
CALCUL DE COMPTE D'ARTICLES /
CALCULO DE CUENTA DE ARTICULOS /
CALCOLO CONTEGGIO VOCI /
RÄKNING MED POSTRÄKNAREN /
REKENEN MET DE POSTENTELLER /
CALCULO DA CONTAGEM DE ITENS /
TEKIJALASKURI
| Bill No. Rechnung Nr. Facture n° N° de facturaNumero di fattura Fakturanr. Rekeningnr. N° da fattura Laskunr. | Number of bills Anzahl der Rechnungen Nbre de factures Cantidad de facturasNumero delle fatture Antal fakturor Aantal rekeningen Numero de fatturas Laskujen lukumäärä | Amount Betrag Montant Importe Importo Belopp Bedrag Quantia Mārā |
| 1 | 1 | 100.55 |
| 2 | 1 | 200.00 |
| 3 | 1 | 200.00 |
| 4 | 1 | 400.55 |
| 5 | 1 | $500.65 |
| Total / Summe / Total Total / Totale / Svar Totaal / Total / Summa | (a) | (b) |
| %CE | %CE | | |
| 100.55 | + | 100.55 | 100·55 + |
| 200 | + | 300.55 | 200·00 + |
| + | 500.55 | 200·00 + |
| 400.55 | + | 901.10 | 400·55 + |
| 500.65 | + | 1'401.75 | 500·65 + |
| * | | 005········································································································································································································.
1'401.75 * (a) |
GRAND TOTAL / ENDSUMME / TOTAL GÉNÉRAL / TOTAL GLOBAL / TOTALE GENERALE / SLUTSVAR / EINDTOTAAL / TOTAL GERAL / KOKONAISSUMMA
$$
1 0 0 + 2 0 0 + 3 0 0 =
$$
$$
+) 3 0 0 + 4 0 0 + 7 0 0 =
$$
$$
- 7 2 \times 8 = ③
$$
Total / Summe / Total
Total / Totale / Svar ④
Totaal / Total / Summa
F320A

RATE
GT·SET

| *3 | *M | | | |
| 46 | × | 46. | 46•× |
| 78 | M+ | | | 78•= |
| | M | 3'588. | 3·588•+M① |
| 125 | ÷ | M | 125. | 125•÷ |
| 5 | M+ | | | 5•= |
| | M | 25. | 25•+M② |
| 72 | × | M | 72. | 72•× |
| 8 | M- | | | 8•= |
| | M | 576. | 576•-M③ |
| *M | | | 3·037•◇M④ |
| | M | 3'037. | |
| *M | | | 3·037•*M |
| | M | 3'037. | |
3: Press M to clear the memory before starting a memory calculation.
3: Vor dem Beginn einer Speicherberechnung drücken Sie , um den Speicher zulöschen.
3: Effacer le contenu de la mémoire ([M]) avant de procéder à un calcul avec mémoire.
3: Apretar M para cancelar la memoria antes de empezar a efectuar un calculo con memoria.
3: Premere per cancellare la memoria prima di iniziare un calcolo con memoria.
3: Tryck på M För att tomma minnet innan minnesrakning startas.
3: Voordat u begint met het make van een geheugenberekening drukt u op om het geheugen te wissen.
3: Pressione M para limpar a的记忆after devenirum calculo com的记忆a.
3: Tyhjennä muisti painamalla nappäintä M ennen muistilaskun aloittamista.
AVERAGING / MITTELWERT-BERECHNUNGEN / PRENANT LA MOYENNE / PROMEDIO / MEDIE / MEDELVÄRDET BLIR / GEMIDDELDE / OBTENÇAO DE UMA MÉDA / KESKIARVON LASKU
Ex. / Bsp. / Ex. / Ej. / Es. / T.ex. / Vb. / Ex. / Esim.
| Day / Tag / Jour / Día / Giorno / Dag / Dag / Dia / Páivã | Sales / Verkauf / Transactions / Ventas / Vendite / Försäljning / Verkoop / Vendas / Mynty |
| If / | Monday / Montag / Lundi / | |
| Wenn / | Lunes / Lunedi / Mândag / | |
| Si / | Maandag / Segunda-feira / | |
| Si el / | Maanantai | 123.15 /123,15 |
| Se / | | |
| Om / | Tuesday / Dienstag / Mardi / | |
| Als / | Martes / Martedi / Tisdag / | |
| Se / | Dinsdag / Terça-feira / Tiistai ...... | 118.00 /118,00 |
| Jos | Wednesday / Mittwoch / | |
| Mercredi / Miercoles / | |
| Mercoledi / Onsdag / | |
| Woensdag / Quarta-feira / | |
| Keskiviikko | 131.58 /131,58 |
| Thursday / Donnerstag / | |
| Jeudi / Jueves / Giovedi / | |
| Torsdag / Donderdag / | |
| Quinta-feira / Torstai ...... | 125.02 /125,02 |
Friday / Freitag / Vendredi /
Viernes/Venerdi/Fredag/
Then Average Sales = $131.20 /
Vendite medie = $131,20 /
Snittforsäljning = $131,20 /
Logo, as vendas médias = $131,20 /
| * | | |
| 12315 | + | 123.15 123·15 + |
| 118 | + | 241.15 118·00 + |
| 13158 | + | 372.73 131·58 + |
| 12502 | + | 497.75 125·02 + |
| 15825 | + | 656.00 158·25 + |
| * | | 005········································································································································································································.
656·00 * |
| AVG | | 131·20 ΔG |
| 131.20 | | |
COST / SELL / MARGIN CALCULATION
BERECHNUNG VON EINKAUFSPREIS,
VERKAUFSPREIS UND GEWINNSPANNE
CALCUL DE ACHAT / VENTE / MARGE
CALCULO DE COSTES / VENTAS / MÁRGENES
CALCOLO DI COSTI / VENDITE / MARGINI
BERÄKNING AV KOSTNAD / FÖRSALJNING / MARGINAL
INKOOPPRIJS / VERKOOPPRIJS /
WINSTMARGE BEREKENINGEN
CALCULO DE CUSTO / VENDA / MARGEM
OMAKUSTANNUSHINNAN / MYYNTIHINNAN / VOITTOMARGINAALIN LASKENTA
EXAMPLE 1: Determine the cost price for 30% margin when the selling price is set at $500.
① Selling Price ② Margin ③ Cost price
EXAMPLE 2: Determine the selling price for (30\%) margin when the cost price is set at \(350.
① Cost price ② Margin ③ Selling Price
Determine the margin when the cost price is set at 350, and the selling price at 500.
① Cost price ② Selling Price
③ Margin
Also, obtain the margin when the cost price is set to $250.
BEISPIEL 3:
EXAMPLE 2: Perform two calculations using 840 and 525, both of which already include tax. Calculate the tax on the total and the total without tax. (tax rate: 5%)