
Raphael Plus - Iron FAKIR - Free user manual and instructions
Find the device manual for free Raphael Plus FAKIR in PDF.


| Type | Steam Station Iron |
| Brand | Fakir |
| Model | Raphael Plus |
| Power Consumption | 2000-2400 W |
| Voltage | 220-240 V |
| Frequency | 50/60 Hz |
| Water Tank Capacity | 1.5 L |
| Usage Life | 7 years |
| Steam Settings | Low, Medium, High |
| Dry Ironing | Yes |
| Automatic Power Off | Yes, after 10 minutes without steam |
| Safety Features | Automatic shut-off, do not immerse in water, keep out of reach of children |
| Indicators | Temperature, steam level, lack of water, descaling |
| Control Panel | ON/OFF switch, temperature dial, steam switch, release button, trigger |
| Soleplate | Standard (non-specified material) |
| Color | Black |
| Accessories | Filling cup, cord clamp, locking pin, thermal insulating cushion |
| Maintenance | Descaling indicator, drain water cap for cleaning steam generator |
| Waste Disposal | Do not dispose with household waste; recycle according to local regulations |
| CE Certification | Yes |
Frequently Asked Questions - Raphael Plus FAKIR
User questions about Raphael Plus FAKIR
0 question about this device. Answer the ones you know or ask your own.
Ask a new question about this device
Download the instructions for your Iron in PDF format for free! Find your manual Raphael Plus - FAKIR and take your electronic device back in hand. On this page are published all the documents necessary for the use of your device. Raphael Plus by FAKIR.
USER MANUAL Raphael Plus FAKIR
natural_image
Exterior view of a black electric steam iron (no visible text or symbols)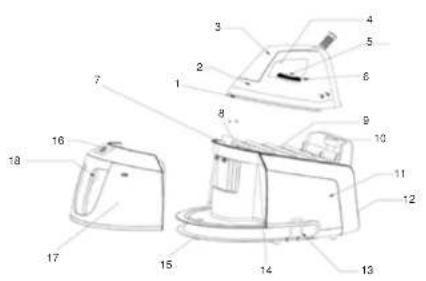
Sicherheit ....4
natural_image
Line drawing of a steam iron with attached circuit breaker (no text or symbols)
WARNUNG!
natural_image
Line drawing of a washing machine with a cross symbol crossed out, no text or symbols presentnatural_image
Three black-and-white symbols: a trash can with crossed lines, a horizontal line, and a recycling symbol (no text or labels)Important safeguards.... 18
Before Use.... 20
Overview....20
Control Panel....20
Technical Specification.... 20
Trigger 21
Filling cap 21
Release button 21
Rear support hook 21
Front support hook 21
ON/OFF switch 21
Temperature dial 21
Temperature indicator 21
Steam switch 22
Lack of water indicator.... 22
Descaling indicator 22
Drain water cap 22
Cord clamp 22
Locking pin 22
Automatic power off.... 22
Before first use 23
Operating....23
Dry ironing 24
Steam ironing 24
After Use.... 26
Cleaning and maintenance.... 26
Ironing tips 27
CE Declaration of Conformity 28
Waste disposal 29
Dispatch....29
Thank you for purchasing Fakir RAPHAEL PLUS Steam Station Iron which has been designed and manufactured to give you many years of trouble-free service. You may already be familiar with using a similar product, but do please take time to read these instructions – they have been written to ensure you get the very best from your purchase.
Important safeguards
Before using the electrical appliance, basic precautions should always be followed including the following:
- Read all instructions.
- Before using check that the voltage of wall outlet corresponds to the one shown on the rating plate.
- Do not use the appliance if the main cord, plug, light or the appliance itself shows visible damage, or the appliance has been dropped or is leaking. Take it to the nearest authorized service facility or a qualified serviceman for examination and repair in order to avoid a hazard.
- Do not allow the cord to come into contact with the soleplate when it is hot.
- Burns may occur from touching hot metal parts, hot water, or steam
- Do not let cord hang over edge of table or hot surface.
- To protect against a risk of electric shock, never immerse the iron in water or other liquids. If this has happened, do not use this appliance any more; dispose of the appliance.
- Keep the appliance out of the reach of children.
- Do not leave iron unattended while connected into power supply or on an ironing board.
- Always place or use the appliance on a stable, level and horizontal surface.
- The use of accessory not recommended by manufacturer may cause injury to persons or damage to appliance.
- When placing the iron on its stand, ensure that the surface on which the stand is placed is stable.
- The drain water cap must be always well closed during the use
- Never fill the water tank with hot water, scent, vinegar, starch, descaler, fabric softener or other chemical reagent.
- Unplug from outlet when not in use, before filling water or cleaning.
- Do not use the appliance for other than its intended use.
-
The iron must not be left unattended while it is connected to the supply mains;
-
The plug must be removed from the socket-outlet before the water reservoir is filled with water.
- The iron must be used and rested on a stable surface;
- The iron is not to be used if it has been dropped, if there are visible signs of damage or if it is leaking;
- Do not use outdoors.
- Save these instructions
- The user must not leave the iron unattended while connected to the supply
- Keep the iron and its cord out of reach of children less than 8 years of age when it is energized or cooling down.
- Liquid or steam must not be directed towards equipment containing electrical components, such as the interior of ovens.
- The appliance has to be unplugged after use and before cleaning or user maintenance of the appliance.
- The surfaces are liable to get hot during use.
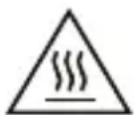
BURNS CAN OCCUR FROM TOUCHING HOT METAL PARTS,HOT WATER OR STEAM. EXERCISE CARE WHEN HANDLING!
Overview
- Soleplate 13. Cord clamp
- Iron 14. Locking pin
- Handle 15. Cord winding groove
- Steam control button 16. Filling cup
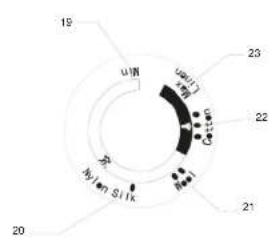
- Temperature dial 17. Water tank
- Temperature indicator 18. Trigger
- Release button 19. Minimum setting
- Front support hook 20. The first setting
- Thermal insulating cushion 21. The second setting
- Back support hook 22. The third setting
- Steam generator 23. Maximum setting
- Control panel
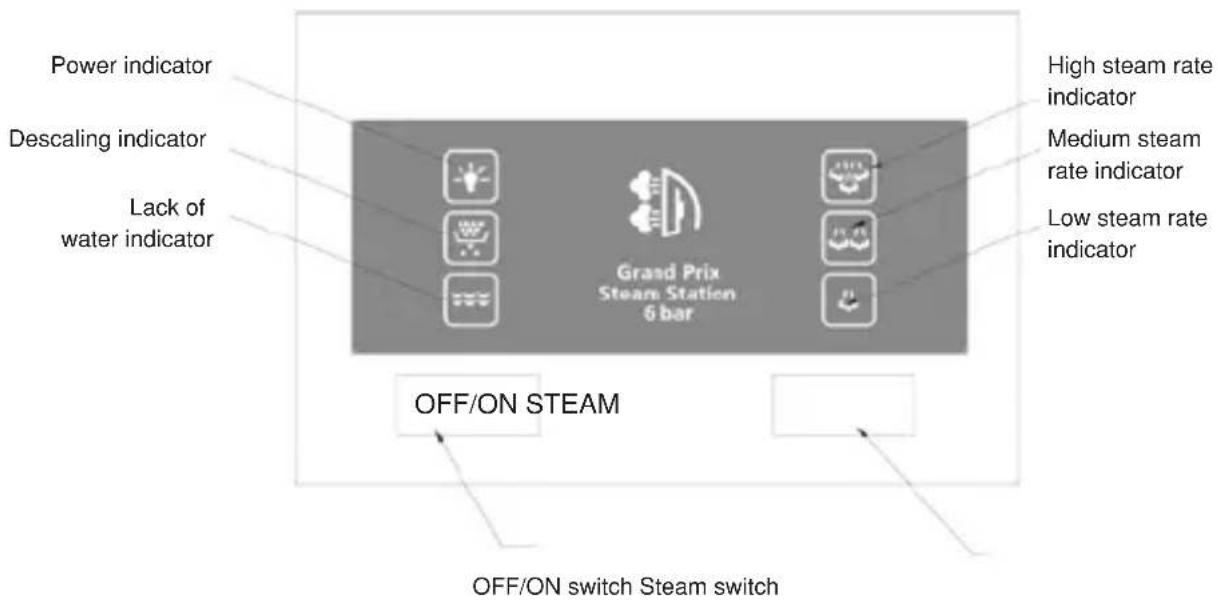
Control Panel
Technical Specification
2000-2400 Watt
220-240 V
50/60 Hz
Usage Life: 7 Years
Trigger
Grasp the water tank's handle with the hand and press the trigger with one finger, then you can take out of the water tank for filling water.
Filling cap
The filling cap is attached in the water tank, if less water in the tank, you shall open the cap and fill water. After filling water, close it.
Release button
Press the release button with one finger and grasp the iron's handle with the hand, and then you can slide out the iron anti-clockwise.
Rear support hook
When you need to replace the iron onto the thermal insulating cushion, you can firstly insert the back of the iron into the rear support hook, then put the soleplate on the locking pin and press the locking pin down, and then you can rotate the iron clockwise until the iron is fixed into the front support hook. At this time, the iron can be secured onto the thermal insulating cushion.
Front support hook
You can put the iron on the front support hook for operation, and you can also secure the iron into the front support hook after finishing ironing.
ON/OFF switch
Plug in the appliance and press down the ON/OFF switch, a “D” sound of buzzer will be heard and the power indicator will be illuminated, also the low steam rate regarded as defaulted one and its indicator will flash. Press down the ON/OFF switch for 2 seconds, together with a “D” sound of buzzer, both the power indicator and steam indicator will be extinguished, and the appliance will be disconnected from the power supply.
Temperature dial
Turn the dial to set ironing temperature to meet the garment changed.
Temperature indicator
When the iron is heating up, the temperature indicator will be illuminated. Once the iron has reached the selected temperature, it will extinguish. The temperature indicator will be cycled on and off as the iron maintains the selected temperature during ironing.
Steam switch
The steam rate can be selected low, medium or high with one button operation. You can select your desired steam rate by pressing the “Steam switch”. And there are three corresponding indicators to indicate the steam rate you have selected. The default setting is low steam rate. Any one to be selected, its indicator will flash, after a few minutes, the indicator will be changed to illuminating. At this time, the appliance can produce steam and you can use the steam for ironing.
Lack of water indicator
If less water in the tank, the indicator will be illuminated, following with two "D" sounds of buzzer, the steam generator stops working. It prompts you to add water into the tank.
Descaling indicator
If the descaling indicator illuminating, it indicates the steam generator shall be cleaned by virtue of the mineral deposits collecting to a degree. When the system ensures the mineral deposits have been removed, the indicator will be extinguished.
Drain water cap
Open the cap for cleaning the steam generator (see Fig. 4).
Cord clamp
When not in use, the iron cord and power cord shall be stored. Pull out the cord clamp first, after winding the cord around the cord winding groove, push the cord clamp back.
Locking pin
The iron can be tightly secured onto the thermal insulating cushion by the locking pin.
Automatic power off
The appliance will be automatically turned off if no steam sprayed out from the soleplate within 10 minutes.
Before first use
- Remove any sticker, protective foil or storage cover from the soleplate.
- Heat up the iron to maximum temperature and iron over a piece of damp cloth for several minutes for the purpose of removing any residue on the soleplate according to the section of "Steam ironing".

It is normal that strange odor comes out from the unit for the first use. This will cease after a short while.

Some particles may come out of the soleplate when you use the iron for the first time. This is normal; the particles are harmless and stop coming out of the iron after a short while.
When you switch on the appliance, the steam generator may produce a pumping sound. This is normal; the sound tells you that water is pumped into the steam generator.

During the heating process of the soleplate, there will be little steam coming out from the soleplate automatically and this phenomenon will continue for about 3 seconds. This is normal.
The appliance has two iron portions. You can use dry ironing or steam ironing, the details refer to the following.
Dry ironing
- Place the steam station on a stable and level surface.
- Press the release button with one finger and grasp the iron's handle with the hand to rotate the iron anti-clockwise to take out of the iron, and then put the iron on the steam generator's front hook. And you do not need to secure the iron onto the thermal insulating cushion during the operation and can just put the iron on the front hook for convenient using.

CAUTION!
Avoid being hurt, never press the locking pin to take out of the iron.
Steam ironing
-
Grasp the water tank's handle with the hand and press the trigger with one finger to take out of the water tank, then open the filling cap and fill water into it. You had better use purified water with less calcium particles. After it, close the filling cap. The max capacity of water tank is 1.5L, the water level shall not be exceeded the MAX mark.
-
Replace the detachable water tank properly.
-
Press the release button with one finger and grasp the iron's handle with the hand to rotate the iron anti-clockwise (see Fig. 1) to take out of the iron, and then put the iron on the steam generator's front hook. And you do not need to secure the iron onto the thermal insulating cushion during the operation and can just put the iron on the front hook for convenient using.
-
Connect plug to the wall outlet, press down the ON/OFF switch, and the defaulted low steam rate indicator will flash. Turn temperature dial to your desired setting, which is depended on the fabric of garment, and the temperature indicator will illuminate. Refer to IRONING TIPS latter.
-
After a few minutes, the temperature indicator will be extinguished, it indicates the soleplate temperature has achieved the selected temperature. If the indicator of defaulted steam rate has been changed flashing to illuminating, it indicates you can take out of the iron and iron the garment with steam by pressing the steam control button of the iron.
-
According to your requirement, you can select the desired steam output for each garment, there are three modes of low, medium, high on available. Make sure that there is enough water in the tank.

CAUTION!
1) Do not touch hot soleplate at any time before cooling down!
2) Never direct the steam at people!
- After ironing, press down the ON/OFF switch for a while and the appliance will be turned off, all the indicators will be extinguished. Remove the plug from the wall socket. But the soleplate is still hot, never touch it with hand.
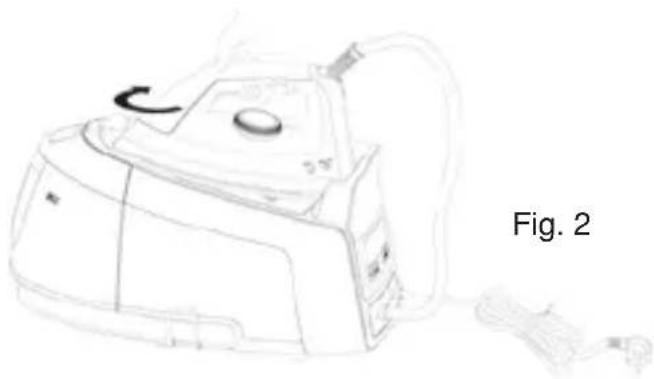
- After cooling down, you can replace the iron onto the thermal insulating cushion according to the following operation: firstly, you can insert the back of the iron into the rear support hook, then put the soleplate on the locking pin and press the locking pin down, and then you can rotate the iron clockwise until the iron is fixed into the front support hook (see Fig. 2). At this time, the iron can be secured onto the thermal insulating cushion.
natural_image
Line drawing of a steam iron device with attached cable, labeled Fig. 2 (no text or symbols on the device itself)
CAUTION!
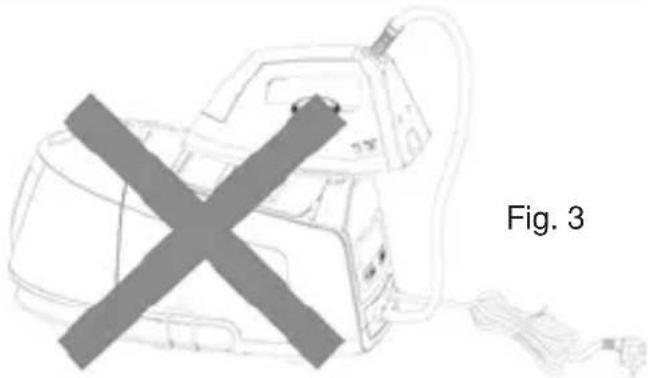
During the operation or after finish ironing, never place the hot soleplate on the area except the thermal insulating cushion.
natural_image
Line drawing of a washing machine with a cross symbol crossed out, labeled 'Fig. 3' (no text on the machine itself)Cleaning and maintenance
Before cleaning, firstly disconnect the power outlet and let the appliance cools down.
- Wipe flakes and any other deposits on the soleplate with a damp cloth or a non-abrasive (liquid) cleaner.

Do not use chemical, steel, wooden or abrasive cleaners to scrape the soleplate.
-
Clean the upper part of iron with a soft damp cloth. Wipe the water drop on the steam generator and the thermal insulating cushion with dry cloth.
-
To remove the mineral deposits collecting at inner steam generator, firstly put the iron horizontally on a level surface, then tilt the steam generator and unscrew the drain water cap with the attached screwer, and then drain the steam generator, see Fig. 4.

If the attached screwer is lost, you can unscrew the drain water cap with coin.
Bottom of steam generator
Drain water cap Screwer
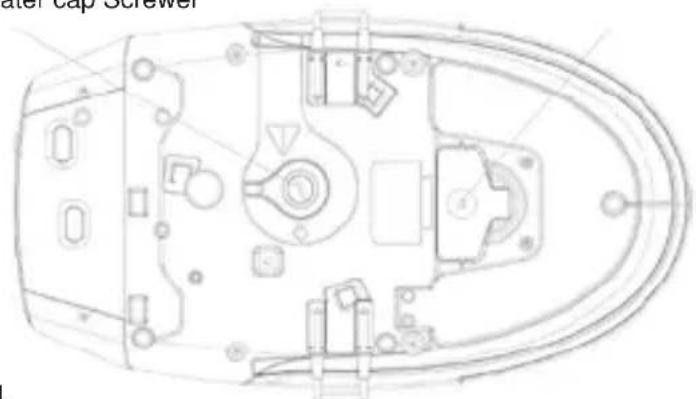
Fig. 4
- After drainage, screw the drain water cap tight and recover the steam generator standing.
- When do not use the appliance for a long time, pour out the water in the tank, and store the iron on the thermal insulating cushion.
- Wind the iron cord and power cord around the cord winding groove and secure it by the cord clamps.

Make sure that the whole steam generator together with the iron can be lifted up together by grasping the iron's handle after the iron is properly secured on the thermal insulating cushion.
Ironing tips
- Always check first whether a label with ironing instructions is attached to the article. Follow these ironing instructions in any case.
- The iron heats up quicker than cooling it down, therefore, you should start ironing the articles requiring the lowest temperature such as those made of synthetic fiber.
- If the fabric consists of various kinds of fibers, you must always select the lowest ironing temperature to iron the composition of those fibers.
- Silk and other fabrics that are likely to become shiny should be ironed on the inner side. -Velvet and other textures that rapidly become shiny should be ironed in one direction with light pressure applied. Always keeps the iron moving at any moment.
- Pure wool fabrics (100% wool) may be ironed with the steam iron. Preferably set temperature dial to the maximum position and use a dry cloth as a mat.
- Never iron over zip, rivet in the cloth. This will damage the soleplate. Iron around any such object.

When ironing woolen fabrics, shining of the fabric may occur. So it is suggested that you should turn the article inside out and iron the reverse side.
Additional table
| Symbol Fabric | Temp. | Variable Steam | |
 | Synthetic fiber/silk | 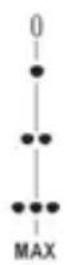 | x |
 | Wool | √ | |
 | Cotton Linen | √ | |
 | Note: The symbol means: This article cannot be ironed! | ||
Note: “√”stands for being able to use ;
“×”stands for being NOT able to use.
CE Declaration of Conformity
This appliance fulfills the requirements of the Appliance and Product Safety Law (GPSG) and the EU Directives 2004/108/EC “Electromagnetic Compatibility” and 2006/95/EC “Low-Voltage Directive.” The appliance bears the CE mark on the rating plate.
Waste disposal
If the service life of the device has ended, in particular if
functional disturbances occur, make the worn-out device unusable by cutting through the power cable.
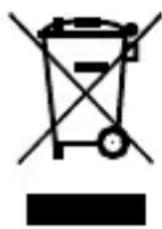
Dispose of the device according to the environmental regulations applicable in your country.
Electrical waste must not be disposed of together with household waste. Bring the worn-out device to a collection center.
The packaging of the device consists of recycling-capable materials.
Place these, sorted out according to material, in the collectors provided, so that recycling can be carried out on them.

For advice on recycling, refer to your local authority or your dealer.
Dispose of used dust bag and filters in domestic waste.
Dispatch:
Carry the appliance in the original package or a similar, wellpadded package to prevent damage to the appliance.
Güvenlik....31
- Kademe Buhar
- Kademe Buhar
- Kademe Buhar
OFF/ON BUHAR
natural_image
Line drawing of a steam iron with attached circuit board (no text or symbols)
UYARI!
natural_image
Line drawing of a washing machine with a cross symbol crossed out, no text or symbols presentTemizlik Ve Bakım
natural_image
Top-down schematic of a mechanical device with labeled components (no text or symbols)natural_image
Line drawing of a steam iron with attached circuit board and power cord (no text or symbols)
ПРЕДУПРЕЖДЕНИЕ!
natural_image
Line drawing of a washing machine with a cross symbol crossed out, no text or symbols presentЧистка и уход
natural_image
Top-down technical line drawing of a mechanical or electronic component with no visible text or symbolsnatural_image
Three black-and-white symbols: a trash can with cross, a horizontal line, and a recycling symbol (no text or labels)3-bxar_formula
2-bخار المرحلة
1- بخار المرحلة
المبخار زر المفتح
natural_image
Line drawing of a steam iron with attached circuit board (no text or symbols)تحذير!

natural_image
Line drawing of a washing machine with a cross symbol crossed out, no text or symbols presentالمتظيف و المعنية
natural_image
Top-down schematic of a vehicle's internal components (no text or labels)

- WARNUNG!
- Important safeguards
- Overview
- Control Panel
- Technical Specification
- Trigger
- Filling cap
- Release button
- Rear support hook
- Front support hook
- ON/OFF switch
- Temperature dial
- Temperature indicator
- Steam switch
- Lack of water indicator
- Descaling indicator
- Drain water cap
- Cord clamp
- Locking pin
- Automatic power off
- Before first use
- Dry ironing
- CAUTION!
- Steam ironing
- Cleaning and maintenance
- Ironing tips
- CE Declaration of Conformity
- Waste disposal
- Dispatch:
- UYARI!
- Temizlik Ve Bakım
- ПРЕДУПРЕЖДЕНИЕ!
- Чистка и уход
Brand : FAKIR
Model : Raphael Plus
Category : Iron