
SBL-1215 - Uncategorized Clas Ohlson - Free user manual and instructions
Find the device manual for free SBL-1215 Clas Ohlson in PDF.


| Product Type | Mushroom and Fruit Dehydrator |
| Model | SBL-1215 |
| Article Number | 44-1371 |
| Power Supply | 220–240 V AC, 50/60 Hz |
| Power Consumption | 250 W |
| Adjustable Temperature Range | 35–70 °C |
| Number of Drying Trays | 5 |
| Drying Tray Diameter | 27 cm |
| Material | Plastic base and trays, metal heating element |
| Control | Power switch [1/0] and temperature setting knob |
| Safety Features | Overheating protection (ventilation required); not for use with timer or remote control |
| Usage | Indoor use only; max 40 hours continuous operation |
| Cleaning | Wash lid and trays in warm soapy water; wipe base with damp cloth; do not immerse in water |
| Maintenance | Unplug before cleaning; check mains lead regularly; repairs by qualified tradesmen only |
| Accessories Included | 5 drying trays, lid, base unit |
Frequently Asked Questions - SBL-1215 Clas Ohlson
User questions about SBL-1215 Clas Ohlson
0 question about this device. Answer the ones you know or ask your own.
Ask a new question about this device
Download the instructions for your Uncategorized in PDF format for free! Find your manual SBL-1215 - Clas Ohlson and take your electronic device back in hand. On this page are published all the documents necessary for the use of your device. SBL-1215 by Clas Ohlson.
USER MANUAL SBL-1215 Clas Ohlson
Mushroom and Fruit Dehydrator
Svamp- och fruktork
Sopp- og fruktørker
natural_image
Illustration of a multi-tiered cylindrical appliance with a control panel and temperature scale (no text or symbols)Art.no
44-1371
Model
SBL-1215
Ver. 20141230
Mushroom and Fruit Dehydrator
Art.no 44-1371 Model SBL-1215
Please read the entire instruction manual before using the product and then save it for future reference. We reserve the right for any errors in text or images and any necessary changes made to technical data. If you have any questions concerning technical problems please contact our Customer Services.
Safety
- This dehydrator can be used by children aged from 8 years and above if they have been given supervision or instruction concerning use of the appliance in a safe way and if they understand the hazards involved.
- Cleaning and user maintenance shall not be made by children unless they are older than 8 and supervised.
- The dehydrator may be used by persons with reduced physical, sensory or mental capability, lack of experience or knowledge which could jeopardise their safety, provided they have been given proper supervision or instruction regarding the safe use of the product and understand any hazards involved.
- Never let children play with the dehydrator.
- Keep the dehydrator and its mains lead out of reach of children aged less than 8 years.
- The dehydrator must only be used with a power supply corresponding to the voltage specified on the rating plate of the dehydrator.
- Make sure that the plug is designed for and fits the wall socket. Never try to modify the plug or use any kind of plug adaptor.
-
Never use the dehydrator if it or the mains lead has been damaged in any way. The mains lead should be checked regularly. Never use the dehydrator if the mains lead or plug is damaged.
-
The mains lead must be changed if damaged. This is to prevent the risk of electric shock or fire and should only be carried out by the manufacturer, authorised service facility or a qualified tradesman.
- The dehydrator must not be plugged into a wall socket controlled by any kind of time switch or remote control.
- Place the dehydrator on a firm, level surface where there is no risk of it tipping over.
• Always turn the dehydrator off before unplugging it. - Never place the dehydrator onto a cooker hob, into an oven or into a freezer.
- Always unplug the dehydrator from the wall socket when it is not in use.
- The dehydrator is only intended for normal domestic use and only in the manner described in this instruction manual.
- Never immerse the dehydrator, its mains lead or plug in water or other liquid. Doing so could result in an electric shock. The dehydrator should not be washed in the dishwasher.
- Children should be kept under continuous supervision if they are in close proximity to the dehydrator while it is in use.
- Never attempt to dismantle or modify the dehydrator in any way.
- Never use accessories which are not approved by the manufacturer or retailer.
- Do not let the mains lead hang over the edge of the table or counter. Do not let the mains lead come into contact with sharp edges or hot surfaces.
• Repairs should only be carried out by qualified tradesmen. - Keep the dehydrator out of direct sunlight.
-
The dehydrator is only intended for indoor use and must not be used outdoors or in humid environments. Never touch the mains lead with wet hands. Doing so could result in an electric shock.
-
Never use the dehydrator close to flammable substances or materials such as curtains or paper. The base of the dehydrator will become hot during use, make sure that air can circulate around it and that the ventilation openings are not blocked. Failure to take these precautions could result in the appliance overheating.
- Do not place anything on top of the dehydrator. Let the dehydrator cool before moving it.
- The dehydrator is only intended for drying food, never place anything else in the dehydrator such as paper or plastic items, and never store anything inside the dehydrator.
- Do not use the dehydrator without the drying racks in place. They are required in order for the air to circulate properly. Always use the dehydrator with all the drying racks in place even if they are not all filled with food.
- It is important that the drying racks are thoroughly cleaned since they come into contact with foodstuffs.
- The dehydrator should not be used for more than 40 hours at a time.
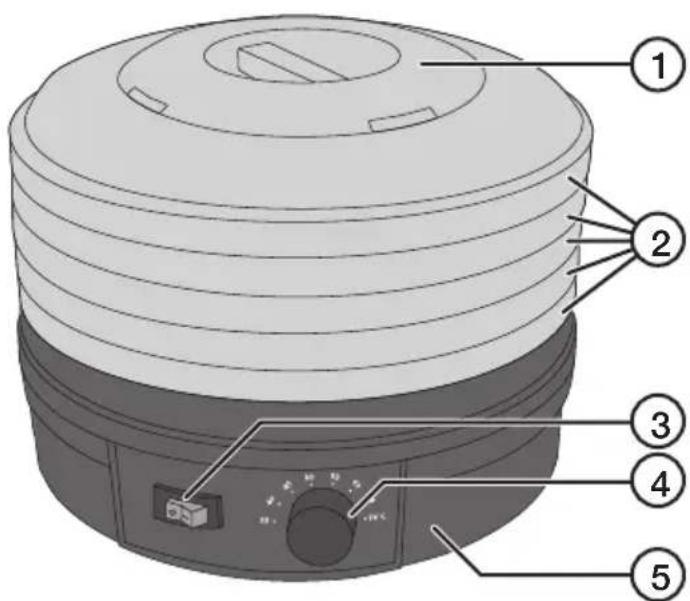
Product description
- Lid
- Drying trays (× 5)
- Power switch [1/0] (on/off)
- Temperature setting knob
- Base unit
Dehydration
Drying or dehydrating is one of the oldest methods of food preservation. Food contains a certain amount of water which can be removed by dehydration. Removing the moisture from foodstuffs prevents the growth of bacteria and moulds which would otherwise cause the food to deteriorate. This makes it possible to keep foodstuffs for several years under favourable conditions. Dehydration concentrates the aromatic substances in foodstuffs and intensifies the flavour. Dehydration is an environmentally friendly method of preservation which uses no preservatives and one in which the foodstuffs retain most of their vitamins and minerals. Dehydration is suitable for fruits, vegetables, mushrooms, herbs and teas.
The air is warmed up and blown through the drying racks, causing most of the moisture in the food to evaporate and be blown out through the openings in the lid. The contents of every drying tray will be dried but the trays must be swapped around in order for their contents to be dried as efficiently and evenly as possible. The contents of the lowest tray will be dried the most efficiently, so the trays should all be circulated through the different positions at regular intervals.
Operating instructions
Before using for the first time
- Remove all packaging.
- Place the dehydrator on a flat stable and heat-resistant surface. Bear in mind that it is unwise to move the dehydrator during the drying process. Make sure that there is at least 15 cm free space around the outside of the dehydrator to ensure adequate air circulation in and around the dehydrator.
- Fit all the (empty) drying trays and then the lid onto the base unit. Switch the dehydrator on and let it run empty for about 30 minutes before switching it off and letting it cool down (this only needs to be done prior to initial use). Wash the drying trays and the lid, rinse and dry them thoroughly. The dehydrator might emit a slight odour of burning the first time it is used, but this is quite normal. Wipe the exterior of the base unit with a damp cloth.
Preparations
- Wash or clean the raw ingredients before drying to cleanse them of any traces of chemicals, dirt, insects, etc.
- Inspect any fruit or veg before placing it onto the drying tray. Remove any food that is discoloured, overripe, or damaged, otherwise it could ruin everything on the tray.
-
Slice the food to be dried into 6 mm thick slices. Thinner slices will dry quicker but they will shrink more. Slices of unpeeled fruit should be laid with the cut side facing up. Lay each piece separately so that it does not overlap any of the others on the tray.
-
Spread the food over the tray in an even layer. Herbs should be dried very carefully, just remove the stalks. They do not need to be broken down any more. Herbs need turning from time to time to stop them sticking to the tray.
- Make sure that the power switch is set to 0 (off) before the dehydrator is plugged into an electrical socket.
Dehydration
The food selected for dehydrating should be fresh and fully ripe. It is impossible to achieve good results if the food that you start with is overripe, bruised or otherwise deteriorated. Do not dehydrate wet produce, once rinsed the food should be allowed to air dry for a while before you begin to dehydrate it.
- Spread the food over the tray in an even layer.
- Place the drying trays with the food on them onto the base unit and then put the lid on.
- Plug the dehydrator into an electrical socket and switch the power switch to 1 (on).
-
Set the temperature using the table below as a guide and let the produce dehydrate for the recommended time (depending on the type and amount of produce). The greater the moisture content of the food, the longer the drying time it will need. All of the included drying trays must be used regardless of whether they contain any food.
-
The contents of the lowest tray will be dried the most efficiently, so the trays should all be circulated through the different positions at regular intervals to ensure that all the food is dried to the same degree.
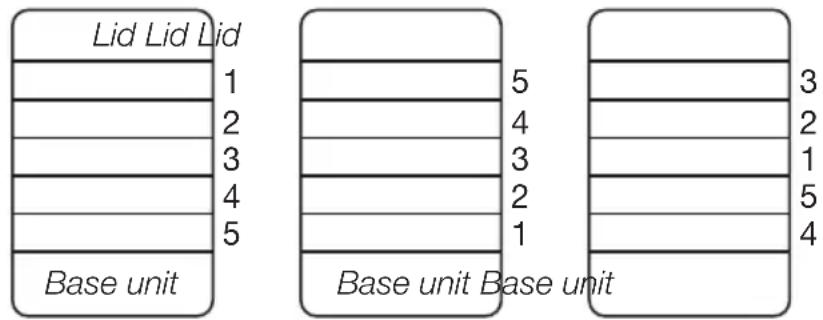
Start Change Change
-
Check the progress of the dehydration from time to time to ensure that you do not dehydrate the food too much. The food should be removed from the dehydrator when it is dehydrated. The dehydrated food should be stored in a cool, dark place in a suitable container.
-
Turn the dehydrator off and unplug it when you have finished.
-
Wash the lid and the drying trays.
Pre-treatment
In order to prevent certain types of fruit from discolouring, we recommend that the fruit is first dipped into a solution made of one teaspoon lemon juice mixed with one cup of water. The fruit should then be wiped with a paper towel. The lemon juice can be substituted with pineapple juice or other source of vitamin C. Certain fruits such as figs, plums, grapes and bilberries contain a natural protective layer of wax. They should be treated like this: Lower them into boiling water for 1 to 2 minutes, take them out, let them drain and then lower them immediately into cold water again before taking them out, draining them and wiping them dry. Slice them and then dehydrate them.
Blanching
The majority of raw produce should be blanched before dehydration to help preserve its flavour and appearance. This involves boiling the produce very briefly (1–5 minutes). Place the prepared produce in a basket or strainer and immerse it in a pot of boiling water for a couple of minutes before removing it and letting it drain. Let the produce dry completely before you put it onto the drying tray and switch the dehydrator on.
Blanching is a suitable method for helping preserve the colour of apples, apricots, figs, nectarines, peaches, pears and plums. The result will be sweetened candied fruit. Different methods should be tried until you achieve the best result.
Recommended drying temperature (these temperatures are approximate only, the dehydration time depends on the thickness of the slices, moisture content, etc.)
Experiment until you determine the optimum temperatures and times.
| Type of food Recommended temperature | |
| Flowers 35–40 °C | |
| Herbs 40 °C | |
| Baked goods 40–50 °C | |
| Vegetables 50–55 °C | |
| Fruit (apples) 55–60 °C | |
| Fruit (pears) 55–60 °C | |
| Fruit (apricots, peaches, plums) 55–60 °C | |
| Meat, fish 65–70 °C | |
| Mushrooms 40–50 °C |
Which foods are suitable to be dehydrated?
Vegetables should be ripe, fresh and undamaged.
| Sort Pre-treatment Drying time (hours) | ||
| Apples Cut into slices or rings. 4–15 | ||
| Apricots Cut into halves or quarters. 8–36 | ||
| Fresh pineapple Peel and slice into rings. 6–36 | ||
| Tinned pineapple Slice and drain. 6–36 | ||
| Ripe bananas Cut into 4 mm rounds or strips. 5–24 | ||
| Strawberries Cut in half, small ones whole. 5–24 | ||
| Pears Remove the core, cut into halves or slices. 5–24 | ||
| Plums | Whole or cut in half, with or without stones. | 5–24 |
| Grapes | Pierce, choose seedless if possible. | 6–36 |
| Cherries Whole with stones. 6–36 | ||
| Peaches | Remove the stone, cut into halves or slices. | 5–24 |
| Citrus fruit | Slice with or without peel. | 6–36 |
| Rhubarb | Use thin stalks only, rinse and slice into 3 cm pieces. | 4–16 |
| Mushrooms | Cleanse the mushrooms and slice them, leave small ones whole. | 4–6 |
Storing dehydrated produce
Dehydrated food must be stored correctly in order for it to keep its colour, flavour and quality for as long as possible.
We recommend that the dehydrated food be packed into freezer bags and stored in a cool, dark place, the cooler the better. Make sure that the food is completely dry before packing it in the bags, squeeze out as much air as possible before sealing the bags. The bags should then be kept in an airtight storage jar. Inspect the bags after a few days, if there is condensation inside the bags, the food is not properly dehydrated and needs to be dehydrated again.
Care and maintenance
- Unplug the mains lead before cleaning the product.
- Clean the product using a soft, moist cloth. Use a mild detergent – never use a solvent or strong, abrasive detergent, as this may damage the product.
- Wash the lid and the drying trays.
Disposal
This product should be disposed of in accordance with local regulations. If you are unsure how to proceed, contact your local council.
Specifications
Voltage 220–240 V AC, 50/60 Hz
Power 250 W
Adjustable drying temperature 35–70 °C
Drying tray diameter 27 cm
Svamp- och fruktork
Art.nr 44-1371 Modell SBL-1215
Torkning
Tørking
Kuivaus
Trocknen
Postal 10 – 13 Market Place
Kingston Upon Thames
Surrey
KT1 1JZ
Deutschland

- Mushroom and Fruit Dehydrator
- Safety
- Product description
- Dehydration
- Operating instructions
- Before using for the first time
- Preparations
- Pre-treatment
- Blanching
- Which foods are suitable to be dehydrated?
- Storing dehydrated produce
- Care and maintenance
- Disposal
- Specifications
- Svamp- och fruktork
- Torkning
- Tørking
- Kuivaus
- Trocknen
- Deutschland
Brand : Clas Ohlson
Model : SBL-1215
Category : Uncategorized