TF-L19B ATV - TV TechnoStar - Free user manual and instructions
Find the device manual for free TF-L19B ATV TechnoStar in PDF.


User questions about TF-L19B ATV TechnoStar
0 question about this device. Answer the ones you know or ask your own.
Ask a new question about this device
Download the instructions for your TV in PDF format for free! Find your manual TF-L19B ATV - TechnoStar and take your electronic device back in hand. On this page are published all the documents necessary for the use of your device. TF-L19B ATV by TechnoStar.
USER MANUAL TF-L19B ATV TechnoStar
natural_image
Abstract geometric diagram with overlapping planes and lines, no text or symbols presentInhaltsverzeichnis
VORSICHTSMASSNAHMEN....G3
BEDIENELEMENTE...... G4
ERSTE INBETRIEBNAME DES TV-GERÄTES...... G7
GRUNDFUNKTIONEN...... G8
text_image
OK ON OFF OK ON OFF OK ON OFF OK ON OFF OK ON OFF OK ON OFF OK ON OFF OK ON OFF OK ON OFF OK ON OFF OK ON OFF OK ON OFF OK ON OFF OK ON OFF OK ON OFF OK ON OFF OKFernbedienung X 1
text_image
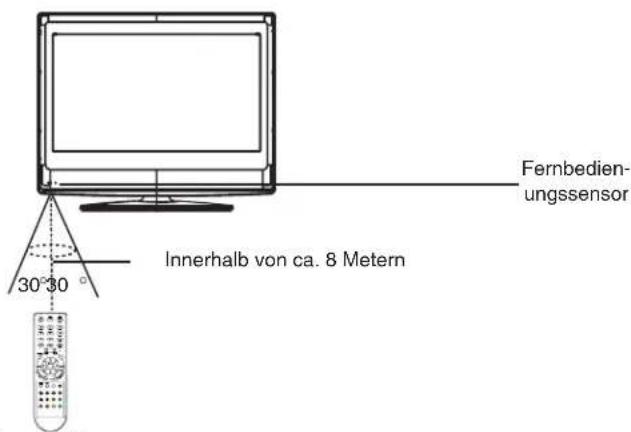
Diagram showing a device being processed into a device with a labeled component, including directional arrows and a separate view.Reichweite
text_image
MIX CANCEL SIZE HOLD INDEX REVEAL SUBPAGE TTXERSTE INBETRIEBNAME DES TV-GERÄTES
text_image
FIRST TIME INSTALLATION First time installation is not finished! Are you sure to exit? YES DO IT NEXT TIME NO MOVE MENU EXIT ADJUSTHinweis:
text_image
TV COUNTRY OTHER AUTO TUNING MANUAL TUNING CHANNEL EDIT MOVE ADJUST MENU EXIT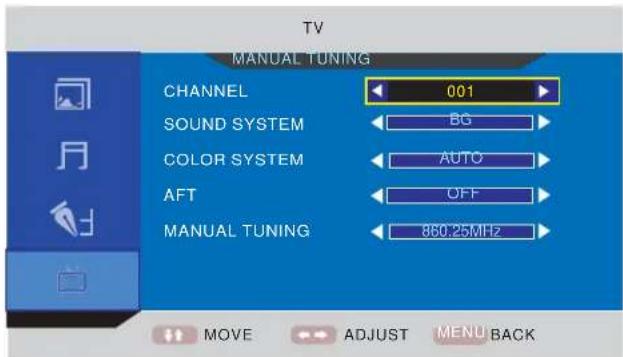
text_image
TV MANUAL TUNING CHANNEL 001 SOUND SYSTEM BG COLOR SYSTEM AUTO AFT OFF MANUAL TUNING 860.25MHz MOVE ADJUST MENU BACKnatural_image
Abstract geometric diagram with overlapping planes and lines, no text or symbols presentInhoudstafel
VOORZORGEN...... D3
BEDIENINGSTOETSEN...... D4
EERSTE GEBRUIK VAN DE TV...... D7
BASISFUNCTIONS...... D8
INSTELLING OSD-MENU......D9
ONDERHOUD......D12
VERHELPEN VAN STORINGEN...... D12
text_image
OK OK OK OK OK OK OK OK OK OK OK OK OK OK OK OK OK OK OK OK OK OK OK OK OK OK OK OK OK OK OK OK OK OK OK OK OK OK OK OK OK OK OK OK OK OK OK OK OK OK OKAfstandsbediening X 1
CAUTION: TO PREVENT THE RISK OF ELECTRIC
SHOCK, DO NOT REMOVE COVER (OR BACK).
NO USER-SERVICEABLE PARTS INSIDE.
REFER SERVICING TO QUALIFIED SERVICE PERSONNEL.
text_image
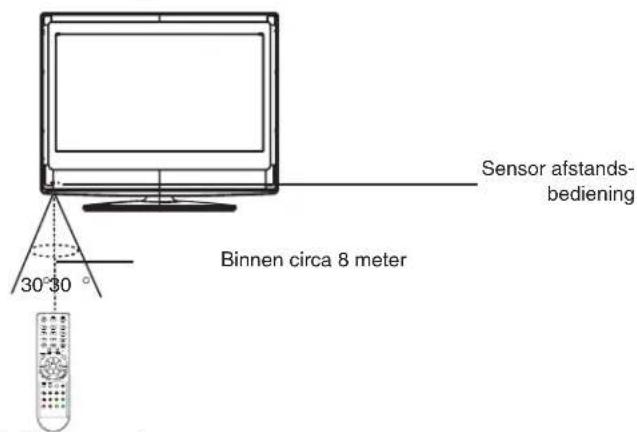
Diagram showing a device being processed into a battery, with arrows indicating the process and component placement.Bedieningsbereik
text_image
Sensor afstands- bediening Binnen circa 8 meter 30° 30°Opmerking:
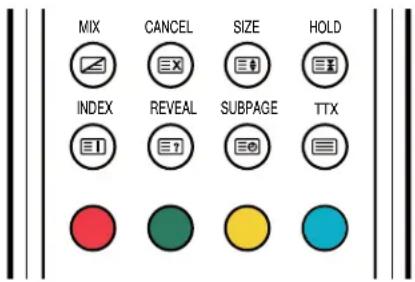
ROOD Selecteert STADSINFORMATIE,
BLAUW selecteert REISINFORMATIE,
GROEN selecteert WEERSINFORMATIE,
GEEL selecteert TV-PROGRAMMERING.
text_image
MIX CANCEL SIZE HOLD INDEX REVEAL SUBPAGE TTXEERSTE GEBRUIK VAN DE TV
text_image
FIRST TIME INSTALLATION First time installation is not finished! Are you sure to exit? YES DO IT NEXT TIME NO MOVE MENU EXIT ADJUSTOpmerking:
text_image
TV COUNTRY OTHER AUTO TUNING MANUAL TUNING CHANNEL EDIT MOVE ADJUST MENU EXIT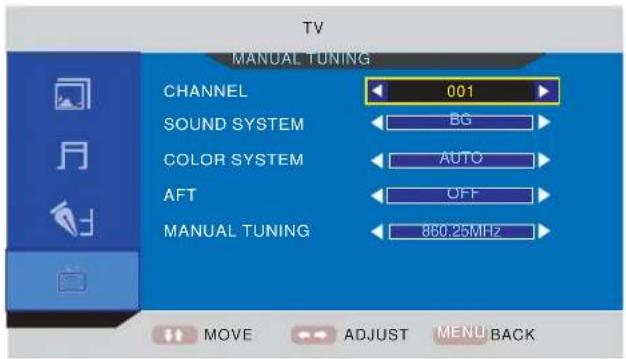
text_image
TV MANUAL TUNING CHANNEL 001 SOUND SYSTEM BG COLOR SYSTEM AUTO AFT OFF MANUAL TUNING 860.25MHz MOVE ADJUST MENU BACKFUNCTION → Hotel Mode → Hotel Lock → ...
text_image
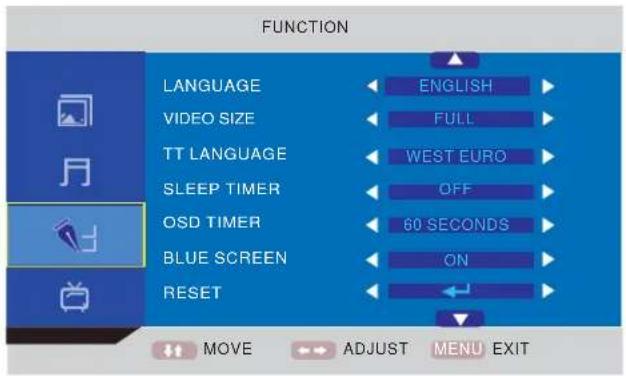
FUNCTION LANGUAGE ENGLISH VIDEO SIZE FULL TT LANGUAGE WEST EURO SLEEP TIMER OFF OSD TIMER 60 SECONDS BLUE SCREEN ON RESET MOVE ADJUST MENU EXIT
text_image
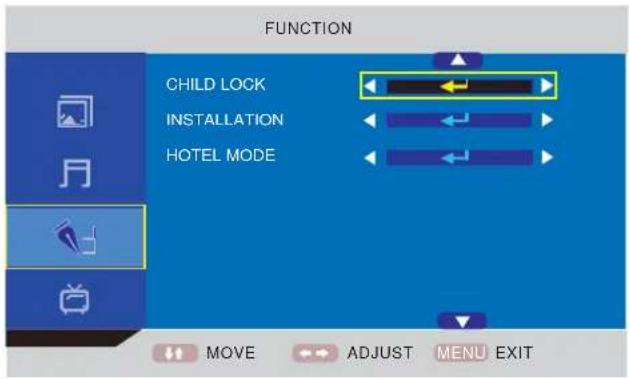
FUNCTION CHILD LOCK INSTALLATION HOTEL MODE MOVE ADJUST MENU EXIT
text_image
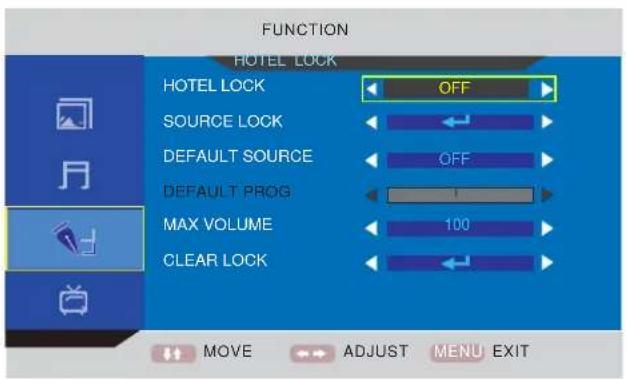
FUNCTION HOTEL LOCK HOTEL LOCK OFF SOURCE LOCK DEFAULT SOURCE OFF DEFAULT PROG 1 MAX VOLUME 100 CLEAR LOCK MOVE ADJUST MENU EXITnatural_image
Abstract geometric diagram with overlapping planes and lines, no text or symbols presentTable of contents
PRECAUTONS.... E3
CONTROLS E4
USING THE TV FOR THE FIRST TIME ...... E7
BASIC OPERATIONS.... E8
OSD MENU SETTING ...... E9
MAINTENANCE E12
TROUBLE SHOOTING E12
SPECIFICATIONS ...... E13
Dear Customer:
Thank you for purchasing this LCD TV. When opening the box for the first time, please check whether all the accessories are present. Before connecting parts and power, please carefully read the user manual and always keep these instructions handy and close by your LCD TV.
text_image
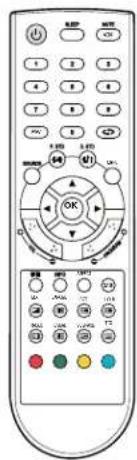
OK ON OFF OK ON OFF OK ON OFF OK ON OFF OK ON OFF OK ON OFF OK ON OFF OK ON OFF OK ON OFF OK ON OFF OK ON OFF OK ON OFF OK ON OFF OK ON OFF OK ON OFF OK ON OFF OKRemote control X 1
Instruction Manual X 1
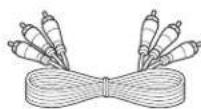
AV cable X 1
Batteries X 2
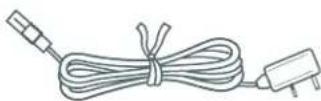
Power cord X 1
Please check the accessories when open the package. If anything damaged or lacked, consult with your local dealer.
Note:
This handling description is printed prior to product development.
When a part of the product specification must be changed to improve operability or other functions, priority is given to the product specification itself. In such instances, the instruction manual may not entirely match all the functions of the actual product.
Therefore, the actual product and packaging, as well as the name and illustration, may differ from the manual.
The screen shown as an example in this manual may be different from the actual screen display.

If at any time in the future you should need to dispose of this product, please note that: Waste electrical products should not be disposed of with household waste. Please recycle where facilities exist. Check with your Local Authority or retailer for recycling advice (Waste Electrical and Electronic Equipment).
PRECAUTIONS

CAUTION
RISK OF ELECTRIC SHOCK DO NOT OPEN

CAUTION: TO PREVENT THE RISK OF ELECTRIC SHOCK, DO NOT REMOVE COVER (OR BACK). NO USER-SERVICEABLE PARTS INSIDE.
REFER SERVICING TO QUALIFIED SERVICE PERSONNEL.
 | This symbol indicates that dangerous voltage constituting a risk of electric shock is present within this unit. |
 | This symbol indicates that there are important operating and maintenance instructions in the literature accompanying this unit. |
CAUTION
TO ENSURE CONTINUED SAFETY DO NOT REMOVE ANY COVERS OR ATTEMPT TO GAIN ACCESS TO THE INSIDE OF THE PRODUCT.
REFER ALL SERVICING TO QUALIFIED PERSONNEL.
TO PREVENT FIRE OR SHOCK HAZARD, DO NOT EXPOSE THIS APPARATUS TO RAIN OR MOISTURE.
- Do not install the unit in an unstable space.
- Do not exposed the unit to where there are extremes of temperature (below 5°C or exceeding 35°C) or moisture.
- Do not expose the unit to directly sunlight or heat nearby.
- Do not install this unit in a confined space, such as a bookcase or built-in cabinet. For suffi cent ventilation, there should be at least 20 cm distance around the apparatus.
- The ventilation should not be impeded by covering the ventilation openings with items, such as newspapers, table-cloths, curtains, etc..
- Do not place this unit in any liquid.
- Do not insert any tiny object into the unit through the ventilation.
- The apparatus shall not be exposed to dropping or splashing. No object filled with liquids, such as vases, shall be placed on the apparatus.
- No naked flame sources, such as lighted candles, should be placed on the apparatus.
- Never touch the TV screen or antenna / power cord during thunderstorms. Stop use it during thunderstorms.
- Do not step on the power cord, or twist the power cord wire.
- This product should not be adjusted or repaired by anyone except properly qualified personal when an abnormal condition or trouble happens. Please consult with the qualified service person.
• Always remove the batteries and store in a dry place if the remote control is not to be used for a long time. - Avoid drop down the remote control and damage it.
- Always power this unit from an outlet with the same rating (voltage and frequency) as indicated on the rating label at the back of this unit.
- When not in use, disconnect the power cord from the outlet. Grasp the plug, not the cord, when disconnecting the unit.
- This CLASS 1 device should be connected to the AC power plug with earthed-protective, and place the AC power plug at the position easy to plug in and out.
- Where the MAINS plug or an appliance coupler is used as the disconnect device, the disconnect device shall remain readily operable.
CONTROLS
MAIN UNIT
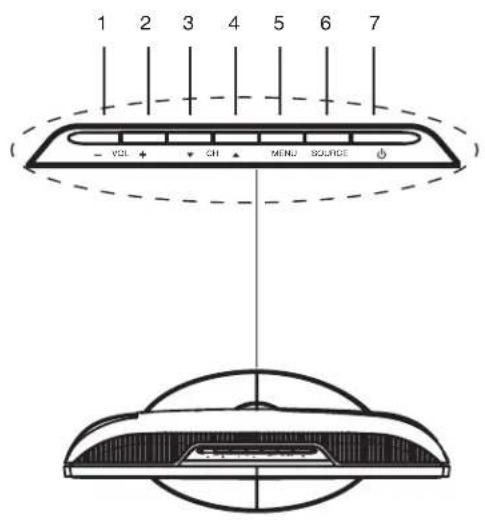
Control buttons
text_image
1 2 3 4 5 6 7 ( - VOL + CH ▲ MENU SOURCE ● )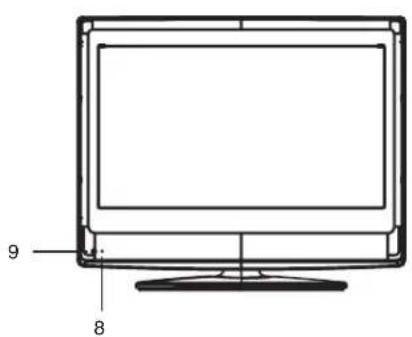
text_image
9 8General control buttons
- Volume decrease button (- VOL)
- Volume increase button (VOL+)
- Channel down button (▼ CH)
- Channel up button (CH ▲)
- Menu button (MENU)
- Input source select button (SOURCE)
- Power/Standby button (①)
- Power indicator
- Remote sensor
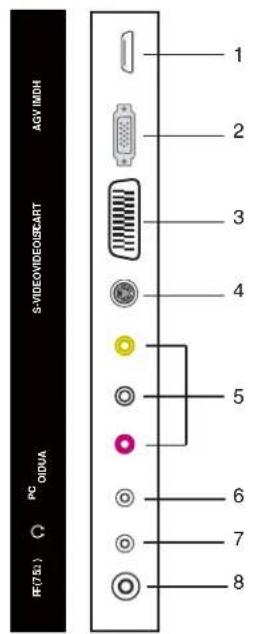
Jacks (Rear Panel)
- High-Definition Multimedia interface input plug (HDMI)
- VGA interface input plug (VGA)
- SCART input plug (SCART)
- S-video input plug (S-VIDEO)
- Composite audio & video input plug (R/L/VIDEO)
- PC audio input plug (PC AUDIO)
- Audio output plug (Ω)
- Antenna/Cable TV input plug (RF 75 Φ)
text_image
AGV/IMDH S-VIDEO/IDESTART PC O/DUA 1 2 3 4 5 6 7 8REMOTE CONTROL
Control buttons
text_image
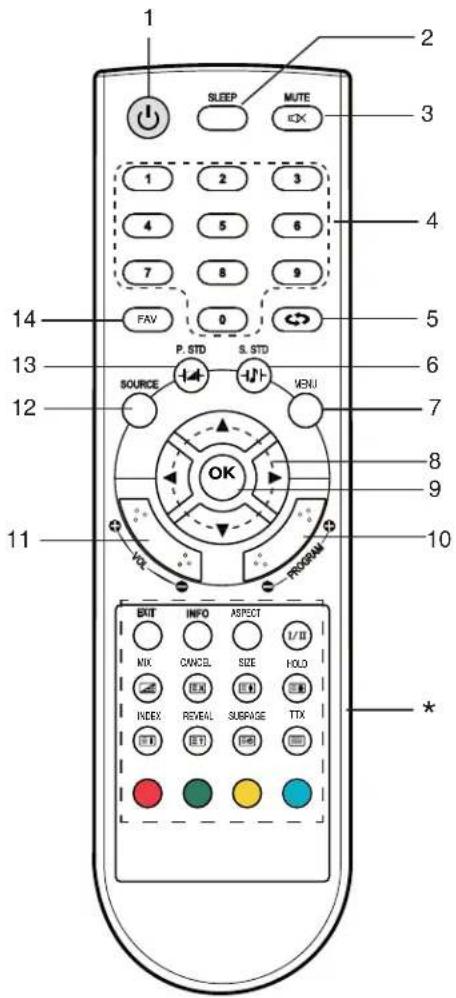
1 2 SLEEP MUTE IDX 3 1 2 3 4 5 6 7 8 9 FAV 0 ↔ 5 14 P. STD S. STD SOURCE MENU 13 12 OK 7 8 9 10 11 VOL. PROGRAM EXIT INFO ASPECT MIX CANCEL SIZE HOLE INDEX REVEAL SURPAGE TTX * *- Power/Standby button (⏻)
- Sleep timer button (SLEEP)
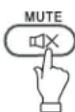
- Mute button (MUTE)
- Number buttons (0, 1\~9)
- Previous channel button (2)
- Sound mode button (S.STD)
- Menu button (MENU)
- Navigation keys (▲, ▶, ▼, ◀)
- Confi rm button (OK)
- Channel select buttons (-PROGRAM +)
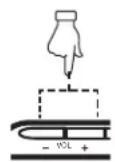
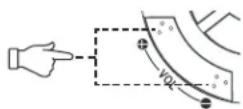
- Volume control buttons (- VOL +)
- Source select button (SOURCE)
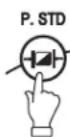
- Picture mode button (P.STD)
- Favorite program list button
*. Special buttons:
EXIT: Menu exit button
INFO: Information display button
ASPECT: Display mode select button
I/II: NICAM mode select button
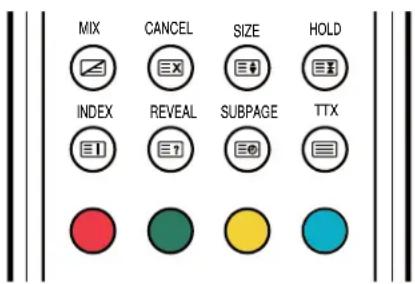
MIX: Teletext mix button
CANCEL: Teletext cancel button
SIZE: Teletext size/zoom button
HOLD: Teletext hold button
INDEX: Teletext index display button
REVEAL: Teletext reveal button
SUBPAGE: Teletext subpage button
TTX: Teletext on/off button
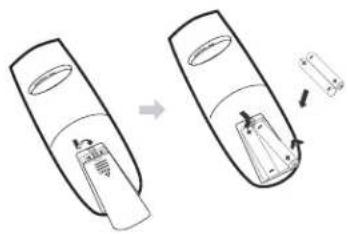
Inserting Batteries
Two "LR03/AAA" batteries
text_image
Diagram showing a device being processed into a battery, with arrows indicating the process and component placement.Control Range
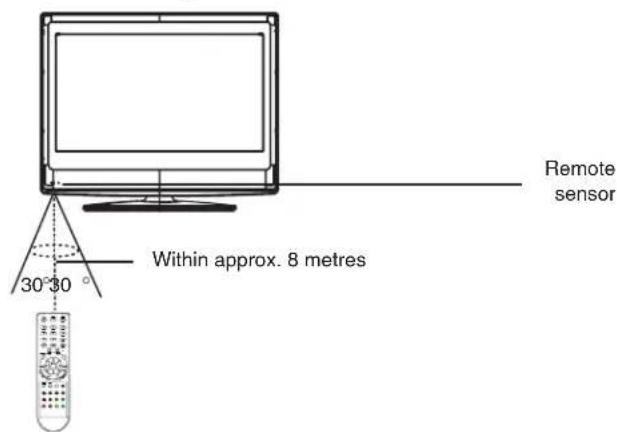
text_image
Remote sensor Within approx. 8 metres 30° 30°Note:
- Bright Sunlight or lighting may cause erratic remote operation.
• Always remove batteries if the remote control is not to be used for more than a month. Batteries left in it may cause damage.
- The buttons on the remote control perform similar function to similarly marked buttons on the main unit.
Teletext Function
☐: Press this button to enter teletext state and display teletext page. If you want to exit teletext state, press this button again. When teletext page is displayed on the screen, you can select relevant function by using the remote control.
☐: If you want to display image and teletext page at the same time, press this button. Press it again to release it.
☐: It is refer to the subpage of teletext page, i.e subcode page. When it is pressed, the screen displays the requirement of subpage code entry. If there is no subpage, it will not be displayed. In most case, there is no subpage.
≡: Press this button if you want to keep the displaying of the page and press it again to exit hold state.
≡ x:
Press this button if you do not want to display the content of the page, but only the channel image.
Press it again to display the content of the page again.
Number buttons 0\~9 on the remote control can be used to get to a certain page. "▲/▼" button on the remote control can be used to display the content of previous or next page.
Press the RED/GREEN/YELLOW/CYAN button on the remote control, the page of relevant color displayed on the lower part of the screen will be displayed.
Press this button if you want to enlarge the content on the upper part of the page, and press the second time to enlarge the content on the lower part of the page, and the third time to resume normal display of all the contents on the page.
☐: Press this button if you want to display the concealed text. Press it again to close the display of concealed text.
≡i: Press this button if you want to display the index for all the teletext page.
FAST TEXT:
The RED, GREEN, YELLOW & CYAN buttons are used for quick access to color coded pages transmitted by FAST TEXT broadcast.
Example:
RED selects CITY INFORMATION,
CYAN selects TRAVEL INFORMATION,
GREEN selects WEATHER INFORMATION,
YELLOW selects TV PROGRAMMING.
text_image
MIX CANCEL SIZE HOLD INDEX REVEAL SUBPAGE TTXUSING THE TV FOR THE FIRST TIME
- Connect the antenna to the RF 75Ω socket.
- Turn on the TV unit.
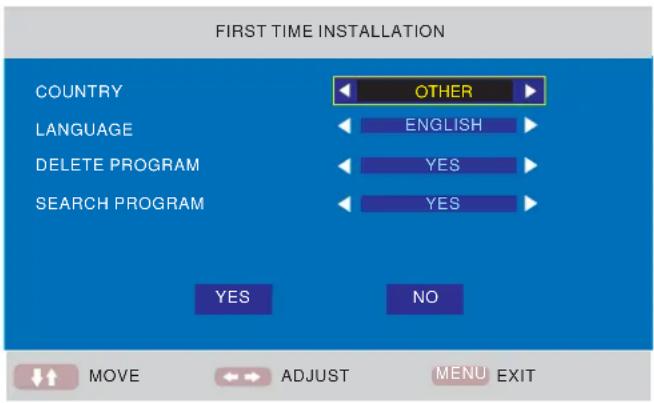
- The Installing Guide screen appears as below:
text_image
FIRST TIME INSTALLATION COUNTRY OTHER LANGUAGE ENGLISH DELETE PROGRAM YES SEARCH PROGRAM YES NO MOVE ADJUST MENU EXIT- Press [▲] or [▼] to select the desired settings.
- Press [◀] or [▶] to adjust the desired settings.
- Press [▼] to select "YES", and press [OK] to confirm.
Note:
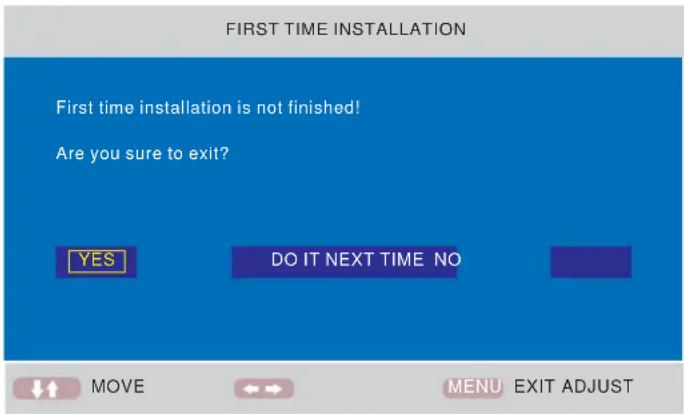
To cancel the first time installation during it's installation process, press [▼] to select "NO", below screen appears: To cancel clearing channel search, press [MENU].
text_image
FIRST TIME INSTALLATION First time installation is not finished! Are you sure to exit? YES DO IT NEXT TIME NO MOVE MENU EXIT ADJUSTNote: The first time installation screen appears again, when the "reset" operation has been done, and then turn off and turn on the main unit.
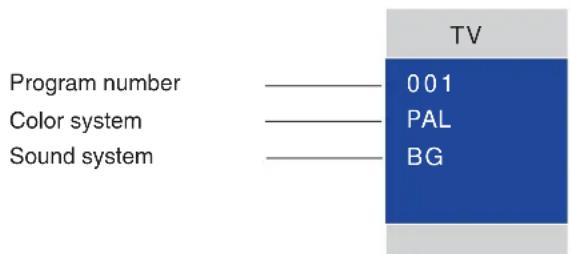
TV information
Press [INFO] to display the program information.
text_image
Program number Color system Sound system TV 001 PAL BGBASIC OPERATIONS
Make sure all necessary connections are correctly connected before turn on the power.
The power indicator turns red and the unit is in the standby mode.
Turn on the power
Press [⏻] to turn on the main unit.
The power indicator turns blue.
Turn off the power
Press [☐] again can turn off the main unit.
The unit is automatically set standby mode.
The power indicator turns red.
Using the Sleep Timer
The sleep timer automatically switches off the power after a preset time has elapsed. There are 9 time periods available, press [SLEEP] on the remote control repeatedly to select the desired sleep time:
0 Min → 15 Min → 30 Min → 45 Min
→60 Min → 75 Min → 90 Min → 105 Min → 120 Min
(The sleep timer starts when the setting is finished.)
To check the remain sleep time
Press [SLEEP] on the remote control, the remain sleep time appears on the screen for a few seconds.
Select the TV channel
After selected "ATV" as input source, you can do either one of followings to select your channel.
- Press [-PROGRAM] or [PROGRAM+] (or [▼ CH] or [CH▲] on the main unit).
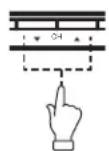
or
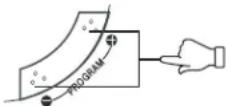
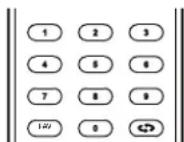
- Press [0, 1\~9] to input the channel number directly.
- Press [] to go back the previous channel you've watched last time.
Selecting the picture mode
Press [P.STD] repeatedly on the remote control to select the desired picture mode.
Select the input source
Turn on the connected necessary external device. Press [SOURCE] to select the proper input source.
The input source menu appears.
- Press [▲▼] to move the high-lighted bar to the desired source item.
- Press [OK] (or [▶]) to confirm.

TV
AV
S-VIDEO
SCART
HDMI
PC
Information of the selected source name appears on the TV for a few seconds.
Information display
Press [INFO] on the remote control, the related information of current source appears on the screen automatically.

Adjusting the volume
Press [- VOL] to increase the volume.
Press [VOL+] to reduce the volume.
or
NICAM Function
Press [I/II] on the remote control when input source is "TV". This operation do no effect to the channels without NICAM signal.
Once [I/II] is pressed, it alternates in the different sound options such as mono, stereo, dual I, dual II.
Selecting the OSD language
The factory setting of OSD (On Screen Display) language is "English". To edit the OSD.
- Press [MENU], OSD menu appears.
- Press [▼] until "Function" menu appears.
- Press [▶] to enter the setting menu, and "Language" is high-lighted.
- Press [◀/▶] to set the language to your desired language.
- Press [MENU] to exit the submenu.
Mute function
Press [MUTE] on the remote control to switch off the sound temporarily.
Press this button again (or [VOL+]), the sound comes back.
Selecting the sound mode
Press [S.STD] repeatedly on the remote control to select the desired sound mode.
S. STD

OSD MENU SETTING
Navigating through menus
Press [MENU], OSD main menu appears.
Press [▼], the main menu displays sequentially:
PICTURE → SOUND → FUNCTION → TV → ...
When some menu option is gray displayed, that means the option is not available in current setting mode.
Common procedure of operation:
- For each menu, press [▲,▼] on the remote control to select the options of the main menu.
- Press [◀, ▶, ▲, ▼] on the remote control to change or confirm your settings.
(Follow the tips at the bottom of the related OSD screens.)
- After setting of an option is finished, press [MENU] to exit stage by stage, while press [EXIT] to turn off OSD screen directly.
Structure of OSD menu:
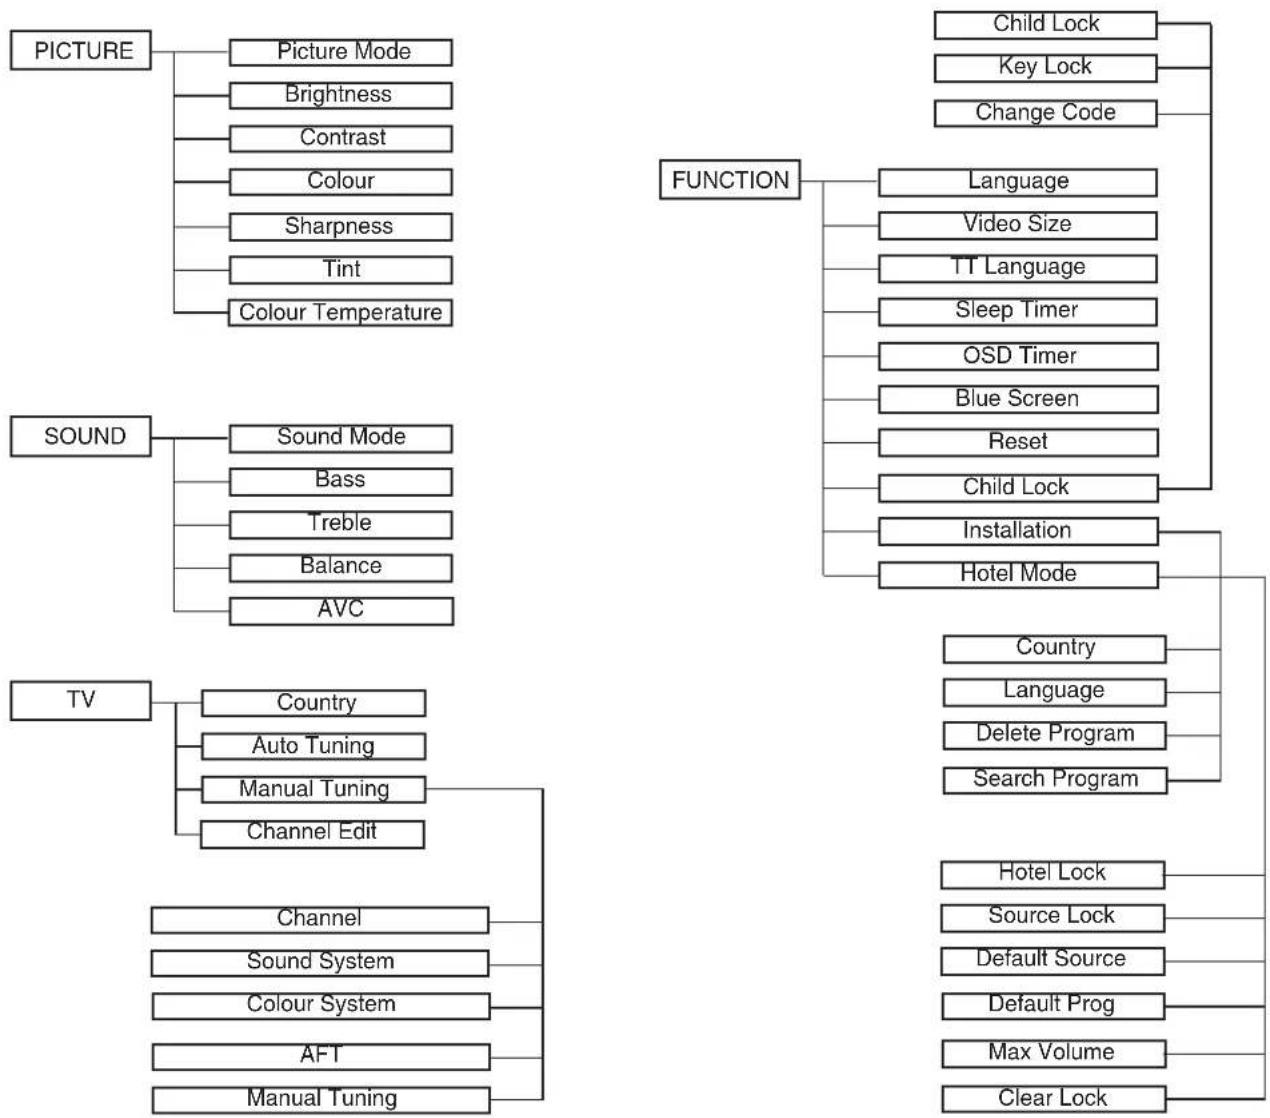
flowchart
graph TD
    A["PICTURE"] --> B["Picture Mode"]
    A --> C["Brightness"]
    A --> D["Contrast"]
    A --> E["Colour"]
    A --> F["Sharpness"]
    A --> G["Tint"]
    A --> H["Colour Temperature"]

    I["SOUND"] --> J["Sound Mode"]
    I --> K["Bass"]
    I --> L["Treble"]
    I --> M["Balance"]
    I --> N["AVC"]

    O["TV"] --> P["Country"]
    O --> Q["Auto Tuning"]
    O --> R["Manual Tuning"]
    O --> S["Channel Edit"]

    T["FUNCTION"] --> U["Language"]
    T --> V["Video Size"]
    T --> W["TT Language"]
    T --> X["Sleep Timer"]
    T --> Y["OSD Timer"]
    T --> Z["Blue Screen"]
    T --> AA["Reset"]
    T --> AB["Child Lock"]
    T --> AC["Installation"]
    T --> AD["Hotel Mode"]

    AE["CHANNEL"] --> AF["Sound System"]
    AE --> AG["Colour System"]
    AE --> AH["AFT"]
    AE --> AI["Manual Tuning"]

    AJ["FUNCTION"] --> AK["Country"]
    AJ --> AL["Language"]
    AJ --> AM["Delete Program"]
    AJ --> AN["Search Program"]

    AO["Hotel Lock"] --> AP["Source Lock"]
    AO --> AQ["Default Source"]
    AO --> AR["Default Prog"]
    AO --> AS["Max Volume"]
    AO --> AT["Clear Lock"]
Main OSD :
PICTURE MENU
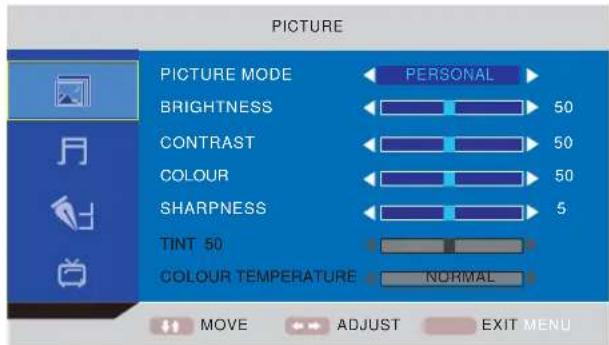
text_image
PICTURE PICTURE MODE BRIGHTNESS CONTRAST COLOUR SHARPNESS TINT 50 COLOUR TEMPERATURE NORMAL MOVE ADJUST EXIT MENUSOUND MENU
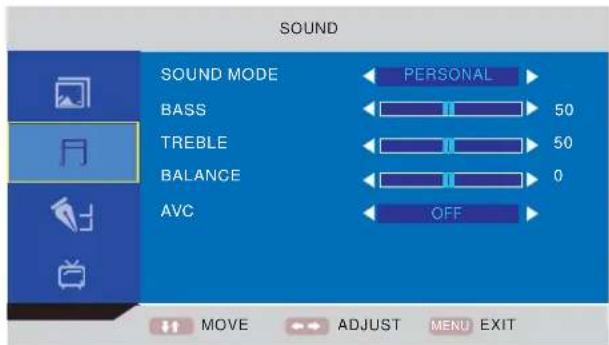
text_image
SOUND SOUND MODE BASS TREBLE BALANCE AVC PERSONAL 50 50 0 OFF MOVE ADJUST MENU EXITTV MENU
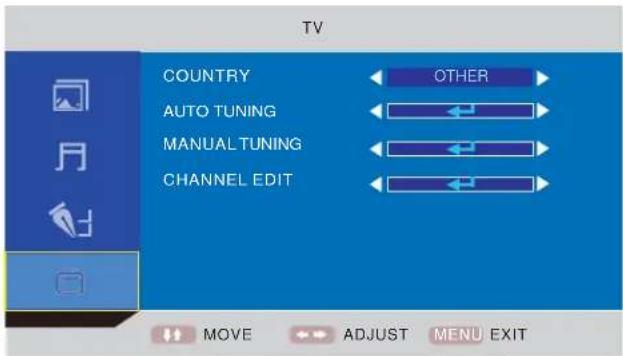
text_image
TV COUNTRY OTHER AUTO TUNING MANUAL TUNING CHANNEL EDIT MOVE ADJUST MENU EXIT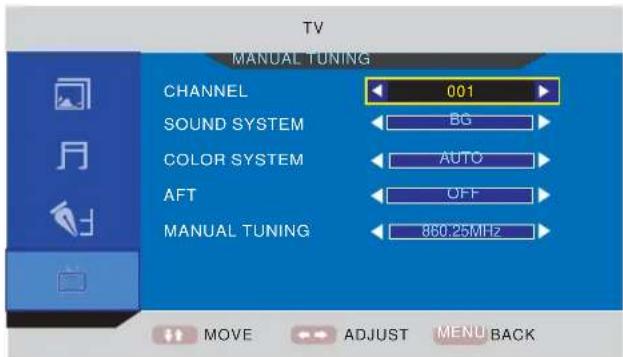
text_image
TV MANUAL TUNING CHANNEL 001 SOUND SYSTEM BG COLOR SYSTEM AUTO AFT OFF MANUAL TUNING 860.25MHz MOVE ADJUST MENU BACK(TV Menu is not available when "AV/S-VIDEO" is selected as input source.)
FUNCTION MENU
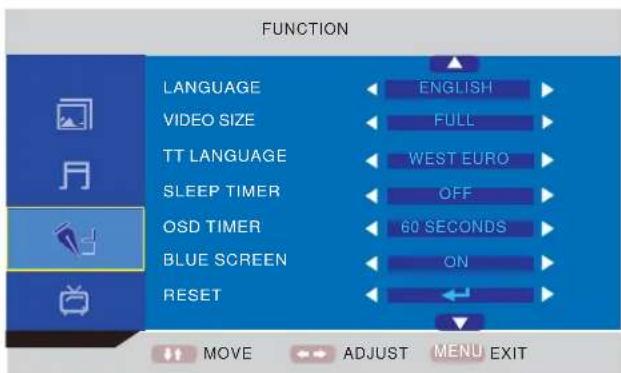
text_image
FUNCTION LANGUAGE ENGLISH VIDEO SIZE FULL TT LANGUAGE WEST EURO SLEEP TIMER OFF OSD TIMER 60 SECONDS BLUE SCREEN ON RESET MOVE ADJUST MENU EXIT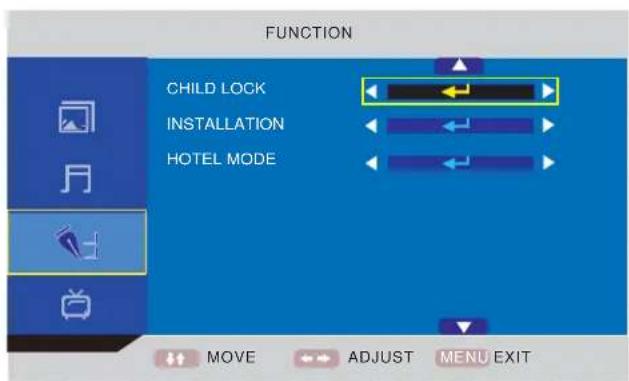
text_image
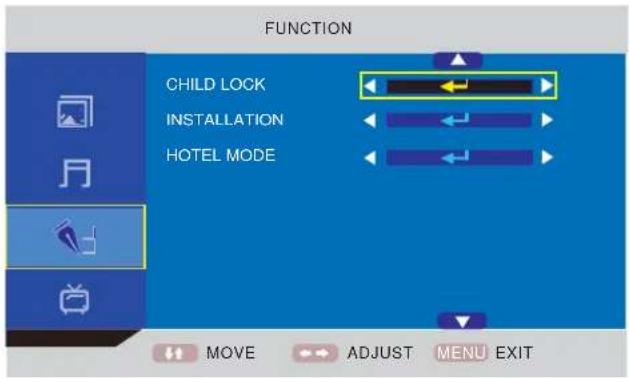
FUNCTION CHILD LOCK INSTALLATION HOTEL MODE MOVE ADJUST MENU EXITAbout the Hotel Lock function
Expand the sub-menu stage by stage in turn:
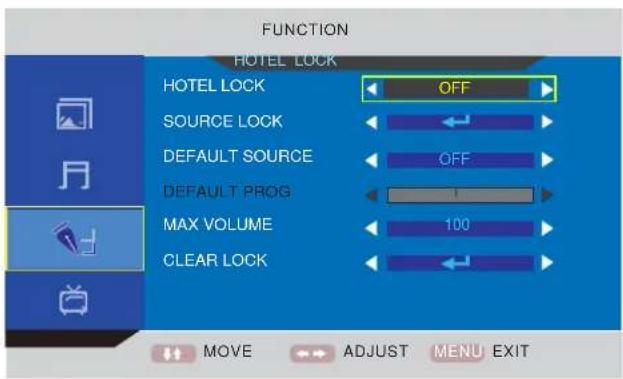
FUNCTION → Hotel Mode → Hotel Lock → ...
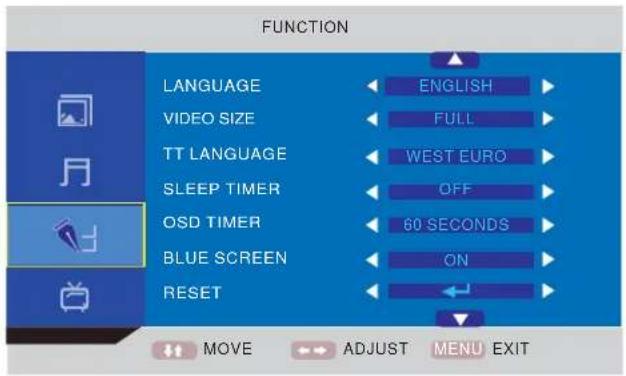
text_image
FUNCTION LANGUAGE ENGLISH VIDEO SIZE FULL TT LANGUAGE WEST EURO SLEEP TIMER OFF OSD TIMER 60 SECONDS BLUE SCREEN ON RESET MOVE ADJUST MENU EXIT
text_image
FUNCTION CHILD LOCK INSTALLATION HOTEL MODE MOVE ADJUST MENU EXIT
text_image
FUNCTION HOTEL LOCK HOTEL LOCK OFF SOURCE LOCK DEFAULT SOURCE OFF DEFAULT PROG 1 MAX VOLUME 100 CLEAR LOCK MOVE ADJUST MENU EXITHotel Lock: Have the priority than other options below. To set below options, this item must be set to "ON" firstly.
When it is set to "On", all options below it are available.
Source Lock: Set the lock to the input source (E.g.: TV, HDMI...) you want to set.
Default Source: Set an input source channel as default while turning on the TV unit.
Default Prog: Set a TV programme number as default while alternate into "ATV".
Max Volume: To set the maximum volume value.
Clear Lock: Clear the locks.
About the PIN Code:
(The default setting is "0000".)
If you forget the password...
Input "2008" to enter it.
Avoid young kids know this password.
MAINTENANCE
WARNING:
FOR YOUR PERSONAL SAFETY, BE SURE TO DISCONNECT THE AC POWER CORD BEFORE PROCEEDING WITH ANY MAINTENANCE OR CLEANING.
Cleaning the LCD Panel
The LCD panel should not be toughed with sharp objects. If dust and fingerprints is on the LCD panel surface, wipe them off with a clean soft cloth.
Wipe in a straight motion from the center to the outside of the LCD panel.
Never use chemicals such as record cleaning sprays, antistatic sprays or fluids, benzene or thinner to clean the LCD panel.
Cleaning the Main Unit
Clean the outside of the unit with a clean soft cloth moistened with luke-warm water. Do not use benzene, thinner or alcohol since they will mar the fi nish of the surface.
TROUBLESHOOTING
Symptom
Possible cause
Corrective active
No Picture and sound.
Power cord is not correctly connected with the main unit. Connected the power cord with the main unit.
Power cord is not plugged into an AC outlet. Plug the power cord into an AC outlet.
The wrong input source is selected. Select a correct input source.
The input source is failed to connect with the TV. Make correct connections.
No sound only.
Volume control is set to minimum.
Press the VOL+ button to increase the volume.
The ☒ button on the remote control is pressed. Press the ☒ (or VOL+/-) button to release the volume.
An incorrect sound system mode is setted. Set a correct sound system from the main menu to match your TV.
Symptom
Possible cause
Corrective active
No picture only, or monochrome picture.
The color system setting doesn't match the program. Set the proper color system setting.
The sound system setting doesn't match the program. Set the proper sound system setting.
Interfered sound or picture.
Some equipment that brings interference is nearby the TV. Keep these things away from the TV.
Multi devices plug into the same one AC outlet collections. Plug the power cord into another AC outlet.
An incorrect sound system mode is setted.
Set a correct sound system from the main menu to match your TV.
Note:
A few bright dots and dark dots may appear on the TV screen, that is normal appearance.
SPECIFICATIONS
TF-L19B ATV
Display Features
Display Type LCD
Screen Size 18.5 inch
Aspect ratio 16:9
Active Area 409 (H) X 230 (V)
Panel Resolution 1366 (H) X 768 (V)
Brightness 250 ^2 cd/m
Contrast Ratio 1000:1
Dot Pitch 0.3 (H) X 0.3 (V) mm
Maximum Color 16.7 M
Response Time 5 ms
Features
HD compatible 480I, 480P, 576I, 576P, 720P, 1080I, 1080P
Wall mounting VESA 100
TV Reception
TV System: PAL / SECAM
Sound System B/G, I, D/K
Antenna Impedance: 75 Ohm
Tuner receiving range:
ATV 49MHz - 863MHz
Power Requirements
Power Input 100-240V \~ 50/60 Hz
Power Consumption
Maximum < 60W
Connections
Input:
TV Tuner (RF 75Ω) 1
Video Input (AV) 1
S-Video Input (S-VIDEO) 1
SCART 1
VGA Input (VGA) 1
PC audio Input (PC AUDIO) 1
HDMI input (HDMI) 1
Output:
Earphone (♀) 1
VGA Resolutions Supported
up to 1360 x 768
Dimension(WxHxD)
Unit W/stand/speakers 461 x 379 x 169 mm
Unit W/O stand 461 x 354 x 76 mm
Weight(N.W.)
Unit W/stand/speakers 3.7 Kg
Environment
Operating Temperature 5°C-35°C
Operating Humidity 20%-80%
Note:
Specifications subject to change without notice.
natural_image
Abstract geometric design with overlapping planes and lines (no text or symbols)