TF-L26B DVB-T - TV TechnoStar - Free user manual and instructions
Find the device manual for free TF-L26B DVB-T TechnoStar in PDF.


User questions about TF-L26B DVB-T TechnoStar
0 question about this device. Answer the ones you know or ask your own.
Ask a new question about this device
Download the instructions for your TV in PDF format for free! Find your manual TF-L26B DVB-T - TechnoStar and take your electronic device back in hand. On this page are published all the documents necessary for the use of your device. TF-L26B DVB-T by TechnoStar.
USER MANUAL TF-L26B DVB-T TechnoStar
natural_image
Abstract geometric diagram with overlapping planes and lines, no text or symbols presentInhaltsverzeichnis
VORSICHTSMASSNAHMEN....G3
BEDIENELEMENTE...... G4
ERSTE INBETRIEBNAME DES TV-GERÄTES...... G7
GRUNDFUNKTIONEN...... G8
text_image
Front panel of a remote control with labeled buttons and function keysFernbedienung X 1
text_image
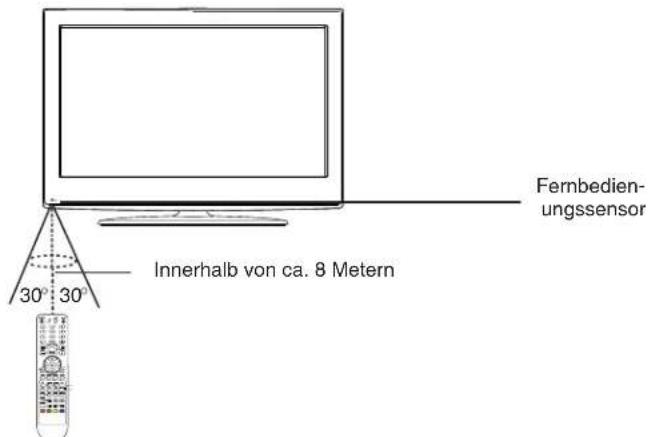
Diagram showing a device being processed from a component, with arrows indicating the process and a small inset image of a device.Reichweite
text_image
First Time Installation < Setup 1> Language: English Italian Spanish Portuguese French Next Page Move Exit Exit First Time Installation < Setup 2> Country: Germany UK Italy France Spain Previous Page Next Page Move Exit Exitflowchart
graph LR
    A["First Time Installation < Setup 3>"] --> B["Start Auto Tune"]
    B --> C["Previous Page OK"]
    B --> D["Start Tuning EXIT Exit"]

    E["First Time Installation"] --> F["Digital channels found: 45"]
    E --> G["Analogue channels found: 6"]
    E --> H["Exit Exit"]
text_image
Picture Picture M ode Standard Brightness 50 Contrast 50 Sound Sharpness 5 Colour 50 Channel Tint 50 Feature Colour Temperature Standard Noise Reduction High Setup Move CX Enter OK Return EXIT ExitKLANGMENÜ
text_image
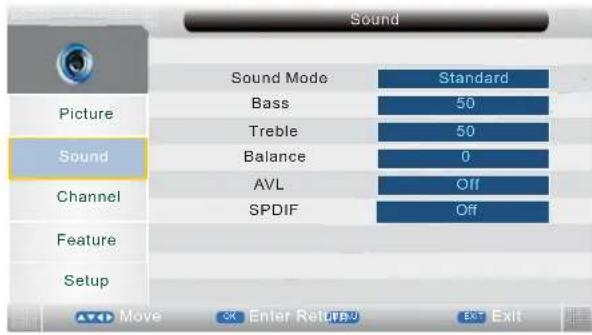
Sound Sound Mode Standard Bass 50 Treble 50 Balance 0 AVL Off SPDIF Off Picture Sound Channel Feature Setup Move OK Enter Return Exit ExitSENDERMENÜ
text_image
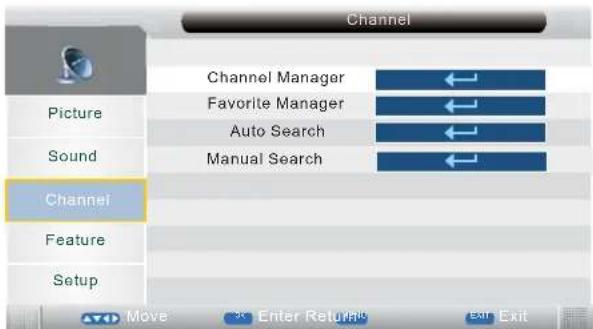
Channel Picture Sound Channel Feature Setup Channel Manager Favorite Manager Auto Search Manual Search Move Enter Return Exit Exit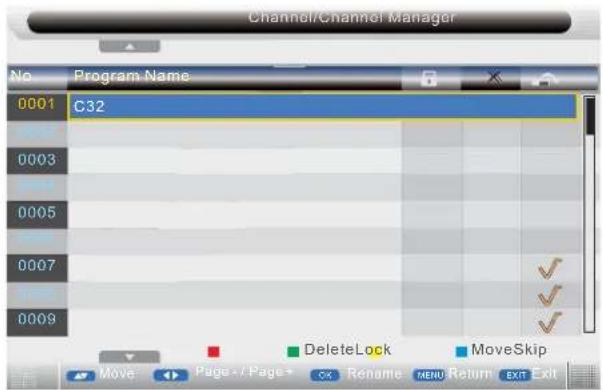
text_image
Channel/Channel Manager No Program Name 0001 C32 0003 0005 0007 0009 DeleteLock MoveSkip Move Page-/Page+ CX Rename MENU Return EXIT Exittext_image
Channel Favorite Manager No. Program Name Eav1 Eav2 Eav3 Eav4 0001 ✓ ✓ ✓ 0003 ✓ ✓ 0005 ✓ 0007 Fav1 Fav2 Fav3 Fav4 0009 Move Page - / Page + Exit Exit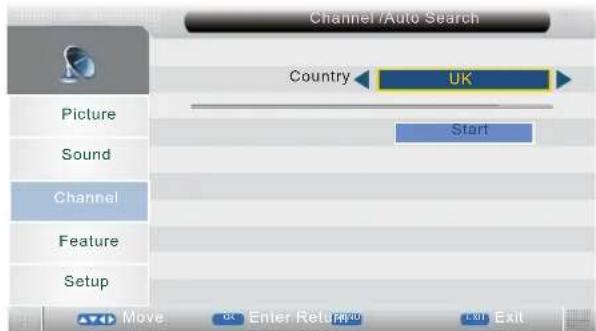
text_image
Channel /Auto Search Country UK Picture Start Sound Channel Feature Setup Move Enter Return Exit Exit| Channel/ Manual Search | Feature | ||||
| Current Channel | 00148.25MHz | System LockLanguage | |||
| Picture | Search | Picture | Timer | ||
| Sound | Fine Tune | Sound | Clock | ||
| AFC | On | Channel | Hearing Impaired | Off | |
| Colour System | PAL | First Time Installation | |||
| Feature | Sound System | DK | CI Info | ||
| Setup | Setup | ||||
| Feature / System Lock | Feature / Language | ||||
| System Lock | Off | OSD Language | English | ||
| Picture | Parental Lock | Off | Picture | TT Language | West |
| Key lock | Off | ExtSubtitle Language | English | ||
| Sound | Change Pin Code | Sound | |||
| Channel | Channel | ||||
| Setup | Setup | ||||
EINSTELLUNGSMENÜ
| Setup | Setup / Firmware Upgrade | |||
| OSD Timer | 15 Seconds | Searching for software, Please wait... | ||
| Picture | Sleep Timer | Off | Picture | 100% |
| Aspect Ratio | Full | |||
| Sound | Blue Screen | On | Sound | Erasing, Please wait... |
| Channel | Reset To DefaultHotel Lock | Channel | 50% | |
| Feature | Filmmware Upgrade | Feature | Do not power off during upgrading!! | |
DTV -Modus
SENDERMENÜ
text_image
Channel/Channel Manager No. Program Name 0001 RaiDue 0002 QVC 0003 Nelonen 0004 The HITS 0005 Five 0006 YLE Teema 0008 TMF 0010 Ideal Word 0013 bid tv DeleteLock MoveSkip Page - / Page + OK RenameMoveExit Exit Exit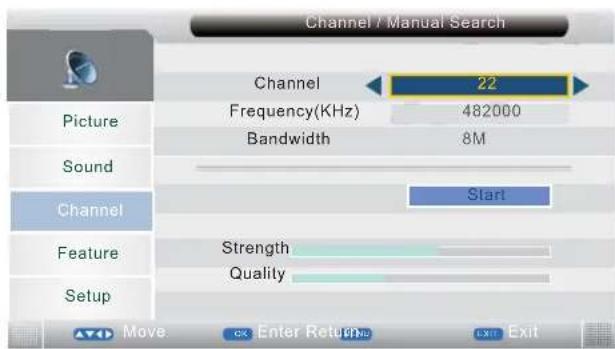
text_image
Channel / Manual Search Channel 22 Frequency(KHz) 482000 Bandwidth 8M Picture Sound Channel Start Feature Strength Quality Setup Move OK Enter Return No Exit ExitFUNKTIONSMENÜ
text_image
Timer 12/01/2008 18:02:25 No. Ch No Channel Start End Date Mode 01 0031 ITV2 +1 21:00 21:15 12/04/2009 Once 02 0029 Film4 22:40 23:15 12/04/2009 Once 0005 STYLE FST 11:30 --:-- 12/04/2009 Once Delete AllDelete Add Edit Move Return Exit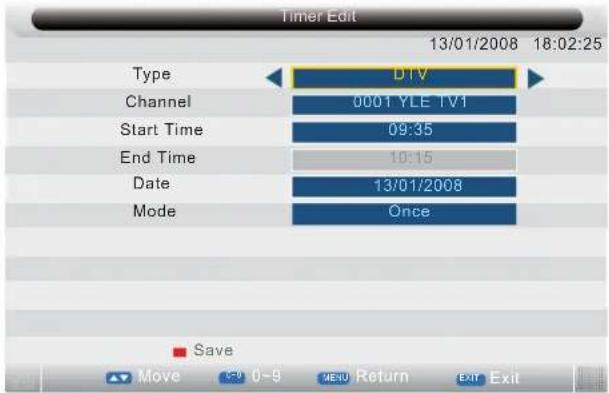
text_image
Timer Edit 13/01/2008 18:02:25 Type DV Channel 0001 YLE TV1 Start Time 09:35 End Time 10:15 Date 13/01/2008 Mode Once Save Move 0-9 MENU Return EXIT Exittext_image
Common Interface Slot0: Viaccess Access Return Exit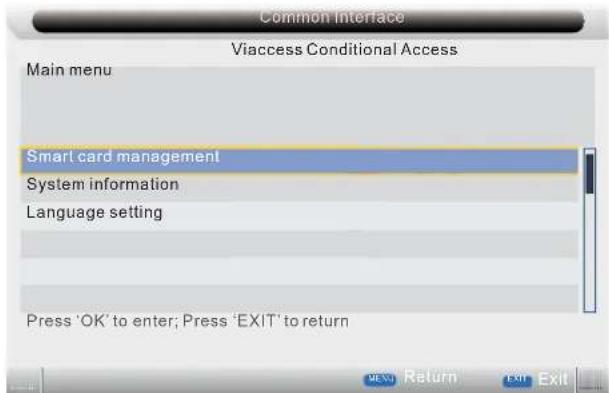
text_image
Common Interface Viaccess Conditional Access Main menu Smart card management System information Language setting Press 'OK' to enter; Press 'EXIT' to returntext_image
Setup OSD Timer 15 Seconds Sleep Timer Off Aspect Ratio Full PC Setup ← Blue Screen On Reset To Default ← Hotel Lock ← Filmware Upgrade ← Picture Sound Channel Feature Setup Move Enter Return Exit Exit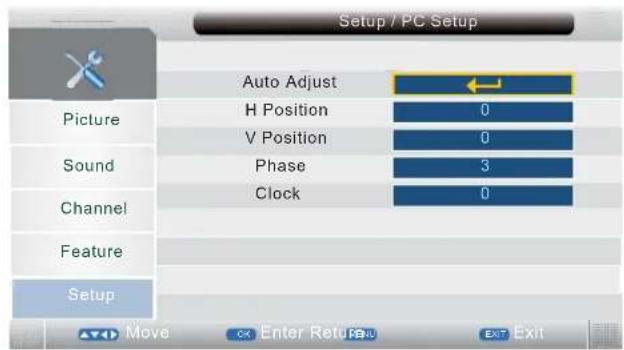
text_image
Setup / PC Setup Auto Adjust H Position 0 V Position 0 Phase 3 Clock 0 Picture Sound Channel Feature Setup Move Enter Return Exit ExitYPBPR-Modus
EINSTELLUNGSMENÜ
text_image
Setup OSD Timer 15 Seconds Sleep Timer Off Aspect Ratio Full YPBPR Setup Blue Screen On Reset To Default Hotel Lock Filmware Upgrade Setup Move Enter Return Exit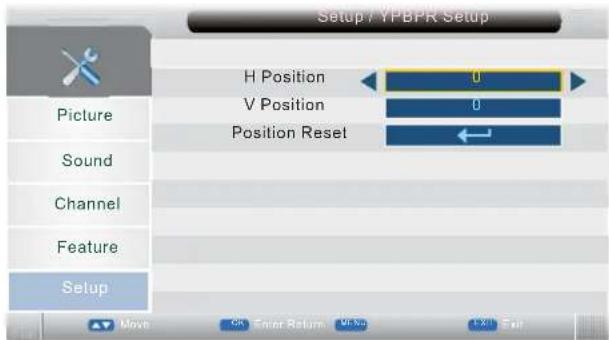
text_image
Setup / YPBPR Setup H Position 0 V Position 0 Position Reset Picture Sound Channel Feature Setup Move OK Enter Return 0.5% 1:31 ExitHDMI-Modus
EINSTELLUNGSMENÜ
text_image
Setup OSD Timer 15 Seconds Sleep Timer Off Aspect Ratio Full HDMI Setup ← Blue Screen On Reset To Default ← Hotel Lock ← Firmware Upgrade ← Picture Sound Channel Feature Setup Move Enter MENU Return Exit Exit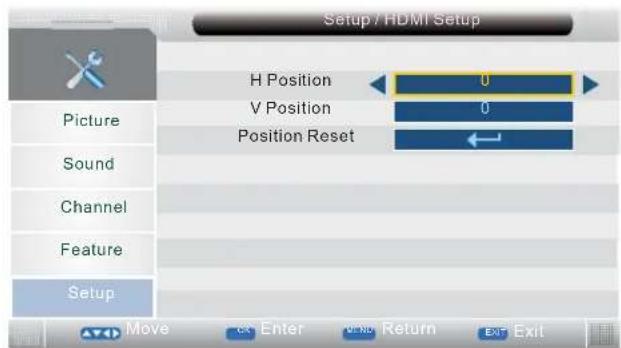
text_image
Setup / HDMI Setup H Position 0 V Position 0 Position Reset ← Picture Sound Channel Feature Setup Move Enter Return ExitMEDIA-Modus
text_image
Setup OSD Timer 15 Seconds Sleep Timer Off Aspect Ratio Full Sound Blue Screen On Channel Reset To Default ← Hotel Lock ← Feature Filmware Upgrade ← Setup Move Enter Return Exit
text_image
Setup / Hotel Lock Hotel Lock Off Source Lock Default Source TV Default Prog 1 Default Volume 30 Max Volume 100 Tuner Lock Off Clear Lock Setup Move OK Enter Return Exit
text_image
Hotel Lock / Source Lock TV Off DTV Off Media Off AV Off Channel S-Video Off PC Off Feature YPBPR Off SCART 1 Off Setup Move Enter Return ExitPixelpitch 0.1405 (H) X 0.4215 (V) mm
Maximale Farben 16.7 M
Reaktionszeit 5 ms
Merkmale
HD-kompatibel 480l, 480P, 576l, 576P, 720P, 1080l, 1080P
Wandmontage VESA 100
TV-Empfang
natural_image
Abstract geometric diagram with overlapping planes and lines, no text or symbols presentInhoudstafel
VOORZORGEN...... D3
BEDIENINGSTOETSEN...... D4
EERSTE GEBRUIK VAN DE TV...... D7
BASISFUNCTIONS...... D8
INSTELLING OSD-MENU......D9
ONDERHOUD......D17
VERHELPEN VAN STORINGEN...... D17
CAUTION: TO PREVENT THE RISK OF ELECTRIC
SHOCK, DO NOT REMOVE COVER (OR BACK).
NO USER-SERVICEABLE PARTS INSIDE.
REFER SERVICING TO QUALIFIED SERVICE PERSONNEL.

text_image
Twee "LR03/AAA" batterijenBedieningsbereik
text_image
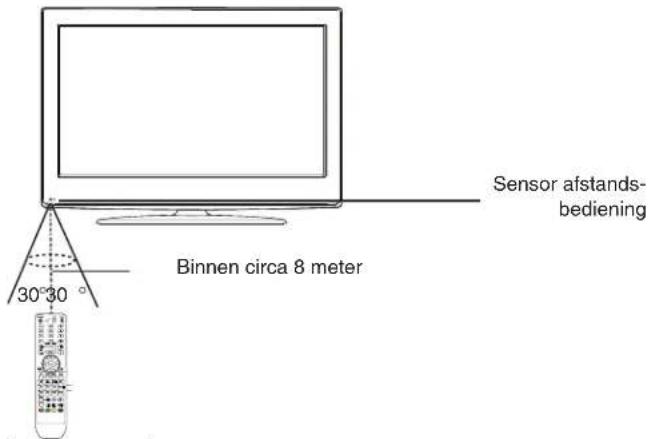
Sensor afstands- bediening Binnen circa 8 meter 30°30°Opmerking:
ROOD Selecteert STADSINFORMATIE,
BLAUW selecteert REISINFORMATIE,
GROEN selecteert WEERSINFORMATIE,
GEEL selecteert TV-PROGRAMMERING.
text_image
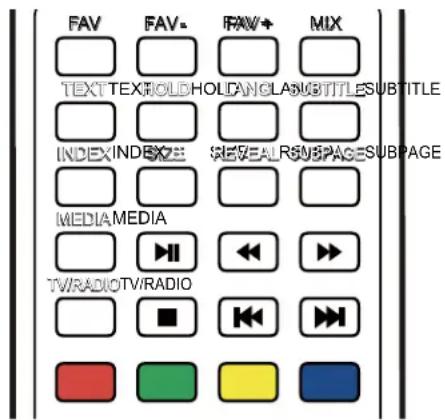
FAV FAV+ FAV+ MIX TEXT TEXHOLD HOLTANG LSUBTITLE SUBTITLE INDEX INDEX REVEALS SUBPAGE SUBPAGE MEDIAMEDIA TV/RADIOTV/RADIOCI-kaartfunctie
text_image
First Time Installation < Setup 1> Language: English Italian Spanish Portuguese French Next Page Move Exit Exit First Time Installation < Setup 2> Country: Germany UK Italy France Spain Previous Page Next Page Move EXIT Exitflowchart
graph LR
    A["First Time Installation < Setup 3>"] --> B["Start Auto Tune"]
    B --> C["Previous Page: OK, OK Start Tuning Exit"]
    D["First Time Installation"] --> E["Digital channels found: 45, Analogue channels found: 6, 30% Exit"]
Opmerking:
PICTURE → SOUND → CHANNEL → FEATURE → SETUP → ...
text_image
Picture Picture M ode Standard Brightness 50 Contrast 50 Sound Sharpness 5 Colour 50 Channel Tint 50 Feature Colour Temperature Standard Noise R eduction High Setup Move OK Enter MENU Return EXIT ExitKLANKMENU
text_image
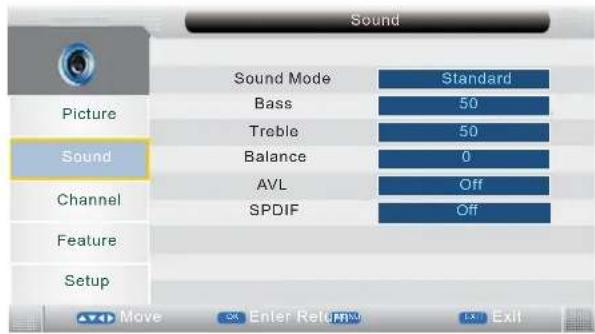
Sound Sound Mode Standard Picture Bass 50 Treble 50 Sound Balance 0 Channel AVL Off SPDIF Off Feature Setup Move Enter Return Exit ExitKANAALMENU
text_image
Channel Channel Manager Favorite Manager Auto Search Manual Search Picture Sound Channel Feature Setup Move 54 Enter ReturnUp 5.00 Exit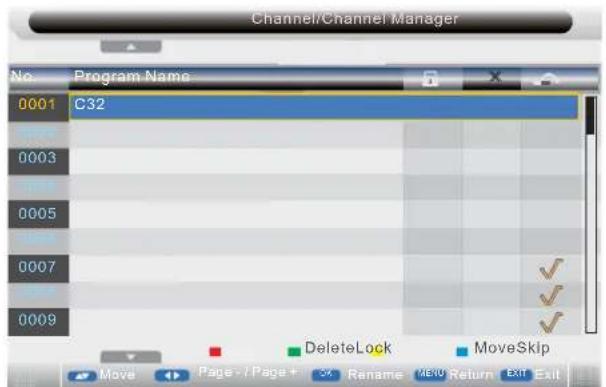
text_image
Channel/Channel Manager No. Program Name 0001 C32 0003 0005 0007 0009 DeleteLock MoveSkip Move Page - 1 Page + 5X Rename M80 Return Exit Exittext_image
Channel/Favorite Manager No Program Name Fav1 Fav2 Fav3 Fav4 0001 ✓ ✓ ✓ 0003 ✓ ✓ 0005 ✓ 0007 ✓ 0009 ✓ Fav1 Fav2 Fav3 Fav4 Move Page - / Page + Exit Exit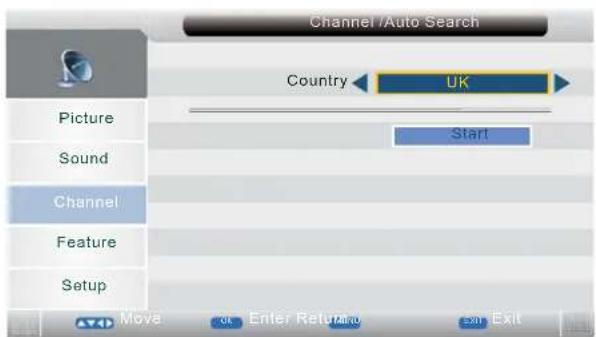
text_image
Channel /Auto Search Country UK Picture Start Sound Channel Feature Setup Move OK Enter Return Exittext_image
Channel/ Manual Search Current Channel 001 48.25MHz Picture Search Sound Channel Fine Tune AFC On Colour System PAL Feature Sound System DK Setup Move OK Enter Return Exit Exit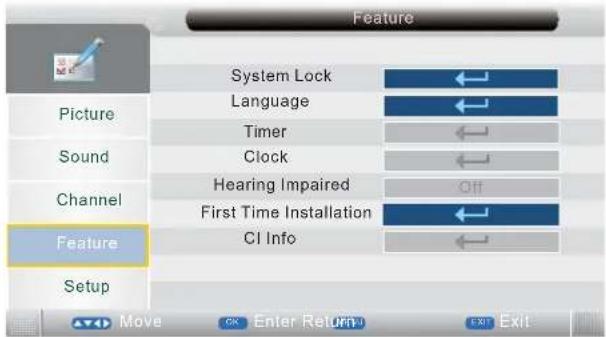
text_image
Feature System Lock Language Timer Clock Hearing Impaired First Time Installation CI Info Picture Sound Channel Feature Setup Move OK Enter Return Exit Exit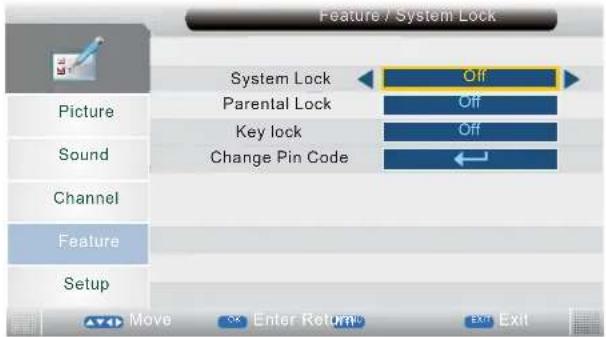
text_image
Feature / System Lock System Lock Off Picture Parental Lock Off Sound-May lock Off Change Pin Code ← Channel Feature Setup Move Enter Return Exit Exit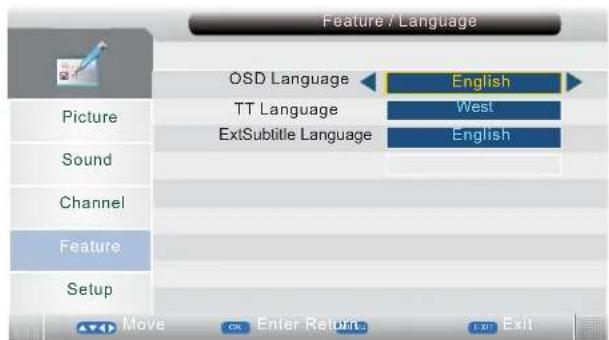
text_image
Feature / Language OSD Language English TT Language West ExtSubtitle Language English Picture Sound Channel Feature Setup Move Cancel Enter Return Cancel ExitINSTELMENU
text_image
Setup OSD Timer 15 Seconds Sleep Timer Off Aspect Ratio Full Sound Blue Screen On Channel Reset To Default Hotel Lock Feature Filmware Upgrade Setup Move Enter Return Exit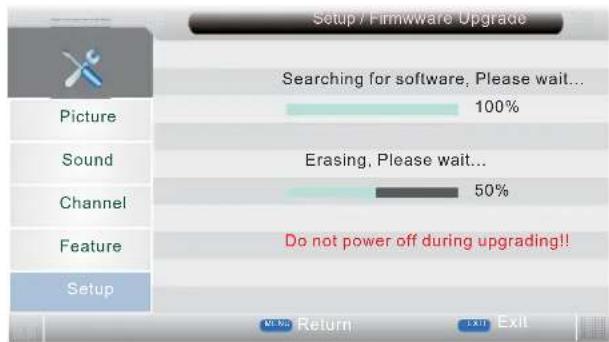
text_image
Setup / Firmware Upgrade Searching for software, Please wait... 100% Erasing, Please wait... 50% Do not power off during upgrading!! Picture Sound Channel Feature Setup No. No. Return Exit ExitDTV-modus
KANAALMENU
text_image
Channel/Channel Manager No. Program Name 0001 RaiDue QVC 0003 Nelonen The HITS 0005 Five YLE Teema 0008 TMF Ideal Word 0013 bid tv DeleteLock MoveSkip Page - / Page + 5k RenameMoveu Exit Exit Exit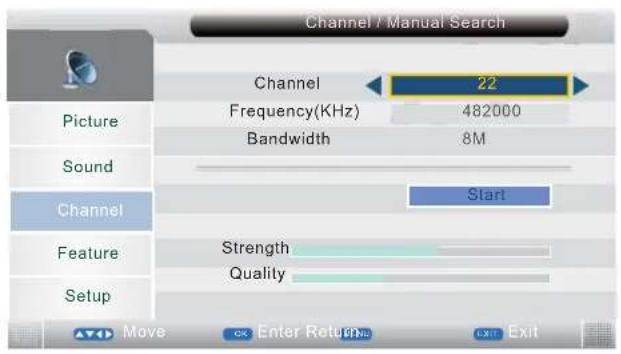
text_image
Channel / Manual Search Channel 22 Frequency(KHz) 482000 Bandwidth 8M Picture Sound Channel Start Feature Strength Quality Setup Move Enter Return No Exit ExitFUNCTIEMENU
text_image
Timer 12/01/2008 18:02:25 No. Ch No Channel Start End Date Mode 01 0031 ITV2 +1 21:00 21:15 12/04/2009 Once 02 0029 Film4 22:40 23:15 12/04/2009 Once 0005 3YLE FST 11:30 --:-- 12/04/2009 Once Delete AllDelete Add Edit Move Return Exit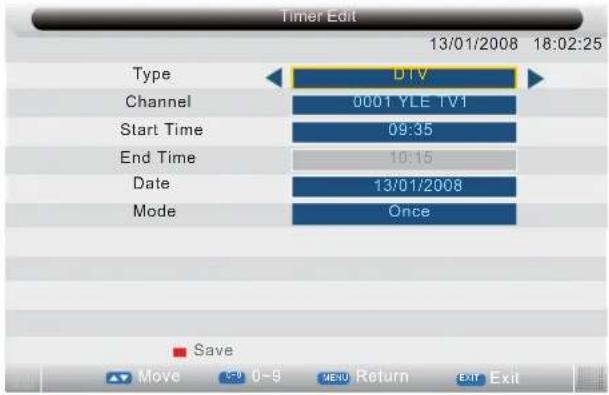
text_image
Timer Edit 13/01/2008 18:02:25 Type DV Channel 0001 YLE TV1 Start Time 09:35 End Time 10:15 Date 13/01/2008 Mode Once Save Move 0-5 MENU Return Exit Exittext_image
Common Interface Slot0: Viaccess Access Return Exit Exit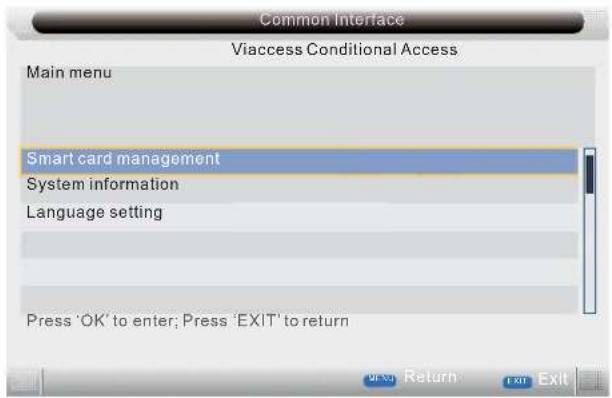
text_image
Common Interface Viaccess Conditional Access Main menu Smart card management System information Language setting Press 'OK' to enter; Press 'EXIT' to returntext_image
Setup OSD Timer 15 Seconds Sleep Timer Off Aspect Ratio Full PC Setup ← Blue Screen On Reset To Default ← Hotel Lock ← Filmmware Upgrade ← Picture Sound Channel Feature Setup Move Enter Return Exit Exit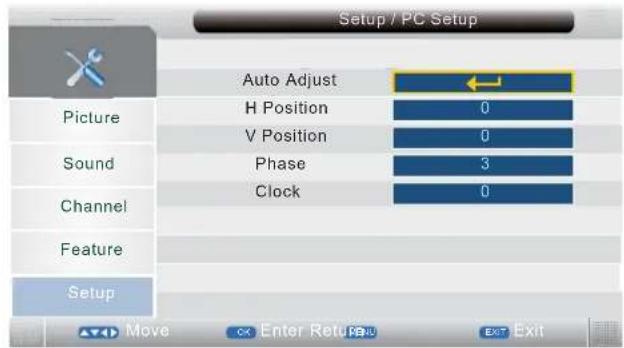
text_image
Setup / PC Setup Auto Adjust H Position 0 V Position 0 Phase 3 Clock 0 Picture Sound Channel Feature Setup Move Enter Return Exit ExitYPBPR-modus
INSTELMENU
text_image
Setup OSD Timer 15 Seconds Sleep Timer Off Aspect Ratio Full YPBPR Setup Blue Screen On Reset To Default Hotel Lock Filmware Upgrade Setup Move Enter Return Exit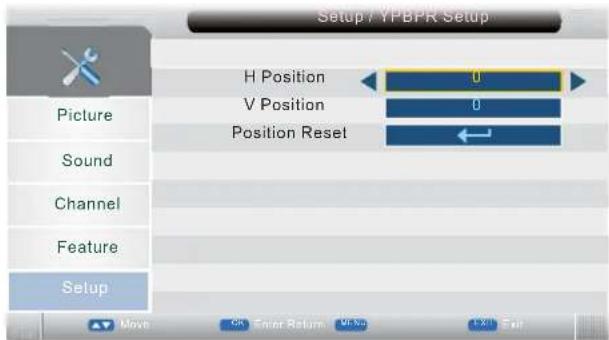
text_image
Setup / YPBPR Setup H Position 0 V Position 0 Position Reset Picture Sound Channel Feature Setup Move OK Enter Return OK ExitHDMI-modus
INSTELMENU
text_image
Setup OSD Timer 15 Seconds Sleep Timer Off Aspect Ratio Full HDMI Setup ← Blue Screen On Reset To Default ← Hotel Lock ← Firmware Upgrade ← Picture Sound Channel Feature Setup Move Enter MENU Return Exit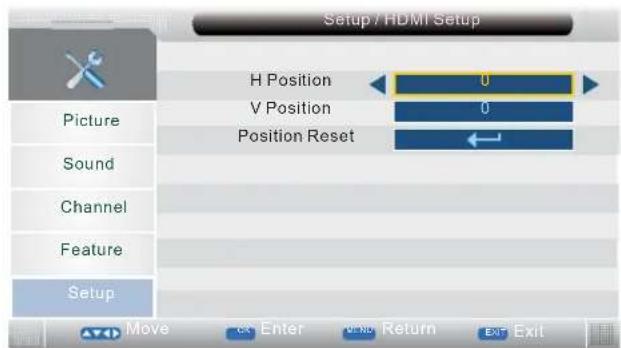
text_image
Setup / HDMI Setup H Position 0 V Position 0 Position Reset ← Picture Sound Channel Feature Setup Move Enter Return ExitMEDIA-modus
Photo Manager (FOTOBEHEERDER)
text_image
FMSO0 Manager usb1_1 No 001/001 0001 /usb1_1 No 0007/001 57843107714123035.jpg Thumbnails Disk Manager Move Page - / Page + OK Play MENU Back EXIT ExitFUNCTION → Hotel Lock → Source Lock → ...
text_image
Setup OSD Timer 15 Seconds Sleep Timer Off Aspect Ratio Full Sound Blue Screen On Channel Reset To Default Hotel Lock Feature Filmware Upgrade Setup Move Enter Return Exit Exit
text_image
Setup / Hotel Lock Hotel Lock Off Source Lock Default Source 1V Default Prog 1 Default Volume 30 Max Volume 100 Tuner Lock Off Clear Lock Picture Sound Channel Feature Setup Move Enter Return Exit
text_image
Hotel Lock / Source Lock TV Off DTV Off Media Off AV Off S-Video Off PC Off YPBPR Off SCART 1 Off Picture Sound Channel Feature Setup Move OK Enter Return Exit Exitnatural_image
Abstract geometric diagram with overlapping planes and lines, no text or symbols presentTable of contents
PRECAUTONS.... E3
CONTROLS E4
USING THE TV FOR THE FIRST TIME ...... E7
BASIC OPERATIONS.... E8
OSD MENU SETTING ...... E9
MAINTENANCE E17
TROUBLE SHOOTING E17
SPECIFICATIONS ...... E18
Dear Customer:
Thank you for purchasing this LCD TV. When opening the box for the first time, please check whether all the accessories are present. Before connecting parts and power, please carefully read the user manual and always keep these instructions handy and close by your LCD TV.
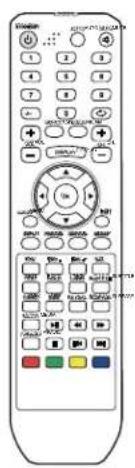
text_image
Front panel of a remote control with labeled buttons and function keysRemote control X 1

Instruction Manual X 1
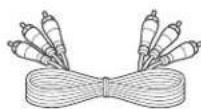
AV cable X 1

Batteries X 2
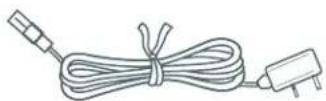
Power cord X 1
Please check the accessories when open the package. If anything damaged or lacked, consult with your local dealer.
Note:
This handling description is printed prior to product development.
When a part of the product specification must be changed to improve operability or other functions, priority is given to the product specification itself. In such instances, the instruction manual may not entirely match all the functions of the actual product.
Therefore, the actual product and packaging, as well as the name and illustration, may differ from the manual.
The screen shown as an example in this manual may be different from the actual screen display.


If at any time in the future you should need to dispose of this product, please note that: Waste electrical products should not be disposed of with household waste. Please recycle where facilities exist. Check with your Local Authority or retailer for recycling advice (Waste Electrical and Electronic Equipment).
PRECAUTIONS

CAUTION
RISK OF ELECTRIC SHOCK DO NOT OPEN

CAUTION: TO PREVENT THE RISK OF ELECTRIC SHOCK, DO NOT REMOVE COVER (OR BACK). NO USER-SERVICEABLE PARTS INSIDE.
REFER SERVICING TO QUALIFIED SERVICE PERSONNEL.
 | This symbol indicates that dangerous voltage constituting a risk of electric shock is present within this unit. |
 | This symbol indicates that there are important operating and maintenance instructions in the literature accompanying this unit. |
CAUTION
TO ENSURE CONTINUED SAFETY DO NOT REMOVE ANY COVERS OR ATTEMPT TO GAIN ACCESS TO THE INSIDE OF THE PRODUCT.
REFER ALL SERVICING TO QUALIFIED PERSONNEL.
TO PREVENT FIRE OR SHOCK HAZARD, DO NOT EXPOSE THIS APPARATUS TO RAIN OR MOISTURE.
- Do not install the unit in an unstable space.
- Do not exposed the unit to where there are extremes of temperature (below 5°C or exceeding 35°C) or moisture.
- Do not expose the unit to directly sunlight or heat nearby.
- Do not install this unit in a confined space, such as a bookcase or built-in cabinet. For suffi cent ventilation, there should be at least 20 m distance around the apparatus.
- The ventilation should not be impeded by covering the ventilation openings with items, such as newspapers, table-cloths, curtains, etc..
- Do not place this unit in any liquid.
- Do not insert any tiny object into the unit through the ventilation.
- The apparatus shall not be exposed to dropping or splashing. No object filled with liquids, such as vases, shall be placed on the apparatus.
- No naked flame sources, such as lighted candles, should be placed on the apparatus.
- Never touch the TV screen or antenna / power cord during thunderstorms. Stop use it during thunderstorms.
- Do not step on the power cord, or twist the power cord wire.
- This product should not be adjusted or repaired by anyone except properly qualified personal when an abnormal condition or trouble happens. Please consult with the qualified service person.
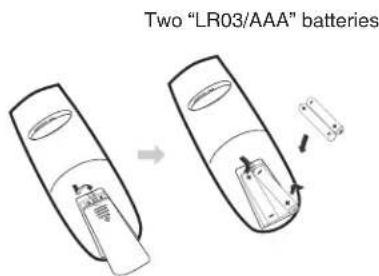
• Always remove the batteries and store in a dry place if the remote control is not to be used for a long time. - Avoid drop down the remote control and damage it.
- Always power this unit from an outlet with the same rating (voltage and frequency) as indicated on the rating label at the back of this unit.
- When not in use, disconnect the power cord from the outlet. Grasp the plug, not the cord, when disconnecting the unit.
- This CLASS 1 device should be connected to the AC power plug with earthed-protective, and place the AC power plug at the position easy to plug in and out.
- Where the MAINS plug or an appliance coupler is used as the disconnect device, the disconnect device shall remain readily operable.
CONTROLS
MAIN UNIT
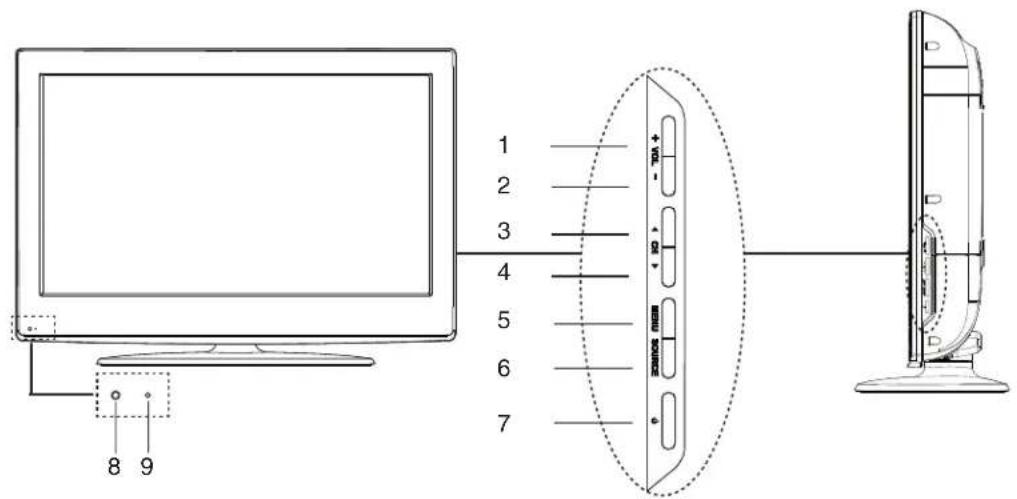
Control buttons
text_image
1 2 3 4 5 6 7 8 9General control buttons
- Volume increase button (+ VOL)
- Volume decrease button (VOL - )
- Channel up button (▲ CH)
- Channel down button (CH ▼)
- Menu button (MENU)
- Input source select button (SOURCE)
- Power/Standby button (①)
- Remote sensor
- Power indicator
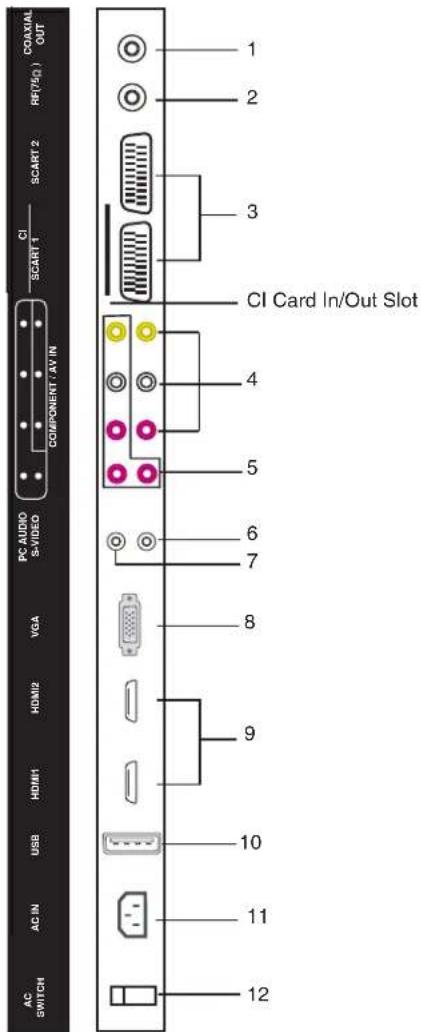
Jacks (Rear Panel)
- Coaxial output plug (COAXIAL OUT)
- Antenna/Cable TV input plug (RF 75 Φ)
- SCART input plug (SCART1/2)
- Composite audio & video input plug (R/L/VIDEO)
- Component video input plugs (R/L/Y Pb Pr)
- S-video input plug (S-VIDEO)
- PC audio input plug (PC AUDIO)
- VGA interface input plug (VGA)
- High-Definition Multimedia interface input plug (HDMI1/2)
- USB input plug (USB)
- AC power input terminal (AC IN)
- AC power on/off (AC SWITCH)
text_image
COAXIAL OUT RF(PSQ) SCART 2 CI SCART 1 COMPONENT / AV IN PC AUDIO S-VIDEO VGA HDMI2 HDMI1 USB AC IN AC SWITCH 1 2 3 CI Card In/Out Slot 4 5 6 7 8 9 10 11 12REMOTE CONTROL
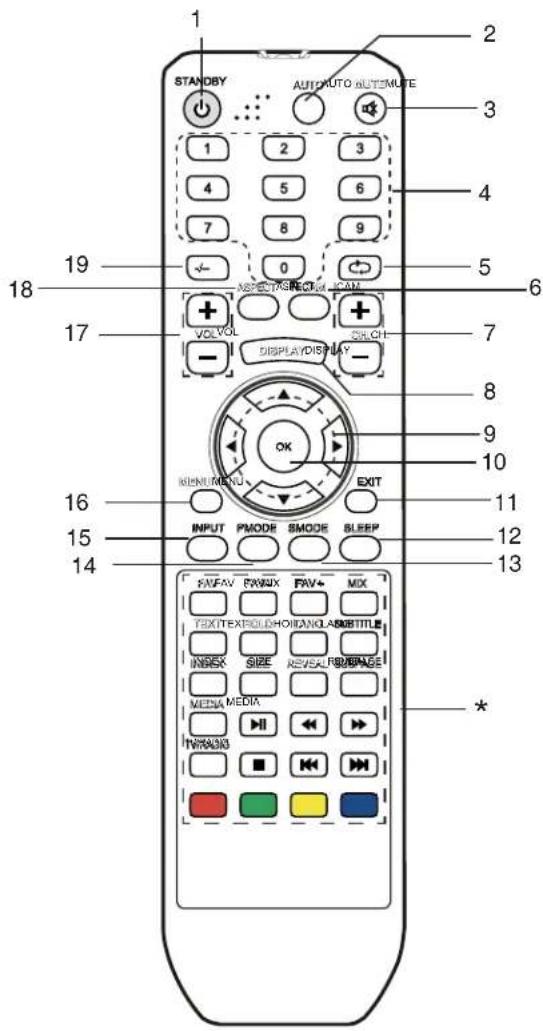
Control buttons
text_image
1 STANDBY AUTO AUTO AUTENUTE 2 3 4 5 6 7 8 9 0 1 2 3 4 5 6 7 8 9 10 11 12 13 14 15 16 17 18 19 ASPECTRICKI CAM VOLVOL DISPLAY/DISPLAY SELLCH EXIT BIENUMENTU INPUT PMODE SMODE SLEEP P/FAV P/WJX F/V+ MIX EXIT/EXTROLDHOUSTANLABS/TITLE INDEX SIZE REVSAL/BUSPAGE MEDIA MEDIA TIRKANDI * *- Power/Standby button (⊕)
- Auto button (AUTO)
- Mute button (MUTE)
- Number buttons (0, 1\~9)
- Channel return button (←)
- NICAM mode select button (NICAM)
- Channel select buttons (+ CH -)
- Display button (DISPLAY)
- Navigation keys (▲, ▶, ▼, ◀)
- Confirm button (OK)
- Menu exit button (EXIT)
- Sleep timer button (SLEEP)
- Sound mode button (SMODE)
- Picture mode button (PMODE)
- Input source select button (INPUT)
- Menu button (MENU)
- Volume control buttons (+ VOL -)
- Display mode select button (ASPECT)
- Multi-digitals button (-/-)
*. Special buttons:
FAV: Favorite program list button FAV-: Favorite program channel down FAV+: Favorite program channel up MIX: Teletext mix button
TEXT: Teletext button
HOLD: Teletext hold button
LANG: Language select button
SUBTITLE: Teletext subtitle button
INDEX: Teletext index button
SIZE: Teletext size button
REVEAL: Teletext reveal button
SUBPAGE: Teletext subpage button
MEDIA: Media select button
▶ II: Play/pause button
◀◀: Fast-backward button
▶▶: Fast-forward button
TV/RADIO: TV / Radio select button
■: Stop button
◀◀: Previous button
▶▶: Next button
Inserting Batteries
text_image
Two "LR03/AAA" batteriesControl Range
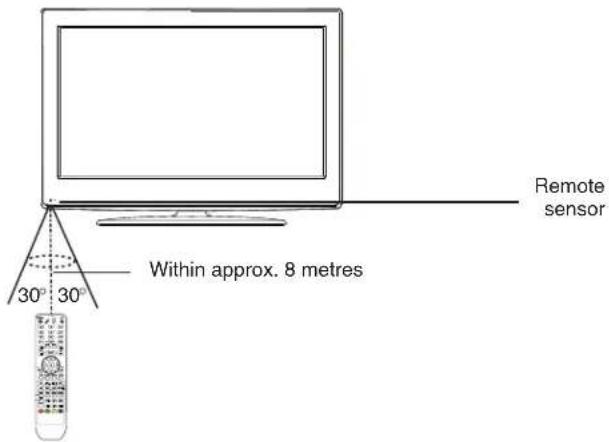
text_image
Remote sensor Within approx. 8 metres 30° 30°Note:
- Bright Sunlight or lighting may cause erratic remote operation.
• Always remove batteries if the remote control is not to be used for more than a month. Batteries left in it may cause damage.
- The buttons on the remote control perform similar function to similarly marked buttons on the main unit.
Teletext Function
TEXT: Press this button to enter teletext state and display teletext page. If you want to exit teletext state, press this button again.
MIX: Press this button to display both image and teletext page at the same time.
SUBPAGE: It is refer to the subpage of teletext page, i.e subcode page. When it is pressed, the screen display the requirement of subpage code entry. If there is no subpage, it will not be displayed. In most case, there is no subpage.
HOLD: Press this button if you want to keep the displaying of the page and press it again to exit hold state.
SIZE: Press this button if you want to enlarge the content on the upper part of the page, and press the second time to enlarge the content on the lower part of the page, and the third time to resume normal display of all the contents on the page.
REVEAL: Press this button if you want to display the concealed text. Press it again to close the display of concealed text.
INDEX: Press this button if you want to display the index for all the teletext page.
Number buttons 0\~9 on the remote control can be used to get to a certain page. "▲▼" button on the remote control can be used to display the content of previous or next page.
Press the RED/GREEN/YELLOW/CYAN button on the remote control, the page of relevant color displayed on the lower part of the screen will be displayed.
FAST TEXT:
The RED, GREEN, YELLOW & CYAN buttons are used for quick access to color coded pages transmitted by FAST TEXT broadcast.
Example:
RED selects CITY INFORMATION,
CYAN selects TRAVEL INFORMATION,
GREEN selects WEATHER INFORMATION,
YELLOW selects TV PROGRAMMING.

text_image
FAV FAVs FAV++ MIX TEXT TEXTHOLDHOLDANGLASUBTITLESUBTITLE INDEXINDEX REVEALRSUBPAGESUBPAGE MEDIA TVRADIOTV/RADIOCI Card Function
CI (Common Interface) is more properly the term used to describe the slot, into which you then put a Conditional Access Module, or CAM. The CI will usually have a slot in it for a subscription card, which enables you to subscribe to pay services. All you have to do is get the appropriate CAM for the service you want to watch, or you can just leave the slot empty if you wish to do so.
USING THE TV FOR THE FIRST TIME
- Connect the antenna or DTV STB to the RF 75Ω socket.
- Turn on the TV unit.
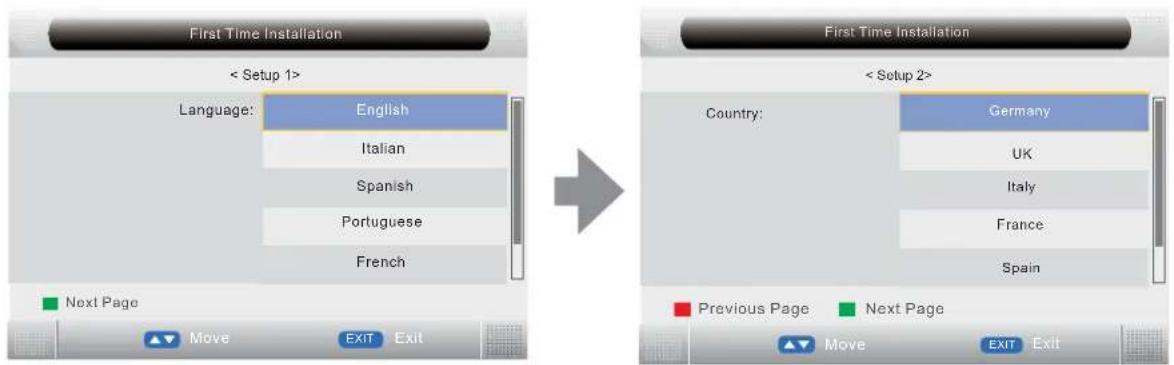
- The Installing Guide screen appears as below:
text_image
First Time Installation < Setup 1> Language: English Italian Spanish Portuguese French Next Page Move Exit Exit First Time Installation < Setup 2> Country: Germany UK Italy France Spain Previous Page Next Page Move Exit Exit- Press [▲▼] to select language, press [OK] or green button to enter Setup 2.
- Press [▲▼] to select country, press [OK] or green button to enter Setup 3.
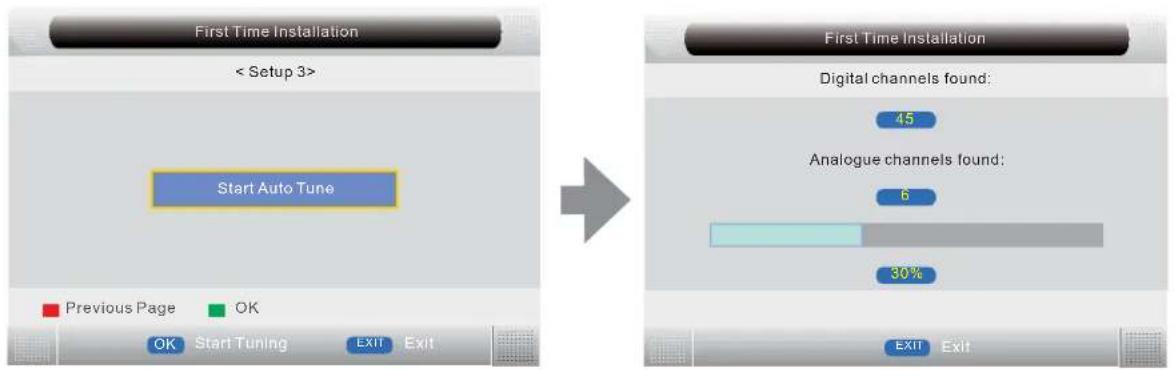
- Press GREEN button to start auto search, the picture appear as follows:
flowchart
graph LR
    A["First Time Installation < Setup 3>"] --> B["Start Auto Tune"]
    B --> C["Previous Page OK Start Tuning EXIT Exit"]
    D["First Time Installation"] --> E["Digital channels found: 45"]
    D --> F["Analogue channels found: 6"]
    D --> G["Exit Exit"]
Note:
The first time installation screen appears again, when the "reset" operation has been done, and then turn off and turn on the main unit.
TV information
Press [DISPLAY] to display the program information.

text_image
Channel number Color system 001 C32 Channel name PAL DK ∇ Sound system NICAM modeBASIC OPERATIONS
Make sure all necessary connections are correctly connected before turn on the power.
The power indicator turns red and the unit is in the standby mode.
Turn on the power
Press [⏻] to turn on the main unit.
The power indicator turns blue.
Turn off the power
Press [☐] again can turn off the main unit.
The unit is automatically set standby mode.
The power indicator turns red.
Using the Sleep Timer
The sleep timer automatically switches off the power after a preset time has elapsed. There are 9 time periods available, press [SLEEP] on the remote control repeatedly to select the desired sleep time:
0 Min → 15 Min → 30 Min → 45 Min
→60 Min → 75 Min → 90 Min → 105 Min → 120 Min
(The sleep timer starts when the setting is finished.)
To check the remain sleep time
Press [SLEEP] on the remote control, the remain sleep time appears on the screen for a few seconds.
Select the TV channel
After selected "ATV" or "DTV" as input source, you can do either one of followings to select your channel.
- Press [CH.+] or [CH.-] (or [▲ CH] or [CH ▼] on the main unit).
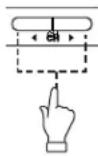
or
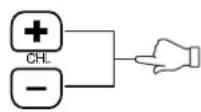
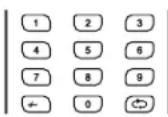
- Press [0, 1\~9] to input the channel number directly.
- Press [] to go back the previous channel you've watched last time.
Selecting the picture mode
Press [PMODE] repeatedly on the remote control to select the desired picture mode.

Select the input source
Turn on the connected necessary external device. Press [INPUT] to select the proper input source.
The input source menu appears.
- Press [▲▼] to move the high-lighted bar to the desired source item.
- Press [OK] (or [▶]) to confirm.

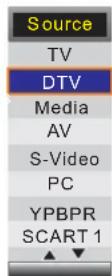
Information of the selected source name appears on the TV for a few seconds.
Information display
Press [DISPLAY] on the remote control, the related information of current source appears on the screen automatically.

Adjusting the volume
Press [+VOL] to increase the volume.
Press [VOL-] to reduce the volume.
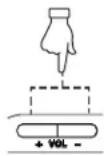
or
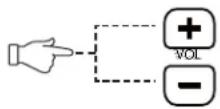
NICAM Function
Press [NICAM] on the remote control when input source is "TV". This operation do no effect to the channels without NICAM signal.
Once [NICAM] is pressed, it alternates in the different sound options such as mono, stereo, dual I, dual II.
Selecting the OSD language
The factory setting of OSD (On Screen Display) language is "English". To edit the OSD.
- Press [MENU], OSD menu appears.
- Press [▼] until "Feature" menu appears.
- Press [▶] to enter the "Language" menu, and "OSD Language" is high-lighted.
- Press [◀/▶] to set the language to your desired language.
- Press [MENU] to exit the submenu.
Mute function
Press [MUTE] on the remote control to switch off the sound temporarily.
Press this button again (or [+VOL]), the sound comes back.

Selecting the sound mode
Press [SMODE] repeatedly on the remote control to select the desired sound mode.
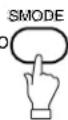
OSD MENU SETTING
Navigating through menus
Press [MENU], OSD main menu appears.
Press [▼], the main menu displays sequentially:
PICTURE → SOUND → CHANNEL → FEATURE → SETUP → ...
When some menu option is gray displayed, that means the option is not available in current setting mode.
Common procedure of operation:
- For each menu, press [▲,▼] on the remote control to select the options of the main menu.
- Press [◀, ▶, ▲, ▼] on the remote control to change or confirm your settings.
(Follow the tips at the bottom of the related OSD screens.)
- After setting of an option is finished, press [MENU] to exit stage by stage, while press [EXIT] to turn off OSD screen directly.
Structure of OSD menu:
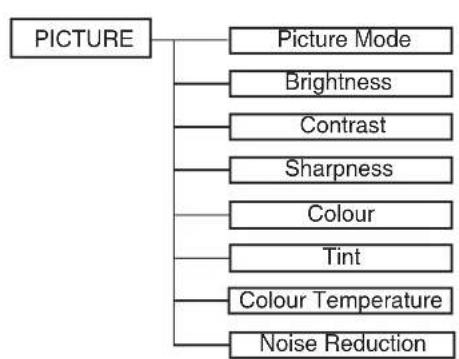
flowchart
graph TD
    A["PICTURE"] --> B["Picture Mode"]
    A --> C["Brightness"]
    A --> D["Contrast"]
    A --> E["Sharpness"]
    A --> F["Colour"]
    A --> G["Tint"]
    A --> H["Colour Temperature"]
    A --> I["Noise Reduction"]
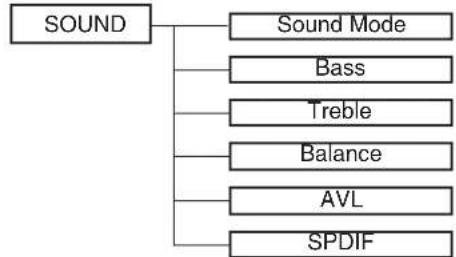
flowchart
graph TD
    A["SOUND"] --> B["Sound Mode"]
    A --> C["Bass"]
    A --> D["Treble"]
    A --> E["Balance"]
    A --> F["AVL"]
    A --> G["SPDIF"]
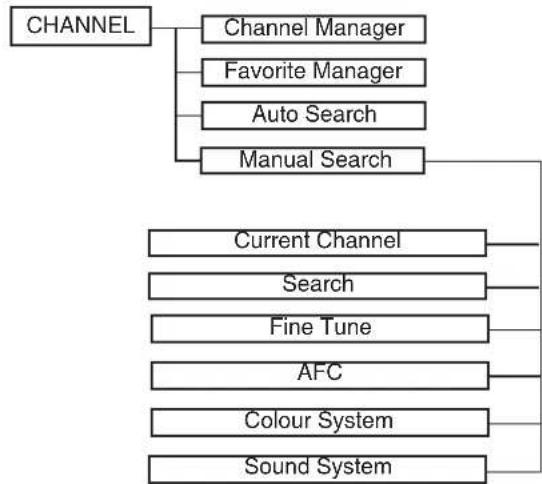
flowchart
graph TD
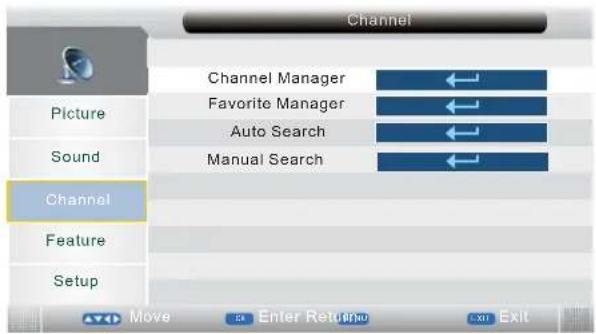
    A["CHANNEL"] --> B["Channel Manager"]
    A --> C["Favorite Manager"]
    A --> D["Auto Search"]
    A --> E["Manual Search"]
    E --> F["Current Channel"]
    E --> G["Search"]
    E --> H["Fine Tune"]
    E --> I["AFC"]
    E --> J["Colour System"]
    E --> K["Sound System"]
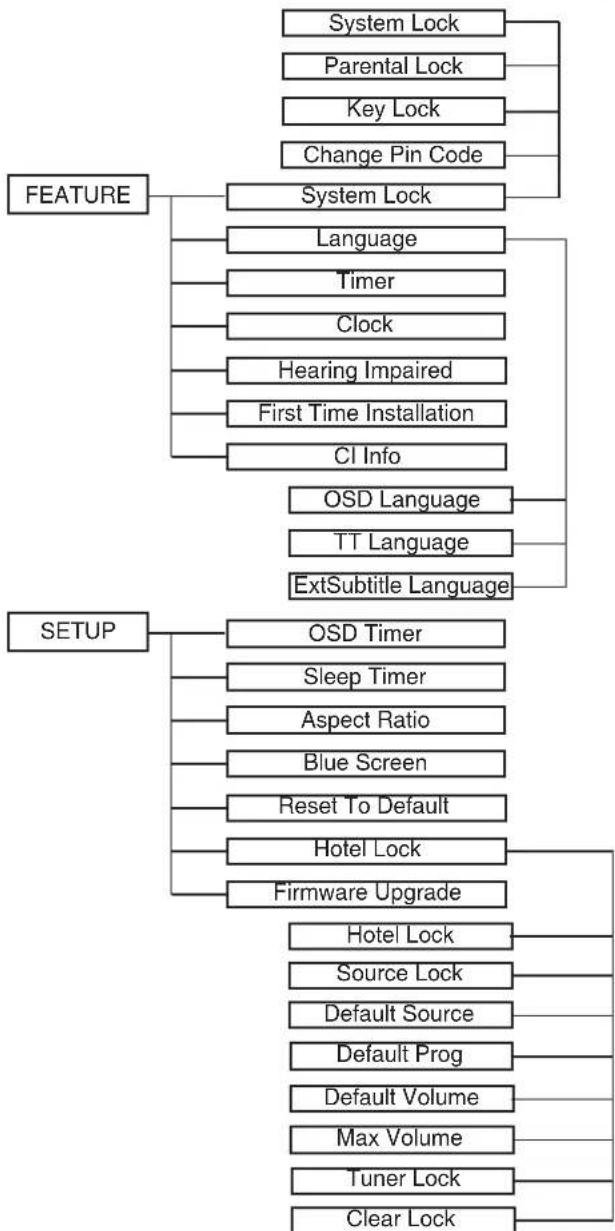
flowchart
graph TD
    A["FEATURE"] --> B["System Lock"]
    A --> C["Language"]
    A --> D["Timer"]
    A --> E["Clock"]
    A --> F["Hearing Impaired"]
    A --> G["First Time Installation"]
    A --> H["CI Info"]
    A --> I["OSD Language"]
    A --> J["TT Language"]
    A --> K["ExtSubtitle Language"]
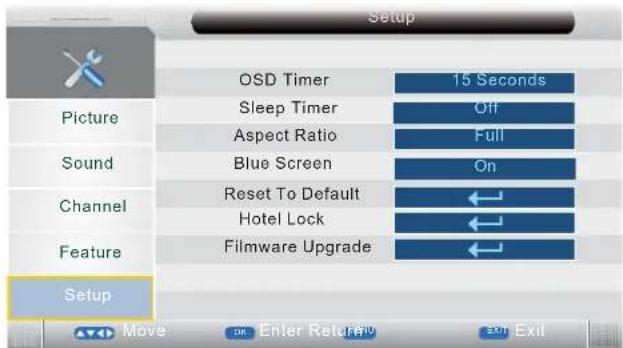
    L["SETUP"] --> M["OSD Timer"]
    L --> N["Sleep Timer"]
    L --> O["Aspect Ratio"]
    L --> P["Blue Screen"]
    L --> Q["Reset To Default"]
    L --> R["Hotel Lock"]
    L --> S["Firmware Upgrade"]
    S --> T["Hotel Lock"]
    S --> U["Source Lock"]
    S --> V["Default Source"]
    S --> W["Default Prog"]
    S --> X["Default Volume"]
    S --> Y["Max Volume"]
    S --> Z["Tuner Lock"]
    S --> AA["Clear Lock"]
Main OSD :
TV mode
PICTURE MENU
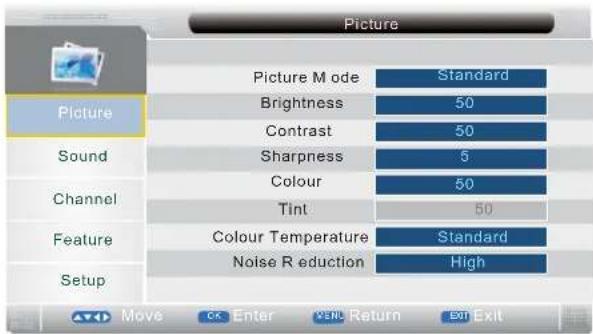
text_image
Picture Picture M ode Standard Brightness 50 Contrast 50 Sound Sharpness 5 Colour 50 Channel Tint 50 Feature Colour Temperature Standard Noise Reduction High Setup Move Enter Return ExitSOUND MENU
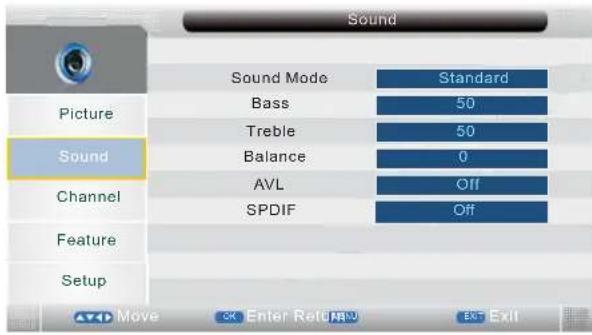
text_image
Sound Sound Mode Standard Bass 50 Treble 50 Balance 0 AVL Off SPDIF Off Picture Sound Channel Feature Setup Move OK Enter Return Exit ExitCHANNEL MENU
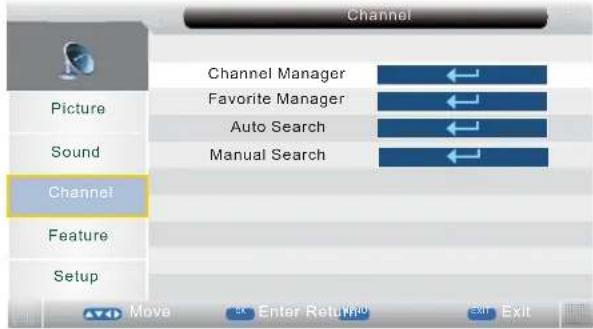
text_image
Channel Picture Sound Channel Feature Setup Channel Manager Favorite Manager Auto Search Manual Search Move Enter Return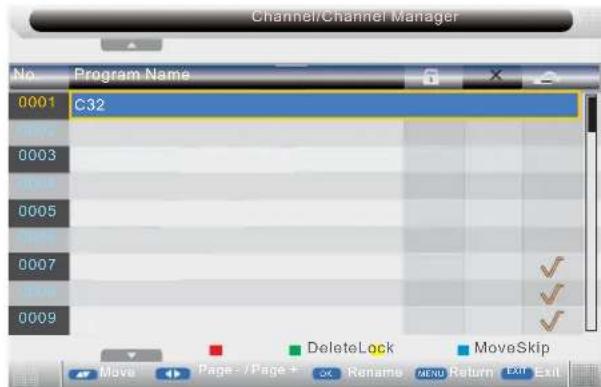
text_image
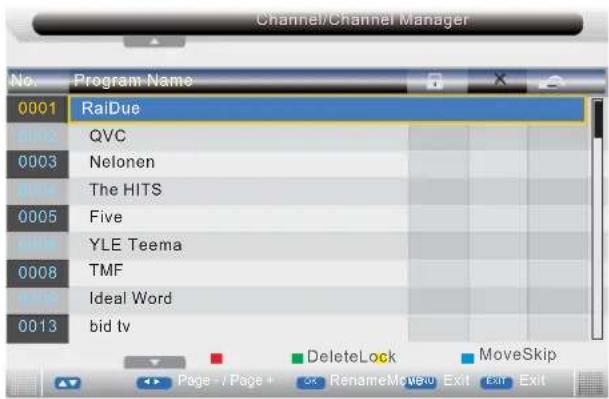
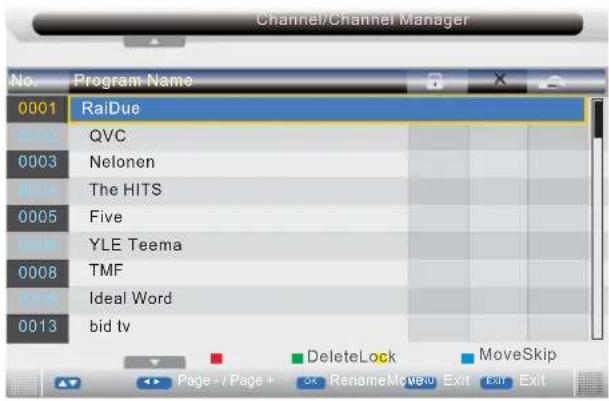
Channel/Channel Manager No Program Name 0001 C32 0003 0005 0007 0009 DeleteLock MoveSkip Move Page - / Page + SK Rename MENU Return Exit ExitNote: Press red button to set the current channel to lock. If the current channel is already locked, press red button again will unlock.
Press green button to set the current channel to delete. If the current channel already delete, press green button again will cancel delete.
Press yellow button to skip the current channel. Use the cursor buttons to select the channel you wish to skip. Press yellow button and √will be shown at the channel selected. To remove the skip function, press the yellow button again.
If one of the stations has been incorrectly placed in the station list, you may move it to the correct position. Use the cursor select the channel to be moved, press blue button, move the station to the new location and press [OK], this will move the station to the new location.
text_image
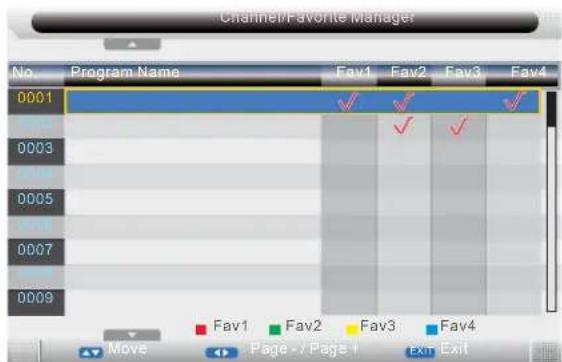
Channel/Favorite Manager No Program Name Fav1 Fav2 Fav3 Fav4 0001 ✓ ✓ ✓ 0003 ✓ ✓ 0005 ✓ 0007 Save1 Fav2 Fav3 Fav4 0009 Save1 Fav2 Fav3 Fav4 Move Page - / Page + Cash Exit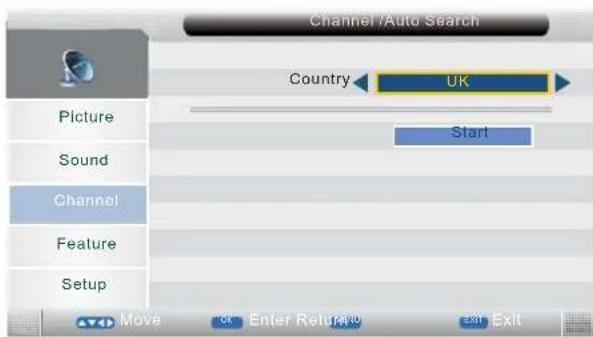
text_image
Channel /Auto Search Country UK Picture Sound Channel Feature Setup Start Move Enter Return 0 ExitNote: Press [▲▼] to select Channel, press red button to set to Fav1.
Press [▲▼] to select Channel, press green button to set to Fav2.
Press [▲▼] to select Channel, press yellow button to set to Fav3.
Press [▲/▼] to select Channel, press blue button to set Fav4.
If the current channel already be one of your favorite channel, press red / green / yellow / blue button again will set it to a normal channel.
Press [MENU] or [EXIT], the successfully updated menu will appear.
FEATURE MENU
text_image
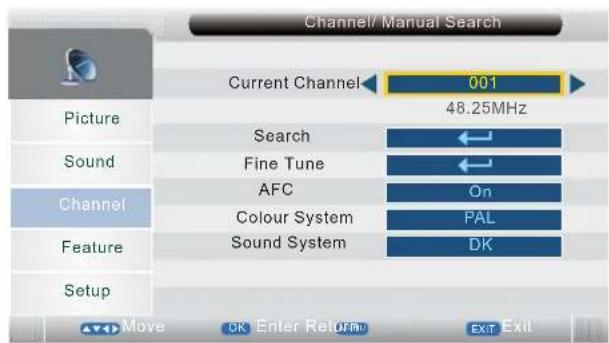
Channel/ Manual Search Current Channel 001 48.25MHz Picture Search Sound Channel Fine Tune AFC On Colour System PAL Feature Sound System DK Setup Move OK Enter Return Exit Exit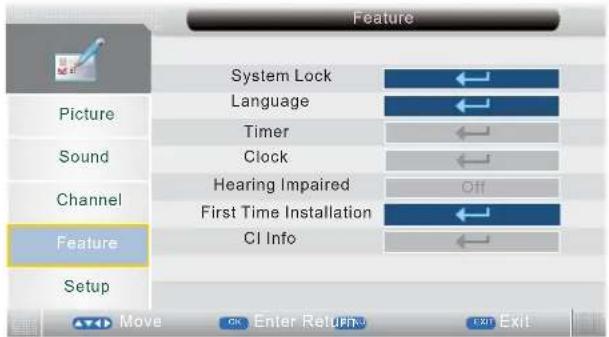
text_image
Feature System Lock Language Timer Clock Hearing Impaired First Time Installation CI Info Picture Sound Channel Feature Setup Move OK Enter Return EXIT Exit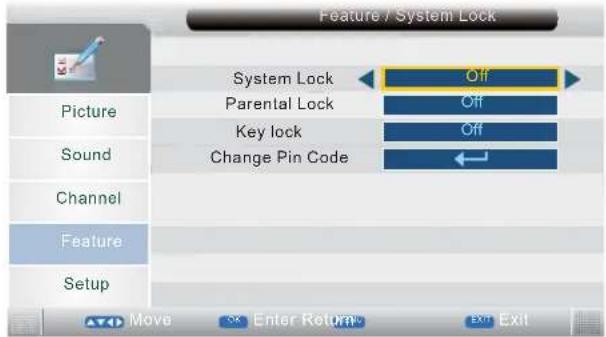
text_image
Feature / System Lock System Lock Off Parental Lock Off Key lock Off Change Pin Code ← Picture Sound Channel Feature Setup Move Enter Return Exit Exit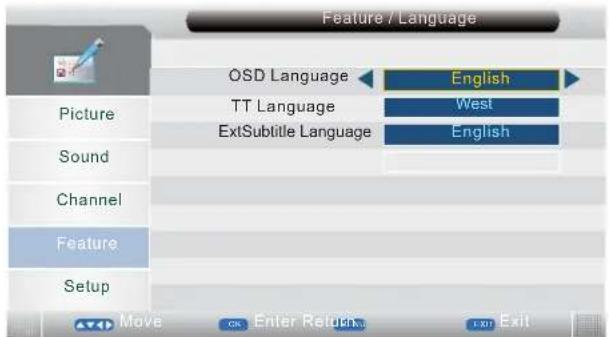
text_image
Feature / Language OSD Language English TT Language West ExtSubtitle Language English Picture Sound Channel Feature Setup Move CR Enter Return Exit ExitSETUP MENU
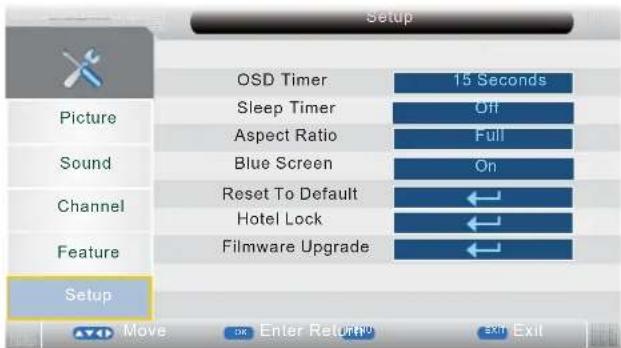
text_image
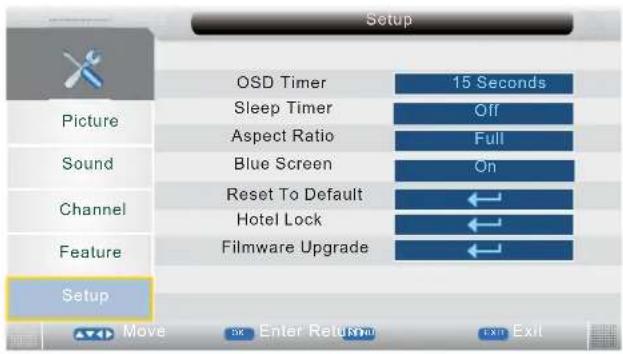
Setup OSD Timer 15 Seconds Sleep Timer Off Aspect Ratio Full Sound Blue Screen On Channel Reset To Default Hotel Lock ← Feature Filmware Upgrade ← Setup Move Enter Return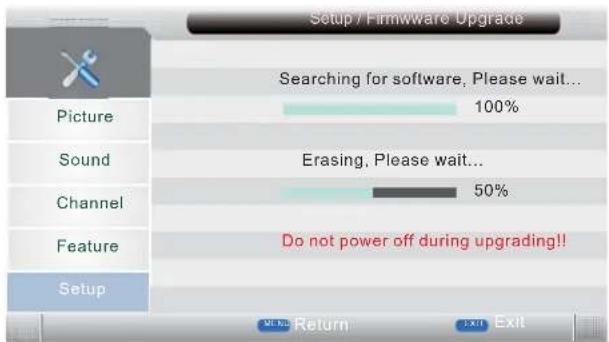
text_image
Setup / Firmware Upgrade Searching for software, Please wait... 100% Erasing, Please wait... 50% Do not power off during upgrading!! Picture Sound Channel Feature Setup Return Exit ExitDTV mode
CHANNEL MENU
text_image
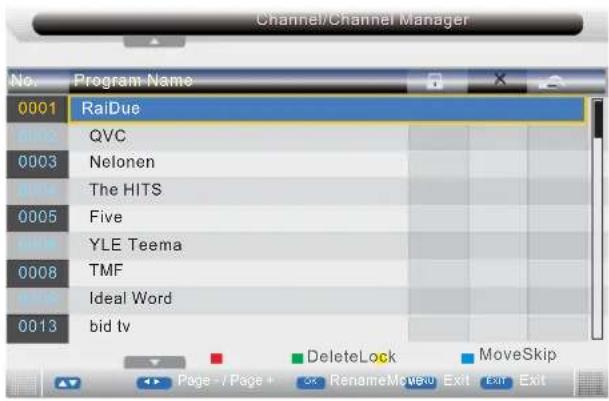
Channel/Channel Manager No. Program Name 0001 RaiDue QVC 0003 Nelonen The HITS 0005 Five YLE Teema 0008 TMF Ideal Word 0013 bid tv DeleteLock MoveSkip Page - / Page + 5k RenameMoveau Exit Exit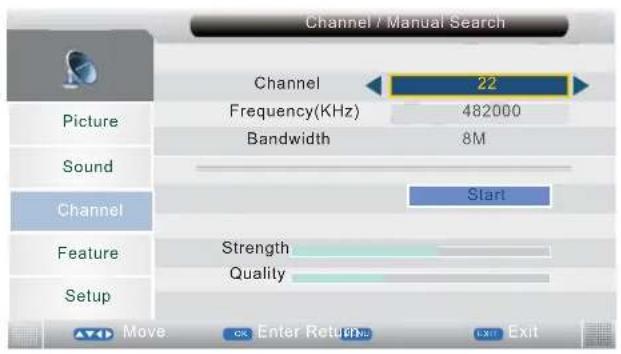
text_image
Channel / Manual Search Channel 22 Frequency(KHz) 482000 Bandwidth 8M Picture Sound Channel Start Feature Strength Quality Setup Move Enter ReturnNo Exit ExitFEATURE MENU
text_image
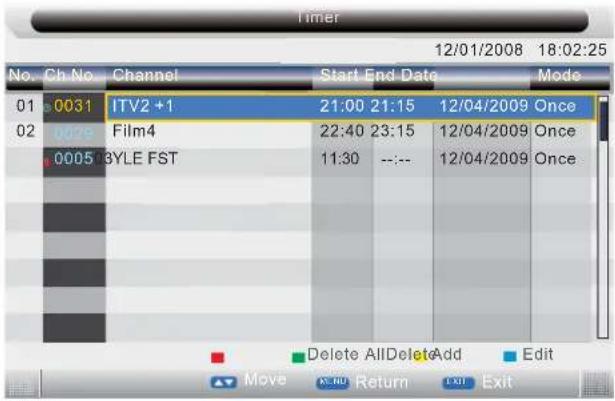
Timer 12/01/2008 18:02:25 No. Ch No Channel Start End Date Mode 01 0031 ITV2 +1 21:00 21:15 12/04/2009 Once 02 0079 Film4 22:40 23:15 12/04/2009 Once 0005 STYLE FST 11:30 --- 12/04/2009 Once Delete AllDelete Add Edit Move OK,BU Return Exit Exit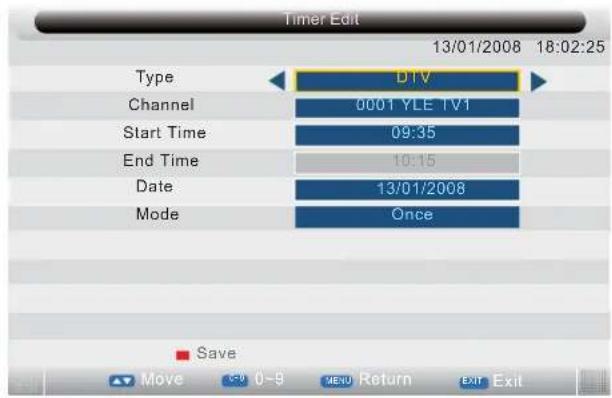
text_image
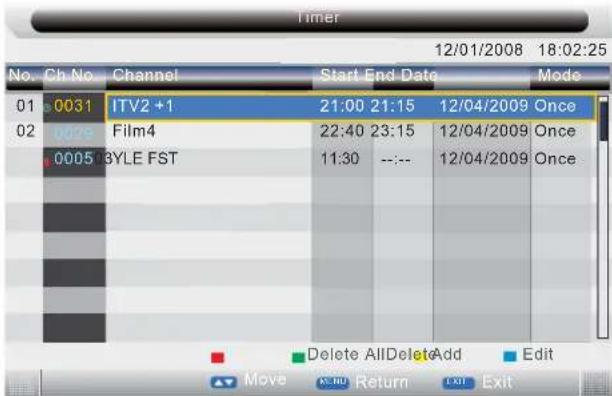
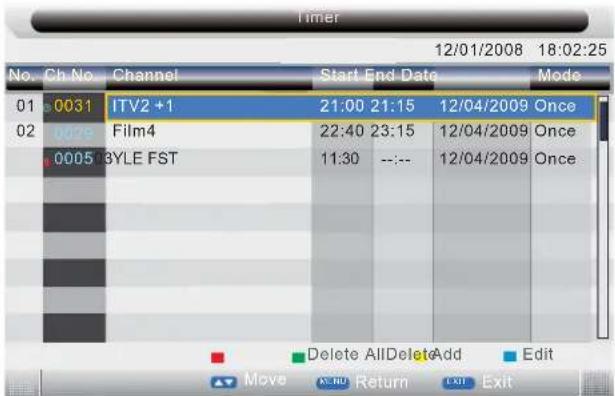
Timer Edit 13/01/2008 18:02:25 Type DIV Channel 0001 YLE TV1 Start Time 09:35 End Time 10:15 Date 13/01/2008 Mode Once Save Move C-0 0-9 MENU Return Exit ExitNote: Press [▲▼] to select Ch No, then press Red button to delete selected channel.
Press Green button to delete all timers.
PressYellow button to add channel to the timer list.
Press Blue button to edit selected channel, the timer edit menu will appear.
text_image
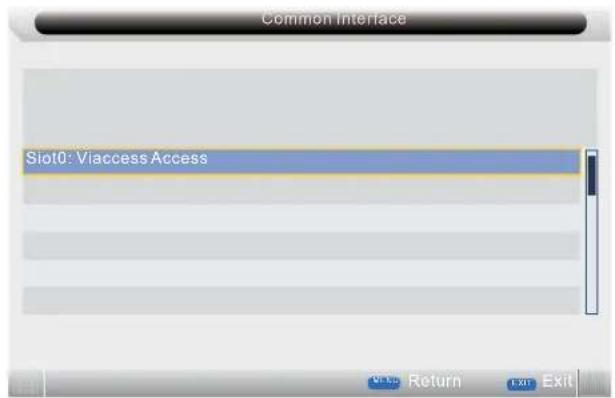
Common Interface Slot0: Viaccess Access Return Exit Exit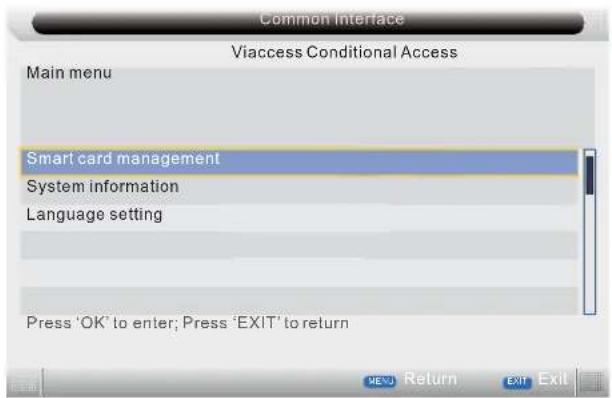
text_image
Common Interface Viaccess Conditional Access Main menu Smart card management System information Language setting Press 'OK' to enter; Press 'EXIT' to returnNote: This is just an example for reference, different CI module will have different CI menu.
PC mode
SETUP MENU
text_image
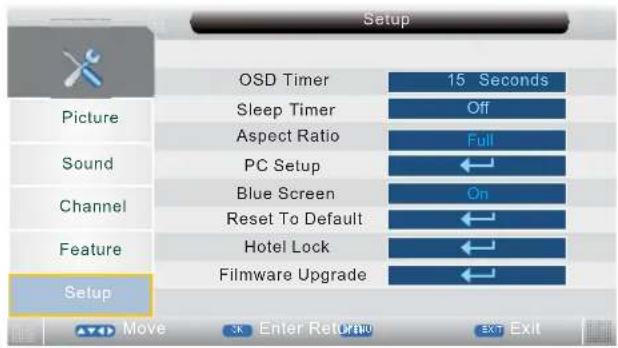
Setup OSD Timer 15 Seconds Sleep Timer Off Aspect Ratio Full PC Setup ← Blue Screen On Reset To Default ← Hotel Lock ← Filmmware Upgrade ← Picture Sound Channel Feature Setup Move Enter Return Exit Exit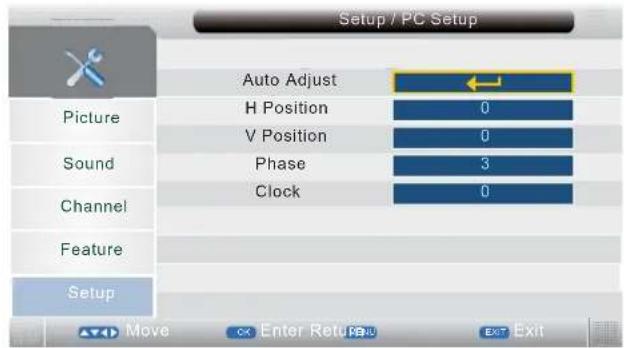
text_image
Setup / PC Setup Auto Adjust H Position 0 V Position 0 Phase 3 Clock 0 Picture Sound Channel Feature Setup Move Enter Return Exit ExitYPBPR mode
SETUP MENU
text_image
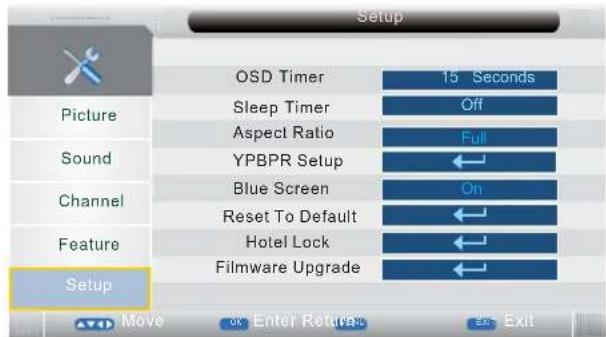
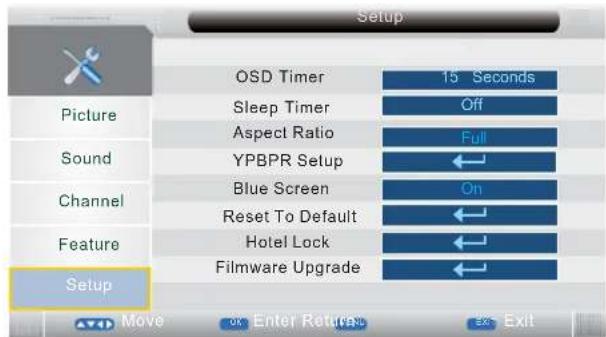
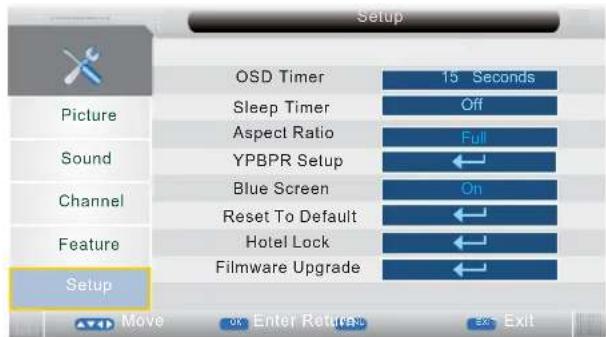
Setup OSD Timer 15 Seconds Sleep Timer Off Aspect Ratio Full YPBPR Setup Blue Screen On Reset To Default Hotel Lock Filmware Upgrade Setup Move Enter Return Exit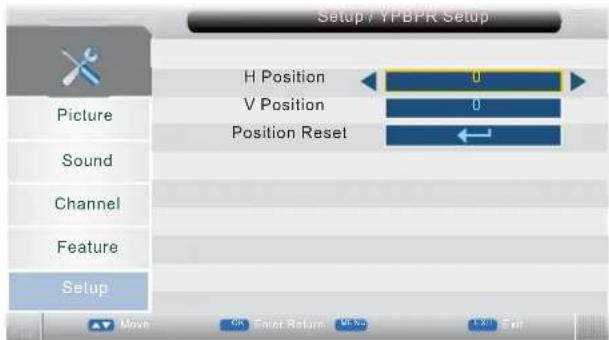
text_image
Setup / YPBPR Setup H Position 0 V Position 0 Position Reset Picture Sound Channel Feature Setup Move OK Enter Return 0.5% 1:31 ExitHDMI mode
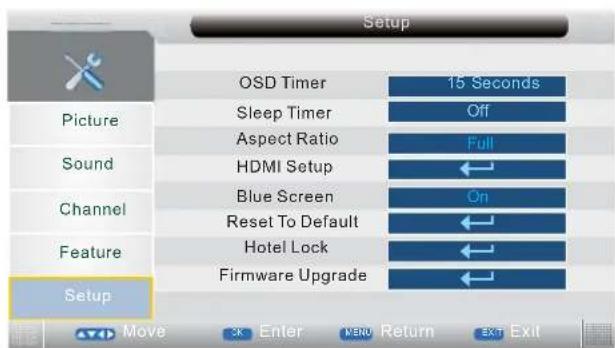
SETUP MENU

text_image
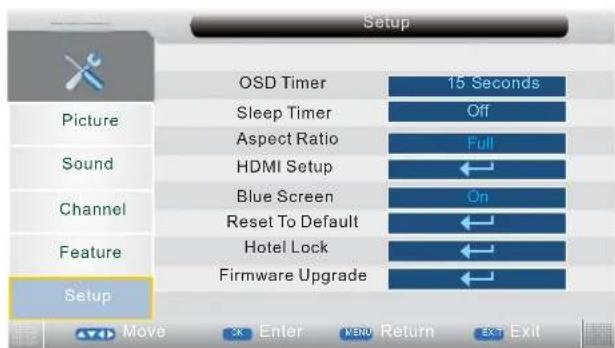
Setup OSD Timer 15 Seconds Sleep Timer Off Aspect Ratio Full HDMI Setup ← Blue Screen On Reset To Default ← Hotel Lock ← Firmware Upgrade ← Picture Sound Channel Feature Setup Move Enter MENU Return Exit Exit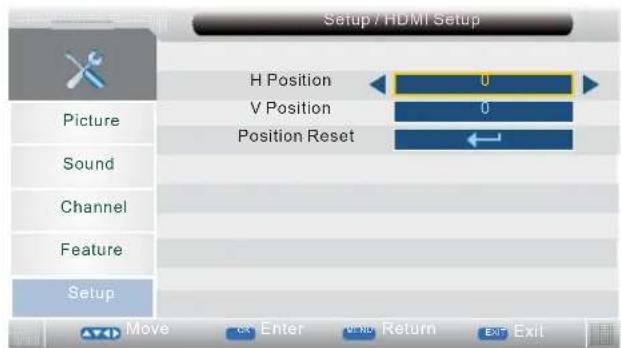
text_image
Setup / HDMI Setup H Position 0 V Position 0 Position Reset ← Picture Sound Channel Feature Setup Move Enter Return Exit ExitMEDIA mode
Note: Before operating MEDIA menu, plug in USB device or memory card, then press [INPUT] to set the input source to Media.
Press [▲▼] to select Media in the source menu. then press [OK] or [▶] to enter.
MOVIE MENU

text_image
MOAGE usb1_1 No 001/001 No 000/001 0001 /usb1_1 0001 b10098-b2f.mpg Disk Manager Move Page - / Page + OK Play NENO Back Exit ExitNote: Press [◀▶] to select Movie in the main menu, then press [OK] or [▼] to enter. Press [MENU] to return back to the previous menu.
Press [▲▼] to select the folder that you want to view, press [OK] or ▶] button to select the sub folder, press [OK] to play, press the [EXIT] to return back.
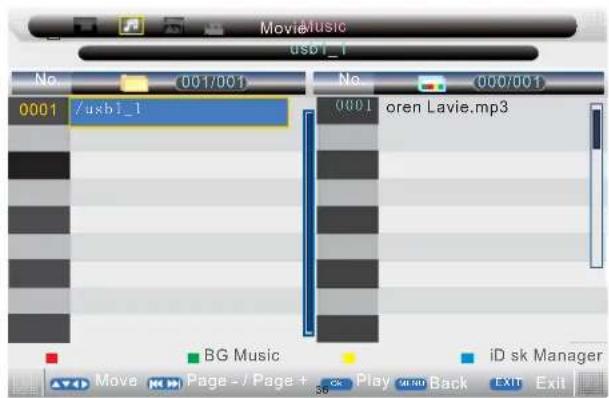
MUSIC MENU
text_image
MovieMusic usb1_1 No 001/001 0001 /usb1_1 No 000/001 oren Lavie.mp3 BG Music iD sk Manager Move Page - / Page + Play Back Exit ExitNote: Press [◀▶] to select Music in the main menu, then press [OK] or [▼] to enter. Press [MENU] to return back to the previous menu.
Press [◀/▶] to select the song that you want to listen, then press [OK] to play.
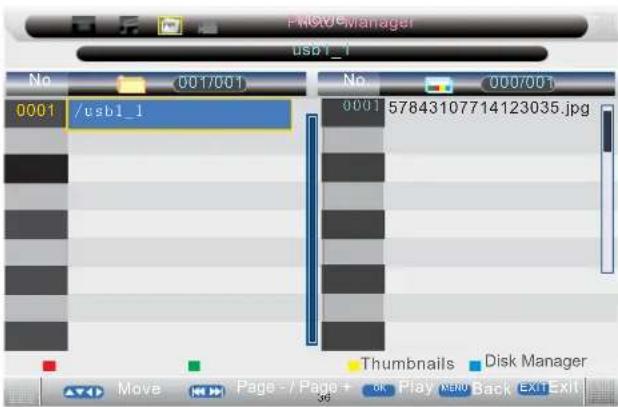
Photo Manager
text_image
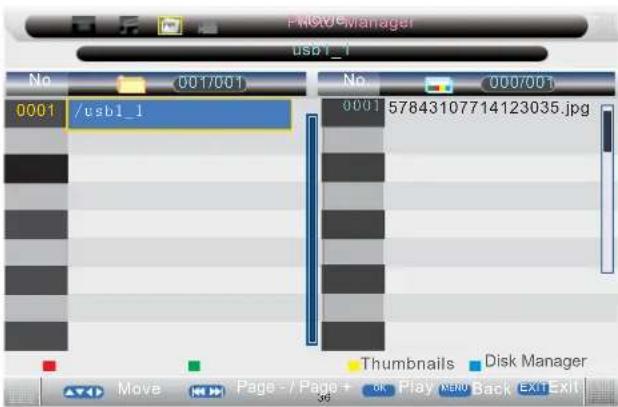
FMSO0 Manager usb1_1 No 001/001 0001 /usb1_1 No 0007/001 57843107714123035.jpg Thumbnails Disk Manager Move Page - /Page + OK Play MENU Back EXIT ExitNote: Press [◀▶] to select Photo Manager in the main menu, then press [OK] or [▼] to enter. Press [MENU] to return back to the previous menu.
Press GREEN button, then press [▲/▼/◄/►] to skin the photoes, press [OK] to view.
For Digital TV :
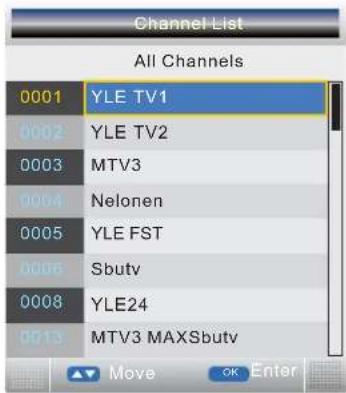
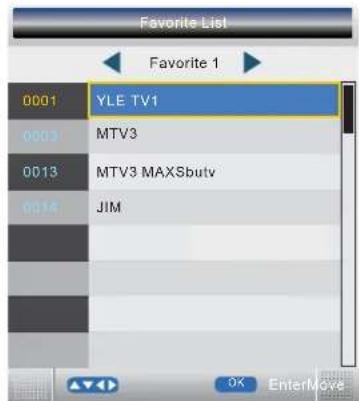
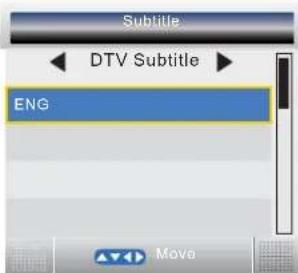
Channel List / Favorite List / Subtitle
text_image
Channel List All Channels 0001 YLE TV1 0002 YLE TV2 0003 MTV3 0004 Nelonen 0005 YLE FST 0006 Sbutv 0008 YLE24 0013 MTV3 MAXSbutv Move OK EnterNote: Press [OK] on the remote control to display the channel list menu.
text_image
Favorite List Favorite 1 0001 YLE TV1 0003 MTV3 0013 MTV3 MAXSbutv 0014 JIM OK EnterMoveNote: Press [FAV] on the remote control to display the FAV list menu.
text_image
Subtitle DTV Subtitle ENG MoveNote: Press [SUBTITLE] on the remote control. Press [▲▼] to select OFF, then press [OK] will not display subtitle. Press [▲▼] to select ENG, then press [OK] to show the subtitle in English. Press [EXIT] to exit.
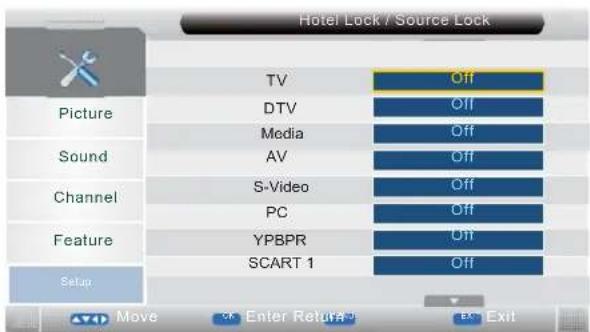
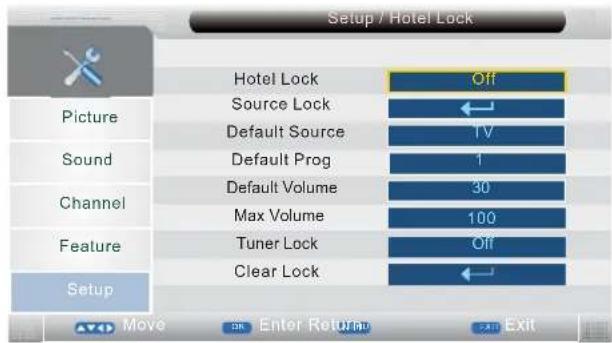
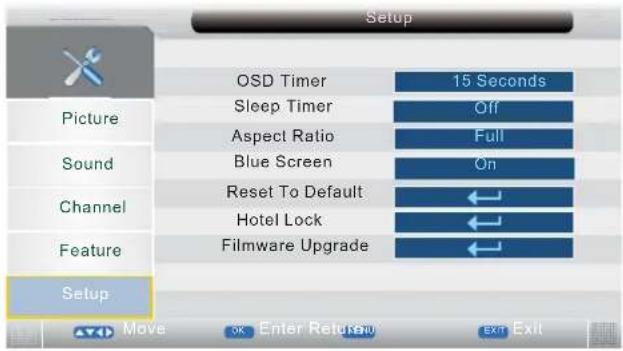
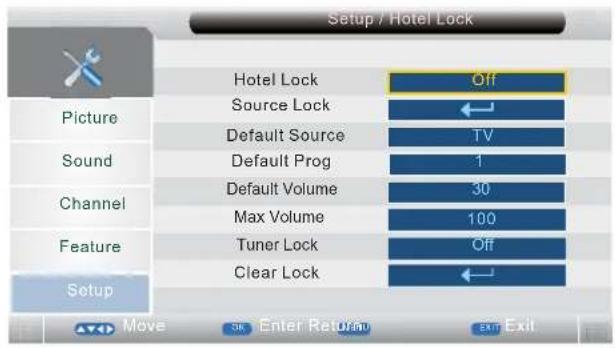
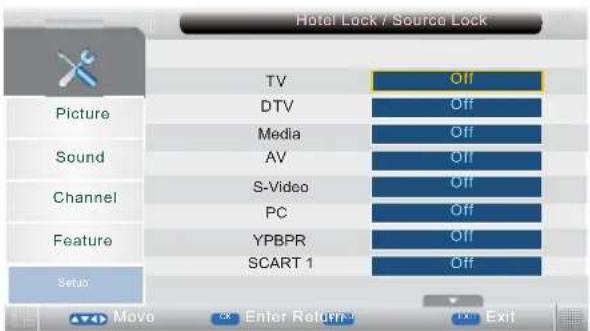
About the Hotel Lock function
Expand the sub-menu stage by stage in turn:
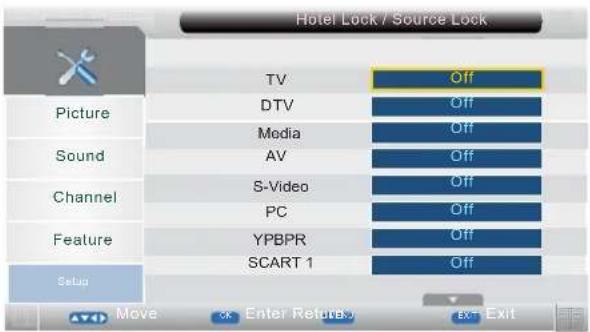
SETUP → Hotel Lock → Source Lock → ...
text_image
Setup OSD Timer 15 Seconds Sleep Timer Off Aspect Ratio Full Sound Blue Screen On Channel Reset To Default Hotel Lock Feature Filmware Upgrade Setup Move OK Enter Return Exit Exit
text_image
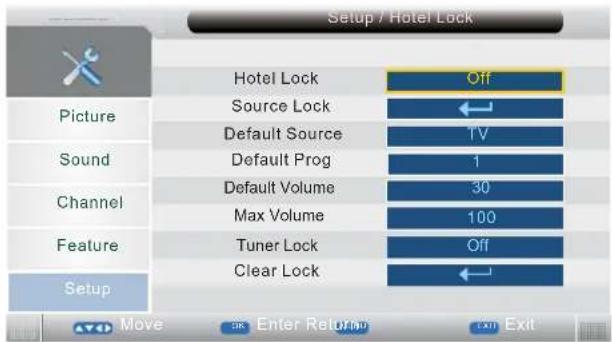
Setup / Hotel Lock Hotel Lock Off Source Lock Default Source TV Default Prog 1 Default Volume 30 Max Volume 100 Tuner Lock Off Clear Lock Picture Sound Channel Feature Setup Move OK Enter Return EXIT Exit
text_image
Hotel Lock / Source Lock Picture Sound Channel Feature Setup TV Off DTV Off Media Off AV Off S-Video Off PC Off YPBPR Off SCART 1 OffHotel Lock: Have the priority than other options below. To set below options, this item must be set to "ON" firstly. When it set to "On", all options below it are available.
Source Lock: Set the lock to the input source (E.g.: TV,HDMI...) you want to set.
Default source: Set an input source channel as default while turning on the TV unit.
Default Prog: Set a TV programme number as default while alternate into "DTV" or "ATV".
Default Volume: To set the default volume value.
Max Volume: To set the maxinium volume value.
Tuner Lock: The TV source is unavailable.
Clear Lock: Clear the locks.
About the PIN Code:
(The default setting is "0000".)
If you forget the password...
Input "2008" to enter it.
Avoid young kids know this password.
MAINTENANCE
WARNING:
FOR YOUR PERSONAL SAFETY, BE SURE TO DISCONNECT THE AC POWER CORD BEFORE PROCEEDING WITH ANY MAINTENANCE OR CLEANING.
Cleaning the LCD Panel
The LCD panel should not be toughed with sharp objects. If dust and fingerprints is on the LCD panel surface, wipe them off with a clean soft cloth.
Wipe in a straight motion from the center to the outside of the LCD panel.
Never use chemicals such as record cleaning sprays, antistatic sprays or fluids, benzene or thinner to clean the LCD panel.
Cleaning the Main Unit
Clean the outside of the unit with a clean soft cloth moistened with luke-warm water. Do not use benzene, thinner or alcohol since they will mar the fi nish of the surface.
TROUBLESHOOTING
Symptom
Possible cause
Corrective active
No Picture and sound.
Power cord is not correctly connected with the main unit. Connected the power cord with the main unit.
Power cord is not plugged into an AC outlet. Plug the power cord into an AC outlet.
The wrong input source is selected. Select a correct input source.
The input source is failed to connect with the TV. Make correct connections.
No sound only.
Volume control is set to minimum.
Press the VOL+ button to increase the volume.
The ☒ button on the remote control is pressed. Press the ☒ (or VOL+/-) button to release the volume.
An incorrect sound system mode is setted. Set a correct sound system from the main menu to match your TV.
Symptom
Possible cause
Corrective active
No picture only, or monochrome picture.
The color system setting doesn't match the program. Set the proper color system setting.
The sound system setting doesn't match the program. Set the proper sound system setting.
Interfered sound or picture.
Some equipment that brings interference is nearby the TV. Keep these things away from the TV.
Multi devices plug into the same one AC outlet collections. Plug the power cord into another AC outlet.
An incorrect sound system mode is setted.
Set a correct sound system from the main menu to match your TV.
Note:
A few bright dots and dark dots may appear on the TV screen, that is normal appearance.
SPECIFICATIONS
TF-L26B DVB-T
Display Features
Display Type LCD
Screen Size 26 inch
Aspect ratio 16:9
Active Area 575.8 (H) X 323.8 (V)
Panel Resolution 1366 (H) X 768 (V)
Brightness 450 ^2 cd/m
Contrast Ratio 800:1
Dot Pitch 0.1405 (H) X 0.4215 (V) mm
Maximum Color 16.7 M
Response Time 5 ms
Features
HD compatible 480I, 480P, 576I, 576P, 720P, 1080I, 1080P
Wall mounting VESA 100
TV Reception
TV System: PAL / SECAM
Sound System B/G, I, D/K, L/L'
Antenna Impedance: 75 Ohm
Tuner receiving range:
ATV 49MHz - 863MHz
DTV VHF (174MHz - 230MHz)
UHF (474MHz - 862MHz)
Power Requirements
Power Input 100-240V \~ 50/60 Hz
Power Consumption
Maximum < 100W
Connections
Input:
TV Tuner (RF 75Ω) 1
Component Video Input (Y Pb Pr) 1
Video Input (AV) 1
S-Video Input (S-VIDEO) 1
SCART 2
VGA Input (VGA) 1
PC audio Input (PC AUDIO) 1
HDMI input (HDMI) 2
USB port 1
Output:
Coaxial output jack (COAXIAL OUT) 1
VGA Resolutions Supported
up to 1360 x 768
Dimension(WxHxD)
Unit W/stand/speakers 662 x 497 x 232 mm
Unit W/O stand 662 x 454 x 113 mm
Weight(N.W.)
Unit W/stand/speakers 9.7 Kg
Environment
Operating Temperature 5°C-35°C
Operating Humidity 20%-80%
Note:
Specifications subject to change without notice.
natural_image
Abstract geometric design with overlapping planes and lines (no text or symbols)