
KAV 3002 - Coffee maker CLATRONIC - Free user manual and instructions
Find the device manual for free KAV 3002 CLATRONIC in PDF.

| Product Type | Coffee Maker |
| Brand | Clatronic |
| Model | KAV 3002 |
| Capacity | 1.25 L (approx. 10 cups) |
| Power Consumption | 1000 W |
| Voltage | 220-240 V, 50/60 Hz |
| Dimensions (W x H x D) | 25 x 30 x 20 cm |
| Weight | 1.5 kg |
| Functions | Brewing, Keep Warm, Auto Shut-off |
| Filter Type | Permanent filter (reusable) or paper filter #4 |
| Carafe Material | Glass |
| Housing Material | Plastic |
| Special Features | Anti-drip system, Water level indicator |
| Cleaning | Descaling recommended every 2-3 months |
| Safety Features | Overheat protection, Auto power-off |
| Spare Parts Available | Carafe, filter holder, permanent filter |
| Repairability | User-replaceable parts: filter, carafe; other repairs by service center |
Frequently Asked Questions - KAV 3002 CLATRONIC
User questions about KAV 3002 CLATRONIC
0 question about this device. Answer the ones you know or ask your own.
Ask a new question about this device
Download the instructions for your Coffee maker in PDF format for free! Find your manual KAV 3002 - CLATRONIC and take your electronic device back in hand. On this page are published all the documents necessary for the use of your device. KAV 3002 by CLATRONIC.
USER MANUAL KAV 3002 CLATRONIC
natural_image
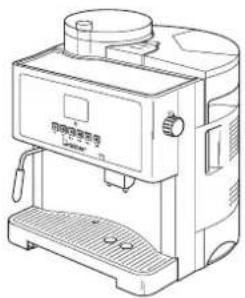
Line drawing of a coffee maker with control panel and side-mounted stand (no text or symbols)GB Fully Automated Coffee Machine
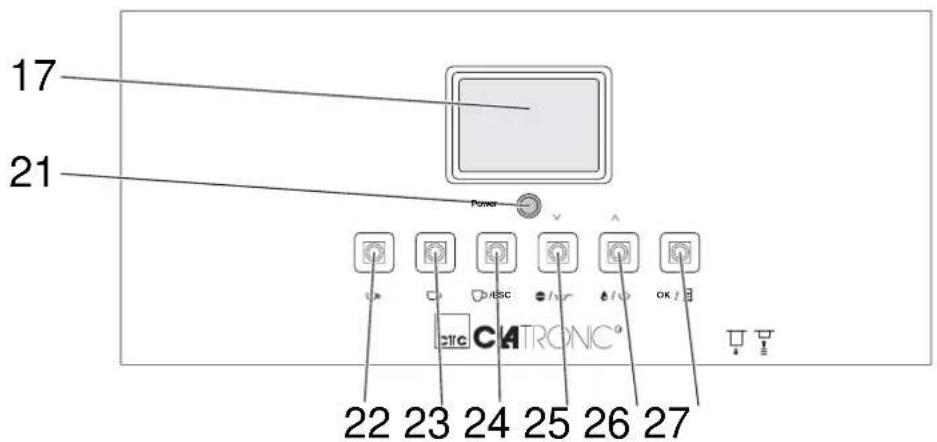
Abb. 1
natural_image
Line drawing of a coffee machine with lid and side ports (no text or symbols)Abb. 2
natural_image
Line drawing of a hand pouring granular material into a container (no text or symbols)natural_image
Line drawing of a refrigerator interior with ventilation slots and a labeled component (no text or symbols)Abb. 4
BEREIT ZUM KAFFEEBRUEH
Abb. 5
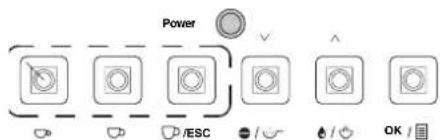
Abb. 6
natural_image
Line drawing of a kitchen appliance with a hand holding a tool, showing no text or symbols
Abb. 8
BEREIT ZUM KAFFEEBRUEH KAFFEEPULVER
Füllmenge ändern
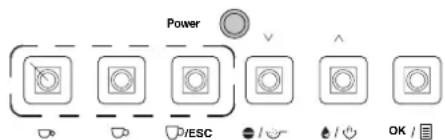
Abb. 9
1 kleine Tasse Kaffee .....
Abb. 10
natural_image
Line drawing of a hand using a pour-over machine to lift three cups (no text or symbols)Abb. 11
Abb. 12
natural_image
Line drawing of a hand pouring a cup into a machine with control buttons (no text or symbols)Abb. 13
⚠️ WARNING:
Abb. 14
WARNING:
Abb. 15
Abb. 16
⚠️ WARNING:
Abb. 17

WARNUNG:
natural_image
Line drawing of a coffee maker with a hand inserting a slot into the base (no text or symbols)Abb. 18
natural_image
Line drawing of a hand inserting a spring into a device panel, showing mechanical components and wiring (no text or symbols)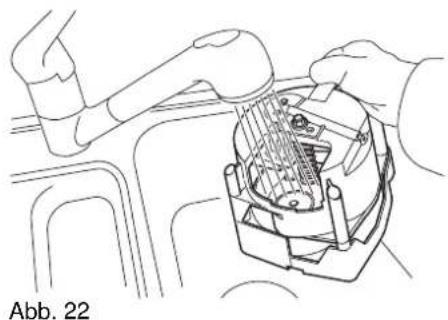
natural_image
Line drawing of a robotic arm interacting with a mechanical component (no text or symbols)Abb. 23
Abb. 24
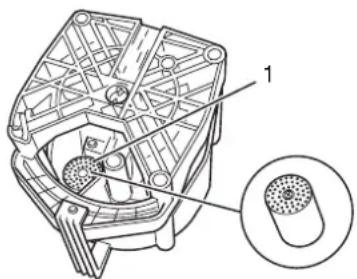
Abb. 25
Abb. 27
natural_image
Line drawing of a hand using a tool to press or install a cylindrical component (no text or symbols visible)Abb. 28
Machine parts/Scope of delivery
1 Filler opening for fresh coffee powder
2 Water tank flap
3 Water tank
4 Rotary knob for hotwater/steam
5 Service door
6 On/Off switch
7 Coffee dregs box
8 Mains plug
9 Adjuster for drive shaft
10 Measuring spoon with cleaningbrush
11 Kaffee outlet
12 Filling level indicator
13 Drip tray
14 Cup grille
15 Steam nozzle with foamingaid
16 Control panel
17 Display
18 Heated cup shelf
19 Coffee bean container
20 Cover for coffee bean container
21 Control display
22 "Small cup" button
23 "Medium cup" button
24 "Large cup" button
25 "Dispense coffee" button
26 "Steam mode" button
27 "Menu" button
Technical data
| Type of machine Fully Automated Coffee Machine | |
| Model | KAV 3002 |
| Voltage 230 V ~50 Hz | |
| Output 1300 W | |
| Water tank 1.4 l | |
| Coffee bean container approx. 250 g | |
| Coffee dregs box 0.5 l | |
| Dimensions(W x H x D) | 350 x 395 x 380 mm |
| Weight approx. 10kg | |

List of Contents
Safety instructions....39
Operating manual 39
Children 39
Power supply 39
Transport 39
Where to position the machine 39
Hot steam/hot water.... 40
Intended use.... 40
Defective....40
Setting up and connecting 40
Unpacking.... 40
Setting up.... 41
Starting up 41
Filling the water tank.... 41
Filling with coffee 41
Switching on 42
Switching off 42
Preparing the coffee....42
Flavour.... 42
Types of preparation.... 42
Self-cleaning function 42
Coffee from beans 43
Coffee from fresh coffee powder 43
Changing the fill quantity 44
Foaming up milk 44
Hot water 45
Changing the default settings....46
Using the menu.... 46
Overview....47
Changing the economy options 47
Changing the menu language.... 47
Changing the coffee output temperature 48
Changing the coffee amount.... 48
Changing the preinjection amount.... 48
Changing the prebrewing time.... 49
Setting the water hardness.... 49
Descaling....50
Displaying the number of cups prepared.... 51
Resetting the default factory settings.... 52
Setting the grinding level 52
Cleaning and maintenance....52
Cleaning the outside of the housing 52
Cleaning the water tank.... 53
Cleaning the coffee bean container.... 53
Cleaning the cup shelf 53
Cleaning/emptying the coffee dregs box 53
Cleaning/emptying the drip tray.... 54
Cleaning the brew unit.... 54
Releasing the brew unit 55
Cleaning the filters.... 55
Adjusting the drive shaft 56
Cleaning the filler opening for the fresh coffee powder 57
Cleaning the coffee outlet....57
Cleaning the hot water/steam nozzle.... 58
Descaling....58
Warning messages 58
Troubleshooting....59
Disposal 60
Warranty....60
After the expiry of the guarantee 60
Conformity declaration....60

Many thanks! We are pleased that you decided to purchase the Fully Automated
Coffee Machine KA-V3002!
We would like to wish you much joy with your machine and thank you for your purchase!
natural_image
Line drawing of a coffee machine with lid and side ports (no text or symbols)Symbols in this operating manual
Important instructions for your safety are especially marked. You must follow these instructions to avoid accidents and damage to the machine:
WARNING:
Warns against dangers to your health and indicates potential risks of injury.
ATTENTION:
Indicates potential hazards for the machine or other objects.
i NOTE:
Highlights tips and information for you.
We reserve the right to make technical and design-related changes in the course of ongoing product improvements.
© 2005 Clatronic International GmbH
Safety instructions
Operating manual Read this operating manual through carefully before using the machine.
Keep the manual safe. If you pass the machine on to a third party, give them the operating manual as well.
Non-compliance with this manual can lead to severe injuries or damage to the machine.
We assume no liability for damage caused as a result of non-compliance with this operating manual.
The machine may only be used in households for private use. It is not suitable for commercial use.
Children
Do not leave the machine unattended, and do not use it if children or persons who cannot assess the risk are nearby.
Children or persons who cannot assess the risks are not allowed to use the machine. Keep the machine inaccessible.
Packaging material must not be used to play with. There is a risk of suffocation.
Power supply
The machine is operated with electrical current, which means there is in principle a risk of electric shock. For this reason, pay particular attention to the following:
- Never touch the plug with wet hands.
If you want to pull the plug out of the plug socket, always pull directly on the plug. Never pull on the cable as it could tear.
Make sure that the power cable is not bent, caught or run over and that it does not come into contact with heat sources.
■ Make sure that the power cable is not wound around the machine while it is being operated. - Never place the machine on the power cable while it is being operated.
Only use extension cables that are designed for the power consumption level of the machine.
Never submerse the machine in water or other liquids. Make sure that only the water tank, the drip tray and the coffee dregs box for the water tank come into contact with water. Keep the other parts of the machine away from rain and moisture.
Only operate the machine if the electrical voltage stated on the type plate beneath the machine agrees with the voltage on your plug socket. The wrong voltage can destroy the machine.
Transport
Always hold the machine by the housing and never by the water tank.
- Never move the machine when it is in operation.
Where to position the machine
Safe operation of the machine presupposes that the machine is positioned in an appropriate place. Therefore observe the following:
- Protect the machine against the influence of weather. Never use it in the open-air.
- Protect the machine against moisture.
- Protect the machine against frost. The residual water in the

machine could freeze and damage the machine.
Never place the machine on or in direct proximity to heat sources, such as e.g. hobs, ovens, etc.
Do not place the machine in direct sunlight.
The machine must be at least 10 cm away from walls and objects.
Hot steam/hot water
The machine creates hot steam and/or hot water with a temperature of up to 100 °C to foam up milk or to prepare hot water. Hot steam causes various risks. Therefore:
Place a container under the hot water/steam nozzle.
- Never direct the hot water/steam jet at persons or animals. There is a risk of scalding.
Do not direct the hot water/steam jet at electrical appliances, sockets, etc. There is a risk of electric shock.
The steam nozzle is hot when being operated. Avoid touching the steam nozzle.
Intended use
The fully automated coffee machine is exclusively determined for the following tasks:
Preparing coffee/espresso
Preparing hot water
■ Foaming up milk with hot steam.
Any other use is considered non-intended use and is prohibited. Filling the water tank with liquids such as e.g. milk or mineral water is particularly prohibited.
Defective If the machine should become defective at some point:
If the mains connection line for this machine is damaged, it must be replaced by the manufacturer or his customer services or a similarly qualified person in order to avoid hazards.
Never operate a defective machine or a machine with a defective cable. There is a substantial risk of injury.
Setting up and connecting
Unpacking Unpack the machine and all accessories and check that the contents are complete.
ATTENTION:
Always transport/send the machine in its original packaging so that it is not damaged. Keep the packaging for this purpose. Dispose of unnecessary packing material in accordance with the regulations applicable in your country.
i NOTE:
Get in touch with your dealer straightaway if you notice damage caused by transport.
Setting up
- Set the machine on a stable, heat resistant, horizontal and even surface. Keep a distance of at least 10 cm from walls and objects.
- Remove the water tank (Fig. 1/3) from the machine and rinse it with clear water.
- Put the water tank back onto the machine.
- Connect the machine to an earthed socket.
Starting up
Filling the water tank

Fig. 2
In order to use the machine, the water tank must be filled first. The machine does not work if there is too little or no water in the tank.
- Remove the water tank (Fig. 1/3) from the machine.
- Open the flap (Fig. 2/1).
- Fill the water tank with fresh, cold water. Fill the water tank at the most to the "Max" mark (Fig. 2).
ATTENTION:
Only fill the water tank with cold water. Never fill the water tank with other liquids, such as e.g. milk or mineral water. Empty the water tank daily and fill it up with fresh water.
i NOTE:
Your coffee will taste better if you use water containing as little lime as possible. Furthermore, water deficient in lime means fewer lime deposits in the machine.
- Put the water tank back onto the machine.
Filling with coffee
natural_image
Line drawing of hands pouring liquid into a container (no text or symbols)Fig. 3
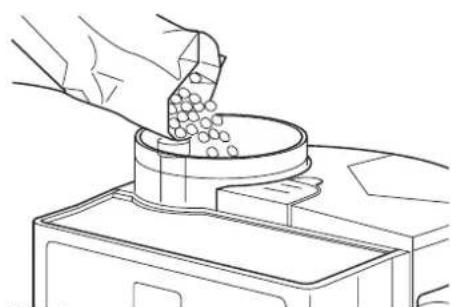
- Remove the cover on the coffee bean container (Fig. 1/20).
- Fill the container (Fig. 3) with coffee beans.
- Close the coffee bean container again.
ATTENTION:
In order to avoid damage to the machine: only fill the coffee bean container with coffee beans.
Make sure that the coffee does not contain any impurities, such as small stones, etc. These can destroy the grinding gear.
i NOTE:
Any water that appears in the lower area of the machine or brew unit is due to the design and is not a fault. This is residual or condensation water.

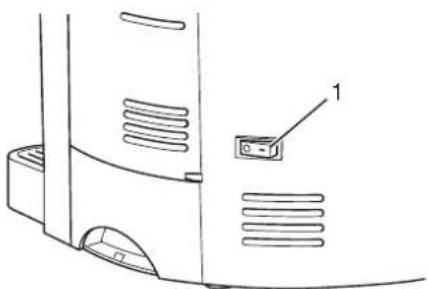
Switching on Before switching it on each time, check whether there is enough
water in the water tank. The machine does not work if there is too little water in the tank.
Switch the machine on at the on/off switch (Fig. 4/1).
natural_image
Technical line drawing of a refrigerator with ventilation grilles and a labeled component (no text or symbols)Fig. 4
READY TO BREW COFFEE
The machine now carries out a self-test. At the same time, any existing residual water is rinsed from the machine.
The machine is ready to start when the message "Ready to brew coffee" appears in the display.
Switching off
Switch the machine off at the on/off switch (Fig. 4/1).
i NOTE:
If the machine is not operated for a longer period of time, empty and clean the water tank, the drip tray and the coffee dregs box. Clean the brew unit.
Preparing the coffee
Flavour
The flavour of your coffee depends on various factors, like for example the grinding level, the coffee roast, etc.
For this reason, try out different types of coffee. The degrees of roasting and therefore also the flavour are very different. Change the grinding level. Use soft water. Vary the filling height of the cups.
For the best results, we recommend an espresso roast.
Types of preparation
You can choose between two different types of preparation. You can prepare coffee from beans or from fresh coffee powder.
You usually achieve the best flavour by preparing coffee from beans. In spite of that, it is useful to be able to prepare coffee from fresh coffee powder, particularly if you want to drink a different type of coffee (e.g. decaffinated coffee).
Self-cleaning function
The machine automatically self-cleans after preparing 10 cups.
MACHINE IS RINSING
You will see the message "Machine is rinsing".
If necessary, empty the drip tray and the coffee dregs box.
Coffee from beans
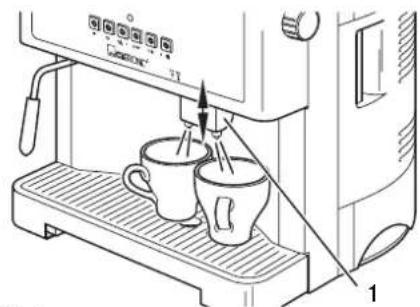
Fig. 5

Fig. 6
- Place the coffee outlet at the correct height (Fig. 5/1). Push it up or pull it down.
-
Place one or two cups under the coffee outlet (Fig. 5).
-
Press the corresponding button (Fig. 6), depending on whether you want to brew a small, medium or large cup of coffee. Two cups: Press the corresponding button twice if you want to prepare two cups of coffee.
ATTENTION:
In order to avoid damage to the machine: Never switch the machine off while it is producing coffee as the brew unit can block.
i NOTE:
You can interrupt the brewing procedure if you press the button just pressed for a second time while it is brewing.
Coffee from fresh coffee powder

natural_image
Line drawing of a kitchen appliance with a hand holding a tool, no text or symbols presentFig. 7
If you would like to prepare coffee from fresh coffee powder, then you can only brew one cup of coffee at a time.
- Place the coffee outlet at the correct height (Fig. 5/1). Push it up or pull it down.
- Place a cup under the coffee outlet.
- Remove the cover (Fig. 1/1) from the filler opening for the fresh coffee powder.
- Using at most a level measuring spoon of fresh coffee powder, fill the filler opening with fresh coffee powder (Fig. 7). The filler funnel is not a storage container, the fresh coffee powder is used immediately.
ATTENTION:
In order to avoid damage to the machine: Fill the filler opening for fresh coffee powder only with fresh coffee powder, under no circumstances fill it with beans or instant coffee. Never switch the machine off while it is producing coffee as the brew unit can block.
- Replace the cover on the filler opening.
- Press the "Dispense coffee" button (Fig. 8), to activate the "Coffee from powder" option. "Ready to brew coffee, coffee powder" appears in the display.
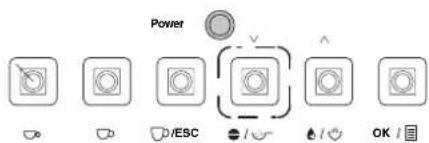
Fig. 8
READY TO BREW COFFEE COFFEE POWDER
Changing the fill quantity
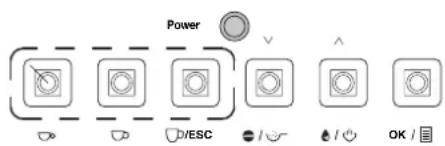
Fig. 9
1 small cup of coffee .....
- Press the corresponding button (Fig. 6), depending on whether you want to brew a small, medium or large cup of coffee.
i NOTE:
You can interrupt the brewing procedure if you press this key a second time while it is brewing.
- Press the "Dispense coffee" button (Fig. 8) again, to deactivate the "Coffee from powder" option.
You can change the default cup fill quantity and adapt it to the size of the cups you use.
Proceed as follows:
-
Keep the "Small cup", "Medium cup" or "Large cup" button (Fig. 9) pressed until the fill quantity is shown in the display by dots. Now release the button.
-
Once the desired fill quantity has been achieved, press the previously selected button once again. The fill quantity will be symbolized by dots in the display (maximum of 10). The selected fill quantity is now saved as a default value for the corresponding button.
Foaming up milk
Fig. 10
Milk can be heated and foamed up using steam. Since a higher temperature is required for this, the machine has a special steam mode.
WARNING:
Danger of scalding: Any hot steam escaping can lead to injuries. Therefore, only activate the steam mode if the steam nozzle is already submersed in milk! Start the steam mode after producing hot water; hot water/steam can exit the steam nozzle for a short period!
READY TO USE STEAM
natural_image
Line drawing of a hand using a pour-over machine to prevent another cup and two cups (no text or symbols)Fig. 11
- Swing the steam nozzle outwards so that the nozzle can be inserted easily into a container.
- Press the "Steam mode" (Fig. 10) button.
After a warm-up phase, "Ready to use steam" appears in the display. - Fill a deep container to approx. 1/3 full with cold milk.
Use low-fat milk if you want to produce the stiffest foam possible. - Hold the container under the steam nozzle. Submerse the steam nozzle in the milk. Avoid touching the base of the container with the nozzle so the steam output is not obstructed.
WARNING:
Danger of scalding from hot milk spraying out: Hold the container under the steam nozzle until the steam production is completely finished.
Fig. 12
- Turn the rotary knob "Hot water/steam" to the left (Fig. 12/1). The milk is now foamed up.
The further you turn the rotary knob to the left, the more steam will be produced.
Move the container up and down slightly while it is foaming up to achieve an even foam production.
- Turn the rotary knob "Hot water/steam" to the right (Fig. 12/2) to finish the foaming process.
READY TO BREW COFFEE
- Press the "Steam mode" button (Fig. 10) to finish the steam mode. After a brief wait, "Ready to brew" appears in the display.
i NOTE:
After foaming up, rinse the steam nozzle by briefly starting the hot water production option (see Page 45, "Hot water"). When doing this, hold a container under the steam nozzle! Clean the entire steam nozzle regularly Page 58, "Cleaning the hot water/steam nozzle".
Hot water You can also produce hot water with the machine for preparing e.g.
tea. To do this, proceed as follows:
natural_image
Line drawing of a hand pouring a cup into a coffee machine (no text or symbols visible)Fig. 13
WARNING:
Danger of scalding: Any hot water escaping can lead to injuries. For this reason, only activate the hot water/steam nozzle if it is already submersed in the container.
- Swing the steam nozzle outwards so that the nozzle can be inserted easily into a container.
- Hold a cup or something similar under the steam nozzle (Fig. 13).
READY TO BREW COFFEE
- Make sure that normal mode is set not steam mode. If necessary, press the "Steam mode" button (Fig. 10) to change mode.
You will recognize the normal mode with the message "Ready to brew coffee".
Fig. 14
WARNING:
Danger of scalding from hot water spraying out: Hold the container under the hot water/steam nozzle until the water production is completely finished.
- Turn the rotary knob "Hot water/steam" to the left (Fig. 14/1). Hot water is prepared.
At the same time, the message "Hot water preparation" is displayed.
HOT WATER PREPARATION
- Turn the rotary knob "Hot water/steam" to the right (Fig. 14/2) to finish the hot water tapping process.
Changing the default settings
With the exception of the grinding level, all default settings can be easily managed using the menu.
Using the menu
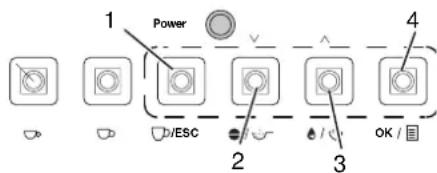
Fig. 15
The menu is operated using four buttons (Fig. 15).
1 "ESC" button: Leave menu point.
2 "▽" button: Select next menu point or reduce a value.
3 "△" button: Select previous menu point or increase a value.
4 "OK" button: Select menu point
Example of using the menu
The following example shows how the brewing temperature is increased.
To do this, proceed as follows:
ECONOMY MODE LANGUAGE TEMPERATURE
- Press the "OK" button to start the menu mode.
- You now see the menu points "Economy mode, Language, Temperature".
- The currently marked menu point is distinguished by the initial letter flashing (in this case: "Economy mode").
- You can select other menu points using the "▽" or "△" buttons.
ECONOMY MODE LANGUAGE TEMPERATURE
- Press the "▽" button twice. Now the menu point "Temperature" should be marked.
LOW MEDIUM HIGH
- Press the "OK" button to select the menu point "Temperature".
- You now see the options belonging to the menu point "Temperature" - "Low, Medium, High".
LOW MEDIUM HIGH
- Press the "▽" button twice to select the "High" option.
LOW MEDIUM HIGH ×
- Press the "OK" button to select the option "High".
- The currently activated option is marked with an attached "*" (in this case: "High").
- Press the "ESC" button twice to leave the menu.
i NOTE:
Changes to the default settings (like to the temperature in the example above) only become effective after brewing approx. 4 cups.
Overview You will find the following entries in the main menu
Economy mode
Language
Temperature
Coffee amount
Preinjection
Prebrewing time
Water hardness
Descaling
Cup number
Default
You will find information about using these menu commands in the following sections.
Changing the economy options
The machine has an economy mode. This is started after a certain period of time (default setting: 1 hour).
You can change this period of time in 15 minute increments in the "Economy mode" menu point. The maximum value is 12 hours, the minimum value is 0 minutes.
Select the minimum value of 0 minutes to switch off the economy mode.
Menu overview
| Sub-menu |
| Time |
| On |
TIME
1:00
Changing the menu language
Use
Select the sub-menu command "Time", to redetermine the time period after which the economy mode should be started.
- The time is shown in hours/minutes (in this case: 1 hour).
- Reduce or increase the value with the "▽" button or the "△" button.
- Save the entry with the "OK" button.
Select the sub-menu command "On" to start the economy mode immediately.
Select the "Language" menu point to adjust the menu language.
Menu overview
| Sub-menu |
| Deutsch |
| English |
| Italiano |
| Dutch |
| Espanol |
| Polish |

Use
- Select the desired language and confirm your entry with the "OK" button.
Changing the coffee output temperature
The output temperature has a decisive influence on the flavour of the coffee.
Brew the coffee with a lower temperature if you want the coffee to be a bit acidic and less bitter.
In contrast, brew it with a higher temperature if it should be a bit stronger/more bitter.
Select the "Temperature" menu point to adjust the coffee output temperature.
Menu overview
| Sub-menu |
| Minimum |
| Low |
| Medium |
| High |
| Maximum |
Use
- Select the desired temperature and confirm your entry with the "OK" button.
Changing the coffee amount
Using the "Coffee amount" menu point, change the fresh coffee powder amounts which are used when you press the "Small cup", "Medium cup" or "Large cup" buttons.
Overview
| Sub-menu Options | |
| Small cup Low | |
| Medium | |
| High | |
| Medium cup Low | |
| Medium | |
| High | |
| Large cup Low | |
| Medium | |
| High | |
Use
Branch off into the desired sub-menu, e.g. "Small cup".
- Select the desired option and confirm your entry with the "OK" button.
Changing the preinjection amount
Before brewing, the fresh coffee powder is slightly moistened and swells up. See also ▷Chapter, "Changing the prebrewing time". This means the aroma can develop better. Experiment with this setting to find the optimum value for you.
Menu overview
| Sub-menu Options | |
| Small cup Low | |
| Medium | |
| High | |
| Medium cup Low | |
| Medium | |
| High | |
| Large cup Low | |
| Medium | |
| High | |

Use
Branch off into the desired sub-menu, e.g. "Small cup".
Select the desired option and confirm your entry with the "OK" button.
Changing the prebrewing time
The prebrewing time states how long the slightly moistened fresh coffee powder can swell for. See also: ▷ Chapter, "Changing the preinjection amount". Experiment with this setting to find the optimum value for you.
Menu overview
| Sub-menu Options | |
| Small cup Low | |
| Medium | |
| High | |
| Medium cup Low | |
| Medium | |
| High | |
| Large cup Low | |
| Medium | |
| High | |
Use
Branch off into the desired sub-menu, e.g. "Small cup".
- Select the desired option and confirm your entry with the "OK" button.
Setting the water hardness
The time for descaling is determined automatically based on the preset water hardness.
ATTENTION:
In order to avoid damage to the machine from descaling: Make sure that the water hardness setting is adjusted correspondingly to your drinking water.
Use
WATER HARDN. HARDNESS 3
Select the menu command "Hardness" to define the water hardness.
- The water hardness can be entered in four levels. The preset value is "3".
- Reduce or increase the value with the "▽" button or the "△" button.
- Save the entry with the "OK" button.
The correct setting for the water hardness can be determined with the following table. You can get information about the level of hardness or hardness area for your drinking water from your water supplier.
| Hardness (setting) | Hardness area | Hardness |
| 1 (soft) I 1-7 °dH | ||
| 2 (medium) II 8-14 °dH | ||
| 3 (hard) III 15-21 °dH | ||
| 4 (very hard) IV >21 °dH |
Descaling Lime deposits endanger the functioning capacity of the machine.
Therefore, it is necessary to descale the machine regularly.
This is easy using the "Descaling" menu point.
WARNING:
Health risk from deliming agent: You must take into account the safety instructions from the manufacturer of the deliming agent.
ATTENTION:
In order to avoid damage to the machine: Under no circumstances use vinegar for descaling. Use a commercial deliming agent based on citric acid.
If "Descaling" appears in the display then the machine must be descaled.
i NOTE:
Since the message depends on the preset water hardness, it is important that the water hardness is set correctly Page 49, "Setting the water hardness".
Start descaling
- Select the menu command "Descaling".
You will find the following information in the sub-menu:
- On: Start descaling
- Percent: How much of the recommended amount of water has already been used since the last descaling? If the value 100% is displayed then the machine must be descaled.
-
Processes: How many descaling processes have already been carried out.
-
Select the sub-menu command "On" to start the descaling. The message "Ready for descaling" is displayed.
-
Place a large container under the steam outlet opening (minimum volume of 1 litre).
DESCALING ON PERCENT 100% PROCESSES 2
READY FOR DESCALING
DESCALING PROCESS PLEASE WAIT
FILL UP WATER TANK PLEASE WAIT 4S
MACHINE IS RINSING PLEASE WAIT
FILL UP WATER TANK
READY TO BREW COFFEE
Displaying the number of cups prepared
NO. OF CUPS S. CUP 184 M. CUP 745 L. CUP 564
WARNING:
Danger of scalding from hot water spraying out: Hold a sufficiently large container under the hot water/steam nozzle until the descaling process is completely finished. Start the steam mode after descaling; hot water/steam can exit the steam nozzle for a short period!
- Fill the water tank with a deliming agent and at least one litre of water (Fig. 2).
Dose the delimining agent according to the instructions. - Turn the rotary knob "Hot water/steam" to the left (Fig. 14/1). Automatic descaling is now started.
The message "Descaling process please wait" is shown.
i NOTE:
Descaling runs at intervals until the tank is empty. Pauses between pump processes are normal and are used to allow the deliming agent to work for longer.
- If the water tank is empty, then the message "Fill up water tank, please wait" appears.
i NOTE:
This message appears for 900 seconds. During these 15 minutes, you can carry out work steps 6 to 8. Descaling is continued at the end of the 15 minutes.
- Rinse the water tank thoroughly with clear, cold water.
- Fill the water tank with fresh, cold water.
- Empty the container with the used deliming solution.
- Place the container back under the steam outlet opening.
-
Put the water tank back onto the machine. You will see the message "Machine is rinsing, please wait".
-
The rinsing process is finished when the message "Fill up water tank" appears. Fill the water tank with fresh, cold water.
- Empty the container with the rinse water.
- Turn the rotary knob "Hot water/steam" to the right (Fig. 14/2).
Once the automatic descaling process is finished, the message "Ready to brew coffee" will appear.
Using the menu command "No. of cups", you can display the total number of cups prepared up to now.
The display appears sorted according to small, medium and large cups.

Resetting the default factory settings
Setting the grinding level
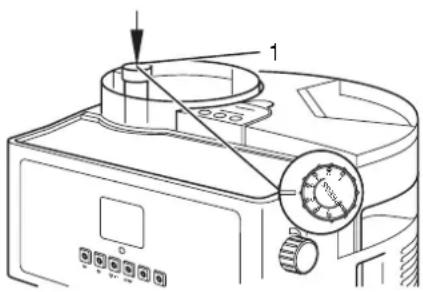
Fig. 16
Reset the default factory settings using the menu command "Default".
Any changes you have made will be lost.
WARNING:
Danger of injury: Never reach into the grinding gear!
The grinding level setting determines how fine or coarse the coffee is to be ground. The grinding level is set at the factory in such a way that optimal results are achieved for most types of coffee.
However, the grinding level should be adjusted in the following cases:
Coffee output is too slow: Too many bitter constituents are released. The coffee tastes bitter. Choose a coarser grinding level.
No/little froth: Coffee output is too fast. Because of the quick throughput time, the coffee does not release all its aromas. The coffee is tasteless.
Choose a finer grinding level.
Change the grinding level as follows:
- Remove the cover on the coffee bean container (Fig. 1/20).
- Press the rotary knob down. Change the grinding level by carefully turning the rotary knob (Fig. 16/1).
- Turn the rotary knob to the right (in the direction of Position 1) to achieve a finer grinding level.
- Turn the rotary knob to the left (in the direction of Position 8) to achieve a coarser grinding level.
- If the rotary knob cannot be turned easily: briefly turn on the coffee production and adjust the rotary knob at the same time. The rotary knob should now turn easily.
Cleaning and maintenance
Always keep the machine clean to achieve a consistently good coffee quality and fault-free functioning.
WARNING:
Danger of injury: Before cleaning the machine, turn the machine off and remove the mains plug. Wait until the machine and accessories have cooled down.
WARNING:
Danger of electric shock:
Never dismantle the machine! Do not carry out any work on the insides of the machine!
Do not allow any moisture to enter the housing!
Never put the machine in a dishwasher!
Never submerse the machine in water or other liquids!
Cleaning the outside of the housing
Only ever clean the housing with a slightly damp cloth. Do not use any cleaning agents, abrasives or alcohol as these can damage the housing.
Cleaning the water tank
You can turn the housing easily due to the rotary plate integrated into the base area.
- Remove the water tank (Fig. 1/3) from the machine.
- Rinse the water tank with clear, cold water.
- Replace the water tank.
Cleaning the coffee bean container
- Remove the coffee bean container cover (Fig. 1/20) from the machine.
- Clean the empty coffee bean container (Fig. 1/19) with the brush supplied (Fig. 1/10).
ATTENTION:
In order to avoid damage to the grinding gear: Never use water or other liquids to clean the container!
Cleaning the cup shelf
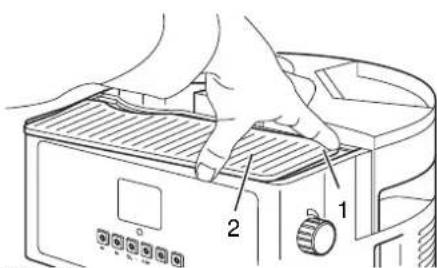
Fig. 17
WARNING:
Danger of burning: Switch the machine off and allow it to cool before cleaning the cup shelf.
- Press the rear right corner of the cup shelf (Fig. 17/1) down. You can now remove the cup shelf.
- Clean the cup shelf with clear water.
- Put the cup shelf back into position again.
ATTENTION:
In order to avoid damage to the machine: Never carry out a damp-clean of the cup shelf while it is still on the machine!
Cleaning/emptying the coffee dregs box
Clean the coffee dregs box daily, but at latest if it is full or the message "Empty dregs box" appears. This will prevent mould forming.
i NOTE:
The message "Empty dregs box" appears after 10 brewing processes. The message will disappear after the dregs box has been outside of the housing for at least 10 seconds.
natural_image
Line drawing of a coffee machine with a hand inserting a container into it (no text or symbols)Fig. 18
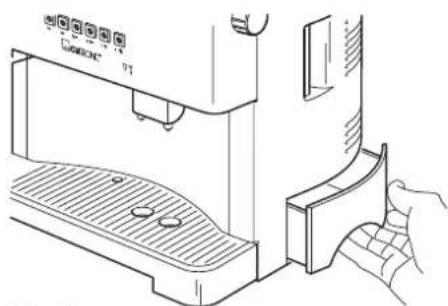
- Pull the coffee dregs box out of the machine (Fig. 18).
- Remove the coffee dregs.
- Clean the coffee dregs box with clear water.
- Replace the water tank.

Cleaning/emptying the drip tray

Fig. 19
Clean the drip tray daily, but at the latest when it is full. This will be apparent by the red level indicator (Fig. 19/1) jutting up out of the cup grille (Fig. 19/2).
- Pull the drip tray out of the machine (Fig. 19).
- Remove the cup grille (Fig. 19/2).
- Empty the drip tray and clean it with clear water.
- Place the cup grille back on the drip tray.
- Replace the drip tray.
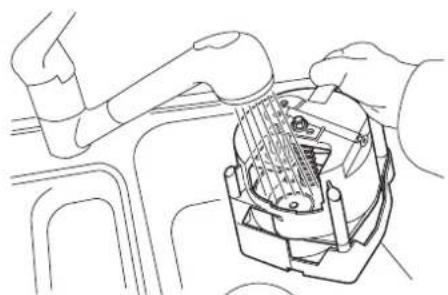
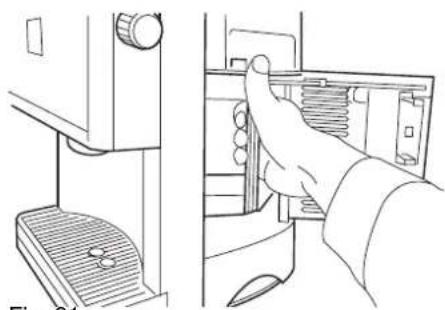
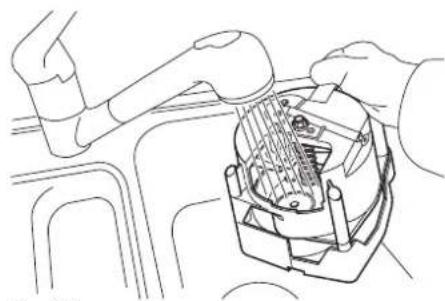
Cleaning the brew unit
Clean the brew unit regularly, at least once a week. This will help you to achieve a consistently good coffee quality and also to prevent mould forming.
Fig. 20
WARNING:
Danger of scalding: Switch the machine off and allow it to cool before cleaning the brew unit.
- Open the service door. To do this, pull on the handle (Fig. 20/1).
natural_image
Line drawing of a hand inserting a spring into a door panel (no text or symbols)Fig. 21
- Lift the brew unit slightly and pull it carefully out of the machine using the handle (Fig. 21).
i NOTE:
If the brew unit cannot be removed easily, try the following: Close the service door and switch the machine off and on again. If the problem is not rectified by this: carry out the menu point "Release brew unit" Page 55, "Releasing the brew unit".
natural_image
Line drawing of a robotic arm interacting with a mechanical device (no text or symbols present)Fig. 22
- Rinse the brew unit thoroughly with warm water (Fig. 22).
- Allow the brew unit to dry.
- Clean the service compartment with a soft, damp cloth.
- Push the brew unit back into the service compartment until it clicks into place.
Releasing the brew unit
Fig. 23
ATTENTION RELEASE UNIT
Cleaning the filters
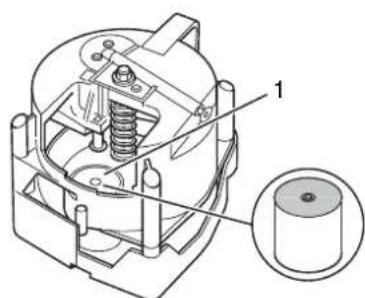
Fig. 24
- Close the service door.
i NOTE:
If the service door cannot be closed easily, then the brew unit has not been correctly inserted.
Check the position of the brew unit. If the problem continues, then probably the coupling of the drive shaft has not clicked into place correctly. Proceed as described on Page 56, "Adjusting the drive shaft".
In some cases, you may be unable to pull the brew unit out of the service compartment.
This can happen if you switch off the machine while it is producing coffee. In this case, it is possible that the starting position of the brew unit does not agree with the starting position of the drive shaft.
Proceed as follows to release the brew unit:
- Switch the machine off.
- Remove the coffee dregs box Page 53, "Cleaning/emptying the coffee dregs box".
-
Keep the "Medium cup" button (Fig. 23) pressed and switch on the machine at the same time.
-
Keep the "Medium cup" button pressed. After a few seconds, the message "Attention release unit" appears.
-
Keep the "Medium cup" button pressed until the message disappears.
-
You should now be able to remove the brew unit.
-
If this is not the case, then carry out the procedure another two times.
-
Now adjust the drive shaft Page 56, "Adjusting the drive shaft".
-
Switch off the machine and then switch it on again.
i NOTE:
Get in contact with customer services if you still cannot remove the brew unit.
If after a period of time the coffee output has become slow or no coffee is dispensed at all, then the filters are probably blocked. Clean the filters as follows:
- Remove the brew unit from the machine Page 54, "Cleaning the brew unit"/Points 1-3.
- If necessary: Turn the lower filter holder (Fig. 24/1) to a position in which you can reach it easily.
- Clean the lower filter (Fig. 24/1) with the brush supplied (Fig. 1/10).
- Turn the brew unit around and clean the upper filter (Fig. 25/1) with the brush.
- Place the brew unit back into the machine Page 54, "Cleaning the brew unit"/Points 5-7.

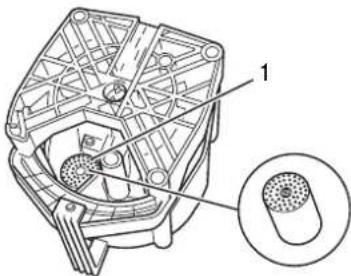
Fig. 25
Adjusting the drive shaft
If it is not possible to clean the filters sufficiently using the aforementioned procedure, then it would be a good idea to dismantle the filters:
- Release the filters with a crosshead screwdriver.
- Take the filters out of their holders.
- Hold the filters against the light. Now you will see which filter holes are blocked.
- Clean the blocked holes carefully using the tip of a needle.
- Place the filters back into the holders.
- Tighten the screws again carefully.
If the brew unit cannot be inserted correctly, then the coupling of the drive shaft has probably not clicked into place correctly.
Proceed as follows:
WARNING:
Danger of injury: Before adjusting the drive shaft, turn the machine off and remove the mains plug. Wait until the machine and accessories have cooled down.
- Remove the brew unit from the machine Page 54, "Cleaning the brew unit"/Points 1-2.
- Close the service door (Fig. 20/1).
- Connect the machine to an earthed socket again.
- Switch the machine off and on again. Now re-adjust the drive shaft. This process lasts about 20 seconds.
- You now see the message "Warning, insert brew unit".
- Place the brew unit back into the machine Page 54, "Cleaning the brew unit"/Points 6-7.
- As long as the brew unit can be replaced easily: Switch the machine on. It is now ready to start.
WARNING INSERT BREW UNIT
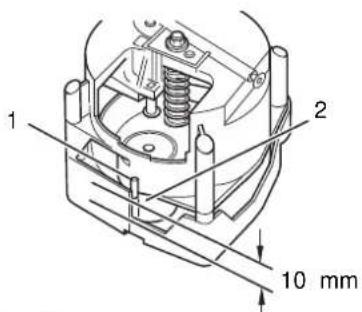
Fig. 26
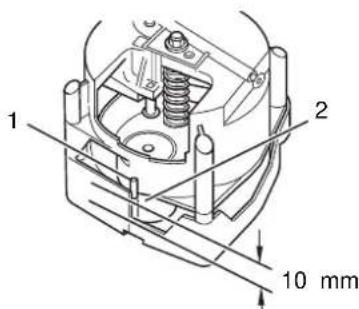
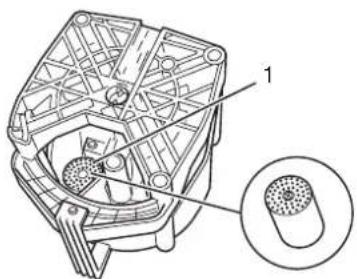
Adjust filter holder in brew unit
If the brew unit can still not be inserted, the position of the filter holder in the brew unit must be checked and if necessary adjusted.
- Switch the machine off.
- Remove the brew unit from the machine Page 54, "Cleaning the brew unit"/Points 1-2.
- Check the starting position of the brew unit. The guide pin on the filter holder (Fig. 26/1) should be approx. 10 mm away from the lower limit when in the starting position (Fig. 26/2). The distance must be altered if it is too small or too large.
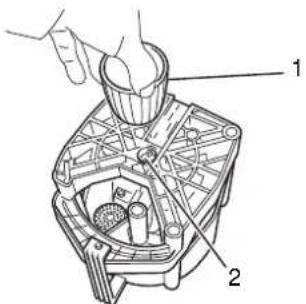
Fig. 27
Cleaning the filler opening for the fresh coffee powder
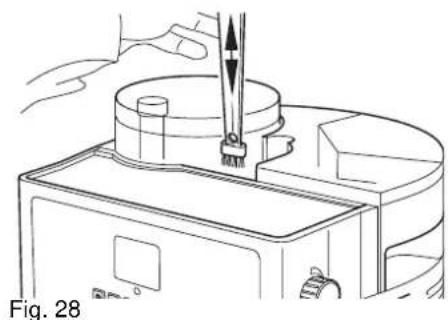
natural_image
Line drawing of a mechanical device with a tool inserted, labeled Fig. 28 (no text or symbols on the diagram itself)Cleaning the coffee outlet

- To do this, turn the brew unit on its head (Fig. 27).
- Place the upper part of the adjuster (Fig. 27/1) on the spindle coupling (Fig. 27/2) on the base of the brew unit.
- Turn the spindle until the distance is approx. 10 mm. When doing this, make sure that the filter holder remains in the starting position (Fig. 26/1).
- Place the brew unit back into the machine Page 54, "Cleaning the brew unit"/Points 6-7.
The brew unit should be inserted easily and the service door can be closed without problem. If this is not the case: Carry out Steps 2 to 6 once again.
- Remove the brew unit from the machine Page 54, "Cleaning the brew unit"/Points 1-2.
- Remove the cover (Fig. 1/1) from the filler opening for the fresh coffee powder.
- Clean the filler opening with the brush supplied (Fig. 1/10).
- Replace the cover on the filler opening.
- Remove any coffee residue from the service compartment before you insert the brew unit again.
- Place the brew unit back into the machine Page 54, "Cleaning the brew unit"/Points 6-7.
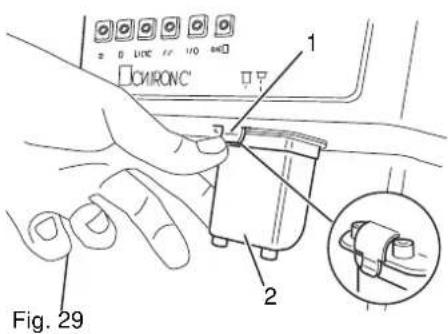
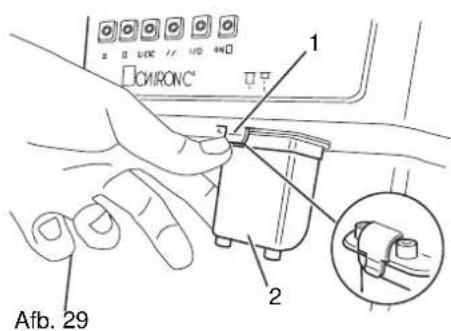
Clean the coffee outlet if you intend not to use the machine for a longer period of time.
WARNING:
Danger of scalding: Switch the machine off and allow it to cool before cleaning the coffee outlet.
- Remove the brew unit from the machine Page 54, "Cleaning the brew unit"/Points 1-2.
- Push the coffee outlet up as far as possible (Fig. 5/1).
-
Press the clip (Fig. 29/1) to release the lock.
-
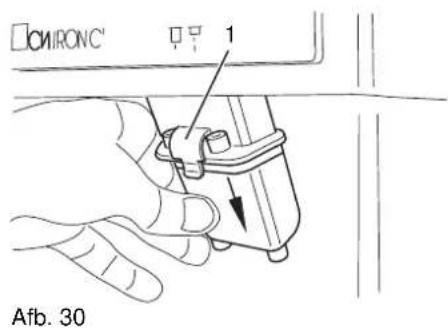
Press the coffee outlet backwards and at the same time pull it down out of the machine.
- Rinse the coffee outlet with hot water.
- Put the coffee outlet back into the machine. Make sure that the clip clicks into place again.
- Place the brew unit back into the machine Page 54, "Cleaning the brew unit"/Points 6-7.

Cleaning the hot water/steam nozzle
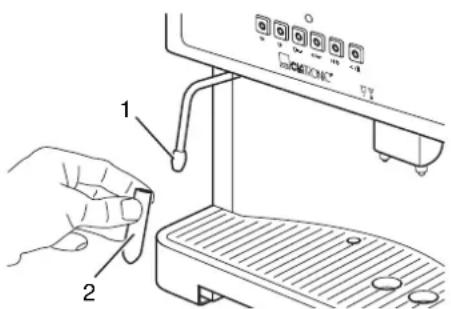
Fig. 31
Descaling
Clean the hot water/steam nozzle daily.
WARNING:
Danger of scalding: Switch the machine off and allow it to cool before cleaning the steam nozzle.
- Remove the steam nozzle (Fig. 31/2) and clean it with warm water.
- If the steam pipe is blocked poke carefully from below into the tip of the pipe (Fig. 31/1) with a needle.
- Clean the steam pipe with a damp cloth.
- Place the steam nozzle back onto the steam pipe.
See Page 50, "Descaling".
Warning messages
The following warning messages can appear on the display:
| Warning message | Possible cause Solution | |
| Blocked brew unit | The brew unit has not been inserted correctly. | Reinsert the brew unit ⇒ Page 55, "Releasing the brew unit".If the warning message still appears after cleaning, get in touch with customer services. |
| Insert brew unit | Brew unit not inserted | Insert the brew unit ⇒ Page 55, "Releasing the brew unit". |
| Dregs box is missing | Dregs box not inserted | Insert the dregs box ⇒ Page 53,"Cleaning/emptying the coffee dregs box". |
| Fill up water tank | Water tank is empty | Fill up the water tank ⇒ Page 41, "Filling the water tank". |
| Empty dregs box | Dregs box is full. Empty the dregs box | ⇒ Page 53,"Cleaning/emptying the coffee dregs box".The dregs box must be outside of the machine for at least 10 seconds for the warning message to stop. |
| Water flow error | Filter is blocked | Clean the filter ⇒ Page 55, "Cleaning the filters".If the warning message still appears after cleaning, get in touch with customer services. |
| Data loss Internal error | Switch the machine off and then on | again. |
| Descaling | Machine is scaled | Descale the machine ⇒ Page 50, "Descaling". |
Troubleshooting
Before sending the machine to the Customer Services, use the following table to check whether you can rectify the fault yourself.
WARNING:
Before troubleshooting, turn the machine off and remove the mains plug. Wait until the machine and accessories have cooled down. Never use a defective machine.
| Fault Possible cause Solution | ||
| The machine does not turn on when the mains switch is operated | No power supply Put the mains plug in | in correctly, if necessary, check the socket is working with another machine. |
| Service door is open Close the service | door (Fig. 1/6). | |
| The brewing process does not start | Coffee dregs box not correctly inserted | Insert the coffee dregs box correctly ▷Chapter , "Cleaning/emptying the coffee dregs box". |
| Water tank is empty | Fill up the water tank ⇒ Page 41, "Filling the water tank". | |
| Machine is in steam mode | Switch the machine back to normal mode ⇒ Page 44, "Foaming up milk". | |
| Brew unit not inserted correctly | Reinsert the brew unit correctly ⇒ Page 54, "Cleaning the brew unit". | |
| When grinding, the grinding gear noise gets louder | Coffee beans have been used up | Fill up the coffee bean container ⇒ Page 41, "Filling with coffee". |
| There is no steam/hot water coming from the steam nozzle | Nozzle is blocked | Clean the steam nozzle ⇒ Page 58, "Cleaning the hot water/steam nozzle". |
| Very little or no coffee comes out | Coffee outlet is blocked | Clean the coffee outlet and the filter ⇒ Page 52, "Cleaning and maintenance". |
| Water cycle is blocked by scaling | Descale the machine ⇒ Page 50, "Descaling" | |
| Grinding level for coffee is too fine | Choose a coarser grinding level ⇒ Page 52, "Setting the grinding level". | |
| Brew unit not inserted correctly | Reinsert the brew unit correctly ⇒ Page 54, "Cleaning the brew unit". | |
| The warm-up time is longer | Machine is scaled | Descale the machine ⇒ Page 50, "Descaling" |
| The coffee is not frothy | Wrong coffee mixture | Use another coffee mixture |
| Grinding level for coffee is too coarse | Choose a finer grinding level ⇒ Page 52, "Setting the grinding level". | |
| The milk is not foamed up or foams up only a little | Milk is unsuitable | Choose low-fat milk. |
| The brew unit is stuck in the service compartment | Starting position for the brew unit does not agree with the starting position of the drive shaft | Release the brew unit ⇒ Page 55, "Releasing the brew unit". |

Disposal
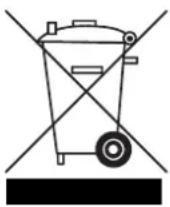
At the end of the service life of the machine, in particular if it is malfunctioning, make the machine unusable by pulling the mains plug out of the socket and separating the power cable. Dispose of the machine according to the environmental regulations applicable in your country. Electrical waste may not be disposed of together with household waste. For any advice regarding recycling, contact your local municipal authorities or your dealer.
Warranty
The device supplied by our Company is covered by a 24 month guarantee starting on the date of purchase (receipt). During the life of the guarantee any fault of the device or its accessories *) ascribable to material or manufacturing defects will be eliminated free of charge by repairing or, at our discretion, by replacing it. The guarantee services do not entail an extension of the life of the guarantee nor do they give rise to any right to a new guarantee! Proof of the guarantee is provided by the proof of purchase. Without proof of purchase no free replacement or repair will be carried out. If you wish to make a claim under the guarantee please return the entire machine in the original packaging to your dealer together with the receipt.
*) Damage to accessories does not mean automatic free replacement of the whole machine. In such cases please contact our hotline. Broken glass or breakage of plastic parts are always subject to a charge. Defects to consumables or parts subject to wearing (e.g. motor pistons, kneading blades, drive shafts, spare remote control, spare toothbrushes, saw blades, etc.) as well as cleaning, maintenance or the replacement of said parts are not covered by the guarantee and hence are to be paid! The guarantee lapses in case of unauthorized tampering.
After the expiry of the guarantee
After the expiry of the guarantee repairs can be carried by the competent dealer or repair service against the payment of the ensuing costs.
Conformity declaration
Clatronic International GmbH hereby declares that the KA-V 3002 machine conforms to the fundamental requirements of the European directive for electro-magnetic compatibility (89/336/ EEC) and the low voltage guideline (93/68/EEC).
natural_image
Line drawing of a coffee machine with lid and side panel (no text or symbols)Afb. 2
natural_image
Line drawing of a hand pouring granular material into a container (no text or symbols)natural_image
Line drawing of a refrigerator interior with a labeled component (no text or symbols present)Afb. 4
KLAAR OM KOFFIE TE ZETTEN
APPARAAT WORDT GESPOELD
natural_image
Line drawing of a coffee machine with two cups and a tray, no text or symbols presentAfb. 5

Afb. 6
natural_image
Line drawing of a kitchen appliance with a hand holding a tool, showing no text or symbols
Afb. 8
KLAAR OM KOFFIE TE ZETTEN KOFFIEPOEDER
Afb. 9
1 kleine kop koffie ...
Afb. 10
natural_image
Line drawing of a hand using a grater to add beverages into cups on a counter (no text or symbols)Afb. 11
Afb. 12
KLAAR ON KOFFIE TE ZETTEN
natural_image
Line drawing of a hand pouring coffee into a machine (no text or symbols)Afb. 13
⚠ WAARSCHUWING:
Afb. 14
⚠ WAARSCHUWING:
Afb. 15
WATERHARDHEID HARDHEIDSGRAAD 3
APPARAAT WORDT GESPOELD, WACHTEN A.U.B.
WATERTANK VULLEN
KLAAR OM KOFFIE TE ZETTEN
Afb. 16
⚠ WAARSCHUWING:
Afb. 17
⚠ WAARSCHUWING:
natural_image
Line drawing of a coffee machine with a hand inserting a slot into it (no text or symbols)Afb. 18
Afb. 20

natural_image
Line drawing of a hand inserting a spring into a refrigerator (no text or symbols)Afb. 21
natural_image
Line drawing of a robotic arm interacting with a mechanical device (no text or symbols)Afb. 22
Afb. 23
Afb. 24
- Sluit de servicedeur.
i AANWIJZING:
Afb. 25
Aandrijfas justeren
WAARSCHUWING: KOOKEENHEID ERIN ZETTEN
Afb. 26


Afb. 27
natural_image
Line drawing of a mechanical device with a tool inserted, no text or symbols presentKoffie-uitloop reinigen
natural_image
Line drawing of a coffee machine with lid and side panel (no text or symbols)Fig. 2
natural_image
Line drawing of a hand pouring granular material into a container (no text or symbols)Fig. 3
natural_image
Line drawing of a refrigerator interior with a labeled component (no text or symbols present)natural_image
Line drawing of a coffee machine with two cups and a tray, no text or symbols presentFig. 5
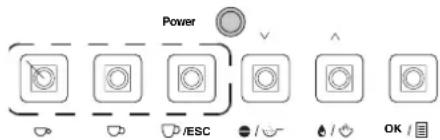
Fig. 6
natural_image
Line drawing of a kitchen appliance with a handle and fan (no text or symbols)Fig. 7
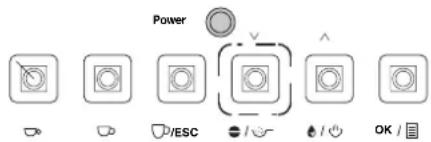
Fig. 8
LISTO PREPA- RAR CAFÉ CAFÉ MOLIDO
Fig. 9
Fig. 10
natural_image
Line drawing of a hand pouring liquid into a cup and two cups on a grater (no text or symbols)Fig. 11
Fig. 12
natural_image
Line drawing of a hand pouring a cup into a coffee machine (no text or symbols)Fig. 13
LISTO PREPA- RAR CAFÉ
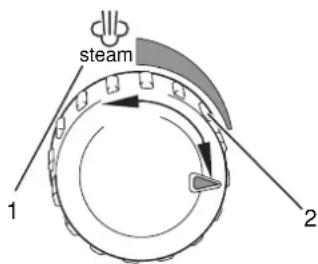
Fig. 14
Fig. 15
| Submenú |
| Deutsch |
| English |
| Italiano |
| Dutch |
| Español |
| Polish |
Empleo
Fig. 16
natural_image
Line drawing of a microwave oven with a hand inserting a tray into the base (no text or symbols)Fig. 18
Fig. 19
Fig. 20
natural_image
Line drawing of a hand inserting a component into a device (no text or symbols)Fig. 21
natural_image
Line drawing of a robotic arm interacting with a mechanical device (no text or symbols)Fig. 22
Fig. 23
Fig. 24
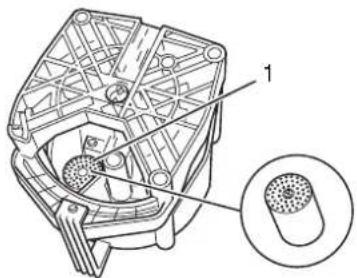
Fig. 25
Fig. 27
natural_image
Line drawing of a mechanical device with a tool inserted, labeled Fig. 28 (no text or symbols on the diagram itself)natural_image
Line drawing of a coffee machine with lid and side ports (no text or symbols)Rys. 2
natural_image
Line drawing of a hand pouring granular material into a container (no text or symbols)Rys. 3
natural_image
Technical line drawing of a mechanical component with labeled part 1 (no text or symbols beyond label)Rys. 4
Rys. 5

Rys. 6
natural_image
Line drawing of a kitchen appliance with a hand holding a tool, no text or symbols present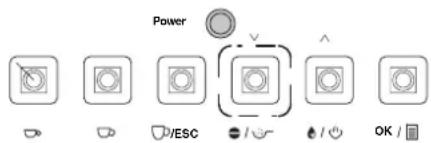
Rys. 8
GOTOWOŚĆ NA KAWĘ KAWĄ MIELONA
Rys. 9
Rys. 10
natural_image
Line drawing of a hand using a grater to wash coffee into a microwave oven (no text or symbols)Rys. 11
Rys. 12
natural_image
Line drawing of a hand pouring a cup into a coffee machine (no text or symbols visible)Rys. 13
GOTOWOŚĆ NA KAWĘ

Rys. 14
PRZYGOTOWAĆ
GORĄCĄ WODĘ
Rys. 15
Rys. 16
natural_image
Line drawing of a device with a grater and a hand holding a clip, labeled 'Rys. 18' (no text or symbols on the diagram itself)Rys. 20
natural_image
Line drawing of a hand inserting a spring into a door panel (no text or symbols)Rys. 21
natural_image
Line drawing of a robotic arm interacting with a mechanical device (no text or symbols present)Rys. 22
Rys. 23
UWAGA ZWOLN ZESPOŁ
Rys. 24
Rys. 25
Rys. 27
natural_image
Line drawing of a hand using a tool to press or inspect a cylindrical object on a base, with no visible text or symbols.natural_image
Line drawing of a coffee maker machine (no text or symbols visible)Fig. 2
natural_image
Line drawing of a hand pouring granular material into a container (no text or symbols)Fig. 3
natural_image
Line drawing of a refrigerator interior with a labeled component (no text or symbols present)Fig. 4
PRONTO EROGAZ.CAFFÈ
natural_image
Line drawing of a coffee machine with two cups and a tray, no text or symbols presentFig. 5
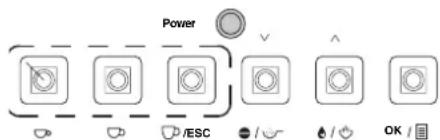
Fig. 6
natural_image
Line drawing of a kitchen appliance with a handle and fan (no text or symbols)Fig. 7

Fig. 8
PRONTO EROGAZ.CAFFÈ CAFFÈ POLVE.
Fig. 9
Fig. 10
natural_image
Line drawing of a hand pouring liquid into a coffee machine with two cups on a tray (no text or symbols)Fig. 11
Fig. 12
PRONTO EROGAZ.CAFFÉ
- Premere il tasto „modo vapore“ (Fig. 10), per terminare il modo vapore. Dopo breve tempo sul display appare „Pronto erogaz.caffè“.
INDICAZIONE:
natural_image
Line drawing of a hand pouring coffee into a washing machine (no text or symbols)Fig. 13
! AVVERTIMENTO:
Fig. 14
Fig. 15
Fig. 16
natural_image
Line drawing of a microwave oven with control panel and door handle (no text or symbols)Fig. 18
Fig. 19
Fig. 20

natural_image
Line drawing of a hand inserting a component into a device (no text or symbols)Fig. 21
natural_image
Line drawing of a robotic arm assembling a mechanical component (no text or symbols)Fig. 22
Fig. 23
Fig. 24
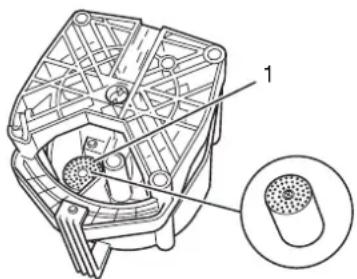
Fig. 25
Fig. 27
natural_image
Line drawing of a hand using a tool to press or inspect a cylindrical object (no text or symbols visible)Fig. 28
- Füllmenge ändern
- ⚠️ WARNING:
- WARNING:
- WARNUNG:
- Machine parts/Scope of delivery
- Technical data
- List of Contents
- Safety instructions....39
- Setting up and connecting 40
- Starting up 41
- Preparing the coffee....42
- Changing the default settings....46
- Cleaning and maintenance....52
- Symbols in this operating manual
- ATTENTION:
- i NOTE:
- Safety instructions
- Children
- Power supply
- Transport
- Where to position the machine
- Hot steam/hot water
- Intended use
- Setting up and connecting
- Setting up
- Starting up
- Filling the water tank
- Filling with coffee
- Switching on Before switching it on each time, check whether there is enough
- Switching off
- Preparing the coffee
- Flavour
- Types of preparation
- Self-cleaning function
- Changing the fill quantity
- Foaming up milk
- Changing the default settings
- Example of using the menu
- Overview You will find the following entries in the main menu
- Changing the economy options
- Menu overview
- Changing the menu language
- Use
- Changing the coffee output temperature
- Changing the coffee amount
- Changing the preinjection amount
- Changing the prebrewing time
- Setting the water hardness
- Start descaling
- Displaying the number of cups prepared
- Resetting the default factory settings
- Setting the grinding level
- Cleaning and maintenance
- Cleaning the outside of the housing
- Cleaning the water tank
- Cleaning the coffee bean container
- Cleaning the cup shelf
- Cleaning/emptying the coffee dregs box
- Cleaning/emptying the drip tray
- Cleaning the brew unit
- Releasing the brew unit
- Cleaning the filters
- Adjusting the drive shaft
- Adjust filter holder in brew unit
- Cleaning the filler opening for the fresh coffee powder
- Cleaning the coffee outlet
- Cleaning the hot water/steam nozzle
- Descaling
- Warning messages
- Troubleshooting
- Disposal
- Warranty
- Conformity declaration
- ⚠ WAARSCHUWING:
- i AANWIJZING:
- Aandrijfas justeren
- Koffie-uitloop reinigen
- Empleo
- INDICAZIONE:
- ! AVVERTIMENTO:
Brand : CLATRONIC
Model : KAV 3002
Category : Coffee maker