
MCBB - Cooker M-SYSTEM - Free user manual and instructions
Find the device manual for free MCBB M-SYSTEM in PDF.


| Product Type | Cooker |
| Brand | M-System |
| Model | MCBB |
| Dimensions (HxWxD) | 85 cm x 60 cm x 60 cm |
| Weight | 50 kg |
| Power Supply | 230 V / 50 Hz |
| Oven Type | Electric |
| Oven Capacity | 60 L |
| Number of Cooking Zones | 4 (radiant or ceramic) |
| Energy Efficiency Class | A |
| Control Type | Rotary knobs |
| Safety Features | Child lock, automatic shut-off, residual heat indicator |
| Cleaning | Easy-clean enamel interior, removable oven door |
| Included Accessories | 1 baking tray, 1 grill rack |
| Warranty | 2 years |
Frequently Asked Questions - MCBB M-SYSTEM
User questions about MCBB M-SYSTEM
0 question about this device. Answer the ones you know or ask your own.
Ask a new question about this device
Download the instructions for your Cooker in PDF format for free! Find your manual MCBB - M-SYSTEM and take your electronic device back in hand. On this page are published all the documents necessary for the use of your device. MCBB by M-SYSTEM.
USER MANUAL MCBB M-SYSTEM
Instruction for the use
Installation advice
| Nederlands | Gebruiksaanwijzing en installatievoorschriften | Bladzijde 3 |
| Deutsch | Gebrauchsanweisung Installationsanleitung | Seite 23 |
| Español | Instrucciones de uso - Consejos para la instalación | Página 43 |
| English | Instruction for the use - Installation advice | Page 63 |
Geachte Klant,
natural_image
Line drawing of a cooking appliance with a basket and stove base (no text or symbols)Afb. 1.2
OLIE BIJVULLEN
VEILIGHEIDSTHERMOSTAAT
natural_image
Simple diagram showing a circle with vertical division and two circular symbols (circle 1 and circle 2) on the right side, no text or labels present.Afb. 1.4
radar
| Temperature (°C) | Value | | ---------------- | ----- | | 150 | Max |Afb. 1.5
natural_image
Line drawing of a cooking pan with a mesh basket and handle, placed on a portable stove (no text or symbols)Afb. 1.6
LET OP
natural_image
Technical line drawing of a kitchen appliance with labeled component A (no text or symbols beyond label)Afb. 1.10
HET DEKSEL VAN DE OLIE- BAK GEBRUIKEN
natural_image
Line drawing of a cooking pot on an induction cooktop with three grating holders (no text or symbols)Afb. 1.11
KOOKTABEL
natural_image
Diagram of a food processing setup with a rack, container, and cooling tray (no text or symbols)DE BARBECUE GEBRUIKEN
natural_image
Line drawing of a cooking oven with a filter basket and side-mounted stove (no text or symbols)Abb. 1.2
ÖL EINFULLEN
natural_image
Simple diagram showing a circle with vertical division and two circular symbols (circle 1 and circle 2) on the right side, no text or labels present.Abb. 1.4
radar
| Temperature (°C) | Value | | ---------------- | ----- | | 170 | Max | | 150 | | | 130 | | | 110 | |Abb. 1.5

natural_image
Line drawing of a frying pan with a mesh basket and handle, placed on a rectangular stand (no text or symbols)Abb. 1.6
ACHTUNG
natural_image
Technical line drawing of a kitchen appliance with labeled component A (no text or symbols beyond label)Abb. 1.10
natural_image
Line drawing of a cooking pot on an induction cooktop with three vertical stirers (no text or symbols)Abb. 1.11
Koteletts 220 160 7/9
natural_image
Line drawing of a food preparation setup with a tray holding a container filled with nuts, supported by a rack of insulation (no text or symbols)GEBRAUCH DES ELEK- TROGRILLS
natural_image
Line drawing of a cooking appliance with a mesh basket and fan, mounted on an induction cooktop (no text or symbols)Fig. 1.2
LLENADO DEL ACEITE
natural_image
Simple diagram showing a circle with vertical division and two circular symbols (circle 1 and one with concentric rings) at the bottom, no text or labels present.Fig. 1.4
radar
| Temperature (°C) | Value | | ---------------- | ----- | | 170 | Max | | 150 | | | 130 | | | 110 | |Fig. 1.5

natural_image
Line drawing of a cooking pan with handle and side handles, no text or symbols presentFig. 1.6
¡CUIDADO!
natural_image
Technical line drawing of a kitchen appliance with labeled component A (no text or symbols beyond label)Fig. 1.10
USO DE LA TAPA DE LA CUBETA
natural_image
Line drawing of a cooking pot on an induction cooktop with three panicles (no text or symbols)Fig. 1.11
natural_image
Diagram of a food storage rack with a tray holding a container filled with nuts, labeled Fig. 2.2 (no text or symbols on the diagram itself)USO DE LA BARBACOA
natural_image
Technical line drawing of an open electrical plug with internal components and a labeled force (F), no text or symbols present.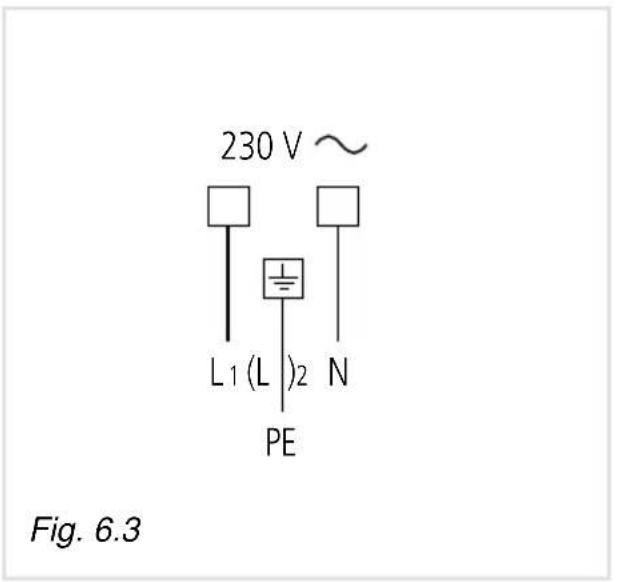
REPARACIONES
Thank you for having purchased and given your preference to our product.
The safety precautions and recommendations given below are for your own safety and that of others. They will also provide a means by which to make full use of the features offered by your appliance.
Please keep this booklet carefully. It may be useful in future, either to yourself or to others if doubts should arise relating to its operation.
This appliance must be used only for the task it has explicitly been designed for, that is for cooking foodstuffs. Any other form of usage is to be considered as inappropriate and therefore dangerous.
The manufacturer declines all responsibility in the event of damage caused by improper, incorrect or unreasonable use of the appliance.
IMPORTANT PRECAUTIONS AND RECOMMENDATIONS FOR USE OF ELECTRICAL APPLIANCES
Use of any electrical appliance implies the necessity to follow a series of fundamental rules. In particular:
√ Never touch the appliance with wet hands or feet;
√ do not operate the appliance barefooted;
√ do not allow children or disabled people to use the appliance without your supervision.
The manufacturer cannot be held responsible for any damages caused by improper, incorrect or unreasonable use of the appliance.
IMPORTANT PRECAUTIONS AND RECOMMENDATIONS
√ After having unpacked the appliance, check to ensure that it is not damaged. If you have any doubts, do not use it and consult your supplier or a professionally qualified technician.
√ Packing elements (i.e. plastic bags, polystyrene foam, nails, packing straps, etc.) should not be left around within easy reach of children, as these may cause serious injuries.
√ The packaging material is recyclable and is marked with the recycling symbol ⬆.
√ Do not attempt to modify the technical characteristics of the appliance as this may become dangerous to use.
√ The manufacturer cannot be considered responsible for damage caused by unreasonable, incorrect or rash use of the appliance.
√ If you should decide not to use this appliance any longer (or decide to substitute an older model), before disposing of it, it is recommended that it be made inoperative in an appropriate manner in accordance to health and environmental protection regulations, ensuring in particular that all potentially hazardous parts be made harmless, especially in relation to children who could play with old appliances.
√ The appliance should be installed and all the electrical connections made by a qualified engineer in compliance with local regulations in force and following the manufacturer's instructions
TIPS FOR THE USER
√ During and after use of the cook-top, certain parts will become very hot. Do not touch hot parts.
√ Keep children away from the cooking hob when it is in use.
√ After use, ensure that the knobs are in off position.
√ Before any cleaning or maintenance, switch off the electricity to the cooktop.
Risk of fire!
√ Do not leave inflammable material on the cooktop.
√ Make sure that the electrical cables of other appliances installed nearby cannot come into contact with the cooktop.
√ Never cook the food directly on the electric hotplates, but in special pans or containers.
DECLARATION OF CE CONFORMITY
- This cooking hob has been designed to be used only for cooking. Any other use (such as heating a room) is improper and dangerous.
- This cooking hob has been designed, constructed, and marketed in compliance with:
-Safety requirements of EEC Directive "Low voltage" 73/23;
-Safety requirements of EEC Directive "EMC" 89/336;
-Requirements of EEC Directive 93/68.
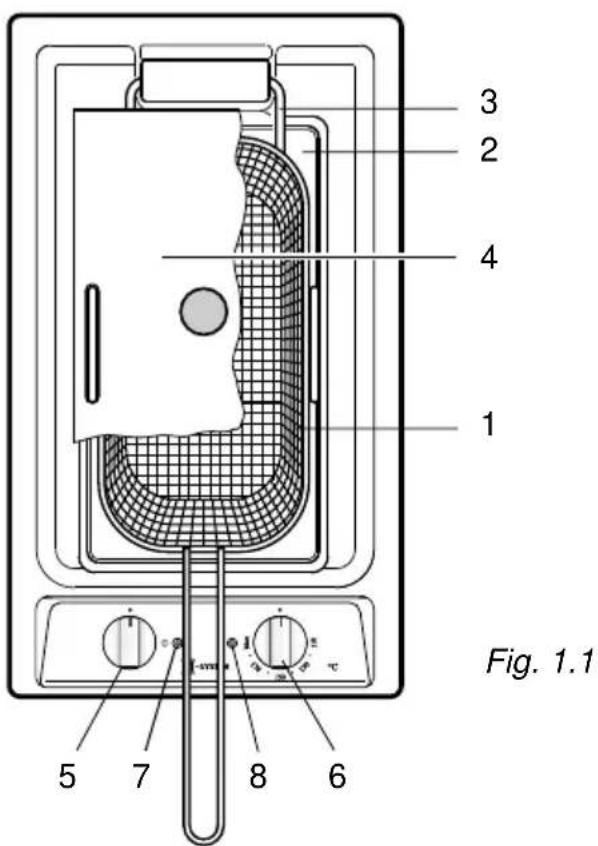
FEATURES
- Electrical insulation Class I.
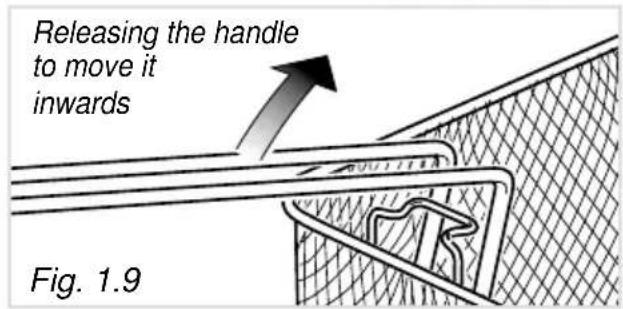
- Basket with draining hook and handle which can be turned inwards
- Oil tray
- Tiltable electrical heating element - 1600 W
- Pan cover
CONTROL PANEL DESCRIPTION
- ON-OFF knob
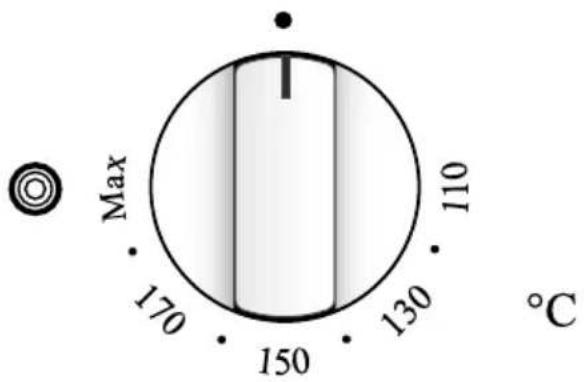
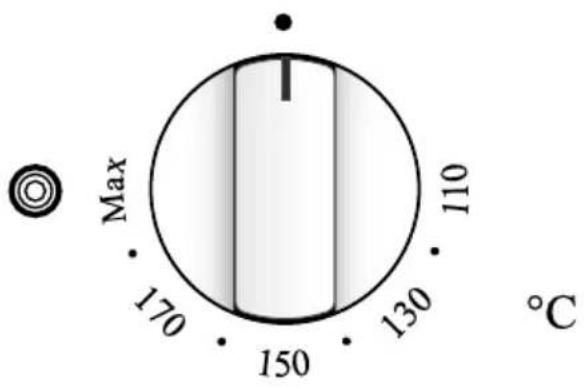
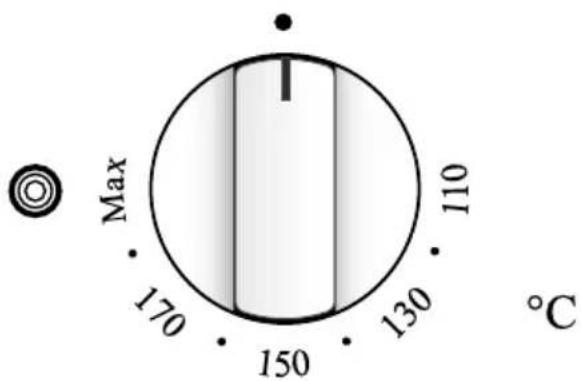
- Oil thermostat knob
- Fryer ON indicator light
- Oil temperature indicator light
USING THE FRYER FOR THE FIRST TIME
- Remove the adhesive film which protects certain parts.
- Carefully remove all the glue residues without using abrasive substances, to avoid scratching the surfaces.
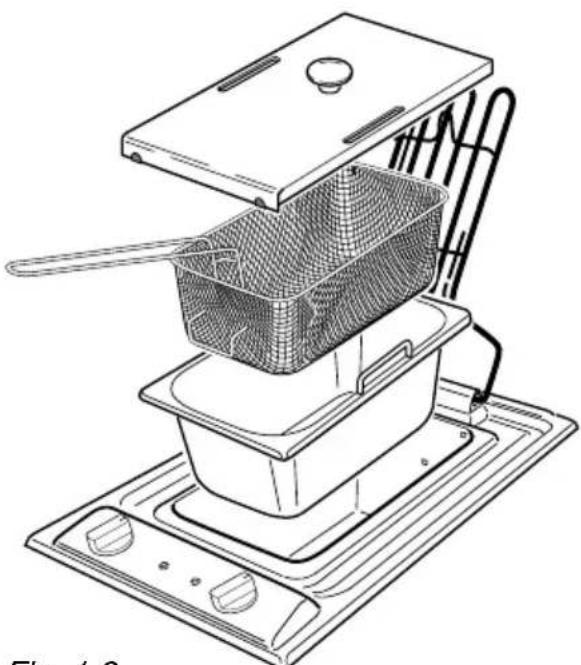
- Remove the pan cover and the basket, raise the heating element and remove the oil pan.
- Wash and dry the tray and the basket carefully (better if in the dishwasher).
- Put the tray back into the fryer and lower the heating element.
- Fill the tray with 3 litres of water.
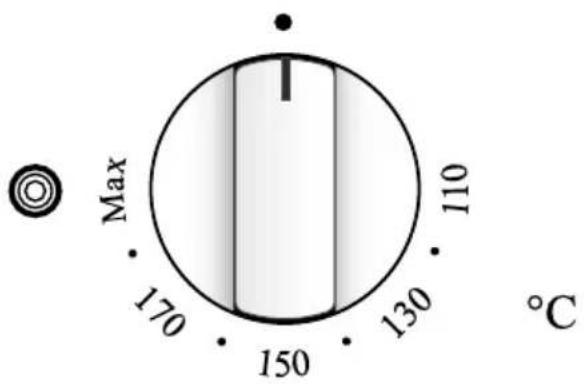
- Switch the fryer on by turning the changeover switch knob and turn the thermostat knob to about 150°C.
This operation will clean the working residues from the electric heating element.
- Leave the fryer ON until the water boils, then leave it to cool down.
- Empty out the water and dry the tray and heating element carefully.
- The fryer is ready for use.
natural_image
Line drawing of a cooking appliance with a pan, grater, and stove (no text or symbols)Fig. 1.2
FILLING WITH OIL
- Remove the pan cover and basket.
- Fill the tray with about 2 litres of oil or fat for frying, already partly melted. The level must be between the minimum and maximum marks printed on the tray.
- Make sure that the heating element is completely lowered.
IMPORTANT: The heating element must never be switched on when it is out of the oil.
COLD AREA
The appliance is so constructed as to allow an ample cold area under the heating element for the solid particles to settle. This helps the oil to last longer and improves the frying which will appear uniform, without burnt spots.
SAFETY THERMOSTAT
The appliance has a manually reset safety thermostat which turns the appliance off when the temperature, because of a fault, exceeds the set temperature.
If this happens call the After-Sales Service.
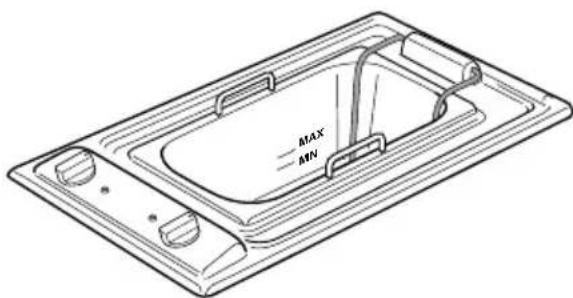
Fig. 1.3
USING THE FRYER
- Check the level of oil or fat, it must be between the minimum and maximum mark.
- Make sure that the heating element is completely lowered.
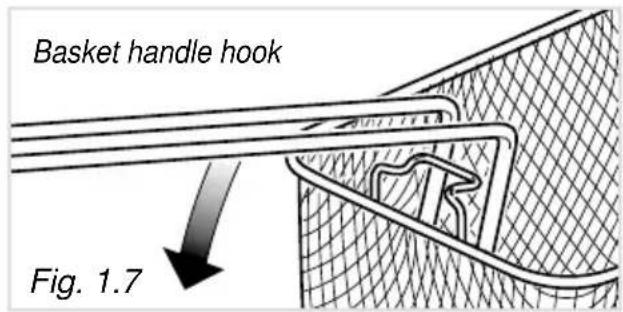
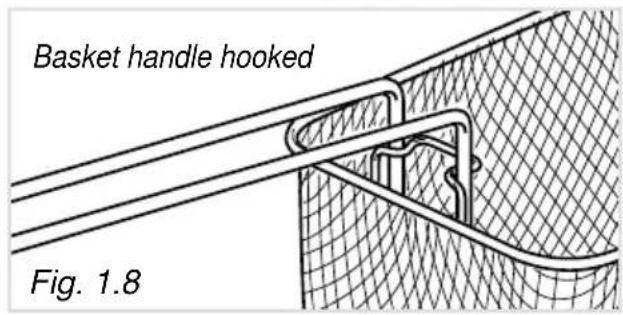
- Move the basket handle outwards (fig. 1.7) and hook it (fig 1.8).
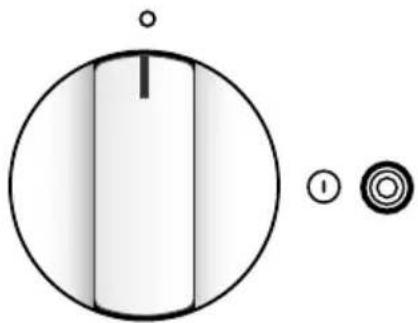
- Turn the changeover switch knob to the ON position (①) the power indicator light comes on.
- Turn the thermostat knob to the temperature required; the temperature indicator light comes on.
- When the temperature indicator light goes out, the oil or fat have reached the set temperature and the appliance is ready for cooking. This indicator will come on and go out intermittently during cooking.
- Before putting food into the basket dry it thoroughly because the contact between the water and the hot oil can lead to very dangerous splashes.
- Fill the basket with the food to be fried and lower it slowly into the oil.
WARNING: If the food is too wet there will be violent and dangerous foaming.
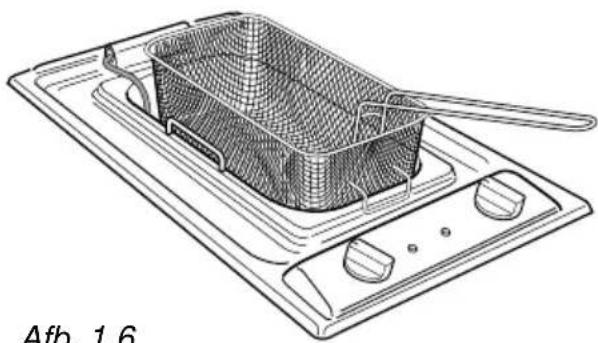
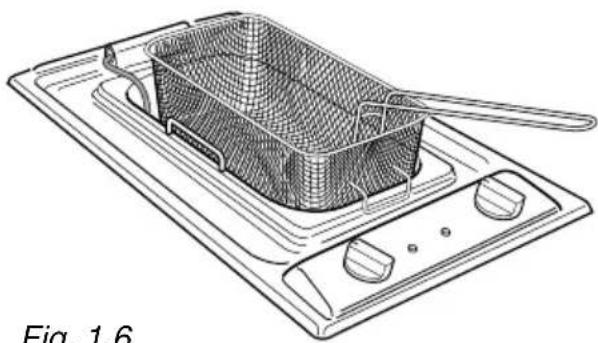
- As soon as the food is cooked, take out the basket and rest it on the support until all the excess oil has drained off (fig. 1.6).
- Always dry off any overflows.
IMPORTANT:
- While using the fryer the pan cover must always be removed.
- Never switch the fryer on with the heating element raised. If this happens by accident, never put the heating element into the oil or fat before it has cooled down.
natural_image
Simple diagram showing a circle with vertical division and two circular symbols (circle 1 and circle 2) beside it, no text or labels present.Fig. 1.4
radar
| Temperature (°C) | Value | | ---------------- | ----- | | 150 | 150 | | 130 | 130 | | 110 | 110 | | Max | 170 |Fig. 1.5
natural_image
Line drawing of a cooking pan with a mesh basket and handle, placed on a stovetop (no text or symbols)Fig. 1.6
WARNING
The fryer and the adjacent surfaces become very hot during use and also there might be splashes of boiling oil.
Keep children away and be careful of oil splashes.
PRECAUTIONS WHEN USING SOLID FAT
Some frying fats solidify when they cool. Melt them as follows:
- Make a hole in the fat down to the heating element.
- Switch the fryer on at 160^ for about a minute, then turn it off by turning the thermostat knob to 0.
- Repeat this operation until the fat is completely melted.
WARNING: Make absolutely sure that when dissolving the fat the heating element does not become red hot because the fat could catch fire.
TIPS FOR CORRECT FRYING
– Each food has a recommended frying temperature which should be respected, because if the temperature is too low the frying will be oily, while if it is too high the food will be too crispy on the outside and raw inside.
- Use a good special oil for frying.
- Put the basket with the food to be fried into the oil only when the oil is at the correct temperature (after the temperature indicator light has gone out).
- Do not overfill the basket otherwise the oil temperature will drop suddenly and the frying will be greasy and uneven.
- If possible the food should be of the same thickness and not too thick.
- When the food is cut too thick it cooks badly in the middle, even if it looks good. If it is of the same thickness cooking will be ideal and uniform.
– Large items of food (chicken, whole fish, etc.) which remain partly uncovered must be turned half way through cooking.
- Before putting the food into the basket dry itthoroughly, otherwise the food, especially potatoes, will be soft after cooking.
- Fish, meat, vegetables and all other food which contains a lot of water should be coated with breadcrumbs or flour. Make sure to shake off the excess of breadcrumbs or flour.
- Never salt the food in the fryer.
- At the end of frying do not leave the food in the basket inside the fryer: the fatty vapours given off in fact made the fried food soft, so that it loses that crispiness which is the sign of good frying.
- For best results filter the oil after cooking a few times and change it frequently.
OIL FIRE
- IMPORTANT: If the oil catches fire suffocate the flames immediately using the fryer cover.
- Never use water, because this would cause the flames to become worse.
CHANGING THE FRYING OIL
- Keep an eye on the oil level, which must never drop below the minimum.
- The oil should be changed regularly.
- The length of time the frying oil lasts depends on the type of food to be fried; as compared with normal frying, if the food is floured, for example, there will be more deposits in the oil and it should therefore be changed more frequently.
- If during cooking the oil smokes or smells bad it should be changed completely.
natural_image
Technical line drawing of a kitchen appliance with labeled component A (no text or symbols beyond label)Fig. 1.10
USE OF THE COVER
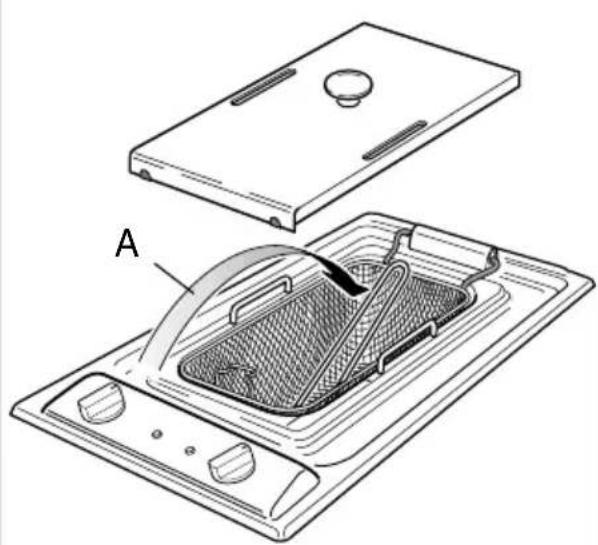
- Wait for the oil to cool down before covering the fryer with the cover. To position the cover correctly fold the basket handle inwards (fig. 1.10 and 1.11 - arrow "A").
EMPTYING THE TRAY
- The try is emptied when the oil is cold.
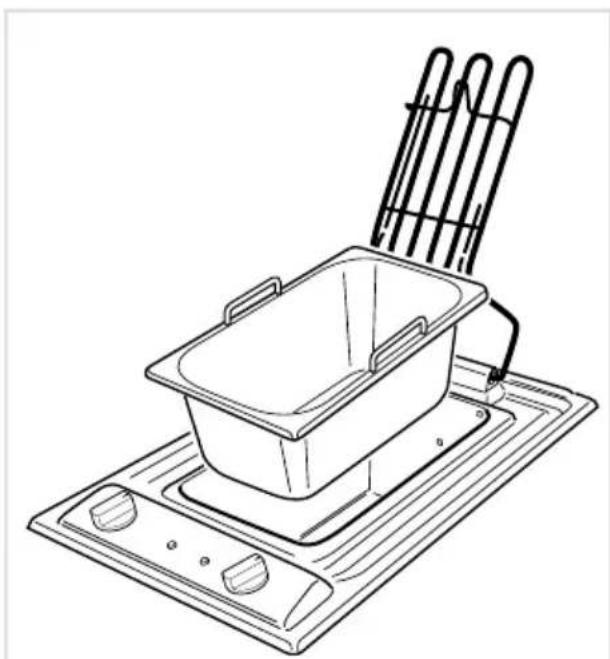
- To take out the tray raise the heating element and lift the tray by pressing with the fingers inside where studs are provided.
- For easier oil emptying hold the tray tightly and tip the oil out at one corner.
If you use frying fats which solidify raise the heating element before the fat solidifies.
Look out for drops of hot oil when raising the heating element and dry them off immediately.
natural_image
Line drawing of a cooking pot on an induction cooktop with three panes (no text or symbols)Fig. 1.11
TABLE OF COOKING TIMES
The values given below are indicative, in fact times and temperatures can also vary depending on the quality of the food.
Food to fry Quantity Temp. Time
[grams] [°C] [min]
Fresh food
Fried potato slices 800 180 10
Fresh breadcrumb food
| Cauliflower pieces 400/450 160 8/10 | |
| Aubergine slices 250/350 170 8/10 | |
| Courgette slices 250/300 160 9/11 | |
| Meatballs (about 7) 400 160 6/8 | |
| Chops | 220 160 7/9 |
Fresh floured food
| Squid | 500 160 | 10/12 |
| Sardines | 500 160 | 10/12 |
| Cuttlefish | 500 160 | 10/12 |
| Scallops | 400 160 7/9 | |
| Sole | 200 160 5/7 |
Frozen food
| Potato croquettes | 400 180 | 9 |
| Fried potato slices 600 180 | 8 | |
| Floured cauliflower pieces | 600 180 | 8 |
| Floured aubergines | 300 180 | 7 |
| Floured courgettes 300 180 12 | ||
| Floured mushrooms | 350 180 | 7 |
| Fish fingers | 300 180 | 7 |
| Breadcrumbsched chops | 300 180 12 | |
After you have used the appliance for a short time, you will learn by experience the cooking times for each food.
CLEANING THE FRYER
- Before cleaning the fryer switch it off and wait for it to cool down.
- Clean the outside with a cloth wetted with hot water and soap or water and liquid detergent, being careful not to dirty the tray oil. To make cleaning operations easier remove the oil tray.
- Stainless steel surfaces can be cleaned with special products available on the market.
- All the enamelled parts must be cleaned with a sponge and soapy water only or other non-abrasive products.
- Do not use steel pads or products which are abrasive, corrosive or chlorine based.
- Do not leave acid or alkaline substances (vinegar, salt, lemon juice etc.) on the fryer surfaces.
- The oil tray and the basket can be washed in the sink, but they are better washed in the dishwasher.
- Clean the heating element very carefully using a dry cloth or a cloth damped just with water. Be very careful not to move the temperature probe.
- Be very careful that no water penetrates inside the appliance.
Do not use steam jet cleaners because the humidity could infiltrate into the appliance making it dangerous.
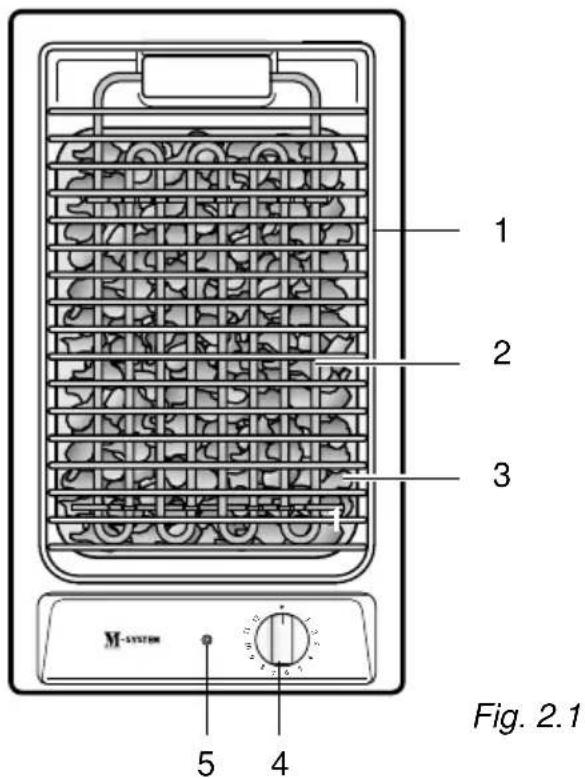
FEATURES
- Electrical insulation Class 1.
-
Protection against overheating of adjacent surfaces Type X.
-
Grill
- Tiltable electric heating element - 2400 W
- Tray with pumice stone
CONTROL PANEL
- Heating element adjuster knob
- Heating element ON indicator light
BARBECUE FEATURES
- This appliance grills meat and fish without fat and oil.
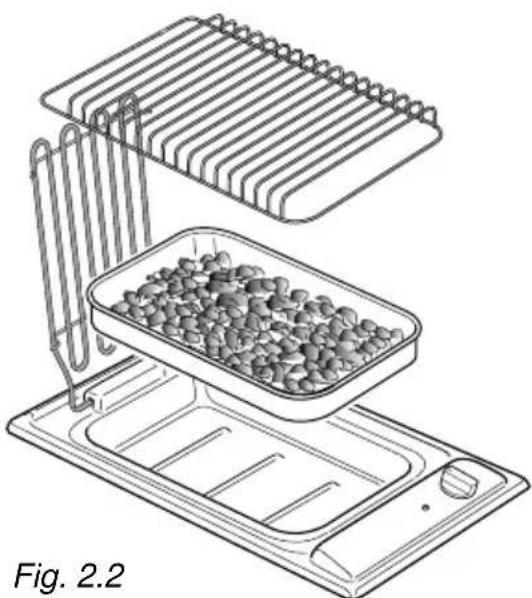
- Under the heating element there is a tray with pumice stone, which guarantees a constant temperature of about 250^ .
- All the parts, grill, tray and stones, can easily be removed for cleaning.
USING THE BARBECUE FOR THE FIRST TIME
- Remove the adhesive film which protects certain parts.
- Carefully remove all the glue residues without using abrasive substances, to avoid scratching the surfaces.
- Wash and dry the grill carefully (better if in the dishwasher).
- Raise the heating element, make sure that the tray is positioned correctly and spread out the pumice stone well.
– Lower the heating element and put the grill on top. - Switch the barbecue on by turning the energy regulator knob to the maximum position (11 - 12) for about 15 minutes to remove the fatty working residues.
natural_image
Diagram of a food storage rack with a tray holding a container filled with nuts, labeled Fig. 2.2 (no text or symbols on the diagram itself)USING THE BARBECUE
- Before cooking, check that the removable parts are in their correct position (tray with well distributed pumice stone, heating element completely lowered, grill in position).
- Switch on the barbecue by turning the knob to position 12.
The indicator light shows that the barbecue is ON. - Preheat for about 5 minutes.
- Turn the knob to the position desired. The numbers from 1 to 12 indicate the operating positions with temperature increasing with the number.
- Put the food on the grill and check the cooking.
- To switch the barbecue off turn the knob to position "0".
- When using the barbecue, the extractor hood should be switched on or a window opened.
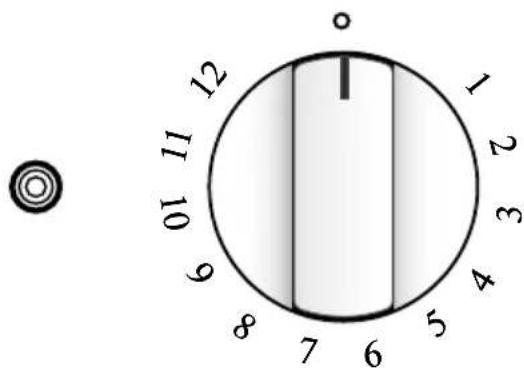
Fig. 2.3
WARNING
The barbecue becomes very hot during use.
Keep children away.
TIPS FOR GRILLING
– Preheat for about 5 minutes.
—The hotter the pumice stone, the quicker and more uniform the cooking.
-Do not pour water onto the hot or working barbecue.
- After grilling is finished, leave the barbecue switched on for a few minutes so that the fats absorbed by the pumice stone are burnt.
TABLE FOR GRILLING ON PUMICE STONES
Foods Regulator Total tim position [minutes]
| Beef fillet 12 8 | |
| Steaks 12 12 | |
| Hamburgers 12 14 | |
| Sausages 12 13 | |
| Liver 12 5 | |
| Lamb chop 12 8 | |
| Chicken steak 12 9 | |
| Chicken thigh 11-10 | 17 |
| Salmon steak 11-10 | 10 |
| Trout 11-10 | 12 |
| Trout baked ingreaseproof paper | 11 30 |
The times given are purely indicative and refer to the barbecue preheated to the maximum.
CLEANING THE BARBECUE
- Before cleaning the barbecue switch it off.
- When cleaning the appliance must always be cold.
- Clean the outside with a cloth wetted with hot water and soap or water and liquid detergent. To make cleaning operations easier remove the grill and the pumice stone tray.
- Stainless steel surfaces can be cleaned with special products available on the market.
- Do not use steel pads or products which are abrasive, corrosive or chlorine based.
- Do not leave acid or alkaline substances (vinegar, salt, lemon juice etc.) on the barbecue surfaces.
- The pumice stone tray and the grill can be washed in the sink, but they are better washed in the dishwasher.
• After each cooking empty the residual fats from the pumice stone tray and wash it carefully. This is to prevent unpleasant smells during cooking. - Every 2 or 3 cookings wash the pumice stone with water.
- Clean the heating element very carefully using a dry cloth or a cloth damped just with water.
- Be very careful that no water penetrates inside the appliance.
Do not use steam jet cleaners because the humidity could infiltrate into the appliance making it dangerous.
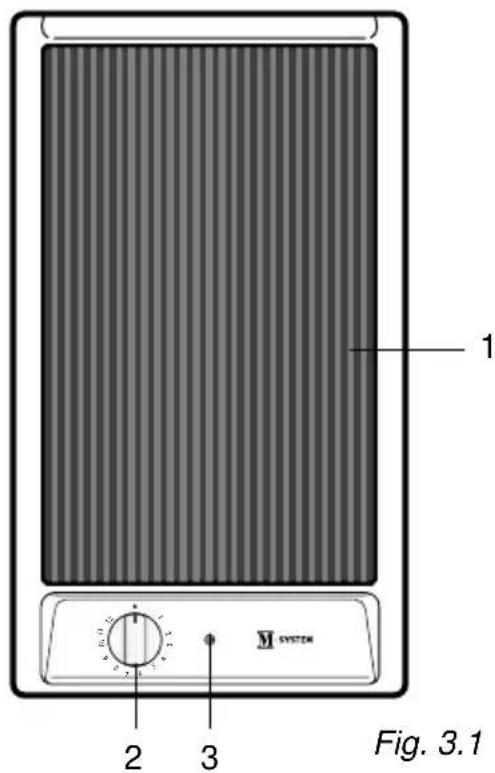
FEATURES
- Electrical insulation Class I.
- Overheating surfaces protection type X.
COOKING POINT
- Hot plate - 1300 W
CONTROL PANEL
- Hot plate control knob
- Hot plate control lamp
HOW TO USE THE COOKER TOP
The griddle reaches the working temperature very quickly and can grill any food, without fat and oil, directly on the radiant zone's glass-ceramic surface.
Operation of the radiant zone is controlled by a continuous 12-position power regulator.
The signal lamp lights up when the griddle is ON.
USING THE GRIDDLE FOR THE FIRST TIME
- Remove the adhesive film which protects some parts.
- Remove any residual glue carefully, without using abrasive substances, to avoid scratching the surfaces.
– Clean the cooking surface carefully. - Switch the griddle on by turning the power setting knob to the maximum position (11-12) for about 15 minutes to remove residual working greases.
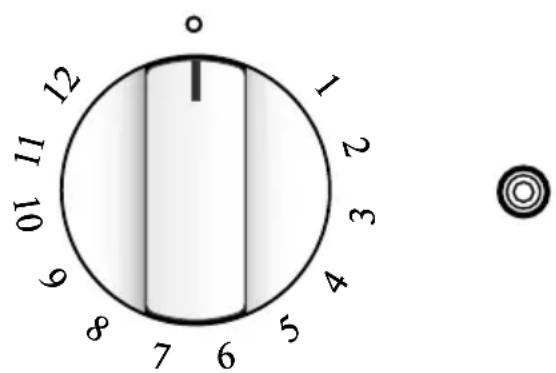
Fig. 3.2
USE OF THE GRIDDLE
- Before cooking make sure that the radiant zone is clean.
- Switch the griddle on by turning the knob to position 12.
- Preheat until the cooking surface becomes red.
- Then turn the knob to the position required. The numbers from 1 to 12 indicate the working positions with temperature increasing as the number increases.
- Place the food on the radiant zone and check the cooking by eye.
- Turn off the griddle by turning the knob to position "0".
- As the radiant zone remains hot for some time after the hob is switched off, turn the zone off a few minutes before the end of cooking.
The residual heat will complete the cooking. - Do not use the griddle for more than 30 minutes.
TIPS FOR GRILLING:
- Preheat the radiant zone sufficiently to obtain quick and uniform cooking.
- Do not pour water on the cooking surface when it is switched on or still hot.
- If cooking very fatty foods, leave the griddle switched on for a few minutes after cooking is finished, to burn off the fatty residues.
Caution!
The griddle becomes very hot during use and remains very hot even after it is switched off.
Keep children well out of reach.
ADVICE FOR THE SAFE USE OF CERAMIC GRIDDLE
- Do not lean on the cooking zones when they are switched on.
- Do not put aluminium foil or plastic objects on the cooking zones when they are hot.
- Do not leave objects of any type on the surfaces made of ceramic, glass or similar fragile material.
- Remember that the cooking zones remain hot for some time after they are switched off (about 30 min.).
– Follow the cleaning instructions carefully. - If you note a crack in the cooktop, switch the appliance off immediately and call the After-Sales Service.
Do not scratch the cooktop with cutting or sharp objects.
Do not use the cooktop as a work surface.
CLEANING THE CERAMIC GRIDDLE
Make sure that the cooktop is switched off before cleaning it.
- Remove any encrustation.
- Remove dust with a damp cloth.
– Detergents can be used, but they must not be abrasive or corrosive. - Any remaining detergent must be completely removed with a damp cloth.
- Do not put any objects on the cooktop which can melt with heat, such as plastic objects, aluminium foil, sugar or sugar products.
- If any object melts on the cooktop, remove it immediately (while the cooktop is still hot) using a speaal scraper, to prevent any irreversible damage to the glass ceramic surface.
- Do not use knives or sharp objects which could damage the cooktop surface.
- Do not use abrasive sponges or pads which could irreversibly damage the glass ceramic surface.
GENERAL ADVICE
√ Before you begin cleaning you must ensure that the hob is switched off.
It is advisable to clean when the appliance is cold and especially when cleaning the enamelled parts.
√ All enamelled surfaces have to be washed with soapy water or some other non-abrasive product with a sponge and are to be dried preferably with a soft cloth.
√ Avoid leaving alkaline or acid substances (lemon juice, vinegar etc.) on the surfaces.
ENAMELLED PARTS
√ All the enamelled parts must be cleaned with a sponge and soapy water only or other non-abrasive products.
√ Dry preferably with a chamois leather. If acid substances such as lemon juice, tomato conserve, vinegar etc. are left on the enamel for a long time they will etch it, making it opaque.
STAINLESS STEEL ELEMENTS
√ Stainless steel parts must be rinsed with water and dried with a soft and clean cloth or with a chamois leather.
√ For persistent dirt, use specific non-abrasive products available commercially or a little hot vinegar.
CAUTION: Any abrasive substances and non-neutral detergents are absolutely not to be used as these can cause permanent damage to these elements.
Do not use steam jet cleaners because the humidity could infiltrate into the appliance making it dangerous.
Installation advice
5
INSTALLATION
TECHNICAL INFORMATION FOR THE INSTALLER
Before installing the cooktop, remove the protective film.
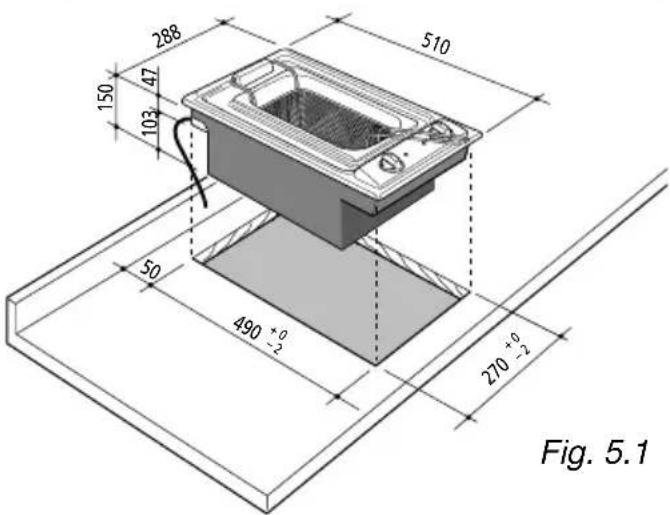
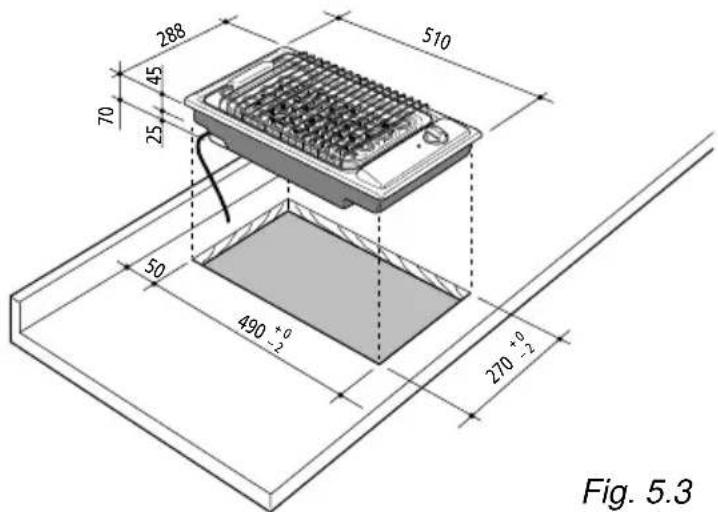
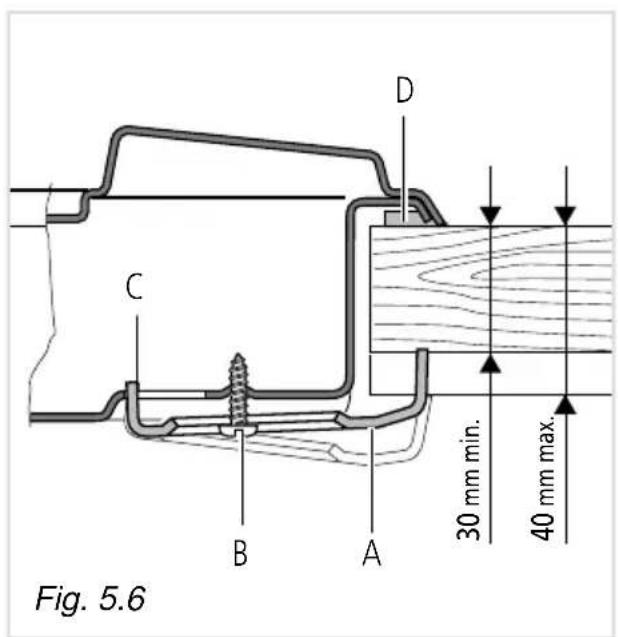
This cooktop can be built into a working surface 30 to 40 mm thick and 600 mm deep.
ceramic griddle
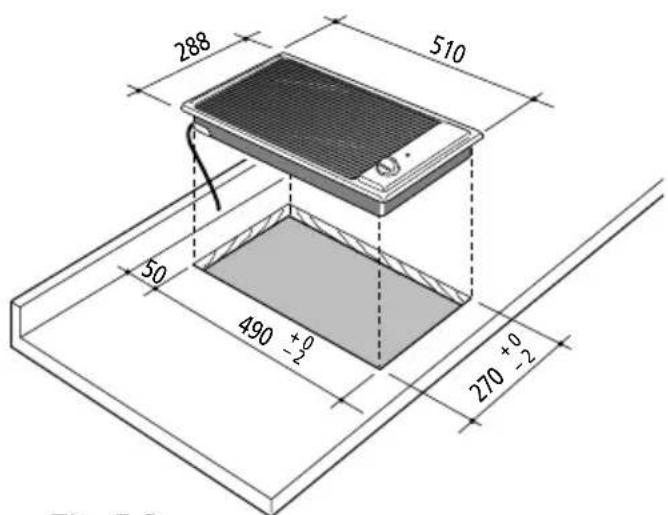
Fig. 5.2
electric fryer
barbecue
Mount an extractor hood above these appliances to remove fumes and smells produced during operation.
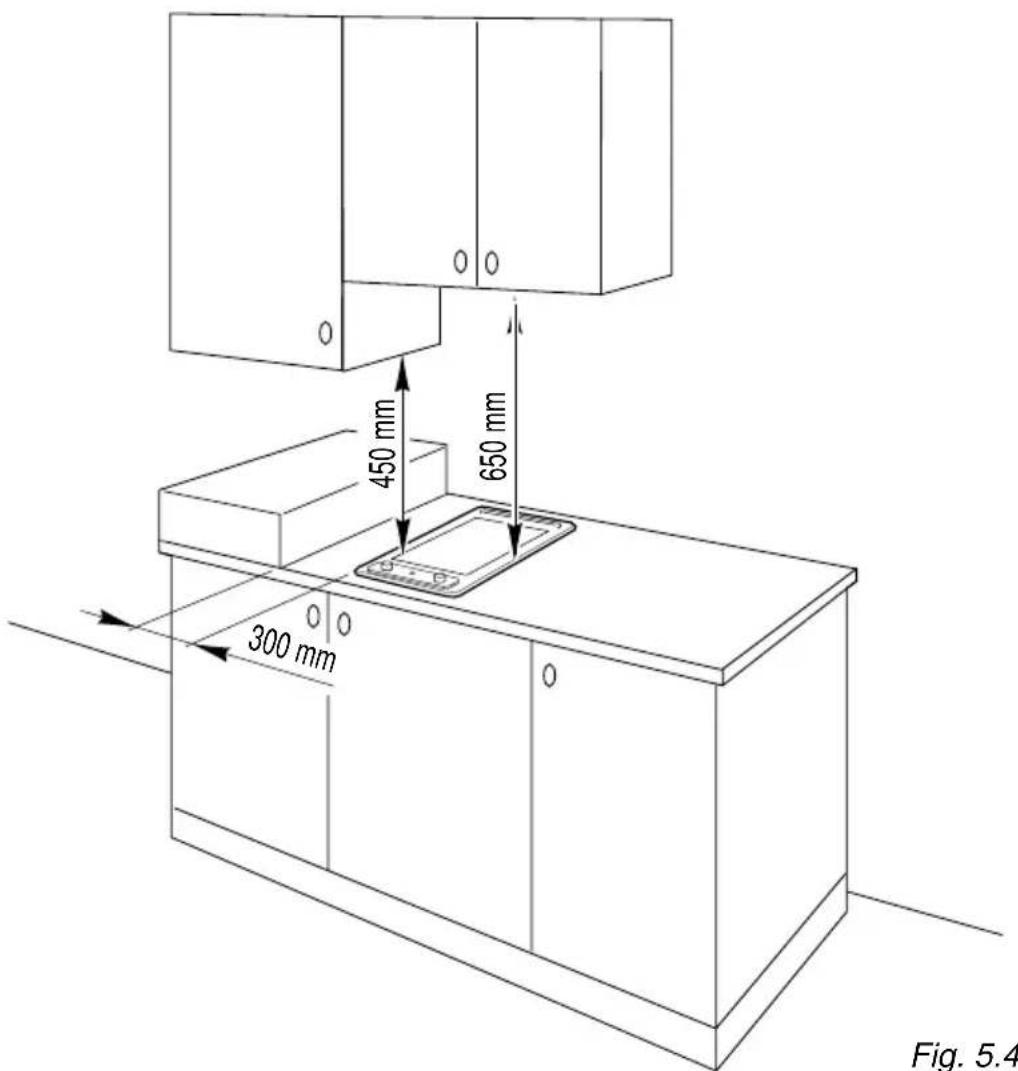
To fit the cooktop into the unit make an opening of the dimensions given in the figures 5.1, 5.2 and 5.3, remembering that:
- inside the unit there must be a space of at least 30 mm between the bottom of the cooktop and the top of an appliance or bracket.
– any wall to the side and above the cooktop must be at least 300 mm away. -
the wall behind the cooktop must be at least 50 mm away.
-
the rear wall must be at least 50 mm from the ceramic griddle and must with stand a temperature of 150^ .
- when there is a wall unit or hood above the cooktop there must be at least 650 mm between the cooktop and the unit or hood.
- the coatings of the walls of the unit or appliances near the cooktop must be heat resistant:
"X" protection against heating in compliance with standards EN 60335-2-6.
Do not install the cooktop near inflammable materials (e.g. curtains).
FASTENING THE APPLIANCES
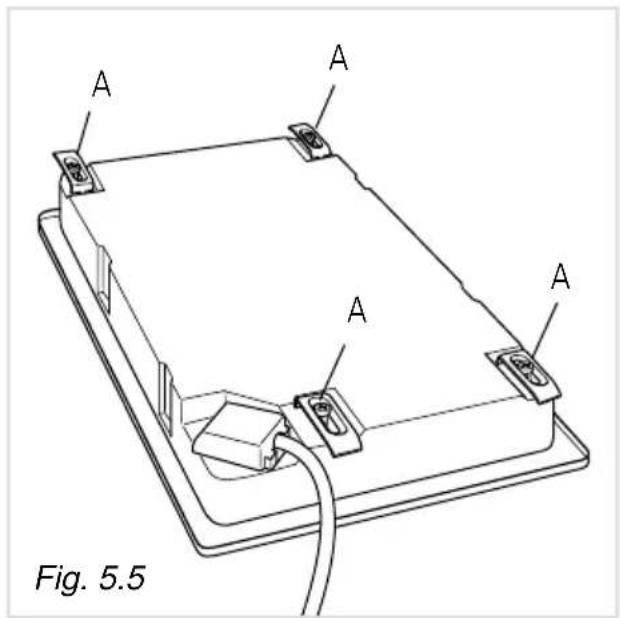
Each appliance is supplied with a set of tabs and screws to fasten it on units.
- Cut the unit (as shown in the figure on the previous page).
- Stretch gasket "D" over the edge of the hole made being careful to overlay the junction edges.
- Turn the appliance over and put tabs "A" into the mountings; only tighten screws "B" a few turns.
Make sure that the tabs are mounted correctly as shown in the figures at the side. Turn the tabs so that the appliance can be put into the hole. - Put the cooktop into the hole cut into the unit and position it correctly.
- Put tabs "A" into place, tooth "C" of the tabs should go into the hole.
- Tighten screws "B" until the appliance is completely secured.
- Using a sharp tool cut off the part of gasket "D" which protrudes from the cooktop.
IMPORTANT:
Installation has to be carried out according to the instructions provided by the manufacturer.
Incorrect installation might cause harm and damage to people, animals or objects, for which the manufacturer accepts no responsibility.
DETAILS
√ Connection to the electric power supply must be carried out by a qualified technician and following the appropriate safety regulations;
√ Before carrying out the connection to the power supply, the voltage rating of the appliance (stamped on the appliance identification plate) must be checked for correspondence to the available mains supply voltage, and the mains electric wiring should be capable of handling the hob's power rating (also indicated on the identification plate);
√ The hob is supplied without a power supply plug and therefore if you are not connecting directly to the mains, a standardized plug suitable for the load must be fitted.
√ The power point must be connected to a suitable earth wiring, in conformity to current safety regulations.
√ It is possible to connect the appliance directly to the mains supply by means of a heavy duty switch with 3 mm minimum distance between the contacts.
√ The power supply cord must not touch against any hot surfaces and must be placed so that its temperature does not exceed 75^ C at any point along its length.
√ After having installed the appliance, the power switch or power plug must always be in a accessible position.
N.B. For connections to the mains power supply, never use adapters, reductions or multiple power points as these may overheat and catch fire.
In the event that installation should require modifications to the mains supply wiring system or if the power plug is not suitable for the type of power point available, it is recommended that a qualified technician be called to carry out substitution.
The technician will also have to verify that the cross-section of the electric cables on the power point match the appliance's power rating.
Before carrying out any work on the electrical section of the appliance, it must be disconnected from the mains.
If the power supply cable is damaged it must be substituted by a suitable cable available in the after sales service.
Connection to a good earth wiring system is absolutely essential.
The manufacturer accepts no responsibility for any inconvenience caused by failure to comply with this rule.
natural_image
Technical line drawing of an open electrical plug with internal components and a labeled force (F), no text or symbols present.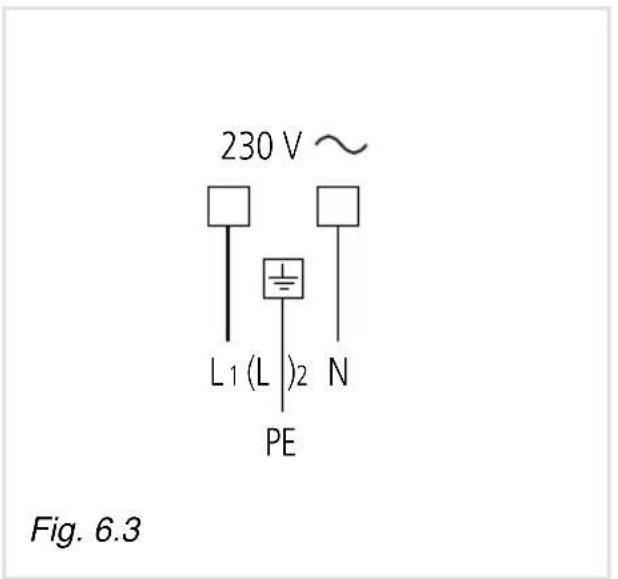
REPAIRS
REPLACING THE POWER SUPPLY CABLE
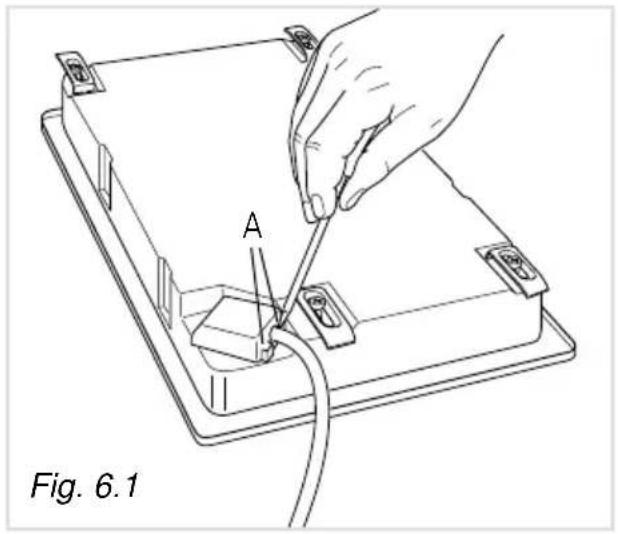
Turn the cooktop over and unhook the terminal board cover by inserting a screwdriver into the two hooks "A" (fig. 6.1).
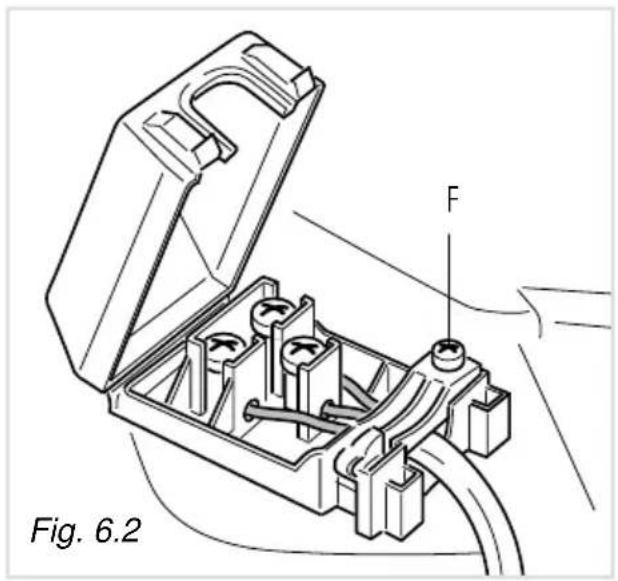
Open the cable gland by unscrewing screw "F" (fig. 6.2), unscrew the terminal screws and remove the cable.
The new supply cable, of suitable type and section, is connected to the terminal board following the diagram in fig. 6.3.
SECTION OF THE SUPPLY CABLES AND CONNECTION DIAGRAM
The external diameter of the supply cable must not be more than 9 mm.
Cable section:
230 V \~ 50/60 Hz 3 x 1,5 mm ^2
For the FRYER use cables type: H05VV-F
or H05V2V2-F resistant to 90°C
or H05RN-F
For the BARBECUE use cables type:
H05RR-F
For the CERAMIC GRIDDLE use cables type:
H05RR-F
Descriptions and illustrations in this booklet are given as simply indicative. The manufacturer reserves the right, considering the characteristics of the models described here, at any time and without notice, to make eventual necessary modifications for their construction or for commercial needs.
M-SYSTEM
1102551
B2
- Geachte Klant,
- OLIE BIJVULLEN
- VEILIGHEIDSTHERMOSTAAT
- LET OP
- HET DEKSEL VAN DE OLIE- BAK GEBRUIKEN
- KOOKTABEL
- DE BARBECUE GEBRUIKEN
- ÖL EINFULLEN
- ACHTUNG
- GEBRAUCH DES ELEK- TROGRILLS
- LLENADO DEL ACEITE
- ¡CUIDADO!
- USO DE LA TAPA DE LA CUBETA
- USO DE LA BARBACOA
- REPARACIONES
- IMPORTANT PRECAUTIONS AND RECOMMENDATIONS FOR USE OF ELECTRICAL APPLIANCES
- IMPORTANT PRECAUTIONS AND RECOMMENDATIONS
- TIPS FOR THE USER
- Risk of fire!
- DECLARATION OF CE CONFORMITY
- FEATURES
- CONTROL PANEL DESCRIPTION
- USING THE FRYER FOR THE FIRST TIME
- FILLING WITH OIL
- COLD AREA
- SAFETY THERMOSTAT
- USING THE FRYER
- WARNING: If the food is too wet there will be violent and dangerous foaming.
- IMPORTANT:
- WARNING
- PRECAUTIONS WHEN USING SOLID FAT
- TIPS FOR CORRECT FRYING
- OIL FIRE
- CHANGING THE FRYING OIL
- USE OF THE COVER
- EMPTYING THE TRAY
- TABLE OF COOKING TIMES
- Food to fry Quantity Temp. Time
- [grams] [°C] [min]
- CLEANING THE FRYER
- CONTROL PANEL
- BARBECUE FEATURES
- USING THE BARBECUE FOR THE FIRST TIME
- USING THE BARBECUE
- TIPS FOR GRILLING
- TABLE FOR GRILLING ON PUMICE STONES
- CLEANING THE BARBECUE
- COOKING POINT
- HOW TO USE THE COOKER TOP
- USING THE GRIDDLE FOR THE FIRST TIME
- USE OF THE GRIDDLE
- TIPS FOR GRILLING:
- Caution!
- ADVICE FOR THE SAFE USE OF CERAMIC GRIDDLE
- CLEANING THE CERAMIC GRIDDLE
- GENERAL ADVICE
- ENAMELLED PARTS
- STAINLESS STEEL ELEMENTS
- Installation advice
- 5
- INSTALLATION
- TECHNICAL INFORMATION FOR THE INSTALLER
- FASTENING THE APPLIANCES
- DETAILS
- N.B. For connections to the mains power supply, never use adapters, reductions or multiple power points as these may overheat and catch fire.
- REPAIRS
- REPLACING THE POWER SUPPLY CABLE
- SECTION OF THE SUPPLY CABLES AND CONNECTION DIAGRAM
- Cable section:
- For the FRYER use cables type: H05VV-F
- For the BARBECUE use cables type:
- For the CERAMIC GRIDDLE use cables type:
- M-SYSTEM
Brand : M-SYSTEM
Model : MCBB
Category : Cooker