
MC 1020 DVD - Hi-Fi System CLATRONIC - Free user manual and instructions
Find the device manual for free MC 1020 DVD CLATRONIC in PDF.

| Brand | Clatronic |
| Model | MC 1020 DVD |
| Product Type | Hi-Fi System with DVD Player |
| Dimensions (W x H x D) | Approx. 360 x 250 x 320 mm |
| Weight | Approx. 5.5 kg |
| Power Supply | AC 230 V ~ 50 Hz |
| Power Consumption | 45 W (operation), < 1 W (standby) |
| Audio Output Power | 2 x 20 W RMS (stereo) |
| Disc Playback | DVD, DVD±R/RW, CD, CD-R/RW, MP3 |
| Tuner | FM, AM (MW) with memory presets |
| USB Port | Yes, for MP3 playback |
| AUX Input | Yes (3.5 mm jack) |
| Headphone Output | Yes (3.5 mm jack) |
| Remote Control | Included |
| Display | LCD with blue backlight |
| Sound Features | Bass Boost, Equalizer presets |
| Cleaning and Maintenance | Clean with soft dry cloth; avoid liquids |
| Safety | Class II, do not open; unplug during storms |
| Spare Parts / Repairability | Contact Clatronic service; limited parts availability |
Frequently Asked Questions - MC 1020 DVD CLATRONIC
User questions about MC 1020 DVD CLATRONIC
0 question about this device. Answer the ones you know or ask your own.
Ask a new question about this device
Download the instructions for your Hi-Fi System in PDF format for free! Find your manual MC 1020 DVD - CLATRONIC and take your electronic device back in hand. On this page are published all the documents necessary for the use of your device. MC 1020 DVD by CLATRONIC.
USER MANUAL MC 1020 DVD CLATRONIC
natural_image
Line drawing of a two-tiered speaker with dual speakers and a central grille (no text or symbols)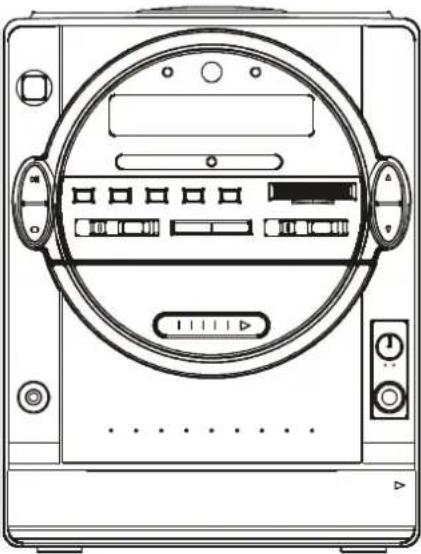
natural_image
Front view line drawing of a CD or audio meter device with control buttons and display screen (no text or symbols)
natural_image
Line drawing of a two-tiered speaker with dual speakers and a central grille (no text or symbols)


ZUIHRER INFORMATION:
natural_image
Line drawing of a remote control panel with a black curved arrow indicating rotation (no text or symbols)B
C
flowchart
graph LR
    A["1 WHAT WILL I DO\n2 HEAR ME CRY\n3 WITHOUT YOU\n4 MOVE CLOSER"] --> B["WITHOUT YOU"]
flowchart
graph LR
    A["Input Device"] --> B["Output Device"]
natural_image
Black-and-white photo of a child standing beside a large black dog on grass (no text or symbols visible)natural_image
Black-and-white photo of a child standing beside a large black dog on grass (no text or symbols visible)
natural_image
Black-and-white photo of a child standing next to a large black dog on grass (no text or symbols visible)
natural_image
Black-and-white photo of a child standing beside a large black dog on grass (no text or symbols visible)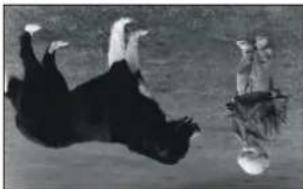
natural_image
Black-and-white illustration of two birds in dynamic poses, one falling and one floating (no text or symbols)natural_image
Black and white photo of a dog standing next to a person, with no visible text or symbols in the main image area.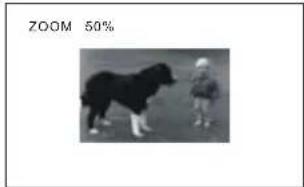
natural_image
Black and white photo of a cow and a child standing together, with no visible text or symbolsnatural_image
Black and white dog standing outdoors with a person standing beside it (no visible text or symbols)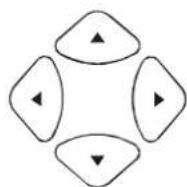
natural_image
Black-and-white photo of a child standing beside a dog in an outdoor setting (no text or symbols visible)Foto-CD
Diashow-Effekte
1 WHAT WILL I DO
2 HEAR ME CRY
3 WITHOUT YOU
4 MOVE CLOSER
flowchart
graph LR
    A["A AB"] --> B["Icon"]
flowchart
graph LR
    A["1/3"] --> B["2/3"]
ZOOM-WIEDERGABE
3.1 TV TYPE
natural_image
Line drawing of a two-tiered speaker with front and back panels (no text or symbols)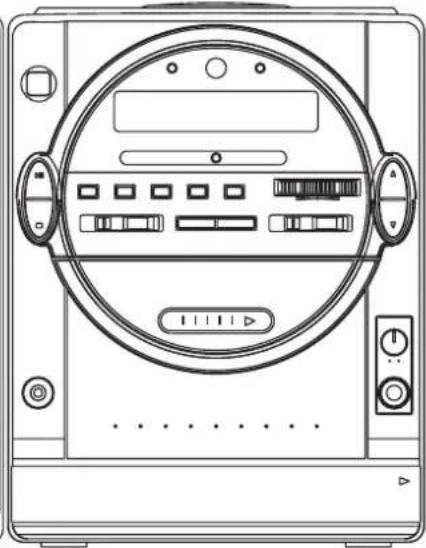
natural_image
Front view line drawing of a CD or audio meter device with control buttons and display screen (no text or symbols)
natural_image
Line drawing of a two-tiered speaker with front and back panels (no text or symbols)


Before attempting to connect, operate or adjust this player, please read these instructions completely. Please save this manual.
CAUTION:
DVD/VIDED CD/CD PLAYER IS A CLASS 1 LASER PRODUCT. HOWEVER THIS DVD/VIDEO CD/CD PLAYER USES A VISIBLE LASER BEAM WHICH COULD CAUSE HAZARDOUS RADIATION EXPOSURE IF DIRECTED. BE SURE TO OPERATE THE DVD/VIDEO CD/CD PLAYER CORRECTLY AS IN-STRUCTED.
WHEN THIS DVD/VIDEO CD/CD PLAYER IS PLUGGED TO THE WALL OUTLET, DO NOT PLACE YOUR EYES CLOSE TO THE OPENING OF THE DISC TRAY AND OTHER OPENINGS TO LOOK INTO THE INSIDE OFTHIS PLAYER.
USE OF CONTROLS OR ADJUSTMENTS OR PERFORMANCE OF PROCEDURES OTHER THAN THOSE SPECIFIED HEREIN MAY RESULT IN HAZARDOUS RADIATION EXPOSURE.
DO NOT OPEN COVERS AND DO NOT REPAIR YOURSELF. REFER SERVICING TO QUALIFIED PERSONNEL.
WARNING:
TO REDUCE THE RISK OF FIRE OR ELECTRIC SHOCK, DO NOT EXPOSE THIS EQUIPMENT TO RAIN OR MOISTURE.
TO REDUCE THE RISK OF FIRE OR ELECTRIC SHOCK, AND ANNOYING INTERFERENCE, USE THE RECOMMENDED ACCESSORIES ONLY.
THIS DEVICE IS INTENDED FOR CONTINUOUS OPERATION!

CAUTION
RISK OF ELECTRIC SHOCK DO NOT OPEN

CAUTION: TO REDUCE THE RISK OF ELECTRIC SHOCK, DO NOT REMOVE COVER (OR BACK). NO USER -SERVICEABLE PARTS INSIDE. REFER SERVICING TO QUALIFIED SERVICE PERSONNEL.
(Back of player)

The lightning flash with arrowhead symbol, within an equilateral triangle, is intended to alert the user to the presence of uninsulated "dangerous voltage" within the product's en-closure that may be of sufficient magnitude to constitute a risk of electric shock to persons.

The exclamation point within an equilateral triangle is intended to alert the user to the presence of important operating and maintenance (servicing) instructions in the literature accompanying the appliance.
CAUTION - LASER RADIATION WHEN OPEN. DO NOT STARE INTO BEAM.
(Inside of player)
VENTILATION WARNING:
THE NORMAL VENTILATION OF THE PRODUCT SHALL NOT BE IMPEDED FOR INTENDED USE.
Table of contents
GettingStarted:
Safety information ....30
Features 32
Precautions ....33
Control reference guide ....34,35
Basic connection ....36,37
Optional audio connections .....38 ,39
Remote control unit preparation ....40
Connecting microphone and phone....40
BasicOperation:
Basic play 41
Preparations .... 41
Basic play 41
Stopping play.... 42
Skipping ahead or back....42
Rapid advance / (Rapid reverse)....42
Pause/step play....42
Slow-motion play [DVD/VCD]......43
Mp3 playback....43
Basic play....43
Play mode....43
Picture CD....44,45
Play mode....44
Skip to next/previous pictures....44
Rotating pictures....44
Flipping pictures....44
Picture shrink/zoom....44
Slide show effects....45
Enjoying Video CDs with playback control.....45
KARAOKE operation.... 45
ON Screen display information....46
AdvancedOperation:
Program play 46
Repeat play....47
Repeat viewing(listening)......47
A-B repeat play....47
Changing subtitle language [DVD.only].....48
Changing audio soundtrack language
[DVD/VCD disc] 48
Viewing from different angle[DVD.only]....49
Search for preferred scene 49
Radio and cassette operations....52
Record options....53
InitialSettings:
General setup ....50
Audio setup....51
Video setup....51
Preference setup....51
Pass word setup....51
FORREFERENCE:
Definition of terms ....54
Specifications....51
Troubleshooting....56
Disc handling and maintenance....57
DearCustomers
May we take this opportunity to thank you for purchasing this DVD/VCD/CD player.
We strongly recommend that you carefully study the Operating Instructions before attempting to operate the player and that you note the listed precaution.
Features
QUAHIGH SOUND AND PICTURE
i 96 kHz/24 bit audio D/A converter
This player enables 96 kHz/24 bit linear PCM signals, which constitute the highest specifications in the DVD standards, to be reproduced faithfully. To support 96 kHz sampling/24 bit sound, the shaping noise of this multi-level digital sigma type of D/A converter is kept flat up to 44 kHz, thus preventing the important audio signals from being affected in any way. In terms of the bottom line, the sound in all of its various modes is reproduced faithfully.
j 10 bit video D/A converter
With its 10 bit capability, this D/A converter reproduces images faithfully.
i Component video output connectors
These connectors are provided to support the kind of top-of-the-line monitors whose specifications cater to professionals. A frequency band for the colour signals up to 3 MHz is supported so that vividly defined colours are reproduced faithfully.
MULTI TV SYSTEM SUPPORTTED
The player can play back discs with signal system of PAL and NTSC.
GRAPHICAL USER INTERFACE SCREEN
Simply by pressing the DISPLAY button on the remote control unit, information on the player and disc can be displayed on the TV screen for easy identification. The player's operations and settings can easily be performed by operating the remote control while monitoring the TV screen.
MULTI-AUDIO FUNCTION
The audio soundtrack can be heard in up to 8 languages. (The number of audio sound languages depends on the software.)
MULTI-SUBTITLES FUNCTION
Subtitles may be displayed in one of a maximum of 32 languages depends on the software.
MULTI-ANGLE FUNCTION
This function allows you to choose the viewing angle of scenes which were shot from a number of different angles. (Limited to DVD recorded with multiple camera angles.)
PARENTAL LOCK FUNCTION
This can prevent play of DVD unsuitable for children.
DISC FORMATS SUPPORTED BY PLAYER
The player can play back discs bearing any of the following marks:


Precautions
Please read these precautions before operating this player.
Power Cord Protection
To avoid any malfunctions of the player, and to protect against electric shock, fire or personal injury, please observe the following.
- Hold the plug firmly when connecting or disconnecting the AC power cord.
- Do not connect or disconnect the AC power cord when your hands are wet.
- Keep the AC power cord away from heating appliances.
- Never put any heavy object on the AC power cord.
- Do not attempt to repair or reconstruct the AC power cord in any way.
- Remove dust, dirt, etc. on the plug at regular intervals.
- If the player has been dropped or otherwise damaged, set the player to the standby mode and disconnect the AC power cord.
- If the player has fumes, odours or noise, set the player to the standby mode and disconnect the AC power cord.
Placement
Avoid placing the player in areas of:
- direct sunlight or heating radiators, or closed automobiles
- high temperature (over 35^ ) or high humidity (over 90% )
• excessive dust - vibration, impact or where the surface is tilted as the internal parts may be seriously damaged.
Non-use periods
When the player is not being used, set the player to the standby mode.
When left unused for a long period of time, the player should be unplugged from the household AC outlet.
No fingers or other objects inside
- Touching internal parts of this player is dangerous, and may cause serious damage to the player. Do not attempt to disassemble the player.
- Do not put any foreign object on the disc tray.
Keep away from water and magnetic object
- Keep the player away from flower vases, tubs, sinks, etc. If liquids are spilled into the player, serious damage could occur.
- Keep magnetic objects such as speakers, at a distance from the player.
Stacking
- Place the player in a horizontal position, and do not place anything heavy on it.
- Do not place the player on amplifiers or other equipment which may become hot.
Condensation
moisture may form on the lens in the following conditions:
- immediately after a heater has been turned on.
• in a steamy or very humid room. - when the player is moved from a cold environment to a warm one.
If moisture forms inside this player, it may not operate properly. In this case, turn off the power and wait about one hour for the moisture to evaporate.
If there is noise interference on the TV while a broadcast is being received
Depending on the reception condition of the TV, interference may appear on the TV screen while you are watching a TV broadcast and the player is left on. This is not a malfunction of the player or the TV. To watch a TV broadcast, set the player to the standby mode.
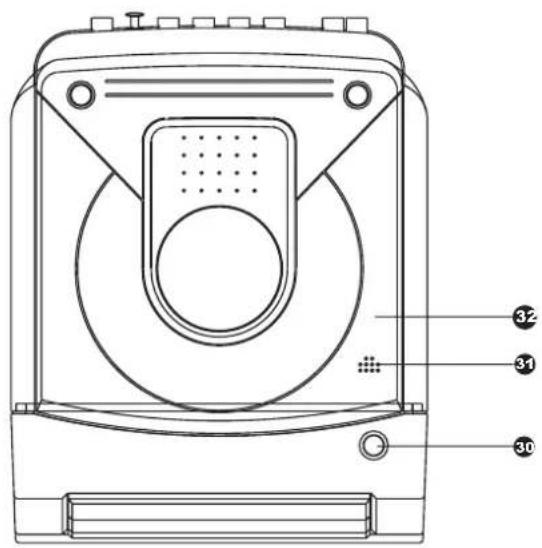
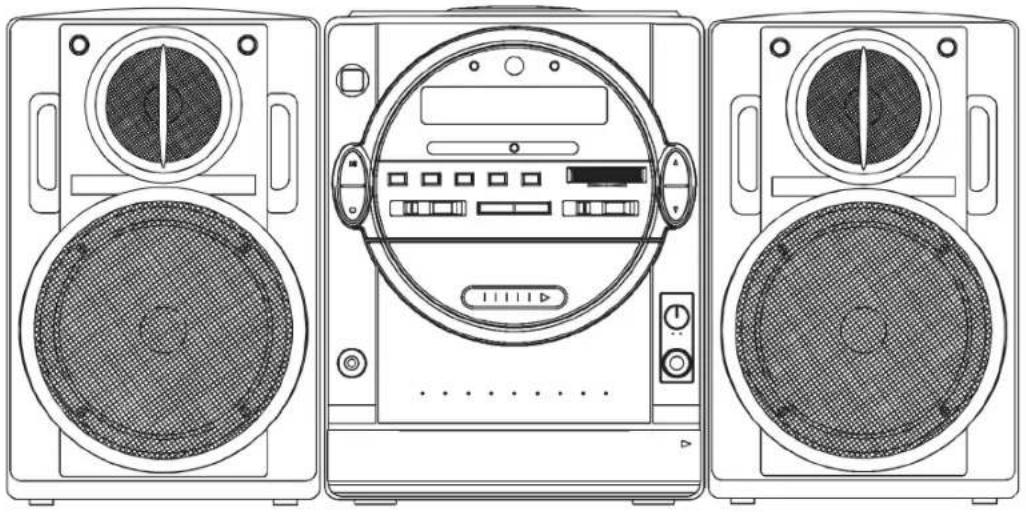
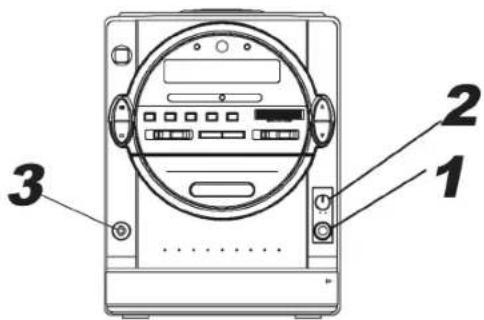
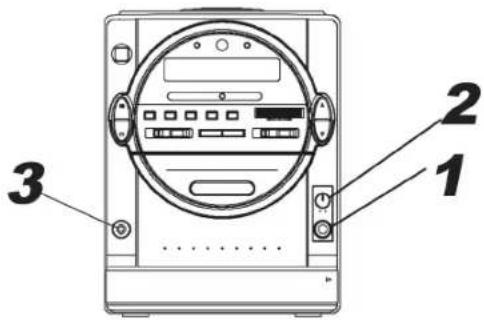
Main unit
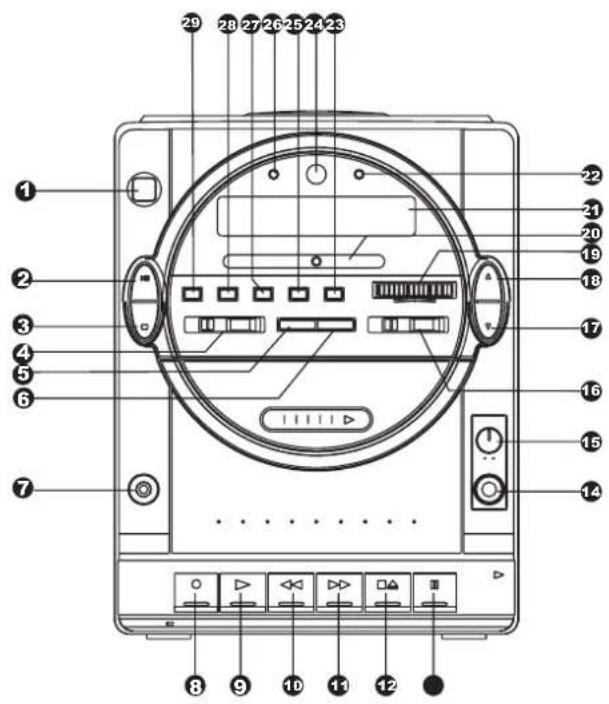
POWER button -press this button to power the player on or off state: This button must be on in order to be able to use the remote control.
② DVD PLAY/PAUSE button- play or halt the disc playing by press this button
③ DVD STOP -stop the DVD playing by pressing this button.
4 FUNCTION Switch slide this button to select a different sound source : DVD/VCD/MP3,Tape,Radio .
5 PREV. button-skip to the previous chapter (DVD) or track (for CD)
6 NEXT button -skip to the next chapter (for DVD) or track (for CD)
⑦ Headphone Jack -to connect one headphone
⑧ Cassette Record button- can record sound signal from other sound source such as radio and DVD etc. The Cassette Record and Play button should be pressed down at the same time
⑨ Cassette Play button press down this button to play the cassette tape.
10 Cassette Fast Rewind button -rewind the cassette fast by pressing this button
11 Cassette Fast Forward button- search the desired point forward by pressing the button.
12 Cassette Stop/Eject button - stop the cassette playing or recording by pressing this button once and remove the cassette tape by pressing this button again
13 Cassette Pause button - to halt the cassette play.
14 MIC Mixing Jack -to connect the Microphone
15 MIC VOLUME Control-to adjust MIC volume of microphone
16 Band Switch -select the radio AM ,FM band
17 VOLUME Down button- decrease the volume level by pressing this button
18 VOLUME Up button- increase the volume level by pressing this button
19 Tuning Control- adjust the knob to search the desired station.
20 Tuning indicator - indicate the frequency of current tuning.
21 LCD DISPLAY Window-show all information of the DVD playing
22 FM Stereo Indicator - the indicator will light when receiving the stereo FM broadcast
23 REPEAT 1/ALL button -repeat one/all chapter(s) or title(s)or track(s) by pressing this button.
2 REMOTE SENSOR-receive the signal from the remote control.
25 DISPLAY button -Press Display button continuously during the playback, the screen will display the elapsed time and remaining time.
26 STANDBY indicator - when the unit is power off state by remote control, the indicator will be on(standby), if you power on by remote control, the indicator will be off.
27 AUDIO button -Select the sound track
28 PAL/NTSC button -Press this button to change PAL, NTSC and MULTI.
29 SUBTITLE button -display the different subtitle language on the screen by pressing this button
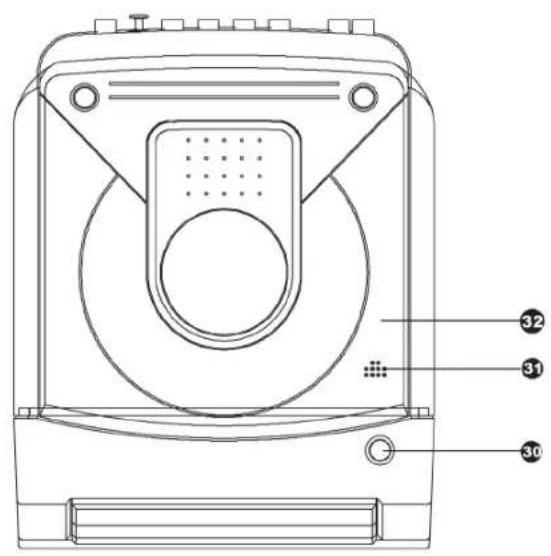
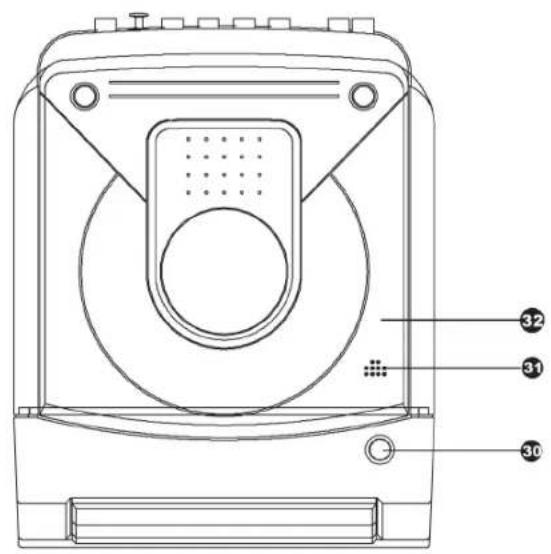
30 DVD door OPEN button -open the DVD player door by pressing this button
31 DVD door PUSH CLOSE button -close the DVD player door by pressing this area. If loading a disc, the player will read the disc immediately after close the DVD door
32 DVD Door -the top cover of DVD player
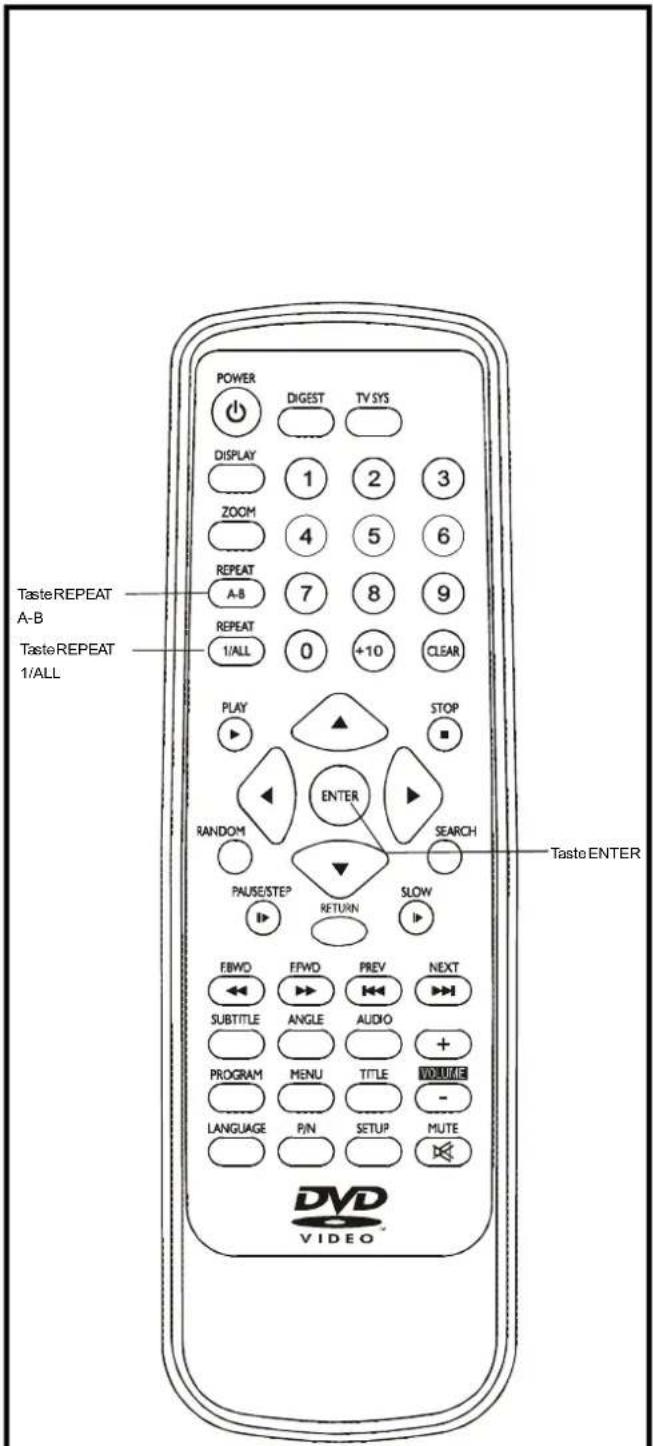
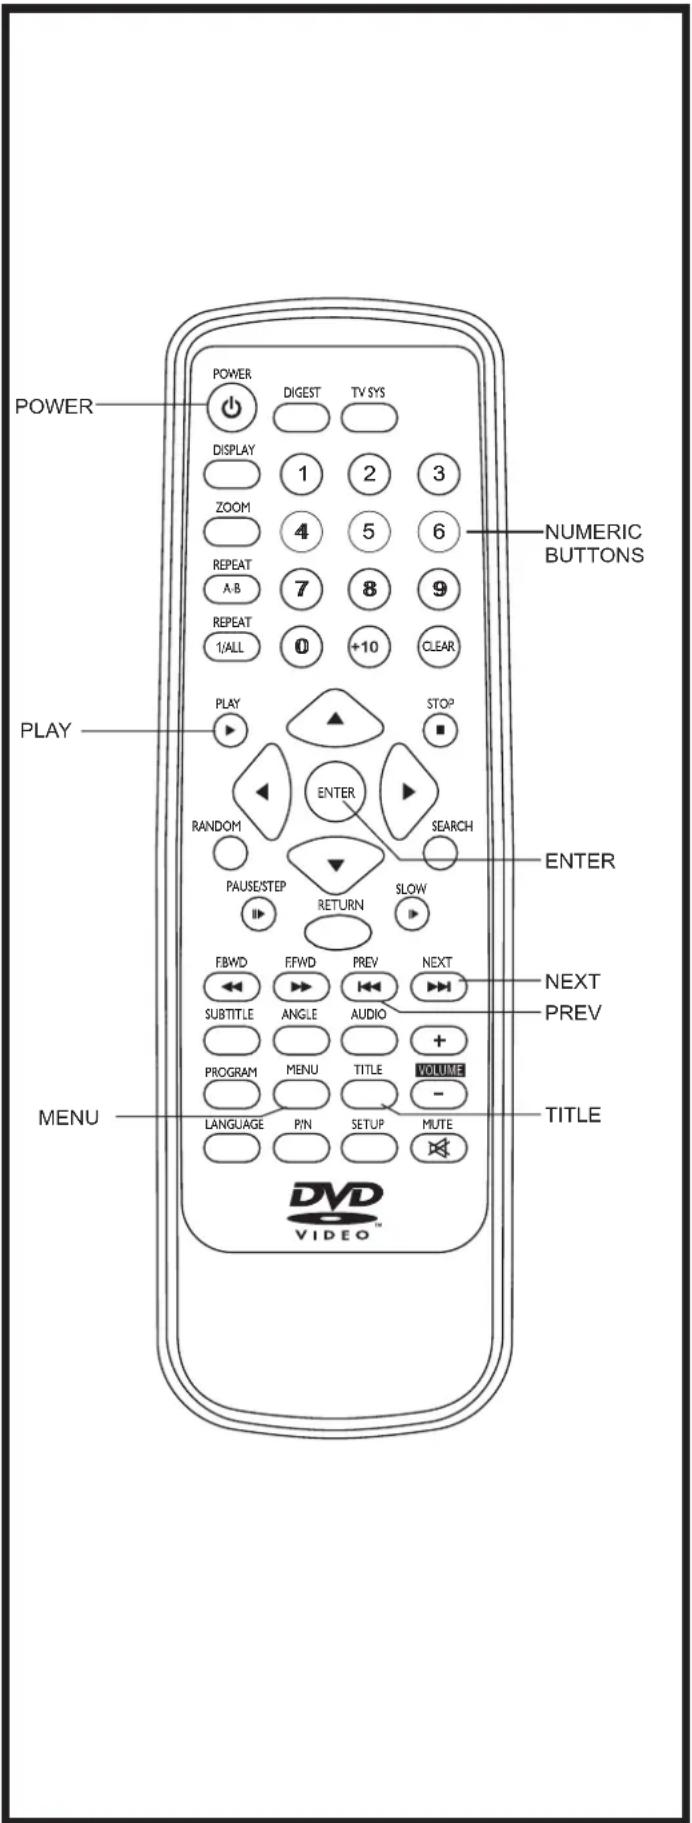
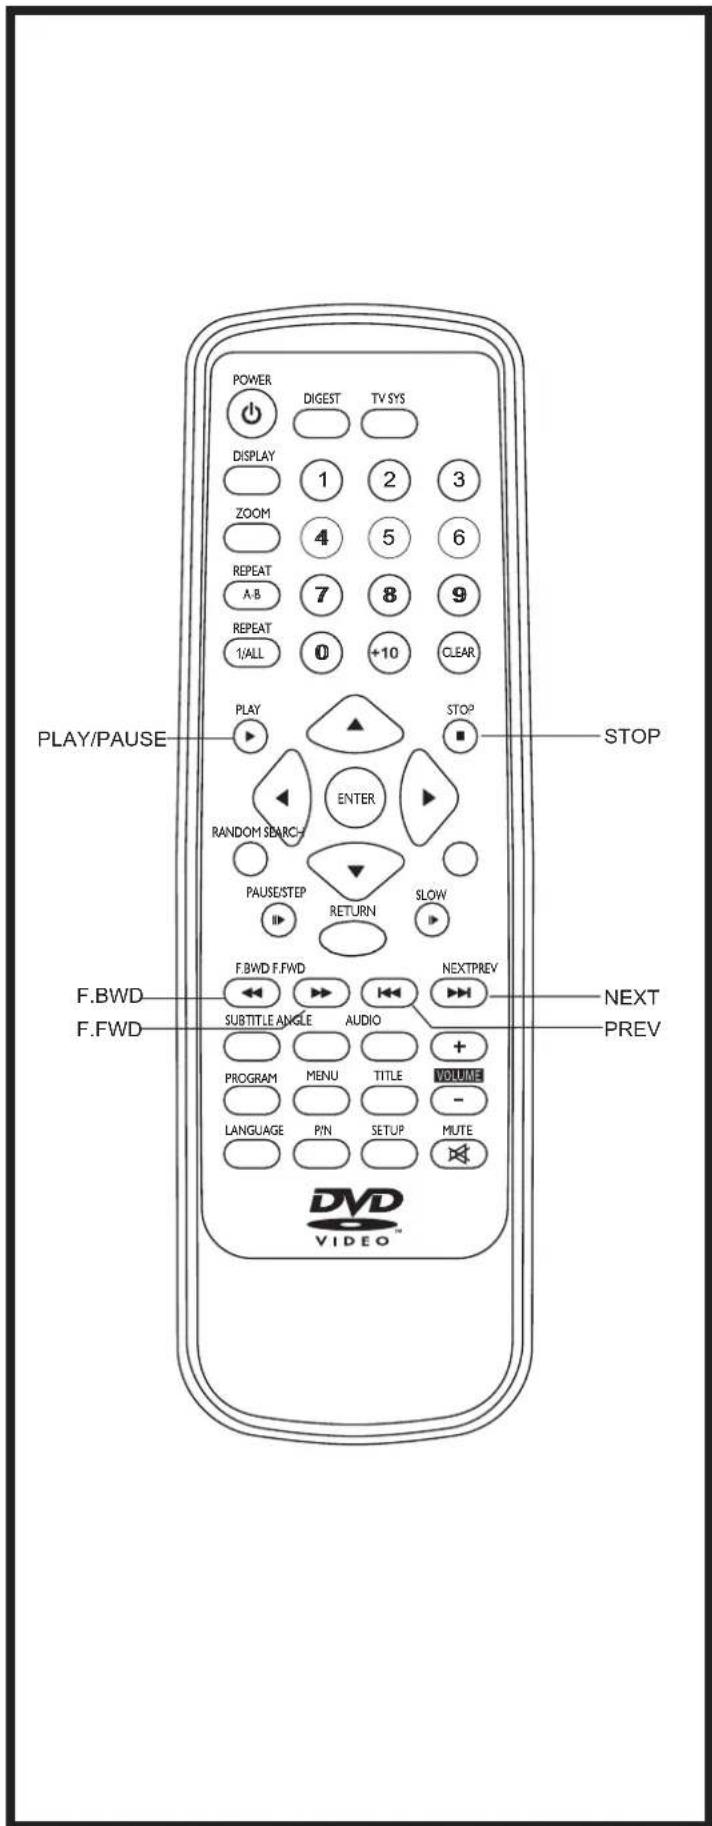
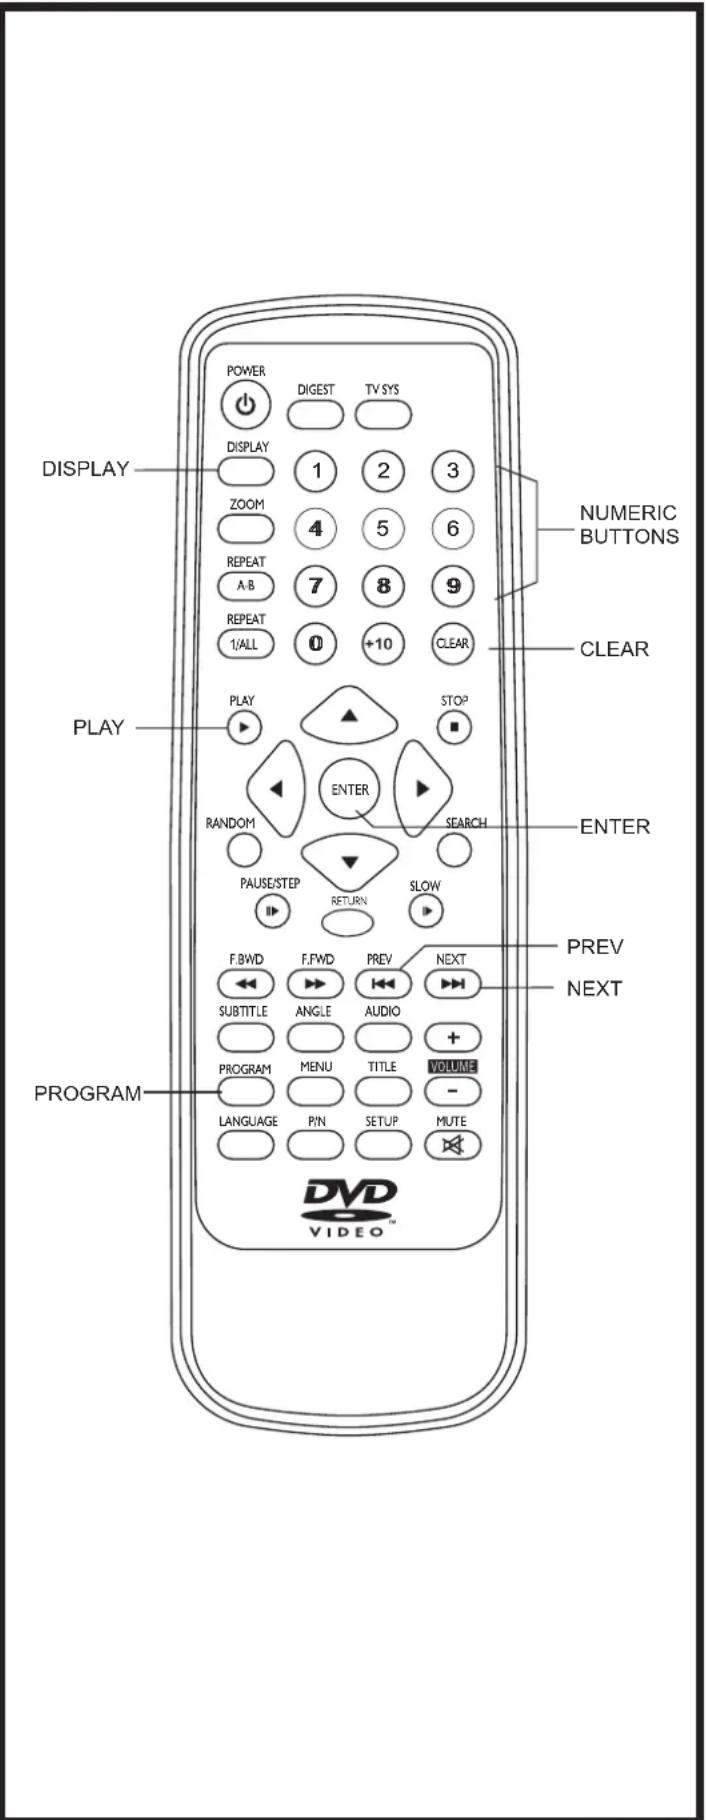
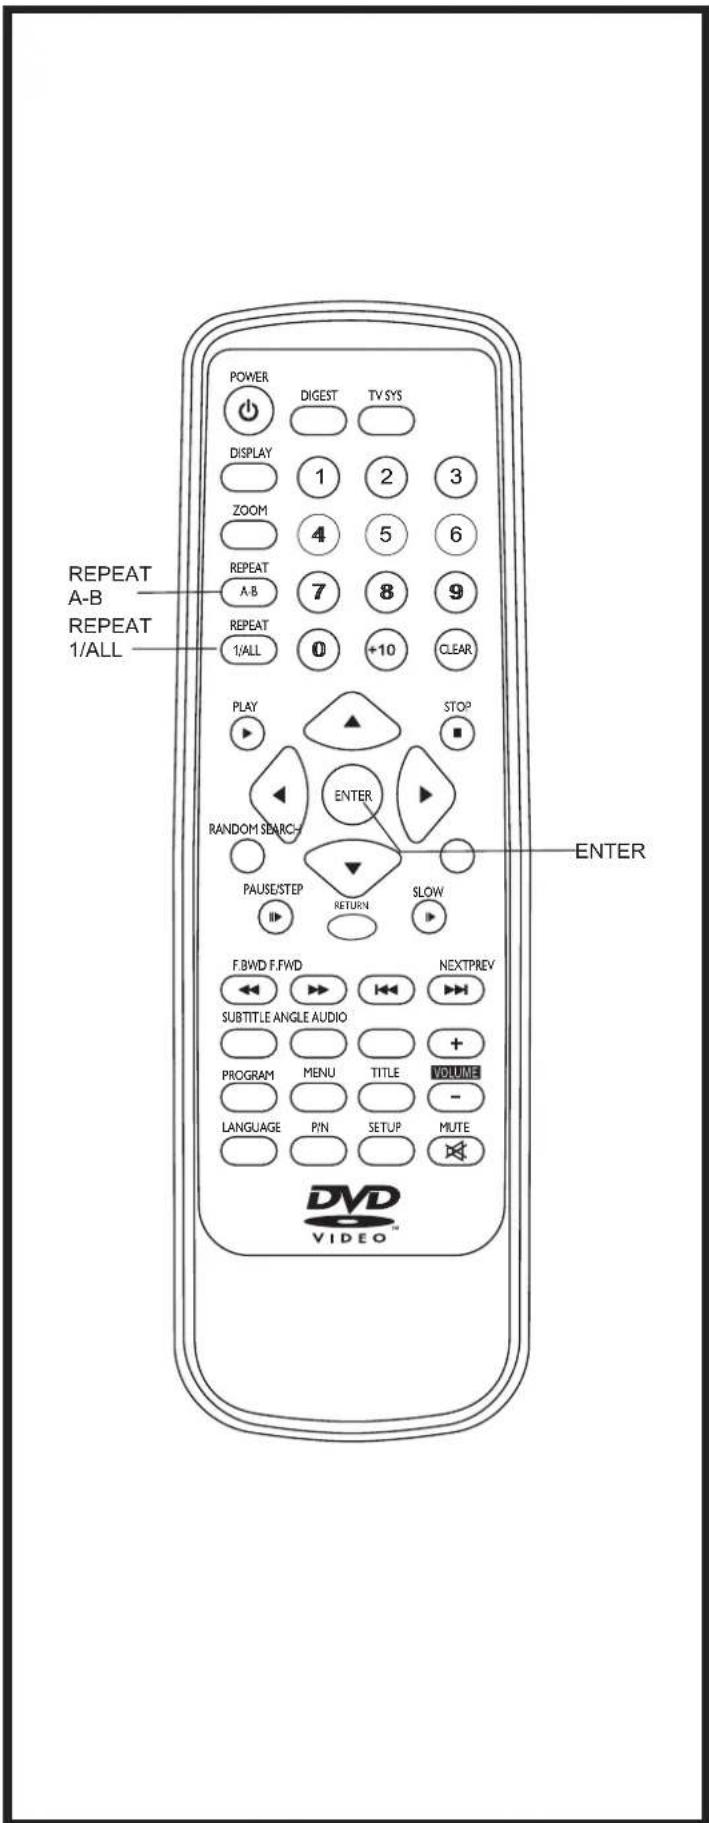
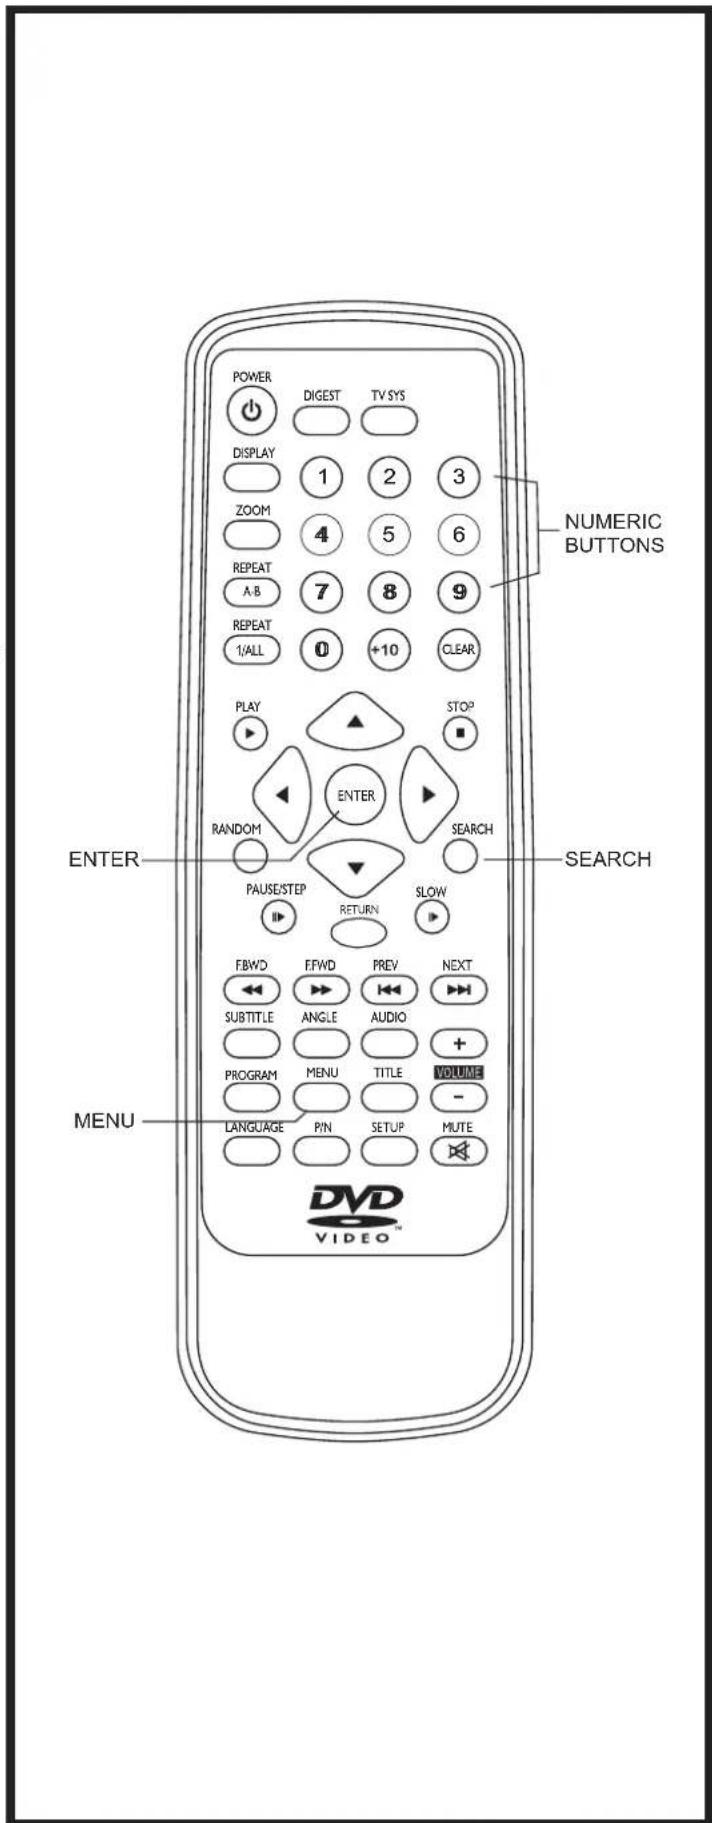
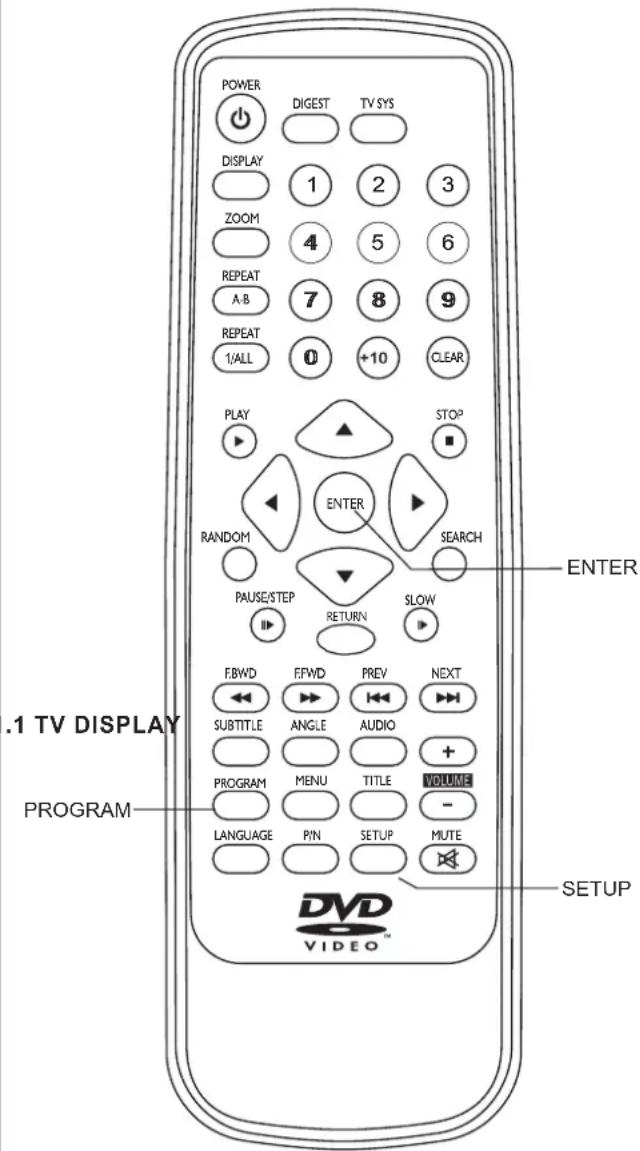
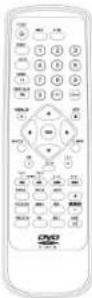
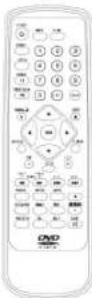
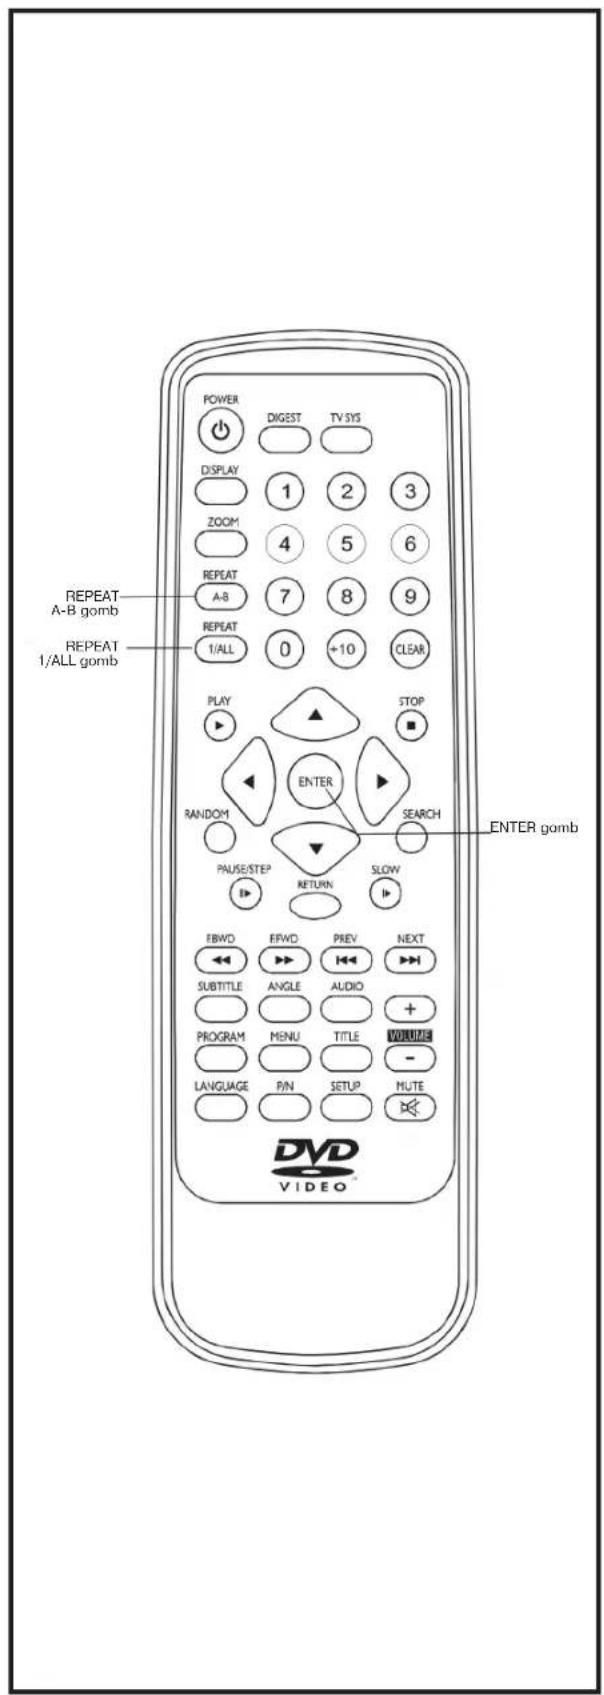
Remote control unit
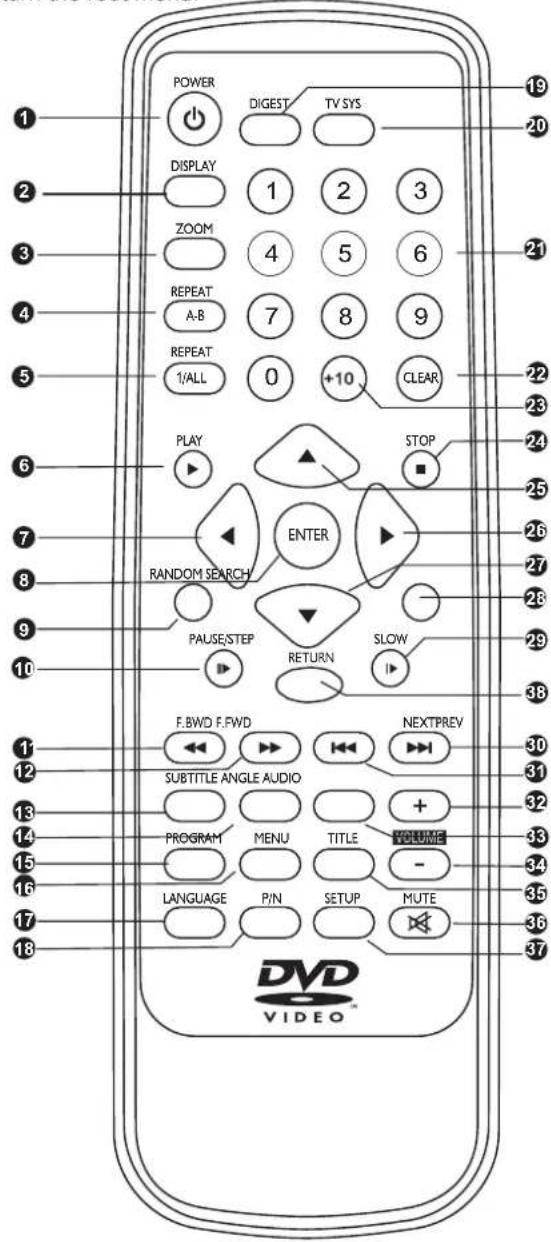
① POWER button- Press this button to set the player to standby on or off state (if the main power of the set is on)
② DISPLAY button -Press Display button continuously during the playback, the screen will display the elapsed time and remaining time.
③ ZOOM button -Press ZOOM button to enlarge picture size.
④ REPEAT A-B button -Press this button, the player will repeat sections between two specific points (A-B).
⑤ REPEAT 1/ALL button -Press this button, the player will repeat play one chapter or one title (for DVD), or repeat play the current track or the whole tracks (for VCD/CD).
⑥ PLAY button -Press this button, the play will start to play the disc.
⑦ NAVIGATION button-Left navigation button
8 ENTER button- Press this button to confirm what you select.
9 RANDOM button- Press this button, the player will play random all chapters or titles (for DVD), or all tracks (for VCD) in random order.
10 PAUSE/STEP button -Press this button will halt or show the movie one picture each time.
F.BWD button- Press this button to play the disc backward at speeds:x2,x4,x8,x16,x32.
⑫ F.FWD button- Press this button to play the disc forward at speeds: x2,x4,x8,x16,x32.
13 SUBTITLE button-this button will display the different language on the screen
1 ANGLE button -Press this button will display the angle number and change to different angles.
15 PROGRAM button -Press this button can setup the memory order of chapter or title (for DVD) or tracks (for CD).
16 MENU button -Select Playback Control for VCD if PBC is on, when you press return button, the player will stat at the VCD root.
⑦ LANGUAGE button -Press this button will change the OSD character to different language.
18 P/N button -Press this button to change between PAL and NTSC, MULTI..
⑲ DIGEST button -Press this button to preview disc contents.(see later page for details)
20 TV system button -Press this button to directly change The TV signal between RGB and S-video (CVBS)
21 NUMERIC button - Use these buttons to select the track.
2 CLEAR button -Press this button, the information on the screen will all be cleared.
+10 button - add ten tracks or chapters by pressing each time.
2 STOP button -Press this button, the player will stop playing.
25 NAVIGATION button-up navigation button
26 NAVIGATION button-right navigation button
27 NAVIGATION button down navigation button
28 SEARCH button -Press this button during play then press NUMERIC button to choose number corresponding to the desired point
SLOW button -Press this button during playback the play speed will be reduced
30 NEXT button -Press this button, the scene will skip to the next chapter or the next track
③ PREV button -Press this button, the scene will skip to the PREVIOUS chapter or the track
③ VOLUME + button -Press this button, the volume will increase
3K AUDIO button -Select the sound track
③ VOLUME - button -Press this button, the volume will reduce
35 TITLE button -Play the title (DVD) or return root (VCD)
36 MUTE button-the audio output of the main unit is to be shut off by pressing this button.
37 SETUP button -press this button will enter initial settings menu
38 RETURN button- If you have set the PBC on, when you press this button during playing video disc, the scene will return the root menu.
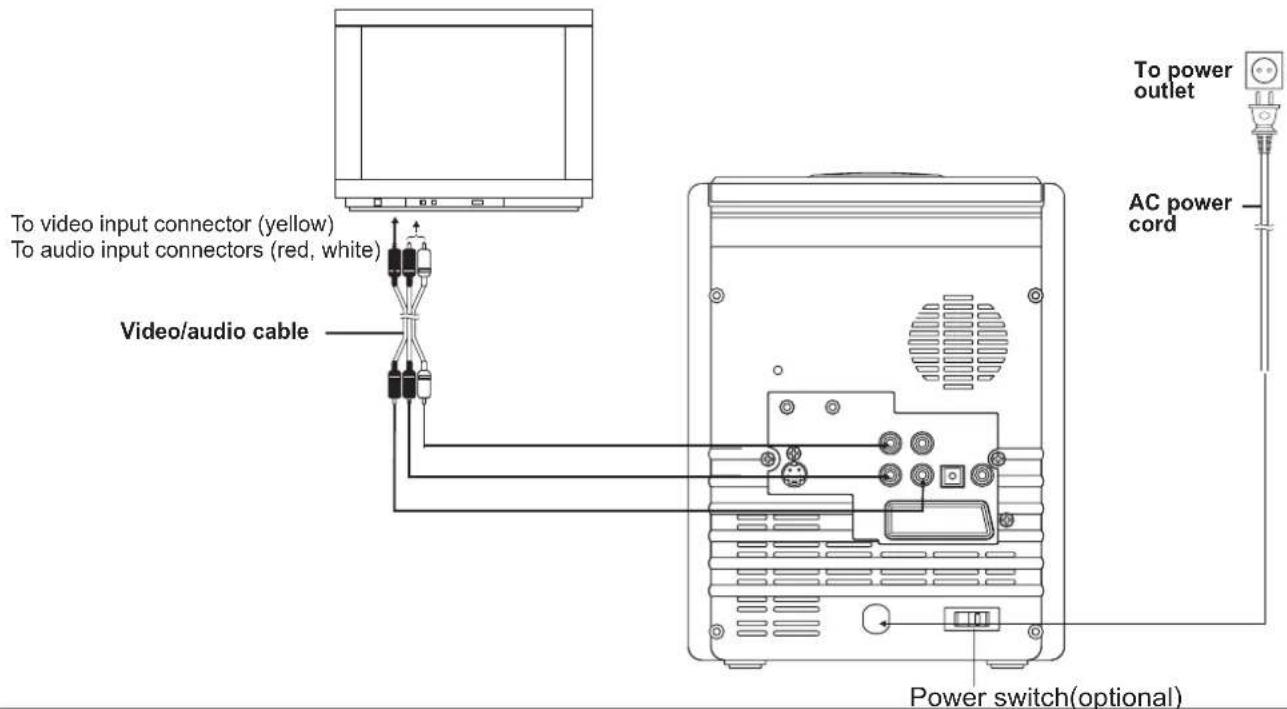
Basic connection
- It is recommended to connect a multi-system TV.
- Ensure that this player and other equipment to be connected are set to the standby mode or off and disconnect the AC power cords before commencing connection.
- Do not block ventilation holes of any of the equipment and arrange them so that air can circulate freely.
- Read through the instructions before connecting other equipment.
- Ensure that you observe the color coding when connecting audio and video cables.
Note:
- During DVD play, the TV volume may be at a lower level than during TV broadcasts, etc. If this is the case, adjust the volume to the desired level.
- If the DVD/VCD/CD player is connected to the TV through a video cassette recorder, the picture may not be played back normally with some DVDs. If this is the case, do not connect the player via the VCR.
Connecting to a stereo TV set
Connecting to a monaural TV set

Connecting to a TV set or monitor with Scart video output connectors

S-video output connectors
The S (separate) video output connector separates the color (C) and luminance (Y) signals before transmitting them to the TV set in order to achieve a sharper picture.
Use the S-video cable (supplied) when connecting the player to a TV set equipped with an S-Video input connector for the best picture clarity possible.
The SCART connector outputs the color signals (red, green, blue) in order to achieve high fidelity in reproducing colors. The description of the component video input connectors may differ depending on the TV set or monitor. Refer to the instruction manual of your TV set for details.
Connecting to audio equipment
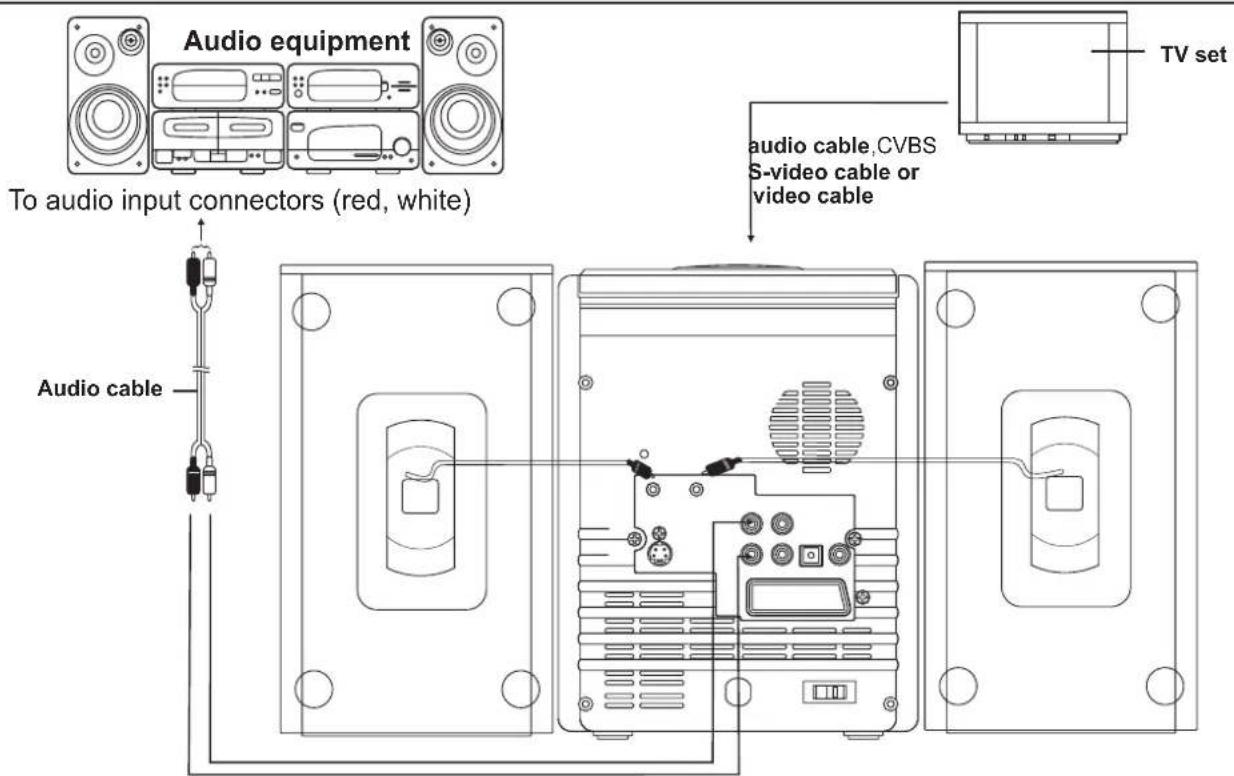
Connecting to a decoder with Dolby Digital (AC-3/DTS) processing
When DVD recorded in Dolby Digital/DTS are played, Dolby digital/DTS bitstream is output from the player's OPTICAL digital audio output connector or COAXIAL digital audio output connector. When the player is connected to a Dolby Digital/DTS decoder, you can enjoy theater-quality audio in your home. [An optical digital audio cable or coaxial audio cable (both optional) is required when an optional Dolby digital/DTS decoder is used.]
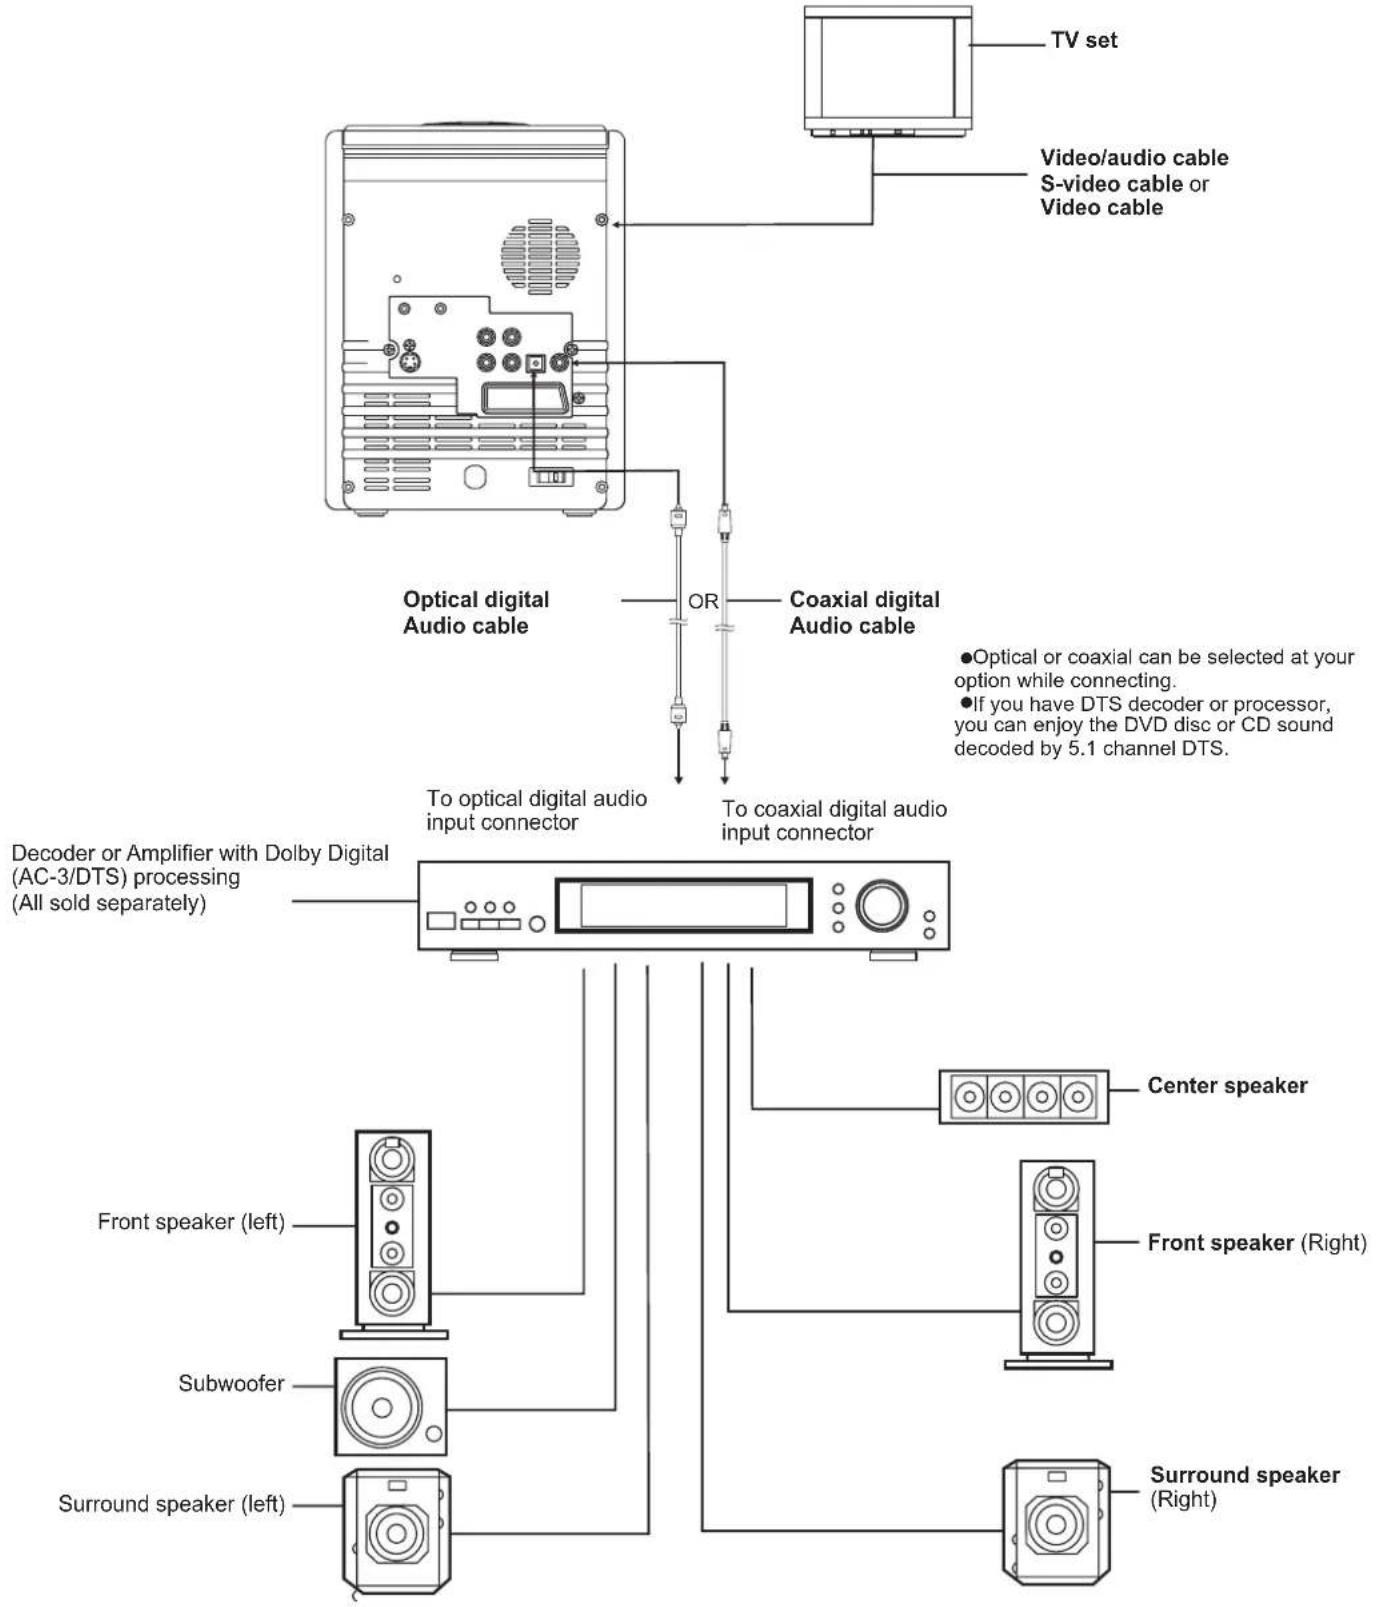
(Continued on the next page)
Optional audio connections
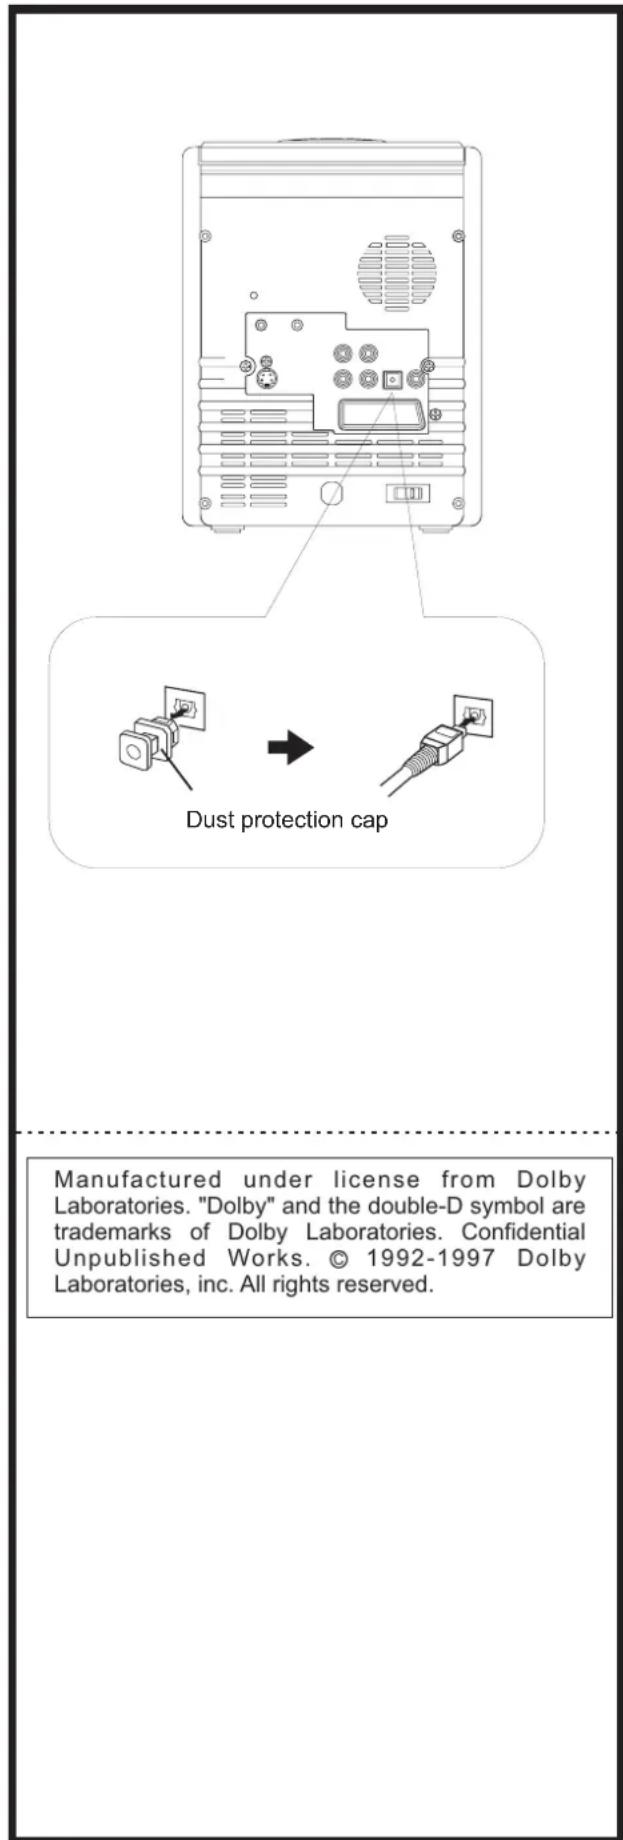
Notes when connecting the optical digital audio cable (optional)
- Remove the dust protection cap from the optical digital audio output and connect the cable firmly so that the configurations of both the cable and the connector match.
- Keep the dust protection cap and to protect against dust, always reattach the cap when not using the connector.
Concerning the audio output from the player's optical/coaxial digital audio output connector
| Disc Sound | recording format | Optical/coaxial digital audio output from connector |
| DVD | Dolby Digital (AC-3) | Dolby Digital bitstream (2-5.1ch) or PCM (2ch) (48 kHz/16 bit)*1 |
| Linear PCM (48/96 kHz 16/20/24 bit) | Linear PCM (2ch) (48 kHz sampling/16 bit only)*2 or no output*1 | |
| Video CD | MPEG 1 | PCM (44.1 kHz sampling) |
| CD | Linear PCM | Linear PCM (44.1 kHz sampling) |
*1 The type of audio output from the connector can be selected by the initial settings.
*2 Sound having 96 KHz sampling is converted into 48 Khz or 96KHz sampling when it is output from the player's optical/coaxial digital audio output connector.
For your reference:
- Dolby Digital (AC-3) is a digital sound compression technique developed by the Dolby Laboratories Licensing Corporation.
- Linear PCM is signal recording format used in a CD. While a CD is recorded in 44.1 KHz/16 bit, a DVD is recorded in 48 KHz/16 bit up to 96 KHz/24 bit.
- If you have a Dolby Pro Logic Surround decoder, you will obtain the full benefit of Pro Logic from the same DVD movies that provide full 5.1-channel Dolby Digital soundtracks, as well as from titles with the Dolby Surround mark.
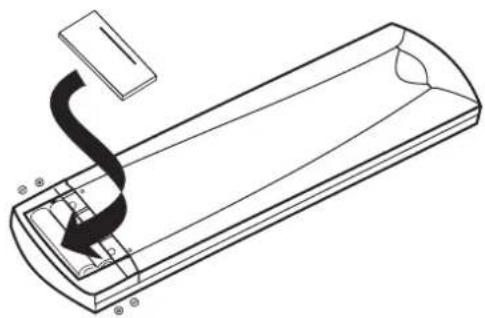
Remote control unit preparation
Battery installation A
Insert the batteries while observing the correct (+) and (-) polarities as illustrated at right.
Service life of batteries
- The batteries normally last for about one year although this depends on how often, and for what operations, the remote control unit is used.
- If the remote control unit fails to work even when it is operated near the player, replace the batteries.
• Use 2 size AAA batteries.
Note:
Do not use rechargeable (Ni-Cd) batteries.
- Do not attempt to recharge, short-circuit, disassemble, heat or throw te batteries into the fire.
- Do not drop, step on or otherwise impact the remote control unit. This may damage the parts or lead to malfunction.
Do not mix old and new batteries.
- If the remote control unit is not going to be used for a long time, remove the batteries. Otherwise, electrolyte may leak which may lead not only to malfunctioning but also to burns if contact is made with the electrolyte.
Wipe away any electrolyte leaking inside the remote
• control unit, and install new batteries.
• If any electrolyte should come into contact with parts of your body, wash it off thoroughly with water.
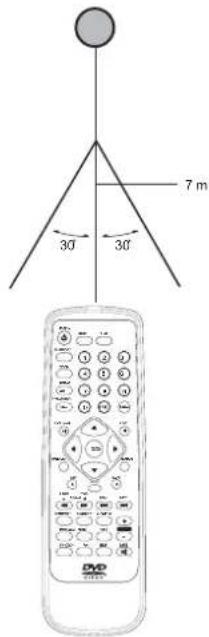
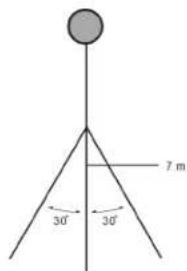
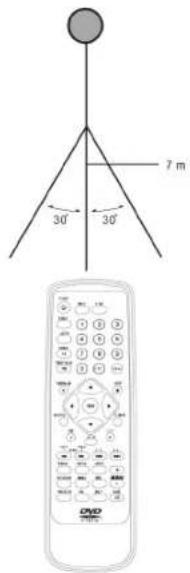
Remote control operation range B
Point the remote control unit from no more than about 7 m from the remote control sensor and within about 60 of the front of the player.
- The operating distance may vary according to the brightness of the room.
Note:
- Do not point bright lights at the remote control sensor.
- Do not place objects between the remote control unit and the remote control sensor.
- Do not use this remote control unit while simultaneously operating the remote control unit of any other equipment.
Connecting Microphone and ☐ Phone
1Connect the Microphone.
- Connect one Microphone to MIC
2 Adjust the MIC Volume to Proper level that you want.
3Connect the phone Connect one phone to PHONE jack
A
natural_image
Line drawing of a remote control panel with a scroll wheel and indicator lights (no text or symbols)B
REMOTE SENSOR
C

Before enjoying DVD/Video CD/CD
The On-Screen menu language of your player has been factory pre-set to English.
If you would like to change the menu language to other language, please refer to "Selecting language of On-Screen Display menu".
In the explanation given below it is assumed that English has been selected as the menu language.
Basic play
Preparations
- Switch the TV ON and select "Video" as the TV input. Switch on the stereo system's power if the player has been connected to a stereo system.
Basic play
- Press POWER to switch on the power.
- Press OPEN button to open the DVD door.
- Place a disc onto the DVD compartment.
Hold the disc without touching either of its surfaces, position it with the printed title side facing up, align it with the guides, and place it in its proper position. - Press PUSH CLOSE button to close the DVD door. The DVD door is closed and play begins. When the DVD door is closed by pressing PUSH CLOSE button, the player will start to read the disc immediately.
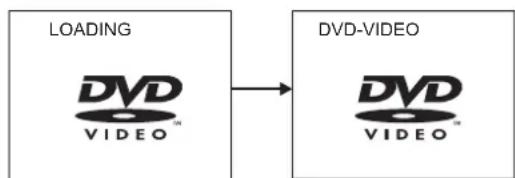
flowchart
graph LR
    A["LOADING\nDVD\nVIDEO™"] --> B["DVD-VIDEO\nDVD\nVIDEO™"]
- When a menu screen appears on the TV, move the navigation buttons or press the numeric buttons to select preferred track number, then press ENTER button to Confirm.

flowchart
graph LR
    A["1 WHAT WILL I DO\n2 HEAR ME CRY\n3 WIT HOUT YOU\n4 MOVE CLOSER"] --> B["WITHOUT YOU"]
- When the menu continues onto another screen, press NEXT SKIP button to view the next screen, press PREV SKIP button to skip to previous screen.
NOTE: Due to the different design of some software titles, NEXT and PREV button may not always work.
- To stop play and return to the menu screen, press TITLE button, or MENU button(which button is pressed differs depending on the disc used)DVD, PRESS TITLE, MENU or RETURN. Video CD, press RETURN.
Stopping play
Press STOP
For your convenience:
When player is stopped, the player records the point where Stop was pressed(RESUME function).Press PLAY again.Playback will resume from this point. When the tray is opened or STOP is pressed again, the RESUME will be cleared.
Skipping ahead or back
Skipping ahead
Press NEXT SKIP ▶▶I button during play
A chapter(DVD) or a track(Video CD/CD) is skipped each time the button is pressed.
Skipping back
{Press PREV SKIP ◀ button on during play
A chapter(DVD) or a track (Video CD/CD) is skipped each. Time the button is pressed.

flowchart
graph LR
    A["Input Block 1"] --> B["Output Block 2"]
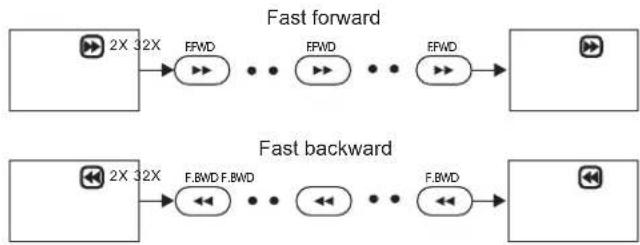
Rapid advance(Rapid reverse)
During playback, press F.FWD ▶ button, or F.BWD ◀ button (On the remote control or on main unit) (2X,4X,8X,16X,32X). Press "PLAY" button to resume normal play.
flowchart
graph LR
    subgraph Fast_forward
        A["2X 32X"] --> B["FFWD"]
        B --> C["..."]
        C --> D["FFWD"]
        D --> E["..."]
        E --> F["FFWD"]
        F --> G["..."]
        G --> H["FFWD"]
    end
    subgraph Fast_backward
        I["2X 32X"] --> J["F.BWD"]
        J --> K["..."]
        K --> L["FFWD"]
        L --> M["..."]
        M --> N["FFWD"]
        N --> O["..."]
        O --> P["FFWD"]
        P --> Q["..."]
        Q --> R["FFWD"]
    end
Pause or step play
During playback, press PAUSE button, the play will be paused, and in this mode, each time the STEP button is pressed, the player will only play one picture, to resume normal play, press PLAY button.
Slow-motion play (DVD/VCD)
On the remote control unit
Press SLOW button during playback.
- Plays the disc at a 1/2 of normal speed at first. Each time The play speed will be reduced(1/2,1/4,1/8,1/16).
- Press PLAY button, normal play will resume.
1/2
MP3 playback
Basic play
- Insert the disc containing the files in MP3 format to be played and after a few seconds, the TV screen will show all folders on the disc.
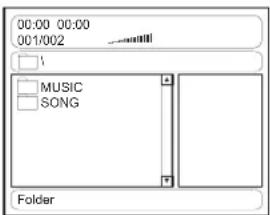
-
Select the folder you want to play by the navigation buttons and press ENTER button to confirm.
-
The files in this folder are displayed and select your favourable song by using the up/down navigation buttons and press ENTER button to start playback.
![Volume level indicator MP3 bit rate indicator Play time Total time Equalizer indicator Current song/Total songs 01:51 03:47 192 002/006 Current folder VMUSIC\ [MP3] ALAN [MP3] BUZZ [MP3] CANDY [MP3] DIANA [MP3] MANDY [MP3] SIMPSON Folder Play mode](/content/2026/05/770695/images/cb96809d52269d653821dcea0c4a845b86071bfee2edd84f2ab6f628ca143543.jpg)
Note: Maximum 11 characters including space can be displayed for the filename.
Non-English file name will not be displayed correctly
-
Press NEXT button to see the next page or PREV button to see the previous page
-
Press REPEAT 1/all button change play mode.
Play mode:
- FOLDER - all the files in the folder will be played.
- SHUFFLE - All the files will be randomly sorted and . play by the order
• RANDOM-randomly select any file to play.
• SINGLE - play one file only. - REPEAT ONE - repeat one file.
- REPEAT FOLDER - all the files in the folder will be played repeatedly.
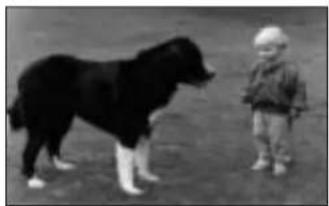
Kodak Picture CD / JPEG CD
- If Kodak Picture CD is inserted, slide show is begins automatically.
- For JPEG picture CD, select the folder you want to play by the navigation buttons and press ENTER button to confirm.
- The files in this folder are displayed and select your favourable pictures by using the up/down navigation buttons and press ENTER button to start playback. Thumbnail of picture will be displayed while you scrolling across the file name.
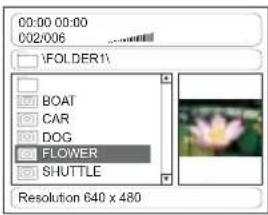
Play mode:
- SHUFFLE - All the files will be randomly sorted and play by the order
• RANDOM-randomly select any file to play.
• SINGLE - play one file only. - REPEAT ONE - repeat one file.
- REPEAT all - all the files in the folder will be played repeatedly.
Once a folder and file is selected, the picture is load onto the TV screen.
natural_image
Black-and-white photo of a child standing next to a large black dog on grass (no text or symbols visible)Note: The time to load and display picture depends on the file size of the pictures.
During playback, press MENU button to return to folder selection or STOP button to enter preview mode.
Skip to next/previous picture
Press NEXT button to skip to the next picture or PREV button to skip to the previous picture.
If no key is pressed for 5 seconds, it will skip to next picture automatically.
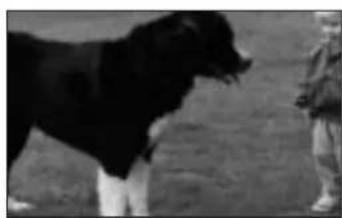
Rotating pictures
- Press RIGHT navigation button to rotate the picture clockwise.
- Press LEFT navigation button to rotate the picture counter-clockwise.
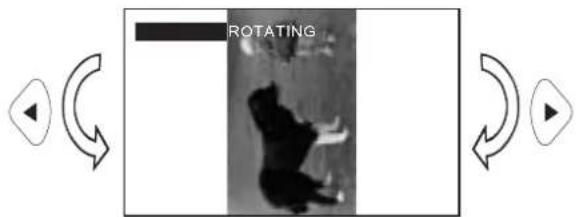
(Continued on the next page)
Flipping pictures
- Press UP navigation button to flip the picture vertically.
- Press DOWN navigation button to flip the picture horizontally.
natural_image
Black-and-white photo of a child standing beside a large black dog on a wet ground (no text or symbols visible)
natural_image
Black-and-white photo of a child standing next to a large black dog on grass (no text or symbols visible)
natural_image
Black-and-white photo of a child standing next to a large black dog on a grassy field (no text or symbols visible)
natural_image
Black-and-white photo of a dark abstract shape and a light bulb against a textured background (no text or symbols)Picture Shrink/Zoom
- Press ZOOM button to enter the zoom mode
- Press F. FWD button to enlarge picture to 100%, 125%, 150% and 200%
- Press F. BWD button to shrink enlarge pictures to 50%, 75%, and 100%

natural_image
Black and white photo of a cow standing near a person, with no visible text or symbols in the main image area.ZOOM 50%
If the picture is enlarged, you may press navigation buttons to see other portions of the picture.
natural_image
Black and white photo of a dog standing with a person standing beside it (no visible text or symbols)
natural_image
Black-and-white photo of a child standing next to a dog (no text or symbols visible)Picture CD
Slide show effects
Press PROGRAM button to select one of the effects when changing from one picture to another:
1 WIPE TOP
2 WIPE BOTTOM
3 WIPE LEFT
4 WIPE RIGHT
5 DIAGONAL WIPE LEFT TOP
6 DIAGONAL WIPE RIGHT TOP
7 DIAGONAL WIPE LEFT BOTTOM
8 DIAGONAL WIPE RIGHT BOTTOM
9 EXTEND FROM CENTRE H
10 EXTEND FROM CENTRE V
11 COMPRESS TO CENTER H
12 COMPRESS TO CENTER V
13 WINDOW H
14 WINDOW V
15 WIPE FROM EDGE TO CENTRE
16 RANDOM
17 NONE
Enjoying Video CDs with playback control
When playing VCD 2.0/3.0 with PBC, the player will show the VCD version and PBC status on the screen
VCD2.0
PBC ON
- Aftera few seconds, amenuwil appear on the screen.
1 WHAT WILL I DO
2 HEAR ME CRY
3 WITHOUT YOU
4 MOVE CLOSER
- Press numeric buttons to select corresponding track, if the track number is under 10, choose one of the numeric buttons 0 \~ 9.
- If the track number is exceed 10, press +10 button firstly, then press numeric buttons 0 \~ 9.
- During playback, press RETURN button to return to main menu.
- Press NEXT SKIP button or PREV SKIP button, the player will play in the scheduled sequence on the disc.
KARAOKE OPERATION
- Turn the MIC Volume switch to MIN.
- Connect MIC to Microphone Jacks on the front panel
• Power on the unit and play a KARAOKE Disc.
• Turn on the Microphones Switch. - If you hold the Microphones too close or Direction toward the speakers, howling maybe occur, to prevent it, please don't hold the Microphones too close or direction toward the speakers, or Adjust the MIC level to a proper Position.
- Adjust the VOLUME knobs to a proper lever that you wanted.
ON Screen display information
When the player is under operation, press DISPLAY button continuously on the remote control, the screen will display sequentially parts of information, all information and clear information..
flowchart
graph TD
    A["TITLE ELAPSED TT 02/03 CH 07/28 0:19:20"] --> B["TITLE REMAIN TT 02/03 CH 07/28 1:17:00"]
    B --> C["CHAPTER REMAIN TT 02/03 CH 07/28 0:01:34"]
    C --> D["DISPLAY OFF"]
    B --> E["CHAPTER ELAPSED TT 02/03 CH 07/28 0:01:53"]
    E --> C
    style A fill:#f9f,stroke:#333
    style B fill:#ccf,stroke:#333
    style C fill:#cfc,stroke:#333
    style D fill:#fcc,stroke:#333
    style E fill:#cff,stroke:#333
Press "DISPLAY" button again, the screen display will be cleared.
Program play
The player plays the tracks in the disc in an order you desired. 1. Press PROGRAM button and the screen will display the program menu.
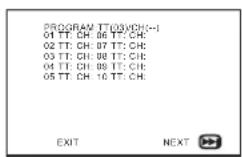
- Press navigation buttons to choose memory index and then press ENTER button to start input. Enter desired Titles/Chapters numbers by using the numeric buttons. The selected Titles/Chapters are stored into the memory. Select NEXT on the menu to see the next page. Up to 20 memories can be stored.
Note: Leading zero is not necessary. If the track number is more than 10, press the 10 key first and then the unit digit. Example: Track 3, press "3"
Track 12, press "+10" and then "2" Track 21, press "+10" twice and then "1"
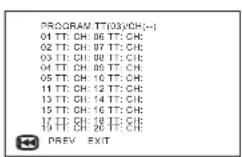
- To start program play, select START on the menu or select EXIT on the menu to exit without program play.
- To clear programmed items, scroll the navigation button to the item to be cleared and press CLEAR button on the remote control, the selected Item will be deleted.
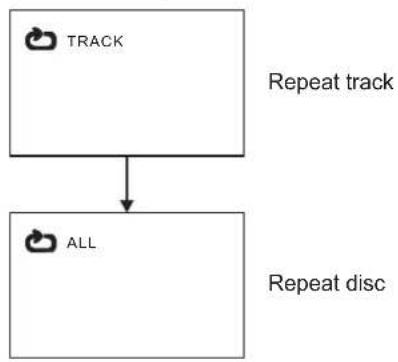
Repeat play
Repeat viewing(listening)
Press REPEAT1/ALLbutton and continually press ENTER button during play, itwillrepeatplayonechapteroronetitle (For DVD disc), or repeat play track (for VCD/CD).
DVD DISC
flowchart
graph TD
    A["CHAPTER"] --> B["TITLE"]
    B --> C["ALL"]
    style A fill:#f9f,stroke:#333
    style B fill:#ccf,stroke:#333
    style C fill:#cfc,stroke:#333
VCD/CD DISC (In the PBC OFF mode)
flowchart
graph TD
    A["TRACK"] --> B["ALL"]
    style A fill:#fff,stroke:#000
    style B fill:#fff,stroke:#000
    note1["Repeat track"]
    note2["Repeat disc"]
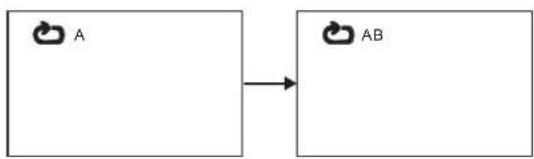
A-B repeat play
Repeating sections between two specific points(A-B repeat)
- Press A-B REPEAT button during play at the point where repeat play is to start(A).
- Press A-B REPEAT button at the point where repeat play is to be concluded(B) repeat play of the selection between points A and B starts.
- Press A-B REPEAT button to return to normal play.
flowchart
graph LR
    A["A"] --> AB["AB"]
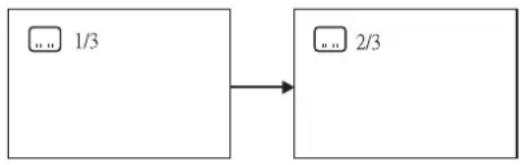
Changing subtitle language (DVD only)
It is possible to change the subtitle language to a different language from the one selected at the initial settings.( This operation works only with discs on which multiple subtitle languages are recorded)
- Press SUBTITLE button during play, the screen will display the current language.
- Press SUBTITLE button again to change language or turn off.
NOTE: When no subtitles are recorded, press this button will not work.
CHANGING SUBTITLE LANGUAGE
flowchart
graph LR
    A["..."] 1/3] --> B["..."] 2/3]
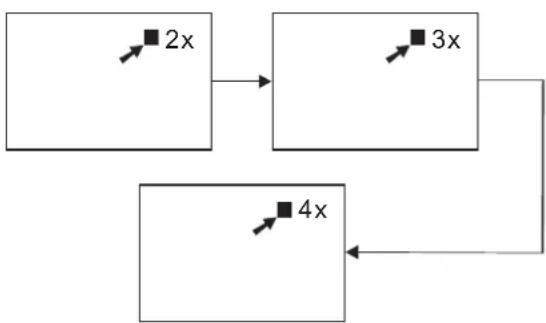
ZOOM PLAY
This function allows you to enjoy a motion or motionless picture.
- Press ZOOM button when playing, the screen shows:
flowchart
graph TD
    A["2x"] --> B["3x"]
    B --> C["4x"]
    C --> A
- Press NAVIGATION button to scroll across the enlarged picture.
Changing audio soundtrack language(DVD/VCD disc)
It is possible to change the audio soundtrack language to a different language from the one selected at the initial settings (This operation works only with discs on which multiple audio soundtrack languages are recorded).
- Press AUDIO button during playing DVD disc, the screen will display the number of current soundtrack language, press the button again will change the language.
- Pressing AUDIO button during playing VCD disc will change audio output mode: L audio soundtrack, R audio soundtrack and stereo (VCD disc only).
NOTE: When no soundtrack languages are recorded, press this button will not work.
NOTE: When the power is turned on or the disc is removed, the language heard is the one selected at the initial settings.
Viewing from different angle (DVD only)
Some DVDs may contain scenes which have been shot simultaneously from a number of different angles. For these discs, the same scene can be views from each of these different angles using the ANGLE button.
- Press ANGLE during play, number of angle being playback will be displayed in the screen, press the button will change to different angles.
Search for preferred scene
- Press SEARCH button during play, then press up or down navigation button to select Title, Chapter, Title time or Chapter time to play.
- Press ENTER button to confirm selection.
- Enter the Title, Chapter, Title time or Chapter time to play by using the numeric buttons..
- Press SEARCH button again to exit search mode.
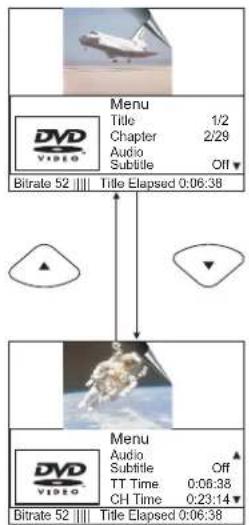
Select title or chapter number
Select title or chapter time
Note: TT Time = Title time
CH Time = Chapter time
Initial Settings
- Once the initial programming is entered it is retained in memory until changed, the player can always be operated under the same conditions.
- The settings will be retained in the memory until the settings are changed even after setting the player to the standby mode.
Common procedure for initial settings
- Press SETUP button.
- Use the navigation buttons to select preferred item, then press ENTER button, each screen for setting the value is displayed.
- Press SETUP button to close setup menu in any mode.
- Use left navigation button to switch to another main setup items
1.GENERAL SETUP
General Setup Page
| Tv Display |
| Angle Mark |
| OSD Lang |
| Screen Saver |
- it is used to select the TV output mode.
Options: Normal/PS:Pan&scanmode
Normal/ L/B: Letter box mode
Wide : 16:9 wide screen mode
1.2 ANGLE MARK - it is used to select whether or not. The multi- angle icon is display on the screen when a Multi-angle DVD disc is playing.
Options: On: Icon will be displayed
Off: Icon will be turned off
1.3 OSD. LANG - it is used to select different On Screen Display language for different user.
1.4 SCREEN SAVER - when the player is not in used for 2 minutes, a running DVD logo will move across the TV screen to protect the TV CRT.
Options: On: Screen saver is enabled
Off: Screen saver is disabled
2. Audio setup
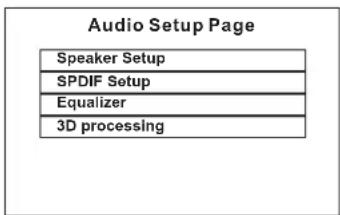
flowchart
graph TD
    A["Speaker Setup"] --> B["SPDIF Setup"]
    B --> C["Equalizer"]
    C --> D["3D processing"]
2.1 SPEAKER SETUP - it is used to set the speaker
Outputs levels
DOWNMIX mode
Options: LT/RT-Left/Right mix mode
STEREO - Select this option if you don't
Have a 5.1 channels amplifier.
Front Speaker
Options: Large-select this option to increase the front speaker's volume.
Small- select this option to decrease the front speaker's volume.
2.2 SPDIF SETUP
2.2.1 SPDIF OUTPUT - digital outputs code format
Options: OFF/RAW/PCM/MANUAL
If MANUAL is selected, the options for CD,DOLBY DIGITAL DTS, MPEG, PCM CHANNEL can be selected individually. Otherwise, they will output At the same format:RAW or PCM.
Recommended settings:
SPDIF OUTPUT: SPDIF OFF
(if you are not connecting to an amplifier via Digital output)
SPDIF OUTPUT: SPDIF/RAW
(Used in general home theater, select this can output 5.1 channel)
SPDIF OUTPUT: SPDIF/PCM
(select this it can only output 2 channel, but you will get high quality audio)
2.2.2 LPCM OUT - set bit-rate of coaxial and optical output Options: 96K/48K
(If you are connecting to an amplifier via digital output please reference your digital amplifier manual before you select this option)
3. Video setup
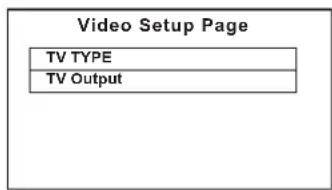
3.1 TV TYPE
Options: PAL/MULTI/NTSC
3.2 TV OUTPUT
Options: CVBS/RGB
CVBS = Composite output
RGB = RGB output
4. Preference setup
The first Power on this set by press power button on the front plane without placing any disc on this tray, press setup button, then you can enter the Preference Page by pressing navigate button.
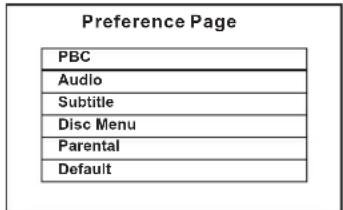
4.1 PBC - select PlayBack Control for VCD
Options: On/Off
(Recommended setting: ON)
4.2 AUDIO - select preferred audio language. (DVD only - need disc software support)
4.3 SUBTITLE - select preferred subtitle language. (DVD only - need disc software support)
4.4 DISC MENU - select preferred disc menu language. (DVD only - need disc software support)
4.5 PARENTAL - select rating levels. You must set PASSWORD MODE OFF to enable this selection. (DVD only - need disc software support)
4.6 DEFAULT - Reset to factory settings
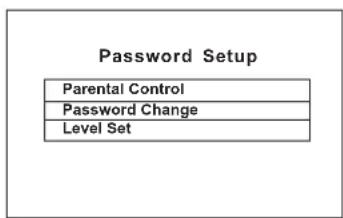
5. Password Setup
flowchart
graph TD
    A["Password Setup"] --> B["Parental Control"]
    A --> C["Password Change"]
    A --> D["Level Set"]
5.1 Parental Control
Options: ON/OFF
5.2 Password Change
Option:Change
Select to change password, a form as below will show on the screen.
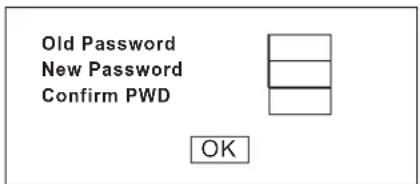
Procedure to change password:
1) Enter old password in the Old Password row
2) Enter new password in the New Password row
3) Enter the new password again in the Confirm PWD row
You may reset the password if you forget the old password by using the supervisor password: 1379
TO PLAY THE RADIO
- Connect the unit to the power source. Press POWER ON/OFF button to turn on the unit. The Power STAND BY INDICATOR will be steady on when the unit is turned off by remote.
- Slide FUNCTION SWITCH to RADIO position.
- Select required receiving band with BAND SWITCH.
- Tune to required station by rotating the TUNING CONTROL. Gently tune this control back & forth, and change the FM antenna, until you get the strongest, clearest sound.
- If you are receiving FM stereo broadcast, the FM Stereo Indicator will illuminate.
- Adjust the VOLUME CONTROL to your listening preference.
- To turn off the radio, slide the FUNCTION SWITCH to TAPE or CD position.
NOTE:
Built-in AM antenna and the FM antenna is pigtail type.
CASSETTE OPERATION
FAST FORWARD AND REWIND BUTTONS
For fast forward or rewinding of the tape, depress the CASSETTE FAST FORWARD button or CASSETTE REWIND button.
PAUSE BUTTON
The CASSETTE PAUSE button is used to edit commercials or in case recording is temporarily interrupted. Since the deck motor is still running, while the pause key is depressed, this pause feature should be used for a short time only.
AUTOMATIC STOP
This instrument has a built-in automatic stop and the tape mechanism will stop playing or recording and shut off when it reached the end of the tape.
STOP/EJECT BUTTON
The tape player can be stopped manually by pressing the CASSETTE STOP/EJECT button.
CASSETTE TAPE SELECTION
The quality and condition of the cassettes tapes you use will have a direct effect on the performance of this unit. Low quality tapes tend to break and stretch and a broken tape can easily become entangled in the drive mechanism, causing major damage. Stretched tapes will run at uneven speeds and will distort anything recorded on them. Use only well-known brands of tapes.
- Use of C-120 (120 minutes) cassette is not recommended. The extreme thinness of this tape may result in breakage or other failures.
- This unit is not designed for CrO2, Fe-Cr or METAL tape use. Therefore, be sure to use name brand normal cassette tapes.
IMPORTANT NOTES CONCERNING CASSETTE TAPES
- After a period of time, especially when inexpensive brands of tape are used, the sound during playback may become "muffled" or in extreme cases, almost inaudible. This is most frequently NOT A FAULT OF THE MACHINE ITSELF but merely a deposit of oxide and other contaminating element on the tape head. The easiest way to overcome the problem is by using a head-cleaning cassette.
Follow the instructions provided with the cleaner carefully and DO NOT OVER-USE as this may cause undue wear.
Don't attempt to scrape the contamination away with a sharp implement.
• Other common causes of trouble are:
- Tapes jamming leading to uneven speed during playback.
- Tapes tangling where the tape wraps itself around vital parts of the mechanism.
- To reduce the chances of these problems occurring, you should take the following precautions:
- Check that there are no loose layers of tape visible through the cassette center window. Take-up these loose layers using a pencil or ballpoint pen before inserting the cassette into the machine.

- If the cassette feels tight while performing the operation, the tape may be jamming due to "ridges" in the winding of the tape (visible through the center window). These may be removed in most cases by fast winding the cassette from one end to the other and back again. Or the tape may be permanently damaged. Do not play damaged or worn out tapes, as this may cause your set to break.
NOTES FOR STORING CASSETTE TAPES
- Do not put a cassette near a magnetic field, such as a TV set, or speaker. Magnetic fields may reduce the tape sensitivity or even erase the recording.
- Do not store cassette for any length of time in a hot, moist or dusty place.
PLAY CASSETTE TAPE
Record options
- Open the cassette door by pressing the CASSETTE STOP/EJECT button (in some cases, you may have to press the CASSETTE STOP/EJECT button twice since this button has combined functions).
- Insert the cassette, with the exposed tape facing downwards, into the tracks in the cassette door.
- Close the cassette door.
- Check the position of the FUNCTION SWITCH to make sure it is in the TAPE position.
- Press down the CASSETTE PLAY button.
- Adjust the VOLUME CONTROL to your listening preference.
- To stop the tape manually, press the CASSETTE STOP/EJECT button.
- To remove the cassette, press the CASSETTE STOP/EJECT button again and the cassette door will open.
Unload the cassette tape, reverse it and return to cassette compartment if you want to play the other side of the cassette tape.
CAUTION:
- Disconnect the AC power cord from the AC outlet if the unit is not going to be used for a long period of time (2 weeks or more).
- Do not leave any tape buttons down when the set is not in use, or else the pinch roller could be damaged.
- Load a cassette tape into the cassette compartment.
- Load the disc and close the DVD DOOR.
- Set the FUNCTION SWITCH to DVD position.
• Press the CASSETTE PAUSE button. - Press the CASSETTE RECORD button and PLAY button for record stand-by.
- Start the DVD playing by pressing the DVD PLAY/PAUSE button.
- Release the CASSETTE PAUSE button when you wish to start the recording.
- Press the CASSETTE STOP/EJECT button to stop the recording.
- To hear what you recorded, press REWIND button firstly and then PLAY button.
TO RECORD FROM BUILT-IN RADIO
• Follow the instruction to play the radio.
- Load the cassette tape into the cassette compartment.
- Locate the portion of the tape where you desire to start recording by :
-
Finding the start of the tape by using the Rewind feature (or Fast Forward).
-
Tune into the station you want to record, press the Cassette Record button and Cassette Play button simultaneously. Both buttons should remain in their depressed positions when releases.
- You are now recording from the Built-in Radio and the tape
recording process will automatically stop at the end of the tape.
- To stop the recording manually, press the Cassette Stop/Eject Button.
NOTE: When you want to play the cassette tape after recording, press CassetteStop/Eject button first, then press Rewind button, and finally press Cassette Play button. Adjust Volume Control to your taste.
MIC MIXING JACK
This jack accepts any dynamic microphone has its impedance between 600 and 300 ohms, with 6.5mm diameter standard plug. Voice through external microphone to mix with another sound source while playing or selected. Adjust VOLUME CONTROL to your listening preference.
NOTE:
• Always disconnect the external microphone when it is not in use.
- Mic. Mixing function is available for TAPE, CD/VCD modes.
HEADPHONE JACK
For private listening, insert a 3.5mm headphone (not included) into the HEADPHONE JACK. The speakers are automatically cut off.
CAUTION: Listening at high power for a long moment could damage user' ears.
Angle
Recorded onto some DVD discs are scenes which have been simultaneously shot from a number of different angles (the same scene is shot from the front, from the left side, from the right side, etc.). With such discs, the ANGLE button can be used to view the scene from different angles.
Chapter number
These numbers are recorded on DVD discs. A title is sub-divided into many sections, each of which is numbered, and specific parts of video presentations can be searched quickly using these numbers.
DVD
This refers to a high-density optical disc on which high quality pictures and sound have been obtained by means of digital signals. Incorporation a new video compression technology (MPEG II) and high-density recording technology, DVD enables esthetically pleasing full-motion video to be recorded over long periods of time (for instance, whole movie can be recorded). DVD has a structure consisting of two 0.6 mm thin discs which are adhered to each other. Since the thinner the disc, the higher the density at which the information can be recorded, a DVD disc has a greater capacity than a single 1.2 mm thick disc. Since the two thin discs are adhered to each other, there is the potential to achieve double-sided play sometime in the future for even longer duration play.
Playback control (PBC)
This is recorded on a Video CD (version 2.0). The scenes or information to be viewed (or listened to) can be selected interactively with the TV monitor by looking at the menu shown on the TV monitor.
Subtitles
This is the appearance of the dialogue at the bottom of the screen which are prerecorded on some DVD discs.
Time number
This indicates the play time which has elapsed from the start of a disc or a title. It can be used to find a specific scene quickly.(It may not work with some discs.)
Title number
These numbers are recorded on DVD discs. When a disc contains two or more movies, these movies are numbered as title 1, title 2, etc.
Track number
These numbers are assigned to the tracks which are recorded on Video CDs and CDs. They enable specific tracks to be located quickly.
Video CD
This contains recordings of pictures and sound whose quality is on a par with that of videotape. This player also supports Video CDs with playback control (version 2.0).
Specifications
GENERAL
Receiving bands...... AM/FM
Tuning range.....AM 540\~1600 KHz
FM 88\~108 MHz
Input equipment......Microphone (600 Ohm)
Output Power 3 W + 3 W
Output equipment.....Speaker(4 Ohm)
Headphones(16\~68 Ohm)
Power supply..... AC 230V 50Hz
Power
Requirements: AC 230V, 50Hz
Power
Consumption: 40W (approx. 3.0W when set to the standby mode either by the power button or the remote control unit)
Signal system: NTSC/PAL/MULTI
Discs played: (1) DVD-VIDEO disc
12 cm single-sided, single-layer
12 cm single-sided, dual-layer
12 cm double-sided, single-layer
8 cm single-sided, single-layer
8 cm single-sided, dual-layer
8 cm double-sided, single-layer
(2) Compact disc (VIDEO CD)
12 cm disc 8 cm disc
S-video output: Y output level: 1 Vp-p (75 Ohm) C
output level: 0.286 Vp-p (75 Ohm)
Video output level:
1 Vp-p
Audio output level:
2.0 Vrms (1 KHz, 0dB)
Audio signal output characteristics:
DVD (linear audio):
(1) Frequency response:
20Hz-20KHz (48KHz sampling)
20Hz-20KHz (96KHz sampling)
(2) S/N ratio: >65dB
(3) Dynamic range: 90dB
(4) Wow and flutter: below measurable level
CD audio:
(1) Frequency response: 20Hz-20KHz
(2) S/N ratio: >65dB
(3) Dynamic range: 90dB
(4) Wow and flutter: below measurable level
Pickup:
Wave length: 655nm
Laser power: CLASS 1
CASSETTE SECTION
Recording system.Stereo......
Biasing system......AC biasing
Frequency response 1.25...6300 Hz
Wow and flutter.... 0.35% WRMS (JIS)
RECEIVER SECTION
Receiving bands...... AM/FM
Tuning range.....AM 540 \~ 1600 KHz
FM 88 - 108 MHz
AUDIO SECTION
Power output.Maximum 3 Watts per Channel
10% THD 2 Watts per channel
Speaker impedance.4.ohms....
Headphones impedance.32.ahms
Specifications are subject to change without notice.
Before requesting service for this player, check the chart below for a possible cause of the problem you are experiencing. Some simple checks or a adjustment on your part may eliminate the problem and restore proper operation.
| Symptom(Common) | Remedy |
| No power. | Insert the AC power plug securely into the power outlet. |
| The player is automatically set to the standby mode. | The player is automatically set to the standby mode after approx. 30 minutes in the stop mode (auto power-off function). Turn the power on again. |
| • Play fails to start even when PLAY is pressed.• Play starts but then stops immediately. | • Condensation has formed: wait about 1 to 2 hours to allow the player to dry out.• This player cannot play a disc other than DVD, Video CD and CD.• The disc may be dirty and may require cleaning.• Ensure that the disc is installed with the label side up. |
| No picture. | • Ensure that the equipment is connected properly.• Ensure that the input setting for the TV is "Video". |
| • No sound.• Distorted sound. | • Ensure that the equipment is connected properly.• Ensure that the input setting for the TV and stereo system are correct.• Adjust the master volume using the GUI screen for player information. |
| Picture is distorted during rapid advance or rapid reverse. | The picture will be somewhat distorted at times: this is normal. |
| No rapid advance or rapid reverse play. | Some discs may have sections which prohibit rapid advance (or rapid reverse.) |
| No operations can be performed with the remote control unit. | • Check the batteries are installed with the correct polarities (+ and−).• The batteries are exhausted: replace them with new ones.• Point the remote control unit at the remote control sensor and operate.• Operate the remote control unit at a distance of not more than 7 m from the remote control sensor.• Remove the obstacles between the remote control unit and remote control sensor. |
| No key operation (by the main unit and/or the remote control unit) is effective. | Press POWER to set the player to the standby mode and then back to ON.Alternatively, press POWER to set the player to the standby mode, disconnect the power plug and then re-connect it. (The player may not be operating properly due to lightning, static electricity or some other external factor.) |
| Symptom [DVD] | Remedy |
| Play does not start even when title is selected. | Confirm the "2 Ratings" setting. |
| Audio soundtrack and/or subtitle language is not the initial settings. | If the audio soundtrack and/or subtitle language does not exist on the disc, the language selected at the initial settings will not be seen/heard. |
| No subtitles. | Subtitles appear only with discs which contain them.Subtitles are cleared from the TV monitor, Perform the steps to display the subtitles. |
| Alternative audio soundtrack (or subtitle) languages fail to be selected. | An alternative language is not selected with discs which do not contain more than one language.In the case of some discs, the alternative language cannot be selected by operating the AUDIO or SUBTITLE button. Try selecting it from the DVD menu if one is available. |
| Angle cannot be changed. | This function is dependent on software availability. Even if a disc has a number of angles recorded, these angles may be recorded for specific scenes only. |
| The password for rating level has been forgotten. | Please contact your local sales dealer. |
| Symptom [Video CD] | Remedy |
| No menu play. | This function works only for Video CDs with playback control. |
Handling precautions

- Hold the disc by the edges so the surface will not be soiled with finger prints. Finger prints, dirt and scratch can cause skipping and distortion.
- Do not write on the label side with aball-point pen or other writing utensils.
- Do not use record cleaning sprays, benzine, thinner, static electricity prevention liquid sor bend the disc.
- Be careful not to drop or bend the disc.
- Do not install more than1disc on the disc tray.
- Do not try to close the disc tray when the disc is not in stalled properly.
- Be sure to store the disc in it sexclusive case when not in use.
LISTENING TO A DVD DISC
- Press the DVD OPEN button to open the DVD Door.
- Load the DISC with the label toward you.
• Do not touch the playback side.
• Center the disc.
- Place the disc with the label toward you. Do not touch the lens.
- Close the lid, the disc will rotate and the LCD DISPLAY will show the disc's total number of tracks.
- Press the PLAY/PAUSE button
- Pressing once the play starts from the first track.
- Pressing again it will be paused.
- To backward and forward the track, Press the DVD BACKWARD or FORWARD SKIP/SEARCH button ( ◀◀ or ▶▶ ) to skip to the desired track during the playback.
Press the FORWARD button to the next track on the disc.
Press the BACKWARD button to the beginning of the track currently playing.
Press and hold the BACKWARD or FORWARD SKIP/SEARCH button (◀◀ or ▶▶) during play to scan the disc at high speed.
When the desired section of the disc is found, release the button to resume normal play.
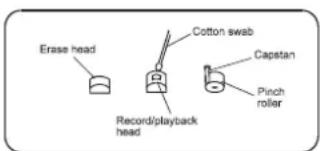
CLEANING THE TAPE HEADS
- When the heads, capstan and pinch roller become dirty, this may result in muffled, distorted or reduced sound during playback and may even result in tape jams.
- Remove the cassette tape and clean with a swab moistened with commercially sold head/pinch roller cleaner or alcohol. Wait approximately 10 seconds for the alcohol or cleaning fluid to dry before using.
• If the surface is soiled
Wipe gently with a soft, damp (water only) cloth.
When wiping discs, always move the cloth from the centre hole toward the occur, which will cause noise.)
(If you wipe the discs using a circular motion, circular scratches are likely to occur, which will cause noise.)
• If the disc is brought from a cold to a warm environment moisture may form on the disc
Wipe this moisture off with a soft, dry, lint-free cloth before using the disc.
• Improper disc storage
You can damage discs if you store them in the following places:
Areas exposed to direct sunlight
Humid or dusty areas
Areas directly exposed to a heat outlet or heating appliance
Maintenance
- Be sure to press POWER to set the player to the standby mode and disconnect the AC power cord before maintaining the player.
• Wipe this player with a dry, soft cloth. - If the surfaces are extremely dirty, wipe clean with a cloth which has been dipped in a weak soap-and-water solution and wrung out thoroughly, and then wipe again with a dry cloth.
• Never use alcohol, benzine, thinner, cleaning fluid or other chemicals. And do not use compressed air to remove dust.
MACROVISION Information
This DVD/VCD/CD player is protected by MACROVISION"and no unauthorized copy can be made by VIDEO CASSETTE RECORDER.
This product incorporates copyright protection technology that is protected by method claims of certain U.S. patents and other intellectual property rights owned by Macrovision Corporation and other rights owners. Use of this copyright protection technology must be authorized by Macrovision Corporation, and is intended for home and other limited viewing uses only unless otherwise authorized by Macrovision Corporation. Reverse engineering or disassembly is prohibited.
Guarantee
This device has been tested according to all relevant current CE guidelines, such as electromagnetic compatibility and low voltage directives, and has been constructed in accordance with the latest safety regulations.
Subject to technical changes without prior notice!
Guarantee
The device supplied by our Company is covered by a 24 month guarantee starting on the date of purchase (receipt).
During the life of the guarantee any fault of the device or its accessories *) ascribable to material or manufacturing defects will be eliminated free of charge by repairing or, at our discretion, by replacing it. The guarantee services do not entail an extension of the life of the guarantee nor do they give rise to any right to a new guarantee!
Proof of the guarantee is provided by the proof of purchase. Without proof of purchase no free replacement or repair will be carried out.
For repairs or replacement during the life of the guarantee return the device in its original packing together with the proof of purchase to your dealer.
*) Damage to accessories does not mean automatic free replacement of the whole machine. In such cases please contact our hotline. Broken glass or breakage of plastic parts are always subject to a charge.
Defects to consumables or parts subject to wearing (e.g. motor pistons, kneading blades, drive shafts, spare remote control, spare toothbrushes, saw blades, etc.) as well as cleaning, maintenance or the replacement of said parts are not covered by the guarantee and hence are to be paid!
The guarantee lapses in case of unauthorized tampering.
After the expiry of the guarantee
After the expiry of the guarantee repairs can be carried by the competent dealer or repair service against the payment of the ensuing costs.
Gebruiksaanwijzing
DVD/RADIO/CASSETTESPELER
MC 1020 DVD
natural_image
Line drawings of three vintage portable audio equipment units with speaker covers and control knobs (no text or symbols)


© 1992-1997 Dolby Laboratories, Inc.
natural_image
Technical line drawing of a mechanical component with a curved arrow indicating motion (no text or symbols)B
Voeler afstandsbediening
C
flowchart
graph LR
    A["1 WHAT WILL I DO\n2 HEAR ME CRY\n3 WITHOUT YOU\n4 MOVE CLOSER"] --> B["WITHOUT YOU"]
flowchart
graph LR
    A["Input Block"] --> B["Output Block"]
natural_image
Black-and-white photo of a child standing beside a large black dog on grass (no text or symbols visible)natural_image
Side-by-side comparison of a cow and a child in a field, both zoomed at 100% and 50% respectively (no text or symbols on the animals themselves)natural_image
Two black-and-white photos of a cow and a child standing in a grassy field, alongside a four-pointed diagram with directional arrows (no text or symbols)Diashow-effecten
1 WHAT WILL I DO
2 HEAR ME CRY
3 WITHOUT YOU
4 MOVE CLOSER
flowchart
graph LR
    A["A"] --> AB["AB"]

flowchart
graph LR
    A["1/3"] --> B["2/3"]
ZOOMWEERGAVE
3.1 TV TYPE
flowchart
graph TD
    A["Password Setup"] --> B["Parental Control"]
    A --> C["Password"]
NOMINAAL VERMOGEN: 3W x 2 (RMS)
MUZIKAAL VERMOGEN: 250W (P.M.P.O.)
Uitgangsaccessoires: Luidsprekers (4 ohm)
Krachtontneming: 40 watt (circa 3,0 watt indien
2.0 Vrms (1 kHz, 0 dB)
natural_image
Line drawing of a two-tiered speaker with dual speakers and a central grille (no text or symbols)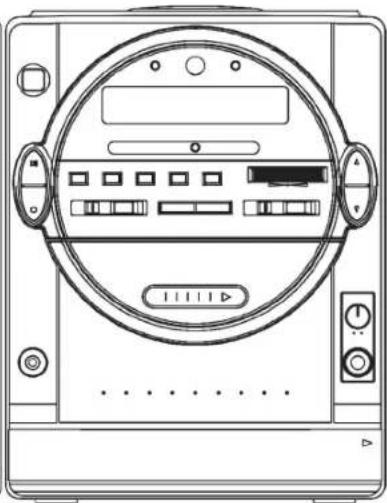
natural_image
Line drawing of a CD or audio workstation front panel with control buttons and display (no text or symbols)
natural_image
Line drawing of a speaker with two circular speakers and a central grille (no text or symbols)


natural_image
Technical line drawing of a mechanical component with a curved arrow indicating motion (no text or symbols)B
Sensore remoto
C
flowchart
graph LR
    A["1 WHAT WILL I DO\n2 HEAR ME CRY\n3 WITHOUT YOU\n4 MOVE CLOSER"] --> B["WITHOUT YOU"]
flowchart
graph LR
    A["Input Block"] --> B["Output Block"]
natural_image
Black and white photo of a child standing beside a large black dog (no text or symbols visible)natural_image
Sequence of black-and-white photos showing a dog interacting with two children, each followed by a diver in motion (no text or symbols)natural_image
Side-by-side comparison of a cow and a child, both showing zoomed-in views (no text or symbols)natural_image
Two black-and-white photos of a dog and a child standing on grass, with a five-pointed square diagram containing four directional arrows (no text or symbols)1 WHAT WILL I DO 2 HEAR ME CRY 3 WITHOUT YOU 4 MOVE CLOSER
flowchart
graph LR
    A["A"] --> AB["AB"]

flowchart
graph LR
    A["..."] 1/3] --> B["..."] 2/3]
RIPRODUZIONE ZOOM
3.1 TV TYPE
flowchart
graph TD
    A["Password Setup"] --> B["Parental Control"]
    A --> C["Password"]
5.2.1 OLD PASSWORD – Password vecchia
5.2.1 NEW PASSWORD – Password nuova
5.2.3. CONFIRM PWD - Confermare password
2.0 Vrms (1 kHz, 0 dB)
Segnale d'uscita audio: DVD (audio lineare)
natural_image
Line drawing of three identical outdoor audio equipment units with speaker dividers and control knobs (no text or symbols)


natural_image
Line drawing of a mechanical component with a curved arrow indicating motion or force (no text or symbols)B
C

flowchart
graph LR
    A["1 WHAT WILL I DO\n2 HEAR ME CRY\n3 WITHOUT YOU\n4 MOVE CLOSER"] --> B["WITHOUT YOU"]
natural_image
Black-and-white photo of a child standing beside a large black dog (no text or symbols visible)natural_image
Side-by-side comparison of a cow and a child, both showing zoomed-in views (no text or symbols)natural_image
Black-and-white photo of a cow and a child standing in a grassy field, with a four-pointed diagram showing directional arrows (no text or symbols)Efekty slide show
1 WHAT WILL I DO
2 HEAR ME CRY
3 WITHOUT YOU
4 MOVE CLOSER
flowchart
graph LR
    A["A"] --> AB["AB"]

flowchart
graph LR
    A["..."] 1/3] --> B["..."] 2/3]
ODTWARZANIE ZOOM
3.1 TV TYPE
flowchart
graph TD
    A["Password Setup"] --> B["Parental Control"]
    A --> C["Password"]
natural_image
Line drawings of three different audio equipment units with speaker dividers and control knobs (no text or symbols)


natural_image
Technical line drawing of a mechanical component with a curved arrow indicating motion (no text or symbols)B
C

flowchart
graph LR
    A["1 WHAT WILL I DO\n2 HEAR ME CRY\n3 WITHOUT YOU\n4 MOVE CLOSER"] --> B["WITHOUT YOU"]
natural_image
Two-panel image showing a cow and a photo of a child standing on grass; left panel shows zoom percentage (100% for cow, 50% for child), right panel shows zoom percentage (50%) for the same animal.natural_image
Black-and-white photo of a cow and a child standing in a grassy field, with a four-pointed diagram showing directional arrows (no text or symbols)Diashow-effektusok
1 WHAT WILL I DO
2 HEAR ME CRY
3 WITHOUT YOU
4 MOVE CLOSER
flowchart
graph LR
    A["A"] --> AB["AB"]
flowchart
graph LR
    A["..."] 1/3] --> B["..."] 2/3]
ZOOM-LEJÁTSZÁS
- ZUIHRER INFORMATION:
- Foto-CD
- Diashow-Effekte
- ZOOM-WIEDERGABE
- TV TYPE
- CAUTION:
- WARNING:
- VENTILATION WARNING:
- Table of contents
- GettingStarted:
- BasicOperation:
- AdvancedOperation:
- InitialSettings:
- FORREFERENCE:
- DearCustomers
- Features
- QUAHIGH SOUND AND PICTURE
- i 96 kHz/24 bit audio D/A converter
- j 10 bit video D/A converter
- i Component video output connectors
- MULTI TV SYSTEM SUPPORTTED
- GRAPHICAL USER INTERFACE SCREEN
- MULTI-AUDIO FUNCTION
- MULTI-SUBTITLES FUNCTION
- MULTI-ANGLE FUNCTION
- PARENTAL LOCK FUNCTION
- DISC FORMATS SUPPORTED BY PLAYER
- Precautions
- Power Cord Protection
- Placement
- Non-use periods
- No fingers or other objects inside
- Keep away from water and magnetic object
- Stacking
- Condensation
- If there is noise interference on the TV while a broadcast is being received
- Main unit
- Remote control unit
- Basic connection
- Note:
- Connecting to a stereo TV set
- Connecting to a monaural TV set
- S-video output connectors
- Connecting to a decoder with Dolby Digital (AC-3/DTS) processing
- Optional audio connections
- For your reference:
- Remote control unit preparation
- Battery installation A
- Service life of batteries
- Remote control operation range B
- Connecting Microphone and ☐ Phone
- Before enjoying DVD/Video CD/CD
- Basic play
- Preparations
- Stopping play
- Press STOP
- Skipping ahead or back
- Skipping ahead
- Skipping back
- Rapid advance(Rapid reverse)
- Pause or step play
- Slow-motion play (DVD/VCD)
- MP3 playback
- Play mode:
- Kodak Picture CD / JPEG CD
- Skip to next/previous picture
- Rotating pictures
- Flipping pictures
- Picture Shrink/Zoom
- Picture CD
- Slide show effects
- Enjoying Video CDs with playback control
- KARAOKE OPERATION
- ON Screen display information
- Program play
- Repeat play
- Repeat viewing(listening)
- A-B repeat play
- Changing subtitle language (DVD only)
- ZOOM PLAY
- Changing audio soundtrack language(DVD/VCD disc)
- Viewing from different angle (DVD only)
- Search for preferred scene
- Initial Settings
- Common procedure for initial settings
- 1.GENERAL SETUP
- Audio setup
- SPEAKER SETUP - it is used to set the speaker
- DOWNMIX mode
- Front Speaker
- SPDIF SETUP
- SPDIF OUTPUT - digital outputs code format
- LPCM OUT - set bit-rate of coaxial and optical output Options: 96K/48K
- Video setup
- TV OUTPUT
- Preference setup
- PBC - select PlayBack Control for VCD
- Password Setup
- Parental Control
- Password Change
- TO PLAY THE RADIO
- CASSETTE OPERATION
- FAST FORWARD AND REWIND BUTTONS
- PAUSE BUTTON
- AUTOMATIC STOP
- STOP/EJECT BUTTON
- CASSETTE TAPE SELECTION
- IMPORTANT NOTES CONCERNING CASSETTE TAPES
- NOTES FOR STORING CASSETTE TAPES
- Record options
- TO RECORD FROM BUILT-IN RADIO
- MIC MIXING JACK
- HEADPHONE JACK
- Angle
- Chapter number
- DVD
- Playback control (PBC)
- Subtitles
- Time number
- Title number
- Track number
- Video CD
- Specifications
- GENERAL
- Power
- Discs played: (1) DVD-VIDEO disc
- Compact disc (VIDEO CD)
- Audio output level:
- Audio signal output characteristics:
- CD audio:
- Pickup:
- CASSETTE SECTION
- RECEIVER SECTION
- AUDIO SECTION
- Handling precautions
- LISTENING TO A DVD DISC
- CLEANING THE TAPE HEADS
- Maintenance
- MACROVISION Information
- Guarantee
- After the expiry of the guarantee
- Gebruiksaanwijzing
- DVD/RADIO/CASSETTESPELER
- MC 1020 DVD
- Diashow-effecten
- ZOOMWEERGAVE
- RIPRODUZIONE ZOOM
- Segnale d'uscita audio: DVD (audio lineare)
- Efekty slide show
- ODTWARZANIE ZOOM
- Diashow-effektusok
- ZOOM-LEJÁTSZÁS
Brand : CLATRONIC
Model : MC 1020 DVD
Category : Hi-Fi System