
AR 4027 USB - Car stereo AEG - Free user manual and instructions
Find the device manual for free AR 4027 USB AEG in PDF.

| Product Type | Car Stereo / Radio |
| Brand | AEG |
| Model | AR 4027 USB |
| Installation Dimensions (W x H x D) | 182 mm x 52 mm x 108 mm |
| Weight (approx.) | 1.0 kg |
| Supply Voltage | DC 12 V (negative ground) |
| Max. Power Consumption | 5 A |
| Max. Output Power | 4 x 80 W (PMPO) |
| Playable File Formats | MP3, WMA |
| Radio Bands | FM (87.5 – 108.0 MHz) |
| FM Effective Sensitivity | 4 μV |
| Media Inputs | USB (for playback only), SD/MMC card slot, AUX (3.5 mm jack) |
| Functions | RDS, PTY, AF, REG, station presets (6), automatic station search, direct track selection, muting |
| Display | LCD |
| Reset Button | Yes (press with thin object) |
| Audio Output | Line Out (RCA) for external amplifier |
| Loudspeaker Impedance | 4 Ω (min.) |
| Fuse Rating | 1 A (main), 5 A (constant +) |
| Safety Class | Class 1 Laser (CD), CE compliant |
| Included Accessories | Mounting bracket, screws, extraction tool |
| Special Notes | USB port not for charging; use AUX for smartphone/iPod |
Frequently Asked Questions - AR 4027 USB AEG
User questions about AR 4027 USB AEG
0 question about this device. Answer the ones you know or ask your own.
Ask a new question about this device
Download the instructions for your Car stereo in PDF format for free! Find your manual AR 4027 USB - AEG and take your electronic device back in hand. On this page are published all the documents necessary for the use of your device. AR 4027 USB by AEG.
USER MANUAL AR 4027 USB AEG
Overview of the Components ......Page 3
Instruction Manual......Page 37
Technical Data Page 41
Index Page 44
Język polski
Spis treści
Overview of the Components

natural_image
Technical line drawing of a device casing with labeled components (no readable text or symbols)Installationstipps 4
L
natural_image
Technical line drawing of a device casing with ports and control panel (no text or symbols)Ranura SD/MMC-Card....16

natural_image
Technical line drawing of a device casing with labeled component 'h' (no text or symbols beyond label)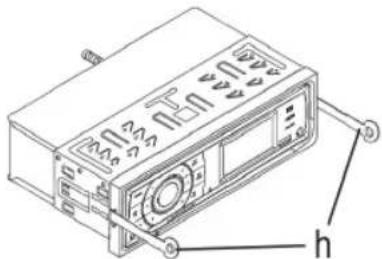
natural_image
Technical line drawing of a mechanical device with labeled components (no readable text or symbols)7 Fessura scheda SD/MMC
MODE = 7, ◀/DIR = 8, ◀/DIR = 9, BAND = 0).
Fessura scheda SD/MMC....32
|
Thank you for choosing our product. We hope you will enjoy using the appliance.
Safety Information
Read the operating instructions carefully before putting the appliance into operation and keep the instructions including the warranty, the receipt and, if possible, the box with the internal packing.
• Use the device only for the intended purpose.
- The device should be installed in such a way that existing ventilation holes are not covered.
- Never open the housing of the device. Incorrect repairs can constitute a considerable risk for the user. If the device is damaged it should not be used, but repaired by a specialist.
These symbols may be found on the machine and are intended to indicate the following:

The symbol with an exclamation mark should advise the user of important operation or maintenance instructions in the accompanying documentation.
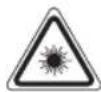
Devices bearing this symbol work with a "class 1 laser" for tracing the CD. The built-in safety switches should prevent the user being exposed to dangerous laser light, which is invisible to the human eye, when the CD compartment is opened.
Under no circumstances should these safety switches be bypassed or manipulated, as this could result in a danger of exposure to the laser light.
Symbols in these Instructions for Use
Important information for your safety is specially marked. It is essential to comply with these instructions in order to avoid accidents and prevent damage to the machine:

WARNING:
This warns you of dangers to your health and indicates possible injury risks.

CAUTION:
This refers to possible hazards to the machine or other objects.

NOTE:
This highlights tips and information.
English
Children and Frail Individuals
- In order to ensure your children's safety, please keep all packaging (plastic bags, boxes, polystyrene etc.) out of their reach.

WARNING!
Caution! Do not allow small children to play with the foil as there is a danger of suffocation!
Road Safety

WARNING:
- Road safety is of paramount importance. You should therefore use your car radio at all times in such a way that you are able to cope with the current traffic situation.
- Please remember that at a speed of 30 mph (50 kph) you travel 15 yards (14 metres) in one second.
• We advise you not to operate the radio in critical situations. - It must be possible to hear the sirens of police and fire brigade vehicles etc. from inside the vehicle in good time.
- When driving you should therefore not turn the radio volume up excessively.
- In order to avoid serious road accidents, the device should be installed in such a way that you are not hindered when operating the steering wheel, gear lever etc.
• Similarly, safety aspects such as airbags and your clear view of the road must not be obstructed either.
Safety notes for the time of assembly/connection
- First disconnect the minus pole and then the plus pole of the battery. (connection in the reverse order.)
Please note: Once the battery has been disconnected the information is lost from all volatile memory. Please note the safety information provided by the vehicle manufacturer. - The main fuse must be installed as closely as possible (not more than 30 cm away) to the plus pole of the battery so that the car is protected from any cable fire caused, for example, by an accident. If the above is not complied with the insurance protection no longer applies.
- The cross-section of the plus and minus cable must not exceed 1.5 mm ^2 .
38 English
Installation Tips
- Cable protection sleeves protect cables against fraying on sharp body parts.
- The insulation of the cables must not be damaged during installation.
- It is essential to use the correct tools when installing car hi-fi.
Depending on the model, your vehicle may deviate from the above description. We do not accept any liability for damage caused by installation or connection errors or for consequential damage.
Important Information for installing your carradio!
- The device is designed for the minus pole of the battery, which must be connected to the body of the vehicle. Please check this before installation.
- When installing/connecting your device please note that not every vehicle is equipped with an "ISO connection". In this case we recommend the use of an ISO adapter specifically designed for your vehicle.
Adapters are available from car accessory shops and/or from your vehicle workshop.
- Depending on the specific car type, different wiring connection of the "Duration +" wire (Constant current connection) are available. (However, this is necessary for storing the radio stations).
In order to guarantee all functions, installation in line with these instructions is essential. In cases of doubt please contact an authorised car workshop.
Due to the various types of motor vehicles and motor manufacturers, it is not possible to guarantee that the pin assignment of the ISO plug is correct, even if the ISO plug connections fit together mechanically. It may therefore be necessary to modify the electrical connection or use vehicle-specific adapters.
i NOTE:
If the device is correctly connected, the radio can be switched on and off via the ignition. If the stored stations are lost, this indicates that the radio is not receiving any "continuous +", current which is required for storing the stations.
CAUTION:
Where there is a connection to "continuous +" without the ignition being switched on, the car battery might be drained of power even if the radio is switched off. This may even result in the battery becoming completely flat.
- Depending on the specific car type, interferences may arise during radio/CD operation. These interferences can avoid easily with an additional Interferences filter. Your car radio is originally prepared with an Interference Filter already.
In these case, please contact your authorized car dealer.
-
When installing your radio please ensure that there is enough space at the rear of the radio to ensure sufficient cooling.
-
For the antenna connection there are two different norms. The first of these is the old (50 ohm) version with a long protruding round contact on the vehicle and a round socket on the radio end. The second is the ISO-standardised antenna plug (150 ohm). Adapters for both formats are available from accessory manufacturers and/or your car workshop.
i NOTE:
Important information for VW/Audi vehicles: Your car may have an active antenna. It requires a power supply as it is provided only by original car radios. In this case, use a phantom-powered antenna adapter. Antenna adapters are available at car accessory suppliers and/or your automotive workshop.
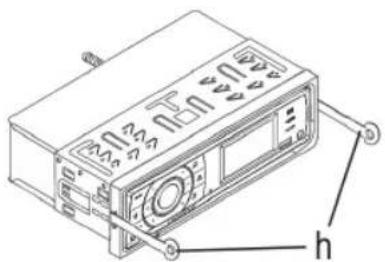
Installation
Please install the car radio as shown below.
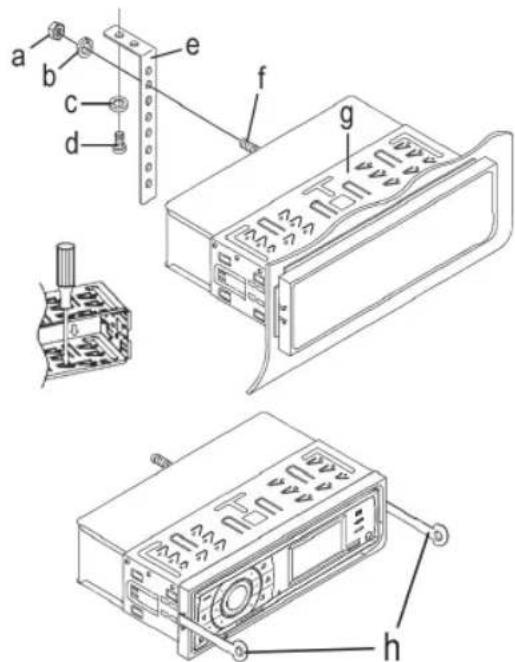
a Nut
b Spring washer
c Plain washer
d Screw
e Mounting bracket
f Threaded bolt
g Slide-in housing
h Extraction tool (spanner for dismantling)
Connection
Connect the device as shown in the diagram.

flowchart
graph TD
    A["Antenna connection"] --> B["ISO connection"]
    B --> C["Constant current connection"]
    C --> D["Earth"]
    D --> E["Ignition +"]
    E --> F["Automatic antenna (Blue)"]
    F --> G["Loudspeaker, front left"]
    G --> H["Rear left"]
    H --> I["Green"]
    I --> J["Violet/black"]
    J --> K["Front right"]
    K --> L["Loudspeaker"]
    L --> M["Red R"]
    M --> N["White L"]
    N --> O["Grey"]
    O --> P["Violet"]
    P --> Q["Rear right"]
    Q --> R["Loudspeaker, front right"]
    R --> S["White/black"]
    S --> T["Red"]
    T --> U["1 A"]
    U --> V["fuse"]
    V --> W["5 A"]
    W --> X["Yellow"]
    X --> Y["+"]
    Y --> Z["Antenna connection"]
    style A fill:#f9f,stroke:#333
    style B fill:#ccf,stroke:#333
    style C fill:#cfc,stroke:#333
    style D fill:#fcc,stroke:#333
    style E fill:#cff,stroke:#333
    style F fill:#ffc,stroke:#333
    style G fill:#fcc,stroke:#333
    style H fill:#fcc,stroke:#333
    style I fill:#fcc,stroke:#333
    style J fill:#fcc,stroke:#333
    style K fill:#fcc,stroke:#333
    style L fill:#fcc,stroke:#333
    style M fill:#fcc,stroke:#333
    style N fill:#fcc,stroke:#333
    style O fill:#fcc,stroke:#333
    style P fill:#fcc,stroke:#333
    style Q fill:#fcc,stroke:#333

CAUTION:
- Please use loudspeakers with an impedance of 4 ohm.
• The loudspeaker cables must be unearthed.
Connection of an external amplifier
For the connection of an external amplifier use the audio cinchoutput LINE OUT at the rear side of the device. Refer to the instruction manual concerning the external amplifier.
Operating Instructions
- Do not switch on the device if the car interior is extremely hot, for example after an extended parking in direct sunlight. Wait until the interior is cooled down after a short drive.
- Possible malfunctions during operation can be resolved by pushing the RESET button. Push the RESET button with a wire or similar (10) to reset the electronics (RESET).
- The time displayed in standby mode is set automatically as soon as you listen to a radio station. Manual setting is not possible.
Operation
In the following, the functions of the individual device buttons are described according to the illustration "Overview of the Components".
1 MODE Button
Press this button to select the different modes. (Radio, USB, CARD and AUX)

NOTE:
The USB and CARD mode can only be selected if you have connected a corresponding medium.
2 Station presets (1-6)
a) In radio mode:
- Hold down the desired station preset button to save a radio station.
- To choose a radio station, shortly press the respective station button.
- To select a program type. Page 41 "BAND/PTY button"
b) In USB/CARD mode:
Direct selection of a music file. Page 41 "AS/PS button"
3 Volume control / On-/Off / SEL Button (Select)
a) Press the control to switch on the device. Hold down the control to switch off the device. The time appears on the display.
b) During normal playback mode, the control is used to control the volume.
Together with the previously pressed control (SEL button), changes can be made in the menu, e. g. the sound mode.
c) Press the SEL button shortly to enter the selection menu. Repeated pressing of the SEL button selects individual menu entries. You can change the settings of the individual menu entries by turning the volume control.
40 English
BAS (Bass)
TRE (Treble)
BAL (Balance)
FAD (Fader)
AF ON/AF OFF
AF (Alternative Frequencies) is a function working with RDS (Radio Data System) and can only be used with FM stations. In the background, the device searches the best frequency for the selected station.
- ON: If a certain broadcast station has bad reception, the device switches automatically to a broadcast station broadcasting the same program via the same RDS broadcast chain.
• OFF: The function is deactivated.
REG ON/REG OFF
At certain times, some stations are segmenting their programs in regional programs with different content.
- ON: Only regional programs of the station are played.
• OFF: Play nationwide programs as well.
VOL (Volume)
4 DIR -Button
a) In radio mode to choose a radio station.
b) In USB/CARD mode:
- Press the button to choose the next music title.
- Hold down the button to choose the next directory (if directories are existing on the storage media).
5 ▶ II/MUT Button
a) Press the button to interrupt the playback of a music title (pause function). Press this button again to continue listening to the CD.
b) If you hold down this button, the playback will be muted. To switch this function off, hold down the button again.
6 LCD (liquid crystal display)
7 SD/MMC Card Slot
Slide the memory card into the respective opening with the label ahead until it latches with a "click". The word CARD appears in the display.
The data are automatically played back.
i NOTE:
In order to search for/select certain tracks proceed as described under section 13 (AS/PS button as search function in MP3 mode).
To remove the memory card, press again onto the end of the memory card. It unlatches with a "click" and can be removed.
CAUTION:
Simple pulling out can damage the slot and/or the memory card.
8 AUX socket
To connect analogue replay devices. Using this socket it is possible to hear the sound of other playback devices such as MP3 players, CD players etc. through the loudspeaker.
- Please connect the external device with a 3.5 mm stereo jack plug to the AUX socket (8).
- Press the MODE button (1) repeatedly until "AUX" appears in the display.
- You hear the playback from the external device via the loudspeakers. You can change the volume with the volume control (3).
- For the remaining procedure please see the operating instructions of the external sound source.
i NOTE:
Adjust the volume of the external device to a comfortable level.
9 USB Connection
If you would like to play back data contained on a USB stick, please insert the stick into the opening provided. e word USB appears in the display. The data is played back automatically.
i NOTE:
- In order to search for/select certain tracks proceed as described under section 13 (AS/PS button as search function in MP3 mode).
- Please note: The USB connection is only designed for playing back storage media and not for charging external devices. Only a low power (100 mA) supply can be provided. This USB connection is not designed for driving e.g. external 2.5" hard discs, needing starting currents of up to 1100 mA. For playing back your smartphone, iPod or iPhone, use the AUX-IN socket, intended for that purpose.
10 Reset-Button (reset)
See section "Operating Instructions" on page 39.
11 DIR Button
a) In radio mode to choose a radio station.
b) In USB/CARD mode:
- Press the button to choose the next music title.
- Hold down the button to choose the next directory (if directories are existing on the storage media).
12 BAND/PTY Button
a) Radio Operation
Shortly press the BAND/PTY button to switch between the three FM- (UKW) areas. The designation of the corresponding level appears in the LCD display.
b) PTY button
Radio operation:
PTY Selecting the program type
Besides the station name, some stations broadcast information about the program type of your program.
This information can be displayed on your car radio.
The program can be of the following types, for example:
SPORT NEWS POP CLASSICS
Using the PTY function, you can select specific stations of a certain program type. The individual program types are divided into two categories: Music and Speech. You can find a list of program types on page 43.
- Hold down the BAND/PTY button 1x to switch on the function and to select the category "Speech".
- Hold down the BAND/PTY button 2 xs to select category "Music".
NOTE: Switch off the function
If you hold down the BAND/PTY button for a third time, the function will be switched off.
Then, press station buttons 1-6 to make the PTY choice. The selected program type appears in the display.
If PTY is selected, the radio starts to search for respective PTY information and stops when the desired PTY information is found.
If the desired program type is not found, the message "NO PTY" appears on the display.
If the PTY information does not exist anymore, the PTY function will automatically switch to normal mode.
13 AS/PS-button
Radio mode:
a) Press the button shortly to play the saved stations sequentially for approx. 5 seconds. Press the desired station to quit the operation and to play the radio station.
b) Hold down this button to start the automatic station scanning. SEARCH appears on the display. The search process can take some minutes. The stations are saved in the order of ascending frequencies. Then, the saved stations are played for a short time. Press a station button to quit the operation.
USB/CARD mode:
Direct selection of a music file.
Press the AS/PS button, "NUM -- -" will be displayed on the display. Turn the volume control to the desired file, or enter the number with the station buttons (button 1-6, MODE = 7, ⏻/DIR = 8, ⏻/DIR = 9, BAND = 0). Then, press the SEL button (3) to play the file.
Technical data
General
Supply voltage ...... DC 12 V (negative ground)
Power consumption....5 A Max.
Power 4 x 80 W (PMPO)
playable file formats ....MP3, WMA
Housing dimensions (Installation) ...... 182 W x 52 H x 108 D
FM band
Frequency range 87.5 MHz \~ 108.0 MHz
Effective sensitivity ....4 μV
I.F. frequency 10.7 MHz
Subject to technical changes without prior notice!
This device has been tested according to all relevant current CE guidelines, such as electromagnetic compatibility and low voltage directives, and has been constructed in accordance with the latest safety regulations.
42 English Troubleshooting
Before going through the checklist please make all the connections first. If you still have questions after going through the checklist, please consult your local customer service representative.
| Fault Symptoms Cause Solution | ||
| No function. The ignition is switched off. | Turn the ignition key to “ON” or “ACC”. | |
| One or more fuses have blown. Replace the fuse by another 5 A/1 A fuse. | ||
| Device cannot be switched on or off via the ignition. | Incorrect connection (each car manufacturer wires the ISO connection in the vehicle differently). | Please contact your car workshop or a vehicle special-ist for connection adapters may specifically for your model. |
| The device does not work correctly. | The microcomputer has been interfered with by electromagnetic fields. | Switch the device off and on again. |
| No radio reception. | The antenna cable is not connected. | Insert the antenna cable firmly into the antenna socket of the device. |
| Poor radio reception. | It is possible that your vehicle has a special antenna (phantom-powered antenna.) | Please contact your car workshop or a vehicle specialist. (For other manufacturers there are specific phantom power supply adapters and voltage adapters available.) |
PTY – Program types
| Station buttons | PTY of the category "Speech" | Station buttons | PTY of the category "Music" |
| 1 | NEWS | 1 | POP M |
| AFFAIRS | ROCK | ||
| INFO | |||
| 2 | SPORT | 2 | LIGHT |
| EDUCATION | EASY | ||
| DRAMA | |||
| 3 | CULTURE | 3 | CLASSIC |
| SCIENCE | OTHER | ||
| VARIED | |||
| 4 | WEATHER | 4 | COUNTRY |
| FINANCE | JAZZ | ||
| CHILDREN | |||
| 5 | SOCIAL | 5 | NATIONAL |
| RELIGION | OLDIES | ||
| PHONE IN | |||
| 6 | TRAVEL | 6 FOLKLEISURE | |
| DOCUMENT |
44 English
Index
| A | P |
| Adjust the volume......39AS/PS Button......41AUX socket......40 | Play / Pause (▶ II)......40PTY-Program types......43 |
| B | R |
| ◀◀◀◀Buttons......40/41BAND/PTY Button......41 | Road Safety......37 |
| C | S |
| Connection......39 | Safety Information......37SD/MMC Card Slot......40SEL Button......39Switching off......39Switching on......39 |
| I | |
| Important Additional Installation Information......38Installation......38Installation (Safety Information)......37Installation Tips......38 | T |
| M | Technical Data......41Time......39Troubleshooting......42 |
| MODE Button......39MUT button (mute)......40Muting......40 | UUSB Connection......40 |
| O | |
| Operation......39Operating instructions......39 |
