
GZ-8502A - Oven Guzzanti - Free user manual and instructions
Find the device manual for free GZ-8502A Guzzanti in PDF.


| Product Type | Built-in Electric Oven |
| Brand | Guzzanti |
| Model | GZ-8502A |
| Power Supply | 220-240 V, 50/60 Hz, 16 A fuse |
| Lamp Power | 15 W (type E14) |
| Thermostat Range | 40 – 240 °C (max 240 °C) |
| Lower Heater Power | 1200 W |
| Upper Heater Power | 1000 W |
| Turbo Heater Power | 1800 W |
| Grill Heater Power (Small) | 1000 W |
| Grill Heater Power (Big) | 2000 W |
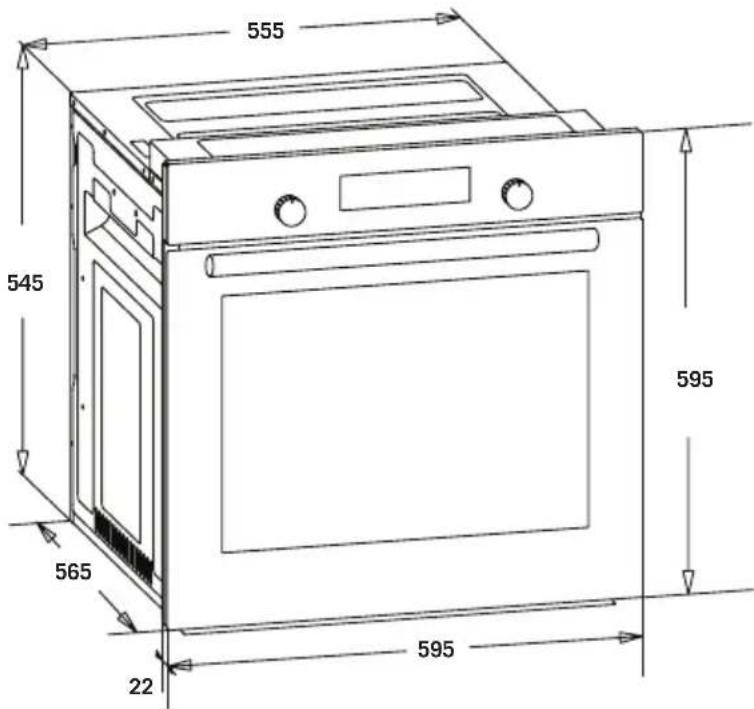
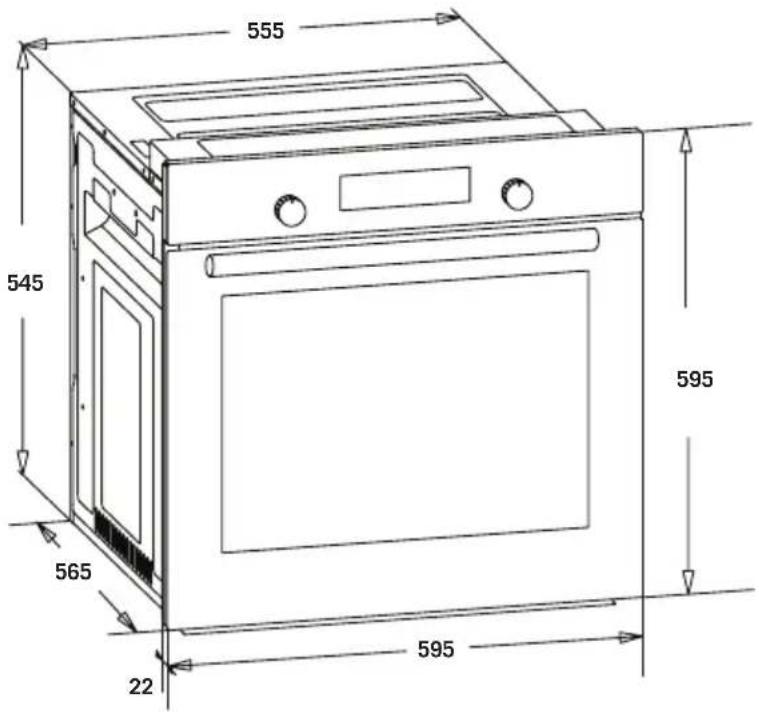
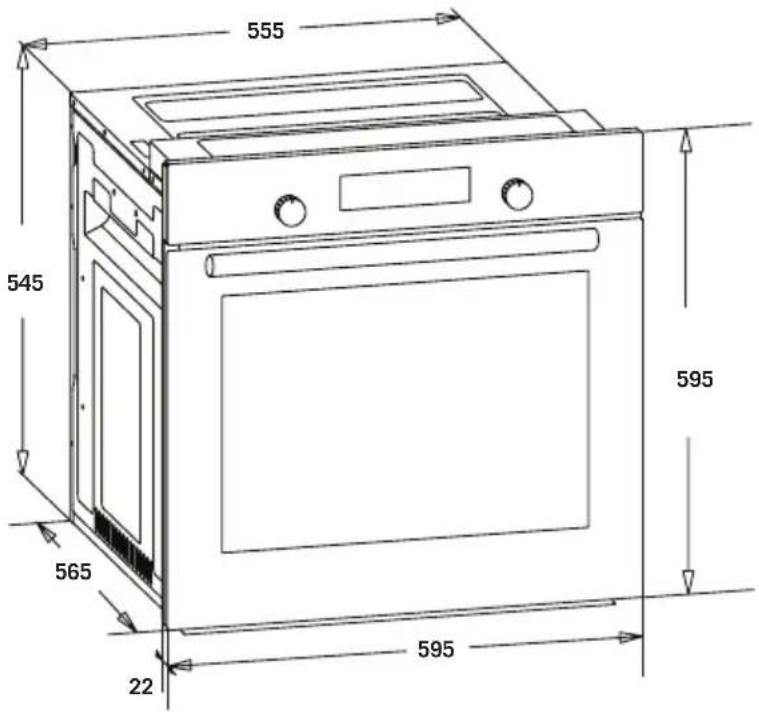
| Dimensions (W x H x D) | 595 x 595 x 590 mm (approx.) |
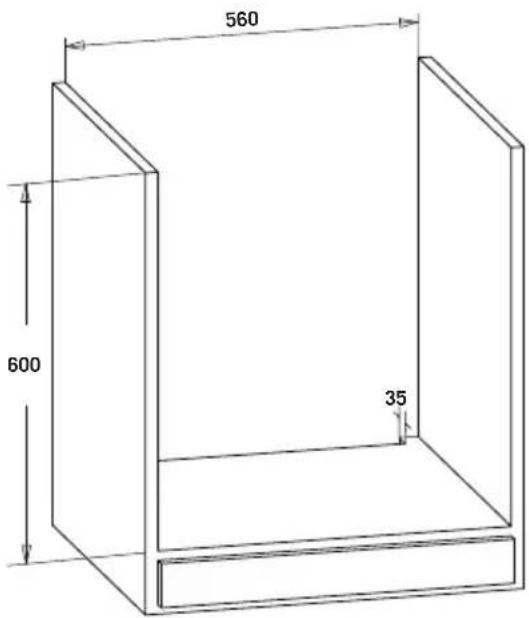
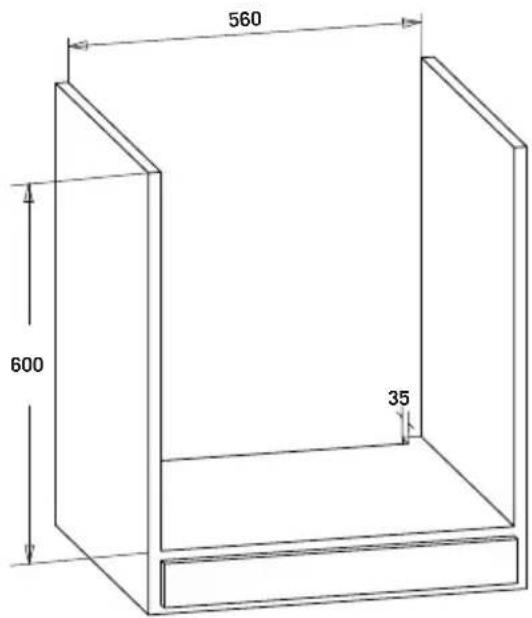
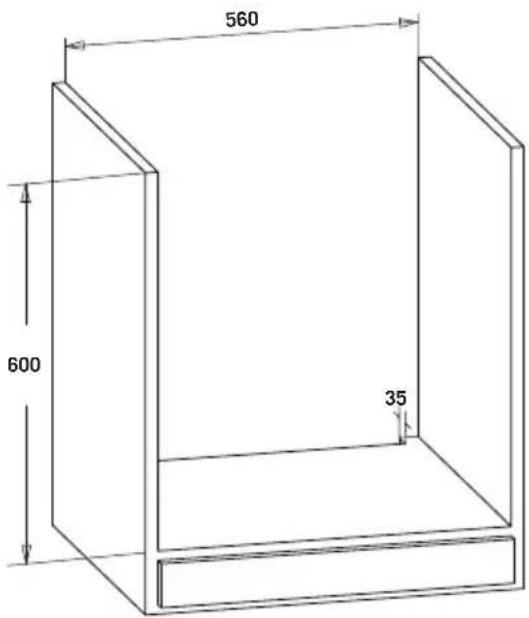
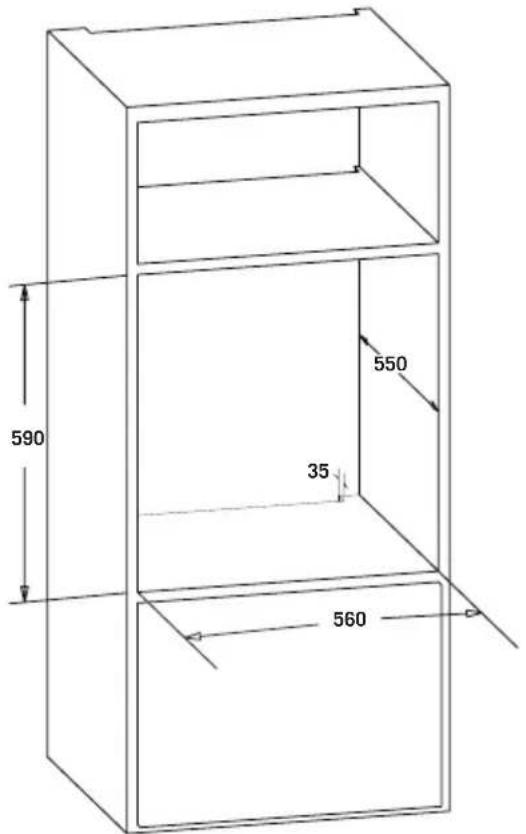
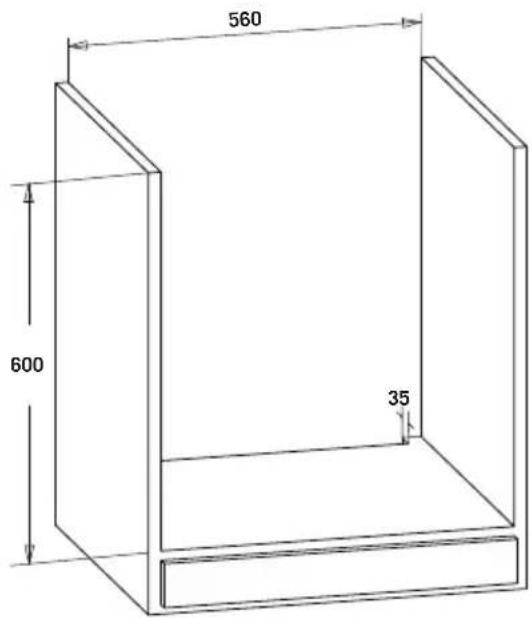
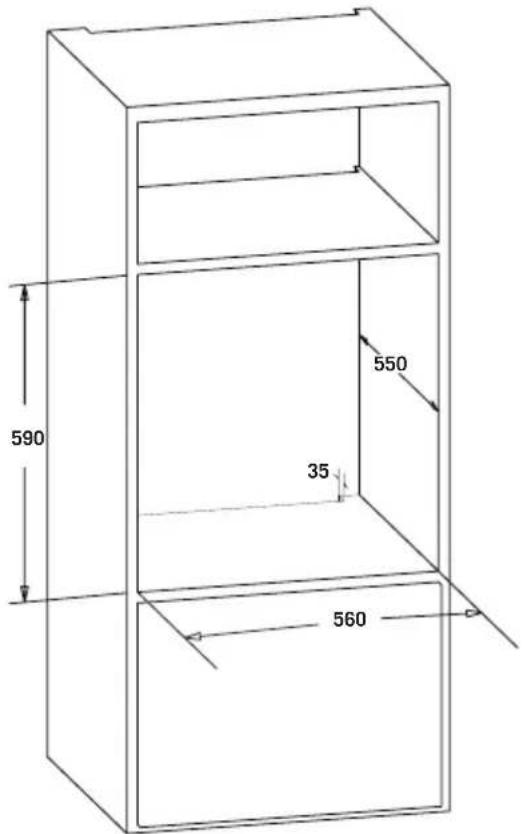
| Cutout Dimensions | 560 x 600 x 35 mm (see manual) |
| Weight | Approximately 30 kg (estimated) |
| Cooking Functions | Lower & Upper Heat, Fan, Grill, Turbo, Steam Cleaning, Multifunctional |
| Timer | Mechanical timer with audible alarm |
| Door Type | Removable oven door with double glass |
| Cleaning Method | Manual cleaning; steam cleaning function available (optional) |
| Safety Features | Child lock (protective tools), automatic shut-off, overheat protection |
| Warranty | Standard manufacturer warranty (check local regulations) |
| Compliance | CE, WEEE Directive 2012/19/EU |
Frequently Asked Questions - GZ-8502A Guzzanti
User questions about GZ-8502A Guzzanti
0 question about this device. Answer the ones you know or ask your own.
Ask a new question about this device
Download the instructions for your Oven in PDF format for free! Find your manual GZ-8502A - Guzzanti and take your electronic device back in hand. On this page are published all the documents necessary for the use of your device. GZ-8502A by Guzzanti.
USER MANUAL GZ-8502A Guzzanti
GZ-8501, GZ-8502, GZ-8503, GZ-8504, GZ-8505, GZ-8506, GZ-8507
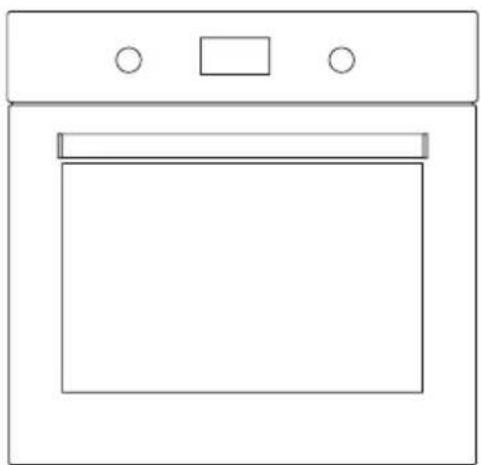
natural_image
Line drawing of a simple kitchen oven with two circular handles (no text or symbols)Návod k obsluze Návod na obsluhu Instrukcja obsługi Használati útmutató Navodila za uporabo Gebrauchsanleitung Instruction manual
Vážený zákazník,
natural_image
Technical line drawing of a refrigerator or condenser unit with heat exchangers and cooling fins (no text or symbols)Obrázek 1
Obrázek 2
Obrázek 3
Obrázek 4
Obrázek 5
DŮLEŽITÁ VAROVÁNÍ
natural_image
Empty white square with a thin gray border (no text or symbols)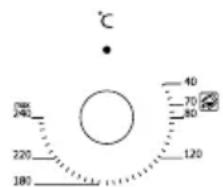
natural_image
Line drawing of a hand pressing a button on a control panel (no text or symbols)natural_image
Line drawing of a hand holding a mechanical knob or dial, with no text or symbols present.natural_image
Line drawing of a hand adjusting a car seatbelt (no text or symbols)Obrázek 11
natural_image
Line drawing of a mechanical component with a knob and arrow indicating rotation (no text or symbols)Obrázek 12
ČIŠTĚNÍ SKLA TROUBY
natural_image
Line drawing of an open oven or rack unit with internal compartments and ventilation grilles (no text or symbols)Obrázek 16
natural_image
Line drawing of an open refrigerator with doors open, showing internal compartments and ventilation slots (no text or symbols)Obrázek 17
natural_image
Four circular diagrams showing mechanical assembly steps with no visible text or symbolsnatural_image
Line drawing of an oven with a lid and door, labeled 'Obrázek 18' (no other text or symbols)natural_image
Symbol of a trash bin crossed with a diagonal line, no text or labels presentnatural_image
Symbol of a trash bin crossed with no text or numbers, representing waste sorting or disposal (no text present)
natural_image
Technical line drawing of a refrigerator or condenser unit with heat exchangers and cooling fins (no text or symbols)Obrázok 1
Obrázok 2
Obrázok 3
Obrázok 4
Obrázok 5
DÔLEŽITÉ VAROVANIA
natural_image
Line drawing of a hand pressing a button on a control panel (no text or symbols)natural_image
Line drawing of a hand holding a circular knob on a cabinet (no text or symbols)natural_image
Line drawing of a hand adjusting a car seatbelt (no text or symbols)Obrázok 11
natural_image
Line drawing of a mechanical component with a knob and arrow indicating rotation (no text or symbols)Obrázok 12
ČISTENIE SKLA RÚRY
natural_image
Line drawing of an open oven or rack unit with internal compartments and ventilation grilles (no text or symbols)Obrázok 16
natural_image
Line drawing of an open refrigerator with doors open, showing internal compartments and ventilation slots (no text or symbols)Obrázok 17
natural_image
Four circular diagrams showing mechanical assembly steps with no visible text or symbolsnatural_image
Symbol of a trash bin crossed with a diagonal line, no text or labels presentnatural_image
Symbol of a trash bin crossed with no text or numbers, representing waste sorting or disposal (no text present)
natural_image
Technical line drawing of a refrigerator or condenser unit with heat exchangers and cooling fins (no text or symbols)Rysunek 1
Rysunek 2
Rysunek 3
Rysunek 4
Rysunek 5
WAŻNE OSTRZEŻENIA
natural_image
Line drawing of a hand pressing a button on a control panel (no text or symbols)natural_image
Line drawing of a hand holding a mechanical knob on a cabinet (no text or symbols)natural_image
Line drawing of a hand adjusting a car seatbelt (no text or symbols)Rysunek 11
natural_image
Line drawing of a mechanical component with a knob and arrow indicating rotation (no text or symbols)Rysunek 12
CZYSZCZENIE SZKŁA PIEKARNIKA
natural_image
Line drawing of an open oven with insulation rack (no text or symbols)Rysunek 13
natural_image
Line drawing of an open oven with internal rack and door (no text or symbols)Rysunek 14
natural_image
Line drawing of an open oven with insulation and a battery inserted (no text or symbols)Rysunek 15
natural_image
Line drawing of an open oven or rack unit with internal compartments and ventilation grilles (no text or symbols)Rysunek 16
natural_image
Line drawing of an open refrigerator with doors open, showing internal compartments and ventilation slots (no text or symbols)Rysunek 17
natural_image
Four circular diagrams showing mechanical assembly steps with no visible text or symbolsnatural_image
Line drawing of an open oven with a black plastic bag inside, labeled 'Rysunek 18' (no other text or symbols)natural_image
Symbol of a trash bin with crossed lines indicating no waste or discharge (no text or labels)natural_image
Symbol of a trash bin crossed with no text or numbers, representing waste sorting or disposal (no text present)
natural_image
Technical line drawing of a refrigerator or condenser unit with heat exchangers and cooling fins (no text or symbols)- ábra
- ábra
- ábra
- ábra
- ábra
FONTOS FIGYELMEZTETÉSEK
natural_image
Line drawing of a hand pressing a button on a control panel (no text or symbols)natural_image
Line drawing of a hand holding a mechanical knob on a cabinet (no text or symbols)natural_image
Line drawing of a hand adjusting a car seatbelt mechanism (no text or symbols)- ábra
natural_image
Line drawing of a mechanical component with a knob and arrow indicating rotation (no text or symbols)- ábra
natural_image
Three technical line drawings of an oven with internal compartments and heat sinks, shown from different angles (no text or symbols present)- ábra
- ábra
- ábra
TISZTÍTÁS ÉS ÁPOLÁS
natural_image
Line drawing of an open oven or rack unit with internal compartments and ventilation grilles (no text or symbols)- ábra
natural_image
Line drawing of an open refrigerator with doors open, showing internal compartments and ventilation slots (no text or symbols)- ábra
natural_image
Four circular diagrams showing mechanical assembly steps with no visible text or symbolsnatural_image
Line drawing of an oven with a lid and door, labeled '18. ábra' (no other text or symbols)natural_image
Symbol of a trash bin crossed with diagonal lines, no text or labels presentnatural_image
Symbol of a trash bin crossed with no text or numbers, representing waste sorting or restriction (no text present)
natural_image
Technical line drawing of a refrigerator or condenser unit with heat exchangers and cooling fins (no text or symbols)Slika 1
Slika 2
Slika 3
Slika 4
Slika 5
POMEMBNA OPOZORILA
natural_image
Line drawing of a hand pressing a button on a control panel (no text or symbols)natural_image
Line drawing of a hand holding a mechanical knob or dial, with no text or symbols present.natural_image
Line drawing of a hand adjusting a car seatbelt (no text or symbols)Slika 11
natural_image
Line drawing of a mechanical component with a curved arrow indicating rotation (no text or symbols)Slika 12
ČIŠČENJE STEKLA PEČICE
natural_image
Line drawing of an open oven or rack unit with internal compartments and ventilation grilles (no text or symbols)Slika 16
natural_image
Line drawing of an open refrigerator with doors open, showing internal compartments and ventilation slots (no text or symbols)Slika 17
natural_image
Four circular diagrams showing mechanical assembly steps with no visible text or symbolsSlika 16.1
natural_image
Line drawing of an oven with a lid and door, labeled 'Slika 18' (no other text or symbols)natural_image
Symbol of a trash bin crossed with a diagonal line, no text or labels presentEmbalažne materiale odstranite na pravilen način.
Ta naprava je označena v skladu z Evropsko direktivo 2002/96/ES o odpadni električni in elektronski opremi (waste electrical and electronic equipment - WEEE). Direktiva določa okvir za zbiranje in recikliranje rabljenih aparatov, ki velja po vsej EU.
INFORMACIJE O EMBALAŽI
natural_image
Symbol of a trash bin crossed with no text or numbers, representing environmental protection (no text present)natural_image
Technical line drawing of a refrigerator or condenser unit with heat exchangers and cooling fins (no text or symbols)Abbildung 1
Abbildung 2
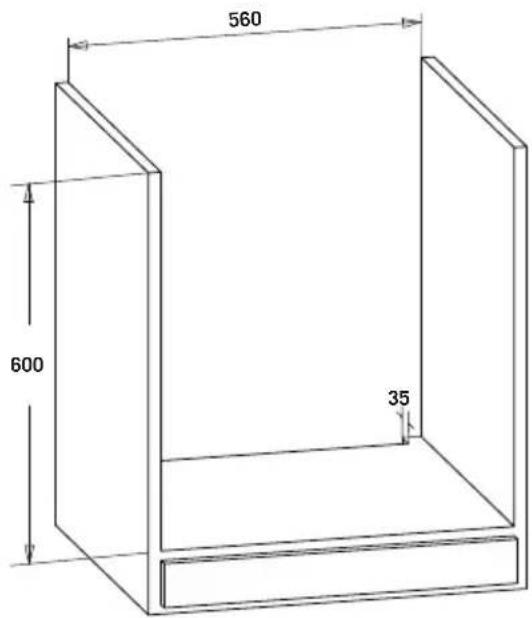
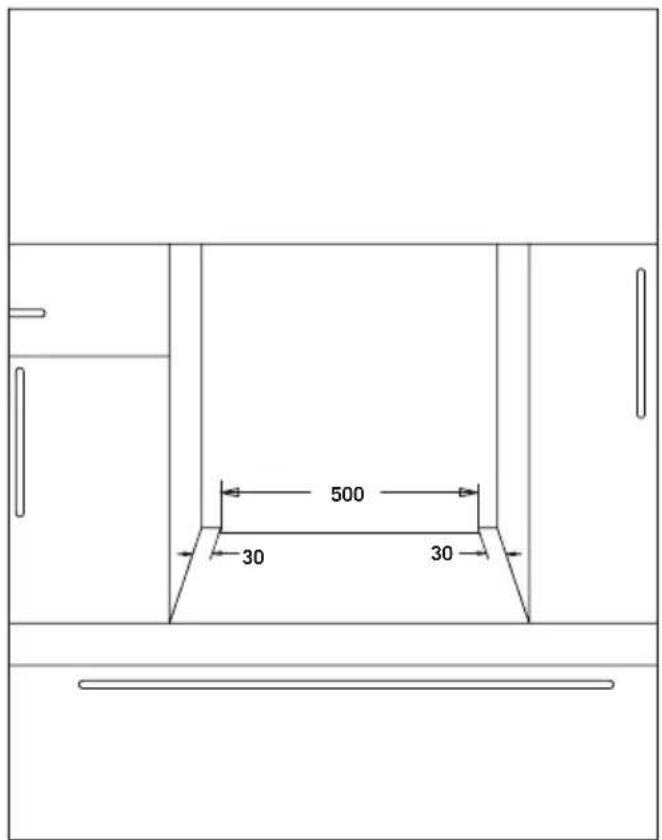
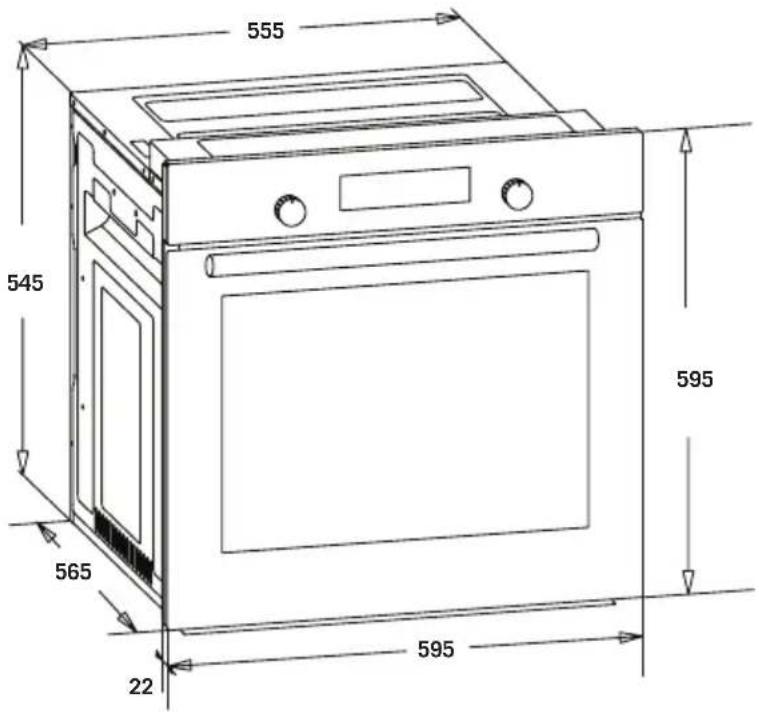
Abbildung 3
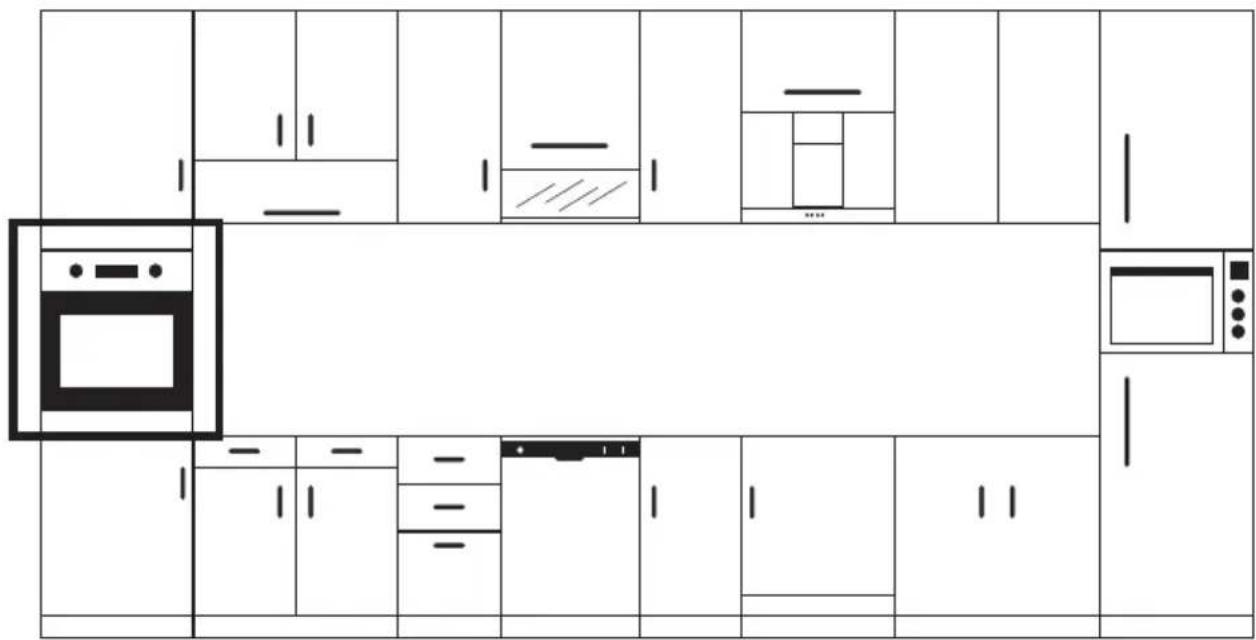
Abbildung 4
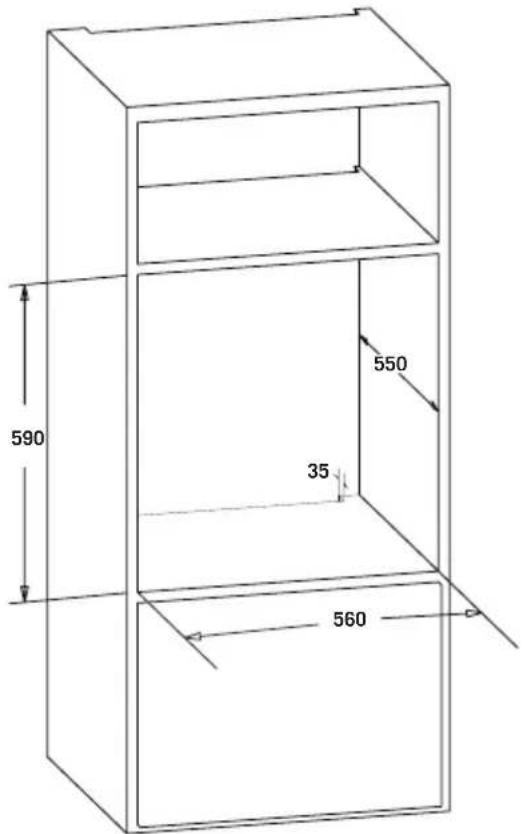
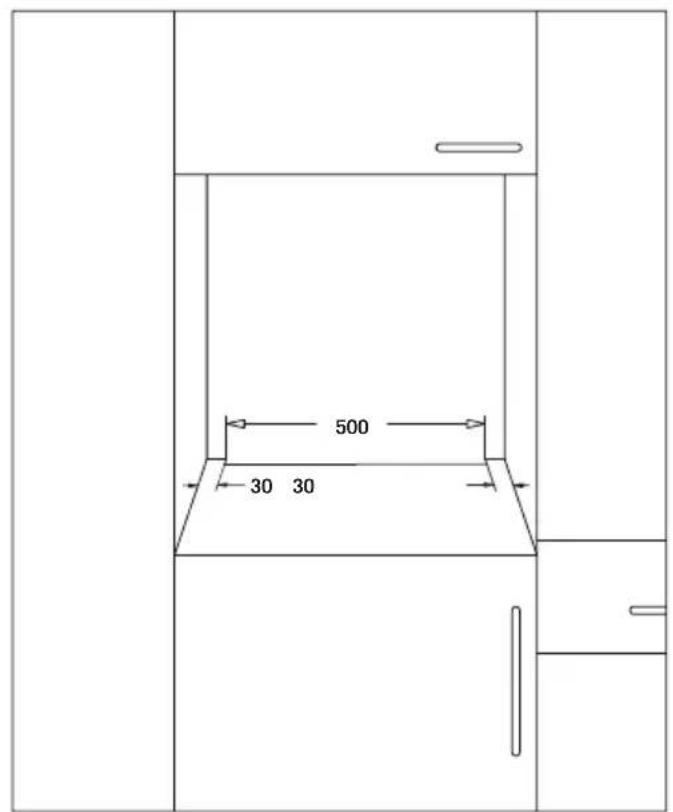
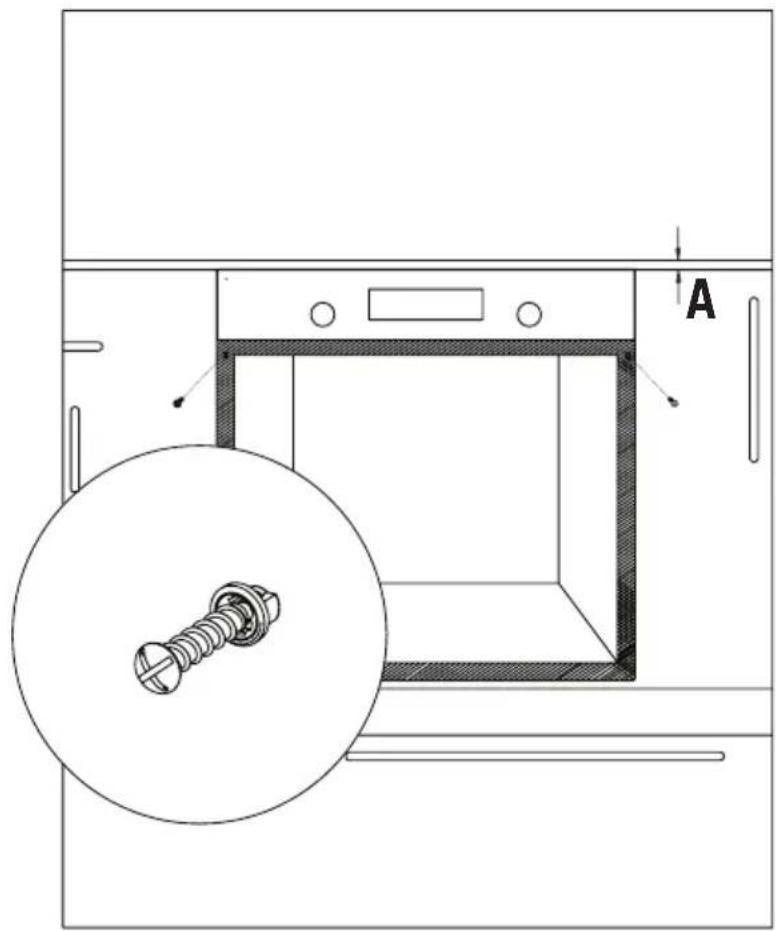
Abbildung 5
WICHTIGE WARNUNGEN
natural_image
Line drawing of a hand pressing a button on a control panel (no text or symbols)natural_image
Line drawing of a hand operating a mechanical switch with rotating components (no text or symbols)natural_image
Line drawing of a hand adjusting a car seatbelt mechanism (no text or symbols)Abbildung 11
natural_image
Line drawing of a mechanical component with a knob and arrow indicating rotation (no text or symbols)Abbildung 12
natural_image
Technical line drawing of an open oven or rack unit with internal compartments and ventilation slots (no text or symbols)Abbildung 16
natural_image
Line drawing of an open refrigerator with internal compartments and ventilation slots (no text or symbols)Abbildung 17
natural_image
Four circular diagrams showing mechanical assembly steps with no visible text or symbolsnatural_image
Line drawing of an oven with a lid and door, labeled 'Abbildung 18' (no other text or symbols)natural_image
Symbol of a trash bin crossed with a diagonal line, no text or labels presentnatural_image
Symbol of a trash bin crossed with no text or numbers, representing waste sorting or disposal (no text present)
Thank you for relying on this product.
We aim to allow you to optimally and efficiently use this environment-friendly product produced in our modern facilities under precise conditions with respect to sense of quality in total.
We advise you to read these operating manual thoroughly before using the oven and keep it permanently so that the features of the built-in oven you have purchased will stay the same as the first day for a long time.
NOTE:
This Operating Manual is prepared for multiple models. Your appliance may not feature some functions specified in the manual.
The product images are schematic.
This product has been produced in modern environment-friendly facilities without adversely affecting nature.
Products marked with (*) are optional.
„Complies with WEEE Regulation“
CONTENTS
CONTENTS....3
IMPORTANT WARNINGS....4
INTRODUCING THE APPLIANCE 5
TECHNICAL SPECIFICATIONS....6
INSTALLATION OF APPLIANCE 6
IMPORTANT WARNINGS....11
CONTROL PANEL....11
PROGRAM TYPES 13
COOKING RECOMMENDATIONS 13
COOKING TABLE 14
USING THE OVEN....14
REPLACING OVEN LAMP 15
CLEANING OVEN GLASS 15
CLEANING AND MOUNTING OVEN DOOR 16
MAINTENANCE AND CLEANING....17
STEAM CLEANING* 17
ACCESSORIES (Optional)....18
TROUBLESHOOTING 19
ENVIRONMENTALLY-FRIENDLY DISPOSAL 19
PACKAGE INFORMATION 19
IMPORTANT WARNINGS
- WARNING: To avoid electric shock, ensure that the appliance circuit is open before changing the lamp.
- WARNING: All supply circuit connections must be disconnected before accessing terminals.
- WARNING: The accessible parts may be hot during use of grid. Children must be kept away.
- WARNING: Fire hazard; do not store materials on cooking surface.
- WARNING: If the surface is cracked, open the appliance circuit to avoid risk of electric shock.
- WARNING: Appliance and its accessible parts are hot during operation.
- Setting conditions of this appliance are specified on the label.(Or on the data plate)
- Accessible parts might be hot during use of grill. Small children should be kept away.
- WARNING: Appliance is intended for cooking only. It should not be used for other purposes like heating a room.
- There are additional protective tools avoiding contact with oven doors. This part must be attached when it's likely that there are children around.
- Do not use steam cleaners to clean the appliance.
- NEVER try to put out the fire with water. Only shut down the appliance circuit and then cover the flame with a cover or a fire blanket.
- Hard and abrasive cleaners or hard metal scrapers should not be used to clean the oven glass door, as these can scratch the surface and cause breaking.
- Ensure that door is fully closed after food is placed.
- Children under 8 years of age should be kept away, if they cannot be monitored continuously.
- Touching the heating elements should be avoided.
- This appliance can be used by children over 8 years of age, people with physical, hearing or mental challenges or people with lack of experience or knowledge; as long as control is ensured or information is provided regarding the dangers.
- The appliance hasn't been designed for operation with an external time or a separate remote control system.
19 This device has been designed for domestic use. - Cleaning and user maintenance can't be made by children without adult supervision.
- Children must not play with the appliance. Cleaning and user maintenance shouldn't be made by children unless they are older than 8 years old and under adult supervision.
- Make sure that children at and under 8 can't reach appliance and appliance cable.
- Keep curtains, tissue paper or combustible (inflammable) materials away from appliance before starting to use it. Do not place inflammable or combustible materials in or on the appliance.
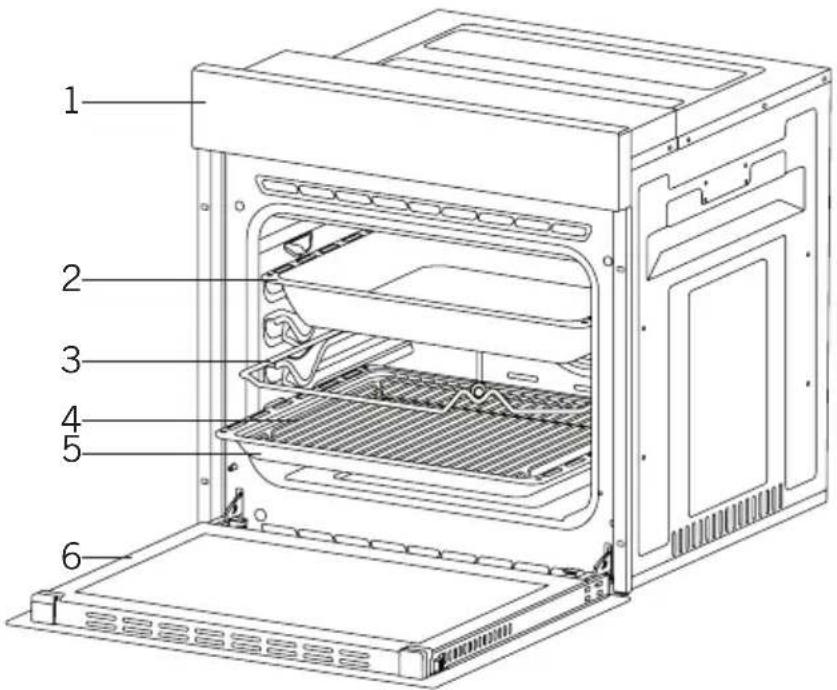
- Control Panel 4. In Tray Wire Grill
2.Deep Tray * 5.Standard Tray - Roast Chicken Skewer 6. Oven door
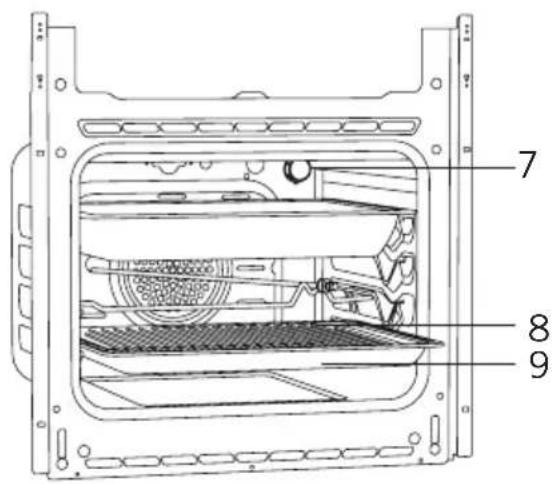
- Lamp
- In Tray Wire Grill
- Standard Tray
TECHNICAL SPECIFICATIONS
| SPECIFICATIONS 60 cm Built-In Oven | ||||
| Lamp Power 15W | ||||
| Thermostat 40-240 / Max °C | ||||
| Lower Heater 1200W | ||||
| Upper Heater 1000W | ||||
| Turbo Heater 1800W | ||||
| Grill Heater Small Grill 1000W | Big Grill 2000W | |||
| Supply Voltage 220V-240V 50/60 Hz | ||||
Technical specifications can be changed without prior notice to improve product quality.
The values provided with the appliance or its accompanying documents are laboratory readings in accordance with the respective standards.
These values may differ depending on the use and ambient conditions. Figures in this guide are schematic and may not be exactly match your product.
INSTALLATION OF APPLIANCE
Ensure that electrical installation is suitable for operationalising the appliance. If not, call an electrician and plumber to make necessary arrangements. Manufacturing firm can't be hold responsible for damages to arise due to operations by unauthorized people and product warranty becomes void.
WARNING: It is customer's responsibility to prepare the location the product shall be placed on and also have power utility prepared.
WARNING: The rules about electrical local standards must be adhered to during product installation.
WARNING: Check for any damage on the product before installing it.
Do not have product installed if it's damaged. Damaged products pose danger for your safety.
Important Warnings for Installation:
natural_image
Technical line drawing of a refrigerator or condenser unit with heat exchangers and cooling fins (no text or symbols)Figure 1
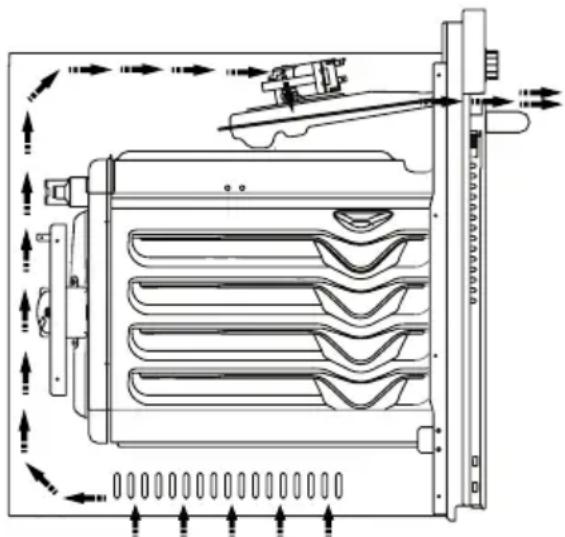
Cooling fan shall take extra steam out and prevent outer surfaces of appliance from overheating during operation of oven. This is a necessary condition for better appliance operation and better cooking.
Cooling fan shall continue operation after cooking is finished. Fan shall automatically stop after cooling is completed.
A clearance must be left behind the enclosure where you'll place the appliance for efficient and good operation. This clearance shouldn't be ignored as it's required for ventilation system of the appliance to operate.
Right Place For Installation
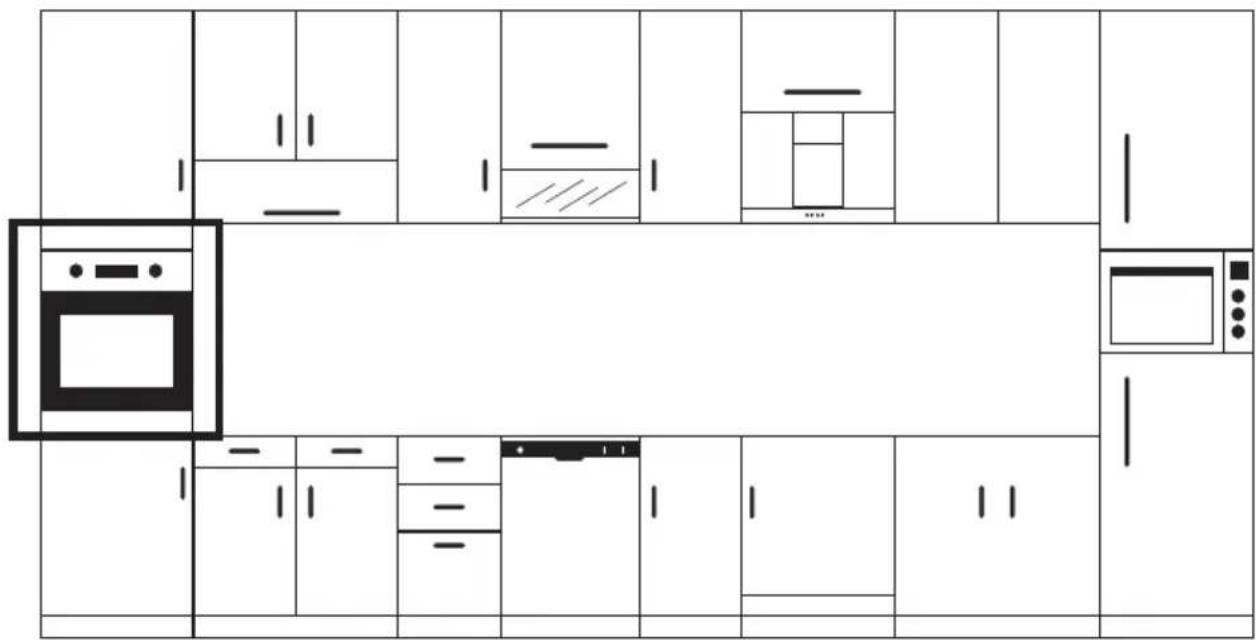
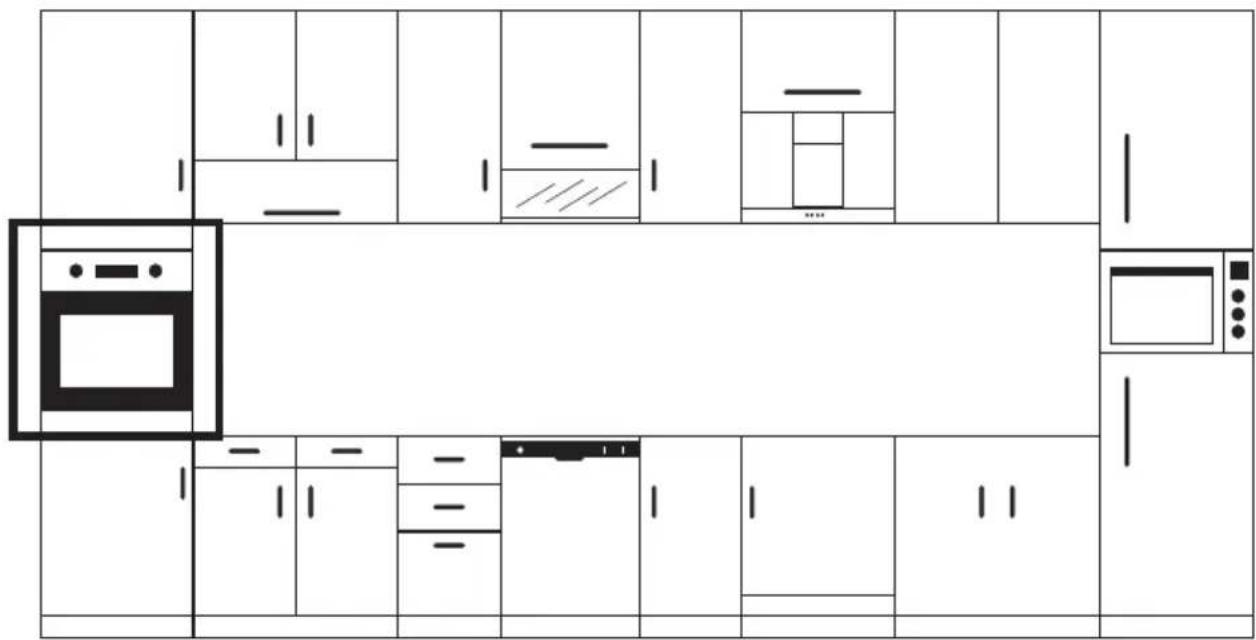
Product has been designed to be mounted to worktops procured from market. A safe distance must be left between the product and kitchen walls or furniture. See the drawing provided on the next page for proper distances. (values in mm).
- Used surfaces, synthetic laminates and adhesives must be heat resistant. (minimum 100^ ).
- Kitchen cupboards must be level with product and secured.
- If there is a drawer below the oven, a rack must be placed between oven and drawer.
WARNING: Do not install the product next to refrigerators or coolers.
The heat emitted by the product increases the energy consumption of cooling devices.
WARNING: Do not use door and/or handle to carry or move the product.
60 cm Built-In Oven Installation and Mounting
Place of use for product must be located before starting installation.
Product mustn't be installed in places which are under the effect of strong air flow.
Carry the product with minimum two people. Do not drag the product so that floor isn't damaged.
Remove all transportation materials inside and outside the product.
Remove all materials and documents in the product.
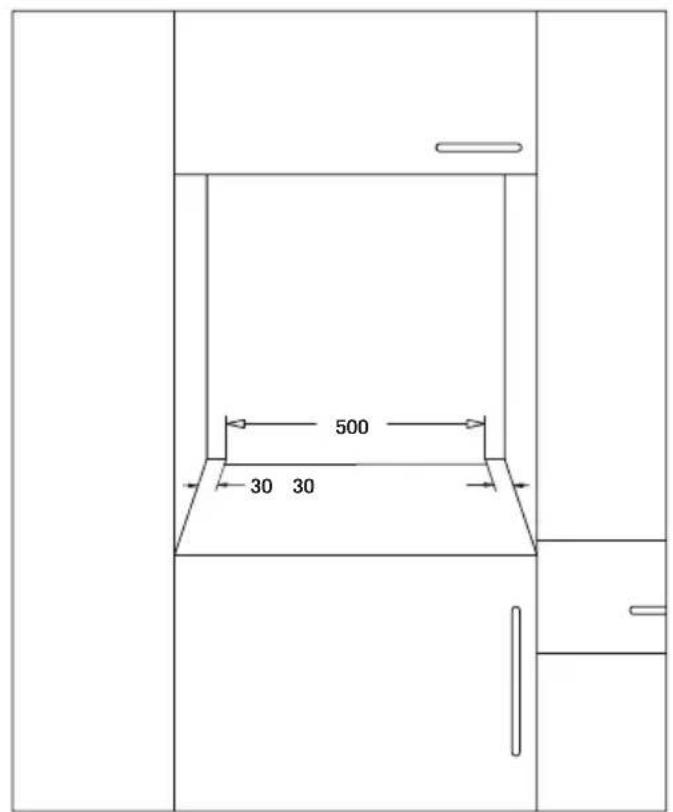
Installation Under Counter
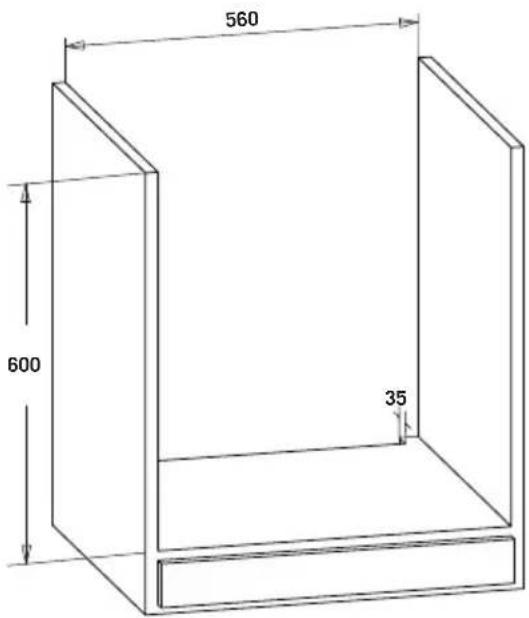
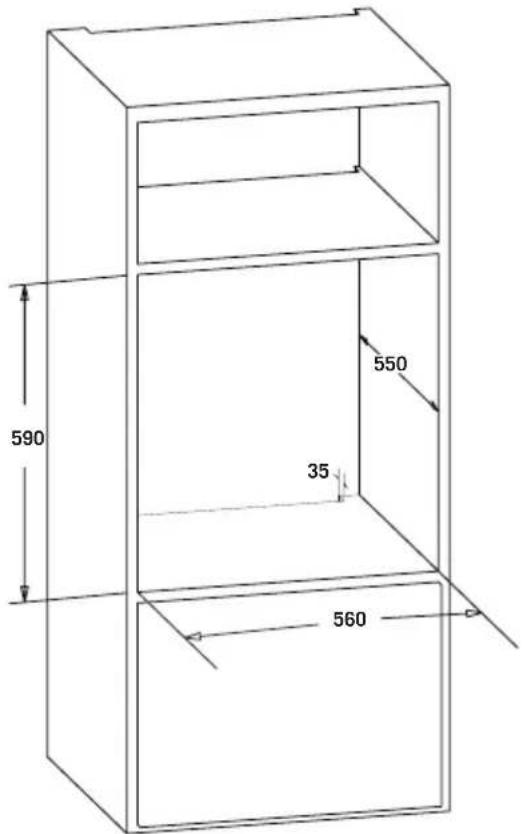
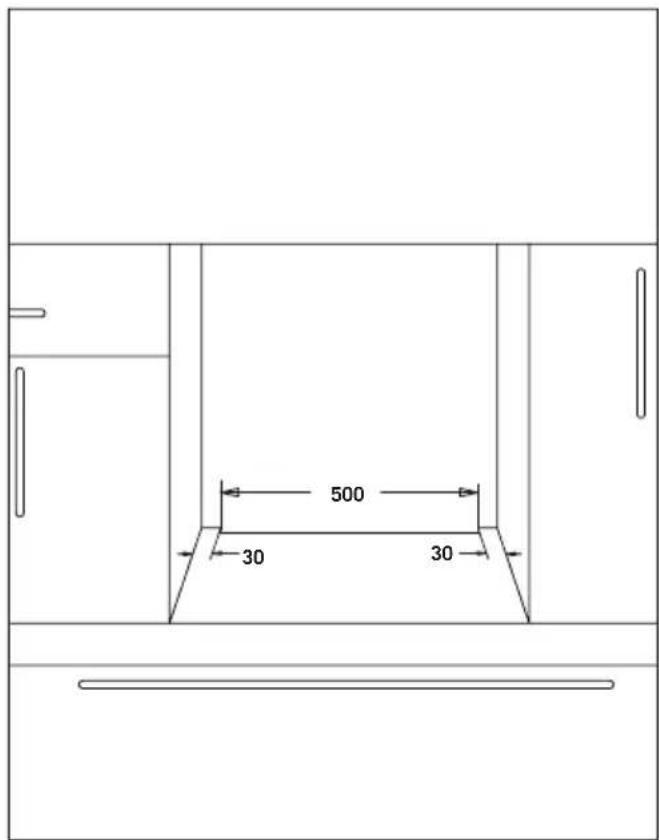
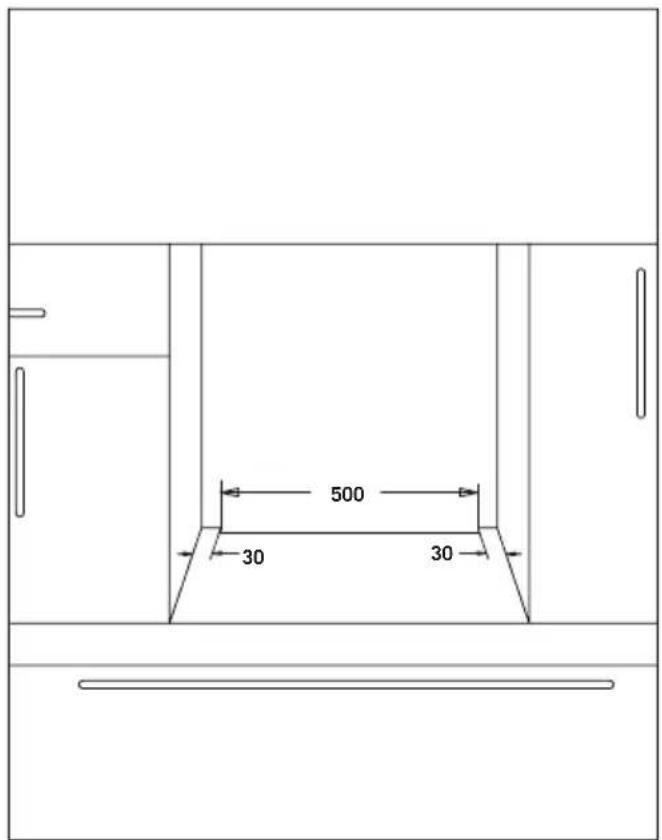
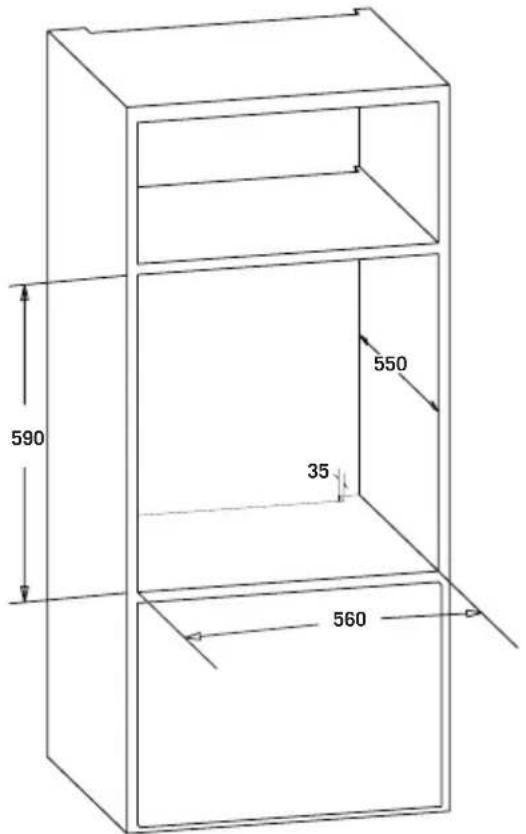
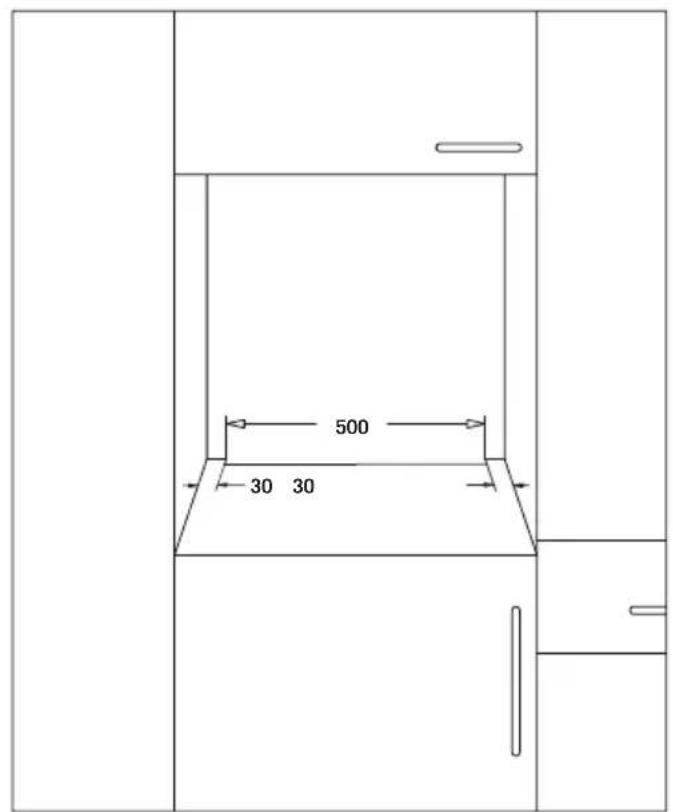
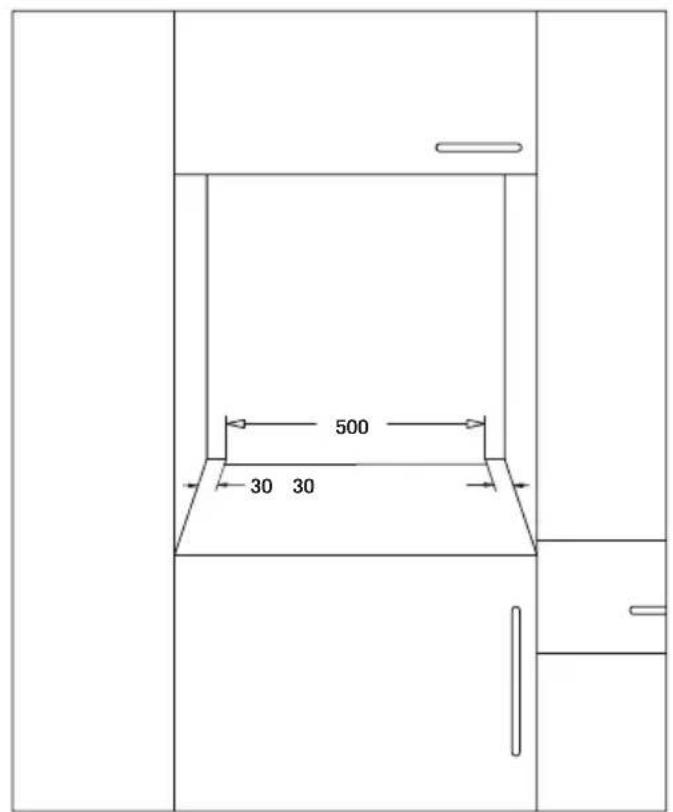
Cabin must match the dimensions provided in Figure 2.
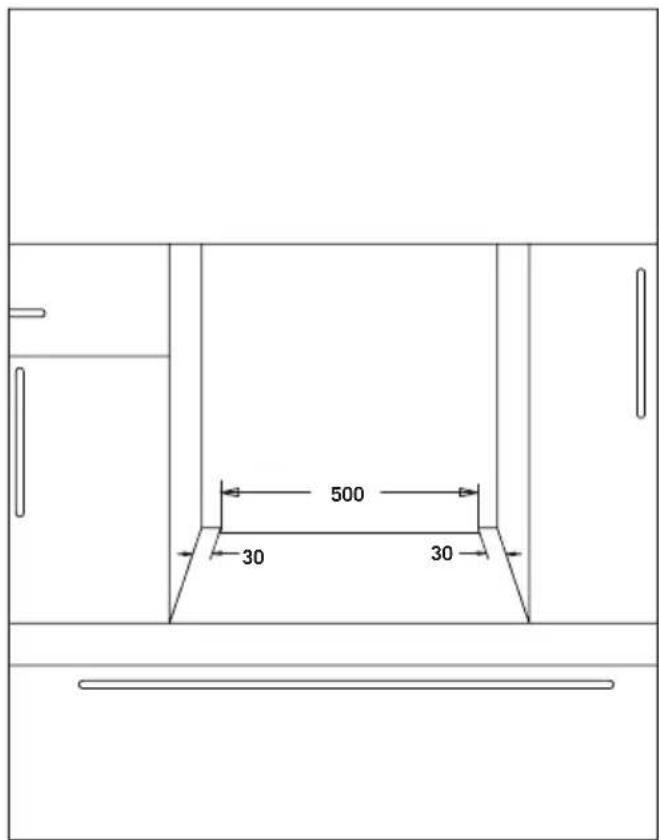
A clearance must be provided at the rear part of the cabin as indicated in the figure so that necessary ventilation can be achieved.
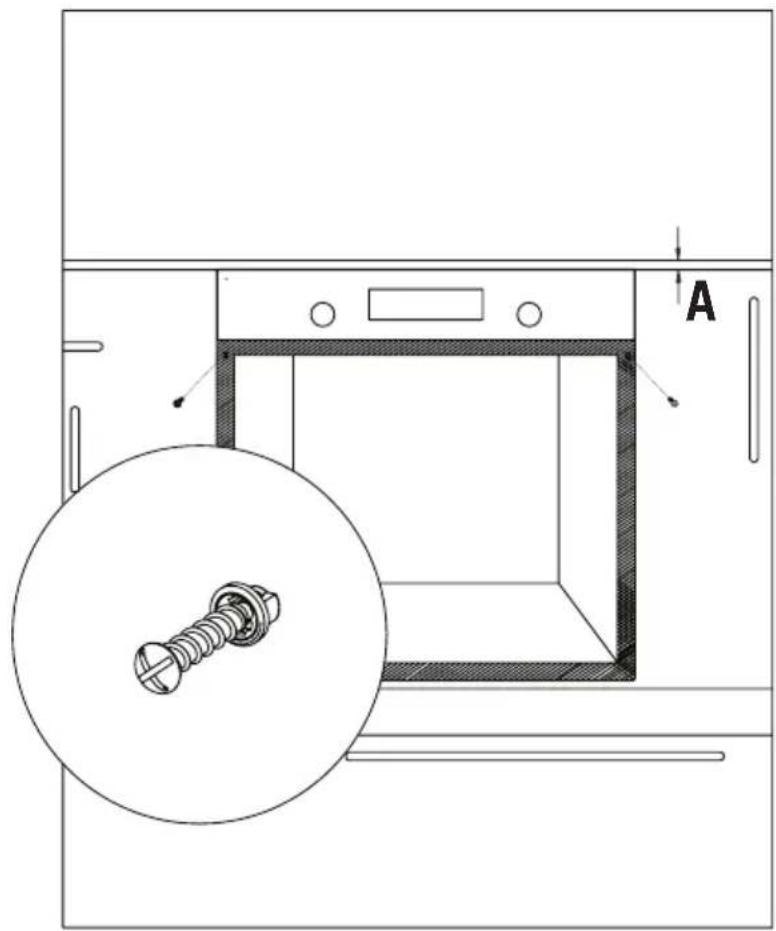
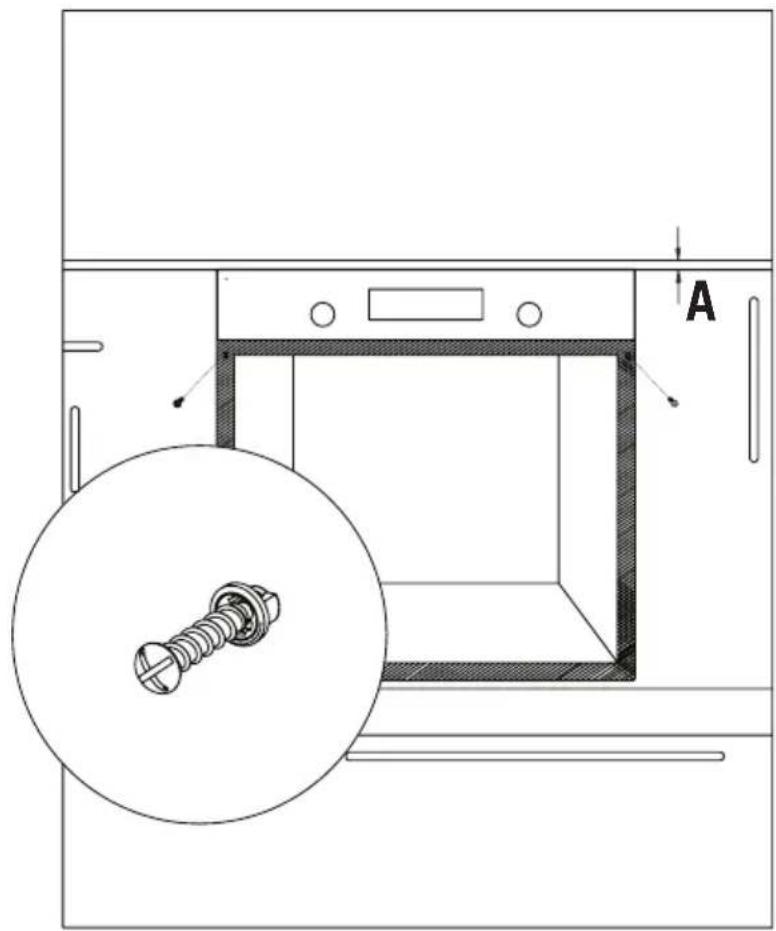
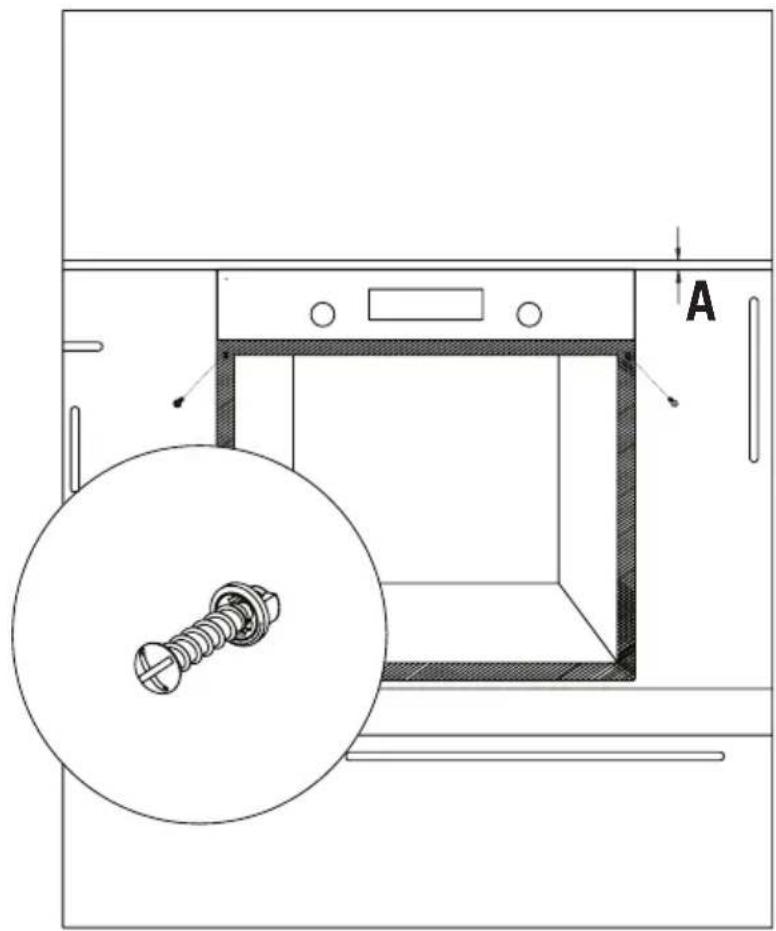
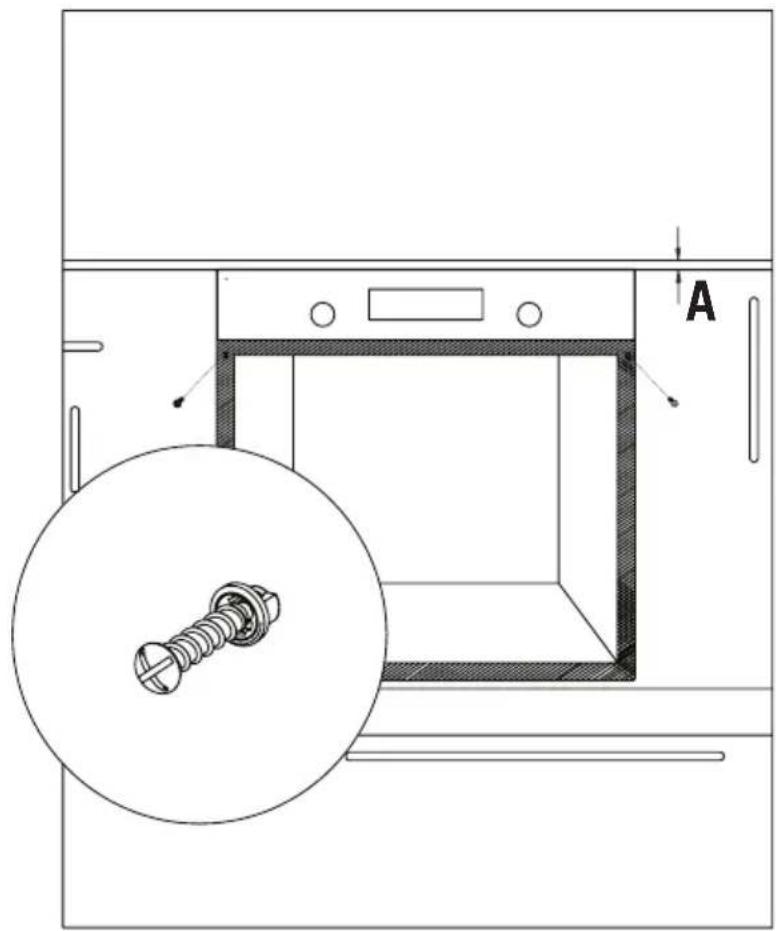
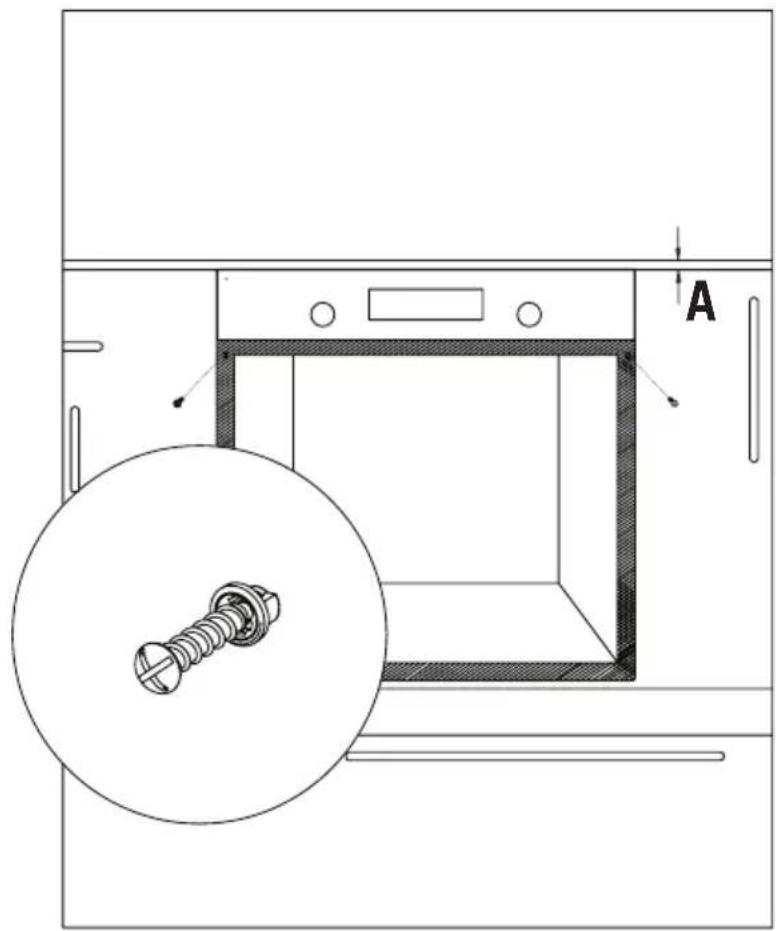
After mounting, the clearance between lower and upper part of the counter is indicated in Figure 5 with "A". It's for ventilation and shouldn't be covered.
Installation In An Elevated Cabinet
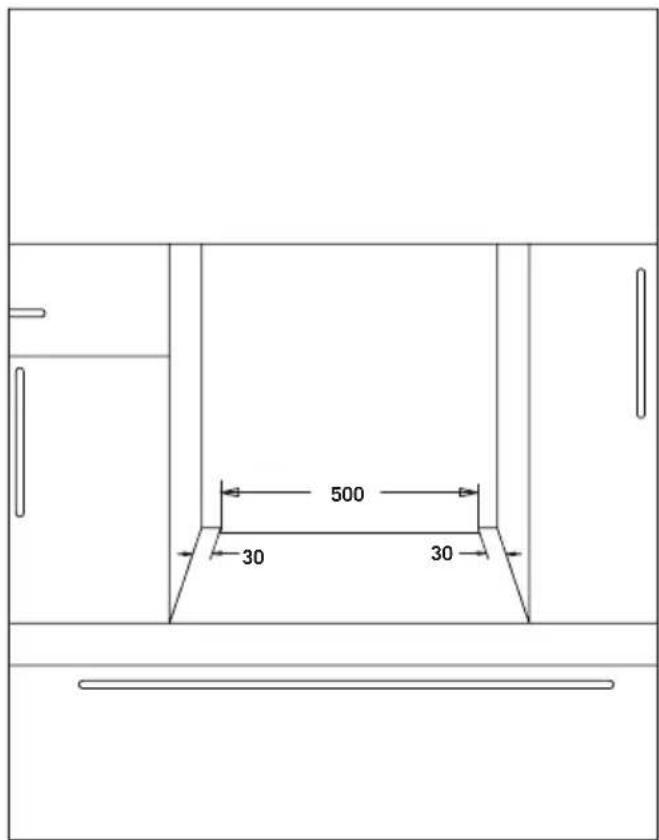
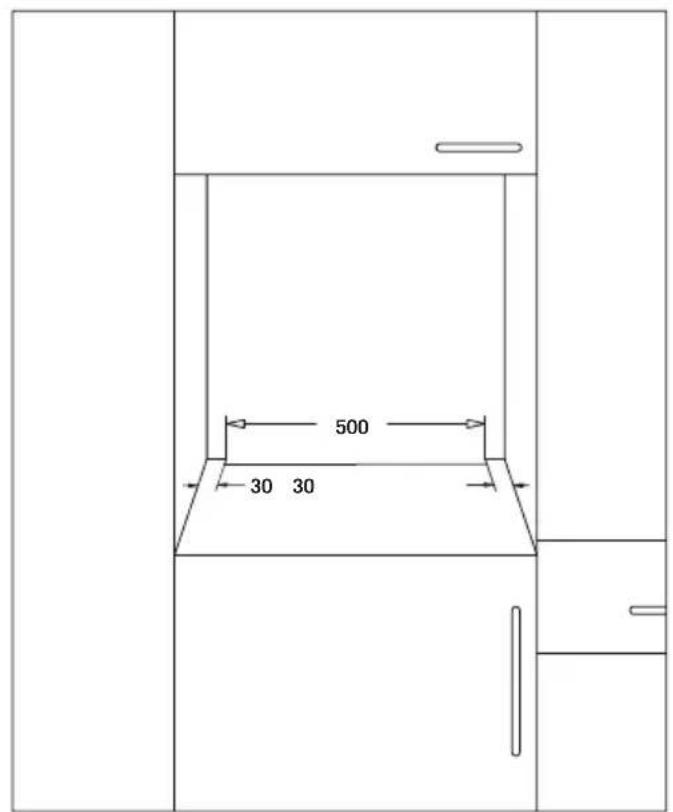
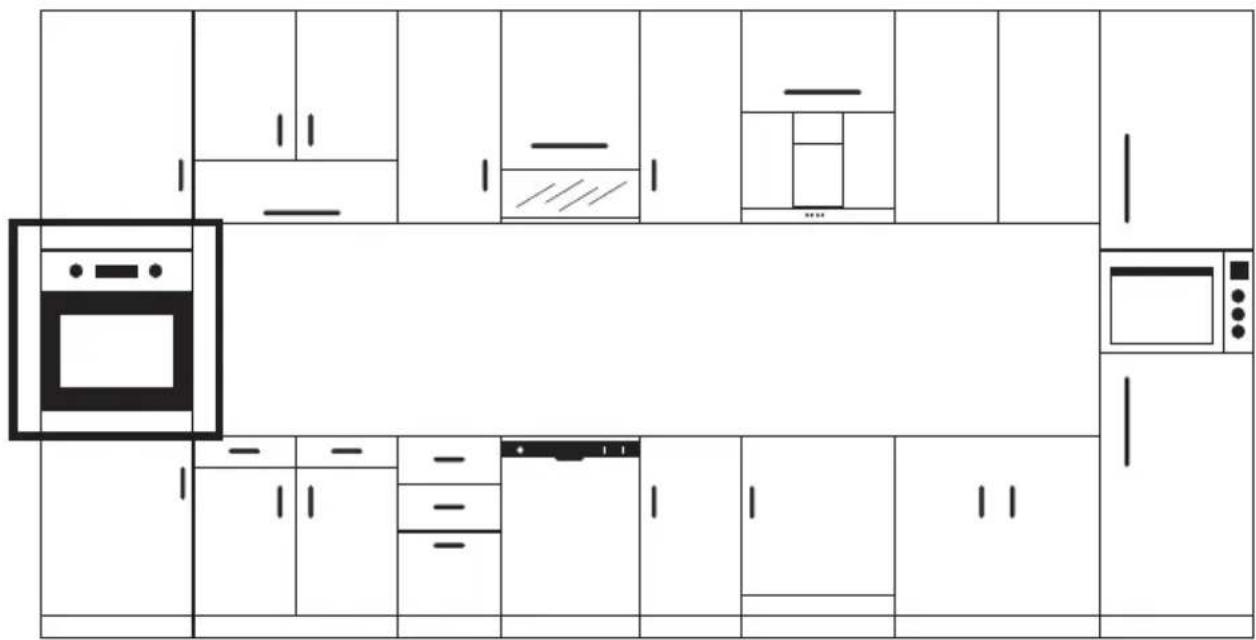
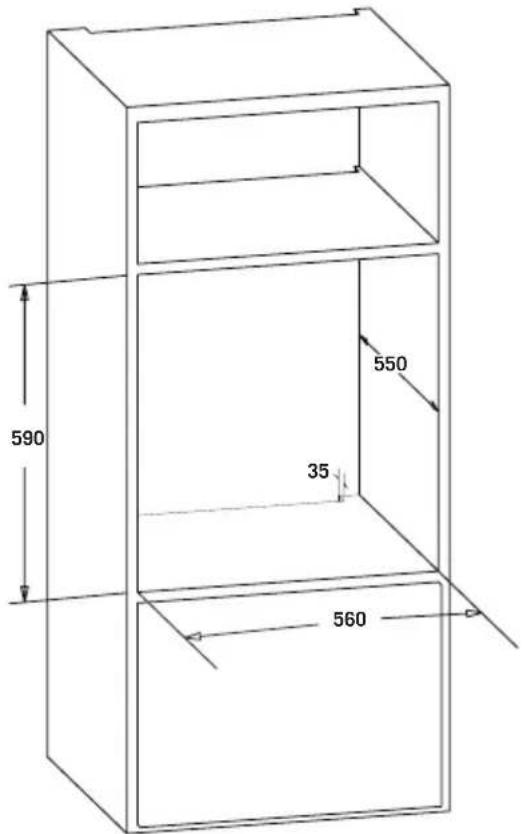
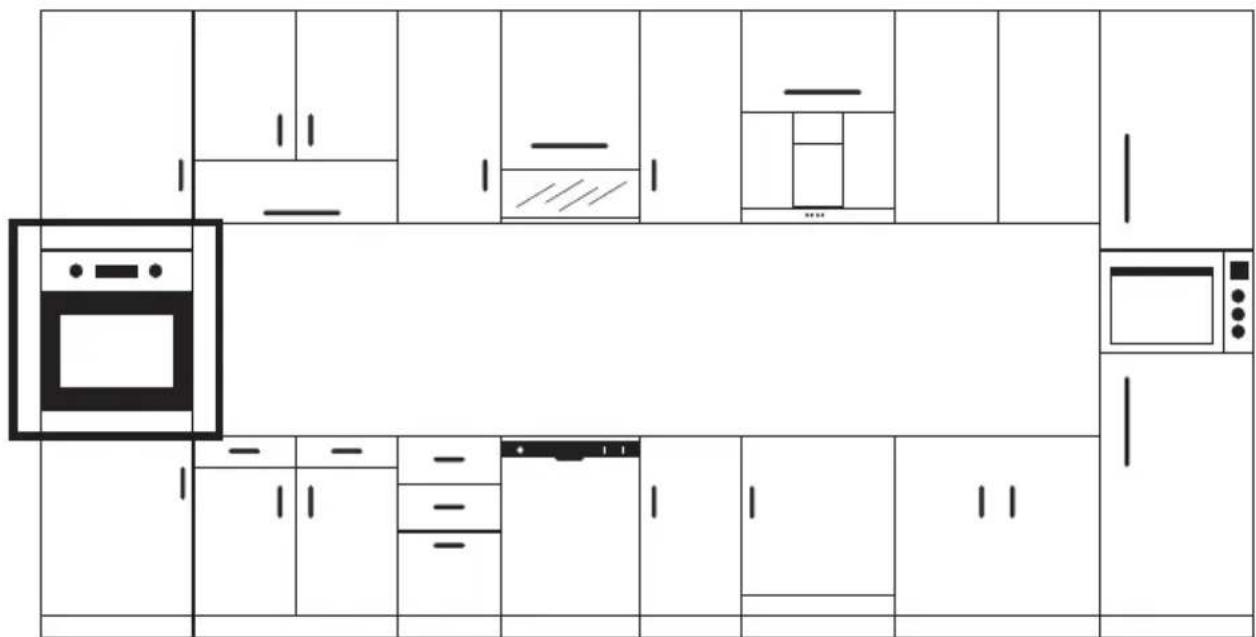
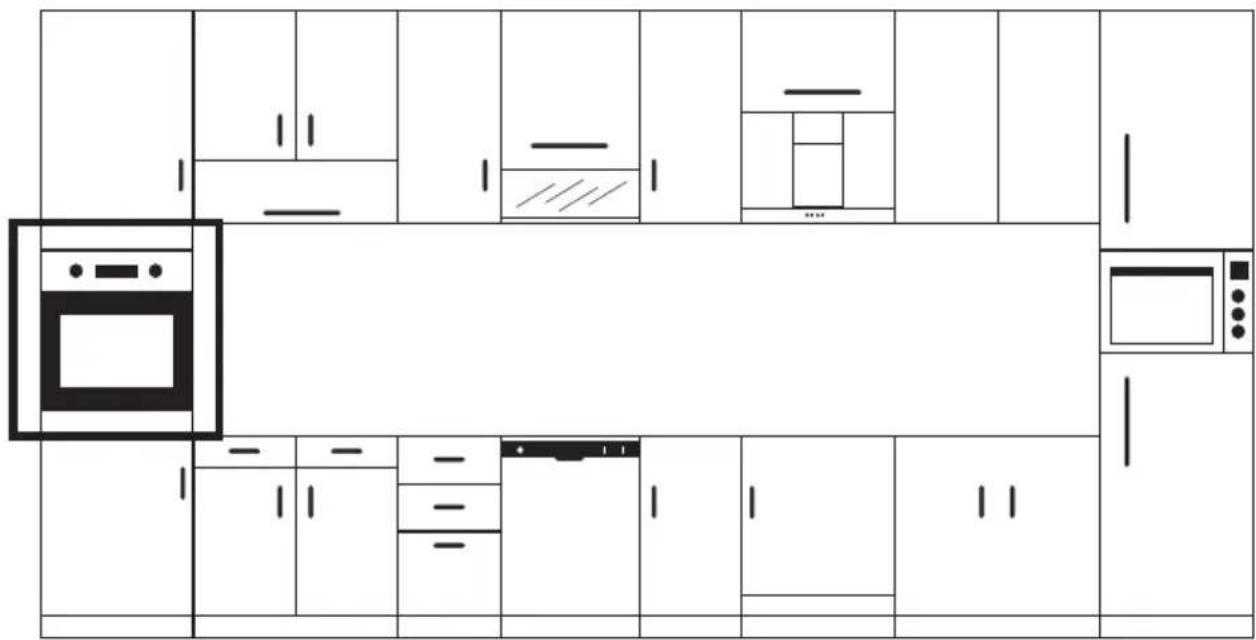
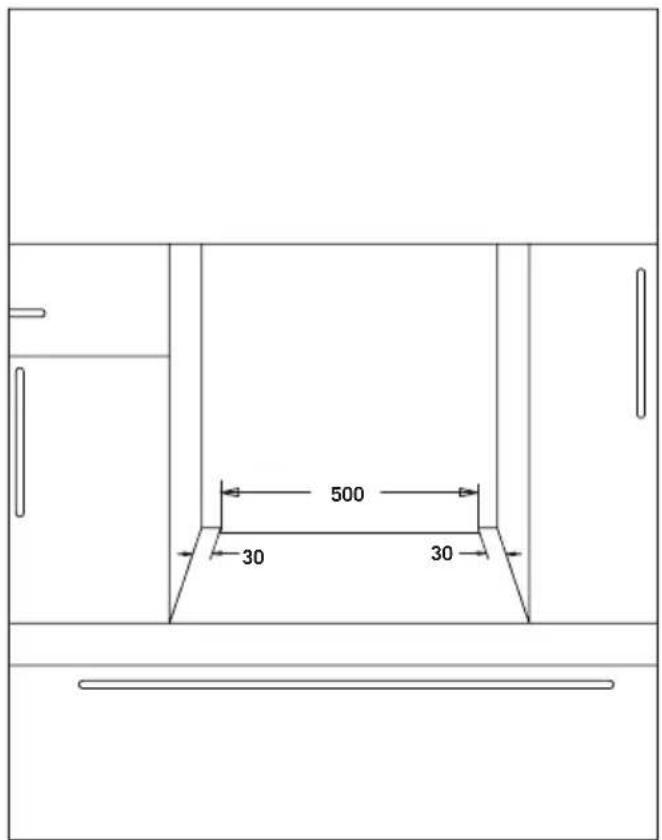
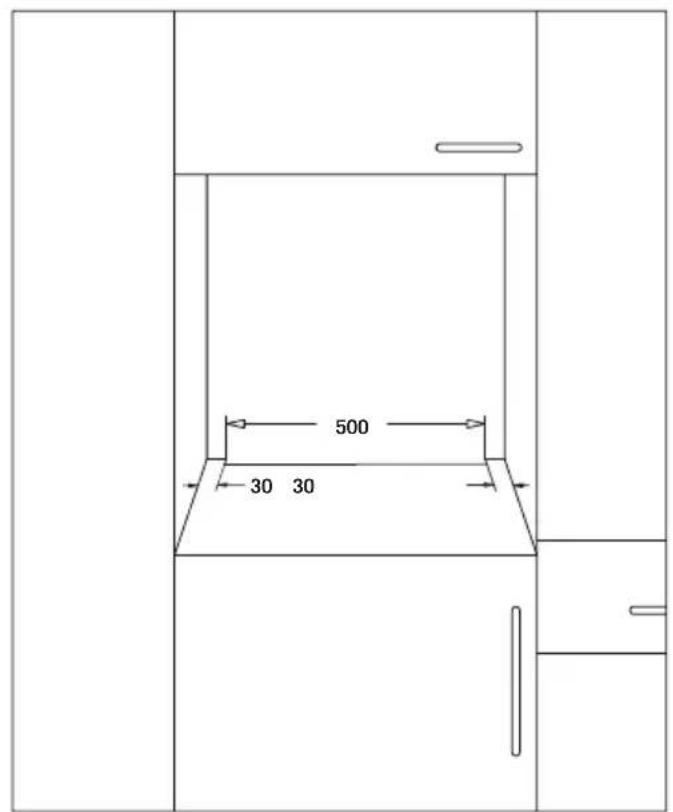
Cabin must match the dimensions provided in Figure 4.
The clearances with the dimensions indicated in the figure must be provided at the rear part of cabin, upper and lower sections so that necessary ventilation can be achieved.
Installation Requirements
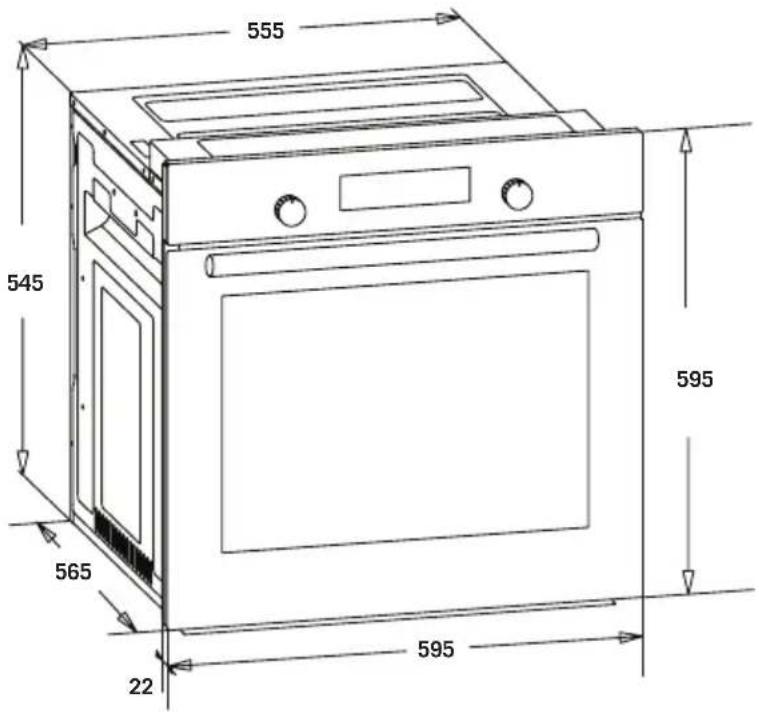
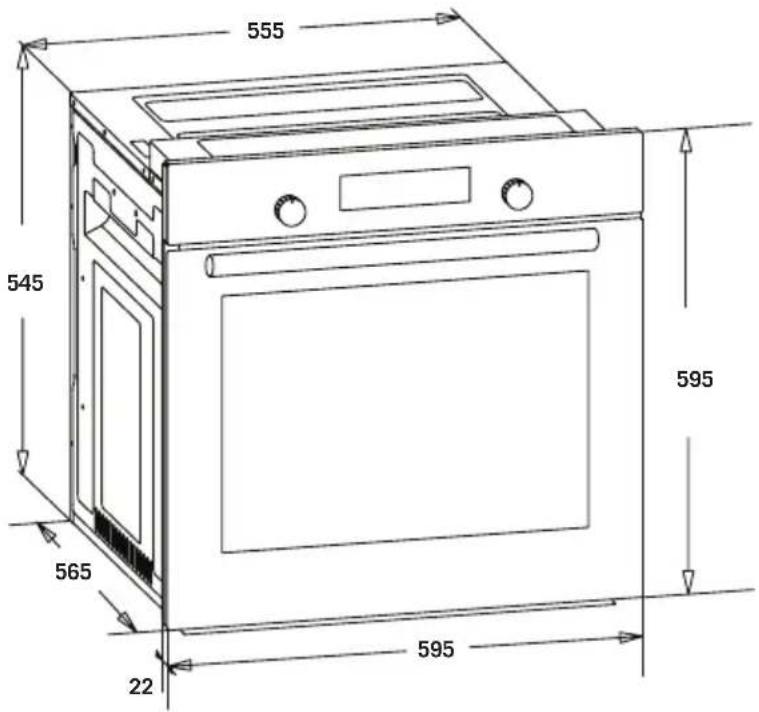
Product dimensions are provided in the Figure 3.
Furniture surfaces for mounting and mounting materials to be used must have a minimum temperature resistance of 100 °C . Mounting cabin must be secured and its floor must be plane for product not to tilt over. Cabin floor must have a minimum strength that would handle a load of 60 kg.
Placing and Securing the Oven
Place the oven into the cabin with two or more people. Ensure that oven's frame and front edge of the furniture match uniformly.
Supply cord mustn't be under the oven, squeeze in between oven and furniture or bend.
Fix the oven to the furniture by using the screws provided with the product. Screws must be mounted as shown in Figure 5 by passing them through plastics attached to frame of the product. Screws mustn't be overtightened. Otherwise, screw sockets might be worn. Check that oven doesn't move after mounting. If oven isn't mounted in accordance with instructions, there is a risk of tilt over during operation.
Electrical Connection
Mounting place of the product must have appropriate electrical installation.
Network voltage must be compatible with the values provided on type label of product.
Product connection must be made in accordance with local and national electrical requirements.
Before starting the mounting disconnect network power. Do not connect the product to network until its mounting is completed.
Mounting
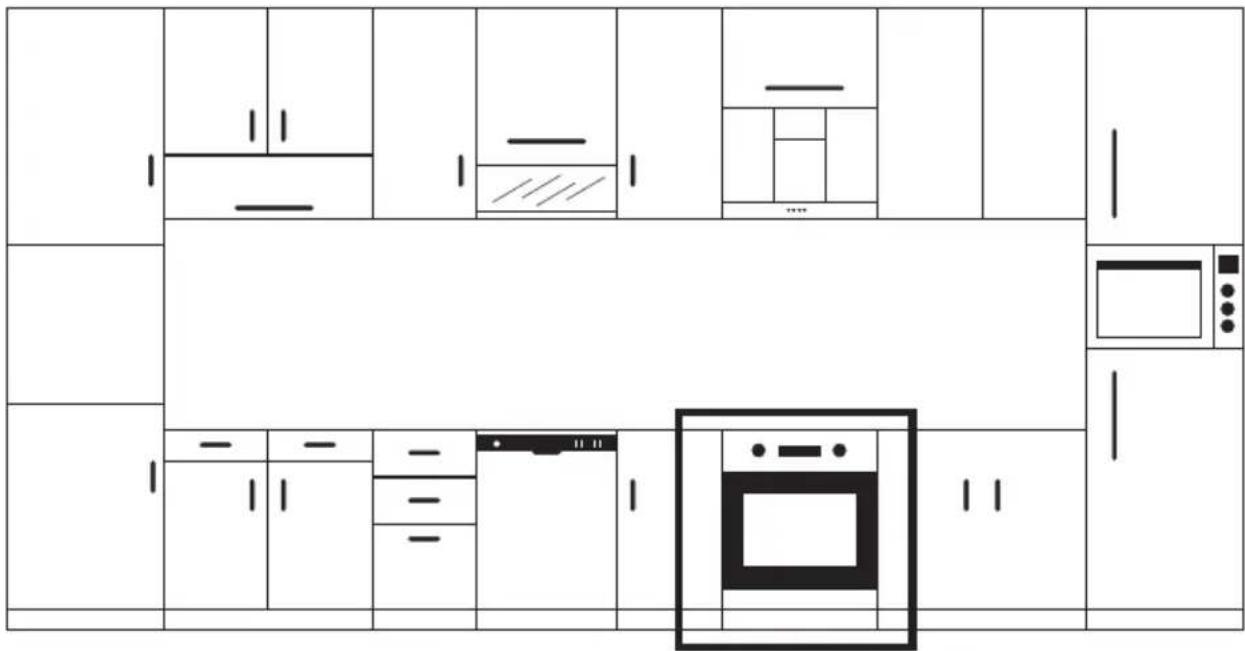
Figure 2
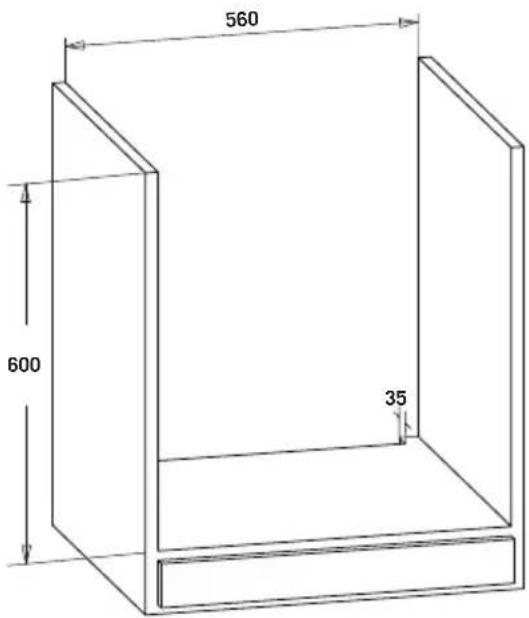
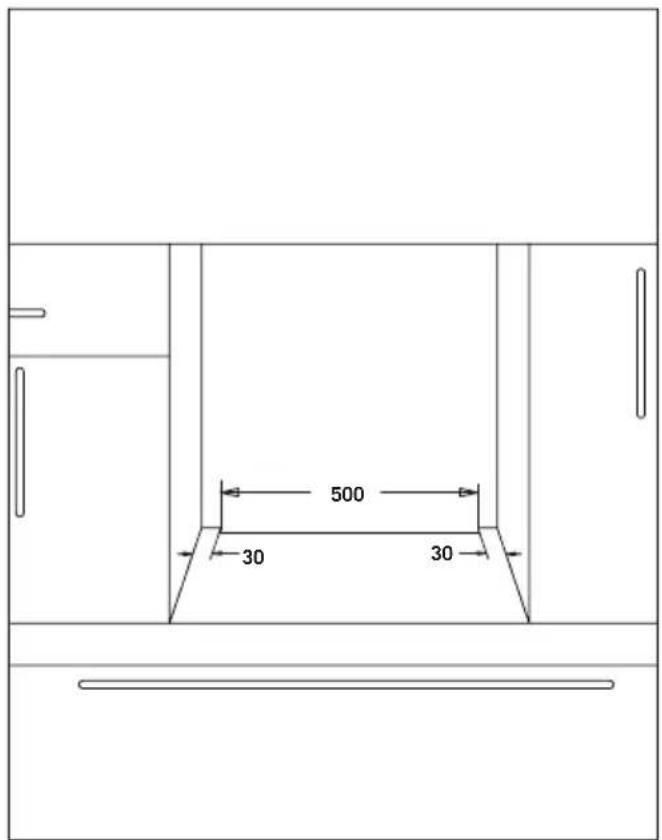
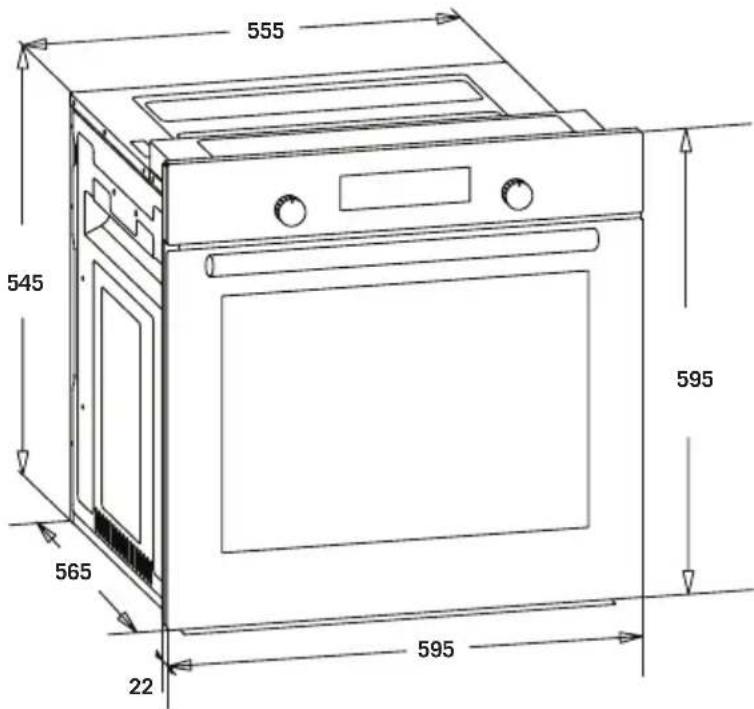
Figure 3
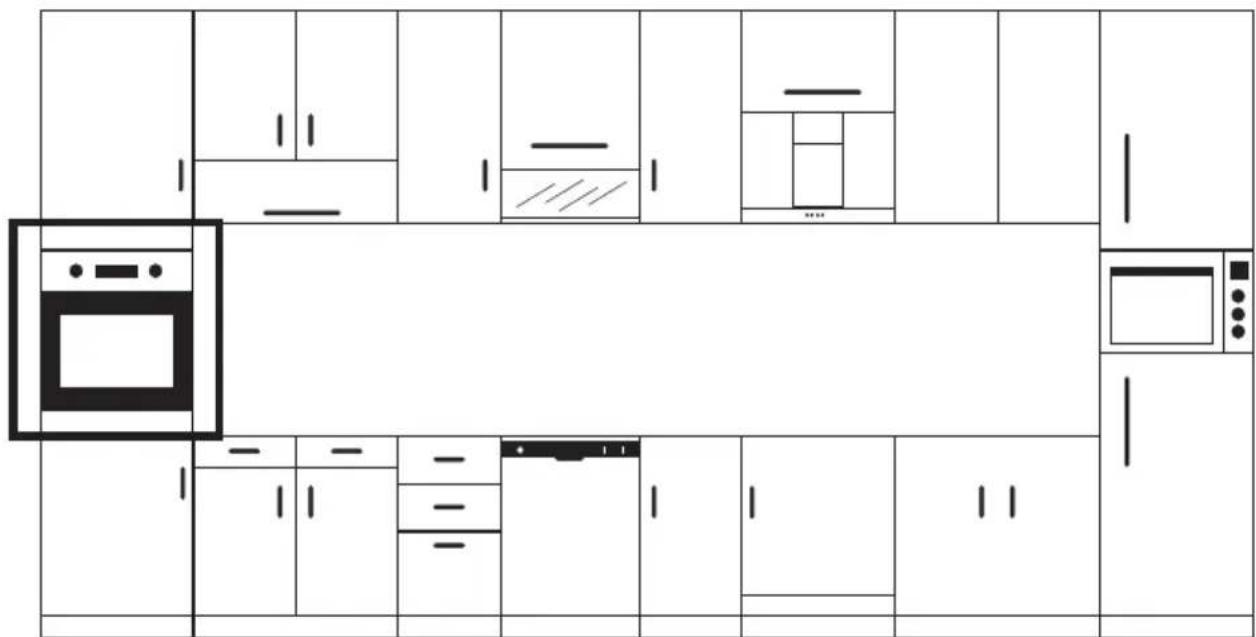
Figure 4
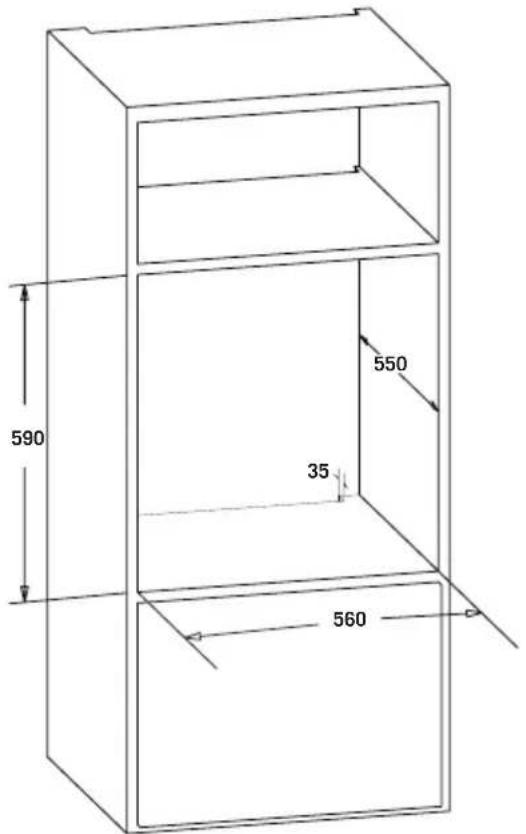
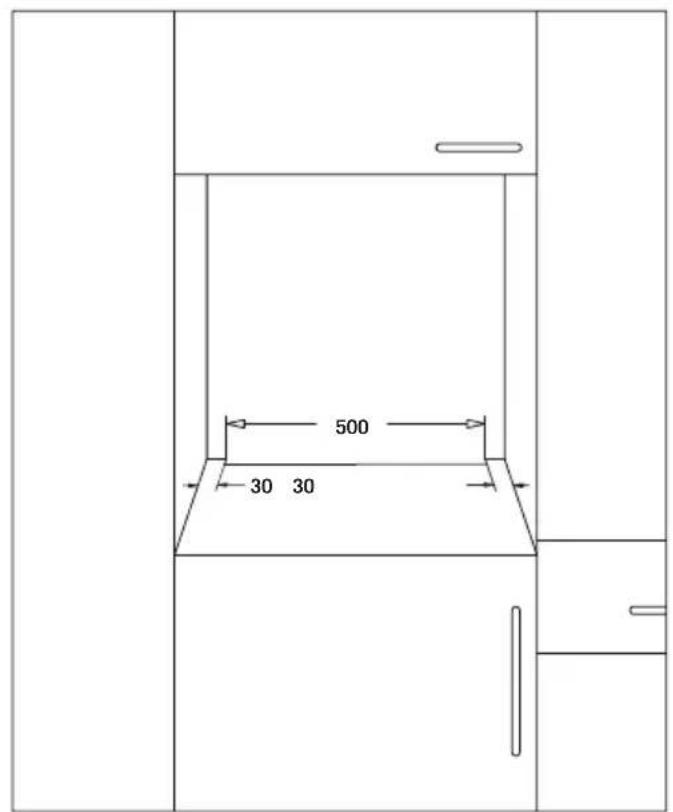
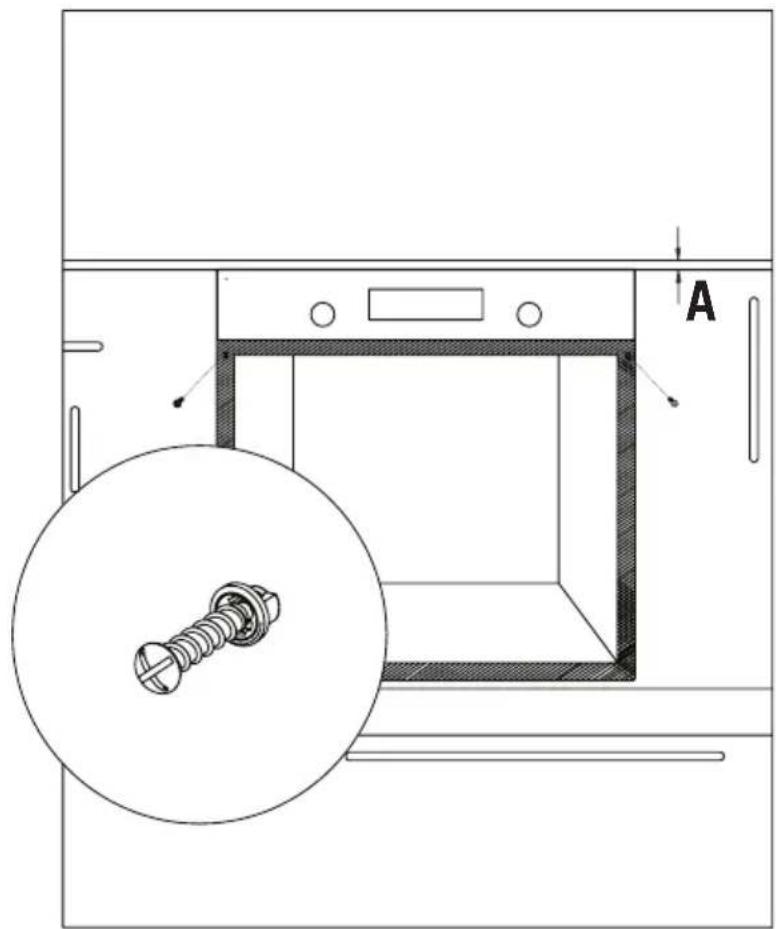
Figure 5
IMPORTANT WARNINGS
Electrical Connection and Safety
This oven must be installed and connected to its place correctly according to manufacturer instructions and by an authorized service.
Appliance must be installed in an oven enclosure providing high ventilation.
Electrical connections of the appliance must be made only via sockets having earth system furnished in compliance with rules. Contact an authorized electrician if there is no socket complying with the earthed system at where appliance will be placed. Manufacturing company is by no means responsible for damage resulting from connection of non-earthed sockets to appliance.
Plug of your oven must be earthed; ensure that socket for the plug is earthed. Plug must be located in a place that can be accessed after installation.
Your oven has been manufactured as 220-240 V 50/60 Hz. AC power supply compliant and requires a 16 Amp fuse. If your power network is different that these indicated values, refer to an electrician or your authorized service.
When you need to replace the electrical fuse, please ensure that electrical connection is made as follows:
- Phase (to live terminal) brown cable
- Blue cable to neutral terminal
- Yellow-green cable to earth terminal
Oven disconnecting switches must be in an accessible place for final user while oven is in its place. Power supply cable (plug in cable) mustn't touch hot parts of the appliance.
If supply cord (plug in cable) is damaged, this cord must be replaced by the importer or its service agent or an equally competent personnel to prevent a hazardous situation.
CONTROL PANEL
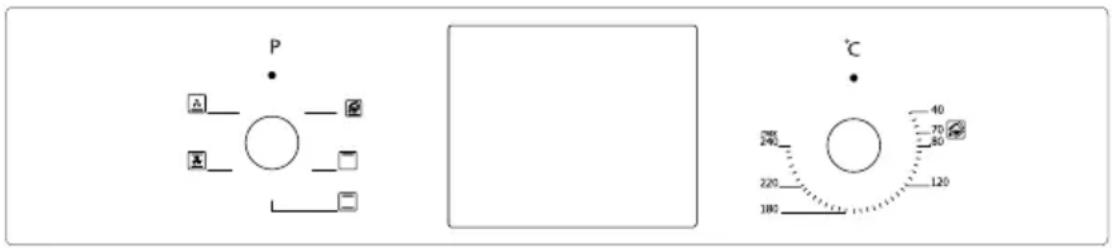
Digital panel visual
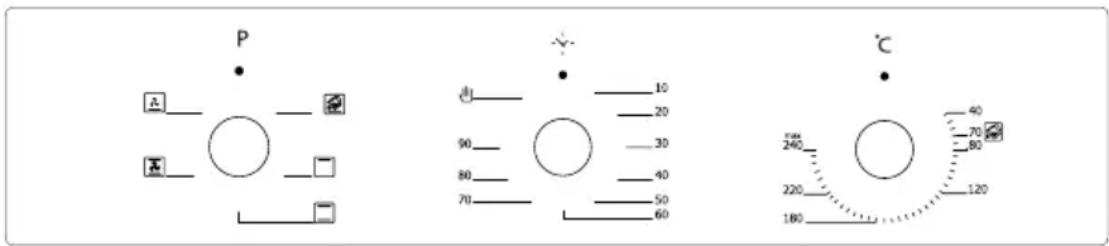
Mechanical Panel Visual
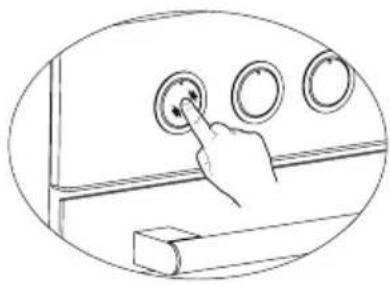
Adjustment can be made only when button is popped for models with pop-up button.
natural_image
Line drawing of a hand pressing a button on a control panel (no text or symbols)Make sure that button is popped by pressing on the button as shown in the figure at left side.
Figure 6*
natural_image
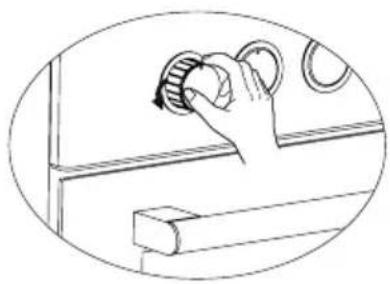
Line drawing of a hand holding a mechanical knob or dial, with no text or symbols present.You can make necessary adjustments by turning right or left when button is popped enough.
Figure 7*
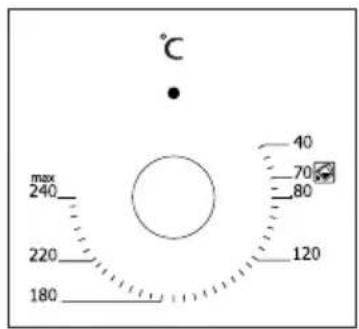
Thermostat Button: Helps to set cooking temperature of the food to be cooked in the oven. You can set the desired temperature by turning the button after placing the food into the oven. Check cooking table related to cooking temperatures of different foods.
Figure 8
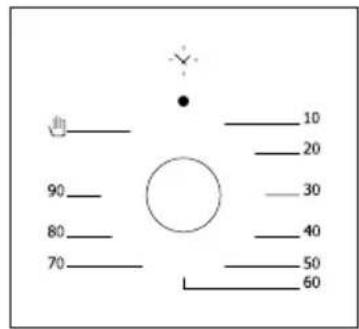
*Mechanical Timer Button: Helps to set time for the food to be cooked in the oven. Timer de-energizes the heaters when set time expires and warns you by ringing. See cooking table for cooking times.
Figure 9
flowchart
graph TD
    P["•"] --> A["Circle"]
    A --> B["Arrow"]
    A --> C["Horizontal Arrow"]
    A --> D["Vertical Arrow"]
    A --> E["Square"]
    A --> F["Horizontal Bar"]
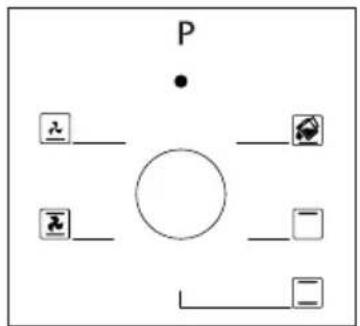
Program Button: Helps to set with which heaters the food placed in oven will be cooked. Heater program types in this button and their functions are stated below. Every model might not have all heater types and thus program types of these heaters.
Figure 10
PROGRAM TYPES
Heating program types in your appliance and important explanations of them are provided below for you can cook different foods appealing to your taste.
 | Lower and Upper Heating Elements Fa |  | |
 | Lower Heating Element and Fan Turb |  | Fan |
 | Grill and Roast Chicken Lower-Upper |  | Element and Fan |
 | Upper Heating Element and Fan Grill |  | |
 | Multifunctional Cooking Grill |  | |
 | Lower Heating Element Upper Heating |  | |
 | Small Grill and Fan Steam Cleaning |  |
Lower heating element: Select this program towards end of cooking time if lower part of the food cooked will be roasted.
Upper heating element: Used for post heating or roasting very little pieces of foods.
Lower and upper heating elements: A program that can be used for cooking foods like cake, pizza, biscuit and cookie.
Lower heating element and fan: Use mostly for cooking foods like fruit cake.
Lower and upper heating element and fan: The program suitable for cooking foods like cakes, dried cakes, lasagne. Suitable for cooking meat dishes, as well.
Grill: Grill cooker is used for grilling meat like foods such as steak, sausage and fish. While grilling, tray should be placed in the lower rack and water must be placed in it.
Turbo heater and fan: Suitable for baking and roasting. Keep heat setting lower than “Lower and Upper Heater” program since heat is conveyed immediately via air flow.
Grill and fan: Suitable for cooking meat type foods. Do not forget to place a cooking tray in a lower rack inside the oven and a little water in it while grilling.
Multi Functional Cooking: Suitable for baking and roasting. Lower and upper heaters operate as well as quick transmission of heat via air flow. Suitable for cooking requiring single tray and intense heat.
COOKING RECOMMENDATIONS
You can find in the following table the information of food types which we tested and identified their cooking values in our labs. Cooking times can vary depending on the network voltage, quality of material to be cooked, quantity and temperature. Dishes to cook by using these values might not appeal to your taste. You can set various values for obtaining different tastes and results appealing to your taste by making tests.
WARNING: Oven must be preheated for 7-10 minutes before placing the food in it.
COOKING TABLE
| Food Cooking Function Cooking | Temperature (°C) | Cooking Rack | Cooking Time (min.) | |
| Cake Static / Static+Fan 170-180 2-3 35-45 | ||||
| Small Cake Static / Turbo+Fan 170-180 2 25-30 | ||||
| Pie Static / Static+Fan 180-200 2 35-45 | ||||
| Pastry Static 180-190 2 20-25 | ||||
| Cookie Static 170-180 2 20-25 | ||||
| Apple Pie | Static / Turbo+Fan | 180-190 | 1 | 50-70 |
| Sponge cake | Static | 200/150* | 2 | 20-25 |
| Pizza | Static Fan | 180-200 | 3 | 20-30 |
| Lasagne | Static 180-200 2-3 25-40 | |||
| Meringue | Static | 100 | 2 | 50 |
| Grilled Chicken** | Grill+Fan | 200-220 | 3 | 25-35 |
| Grilled Fish** | Grill+Fan | 200-220 | 3 | 25-35 |
| Calf Steak** | Grill+Fan | Max | 4 | 15-20 |
| Grilled Meatball** | Grill+Fan | Max | 4 | 20-25 |
* Do not preheat. First half of cooking time is recommended to be at 200°C de while the other half at 150°C.
** Food must be turned after half of the cooking time.
USING THE OVEN
Initial Use of Oven
Here are the things you must do at first use of your oven after making its necessary connections as per instructions:
- Remove labels or accessories attached inside the oven. If any, take out the protective folio on front side of the appliance.
- Remove dust and package residues by wiping inside of the oven with a damp cloth. Inside of oven must be empty. Plug the cable of appliance into the electrical socket.
- Set the thermostat button to the highest temperature (240 Max. °C) and run the oven for 30 minutes with its door closed. Meanwhile a slight smoke and smell might occur and that's a normal situation.
- Wipe inside of the oven with a slightly warm water with detergent after it becomes cold and then dry with a clean cloth. Now you can use your oven.
Normal Use of Oven
- Adjust thermostat button and temperature at which you want to cook the food to start cooking.
- You can set cooking time to any desired time by using the button at models with mechanical timer. Timer will de-energize heaters when time expired and provide warning beep as ringing.
- Timer turns the heaters off and provides audible signal when cooking time expires in line with the information entered in the models with digital timer.
- Cooling system of the appliance will continue to operate after cooking is completed. Do not cut the power of appliance in this situation which is required for appliance to cool down. System will shut down after cooling is completed.
REPLACING OVEN LAMP
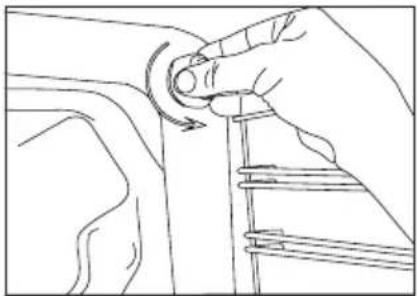
WARNING: To avoid electric shock, ensure that the appliance circuit is open before changing the lamp. (having circuit open means power is off) First disconnect the power of appliance and ensure that appliance is cold.
natural_image
Line drawing of a hand pressing down on a mechanical component (no text or symbols)Figure 11
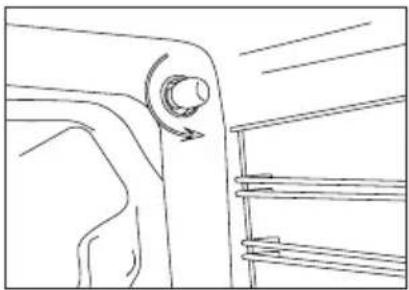
Remove the glass protection by turning as indicated in the figure on the left side. If you have difficulty in turning, then using plastic gloves will help you in turning.
Then remove the lamp by turning, install the new lamp with same specifications. Lamp specifications must be as follows; -220-240 V 50/60 Hz AC, -15 W, -Type E14
Reinstall glass protection, plug the power cable of appliance into electrical socket and complete replacement. Now you can use your oven.
natural_image
Line drawing of a mechanical component with a knob and arrow indicating rotation (no text or symbols)Figure 12
CLEANING OVEN GLASS
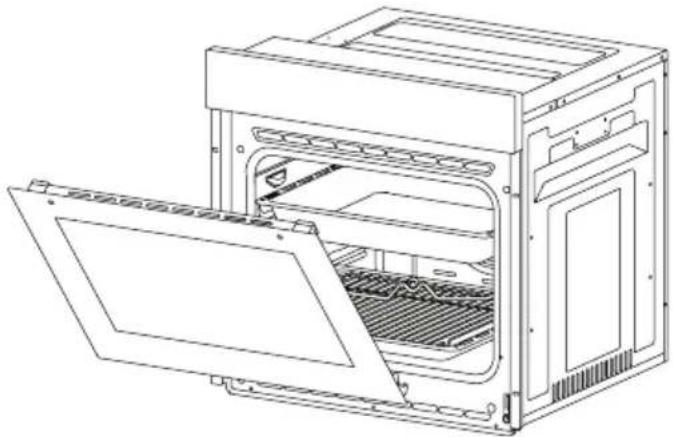
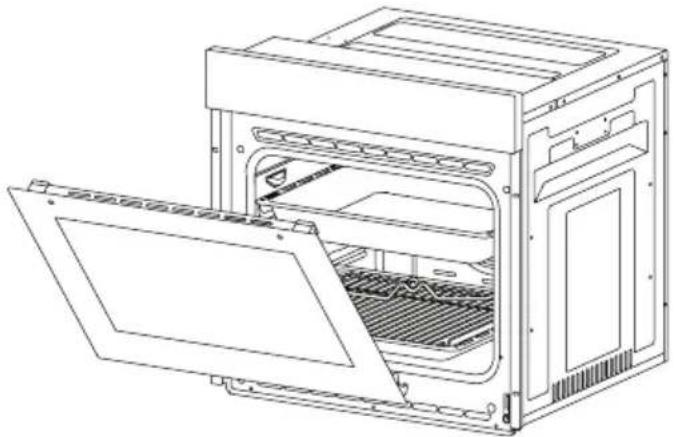
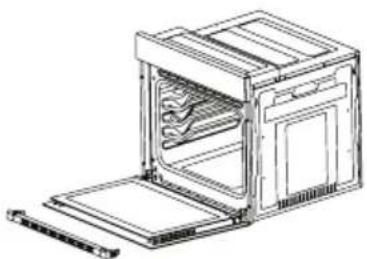
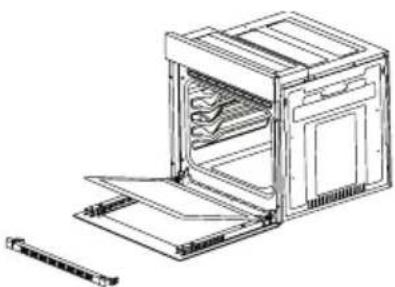
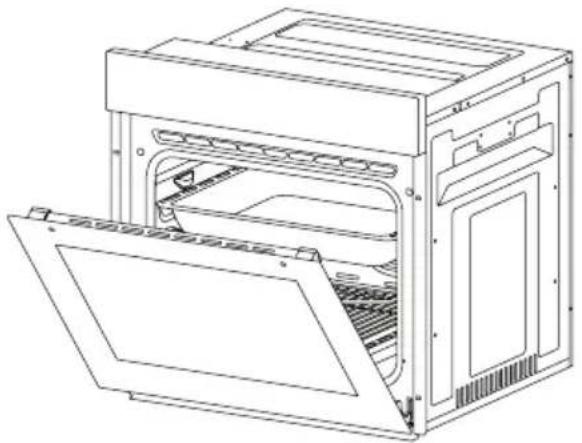
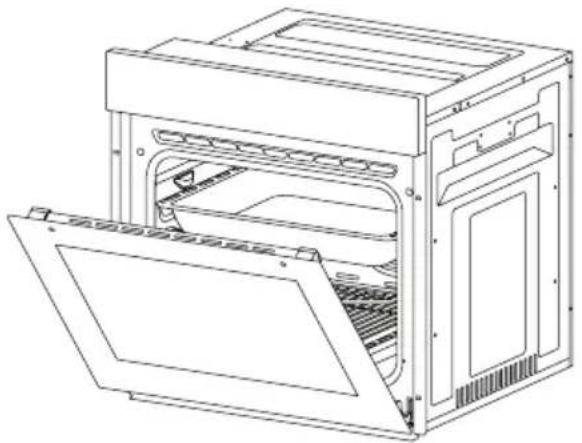
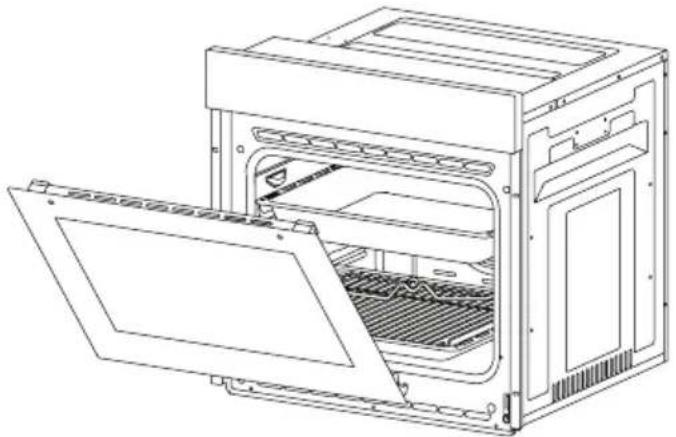
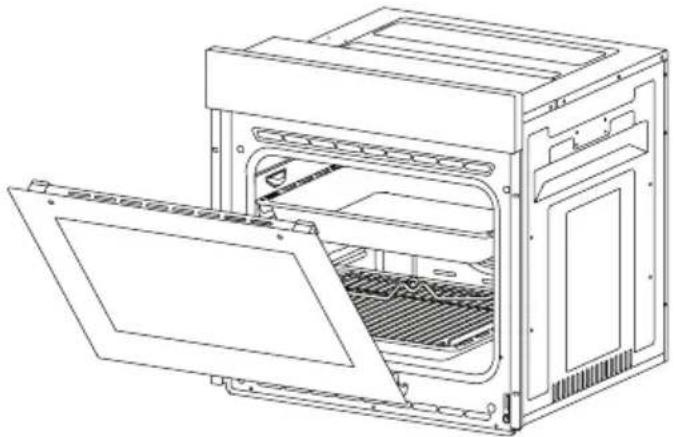
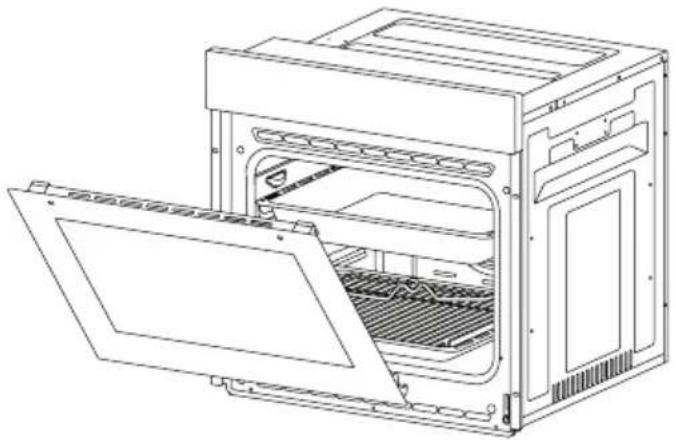
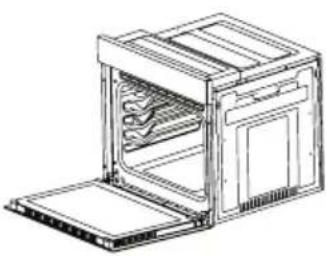
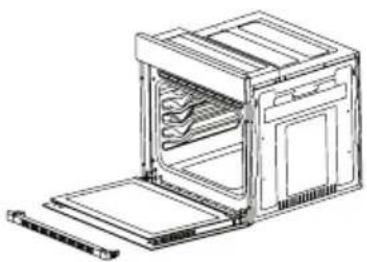
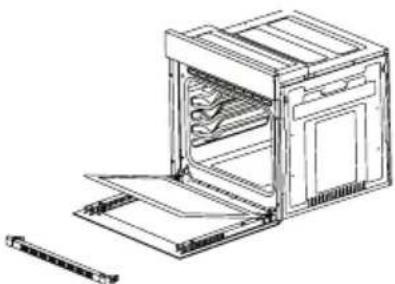
Lift by pressing on plastic latches on left and right side as shown in Figure 13 and pulling the profile toward yourself as in Figure 14. Glass is released after profile is removed as shown in Figure 15. Remove the released glass by pulling toward yourself carefully. Outer glass is fixed to oven door profile. You can perform glass cleaning easily after glasses are released. You can mount glasses back by performing the operations reversely after cleaning and maintenance are completed. Ensure that profile is seated properly in place.
natural_image
Line drawing of an open oven with internal shelves and door (no text or symbols)Figure 13
natural_image
Line drawing of an open oven with insulation and ventilation slots (no text or symbols)Figure 14
natural_image
Line drawing of an open refrigerator with insulation and a detached panel (no text or symbols)Figure 15
natural_image
Line drawing of an open oven or rack unit with internal compartments and ventilation grilles (no text or symbols)Figure 16
natural_image
Line drawing of an open refrigerator with doors open, showing internal compartments and ventilation slots (no text or symbols)Figure 17
natural_image
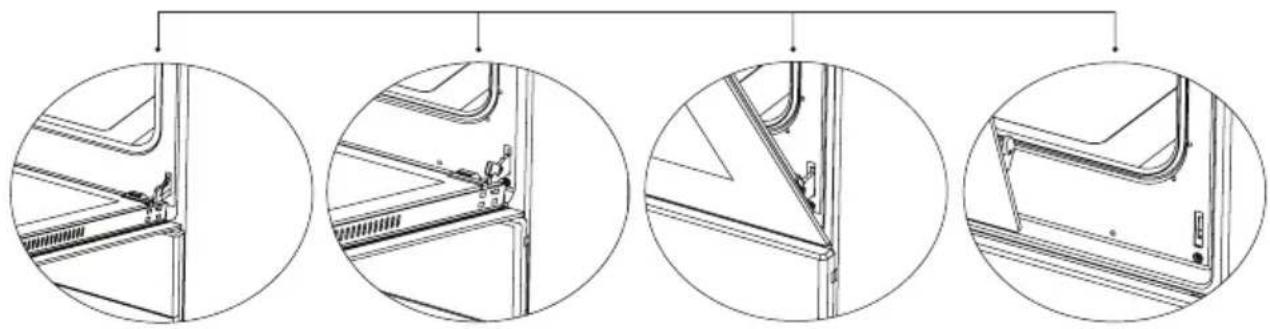
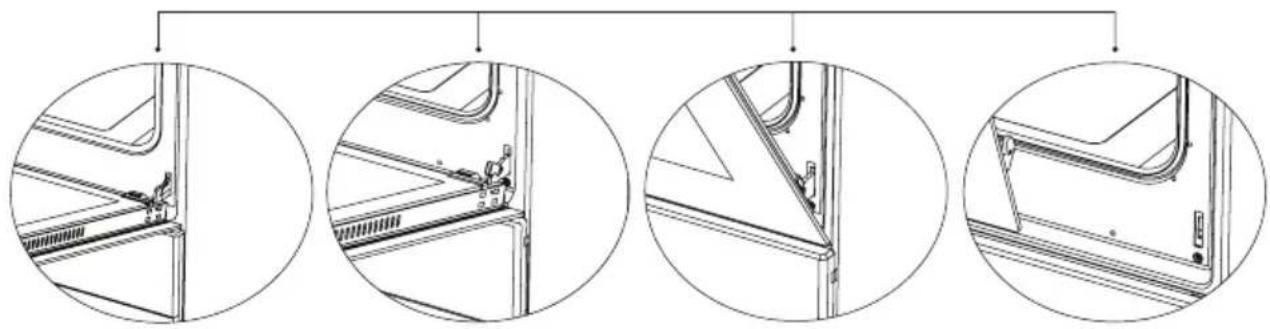
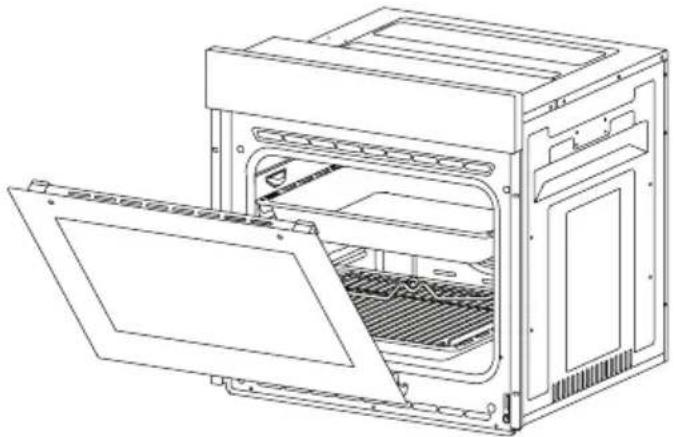
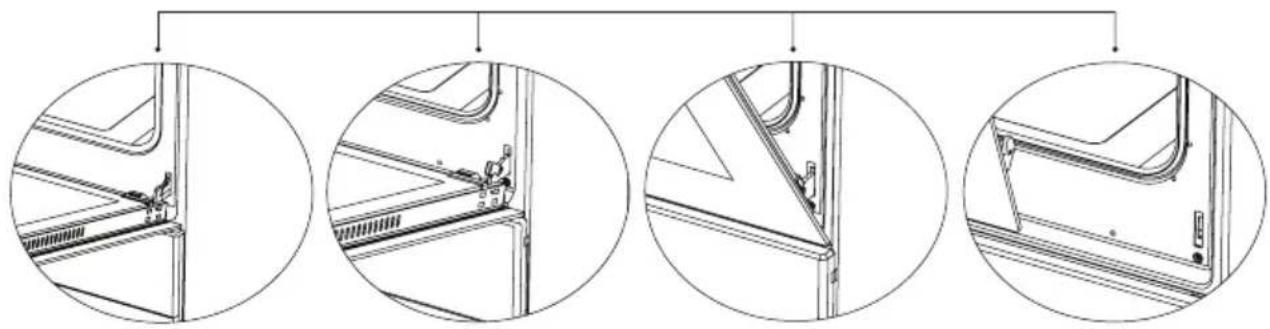
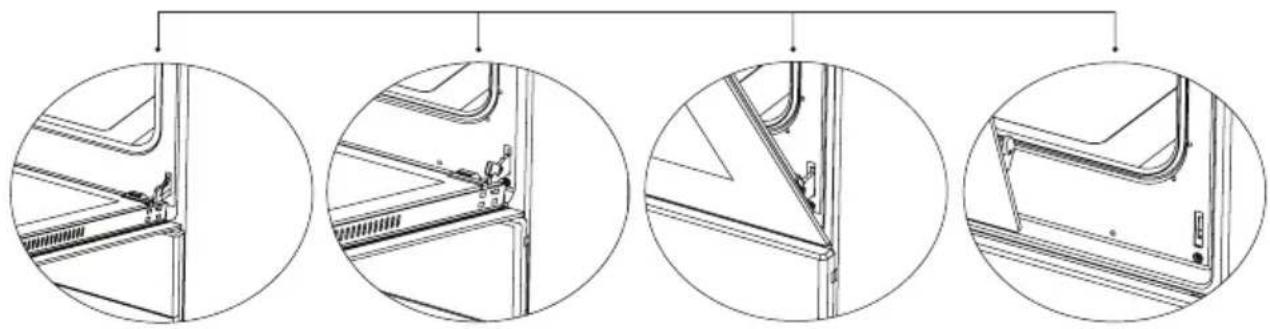
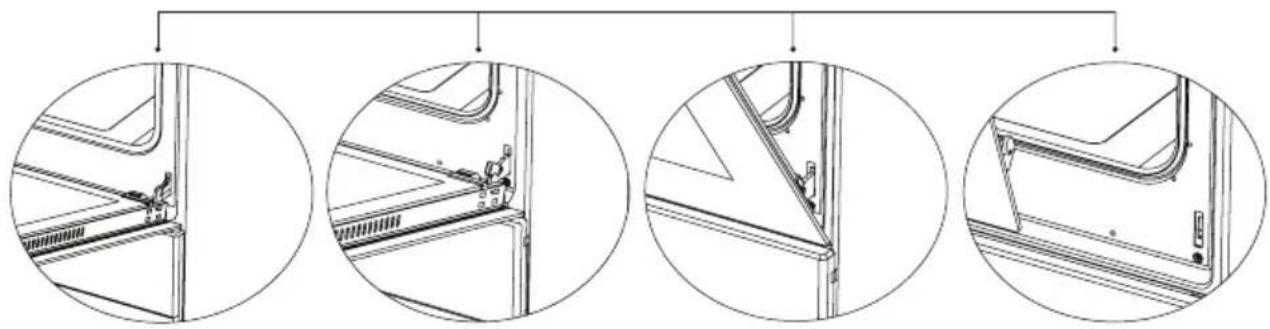
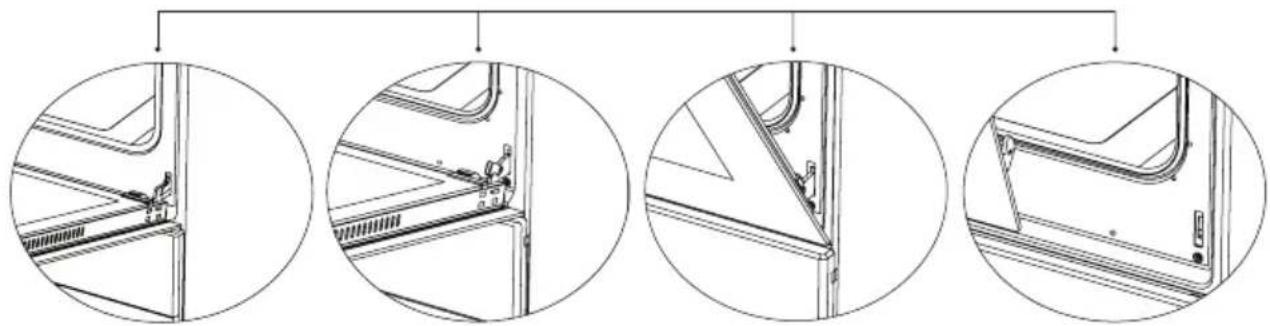
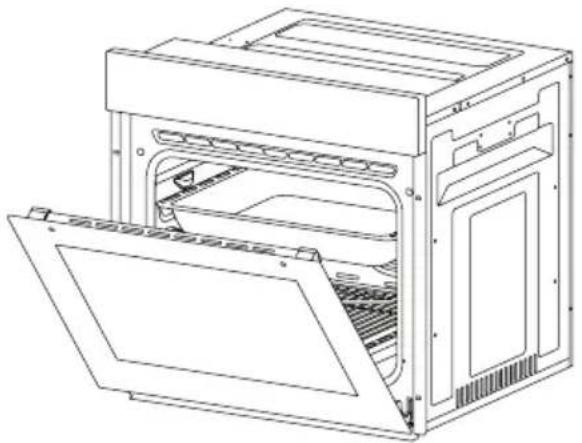
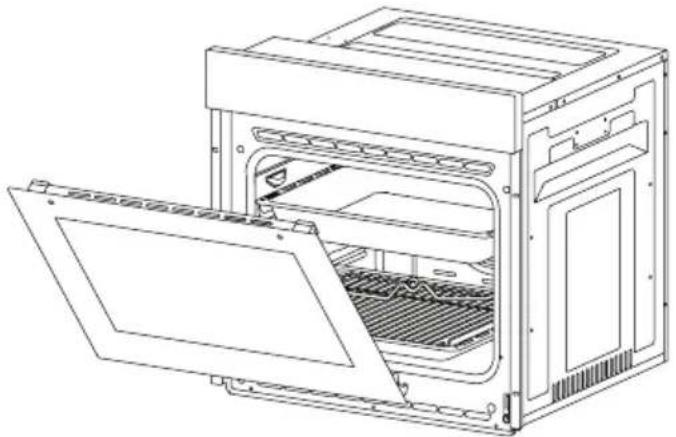
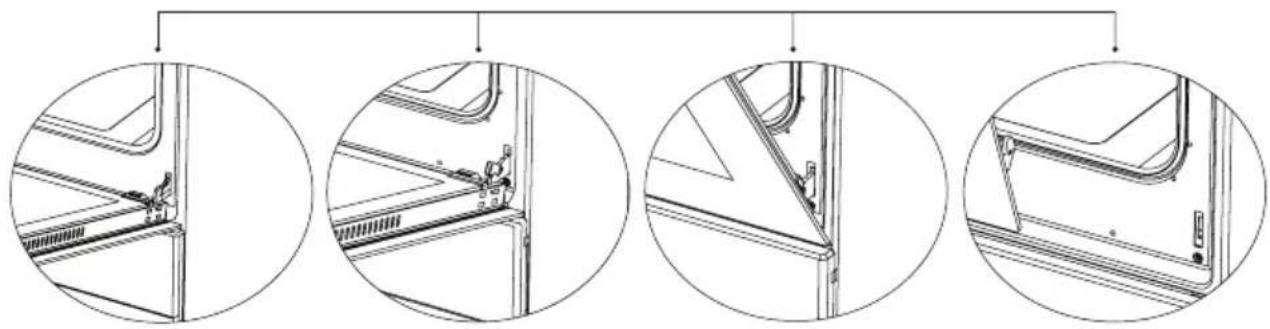
Four circular diagrams showing mechanical assembly steps with no visible text or symbolsFigure 16.1 Open the door fully by pulling the oven door toward yourself. Then perform unlock operation by pulling the hinge lock upwards with the aid of screwdriver as indicated in
Figure 16.2
Set the hinge lock to the widest angle as in Figure 16.2.
Adjust both hinges connecting oven door to the oven to the same position.
Figure 16.3 Later, close the opened oven door so that it will be in a position to contact with hinge lock as in
Figure 17.1.
Figure 16.4 For easier removal of oven door, when it comes close to closed position, hold the cover with two hands as in Figure 17.2 and pull upwards.
Figure 16.1.
Reversely perform respectively what you did while opening door to reinstall oven door back.
MAINTENANCE AND CLEANING
- Remove the power plug from electrical socket.
- Do not clean inner parts, panel, trays and other parts of the product with hard tools such as bristle brush, wire wool or knife. Do not use abrasive, scratching materials or detergent.
- Rinse after wiping the parts at inner parts of the product with soapy cloth, then dry thoroughly with a soft cloth.
- Clean glass surfaces with special glass cleaning material.
- Do not clean your product with steam cleaners.
- Never use combustibles like acid, thinner and gas while cleaning your product.
- Do not wash any part of the product in dishwasher.
- "Use potassium stearate (soft soap) for dirt and stains.
You can perform cleaning with a soft textured cloth not to scratch surfaces according to the figures below.
STEAM CLEANING\*
natural_image
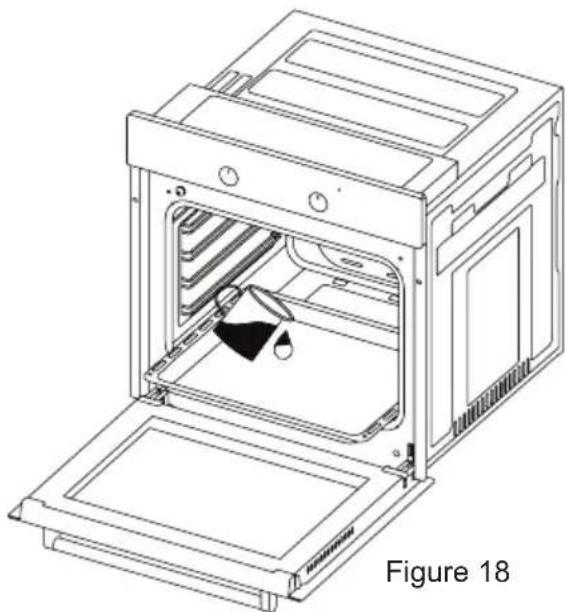
Line drawing of an oven with a lid and door, labeled as Figure 18 (no text or symbols on the diagram itself)It enables cleaning the soils softened thanks to the steam to be generated in the oven.
- Remove all the accessories in the oven.
- Pour a half litre of water into the tray and Place the tray at the bottom of the boiler.
- Set the switch to the steam cleaning mode.
- Set the thermostat to 70^ C degrees and operate the oven for 30 minutes.
- After operating the oven for 30 minutes, open the oven door and wipe the inner surfaces with a wet cloth.
- Use dish-washing liquid, warm water and a soft cloth for stubborn dirt, then dry off the area you have just cleaned with a dry cloth.
ACCESSORIES (OPTIONAL)
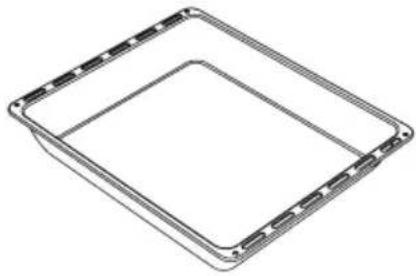 | Deep Tray *Used for pastry, big roasts, watery foods. It can also be used as oil collecting container if you roast directly on grill with cake, frozen foods and meat dishes. |
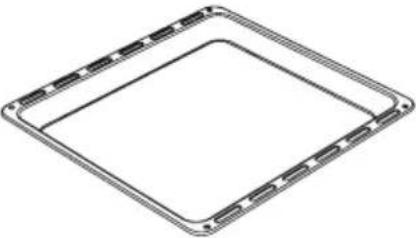 | TrayUsed for pastry (cookie, biscuit etc.), frozen foods. |
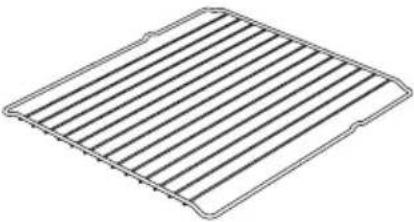 | Wire GrillUsed for roasting or placing foods to be baked, roasted and frozen into desired rack. |
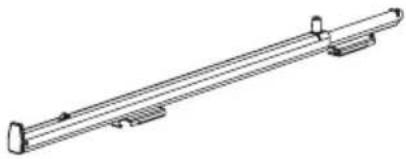 | Telescopic Rail*Trays and wire racks can be removed and installed easily thanks to telescopic rails. |
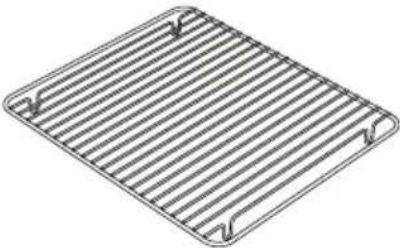 | In Tray Wire Grill *Foods to stick while cooking such as steak are placed on in tray grill. Thus contact of food with tray and sticking are prevented. |
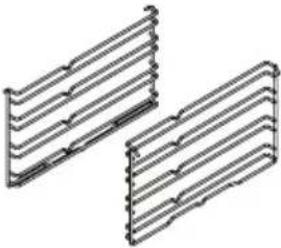 | Wire Racks*You can place deep tray and tray on lower and upper wire racks while cooking. |
TROUBLESHOOTING
You can solve the problems you can face with your product by checking the following points before calling the technical service.
If Oven Doesn't Work;
- Check if electrical cable of the oven is plugged.
- Safely check if there is power in the network.
- Check the fuses.
- Check if electrical cable of the oven is damaged.
ENVIRONMENTALLY-FRIENDLY DISPOSAL
natural_image
Symbol of a trash bin crossed with diagonal lines, no text or labels presentDispose of packaging in an environmentally-friendly manner.
This appliance is labelled in accordance with European
Directive 2012/19/EU concerning used electrical and electronic appliances (waste electrical and electronic equipment - WEEE). The guideline determines the frame work for the return and recycling of used appliances as applicable throughout to the EU.
PACKAGE INFORMATION
Packaging materials of the product are manufactured from recyclable materials in accordance with our National Environment Regulations. Do not dispose of the packaging materials together with the domestic or other wastes. Take them to the packaging material collection points designated by the local authorities.
DISPOSAL OF USED ELECTRICAL AND ELECTRONIC EQUIPMENT
natural_image
Symbol of a trash bin crossed with no text or numbers, representing environmental protection (no text present)This symbol on products or original documents means that used electric or electronic products must not be added to ordinary municipal waste. For proper disposal, renewal and recycling hand over these appliances to determined collection points. Alternatively, in some European Union states or other European countries you may return your appliances to the local retailer when buying an equivalent new appliance. Correct disposal of this product helps save valuable natural resources and prevents potential negative effects on the environment and human health, which could result from improper waste disposal. Ask your local authorities or collection facility for more details. In accordance with national regulations penalties may be imposed for the incorrect disposal of this type of waste.
For business entities in European Union states
If you want to dispose of electric or electronic appliances, ask your retailer or supplier for the necessary information.
Disposal in other countries outside the European Union.
This symbol is valid in the European Union. If you wish to dispose of this product, request the necessary information about the correct disposal method from the local council or from your retailer.


- Vážený zákazník,
- DŮLEŽITÁ VAROVÁNÍ
- ČIŠTĚNÍ SKLA TROUBY
- DÔLEŽITÉ VAROVANIA
- ČISTENIE SKLA RÚRY
- WAŻNE OSTRZEŻENIA
- CZYSZCZENIE SZKŁA PIEKARNIKA
- FONTOS FIGYELMEZTETÉSEK
- TISZTÍTÁS ÉS ÁPOLÁS
- POMEMBNA OPOZORILA
- ČIŠČENJE STEKLA PEČICE
- INFORMACIJE O EMBALAŽI
- WICHTIGE WARNUNGEN
- NOTE:
- CONTENTS
- IMPORTANT WARNINGS
- TECHNICAL SPECIFICATIONS
- INSTALLATION OF APPLIANCE
- Important Warnings for Installation:
- Right Place For Installation
- cm Built-In Oven Installation and Mounting
- Installation Under Counter
- Installation In An Elevated Cabinet
- Installation Requirements
- Placing and Securing the Oven
- Electrical Connection
- Electrical Connection and Safety
- CONTROL PANEL
- PROGRAM TYPES
- COOKING RECOMMENDATIONS
- COOKING TABLE
- USING THE OVEN
- Initial Use of Oven
- Normal Use of Oven
- REPLACING OVEN LAMP
- CLEANING OVEN GLASS
- MAINTENANCE AND CLEANING
- STEAM CLEANING\*
- ACCESSORIES (OPTIONAL)
- TROUBLESHOOTING
- If Oven Doesn't Work;
- ENVIRONMENTALLY-FRIENDLY DISPOSAL
- PACKAGE INFORMATION
- DISPOSAL OF USED ELECTRICAL AND ELECTRONIC EQUIPMENT
- For business entities in European Union states
- Disposal in other countries outside the European Union.
Brand : Guzzanti
Model : GZ-8502A
Category : Oven