
GZ-8571 - Oven Guzzanti - Free user manual and instructions
Find the device manual for free GZ-8571 Guzzanti in PDF.


| Product Type | Built-in Electric Oven |
| Model | GZ-8571 |
| Brand | Guzzanti |
| External Dimensions (H x W x D) | 595 x 595 x 568 mm |
| Supply Voltage | 220-240 V ~ 50/60 Hz |
| Total Power (Max) | 2400 W |
| Lamp Power | 18 W |
| Thermostat Temperature Range | 50 - 250 °C |
| Bottom Heater Power | 1200 W |
| Top Heater Power | 1100 W |
| Turbo Heater Power | 1800 W |
| Grill Heater Power | 2200 W |
| Cooking Levels | 5 levels |
| Functions | Top/Bottom heat, Turbo, Grill, Fan, AirFry, Rotisserie, Defrost, Timer |
| Control Type | Mechanical knobs or digital programmer (depending on model) |
| Accessories Included | Wire shelf, standard tray, deep tray, grill wire, rotisserie set, telescopic rails (optional) |
| Safety Features | Automatic shut-off, child lock (if applicable), cooling fan, overheating protection |
| Cleaning | Enamel interior, catalytic surfaces (optional), removable door glass |
| Energy Efficiency Class | Not specified (estimated A) |
Frequently Asked Questions - GZ-8571 Guzzanti
User questions about GZ-8571 Guzzanti
0 question about this device. Answer the ones you know or ask your own.
Ask a new question about this device
Download the instructions for your Oven in PDF format for free! Find your manual GZ-8571 - Guzzanti and take your electronic device back in hand. On this page are published all the documents necessary for the use of your device. GZ-8571 by Guzzanti.
USER MANUAL GZ-8571 Guzzanti
natural_image
Simple line drawing of a kitchen oven with two circular handles (no text or symbols)Návod k obsluze Návod na obsluhu Instrukcja obsługi Használati útmutató Navodila za uporabo Gebrauchsanleitung Instruction manual
Vážený zákazníku,
DĚKUJEME ZA PROJEVENOU DŮVĚRU V NAŠE PRODUKTY.
INSTALACE A MONTÁŽ....14
Instalace 15
natural_image
Two views of a modern kitchen oven with visible internal grating and ventilation duct (no text or symbols)natural_image
Two 3D renderings of a modern kitchen oven with a tray and ventilation duct (no text or symbols visible)natural_image
3D rendering of an open oven with a tray and ventilation grille (no text or symbols visible)
natural_image
Interior view of a microwave oven with a rack inside (no text or symbols visible)natural_image
Interior view of a microwave oven with visible fan and ventilation duct (no text or symbols)natural_image
Interior view of a microwave oven with airflow lines and ventilation ducts (no text or symbols)natural_image
Line drawing of a kitchen appliance with a hand pointing to the control panel (no text or symbols)natural_image
Line drawing of a kitchen appliance with control panel and door (no text or symbols)natural_image
Technical line drawing of a mechanical or architectural interior with no visible text, numbers, or symbols.
natural_image
Technical line drawing of a mechanical assembly or enclosure with internal components and no visible text or symbolsnatural_image
Technical line drawing of a multi-tiered heat exchanger or cooling unit with a separate support structure (no text or symbols)natural_image
Pure technical line drawing of a mechanical linkage or rail system without any text, numbers, or symbolsnatural_image
Technical line drawing of a mechanical clamp or bracket assembly (no text or symbols)natural_image
3D rendering of a server rack unit with visible cooling fins and ventilation slots (no text or symbols)natural_image
Diagram of a server rack unit with open door and red directional arrows indicating movement (no text or symbols)natural_image
Exterior view of a white appliance oven with red arrows indicating internal components (no text or symbols)natural_image
3D illustration of an oven with a blue tray and a red arrow indicating airflow or heat transfer (no text or symbols)
natural_image
3D rendering of an open oven with a blue insulation panel inserted, showing internal structure and ventilation slots (no text or symbols)natural_image
3D illustration of an oven with a blue panel and red arrow indicating rotation (no text or symbols)
natural_image
Technical line drawings of a mechanical component with two views: top shows cylindrical housing, bottom shows circular component with blue arrow indicating rotation (no text or symbols)natural_image
Simple line drawing of two cylindrical objects with no text or symbolsnatural_image
Symbol of a trash bin crossed with no text or numbers, representing waste sorting or disposal (no text present)natural_image
Two views of a modern kitchen oven with internal grating and ventilation duct (no text or symbols visible)natural_image
Two 3D renderings of a small kitchen oven with a tray and ventilation duct (no text or symbols visible)natural_image
3D rendering of an oven with a tray and lid, showing internal structure (no text or symbols)
natural_image
Interior view of a microwave oven with a rack inside (no text or symbols visible)natural_image
Interior view of a microwave oven with visible fan and ventilation duct (no text or symbols)natural_image
Interior view of a microwave oven with airflow lines and ventilation ducts (no text or symbols)natural_image
Line drawing of a kitchen appliance with a hand pointing to the control panel (no text or symbols present)natural_image
Line drawing of a front-loading kitchen appliance with control knobs and a rotary knob (no text or symbols)natural_image
Technical line drawing of a mechanical or architectural component with internal channels and structural elements (no text or symbols)
natural_image
Technical line drawing of a mechanical assembly or enclosure with internal components and no visible text or symbolsnatural_image
Technical line drawing of a multi-tiered heat exchanger or cooling unit with a separate support structure (no text or symbols)natural_image
Pure technical line drawing of a mechanical linkage or rail system without any text, numbers, or symbolsnatural_image
Technical line drawing of a mechanical clamp or bracket assembly (no text or symbols)natural_image
3D rendering of a server rack unit with visible internal components and a red cable (no text or symbols)Mierne zatvorte dvierka a zdvihnite ich smerom nahor, aby ste ich vytiahli.

natural_image
Diagram of a server rack unit with open door and red directional arrows indicating movement (no text or symbols)natural_image
Exterior view of a white appliance oven with red arrows indicating internal components (no text or symbols)Uchopte plast na dvierkach za rohy a vytiahnite ho smerom hore.
natural_image
3D illustration of an oven with a blue tray and a red arrow indicating airflow or heat transfer (no text or symbols)
natural_image
3D rendering of an open oven with a blue insulation panel inserted, showing internal structure and ventilation slots (no text or symbols)natural_image
3D illustration of an oven with a blue tray and red arrow indicating rotation (no text or symbols)
natural_image
Technical line drawing of a mechanical component with two views: top shows cylindrical housing, bottom shows circular component with blue arrow indicating rotation (no text or symbols)natural_image
Simple line drawing of two cylindrical objects with no text or symbolsnatural_image
Symbol of a trash bin crossed with no text or numbers, representing environmental protection (no text present)INSTALACJA I MONTAŽ 14
Instalacja....15
natural_image
Two views of a modern kitchen oven with visible internal grating and ventilation duct (no text or symbols)natural_image
Two 3D renderings of a modern kitchen oven with a tray and ventilation duct (no text or symbols visible)natural_image
3D rendering of an oven with a tray and lid, showing interior structure without any text or symbols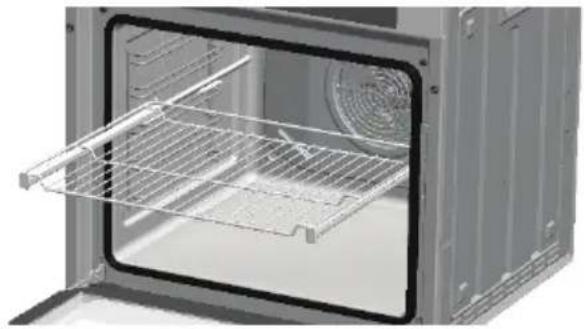
natural_image
Interior view of a microwave oven with a metal rack inside (no text or symbols visible)natural_image
Interior view of a microwave oven with visible fan and ventilation duct (no text or symbols)natural_image
Interior view of a microwave oven with airflow lines and ventilation duct (no text or symbols)natural_image
Line drawing of a kitchen appliance with a hand pointing to the control panel (no text or symbols)natural_image
Line drawing of a front panel with control knobs and indicator lights (no text or symbols)natural_image
Technical line drawing of a mechanical or architectural component with internal channels and structural elements (no text or symbols)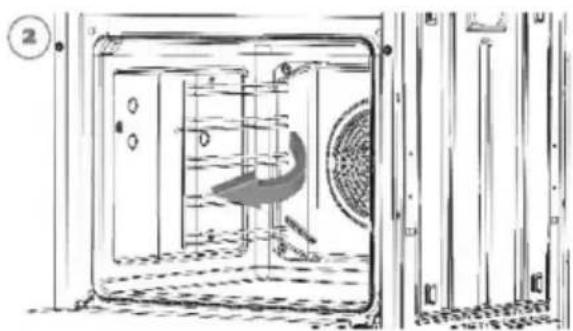
natural_image
Technical line drawing of a mechanical assembly or enclosure with internal components and no visible text or symbolsnatural_image
Technical line drawing of a multi-tiered heat exchanger or cooling unit with a separate support bracket (no text or symbols)natural_image
Technical line drawing of a mechanical clamp or bracket assembly (no text or symbols)natural_image
3D rendering of a server rack unit with visible cooling fins and ventilation slots (no text or symbols)natural_image
Diagram of a server rack with open door and side panel, showing red directional arrows indicating movement (no text or symbols)natural_image
Exterior view of a white appliance with blue lid and red arrows indicating internal components (no text or symbols)natural_image
3D illustration of an oven with a blue tray and a red arrow indicating airflow or heat transfer (no text or symbols)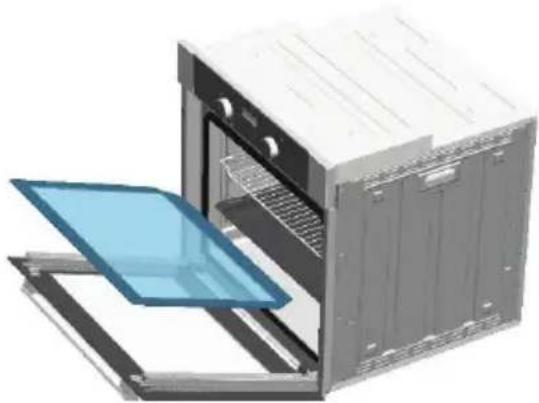
natural_image
3D rendering of an open oven with a blue insulation panel inserted, showing internal structure and ventilation slots (no text or symbols)natural_image
3D illustration of an oven with a blue panel and red arrow indicating rotation (no text or symbols)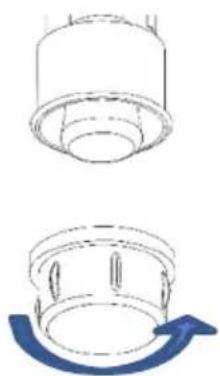
natural_image
Technical line drawings of a mechanical component with two views: top shows cylindrical housing, bottom shows circular component with blue arrow indicating rotation (no text or symbols)natural_image
Simple line drawing of two cylindrical objects with no text or symbolsnatural_image
Symbol of a trash bin crossed with no text or numbers, representing environmental protection (no text present)natural_image
Two views of a modern kitchen oven with visible internal grating and ventilation duct (no text or symbols)natural_image
Two 3D renderings of a modern kitchen oven with a tray and ventilation duct (no text or symbols visible)natural_image
3D rendering of an oven with a tray and lid, showing internal structure (no text or symbols)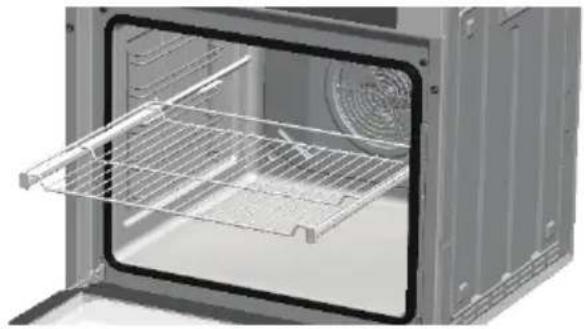
natural_image
Interior view of a microwave oven with a rack inside (no text or symbols visible)natural_image
Interior view of a microwave oven with visible fan and ventilation duct (no text or symbols)natural_image
Interior view of a microwave oven with airflow lines and ventilation ducts (no text or symbols)Funkciógomb
Mechanikus időzítő
Termosztát
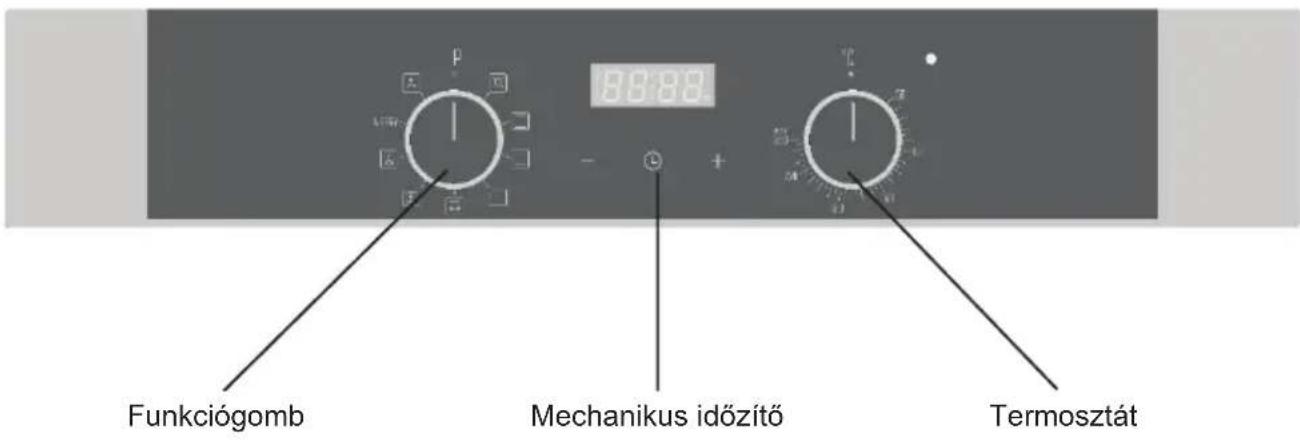
natural_image
Line drawing of a kitchen appliance with a hand pointing to the control panel (no text or symbols present)natural_image
Line drawing of a front-loading kitchen appliance with control knobs and a rotary knob (no text or symbols)natural_image
Technical line drawing of a mechanical or architectural component with internal channels and structural elements (no text or symbols)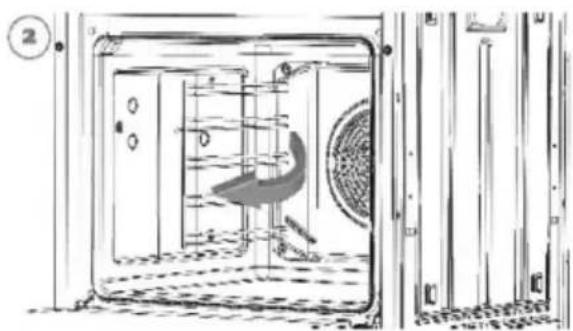
natural_image
Technical line drawing of a mechanical assembly or enclosure with internal components and no visible text or symbolsnatural_image
Technical line drawing of a multi-tiered heat exchanger or cooling unit with a separate support structure (no text or symbols)natural_image
Pure technical line drawing of a mechanical linkage or rail system without any text, numbers, or symbolsnatural_image
Technical line drawing of a mechanical clamp or bracket assembly (no text or symbols)natural_image
3D rendering of a server rack unit with visible cooling fins and ventilation slots (no text or symbols)natural_image
Diagram of a server rack with open door and side panel, showing red directional arrows indicating movement (no text or symbols)natural_image
3D illustration of an open kitchen appliance with red arrows indicating airflow or movement (no text or symbols)natural_image
3D illustration of an oven with a blue tray and a red arrow indicating airflow or heat transfer (no text or symbols)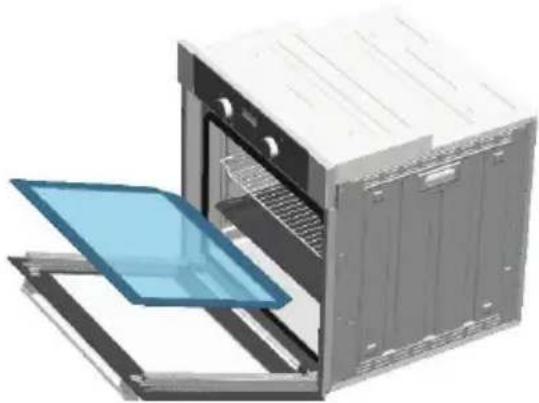
natural_image
3D rendering of an open oven with a blue insulation panel inserted, showing internal structure and ventilation slots (no text or symbols)natural_image
3D illustration of an oven with a blue tray and red arrow indicating airflow or movement (no text or symbols)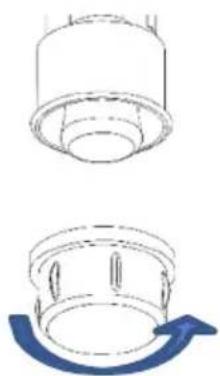
natural_image
Technical line drawings of a mechanical component with top and side views (no text or symbols)natural_image
Simple line drawing of two cylindrical objects with no text or symbolsnatural_image
Symbol of a trash bin crossed with no text or numbers, representing waste sorting or disposal (no text present)natural_image
Two views of a modern kitchen oven with visible internal grating and ventilation duct (no text or symbols)natural_image
Two 3D renderings of a modern kitchen oven with a tray and ventilation duct (no text or symbols visible)natural_image
3D rendering of an oven with a tray and lid, showing internal structure (no text or symbols)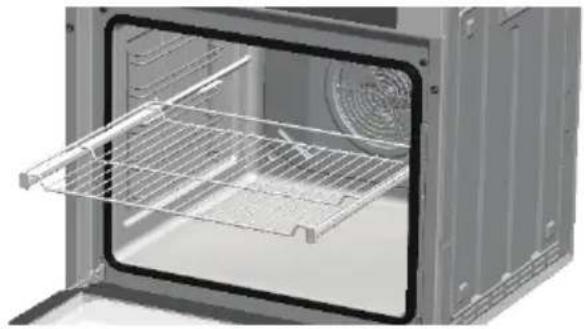
natural_image
Interior view of a microwave oven with a rack inside (no text or symbols visible)natural_image
Interior view of a microwave oven with visible fan and ventilation duct (no text or symbols)natural_image
Interior view of a microwave oven with airflow lines and ventilation ducts (no text or symbols)Ko nataknete piščanca na raženj, ostri del ražnja položite na označeno mesto.
natural_image
Line drawing of a kitchen oven with a hand pointing to the control panel (no text or symbols)Kot je prikazano na sliki, pritisnite na gumb, da ga sprostite.
natural_image
Line drawing of a kitchen appliance with control panel and door (no text or symbols)natural_image
Technical line drawing of a mechanical or architectural component with internal channels and structural elements (no text or symbols)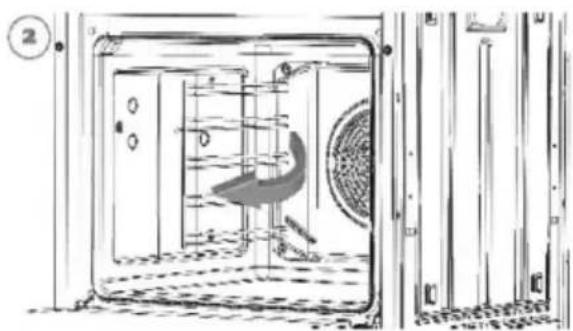
natural_image
Technical line drawing of a mechanical assembly or enclosure with internal components and no visible text or symbolsnatural_image
Technical line drawing of a multi-tiered heat exchanger or cooling unit with a separate support structure (no text or symbols)natural_image
Pure technical line drawing of a mechanical linkage or rail system without any text, numbers, or symbolsnatural_image
Technical line drawing of a mechanical clamp or bracket assembly (no text or symbols)natural_image
3D rendering of a server rack unit with visible cooling fins and ventilation slots (no text or symbols)natural_image
Diagram of a server rack with open door and side panel, showing red directional arrows indicating movement (no text or symbols)natural_image
Exterior view of a white appliance oven with red arrows indicating internal components (no text or symbols)Primate plastiko na vratih za vogale in jo povlecite navzgor.
Odstranite notranje steklo tako, da ga povlečete navzgor.
natural_image
3D illustration of an oven with a blue tray and a red arrow indicating airflow or heat transfer (no text or symbols)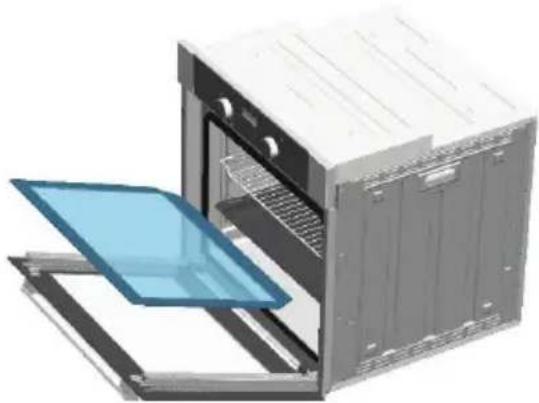
natural_image
3D rendering of an open oven with a blue insulation panel inserted, showing internal structure and ventilation slots (no text or symbols)natural_image
3D illustration of an oven with a blue panel and red arrow indicating rotation (no text or symbols)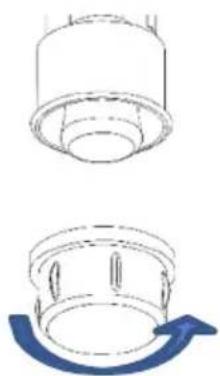
natural_image
Technical line drawing of a mechanical component with two views: top shows cylindrical housing, bottom shows circular component with blue arrow indicating rotation (no text or symbols)Preden razstavite osvetlitev, se prepričajte, da vtič ni vtaknjen v vtičnici! Odstranite steklo pokrova žarnice in žarnico, tako da ju zavrtite.
natural_image
Simple line drawing of two cylindrical objects with no text or symbolsPregorelo žarnico zamenjajte z novo. Znova privijte žarnico in pokrov žarnice.
ČE APARAT NE DELUJE
Če aparat ne deluje;
natural_image
Symbol of a trash bin crossed with no text or numbers, representing environmental hazard (no text present)natural_image
Two views of a laboratory oven with internal grating and ventilation duct (no text or symbols visible)natural_image
Two views of a modern storage unit with a tray and ventilation duct (no text or symbols visible)natural_image
3D rendering of an oven with a tray and lid, showing internal structure (no text or symbols)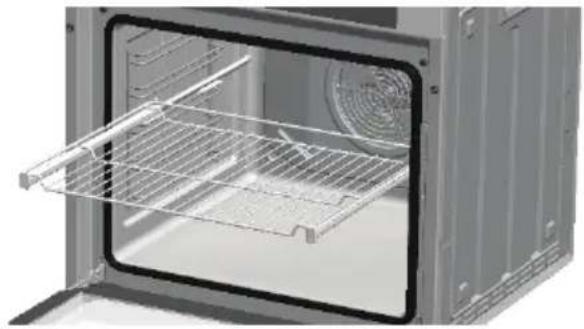
natural_image
Interior view of a microwave oven with a metal rack inside (no text or symbols visible)natural_image
Interior view of a microwave oven with ventilation duct and fan (no text or symbols visible)natural_image
Interior view of a microwave oven with airflow lines and ventilation ducts (no text or symbols)natural_image
Line drawing of a kitchen oven with a hand pointing to the control panel (no text or symbols present)natural_image
Line drawing of a kitchen appliance with control knobs and a door (no text or symbols)natural_image
Technical line drawing of a mechanical or architectural component with internal channels and structural elements (no text or symbols)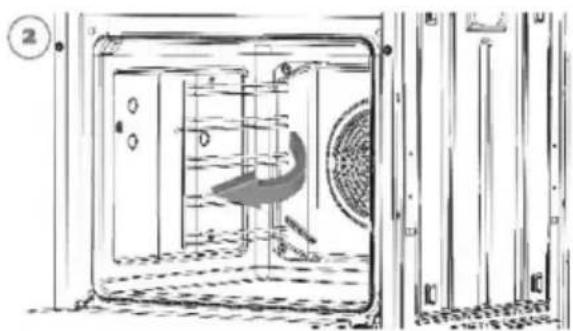
natural_image
Technical line drawing of a mechanical assembly or enclosure with internal components and no visible text or symbolsnatural_image
Technical line drawing of a multi-tiered heat exchanger or cooling unit with a separate support bracket (no text or symbols)natural_image
Technical line drawing of a mechanical clamp or bracket assembly (no text or symbols)natural_image
3D rendering of a server rack unit with visible cooling fins and ventilation slots (no text or symbols)natural_image
Diagram of a server rack with open door and side panel, showing red directional arrows indicating movement (no text or symbols)natural_image
3D illustration of an open refrigerator with red arrows indicating airflow or ventilation direction (no text or symbols)natural_image
3D illustration of an oven with a blue tray and a red arrow indicating airflow or heat transfer (no text or symbols)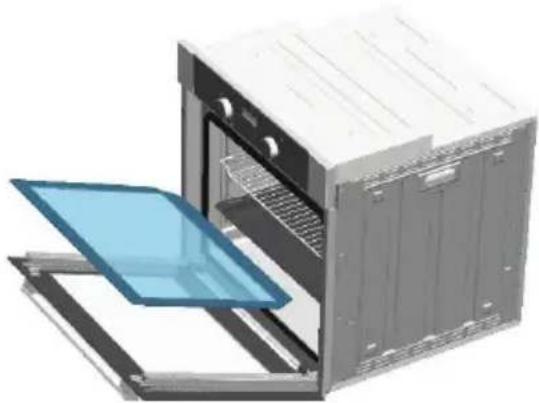
natural_image
3D rendering of an open oven with a blue insulation panel inserted, showing internal structure and ventilation slots (no text or symbols)natural_image
3D illustration of an oven with a blue tray and red arrow indicating rotation (no text or symbols)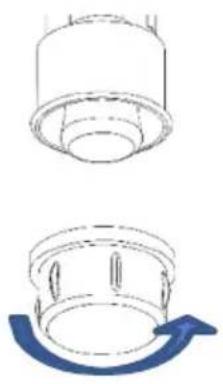
natural_image
Technical line drawing of a mechanical component with two views: top shows cylindrical housing, bottom shows circular component with blue arrow indicating rotation (no text or symbols)natural_image
Simple line drawing of two cylindrical objects with no text or symbolsnatural_image
Symbol of a trash bin crossed with no text or numbers, representing environmental protection (no text present)Thank you for your trust in products.
Our aim is to ensure that you use this product, which is produced in accordance with the total quality understanding, in our modern facilities, in a meticulous working environment, without harming the nature, with the best efficiency.
In order for your built-in oven to maintain its first day features for a long time, we recommend that you read the user manual carefully before using your oven and keep it permanently and use it as a reference source.
Note: This manual has been prepared for more than one model. Some features mentioned in the manual may not be available on your appliance.
The illustrations in the manual are schematic and may not correspond exactly to your product. This product is manufactured in modern facilities that respect the environment without harming nature.
Since this product contains electrical components, it must be installed by authorized services. Otherwise, it is not responsible for any problems that may occur.
Features with * sign are options.
„Complies with WEEE Regulation“
CONTENTS
SAFETY INSTRUCTIONS 4
General safety instructions....4
Electric safety 6
PRODUCT INTRODUCTION AND FEATURES 7
Intended Use 7
Product promotion....7
INSTALLATION AND ASSEMBLY 14
Installation....15
First cleaning 15
USE OF THE OVEN 16
Cooling fan....16
Control panel (*)....16
Use of pop-up button (*) 20
Cleaning the wire shelves....21
Assembly of telescopic rails (*)....21
Oven lighting....22
Turn off the oven....22
COOKING TIPS 22
General information about cooking....22
Cooking Table 22
MAINTENANCE AND CLEANING....23
General cleaning information....23
Cleaning of inox and stainless surfaces 23
Cleaning enamel surfaces 23
Cleaning of catalytic surfaces (*) 23
Cleaning of plastic parts and painted surfaces....24
Cleaning the control panel....24
Removing and cleaning the oven door 25
Removing and cleaning the door glass 26
IF NOT WORKING....27
PACKAGING INFORMATION....27
General safety instructions
- Read these operating instructions carefully and keep them for reference at all times.
- Use your oven in accordance with this manual. Failure to use the oven in accordance with these instructions will void the product warranty.
- This appliance may be used by children aged 8 years and over and persons with reduced physical, auditory or mental capabilities, or lack of experience and knowledge, provided that they have been given supervision or instruction concerning the safe use of the appliance and an understanding of the hazards involved.
- Always have the installation and repair work done by „Authorized Service“. It is not responsible for work done by unauthorized persons.
- In case the product is given to someone else, user manuals, product labels and all documents must be given with the product.
- Keep children under 8 years of age and pets away from the oven during use.
- Accessible parts may be hot when the grill is in use. Children should be kept away.
- Do not store ingredients on the cooking surface.
- Do not touch the accessible parts of the oven while it is in use.
- Use the oven for cooking purposes only. Do not use it for heating etc. purposes.
- Avoid touching the heating elements.
- The cooking process must be monitored continuously.
- Use only original spare parts and accessories that you can obtain from authorized service.
- Ensure that children aged 8 years and under cannot reach the cord of the appliance.
- Before using the appliance, keep curtains, tulle paper or flammable (flammable) materials away from the appliance. Do not place flammable or combustible materials in or on the appliance.
- Keep all ventilation ducts open.
- Do not heat closed cans and glass jars in the oven. The pressure may cause the jar to burst.
- Do not hang towels on the oven handle.
- Do not place baking trays, plates or aluminum foil directly on the bottom of the oven. The accumulated heat can damage the base of the oven.
-
Always use heat-resistant oven gloves when placing food in the hot oven, removing food, etc.
-
Do not use the product in situations that may affect your judgment, such as when taking medication and/or drinking alcohol.
- Be careful when using alcohol in your cooking. Alcohol evaporates at high temperatures and may catch fire when it comes into contact with hot surfaces.
- Check that the product is closed after each use.
- If there is any visible damage to the product, do not operate the product.
- Never touch the plug of the product with wet hands. Do not hold the cord to pull the plug.
- Do not use the product with the front cover glass removed or broken.
- Place the greaseproof paper with food in a baking dish or on an oven accessory (tray, wire rack, etc.) and place it in the preheated oven.
- Proper placement of the wire rack and tray on the wire racks. It is important to place the grill and/or tray correctly on the rack. Place the grill or tray between the two rails and make sure it is level before placing food on it.
- Remove any excess greaseproof paper hanging from accessories or containers to avoid the risk of it touching the oven heating elements.
- Never use the greaseproof paper at an oven temperature higher than the maximum operating temperature indicated on the greaseproof paper. Never place the greaseproof paper on the oven floor.
- Packaging materials are dangerous for children. Keep the packaging materials out of the reach of children. There is a risk of injury or suffocation.
- Do not use abrasive cleaners or sharp metal scrapers to clean the door glass, as scratches on the surface of the door glass may cause the glass to break.
- During use, the internal and external surfaces of the oven become hot. When opening the oven door, step back to avoid hot vapors escaping from the oven. There may be a risk of burns.
- Do not place heavier loads on the oven door when the oven door is open, the oven may tip over.
- Do not move the heating element during cleaning. This may cause electric shock.
- To avoid overheating, the appliance must not be installed behind a decorative door.
- Do not cook food directly on the tray/grill. Place the food in the oven with the appropriate accessory.
Electric safety
- Connect the product to a grounded outlet protected by a fuse in accordance with the values in the specification table.
- Have the grounding installation of your house done by a qualified electrician. Our company will not be responsible for any damages that may occur if the product is used without grounding in accordance with local regulations.
- Oven circuit breaker switches must be within the reach of the end user when the oven is in place.
- The power supply cord (cable with plug) must not touch the hot parts of the appliance.
- If the supply cord (cable with plug) is damaged, it must be replaced by the manufacturer or its service agent or an equally qualified personnel to prevent a dangerous situation.
- Never wash the product by spraying or pouring water on it!
There is a risk of electric shock.
- To avoid the possibility of electric shock, make sure that the appliance is switched off before replacing the lamp.
- All supply circuit connections must be disconnected before accessing the terminals.
- When the oven is in operation, the back of the oven heats up. The electrical connections must not touch the back surface as this may damage the connections.
- Do not pinch the connection cables to the oven door and do not pass them over hot surfaces. Melting of the cable may cause the oven to short-circuit and cause a fire.
- Unplug the product during installation, maintenance, cleaning and repair operations.
- Make sure that the product plug is securely fixed to the socket to prevent sparks.
- The product must be installed in such a way that the electrical wiring can be completely disconnected. The disconnection must be carried out with a switch in accordance with building regulations or with an integrated fuse connected to the fixed electrical installation.
- The product uses a type "Y" cord cable.
- Fixed connections must be connected to an installation that ensures complete separation of all poles. Under overvoltage category III, the disconnection rules must be connected to the fixed installation in accordance with the wiring rules.
Intended Use
- The product is intended for home use only. It cannot be used for commercial purposes.
- The product can only be used for cooking in kitchens. It cannot be used for purposes such as heating the room.
- The oven can be used for defrosting, baking, roasting or grilling food.
- This product should not be used for drying towels or clothes, heating plates, etc.
- The product has a working life of 10 years. This is the manufacturer's spare parts availability period.
Product promotion
Product content
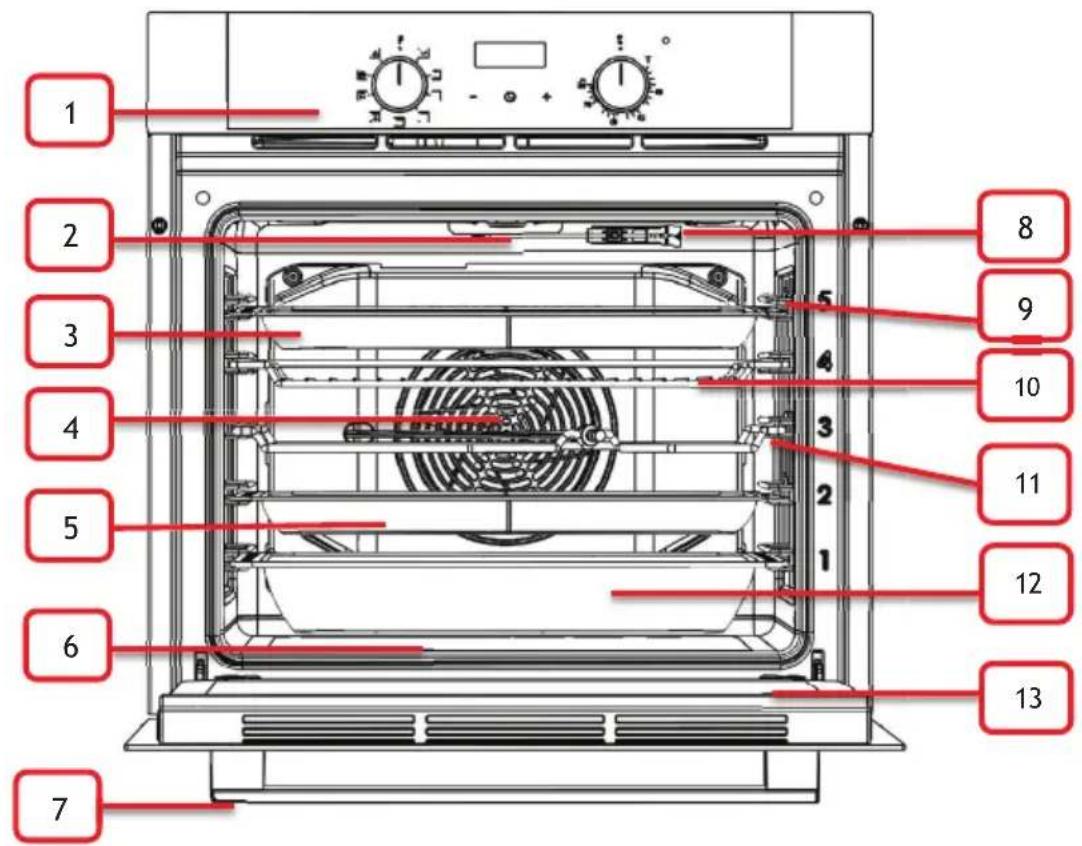
- Control panel (*)
- Lamp (*)
- Airfry Tray
- Fan motor (behind sheet metal) (*)
- Standard tray
- Lower resistance (behind the sheet metal) (*)
- Handle
- Upper resistance (*)
- Wire shelves (*)
- Wire grill
- Rotisserie Chicken and Skewers
- Deep tray (*)
- Cover
| Function Symbol | Function Definition |
| [7DYS] | Bottom heating (*) |
 | Top heating (*) |
 | Bottom and top heating (*) |
 | Lamp (*) |
 | Fan (*) |
 | Turbo heating and Fan (*) |
 | Internal grill heating (*) |
 | Outdoor grill heating (*) |
 | Bottom, top and fan heating (*) |
 | Bottom heating and fan (*) |
 | Top heating and fan (*) |
 | Internal grill heating and fan (*) |
 | Grill heating and fan (*) |
 | Fan and lamp (*) |
| AIRFRY | AIRFRY Mode (*) |
 | Roasted Chicken (*) |
 | Turbo and bottom heating (*) |
Accessories of product (\*)
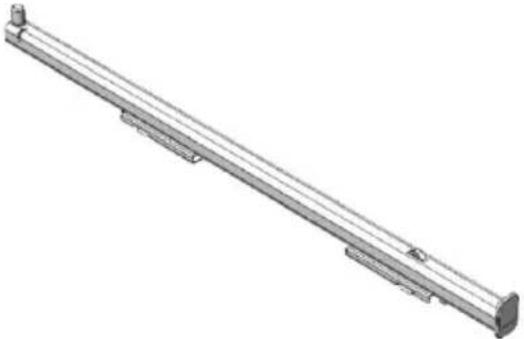 | Telescopic rail (*) |
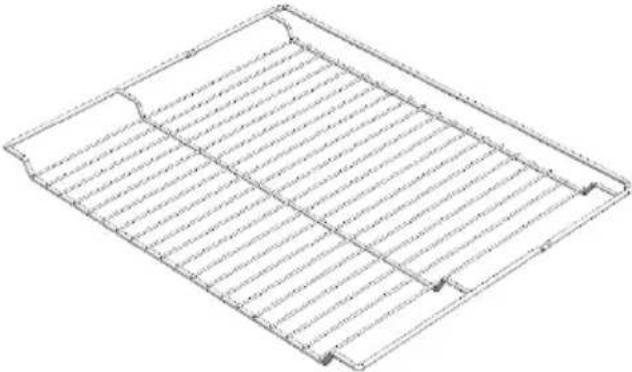 | Wire Grill |
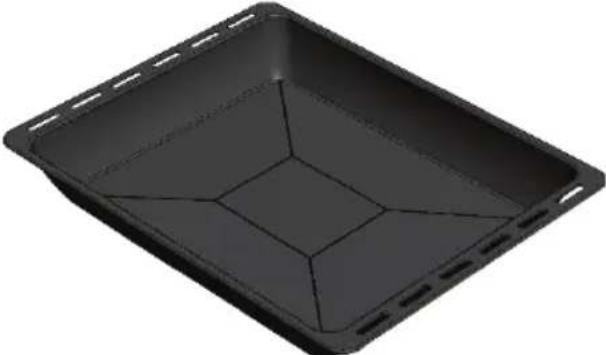 | Deep Tray(*) |
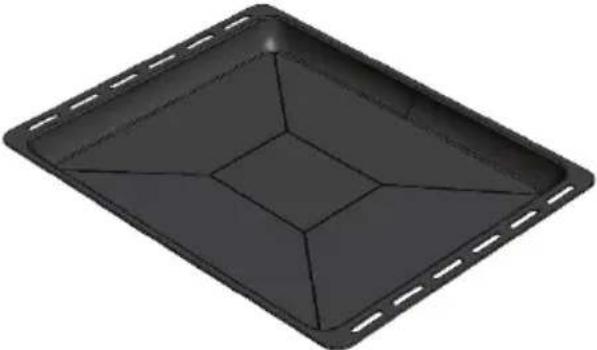 | Standard Tray |
Accessories of product (*)
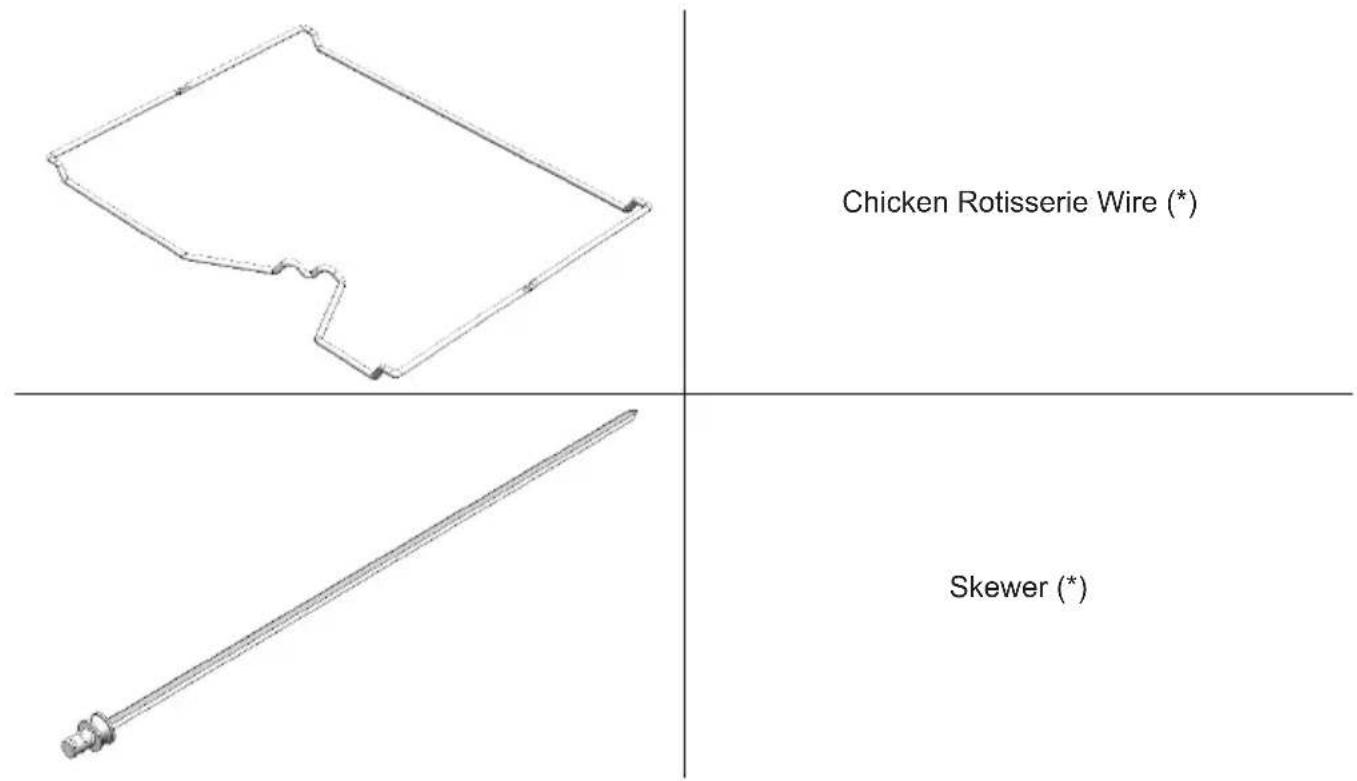
Accessory use
- Cooking racks
- The oven has 5 levels of cooking space. The order of the shelves is according to the sequence and numbers on the front frame.
Models with wire shelves Models without wire shelves
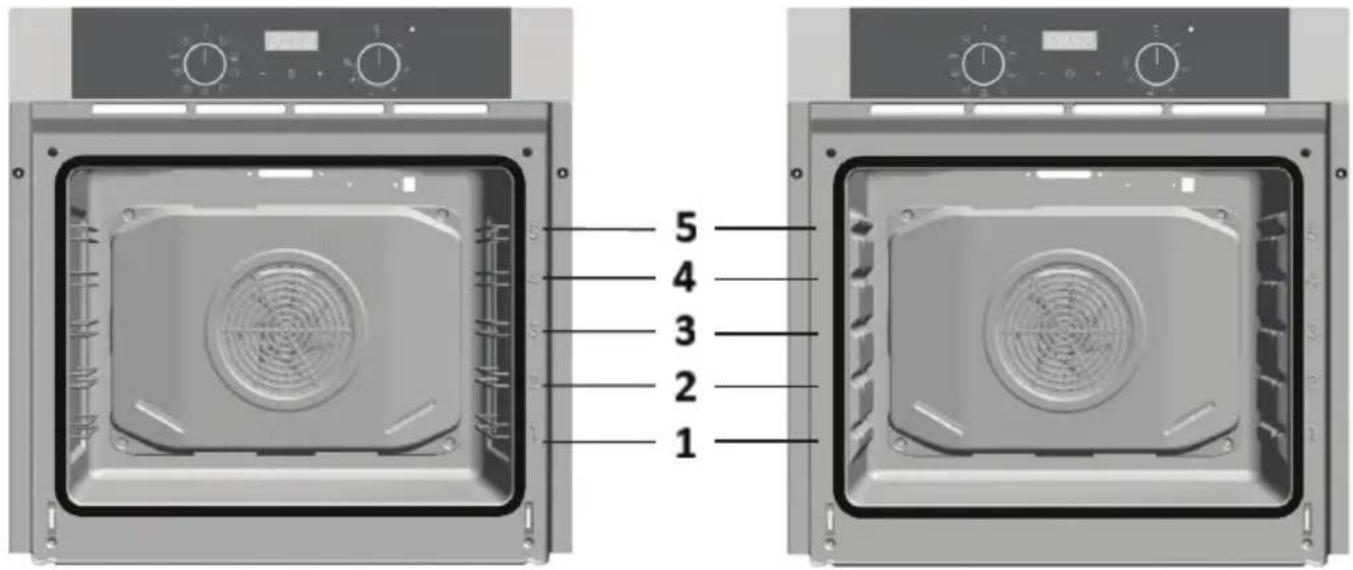
Models with wire shelves Models without wire shelves
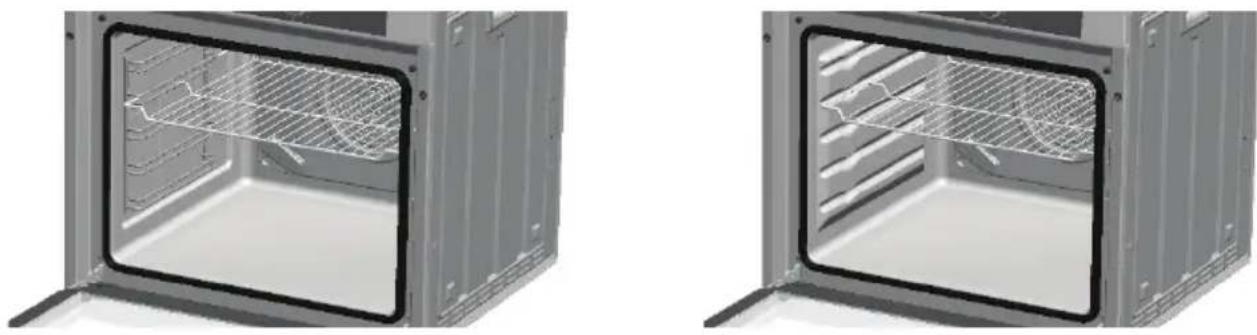
natural_image
Two views of a modern kitchen oven with visible internal grating and ventilation duct (no text or symbols)- For models with and without wire shelves, the grill should be positioned as shown in the figures above. The wire shelf has a direction and should be placed on the desired shelf with the open side of the grill facing the front of the oven.
Models with wire shelves Models without wire shelves
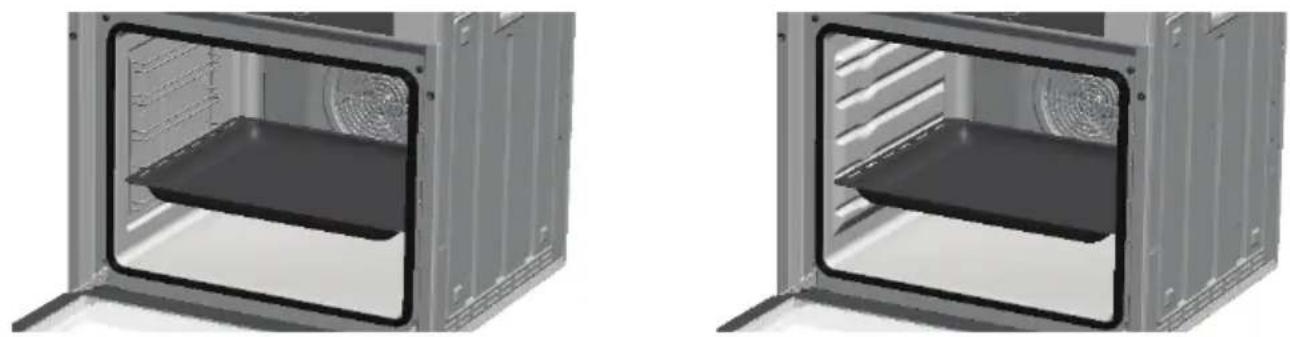
natural_image
Two views of a modern kitchen oven with a tray and ventilation duct (no text or symbols visible)- The deep and standard tray should be placed as shown in the pictures above. The tray does not have any orientation and can be placed on the form or wire shelf designed to hold it.
- Proper placement of the tray and wire grid on the telescopic rails
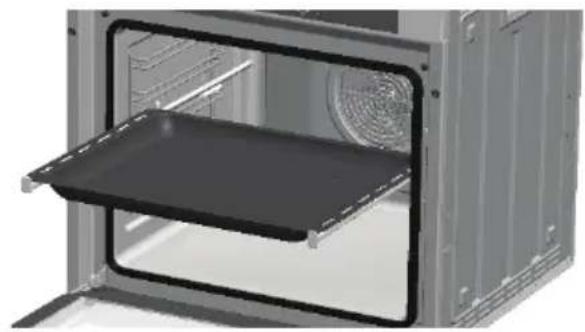
natural_image
3D rendering of an oven with a tray and lid, showing interior structure without any text or symbols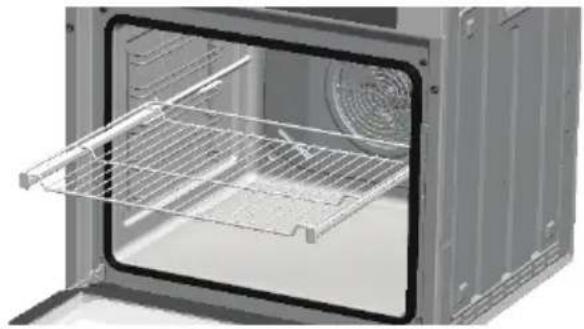
natural_image
Interior view of a microwave oven with a metal rack inside (no text or symbols visible)- Thanks to the telescopic rails, the trays or wire grid can be easily installed and removed. The tray and wire rack should be placed on the telescopic rails as shown in the pictures above.
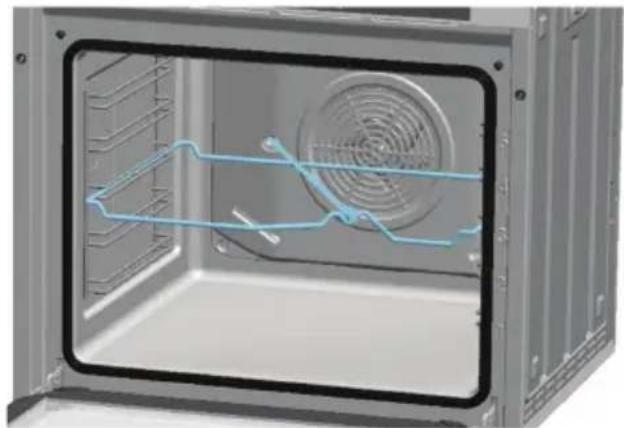
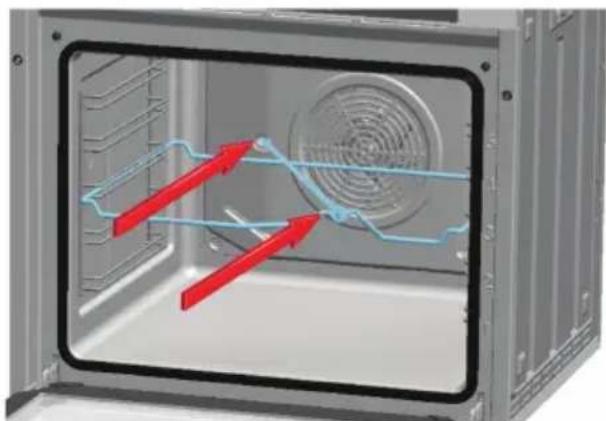
- Use of Chicken Rotisserie Wire and Skewer
natural_image
Interior view of a microwave oven with visible fan and ventilation duct (no text or symbols)Place the rotisserie wire on the third rack as shown in the figure.
natural_image
Interior view of a microwave oven with airflow lines and ventilation ducts (no text or symbols)After putting the chick on the skewer, place the pointed part of the skewer in the marked place.
Insert the other part of the skewer into the slot in the wire.
Technical specifications
| Specifications Explanation | |
| Product external dimensions (Height x Width x Depth) | 595 x 595 x 568 mm |
| Supply voltage and frequency 220 – 240 V | ~ 50/60 Hz |
| Product Total strength (*) Maximum 2400 W | |
| Lamp power (*) 18 W | |
| Thermostat temperature range (*) 50 - 250 °C | |
| Bottom heater power 1200 W | |
| Top heater power 1100 W | |
| Turbo heater power (*) 1800 W | |
| Grill heater power 2200 W |
- Technical specifications may be modified to improve the quality and performance of the product.
- The values declared on the product or in the documents supplied with the product are the values obtained in the tests carried out in the laboratory environment according to the relevant standard and may vary according to the working environment of the oven.
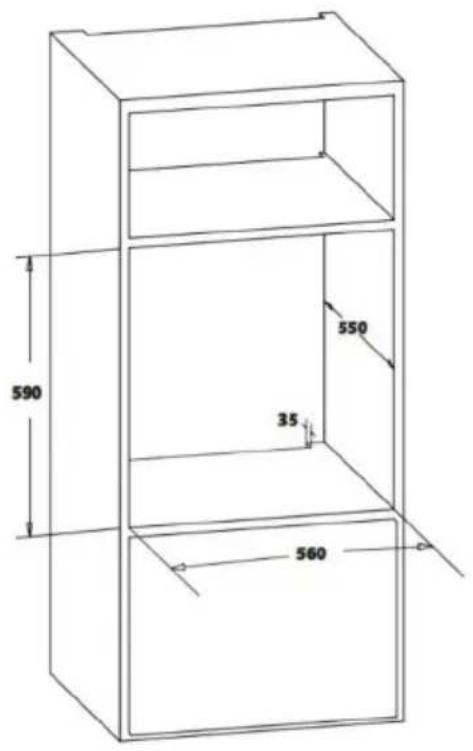
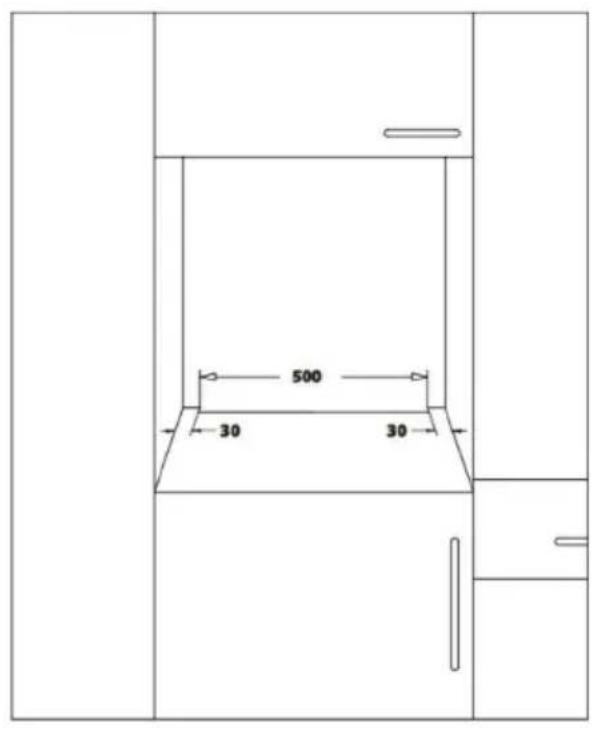
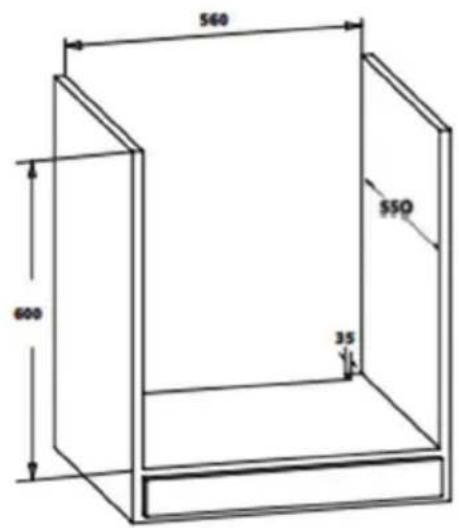
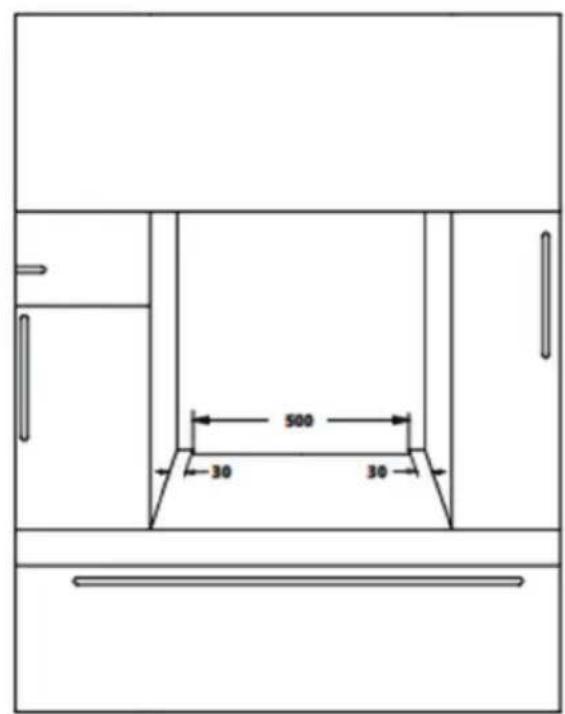
Installation
Before starting the first installation of your product, you must make the following preparations.
- Make sure that the electrical installation is suitable. The preparation of the electrical installation is the responsibility of the customer and must comply with the relevant local standards. If the electrical installation is not suitable, call a qualified electrician to make the necessary arrangements.
- Check whether there is any damage on any part of the product. If there is any damage to the product, do not install it.
- Make sure that there is a space behind the section where you will place the device. This space is necessary for the ventilation system to function properly.
- If there is a drawer under the oven, a shelf should be placed between the oven and the drawer.
- Kitchen cabinets must be level with the product and must be fixed.
- Surfaces, synthetic laminates and adhesives used must be heat resistant (minimum 100°C).
- Do not install the product next to refrigerators or coolers. The heat emitted by the product increases the energy consumption of cooling devices.
- Do not use the lid and/or handle to carry or move the product.
After making the above-mentioned preparations, you can proceed with the installation according to the following sequence.
First cleaning
Clean your product for the first time according to the order below.
- Remove all packaging materials.
- Remove all accessories from the product. Clean the accessories with detergent water and a soft cleaning sponge.
- Run the product at 250 °C for 30 minutes without cooking and then allow it to cool down. Please do not panic if you notice any odor or smoke during this time.
- After the product has cooled down, wipe all surfaces with a wet cloth or sponge and dry with a cloth.
- Make sure that the cleaning materials are not abrasive or sharp objects.
USE OF THE OVEN
Cooling fan
- Thanks to the ventilation system in our product, the front part of the product and the furniture are cooled when necessary. After the cooling process is completed, the system is automatically deactivated. The hot air inside the product is discharged out of the product through the ventilation gaps. Do not close the ventilation gaps to prevent the oven from overheating.
Control panel (\*)
- The function can be selected with the function button on the control panel of the oven and the cooking temperature can be adjusted with the thermostat (the signal lamp will light up when the temperature is adjusted with the thermostat), the oven will start working by setting the mechanical or digital timer.
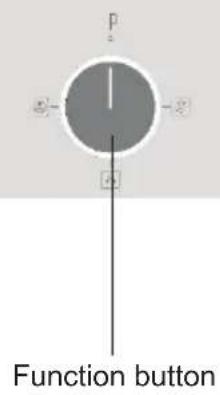
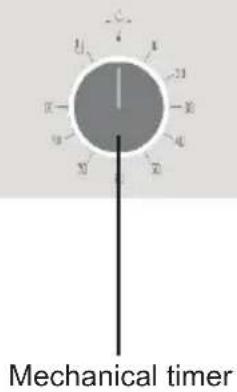
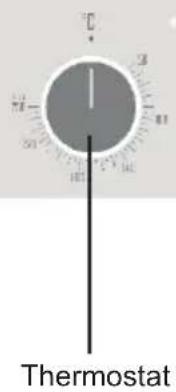
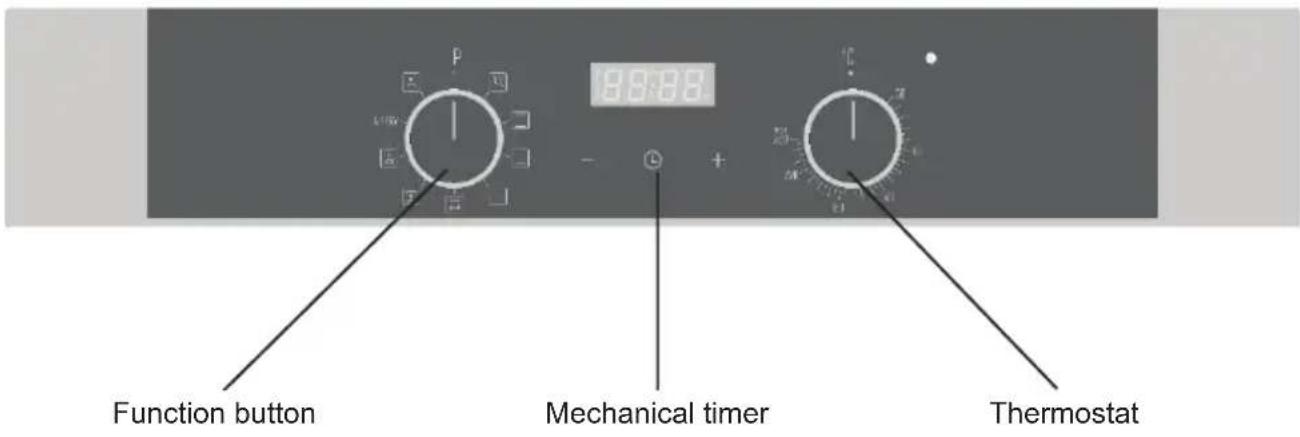
| Minute reminderCooking iconAutomatic Cooking IconPoint Icon | 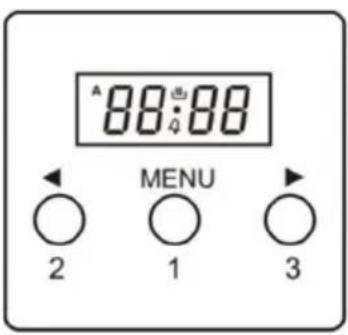 | 1. Function Selector Button2. Minus Button3. Plus Button2 or 3: Manual |
Setting the Time of Day (24 Hours)
After connecting or reconnecting to a power source, "0.00" and "AUTO" flash.
Press and hold 1 for about 2 seconds, the dot icon starts blinking. Use 2 and 3 to set the current time. Approx. 7 seconds after the end of the set time, the new data is memorized.
Time correction can be made after;
Press buttons 2 and 3 for approx. 2 seconds, the dot icon starts blinking. You can then set the current time. Caution. If the correct time is not set, the oven may not function properly.
Manual Operation
If the programmer is not in semi-automatic or fully automatic mode, the oven can be used manually without cooking time setting.
Setting the Minute Reminder
You can activate the minute reminder at any time, these are functions that work independently of the activity status of other programs. The time you can set ranges from 1 minute to 23 hours 59 minutes.
- Press and hold button 1 until the minute counter icon starts blinking. "0.00" starts flashing.
- Use buttons 3 and 2 to enter the required time. The minute reminder icon remains on the screen. After the set time has elapsed, the minute reminder icon starts flashing again and an audible signal warns for approx. 7 minutes.
- Press 1, 2 or 3 to turn off the signal;
- When 1 is pressed for about 2 seconds, the minute reminder icon disappears and the display shows the current time.
- Change Timer Beep Tones
The tone of the timer beeps can be changed as follows: Press buttons 2 and 3 at the same time.
- Press button 1 to see the actual tone.
- Press button 2 to select the desired tone from tone 1 to tone 3.
- Exiting Settings
- Press 2 and 3 simultaneously to cancel the automatic functions.
- Press button 1, then buttons 2 and 3 to select the minute counter settings.
- Cooking Timer
If the oven has to turn off at a specified time, the cooking timer can be set. It is called semi-automatic operation. Press button 1 until "stop" and "0.00" flash. The digits next to the automatic cooking icon start blinking. Use buttons 3 and 2 to set the cooking time. It varies between 1 minute and 10 hours.
The set time is memorized after approx. 7 seconds; the current time is displayed again. The automatic cooking icon remains on the display. Select the required temperature and function. When cooking is complete, an audible signal alerts you for approx. 7 minutes and the automatic cooking icon starts flashing again. Turn the function and thermostat buttons OFF. Press button 1, 2 or 3 to cancel the signal. Press button 1 for about 2 seconds to return to manual operation.
DELAYED COOKING TIME
If the oven needs to be switched on for a specified time, cooking time and switching off at the specified time, cooking time and cooking end time can be set. It is called fully automatic operation.
- Press button 1 until "stop" and "0.00" flash. The automatic cooking icon next to it flashes.
- Set the cooking time using buttons 3 and 2. From 1 minute to varies between 10 hours (e.g. 1 hour)
- Press button 1 until "End" and "18.30" (end time) appear. Icons start blinking
- Use buttons 2 and 3 to set the switch-off (end of cooking) time. Limited to 23 hours 59 minutes" (example 19:30)
- Turn the function and thermostat buttons to the required program.
- The cooking icon disappears on the display. The oven will not turn on until the cooking start time (e.g. 18:30), this is the difference between the cooking end time and the cooking time.
- When cooking is complete (e.g. 19:30), an audible signal sounds for approx. 7 minutes and the automatic cooking icon starts flashing again. Turn the function and thermostat buttons OFF.
- Press 1 of the 1, 2 or 3 buttons to cancel the warning. Press button 1 for about 2 seconds to return to manual cooking.
Rustic Timer Usage
Product Controls
All controls in the product are made with the help of the adjustment bar. The following operations can be performed with the adjustment bar.
- Short press (Confirmation and Menu transitions)
- Long press (Manual mode switching)
- Turn right (Clock, reminder, cooking setting)
- Left rotation (Clock, reminder, cooking setting)
Functional Characteristics
- Initial Energization
When the product is first energized, the clock symbol starts flashing on the display. To start using the oven, press the setting bar for about 3 seconds to pass the opening screen. When the opening screen is passed, the clock symbol stops flashing. The product switches to standby mode.
- Clock Setting
To enter the clock setting mode, press and release the setting bar until the clock symbol starts flashing when no cooking or reminder is set.
While in the time setting mode, the time can be set by turning the setting bar left and right. In the clock setting mode, if no setting is made for 10 seconds, the clock setting mode is exited. The last position of the hour and minute hands is considered as the set time.
- Reminder Setting
To enter the reminder setting, press and release the setting bar until the bell symbol flashes. In the reminder setting mode, the reminder can be set by turning the setting bar left and right. Once the reminder is set, the setting bar must be pressed to activate it. If the setting bar is not pressed, the reminder will be canceled after 10 seconds and go to standby mode. After exiting the reminder setting, if the reminder has been set, the bell symbol will be on steady, if the reminder has not been set, the bell symbol will not be on. To see how much time is left before the set reminder expires, press the setting bar. The hour hand and minute hand will show the time when the reminder will end for 2 seconds and then go back to showing the time again. To cancel the set reminder, press and hold the setting bar for about 2 seconds.
Reminder duration can be set as maximum 3 hours and minimum 2 minutes,
- Cooking Start Time Setting
To enter the cooking start time setting, press and release the setting bar until the start symbol flashes. In the cooking start time setting mode, the cooking start time can be set by turning the adjustment bar left and right. If the setting bar is not pressed, the cooking start time will be canceled after 10 seconds and the standby mode will be entered. The cooking start time cannot be set on its own. After the cooking start time is set, the cooking end time can be set by pressing the setting bar. If the cooking end time is not set, the cooking start time is canceled. Cooking start time can be set as maximum active hour + 12 hours, minimum active hour + 2 minutes.
- Cooking End Time Setting
To enter the cooking end time setting, press and release the adjustment bar until the stop symbol flashes. In the cooking end time setting mode, the cooking end time can be set by turning the setting bar left and right. Once the cooking end time is set, the setting bar must be pressed to activate it. If the setting bar is not pressed, the cooking end time will be canceled after 10 seconds and go into standby mode. The cooking end time can be set on its own. At the set end time, the oven resistances are deactivated and an audible and visual warning is given. Audible and visual warning can be terminated by pressing the setting bar. The cooking end time can be set as maximum active hour + 15 hours, minimum active hour + 2 minutes.
- Delayed Cooking Setting
Delayed cooking is used when you want cooking to start after a certain time. To set delayed cooking, the cooking start time must be set first and then the cooking end time. For example: Active time: 10.00 Cooking Start Time: 11.30 Cooking End Time: 13.30 Cooking will start after 1 and a half hours and will last for 2 hours.
- Manual Mode
The oven is in manual mode if automatic cooking is not installed. In this case, the start and stop symbols are off and the relay is in conduction. To cancel the set cooking times and switch to manual mode, long press the setting bar in the relevant setting menu. When switching to manual mode, the set cooking times are canceled and the product switches to the main screen where the time is displayed. In manual mode, the relay is in conduction. If the oven is to be deactivated, the function setting position on the oven must be set to off. In this mode all leds are off.
- Alarm Sound Cancellation
When the set reminder time or cooking time expires, an audible and visual alert is given. The alarm sound and visual warning can be canceled by pressing the setting bar. If no intervention is made, the alarm sound will continue to sound for 1 minute. After 1 minute, the alarm silences but the visual warning continues to be given that the alarm is over.
- Reminder or Automatic Cooking Cancel
The set reminder or automatic cooking times can be canceled by pressing and holding the setting bar in the relevant setting menu. The product returns to standby mode. The hour and minute hands show the active time.
Use of pop-up button (\*)
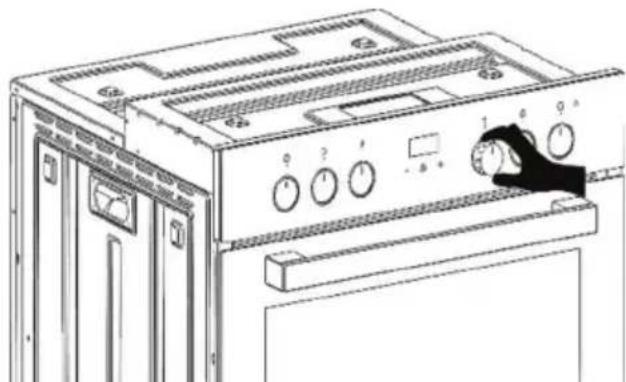
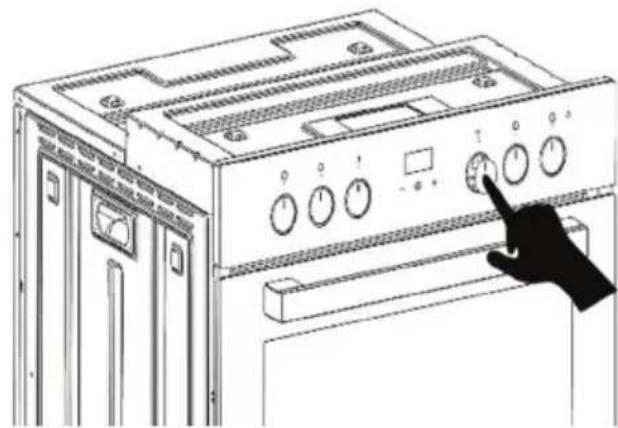
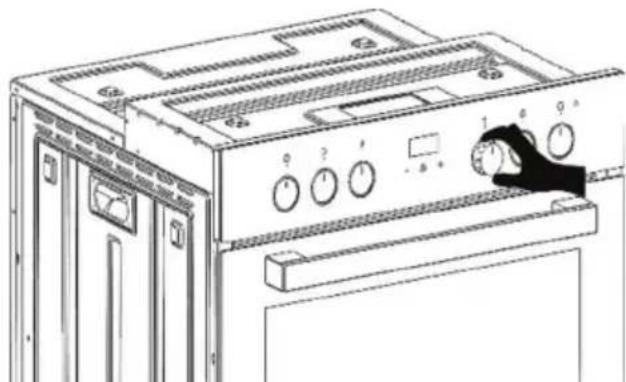
- In models using a pop-up button, the button can only be adjusted when it is outside.
natural_image
Line drawing of a kitchen oven with a hand pointing to the control panel (no text or symbols present)As shown in the figure on the side, press on the button to release it.
natural_image
Line drawing of a kitchen appliance with control panel and door (no text or symbols)Once the button is out, you can make the necessary adjustments by turning it to the right or left.
Cleaning the wire shelves
natural_image
Technical line drawing of a mechanical or architectural component with internal channels and structural elements (no text or symbols)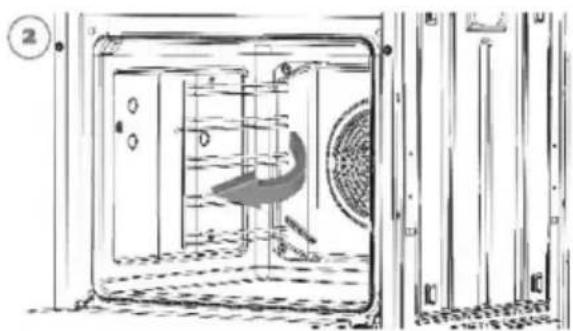
natural_image
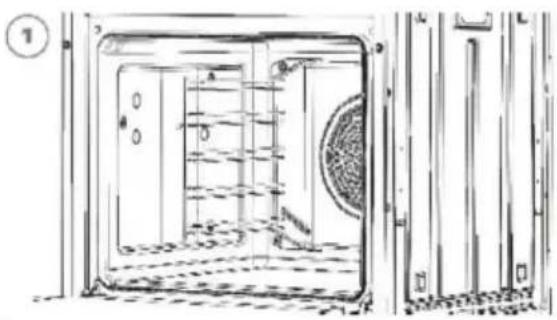
Technical line drawing of a mechanical assembly or enclosure with internal components and no visible text or symbolsTo remove the wire shelves, apply force perpendicular to the surface to which they are attached and the wire shelves will come out. After cleaning, they can be put back in the same way.
Assembly of telescopic rails (\*)
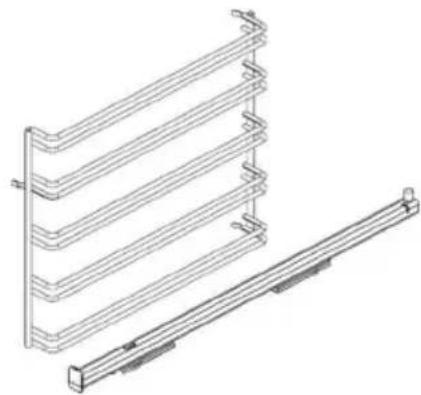
natural_image
Technical line drawing of a multi-tiered heat exchanger or cooling unit with a separate support structure (no text or symbols)Telescopic rails should be installed on the required shelf by looking at the cooking guide. It differs as right and left when installing.
natural_image
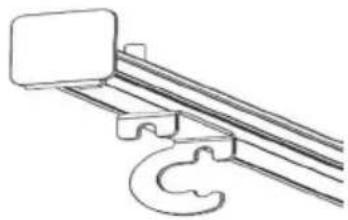
Pure technical line drawing of a mechanical linkage or rail system without any text, numbers, or symbolsYou need to attach the telescopic rails to the top wire of the desired shelf.
natural_image
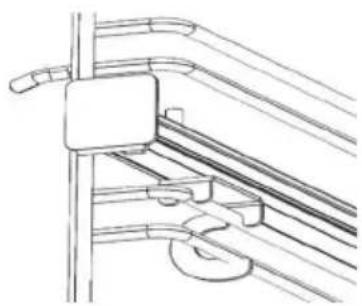
Technical line drawing of a mechanical clamp or bracket assembly (no text or symbols)Check that the telescopic rail is fully seated on the wire. The telescopic rail in the picture is the left telescopic rail.
When you want to remove it, pull the tab indicated by the arrow downwards and then pull the telescopic rail in the opposite direction to the attachment direction. There are 2 of these tabs on the telescopic rails, front and back.
Oven lighting
- In all functions, the oven lighting is switched on automatically and remains on throughout cooking.
Turn off the oven
- You can turn off your oven by turning the function switch and thermostat to the off (top) position.
COOKING TIPS
General information about cooking
- Stay as far away as possible when opening the oven door after cooking. When opening the oven door, hot steam may burn your hands, face and/or eyes.
- The temperature and time values given for cooking vary depending on the recipe and quantity. For this reason, times and temperature values are given as ranges.
- Take accessories out of the oven when not in use during cooking. Accessories not used during cooking may prevent your food from cooking properly.
- Always cut the greaseproof papers used in cooking according to the container. Greaseproof papers overflowing from the container may pose a risk of burning.
Cooking Table
| Food Cooking function Temp. (C) | Cooking Shelf | Cooking time (min.) | ||
| Cake Static / Static +Fan 170-180 2-3 35-45 | ||||
| Muffin Static / Turbo+Fan 170-180 2 25-30 | ||||
| Pastry Static / Static +Fan 180-200 2 35-45 | ||||
| Bun Static 180-190 2 20-25 | ||||
| Cookie Staticv 170-180 2 20-25 | ||||
| Apple Pie | Static / Turbo + Fan | 180-190 1 50-70 | ||
| Sponge Cake | Static | 200/150* | 2 20-25 | |
| Pizza | Static Fan 180-200 3 20-30 | |||
| Lasagne | Static 180-200 2-3 25-40 | |||
| Macaroon | Static | 100 | 2 | 50 |
| Chicken grill** | Grill+Fan | 200-220 | 3 | 25-35 |
| Fish grill** | Grill+Fan | 200-220 3 25-35 | ||
| Beef Steak** | Grill+Fan | Max | 4 | 15-20 |
| Grill Meatball** Grill+Fan Max | 4 20-25 | |||
General cleaning information
- Without regular cleaning, the lifetime of your product may be reduced and common problems may increase.
- The product should be cleaned after each cooking. In this way, food waste is easily removed and it is prevented from burning in the next use.
- Do not use steam cleaners, abrasive detergent powders, cleaning creams or sharp objects during cleaning. Detergents and objects may damage the surfaces of your product.
- Clean the product with dishwashing detergent, warm water and a soft cloth or sponge and dry with a dry cloth.
- Allow the product to cool down after cooking before cleaning.
Hot surfaces may cause burns. - Make sure that any remaining liquid is completely wiped off after cleaning.
Cleaning of inox and stainless surfaces
- Do not use cleaning materials containing acid or chlorine for cleaning stainless and inox surfaces.
- Make sure to wipe in one direction with a detergent cloth (non-scratching).
- Discoloration that occurs on inox and stainless surfaces over time does not affect the operation of the product.
- Stains that remain on inox and stainless surfaces for a long time may cause corrosion. For this reason, clean the lime, oil, starch and protein stains after cooking immediately.
Cleaning enamel surfaces
- Clean enamel surfaces with dishwashing detergent, warm water and a soft cloth or sponge and dry with a dry cloth.
- You can use the steam cleaning function for light non-permanent dirt on enameled surfaces. (*)
- Use stainless steel dishwashing wire and oven cleaner for cleaning burnt food residues. (You can get the recommended cleaners for cleaning enamel surfaces from authorized service).
- Wait for the product to cool down before cleaning the product after cooking. Hot surfaces may cause burns.
Cleaning of catalytic surfaces (\*)
- The inner walls of the oven can only be enameled or catalytic.
- The catalytic walls of the oven have a light matt color and porous surface.
- The catalytic surfaces of the oven should not be cleaned.
- Catalytic surfaces absorb oil thanks to their porous structure and when the surface is saturated with oil, it starts to shine. In this case, it is recommended to replace the surfaces.
Cleaning of plastic parts and painted surfaces
- Clean plastic parts and painted surfaces with dishwashing detergent, warm water and a soft cloth or sponge and wipe dry with a dry cloth.
- Do not use hard metal scrapers and abrasive materials. These materials may damage the surfaces.
Cleaning the control panel
- When cleaning button-controlled panels, wipe the panel and buttons with a damp soft cloth and wipe dry. Do not remove the buttons and the gasket underneath to clean the panel.
- When cleaning the touch control panels, use a damp soft cloth and wipe dry with a dry cloth.
Removing and cleaning the oven door
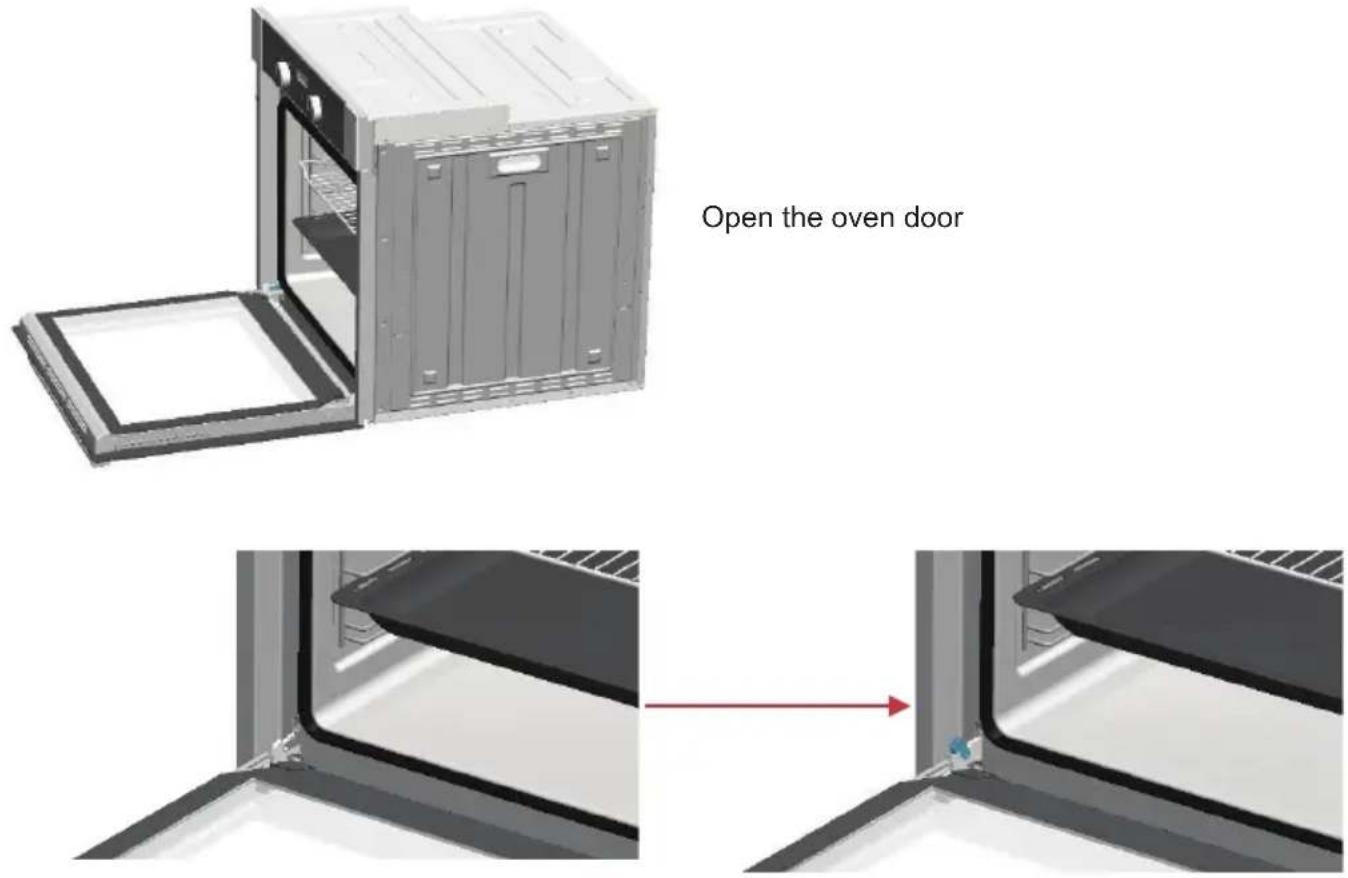
Lift the hinge lock upwards.
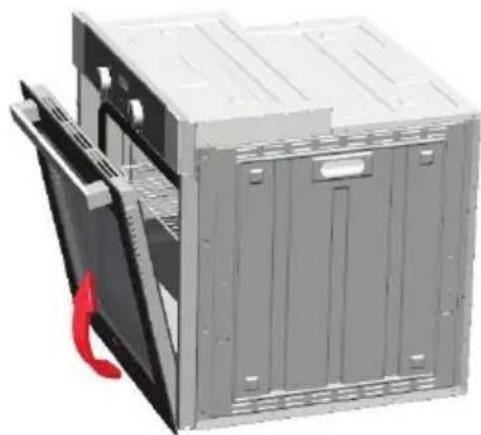
natural_image
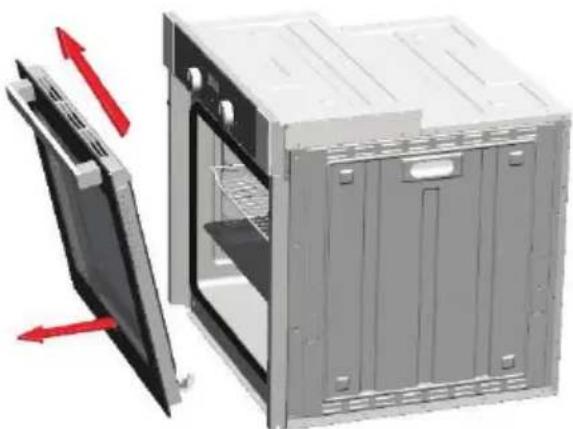
3D rendering of a server rack unit with visible internal components and a red cable (no text or symbols)Close the lid slightly and lift it upwards to pull it out.
natural_image
Diagram of a server rack with open door and side panel, showing red directional arrows indicating movement (no text or symbols)After cleaning, reverse the steps to put the cover back on.
Removing and cleaning the door glass
natural_image
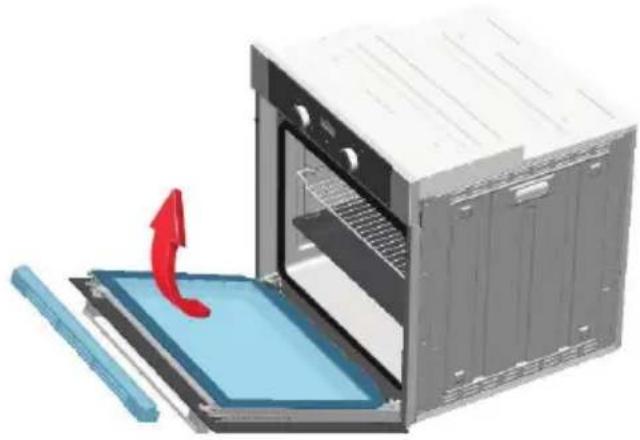
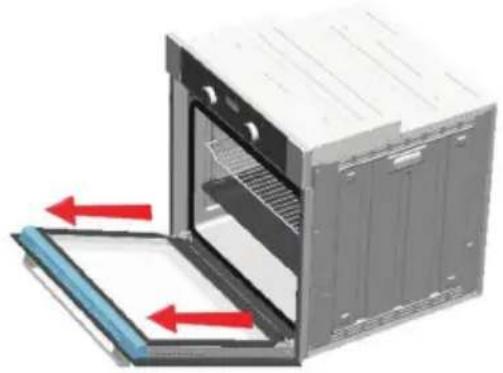
3D illustration of an open refrigerator with red arrows indicating airflow or ventilation direction (no text or symbols)Grasp the plastic on the door by the corners and pull it upwards.
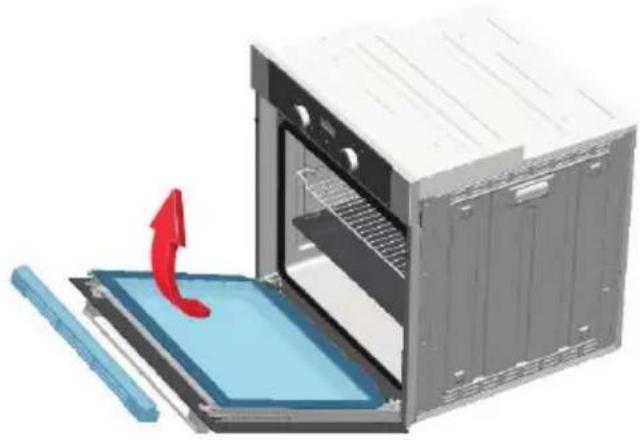
Remove the inner glass by pulling it upwards.
natural_image
3D illustration of an oven with a blue tray and a red arrow indicating airflow or heat transfer (no text or symbols)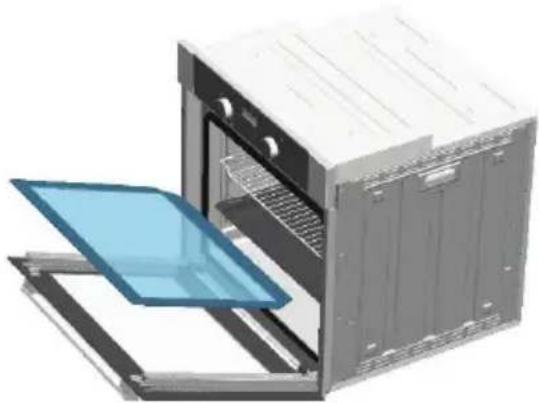
natural_image
3D rendering of an open oven with a blue insulation panel inserted, showing internal structure and ventilation slots (no text or symbols)Remove the center glass (if fitted) by pulling it upwards.
After cleaning, reverse the steps to put the cover back on.
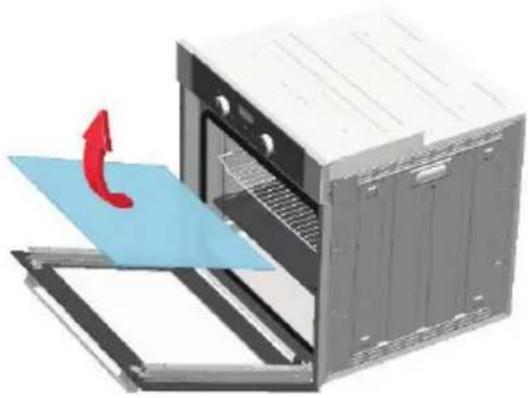
natural_image
3D illustration of an oven with a blue tray and red arrow indicating rotation (no text or symbols)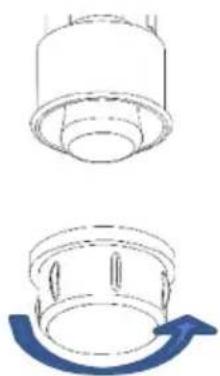
natural_image
Technical line drawings of a mechanical component with top and side views (no text or symbols)Make sure that the plug is not plugged in before removing the lamp! Remove the lamp housing glass and the lamp by turning it.
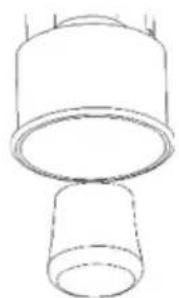
natural_image
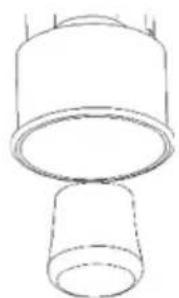
Simple line drawing of two cylindrical objects with no text or symbolsReplace the defective lamp with a new one. Refit the lamp and the lamp housing glass by turning it.
IF NOT WORKING
If it does not work;
Before contacting the service, make sure that the plug is plugged in and the electrical fuse in the installation is intact, do not take any action that may damage the product.
Service and Spare Parts:
Have your product installed by our authorized services free of charge. You can obtain spare parts for your product from your dealer or authorized service center.
PACKAGING INFORMATION
The packaging of the product is made of recyclable materials in accordance with our national legislation. Do not dispose of packaging waste with household or other waste, dispose of it at the packaging collection points specified by the local authority.
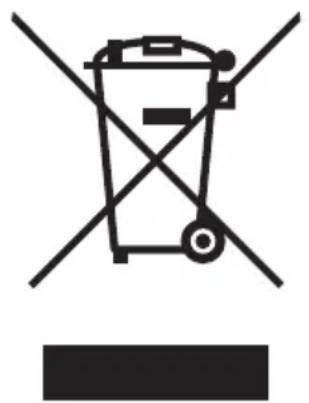
DISPOSAL OF USED ELECTRICAL AND ELECTRONIC EQUIPMENT
natural_image
Symbol of a trash bin crossed with no text or numbers, representing environmental restriction (no text present)This symbol on products or original documents means that used electric or electronic products must not be added to ordinary municipal waste. For proper disposal, renewal and recycling hand over these appliances to determined collection points. Alternatively, in some European Union states or other European countries you may return your appliances to the local retailer when buying an equivalent new appliance. Correct disposal of this product helps save valuable natural resources and prevents potential negative effects on the environment and human health, which could result from improper waste disposal. Ask your local authorities or collection facility for more details. In accordance with national regulations penalties may be imposed for the incorrect disposal of this type of waste.
For business entities in European Union states
If you want to dispose of electric or electronic appliances, ask your retailer or supplier for the necessary information.
Disposal in other countries outside the European Union.
This symbol is valid in the European Union. If you wish to dispose of this product, request the necessary information about the correct disposal method from the local council or from your retailer.

- Vážený zákazníku,
- ČE APARAT NE DELUJE
- Če aparat ne deluje;
- CONTENTS
- General safety instructions
- Electric safety
- Intended Use
- Product promotion
- Product content
- Accessories of product (\*)
- Accessory use
- Technical specifications
- Installation
- First cleaning
- USE OF THE OVEN
- Cooling fan
- Control panel (\*)
- Setting the Time of Day (24 Hours)
- Manual Operation
- Setting the Minute Reminder
- - Change Timer Beep Tones
- - Exiting Settings
- - Cooking Timer
- DELAYED COOKING TIME
- Rustic Timer Usage
- Product Controls
- Functional Characteristics
- - Initial Energization
- - Clock Setting
- - Reminder Setting
- - Cooking Start Time Setting
- - Cooking End Time Setting
- - Delayed Cooking Setting
- - Manual Mode
- - Alarm Sound Cancellation
- - Reminder or Automatic Cooking Cancel
- Use of pop-up button (\*)
- Cleaning the wire shelves
- Assembly of telescopic rails (\*)
- Oven lighting
- Turn off the oven
- COOKING TIPS
- General information about cooking
- General cleaning information
- Cleaning of inox and stainless surfaces
- Cleaning enamel surfaces
- Cleaning of catalytic surfaces (\*)
- Cleaning of plastic parts and painted surfaces
- Cleaning the control panel
- Removing and cleaning the oven door
- Removing and cleaning the door glass
- IF NOT WORKING
- If it does not work;
- Service and Spare Parts:
- PACKAGING INFORMATION
- DISPOSAL OF USED ELECTRICAL AND ELECTRONIC EQUIPMENT
- For business entities in European Union states
- Disposal in other countries outside the European Union.
Brand : Guzzanti
Model : GZ-8571
Category : Oven