
VEGA X Star - Action Camera Niceboy - Free user manual and instructions
Find the device manual for free VEGA X Star Niceboy in PDF.


| Product Type | Action Camera |
| Brand | Niceboy |
| Model | VEGA X Star |
| Chipset | ICATCH V35X |
| Image Sensor | CMOS Sony |
| Lens | Glass 7G with anti-reflective layer, 170° field of view |
| Aperture | f/2.8 |
| Video Resolution | 4K 30fps, 2.7K 30fps, 1080p 60/30fps, 720p 120/60fps |
| Max Photo Resolution | 20 MP |
| Video Stabilization | X-STEADY six-axis electronic stabilization |
| Display | Rear 2" colour touchscreen + front 1.4" colour screen |
| Battery Capacity | 1050 mAh Li-Ion, replaceable |
| Battery Life | Up to 100 minutes (4K, screen and Wi-Fi off, 22°C) |
| Waterproof | Up to 30 m with included waterproof case |
| Connectivity | Wi-Fi 2.4 GHz, microHDMI, microUSB |
| Memory Card Support | microSD UHS-I U3 up to 64 GB (FAT32, not included) |
| Remote Control | Supported (optional accessory, not included) |
| Dimensions (W x H x D) | 59.4 x 41.4 x 30.9 mm |
| Weight | 65 g |
| Operating Temperature | 0°C to 55°C |
| Power Supply | USB charging (5V, min 1A) |
| Package Contents | Camera, waterproof case, battery, fastener set, adhesive helmet mount, manual |
| Compliance | EU Directives 2014/53/EU, 2014/30/EU, 2014/35/EU, 2011/65/EU |
| Manufacturing | Made in China |
Frequently Asked Questions - VEGA X Star Niceboy
User questions about VEGA X Star Niceboy
0 question about this device. Answer the ones you know or ask your own.
Ask a new question about this device
Download the instructions for your Action Camera in PDF format for free! Find your manual VEGA X Star - Niceboy and take your electronic device back in hand. On this page are published all the documents necessary for the use of your device. VEGA X Star by Niceboy.
USER MANUAL VEGA X Star Niceboy
natural_image
Symbol of a trash bin with crossed lines indicating no waste, and a solid black rectangle below (no text or labels)natural_image
Simple line drawing of a trash bin with crossed lines indicating no waste or discharge (no text or symbols)- Camera lens
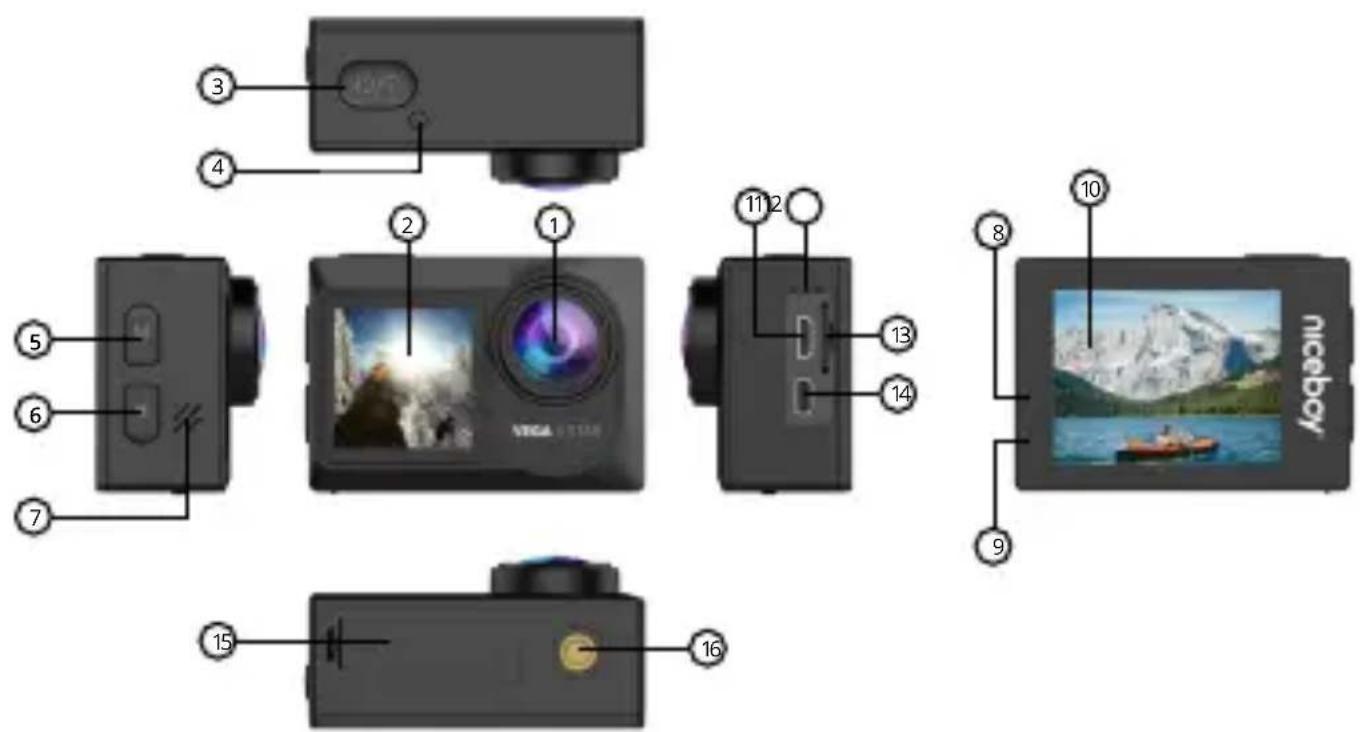
- Front colour selfie display
- On button/shutter release/OK – a long press turns the camera on/off. A short press starts/ends recording when in video mode, or takes a photo when in photo mode. A short press in settings confirms the selected option.
- Operation LED - glowing LED indicates that the camera is on, flashing LED indicates that video is being recorded.
- Up button/Quick menu/Front and back display/Microphone – a short press when in a menu navigates up. A short press when in standby mode (camera is not recording video) opens a quick menu for recording video in video mode and for taking
photos in photo mode. A long press in standby mode switches between the front and the back display. A short press when recording video turns the microphone on/off.
- Down button/Switch mode/Settings/Wi-Fi – a short press when in a menu navigates down. A short press in standby mode switches modes (from video mode to photo mode) and accesses settings. A long press in standby mode turns on the Wi-Fi.
- Speaker – used for playing audio.
- Operation LED – glowing LED indicates connection to Wi-Fi, flashing LED indicates that video is being recorded.
- Charging LED – glowing LED indicates connection to power supply; the LED turns off once the battery is charged to 100 %.
- Rear touch screen
- microUSB – used for charging the camera and for connecting it to a PC.
- Microphone – used for recording audio.
- MicroSD slot – for inserting a memory card.
- MicroHDMI – output port for connection to a TV/monitor.
- Battery cover – allows inserting/removing the battery once opened.
- Tripod thread – for connecting the camera to a tripod and other accessories.
CAMERA MENU LANGUAGE SETTING
Turn on the camera by long pressing the ON button (3). Then press the settings button (6) three times and confirm with the OK button (3). Press the settings button (6) again and confirm with OK (3). Use the navigation button (6) to select the Language option and confirm with OK (3). Use the navigation button (6) to select a menu language of your choice and confirm with OK (3).
You can also use the touch controls: turn on the camera and click the gearwheel on the standby screen. Once in the menu, click the gearwheel again and select Language.
TOUCH CONTROLS
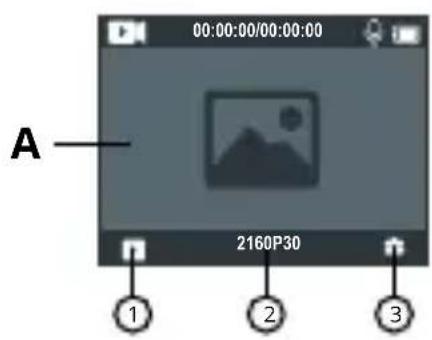
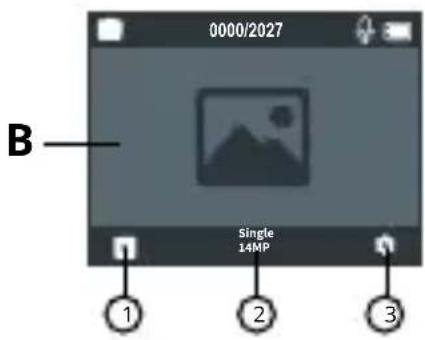
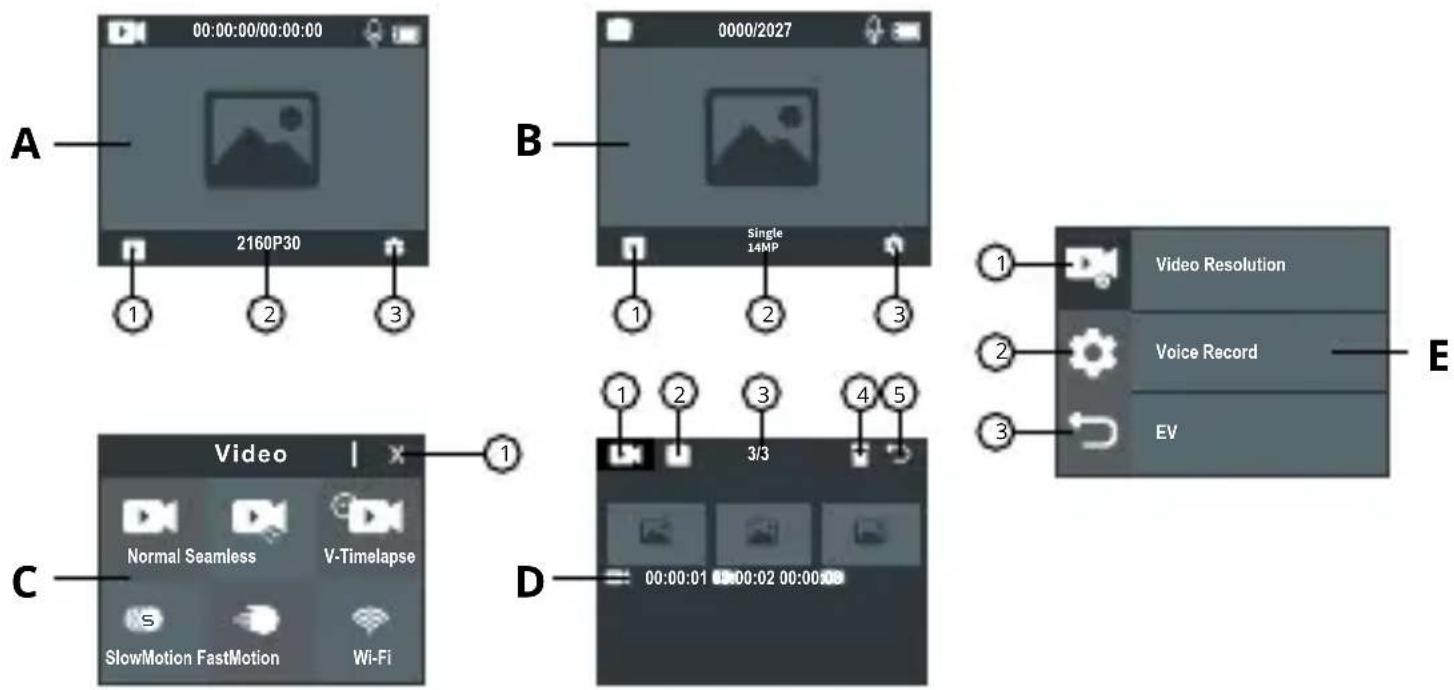
Screen A+B (video mode and photo mode): you can switch between video and photo mode by sliding your finger from left to right or vice versa on the screen. Clicking item 1 opens video playback options/photo gallery (Screen D). Clicking item 2 opens a quick menu of video/photo modes (Screen C) depending on which mode is selected. Clicking item 3 opens video/photo settings (depending on the selected mode) and camera settings (Screen E).
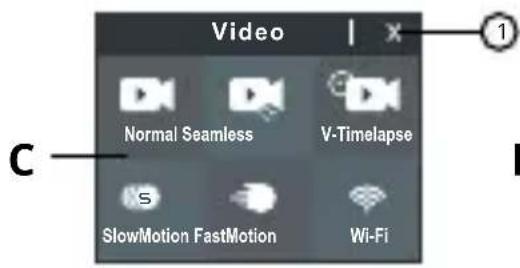
Screen C (mode quick menu): you can access a quick menu for the currently selected mode (video or photo). When in video mode, you can access options for video recording, video looping, timelapse, slow motion, fast motion and Wi-Fi activation. When in photo mode you can select normal photos, continuous shots, timelapse photos, timer, long exposure and Wi-Fi activation. You can exit the menu by clicking the close symbol (item 1) on the screen.
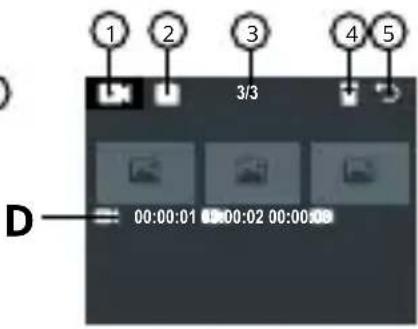
Screen D (video playback/photo gallery mode): clicking item 1 shows all recorded videos, clicking item 2 shows all photos. The number of recorded videos/captured photos is shown under item 3. Clicking the video thumbnail automatically plays the video, while
clicking the photo thumbnail enlarges the photo. Clicking item 4 allows you to delete videos or photos: first click item 4, then select the videos or photos you wish to delete and click item 4 again. Clicking item 5 exits the video playback/photo gallery menu.
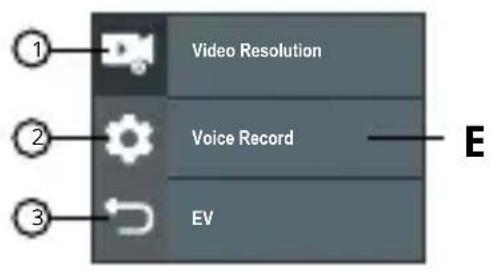
Screen E (settings): based on the selected mode, you can access video/photo settings (item 1) and camera settings (item 2). Sliding your finger across the screen allows you to scroll in the settings menu. Clicking selects the given option. Clicking item 3 exits the menu.
VIDEO MODE SETTINGS
Video resolution: resolution settings for video recording.
Seamless video loop: sets cyclic (loop) recording, i.e. time periods for which videos will be recorded. The feature is available if it is selected in the mode quick menu. See chapter Touch Controls.
Timelapse: time interval settings for a timelapse video. The feature is available if it is selected in the mode quick menu. See chapter Touch Controls.
Timelapse length: Allows setting the duration of the recorded timelapse video. Once the set time elapses, the camera stops recording the timelapse video. The feature is available if it is selected in the mode quick menu. See chapter Touch Controls.
Fast motion: settings for recording a fast motion video. The feature is available if it is selected in the mode quick menu. See chapter Touch Controls.
X-STEADY: activates/deactivates six-axis video stabilisation for perfectly smooth recording. X-STEADY stabilisation is available for all resolutions and at a maximum of 60 fps. Stabilisation cannot be active simultaneously with fisheye correction. Activating the stabilisation reduces the field of view (FOV) of the lens.
Audio: turns the microphone on/off.
Wind filter: activating this feature improves the audio when recording in a windy environment.
Low light: activating this feature improves the image when
recording in low light. Activating the feature may reduce the set number of frames per second (fps) of the video. The feature is available when video recording is set to 60 fps or more.
Exposure: exposure compensation settings. The higher the positive value, the brighter the video; the lower the negative value, the darker the video.
Exposure measurement: sets the method for measuring (determining) exposure of the recorded scene.
Time stamp: allows turning the addition of time stamps (time and date) into recorded video on or off.
PHOTO MODE SETTINGS
Resolution: sets the resolution of the photos you take.
Continuous Shot: determines how many photos are taken by the camera one after another when the shutter release is pressed. If the feature is turned off, the camera will only take one photo at a time. The feature is available if it is selected in the mode quick menu. See chapter Touch Controls.
Timelapse: time interval settings for a timelapse photo. The feature is available if it is selected in the mode quick menu. See chapter Touch Controls.
Timelapse length: you can set the time for which the timelapse photos will be captured. Once the set time elapses, the camera will stop taking timelapse photos
Quality: settings for the quality of photos. The feature is available if it is selected in the mode quick menu. See chapter Touch Controls.
Timer: sets a time interval for delayed shutter release. The feature is available if it is selected in the mode quick menu. See chapter Touch Controls.
Exposure times: allows setting exposure time, i.e. the length of time for which the camera will be capturing a single photo. Suitable e.g. for taking photos at night. Use this feature when the camera is mounted on a tripod. Photos taken this way may have some digital noise. This can be removed in various photo editing software. The feature is available if it is selected in the mode quick menu. See
chapter Touch Controls.
ISO: ISO value setting.
Exposure: exposure compensation settings. The higher the positive value, the brighter the photo; the lower the negative value, the darker the photo.
Exposure measurement: sets the method for measuring (determining) exposure of the photo.
Time Stamp: allows turning the addition of time stamps (time and date) into captured photos on or off.
CAMERA SETTINGS
Sound effects: allows activating/deactivating system sounds (sound when taking a photo, button sounds and sound when turning the camera on/off) and adjusting the volume of system sounds.
Field of view: allows adjusting the field of view. Creates a digital section from the native field of view of the lens.
Diving mode: mode for adjusting colour balance when recording underwater.
Colour effect: sets various colour effects.
Fisheye reduction: turns electronic reduction of fisheye effect on/off by reducing the field of view (FOV). The feature is unavailable while X-STEADY stabilisation is active.
Driving mode: when active, the camera automatically turns on and starts recording when it detects that it is in motion. The camera turns off automatically if it is disconnected from power.
Image rotation: allows rotating the image on the screen.
Screensaver: sets the time after which the camera screen turns off (does not affect video recording). You can reactivate the screen by tapping the screen or pressing any of the camera control buttons.
Automatic shutdown: sets the camera to switch off automatically when idle. When the feature is active, the camera shuts down after the set time as long as it is not recording video.
Frequency: frequency setting (50 Hz for Europe, 60 Hz for the USA). White balance: adjusts the white balance for different kinds of scene lighting.
Date and time: date and time settings.
Language: camera menu language setting.
Format: erases all data on the memory card.
System: allows accessing information about the camera's firmware, information about the memory card (capacity and remaining free space) and enables performing a factory reset (resets the camera to the original factory settings).
WATERPROOFNESS
The camera is resistant to submersion in water as long as the camera is inside the waterproof case, and as long as the following conditions are met:
The case is resistant to submersion up to a depth of 30 meters.
Before using the camera inside the case underwater, make sure the back hatch of the case is properly closed via the mechanism on the top of the case. The hatch and the sealing of the case must be free of dust, dirt, sand etc. If the case was used in salt water, wash it with drinking water afterwards. Do not dry the case with textile fabrics or external heat sources (hair dryer, microwave etc.), always leave the case to air dry on its own. The touch control screen of the camera cannot be used when the camera is in the case. Control the camera using the buttons instead.
Attention: the camera is not waterproof without the case! Use only with the original case to ensure waterproofness.
MICROSD CARD
Always use a brand-name microSD card of type USH-I U3 with fast video writing capability and capacity of up to 64 GB. Before using the SD card in the camera for the first time, the card must be formatted on a PC to a FAT32 file system. Only format the card using software designed for the purpose.
Place the SD card into the slot with the pins facing towards the camera lens (front of the camera). Insert the SD card into the camera by clicking it in place. Remove by reversing the motion.
Attention: format the memory card regularly on a PC to avoid video recording errors. More information about the use of the card and its formatting will be provided by the manufacturer of the SD card.
BATTERY/CHARGING
To insert or remove the battery, open the cover on the underside of the camera. Charge the camera by connecting the enclosed USB cable into the USB port (11) on the left side of the camera and connecting the other end to a charging adapter e.g. from a mobile phone (5 V voltage and minimum current of 1 A). The camera can also be charged by connecting the USB cable to a PC or a power bank.
Attention: fully charge the battery before first use. Do not subject the camera to large temperature swings. Keep the battery and camera under watch during charging. Charge time is dependent on the output current of the charging adapter. The camera will charge faster when it is turned off.
CONNECTING THE CAMERA TO A PHONE VIA WI-FI
Install iSmartDV (for free) onto your phone (available in the AppStore for iOS and Google Play for Android). Do not start the application right after installing it and follow these instructions:
- Turn on the Wi-Fi on the camera by long-pressing the Wi-Fi button (6)
- Open the Wi-Fi settings on your mobile phone and connect to the camera's network (name: Niceboy VEGA X STAR, password: 1234567890).
- Once your phone is connected to the camera's network, you can launch the application, link the application to the camera and start controlling the camera through the application.
- To turn off the Wi-Fi, press the Wi-Fi button (6) on the camera.
Attention: before using the application, enable all the permissions for the application in the phone's settings, turn off „data connection“
on the phone and leave only Wi-Fi turned on. The application is compatible with mobile phones with iOS 9.0 and later or with Android 8.0 and later.
CONNECTING THE CAMERA TO A PC
Connect the camera to a PC using a USB data cable. After connection, the camera screen will show the following modes:
- External drive: you can use the PC to manage files stored on the memory card inside the camera (the camera acts as an external drive connected to the PC).
- PC camera: can be used as a PC camera for software that allows the connection of an external camera.
- Ready for use: the camera remains on and can be used as a normal camera. It will also be charged from the PC.
- Charging: turns the camera off and starts charging it. Allows the camera to charge faster.
REMOTE CONTROL (Optional Accessory)
The camera supports remote control, which can be bought separately from any reputable dealer.
The remote requires no pairing with the camera. Once a memory card is inserted into the camera, the remote will start communicating with the camera automatically. To start or stop video recording, press the video button on the remote. To take a photo, press the photo button on the remote.
Remote range: 20 meters (direct line of sight)
Attention: the remote is not waterproof!
PACKAGE CONTENTS
Niceboy VEGA X STAR camera
Waterproof case
Battery
Set of fasteners for connecting the waterproof case or camera with tripod thread to other accessories.
Adhesive helmet mount.
Manual
SPECIFICATIONS
Chip: ICATCH V35X
Sensor: CMOS Sony
Camera lens: glass 7G + anti-reflective layer, 170°
Lens aperture: f/2.8
Video resolution: 4K 30 fps, 2.7K 30 fps, 1080p 60/30 fps, 720p 120/60 fps
Video format: MOV, H.264
Video data flow: up to 40 Mb/s (4K 30 fps video)
Stabilization: Yes (X-STEADY)
Max. photo resolution: 20 MPx
Photograph format: JPG
Screen: Back 2" colour touch screen + front 1.4" colour screen
Battery: 1050 mAh, Li-Ion, replaceable
Battery life: up to 100 minutes at 4K resolution (screen and Wi-Fi turned off, ambient temperature 22 °C)
Waterproofness: up to 30 meters when in the case
Connectivity: Wi-Fi (2.4 GHz), microHDMI, microUSB
Memory card: microSD, type UHS-I U3, max. 64 GB, FAT32 format (card not included)
Remote control support: Yes (remote not included)
Operating temperature: 0 – 55°C (battery life goes down as temperature decreases)
Dimensions: 59.4 x 41.4 x 30.9 mm
Weight: 65 g
RTB Media s.r.o. hereby declares that the type of radio equipment VEGA X STAR complies with Directives 2014/53 / EU, 2014/30 / EU, 2014/35 / EU, and 2011/65 / EU. The full content of EU Declaration of Conformity is available on the following websites: https://niceboy.eu/cs/podpora/prohlaseni-o-shode-mM38CtmYvX693IHvvu4CWpk3vjGrvnC
USER INFORMATION FOR DISPOSING ELECTRICAL AND ELECTRONIC DEVICES (HOME USE)

natural_image
Simple line drawing of a trash bin with crossed x- and y-axes, no text or symbols presentThis symbol located on a product or in the product's original documentation means that the used electrical or electronic products may not be disposed together with the communal waste. In order to dispose of these products correctly, take them to a designated collection site, where they will be accepted for free. By disposing
of a product in this way, you are helping to protect precious natural resources and helping to prevent any potential negative impacts on the environment and human health, which could be the result of incorrect waste disposal. You may receive more detailed information from your local authority or nearest collection site. According to national regulations, fines may also be given out to anyone who disposes of this type of waste incorrectly. User information for disposing electrical and electronic devices.
(Business and corporate use)
In order to correctly dispose of electrical and electronic devices for business and corporate use, refer to the product's manufacturer or importer. They will provide you with information regarding all disposal methods and, according to the date stated on the electrical or electronic device on the market, they will tell you who is responsible for financing the disposal of this electrical or electronic device. Information regarding disposal processes in other countries outside the EU. The symbol displayed above is only valid for countries within the European Union. For the correct disposal of electrical and electronic devices, request the relevant information from your local authorities or the device seller.
natural_image
Symbol of a trash bin with no text or labels, including a crossed-out box and a solid black rectangle below (no readable text or symbols)natural_image
Symbol of a trash bin with crossed lines indicating no waste, and a solid black rectangle below (no text or labels)- Leća kamere
- Prednji zaslon u boji za selfie
- Gumb uklj/okidač/U redu – dugi pritisak uključuje/isključuje kameru. Kratki pritisak započinje/završava snimanje kad se nalazi u načinu rada video ili snima fotografije kad se nalazi u načinu rada fotografiranje. Kratki pritisak u postavkama potvrđuje odabranu opciju.
- LED svjetlo rada – sjajno LED svjetlo označava da je kamera uključena, a trepereće LED svjetlo da se snima videozapis.
- Gumb gore/Brzi izbornik/Prednji i stražnji prikaz/Mikrofon – kratki pritisak u izborniku vodi prema gore. Kratki pritisak u načinu mirovanja (kamera ne snima videozapis) otvara brzi
izbornik za snimanje videozapisa u načinu rada video i snimanje fotografija u načinu rada fotografiranje. Dugi pritisak u načinu mirovanja prebacuje između prednjeg i stražnjeg prikaza. Kratki pritisak prilikom snimanja videozapisa uključuje/isključuje mikrofon.
6. Gumb Dolje/Prebacivanje načina rada/Postavke/Wi-Fi
- kratki pritisak u izborniku vodi prema dolje. Kratki pritisak u načinu mirovanja prebacuje način rada (iz načina rada video u fotografiranje) i pristupa postavkama. Dugi pritisak u načinu mirovanja uključuje Wi-Fi.
- Zvučnik - upotrebljava se za reproduciranje zvuka.
- LED svjetlo rada – sjajno LED svjetlo označava spajanje na Wi-Fi, a trepereće LED svjetlo da se snima videozapis.
- LED svjetlo punjenja – sjajno LED svjetlo označava priključenja na napajanje; LED svjetlo isključuje se kada je baterija do kraja napunjena.
- Stražnji dodirni zaslon
- MicroUSB – upotrebljava se za punjenje kamere i njezino spajanje na računalo.
- Mikrofon - upotrebljava se za snimanje zvuka.
- Utor Mikro SD - za umetanje memorijske kartice.
- MicroHDMI - izlazni priključak za spajanje na televizor/monitor.
- Poklopac baterije – omogućava umetanje/vađenje baterije kad je otvoren.
- Navoj stativa – za spajanje kamere na stativ i ostalu dodatnu opremu.
POSTAVKA JEZIKA IZBORNIKA KAMERE
Uključite kameru dugim pritiskom na gumb za uključivanje (3). Zatim tri puta pritisnite gumb za postavke (6) i potvrdite gumbom OK (3). Ponovno pritisnite gumb za postavke (6) i potvrdite gumbom OK (3). Upotrijebite gumb za navigaciju (6) da biste odabrali opciju Language (Jezik) i potvrdite gumbom OK (3). Upotrijebite gumb za navigaciju (6) da biste odabrali jezik izbornika prema želji i potvrdite gumbom OK (3).
Možete upotrijebiti i upravljanje dodirom: uključite kameru i kliknite na zupčanik na zaslonu mirovanja. Kad uđete u izbornik, ponovno kliknite zupčanik i odaberite Language (Jezik).
UPRAVLJANJE DODIROM
Zaslon A+B (način rada za video i način rada za
fotografiranje): možete se prebacivati između načina rada za video i fotografiranje tako da prst povučete s lijeva na desno na zaslonu ili obrnuto. Klikom na stavku 1 otvaraju se opcije reprodukcije videozapisa/galerija fotografija (zaslon D). Klikom na stavku 2 otvara se brzi izbornik načina rada videozapisa/fotografija (zaslon C) ovisno o odabranom načinu rada. Klikom na stavku 3 otvaraju se postavke videozapisa/fotografija (ovisno o odabranom načinu rada) i postavke kamere (zaslon E).
Zaslon C (način rada brzog izbornika): možete pristupiti brzom izborniku trenutačno odabranog načina rada (videozapis ili fotografija). Kad se nalazite u načinu rada videozapisa, možete pristupiti opcijama za video snimanje, petlje videozapisa, uzastopno snimanje, usporeno snimanje, ubrzano snimanje i uključivanje Wi-Fi. Kad se nalazite u načinu snimanja fotografija, možete odabrati uobičajene fotografije, uzastopne snimke, kontinuirano snimanje, uzastopno snimanje, mjerač vremena, duga ekspozicija i uključivanje Wi-Fi. Iz izbornika možete izaći tako da kliknete na simbol zatvaranja (stavka 1) na zaslonu.
Zaslon D (način rada reprodukcija videozapisa/galerije fotografija): klikom na stavku 1 prikazuju se svi snimljeni videozapisi, klikom na stavku 2 prikazuju se sve fotografije. Broj snimljenih videozapisa/fotografija prikazuje se ispod stavke 3. Klikom na mali widget: automatsko reproduciranje videozapisa, dok se klikom na mali widget fotografije povećava fotografija. Klik na stavku 4 omogućava brisanje videozapisa ili fotografija: prvo kliknite na stavku 4, zatim odaberite videozapise ili fotografije koje želite izbrisati pa ponovno kliknite na stavku 4. Klikom na stavku 5 izlazi se izbornika galerije videozapisa/fotografija.
Zaslon E (postavke): na temelju odabranog načina rada, možete pristupiti postavkama videozapisa/fotografija (stavka 1) i postavkama kamere (stavka 2). Klizni pomak prsta preko zaslona omogućuje pomicanje u izborniku postavki. Klikom se odabire zadana opcija. Klikom na stavku 3 izlazi se iz izbornika.
POSTAVKE NAČINA RADA VIDEO
Video resolution (Razlučivost videozapisa): postavke razlučivosti za snimanje videozapisa.
natural_image
Symbol of a trash bin with crossed lines and a solid black rectangle below (no text or labels)Simbol naveden na proizvodu ili u popratnoj dokumentaciji znači da je zabranjeno odlagati električne ili elektroničke proizvode zajedno s komunalnim otpadom. Pobrinite se za pravilnu likvidaciju otpada: dotrajali proizvod predajte besplatno u ovlašteni centar za skupljanje otpada. Propisnom likvidacijom dotrajalog proizvoda
ćete doprinijeti očuvanju skupocjenih prirodnih izvora te prevenciji negativnih utjecaja na okoliš i ljudsko zdravlje zbog nepravilne likvidacije otpada. Za više informacija obratite se nadležnom lokalnom uredu ili mjestu zbrinjavanja. Nepravilno zbrinjavanje ove vrste otpada kažnjava se sukladno nacionalnim propisima. Informacije za korisnika o načinu zbrinjavanja električnih i elektronskih uređaja
(Poslovna uporaba)
Vezano za pravilno zbrinjavanje dotrajale električne/elektronske opreme za poslovnu upotrebu i upotrebu u tvorničkim pogonima obratite se proizvođaču ili uvozniku ovog proizvoda. Proizvođač će Vam pružiti informacije o načinu zbrinjavanja proizvoda i obavijestit će vas o tome tko je dužan osigurati zbrinjavanje ovog električnog uređaja ovisno o datumu uvođenja proizvoda na tržište. Informacije o zbrinjavanju dotrajalog proizvoda u ostalim zemljama (izvan EU). Gore navedeni simbol važi samo u Europskoj uniji. Za više informacija o pravilnom zbrinjavanju električnih i elektronskih uređaja se obratite prodavatelju ili dobavljaču.

OPIS I FUNKCJE
natural_image
Symbol of a trash bin with crossed lines indicating no waste or restriction, and a solid black rectangle below (no text or labels)natural_image
Symbol of a trash bin with crossed lines indicating no waste, and a solid black rectangle below (no text or labels)natural_image
Symbol of a trash bin with crossed lines and a solid black rectangle below (no text or labels)natural_image
Symbol of a trash bin with crossed lines indicating no waste or discharge (no text or labels)Praha 4, 140 00, Czech Republic, ID: 294 16 876
Made in China.
RoHS CE 📄 ✉️ 🍒


- CAMERA MENU LANGUAGE SETTING
- TOUCH CONTROLS
- VIDEO MODE SETTINGS
- PHOTO MODE SETTINGS
- CAMERA SETTINGS
- WATERPROOFNESS
- MICROSD CARD
- BATTERY/CHARGING
- CONNECTING THE CAMERA TO A PHONE VIA WI-FI
- CONNECTING THE CAMERA TO A PC
- REMOTE CONTROL (Optional Accessory)
- PACKAGE CONTENTS
- SPECIFICATIONS
- USER INFORMATION FOR DISPOSING ELECTRICAL AND ELECTRONIC DEVICES (HOME USE)
- (Business and corporate use)
- Gumb Dolje/Prebacivanje načina rada/Postavke/Wi-Fi
- POSTAVKA JEZIKA IZBORNIKA KAMERE
- UPRAVLJANJE DODIROM
- Zaslon A+B (način rada za video i način rada za
- POSTAVKE NAČINA RADA VIDEO
- (Poslovna uporaba)
Brand : Niceboy
Model : VEGA X Star
Category : Action Camera