GZ 409BT - Heating Guzzanti - Free user manual and instructions
Find the device manual for free GZ 409BT Guzzanti in PDF.


User questions about GZ 409BT Guzzanti
0 question about this device. Answer the ones you know or ask your own.
Ask a new question about this device
Download the instructions for your Heating in PDF format for free! Find your manual GZ 409BT - Guzzanti and take your electronic device back in hand. On this page are published all the documents necessary for the use of your device. GZ 409BT by Guzzanti.
USER MANUAL GZ 409BT Guzzanti
text_image
Diagram illustrating four stages of a mechanical or electrical process with labeled components and directional arrows.natural_image
Three-panel diagram showing a mechanical device with rotating wheels and a curved component, labeled 2, 3, and 4 (no text or symbols present)POKYNY K OBSLUZE
natural_image
Symbol of a trash bin crossed with no visible text or labelstext_image
Diagram illustrating four stages of a mechanical or electrical process with labeled components and directional arrowstext_image
Diagram illustrating three stages of a mechanical or electrical device operation, labeled 2, 3, and 4 with Chinese characters.POKYNY K OBSLUHE
natural_image
Symbol of a trash bin crossed with no text or numbers, representing environmental protection (no text present)text_image
Diagram illustrating four stages of a mechanical or electrical process with labeled components and directional arrows.natural_image
Three-panel diagram showing a mechanical device with rotating wheels and a curved component, labeled 2, 3, and 4 (no text or symbols present)INSTRUKCJA OBSŁUGI
natural_image
Symbol of a trash bin crossed with no text or numbers, representing environmental protection (no text present)text_image
Diagram illustrating four stages of a mechanical or electrical process with labeled components and directional arrowsnatural_image
Three-panel diagram showing a mechanical device with rotating wheels and a curved component, labeled 2, 3, and 4 (no text or symbols present)HASZNÁLATI ÚTMUTATÓ
natural_image
Symbol of a trash bin crossed with no text or numbers, representing environmental hazard (no text present)text_image
Diagram illustrating four stages of a mechanical or electrical process with labeled components and directional arrows.- Radiator postavite na glavo na trdno površino, pazite, da se ne prevrne.
- Odvijte krilni matici iz nosilca v obliki črke U, nosilec v obliki črke U pritrdite na prirobnico med prvim in drugim rebrom (blizu sprednjega pokrova).
- Nosilec koles pritrdite na telo radiatorja tako, da konca U-nosilca vstavite v luknji v nosilcu koles.
- Privijte krilni matici nazaj na U-nosilec in ju privijte. Opomba: ne zategnite premočno, da se ne poškoduje prirobnica radiatorja.
- Odvijte okroglo matico s koles, usmerite gred v luknjo nosilca koles, vstavite in privijte matico.
- Za namestitev zadnjih koles ponovite korake 2, 3, 4 in 5 na drugem koncu radiatorja.
text_image
Diagram illustrating three stages of a mechanical device with labeled parts and motion indicatorsNAVODILA ZA UPORABO
natural_image
Symbol of a trash bin crossed with no text or numbers, representing environmental protection (no text present)text_image
Diagram illustrating four stages of a mechanical or electrical process with labeled components and directional arrowsnatural_image
Three-panel diagram showing a mechanical device with wheels and a curved arm, labeled 2, 3, and 4 (no text or symbols present)GEBRAUCHSANWEISUNG
natural_image
Symbol of a trash bin crossed with no text or numbers, representing environmental restriction (no text present)Please read the instructions before use!
When using an electric appliance, basic safety precautions should always be observed, including the following:
Warning: To reduce the risk of fire, electrical shock, or injury to person:
-
The appliance is not to be used by persons (including children) with reduced physical, sensory or mental capabilities, or lack of experience and knowledge, unless they have been given supervision or instruction.
-
Children being supervised not to play with the appliance
Do not use this heater if it has been dropped
Do not use if there are visible signs of damage to the heater
Warning: Do not use this heater in small rooms when they are occupied by persons not capable of leaving the room on their own, unless constant supervision is provided. Warning: To reduce the risk of fire, keep textiles, curtains, or any other flammable material a minimum distance of 1 m from the air outlet.
- The product is for household only
- Connect the appliance to single phase AC supply of the voltage specified on the rating plate.
- In order to avoid overheating, do not cover the heater.
- Never leave the heater unattended while it is in use. Always turn the product to the OFF position and unplug it from the electrical outlet when not in use.
- Extreme caution is necessary when any heater is used by or near children, invalids or elderly person. Heater must not be left unattended.
- The heater must not be located immediately below an electrical socket-outlet.
- Do not run cord under carpeting and do not cover cord with throw rugs, runners or the like. Arrange cord away from traffic area and where it will not be tripped over.
- Do not operate the heater with a damaged cord or plug, or after the heater malfunctions, has been dropped, or damaged in any matter.
- If the supply cord is damaged, it must be replaced by the manufacturer or its service agent or a similarly qualified person to avoid a hazard.
- Avoid the use of an extension cord as this may overheat and cause a risk of fire.
- Use the heater in a well-ventilated area. Do not insert or allow objects to enter any ventilation or exhaust opening. To prevent a possible fire, do not block air intakes or exhaust openings in any manner. Do not use on soft surfaces, like a bed, where opening may become blocked. Use the heater on flat, dry surfaces only.
-
Do not place this heater near flammable materials, surfaces or substances, as there may be a risk of fire. Keep the above flammable materials, surfaces or substances at least 1 m from the front of the product and keep them away from the sides and rear.
-
Do not use the heater in any areas where petrol, paint or other flammable liquiads are stored e.g. Garages or workshops.
- Do not use this heater in the immediate surroundings of a bath, a shower or a swimming pool. Never locate the heater where it may fall into bathtub or other water container.
- The heater is hot when in use. To avoid burns and personal injury, do not let bare skin touch hot surfaces. If provided, use handles when moving the product.
- Be sure that no other appliances are in use on the same electrical circuit as your product as an overload may occur.
- The heater is filled with a precise quantity of special oil.
- Repair requiring opening of the oil container are only to be made by the manufacturer or his service agent who should be contacted if there is an oil leakage.
- Regulations concerning the disposal of oil when scrapping the appliance have to be followed
- The heater should not be used in a room, of which the floor area is less than 5m2.
- The cord should not be placed nearby the hot surface of the appliance.
text_image
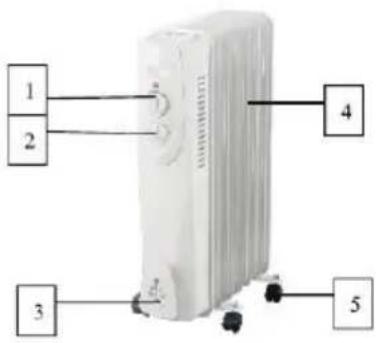
1 2 3 4 5- Thermostat knob
- Power switch
- Cord storage
- Radiant fins
- Castor
ASSEMBLY INSTRUCTIONS
The heater is packed with the feet unattached. You must attach them before operating the heater.
Warning: Do not operate without feet attached. Do operate the heater only in upright position (feet on the bottom, controls on the top) any other position could create a hazardous situation.
text_image
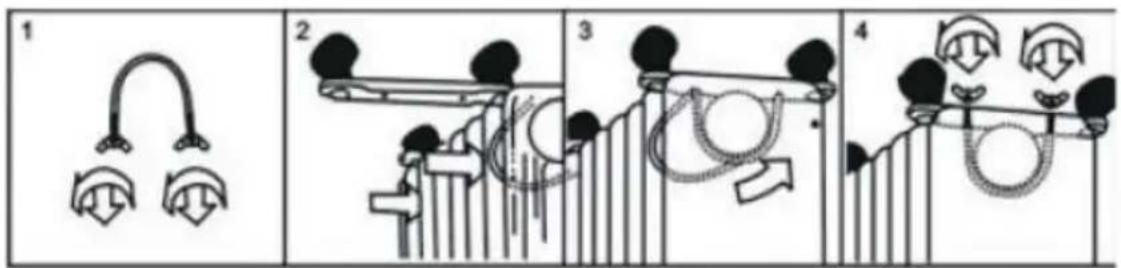
Diagram illustrating four stages of a mechanical or electrical process with labeled components and directional arrows- Place the radiator body upside-down on a scratch-free location, make sure it is stable and will not fall.
- Screw off the wing nuts from the U-shaped bolt provided, attach the U-shaped bolt to the U-facing flange between first and second fins (near the front cover)
- To attach the castor mounting plate to the radiator body, you should insert the threaded ends of the U bolt in the holes on the castor mounting plate.
- Screw the wing nuts back to the U bolt and fasten the wing nut properly.
Note: Do not over tighten, which may cause the damage of radiator flange.
-
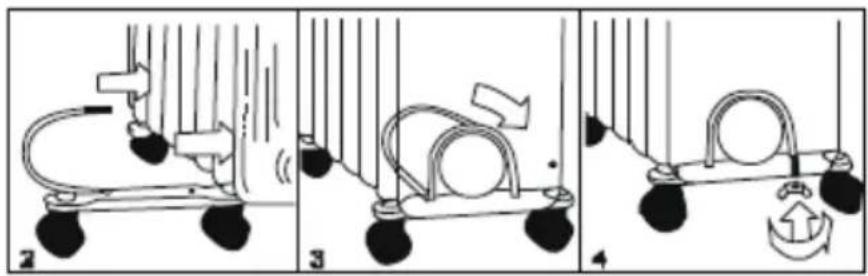
Screw off spherical nut from the castor, align the shaft to the hole of the castor mounting plate, insert in, and screw on the spherical nut.
-
Repeat 2,3,4 and 5 on the rear radiator for mounting of the rear castors.
Note: The rear castors must be mounted between the last two fins.
natural_image
Three-panel diagram showing a mechanical device with wheels, springs, and a curved component, labeled 2, 3, and 4 (no text or symbols present)INSTRUCTIONS FOR USE
- Before using the heater, make sure that it is on a flat and stable surface. Damage may occur if it is placed on an incline or decline.
- Set all the controls to OFF position and insert the plug into a socket-outlet. Be sure that plug fits firmly.
- Rotate the thermostat knob clockwise to MAX position and switch the heater on as follows. The switch I for low heat, the switch II for medium heat and both switches on for high heat.
- When your room reached the desired temperature, slowly rotate the thermostat knob counter clockwise until the indicator light goes out. The thermostat can now be left at this setting. As soon as the room temperature dropped below the set temperature, the unit will switch it self on automatically until the set temperature has been reached again. In this way the room temperature remains constant with the most economical use of electricity.
- If you want to change the room temperature setting, rotate the thermostat knob clockwise to raise the temperature, or counter clockwise to lower it.
- This heater includes an overheat protection system that shuts off the heater when parts of the heater are getting excessively hot.
- To completely shut the heater off, turn all controls to OFF, and remove plug from the socket-outlet.
MAINTENANCE
- Always remove the plug from the socket-outlet and allow the radiator to cool down before cleaning it.
- Wipe the radiator with a soft damp (not wetl cloth.
Warning: Do not immerse the heater in water.
Do not use any cleaning chemicals such as detergents and abrasives.
Do not allow the interior to get wet as this could create a hazard.
- To store away the heater, wind the cable round bobbin and store the heater in a clean dry place.
- In case of malfunction or doubt, do not try to repair the radiator yourself, it may result in a fire hazard or electric shock.
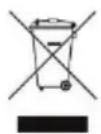
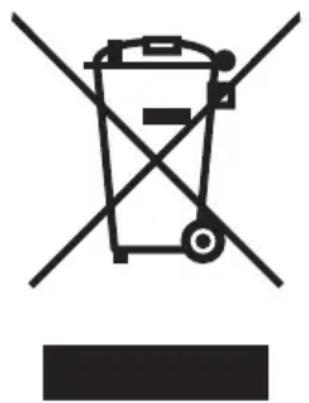
Waste equipment must not be collected separately or disposed of with household waste because it may contain components hazardous to the environment or health. Used or waste equipment may be dropped off free of charge at the point of sale, or at any distributor which sells equipment of identical nature and function. Dispose of product at a facility specializing in the collection of electronic waste. By doing so, you will protect the environment as well as the health of others and yourself. If you have any questions, contact the local waste management organization. We shall undertake the tasks pertinent to the manufacturer as prescribed in the relevant regulations and shall bear any associated costs arising.
DISPOSAL OF USED ELECTRICAL AND ELECTRONIC EQUIPMENT
natural_image
Symbol of a trash bin crossed with no text or numbers, representing environmental restriction (no text present)This symbol on products or original documents means that used electric or electronic products must not be added to ordinary municipal waste. For proper disposal, renewal and recycling hand over these appliances to determined collection points. Alternatively, in some European Union states or other European countries you may return your appliances to the local retailer when buying an equivalent new appliance. Correct disposal of this product helps save valuable natural resources and prevents potential negative effects on the environment and human health, which could result from improper waste disposal. Ask your local authorities or collection facility for more details. In accordance with national regulations penalties may be imposed for the incorrect disposal of this type of waste.
For business entities in European Union states
If you want to dispose of electric or electronic appliances, ask your retailer or supplier for the necessary information.
Disposal in other countries outside the European Union.
This symbol is valid in the European Union. If you wish to dispose of this product, request the necessary information about the correct disposal method from the local council or from your retailer.