
MNP-04 - Humidifier MPM - Free user manual and instructions
Find the device manual for free MNP-04 MPM in PDF.


| Brand | MPM |
| Model | MNP-04 |
| Product Type | Ultrasonic Humidifier |
| Water Tank Capacity | 5 L |
| Power Cord Length | 1.15 m |
| Humidifying Intensity Levels | 3 (Low, Medium, High) |
| Timer Settings | 1, 2, 4, or 8 hours |
| Constant Humidity Range | 45% – 80% RH (in 5% increments) |
| Sleep Mode | Deactivates LED display |
| Aromatherapy | Essential oil reservoir (up to 3–4 drops) |
| Max Water Consumption | Approx. 300 ml/h |
| Remote Control | Yes (CR2025 battery, not included) |
| Filters | Ceramic filter (replace yearly), Air filter (replace when damaged) |
| Water Level Indicator | LED display with low water warning |
| Operating Temperature Range | 5°C – 40°C |
| Cleaning | Weekly tank cleaning; descale transducer as needed |
| Safety Features | Auto shut-off (low water), child safety (8+ years) |
| Usage | Indoor only; place on flat, stable surface |
Frequently Asked Questions - MNP-04 MPM
User questions about MNP-04 MPM
0 question about this device. Answer the ones you know or ask your own.
Ask a new question about this device
Download the instructions for your Humidifier in PDF format for free! Find your manual MNP-04 - MPM and take your electronic device back in hand. On this page are published all the documents necessary for the use of your device. MNP-04 by MPM.
USER MANUAL MNP-04 MPM
natural_image
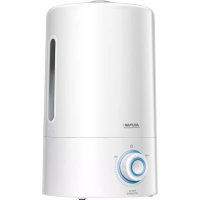
White MPM water purifier with digital display and remote control (no visible text or symbols)ULTRADŻWIĘKOWY NAWILŻACZ POWIETRZA model: MNP-04
Luftbefeuchter/Ultrazvukový zvlhčovač vzduchu/ Humidifier/Umidificatore dell'aria a ultrasuoni/ Увлажнитель воздуха/ Ultrazvukový zvlhčovač vzduchu
PRZED PIERWSZYM UŻYCIEM ZAPOZNAJ SIĘ Z INSTRUKCJĄ OBSŁUGI
DE BEDIENUNGSANLEITUNG......3
CZ NÁVOD K OBSLUZE....9
EN USER MANUAL 16
IT ISTRUZIONI PER L'USO....22
PL INSTRUKCJA OBSŁUGI....28
RU ИНСТРУКЦИЯ ПО ОБСЛУЖИВАНИЮ.... 35
SK POUŽÍVATELŠKÁ PRÍRUČKA....41
SICHERHEITSHINWEISE
natural_image
White remote control device with eight function buttons and a '13' label (no readable text or symbols beyond basic icons)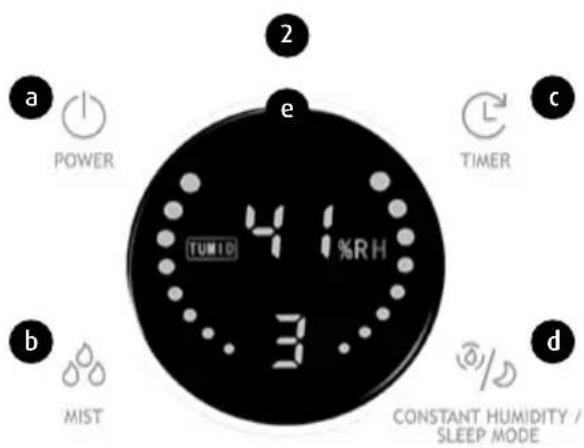
natural_image
White remote control device with buttons and display (no readable text or symbols)Read this Manual thoroughly before use.
Be extremely careful when children are near the appliance!
▶ Use this appliance only as intended.
Do not immerse the appliance or its power cable in water or other liquids.
▶ Never leave the appliance unattended when turned on.
Always unplug the power cord when the appliance is not in use or before filling or cleaning.
Do not use the appliance when damaged and/or its power cord or plug is damaged; have an Authorised Service repair it for you.
Do not use this appliance outdoors.
▶ Never leave the power cord hanging over sharp edges and keep it away from hot surfaces.
Never place the appliance near heat sources or on hot surfaces.
This device is designed for domestic use.
- Keep this appliance and its power cord out of the reach of children below 8 years old.
This product may only be operated by children 8 or more years old, mentally and/or physically deficient persons and persons without knowledge of or experience in operation of this appliance type if supervised or instructed in safe operation, with clear understanding of all related risks. Children without supervision may never clean or maintain/care for this appliance.
Mind that children must never play with this appliance.
Do not use any chemical additives to the water used in the device as it may seriously damage your device.
Do not pour water directly to the mist duct or nozzle.
▶ Never plug the power cable with wet hands.
Never unplug the appliance by pulling by the power cord.
This appliance is not compatible with external power timers or separate remote control systems.
- Keep your children safe: do not leave any parts of the packaging readily accessible (i.e. plastic bags, cardboard boxes, polystyrene inserts, etc.).
Do not touch the appliance with wet hands.
Place the appliance on a dry, flat and stable surface.
Before use always make sure that all parts of the appliance are properly installed.
The appliance is not intended to be operated by means of an external timer or separate remote-control system.
Do not place the appliance directly next to heating appliances or electrical devices. WARNING! Never let children play with plastic film or bags. Choking/asphyxiation hazard!
DEVICE DESCRIPTION
natural_image
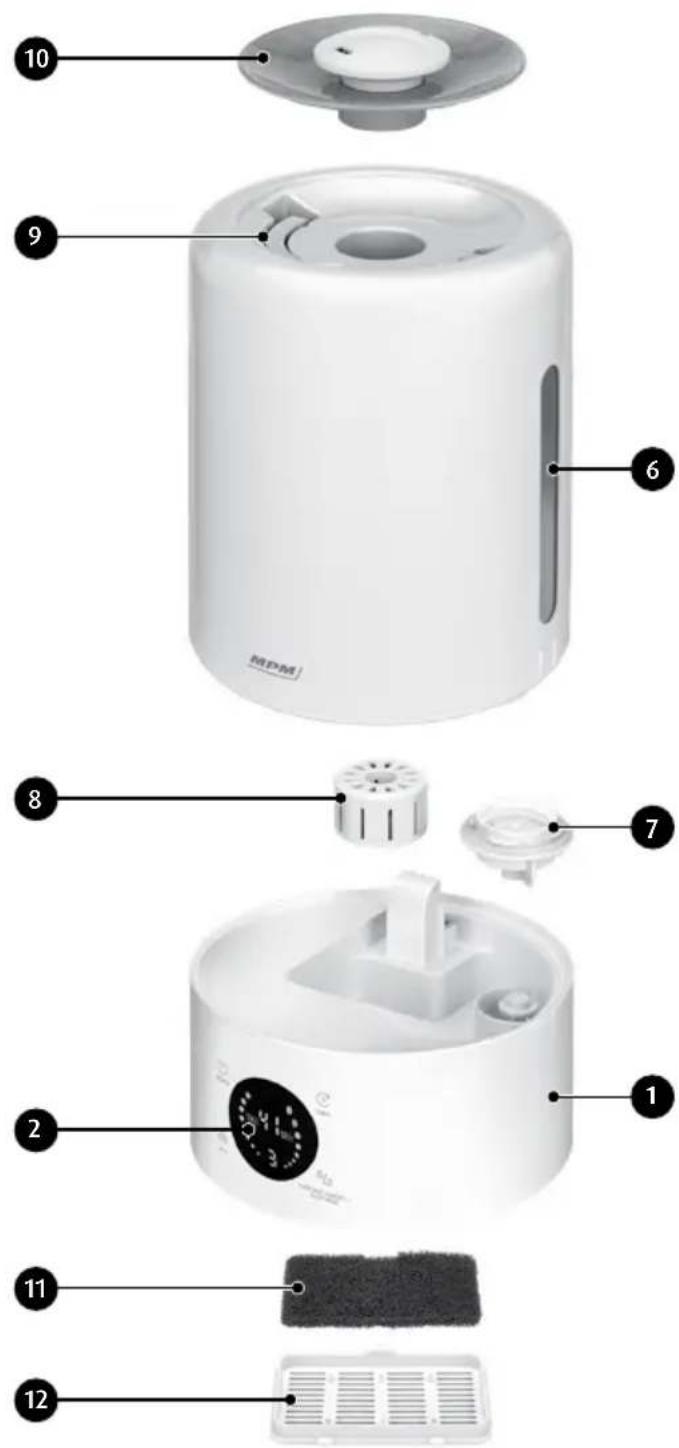
White remote control device with buttons and a 'MPM' label, no visible text or symbols on the device itself.- Humidifier base
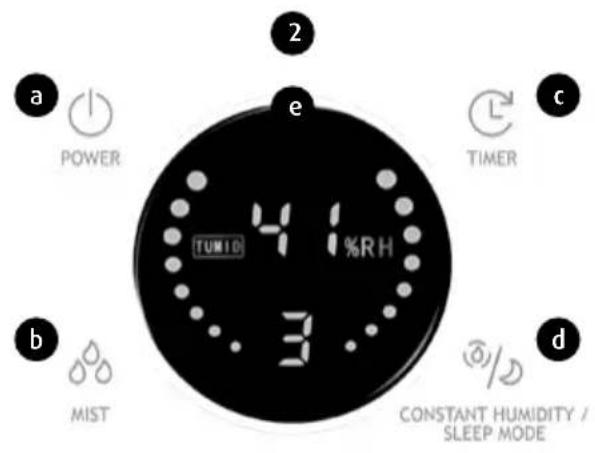
- Control panel
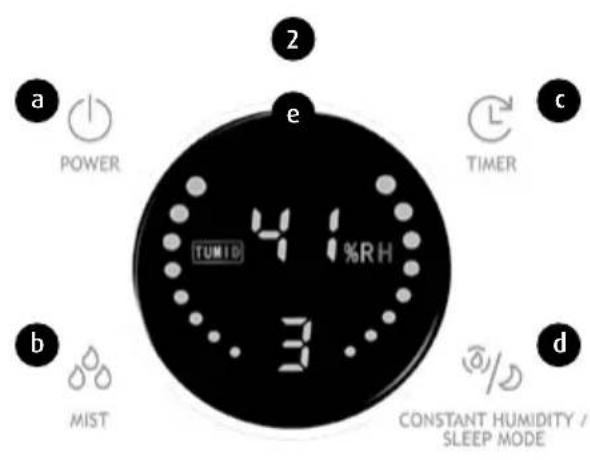
a. POWER ON/OFF switch
b. Humidifying intensity selector button MIST
c. TIMER button
d. Humidity level/sleep mode selector button CONSTANT HUMIDITY/SLEEP MODE
e. LED display
-
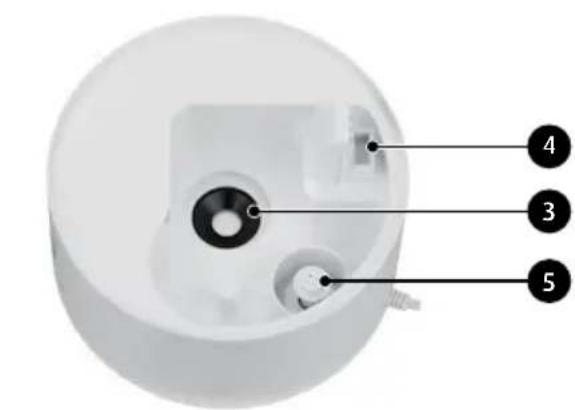
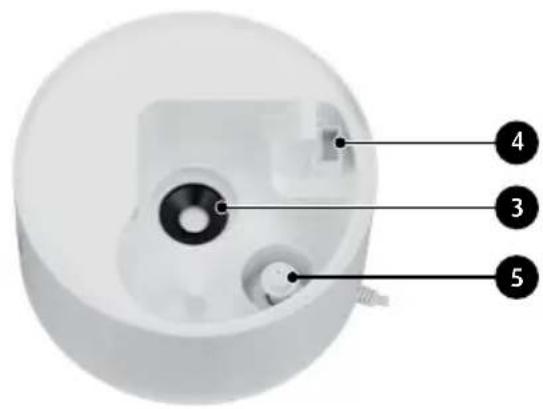
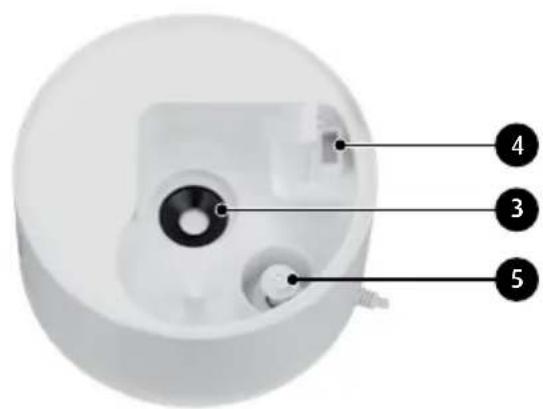
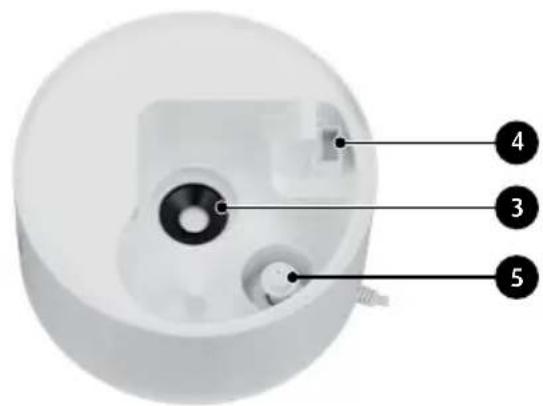
Ultrasound transducer
-
Essential oil reservoir
- Water level sensor
- 5 l water tank
- Water filler plug
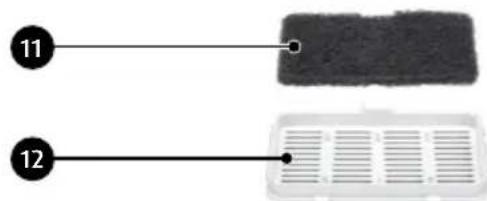
- Ceramic filter
- Water tank handle
- Outlet lid
- Air filter
- Filter cover
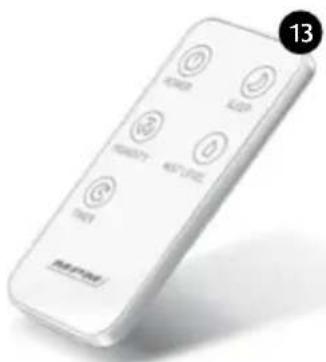
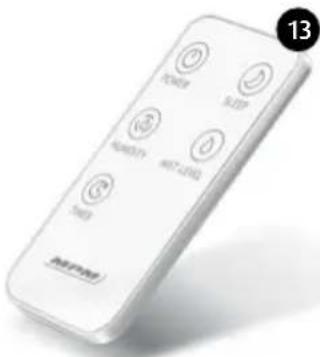
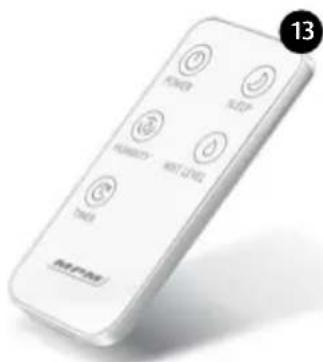
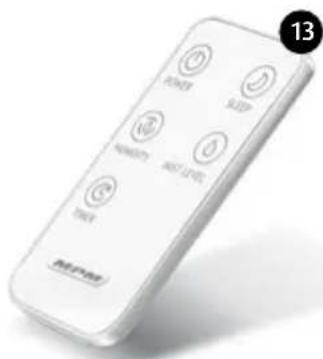
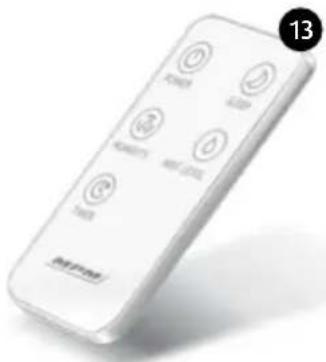
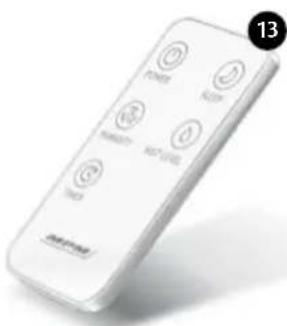
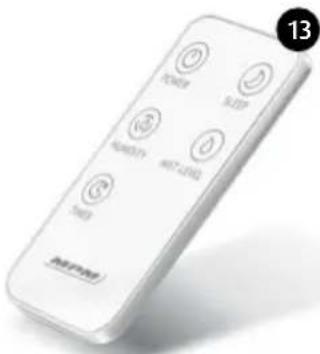
- Remote control
BEFORE FIRST USE
- Unpack the device, and remove all stickers, filling materials and transport locks. Inspect the device carefully for any damage which may have occurred in transport. Consult the seller when in doubt.
- Clean the device as instructed in Section CLEANING AND MAINTENANCE.
- Verify that the parameters of your power mains match the nameplate ratings.
- Place the device on a firm, dry, stable, flat and level surface. The humidifier can be operated only in vertical position.
- Install a CR2025 battery in the remote control (see Section CLEANING AND MAINTENANCE).
ATTENTION! The battery is not included with MNP-04.
FILLING THE WATER TANK
ATTENTION! Always switch off the device and disconnect it from the mains before filling the water tank.
- Remove the outlet lid (10) from the water tank (6).
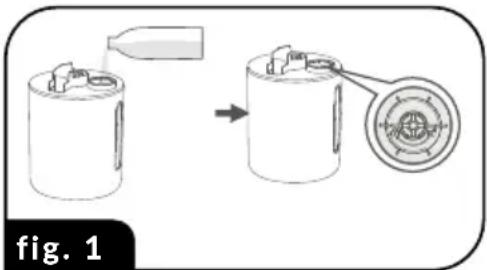
- Pour up to 5 litres of cold (preferably demineralised) water in the tank (fig. 1), with water temperature not exceeding 40°C. Replace and close the plug (7).
-
Turn the tank and attach it to the base (1). Once the tank is attached, the two bars on the base enclosure must be aligned with the two bars on the tank enclosure.
-
Detach the water tank (6) from the base (1) using the water tank handle (9) and turn it bottom up. Remove the water filler plug (7) in the bottom of the tank.
natural_image
Diagram showing a mechanical assembly process: adding liquid into a cylindrical container, then adding a circular component (no text or symbols)ATTENTION! Before attaching the tank to the base, make sure that the ceramic filter (8) is installed on the ultrasound transducer (3). The filter softens the water, extending service life of the device.
- Replace the outlet lid (10) on the tank (6).
HOW TO USE THE HUMIDIFIER
- Once the tank is filled with water, place it on the humidifier base. Attach the handle (9) and outlet lid (10).
- Turn the nozzle ring in the lid (10) in the desired direction.
- Plug the humidifier to the mains and POWER it ON (2a). The humidifying process will start and the LED display (2e) will interchangeably show ambient temperature (TEMP) and relative humidity (HUMID).
ATTENTION! The humidifier is designed to operate at ambient temperatures of 5 to 40°C.
- Set a suitable humidifying intensity level using the MIST button (2b). There are three humidifying intensity levels: 1 – low, 2 – medium, 3 – high. The currently set level is displayed in the bottom section of the LED display (2e).
ATTENTION! The sound of dripping water is normal during operation and does not indicate a malfunction.
ATTENTION! If the outer surface of the humidifier becomes covered with condensed water during operation, power off the device immediately, disconnect it from the mains and wipe it dry.
- You can use the TIMER (2c) to set the device to automatically power off after a specified amount of time. Press the button repeatedly to select a power-off time: 1, 2, 4 or 8 h. Pressing the timer button (2c) for the fifth time will deactivate the function and the text 'TIME' on the LED display will disappear.
- The device can automatically adjust the humidity level in the room, but only upwards (the device cannot decrease the humidity level) from 45 to 80% (every 5%) of relative humidity. To activate this function, use the CONSTANT HUMIDITY/SLEEP MODE button (2d) After setting a humidity level, the indicator on the LED display will return to showing the current humidity value. To deactivate the humidity level control function, restart the humidifier.
ATTENTION! Due to a number of parameters (temperature, pressure and air flow), the indicated humidity level may differ from the actual humidity.
- Press and hold the CONSTANT HUMIDITY/SLEEP MODE button (2d) for 3 seconds to deactivate the LED display; the humidifier will continue to operate (SLEEP mode). Press and hold the button for another 3 seconds to turn the LED display back on.
- You can operate the device using the remote control (13). Controlling the humidifier using the remote control is the same as using the buttons on the device, but separate buttons are used for the humidity level control functions and the sleep mode.
- Constantly monitor the water level in the water tank (6) to prevent an unexpected stop of humidifier operation. Low water tank level is signalled with a red icon showing a crossed out water drop on the LED display. Maximum water consumption is approx. 300 ml/h.
- To add a pleasant scent to the mist (aromatherapy), add up to 3-4 drops of an essential oil to the reservoir (4). While adding the oil, the humidifier must be powered off and disconnected from the mains.
ATTENTION! Do not pour the oil directly into the water. This may cause damage to the humidifier.
- If you want to turn off the device, POWER it OFF (2a) and unplug it from the mains.
CLEANING AND MAINTENANCE
ATTENTION! Unplug the device from the mains before cleaning and maintenance. Do not immerse the humidifier base in water or any other liquid.
ATTENTION! Do not use aggressive cleaning agents, solvents, petroleum products, etc. for cleaning.
ATTENTION! After detaching the water tank, pour out the remaining water in the base of the device by tilting it slightly over a sink.
- Clean the outer surface of the base using a damp cloth and then wipe it dry.
- Clean the water tank at least once a week. Fill it half with water and a mild cleaning agent, screw down the plug and shake the tank with both hands. After finishing cleaning, pour the water out of the tank and rinse it thoroughly. Clean the outer wall of the tank with a damp cloth.
- Regularly remove scale from the ultrasound transducer as necessary. Moisten a soft cloth with a mixture of vinegar and water and hold it for several minutes gently against the transducer (3) and the surfaces on which the scale has accumulated. After finishing scale removal, clean the surfaces with a cloth moisten with water. Be careful not to cause any mechanical damage to the transducer while cleaning it.
-
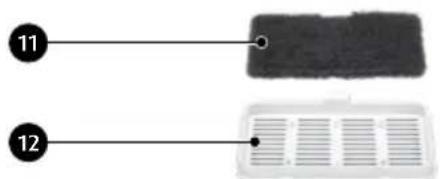
At least once a week, rinse the air filter (11) and ceramic filter (8) with running water, and dry thoroughly. Regular cleaning of the filters helps maintain high performance of the device. To access the air filter (11), remove the cover (12) in the bottom of the base (1). Refit the filters after cleaning. Exchange the ceramic filter once a year, and the air filter when it has been mechanically damaged.
-
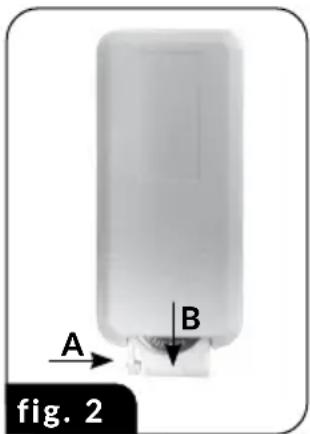
The remote control is powered by a 3 V CR2025 battery. To access the battery, press the lock tab (arrow A in fig. 2) and pull out the battery case (arrow B in fig. 2). Observe correct polarity when installing the battery.
ATTENTION! Do not dispose of spent batteries with household waste. Dispose of spent batteries at designated battery collection points or return them to the seller. Do not dispose of batteries in fire.
- If you anticipate a break in the operation of the humidifier, drain all water from it. Never expose the device to direct sunlight.
TROUBLESHOOTING
| PROBLEM CAUSE SOLUTION | ||
| The humidifier does not spray mist | a. contaminated waterb. water tank empty | a. clean the tank and pour clean waterb. refill water in the tank |
| The humidifier does not start a. float does not rise up | a. check whether the float can move freely in the water level sensor (5)b. refill water in the tankc. check power supply, plug the device into the mains | |
| b. water tank emptyc. no power, device disconnected from the mains | ||
| Water leaking from the device | a. plug not screwed down correctlyb. tank not placed correctly on the base | a. screw down the plug properly, check the plug sealb. place the tank correctly on the base |
| Low humidifier efficiency a. ceramic filter contaminated | a. clean or exchange the ceramic filterb. clean the air filterc. remove scale from the ultrasound transducer | |
| b. air filter contaminatedc. scale on ultrasound transducer | ||
| The ceramic filter turns yellow during operation | Natural reaction of the filter to hard water Clean or exchange the filter regularly | |
| Unpleasant odour from the humidifier | a. no filters in the humidifierb. water tank dirty | a. use the humidifier with filters installedb. clean the water tank |
TECHNICAL SPECIFICATIONS
The technical parameters are given on the data plate of the product.
Power cord lenght: 1,15 m
CAUTION! MPM agd S.A. may introduce technical changes to this product without notice.
PROPER DISPOSAL OF THE PRODUCT (waste electrical and electronic equipment)
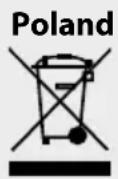
This symbol on the product indicates that the product, after its lifetime, should not be disposed with other household wastes. To avoid harmful influence on the environment and human health due to uncontrolled waste disposal, dispose the waste device to the service point of waste household appliances or report collecting it from home. In order to obtain detailed information about the location and how to dispose the waste electrical and electronic equipment in a safe way, contact your retailer or local Department
of Environmental Protection. Do not dispose the device with other municipal waste.
natural_image
White remote control device with buttons and display screen (no readable text or symbols)natural_image
Diagram showing a battery being inserted into a housing, with no text or symbols present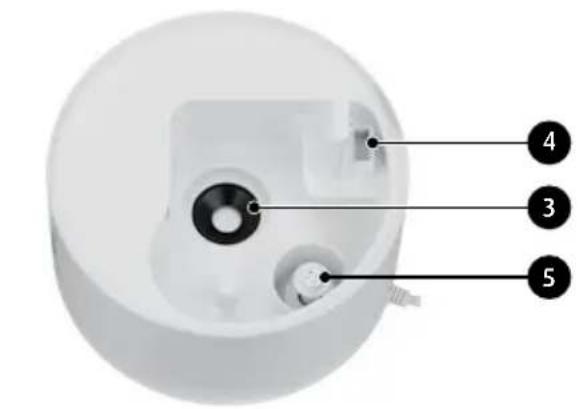
natural_image
White remote control device with eight buttons and a number 13 label (no readable text or symbols beyond branding)PROBLEMY I SPOSÓB ICH USUWANIA
PROBLEM PRZYCZYNA ROZWIAZANIE
natural_image
Line drawing of a vacuum cleaner with a glass bulb and lid (no text or symbols)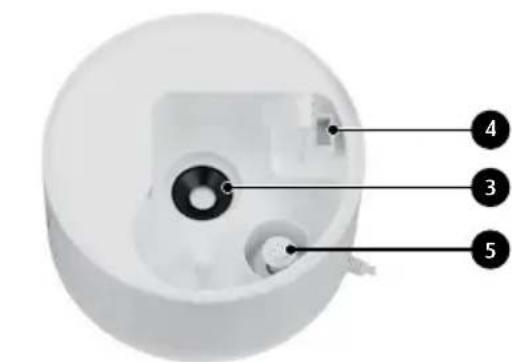
natural_image
White remote control device with eight buttons (no visible text or symbols on the device body)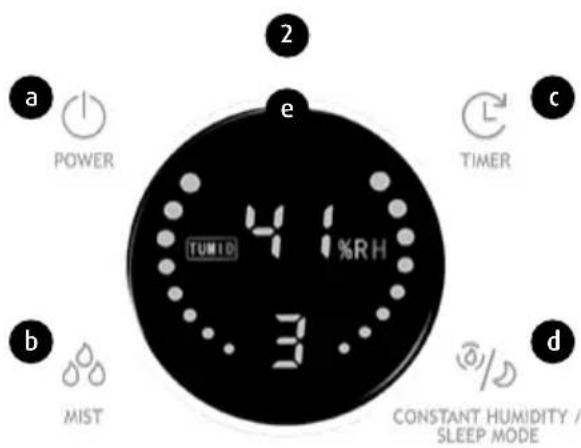
natural_image
White remote control device with buttons and display (no visible text or symbols)We wish you satisfaction from using the product and invite you to check a wide range of other MPM appliances

- ULTRADŻWIĘKOWY NAWILŻACZ POWIETRZA model: MNP-04
- SICHERHEITSHINWEISE
- DEVICE DESCRIPTION
- BEFORE FIRST USE
- FILLING THE WATER TANK
- HOW TO USE THE HUMIDIFIER
- ATTENTION! The humidifier is designed to operate at ambient temperatures of 5 to 40°C.
- ATTENTION! The sound of dripping water is normal during operation and does not indicate a malfunction.
- ATTENTION! Due to a number of parameters (temperature, pressure and air flow), the indicated humidity level may differ from the actual humidity.
- ATTENTION! Do not pour the oil directly into the water. This may cause damage to the humidifier.
- CLEANING AND MAINTENANCE
- TROUBLESHOOTING
- TECHNICAL SPECIFICATIONS
- PROPER DISPOSAL OF THE PRODUCT (waste electrical and electronic equipment)
- PROBLEMY I SPOSÓB ICH USUWANIA
Brand : MPM
Model : MNP-04
Category : Humidifier