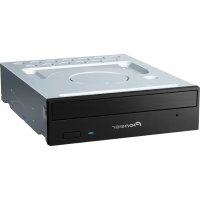
DVR-X162Q - DVD Burner PIONEER - Free user manual and instructions
Find the device manual for free DVR-X162Q PIONEER in PDF.

User questions about DVR-X162Q PIONEER
0 question about this device. Answer the ones you know or ask your own.
Ask a new question about this device
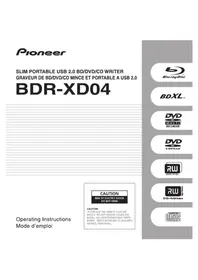
Download the instructions for your DVD Burner in PDF format for free! Find your manual DVR-X162Q - PIONEER and take your electronic device back in hand. On this page are published all the documents necessary for the use of your device. DVR-X162Q by PIONEER.
USER MANUAL DVR-X162Q PIONEER
Thank you for buying this Pioneer product. Before using the drive, read all warnings, cautions, notices and other important safety information contained in these Operating Instructions. Please read the entire manual before using this drive as it contains important information, such as regulatory data, software license agreement(s), product registration details, service instructions and guidelines.
WARNING
This equipment is not waterproof. To prevent a fire or shock hazard, do not place any container filled with liquid near this equipment (such as a vase or flower pot) or expose it to dripping, splashing, rain or moisture.
D3-4-2-1-3_A1_En
WARNING: Handling the cord on this product or cords associated with accessories sold with the product will expose you to chemicals listed on proposition 65 known to the State of California and other governmental entities to cause cancer and birth defect or other reproductive harm.
Wash hands after handling
D36-P4_A_En
This product complies with the Low Voltage Directive 2006/95/EC and EMC Directive 2004/108/EC.
D3-4-2-1-9a_A_En
Precautions Regarding Use
- Pioneer may not be held liable for the loss of any data or any other direct or indirect damage suffered as the result of the use or breakdown of this product. It is strongly recommended to regularly back up all critical data.
- Care must be taken not to infringe copyright restrictions under the laws of each country. If this device is used to record copyrighted materials, approval must be obtained from the respective copyright holders. The recording of copyrighted materials without the express approval of the respective copyright holders may result in legal penalties. Pioneer disclaims any and all responsibility for any legal damages resulting from the use of this device in the unauthorized copying of copyrighted materials.
- All names of corporations, products, and systems listed herein, even when the (TM) or (®) symbols are omitted, are considered the registered trademarks of the respective owners.
CAUTION
This product is a class 1 laser product, but this product contains a laser diode higher than Class 1. To ensure continued safety, do not remove any covers or attempt to gain access to the inside of the product. Refer all servicing to qualified personnel. The following caution label appears on your unit. Location: top of internal drive unit
CLASS 1 LASER PRODUCT
CAUTION CLASS 3B VISIBLE AND INVISIBLE LASER RADIATION WHEN OPEN, AVOID EXPOSURE TO THE BEAM.
ATTENTION RADIATIONS LASER VISIBLES ET INVISIBLES DE CLASSE 3B QUAND OUVERT. ÉVITEZ TOUT EXPOSITION AU FAISCEAU.
ADVARSEL KLASSE 3B SYNLIG OG USYNLIG LASERSTRÅLING VED ÅBNING. UNDGÅ UDSÆTTELSE FOR STRÅLING.
WARNING KLASS 3B SYNLIG OCH OSYNLIG LASERSTRÅLNING NÄR DENNA DEL ÄR ÖPPNAD. UNDVIK ATT UTSÄTTA DIG FÖR STRÅLEN.
VORSICHT BEI GEÖFFNETER ABDECKUNG IST SICHTBARE UND UNSICHTBARE LASERSTRAHLUNG DER KLASSE 38 IM GERÄTEINNEREN VORHANDEN.
NICHT DEM LASERSTRAHL AUSSETZEN!
PRECAUCIÓN CUANDO SE ABRE HAY RADIACIÓN LÁSER DE CLASE 3B VISIBLE E INVISIBLE. EVITE LA EXPOSICIÓN A LOS RAYOS LÁSER.
VARO! AVATTAESSA OLET ALTTIINA NÄKYVÄLLE JA NÄKYMÄTTÖMÄLLE LUOKAN 3B LASERSÄTEILYLLE. ÄLÄ KATSO SÄTEESEEN.
注意 ここを開くと CLASS 3B の可視レーザ光及び不可視レーザ光が出ます。ビームを直接見たり、触れたりしないこと。
D3-4-2-1-8*_A1_En
IMPORTANT

The lightning flash with arrowhead symbol, within an equilateral triangle, is intended to alert the user to the presence of uninsulated “dangerous voltage” within the product’s enclosure that may be of sufficient magnitude to constitute a risk of electric shock to persons.
CAUTION
RISK OF ELECTRIC SHOCK DO NOT OPEN
CAUTION:
TO PREVENT THE RISK OF ELECTRIC SHOCK, DO NOT REMOVE COVER (OR BACK). NO USER-SERVICEABLE PARTS INSIDE. REFER SERVICING TO QUALIFIED SERVICE PERSONNEL.

The exclamation point within an equilateral triangle is intended to alert the user to the presence of important operating and maintenance (servicing) instructions in the literature accompanying the appliance.
D3-4-2-1-1_A1_En
For PLUGGABLE EQUIPMENT, the socket-outlet shall be installed near the equipment and shall be easily accessible.
Information to User
Alterations or modifications carried out without appropriate authorization may invalidate the user's right to operate the equipment. D8-10-2_A_Er
[For Canadian Model]
This Class B digital apparatus complies with Canadian ICES-003.
Replacement and mounting of an AC plug on the power supply cord of this unit should be performed only by qualified service personnel.
NOTE: This equipment has been tested and found to comply with the limits for a Class B digital device, pursuant to Part 15 of the FCC Rules. These limits are designed to provide reasonable protection against harmful interference in a residential installation. This equipment generates, uses, and can radiate radio frequency energy and, if not installed and used in accordance with the instructions, may cause harmful interference to radio communications. However, there is no guarantee that interference will not occur in a particular installation. If this equipment does cause harmful interference to radio or television reception, which can be determined by turning the equipment off and on, the user is encouraged to try to correct the interference by one or more of the following measures:
– Reorient or relocate the receiving antenna.
– Increase the separation between the equipment and receiver.
- Connect the equipment into an outlet on a circuit different from that to which the receiver is connected.
- Consult the dealer or an experienced radio/TV technician for help. D8-10-1-2_En
DANGER – VISIBLE AND INVISIBLE LASER RADIATION WHEN OPEN. AVOID DIRECT EXPOSURE TO BEAM.
CAUTION: Use of controls or adjustments or performance of procedures other than those specified herein may result in hazardous radiation exposure.
CAUTION: The use of optical instruments with this product will increase eye hazard.
FEDERAL COMMUNICATIONS COMMISSION DECLARATION OF CONFORMITY
This device complies with part 15 of the FCC Rules. Operation is subject to the following two conditions: (1) This device may not cause harmful interference, and (2) this device must accept any interference received, including interference that may cause undesired operation.
Product Name: DVD / CD WRITER
Model Number: DVR-X162Q
Responsible Party Name: PIONEER ELECTRONICS SERVICE, INC.
Address: 1925 East Dominguez St. Long Beach, CA 90810, U.S.A.
Phone: TEL: 800-872-4159
CAUTION: This product satisfies FCC regulations when shielded cables and connectors are used to connect the unit to other equipment. To prevent electromagnetic interference with electric appliances such as radios and televisions, use shielded cables and connectors for connections. D8-10-3
IMPORTANT NOTICE
RECORD THE MODEL NUMBER AND SERIAL NUMBERS OF THIS EQUIPMENT BELOW.
THE NUMBERS ARE ON THE REAR.
MODEL NO. DVR-X162Q
SERIAL NO.
KEEP THESE NUMBERS FOR FUTURE USE.
D8-10-3a_En
D1-4-2-6-2*_A1_En
Operating Environment
Operating environment temperature and humidity:
+5 °C to +35 °C (+41 °F to +95 °F); less than 85 %RH (cooling vents not blocked)
Do not install this unit in a poorly ventilated area, or in locations exposed to high humidity or direct sunlight (or strong artificial light).
D3-4-2-1-7c*_A1_En
To ensure your personal safety and to maximize the full operating potential of your unit, read and follow these safety instructions.
Read & Retain Instructions – Read all operating and user information provided with this drive.
Cleaning – Use a damp cloth to clean the exterior housing. Avoid using any fluids including liquid, aerosol or alcohol-based cleaning products.
Water or Moisture – Avoid operating or locating this drive near water or other sources of fluid.
Accessories – Do not place this product on an unstable cart, stand, or table. The product may fall and be seriously damaged.
Ventilation – Slots and openings in the chassis are for cooling and proper operation of the unit. Do NOT block or cover the openings. Do NOT place this unit on a bed, rug, etc. as this can block the openings. This unit should not be placed in a built-in installation unless properly ventilated.
Environment – Avoid installing this drive in a location with exposure to large quantities of dust, high temperatures, high humidity, or subject to excessive vibrations or shocks.
Power Sources – Operate this drive only from the recommended power sources. If you are unsure of the power source, consult an authorized Pioneer representative.
Power-Cord Protection – When unplugging the unit, pull on the plug – not on the cord. Do not handle the cord or plug with wet hands; doing so could cause an electric short or shock. Do not allow anything to pinch or rest on the power cord and do not place in a walkway.
Power – Turn OFF the system before installing this or any other hardware device.
Overloading – Avoid connecting too many devices to a single wall socket or power source as this can cause fires or short circuits.
Object & Liquid Entry – Never push inappropriate objects in to the device. Avoid spilling any liquids in to or on the outside of the drive.
Condensation – Moisture can form in the operating section of the product if the drive is taken from cool surroundings to a room with a warmer temperature. Let the drive stand for one to two hours in the new location before turning it ON.
Servicing – Opening or removing the cover exposes you to possible electrical shock or other danger. Contact a Pioneer authorized service representative for repairing this drive (refer to the enclosed Service & Support Card).
Damage Requiring Service – Unplug the unit and refer servicing to qualified service personnel in the following situations:
- When the power cord, plug, or chassis is damaged
- If liquid has been spilled, or objects have fallen into the video product
■ If the product has been exposed to rain or water - If the product does not operate normally when the operating instructions are followed. Adjust only those controls that are covered by the operating instructions. Improper adjustment of other controls may result in damage and can require extensive work by a qualified technician to restore the unit to its normal operation.
- When the product exhibits a distinct change in performance – this indicates a need for service
About DualDisc Playback – DualDisc is a new two-sided disc with one side containing DVD video / audio / etc. content and the opposite side containing non-DVD content such as digital audio material. The non-DVD audio side is not compliant with the CD Audio Specification; therefore, may not play. The DVD side of DualDisc media plays in this unit. For more details about the DualDisc specification, please refer to the disc manufacturer or your retailer.
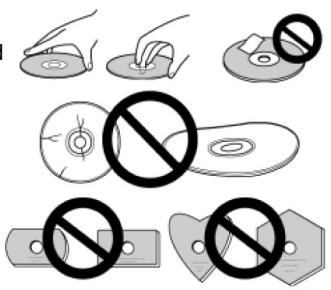
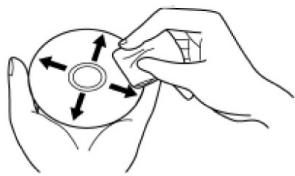
- Avoid touching or scratching the signal surface (shiny side) of the disc.
- Hold the disc by the edges or by the center hold and one edge.
- Do not affix paper or labels to the disc.
- Discard warped or cracked discs as they may cause damage to the drive.
- Avoid specially shaped discs such as hearts or polygons.
- Remove dust or lint from the disc with a soft cloth by wiping from the inside to the outside edge rather than in a circular motion.
- Do not use record-cleaning or anti-static agents as the solutions may cause damage to a disc.
Always be sure to store your discs in proper disc storage cases when not in use, and always be sure to check for dirt or dust on discs (especially on the recording side) before use.
natural_image
Illustration of hands holding a circular object with directional arrows indicating rotation or movement (no text or symbols)Note: Some discs may not be playable due to different recording formats or the physical condition of the disc at the time of recording or playback.
- Interface: USB 2.0
■ Write Speed (▲ZCLV, ★CAV)
DVD-Download disc* 8X PCAV (6X CLV)
DVD-R 1X, 2X, 4X, 6X, 8X ^ , 12X ^ , 16X ^ , 18X ^ , 20X ^*
DVD-R DL 2X, 4X, 6X, 8X ^▲ , 10X ^▲ , 12X ^▲ ,
DVD-RW 1X, 2X, 4X, 6X
DVD+R 2.4X, 4X, 6X, 8X ^ , 12X ^ , 16X ^ , 18X ^ , 20X ^*
DVD+R DL 2.4X, 4X, 6X, 8X ^▲ , 10X ^▲ , 12X ^▲
DVD+RW 2.4X, 3.3X, 4X, 6X, 8X ^▲
DVD-RAM 2X, 3X, 5X, 6X, 8X ^ , 12X ^
CD-R 4X, 10X, 16X, 24X, 32X*, 40X*
CD-RW 4X, 10X, 16X, 20X ^▲ , 24X ^▲ , 32X ^▲
*Note : DVD Download Disc for CSS Managed Recording (Qflix supported software application will be required.)
■ Maximum Read Speed
DVD-Download disc 12X CAV
DVD-ROM (single) 16X DVD-ROM (dual) 12X
DVD-R, DVD+R 16X DVD-R DL, 12X
DVD+R DL
DVD-RW, DVD+RW 13X DVD-RAM 12X
CD-ROM, CD-R 40X CD-RW 32X
■ Buffer Memory Size 2 MBytes (Read/Write)
- Horizontal / Vertical orientation available
■ Low vibration Mechanism by DRA System
■ DVD Download using recordable CSS technology
Disc Format (Read/Write)
■ DVD-Download disc
- DVD single layer/dual layer / 120 mm / 80 mm (Usable only when unit is mounted horizontally) disc
■ DVD-R (In case of write, 650 nm disc for General only.)
■ DVD-R (4X, 8X, 16X Write speed)
■ DVD-R DL
■ DVD-RW (1X, 2X, 4X, 6X Write speed)
■ DVD+R (2.4X, 4X, 8X, 16X Write speed)
■ DVD+R DL
■ DVD+RW (2.4X, 4X, 8X Write Speed)
■ DVD-RAM (Ver 2.0, 2.1, 2.2) (Non-Cartridge)
■ CD-ROM Mode 1
■ CD-ROM XA Mode2 (form 1, form 2)
■ Photo CD (single and multiple sessions)
■ CD-DA
■ CD-Extra (CD PLUS)
■ Video-CD
- CD Text
CD-R
■ CD-RW, HS CD-RW, US CD-RW, US ^+ CD-RW
Notes: · A specific application program is necessary to write the formats listed above.
- Supported media required for specific DVD and CD writing speeds.
- When writing to DVD at 12X, 16X, and 20X use Pioneer-tested media. For media brand information, refer to the Pioneer website: http://www.pioneerelectronics.com
• Average writing speed may decrease when multiple discs are written during the same session. - 20X write speed with DVD±R is possible when USB high-speed driver is used (this driver allows higher data transmission rates than otherwise possible with USB connections). Note that the USB driver is specific to this device, and will not produce the same results when used with other devices on the same USB port. Likewise, high-speed drivers supplied with other devices will not be effective for increasing the transmission speed of this unit.
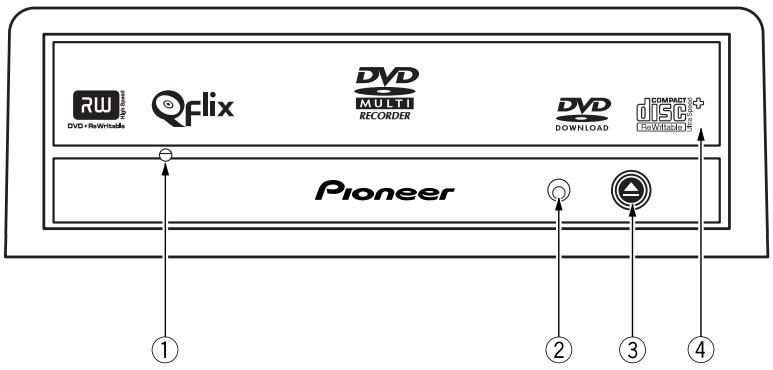
FRONT VIEW
text_image
RW DVD+ReWintrade Qfix DVD MULTI RECORDER DVD DOWNLOAD COMPACT DISC: Pioneer ① ② ③ ④① Forced Ejection Hole
If the tray fails to eject when the Eject button is pressed, insert a stiff rod into the hole and push to eject the tray.
During normal operation, the eject button should be used to unload the tray. Turn the power to the drive OFF then wait approximately one minute until the disc stops spinning before trying to eject the tray redundant prepositional phrase.
② BUSY Indicator
Operation status is indicated as follows:
During reading Lights
During writing Lights
③ Eject Button
Press the button to unload / load the disc.
④ Disc Tray
Press the Eject button to open the loading tray then place a CD or DVD disc onto the tray with the label facing up. Press the Eject button again or gently push the tray to close and load.
Do not attempt to forcibly pull out the disc tray – use the Forced Ejection Hole ①.
ABOUT REGION CODES
The region code can only be changed five (5) times, including the initial setting. Please be aware that the fifth change becomes PERMANENT. Therefore, avoid changing the region code unless absolutely necessary.
- Region codes are part of the DVD Standard. However, region codes on DVD discs are optional. DVD discs with no specified region code can be played on all compliant players.
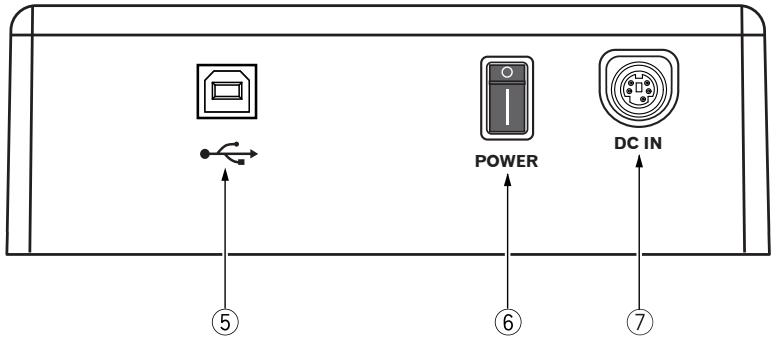
REAR VIEW
text_image
POWER DC IN ⑤ ⑥ ⑦⑤ USB 2.0
4-pin USB 2.0 I/O Connector
⑥ Power on/off switch
⑦ DC In
AC Adapter Connector
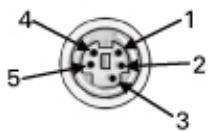
| Pin | Name |
| 1 | Ground |
| 2 | Ground |
| 3 | +12 V |
| 4 | +5 V |
| 5 | +5 V |
text_image
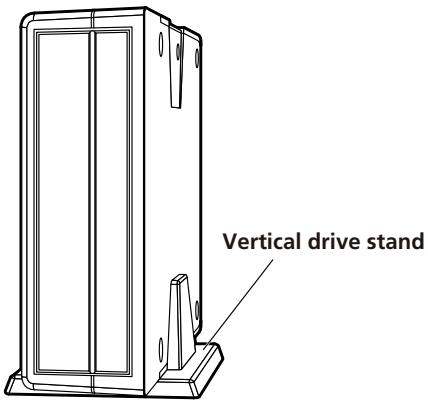
1 2 3 4 5Using vertical drive stand
The supplied vertical drive stand can be used if desired to mount the unit vertically as shown in the accompanying illustration. When using the vertical drive stand, either the right or left side of the drive unit can be oriented downward in the stand.
text_image
Vertical drive stand8
En
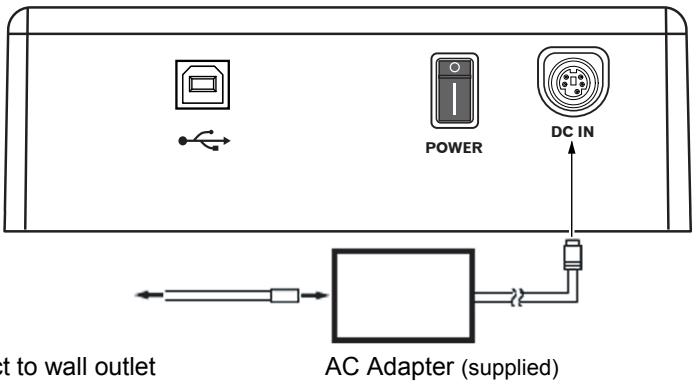
Connect the unit to the supplied AC adapter and connect the USB.
AC Adapter Connection
Connect the AC adapter plug for the DC IN connector on the unit's rear panel. Use the supplied power cord to connect the AC adapter to a wall outlet.
text_image
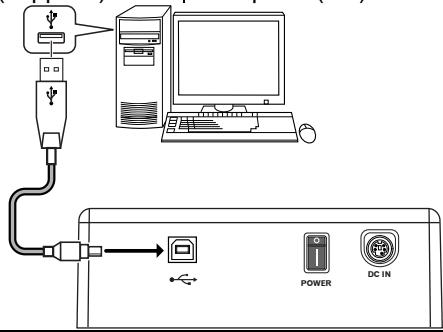
t to wall outlet AC Adapter (supplied)USB Cable Connection
This is a hot-plug unit.
1) Confirm that your computer (PC) has an available USB port.
2) With your Windows® operating system running, use the supplied USB cable to connect the external drive to the PC.
Note: This unit can operate with USB 1.1 but will not provide optimum performance.
Warning: Do not disconnect the unit during data transfers.
USB cable (supplied) | Computer (PC)
text_image
Diagram showing connection between a computer tower, USB cable, and power/DC input devices via USB interfaceThe unit writes to DVD-R/-RW media when the supplied software application is installed on your PC. Writing fails if the PC or operating system does not support the software.
Begin Writing to DVD-R/-RW:
1) Turn on the unit.
2) Turn on the PC.
3) Press the Eject button to open the tray.
4) Place the disc in the tray with the label facing up.
5) Press the Eject button again to close the tray.
6) Start the disc-burning application.
End the Writing Session:
1) Quit the disc burning application.
2) Press the Eject button to open the tray.
3) Remove the disc.
4) Press the Eject button again to close the tray.
5) Shut down the PC.
6) Turn OFF the unit.
For software (including USB high-speed driver) installation directions, please refer to the manual available on the software disc included with your drive. For assistance with writing or playing back discs, see the HELP function within the software application.
Manual Disc Ejection
Use the manual eject hole to remove discs if the tray fails to open and all other methods have been exhausted.
1) Shut down the PC.
2) Wait for the disc to stop spinning.
3) Insert a straightened paper clip or small wire into the manual eject hole.
4) Press firmly until the tray protrudes by at least a 12 inch (5 mm to 10 mm).
5) Gently pull the tray straight out and remove the disc.
natural_image
Illustration of a hand inserting a device into a folder (no text or symbols visible)Notes:
- To prevent injury and damage to the unit, do NOT force the tray to open while the disc is spinning.
- Do not place objects in front of the tray while in operation.
[Position]
This drive is horizontal and vertical use.
[Disc Size]
12 cm / 8 cm (Drive does not support non-standard shapes such as business cards, diamond, etc.)
[Disc Transfer Rate]
Data Read (sustained)
DVD Max. 22.16 MBytes/sec.
CD Max. 6.14 MBytes/sec.
(17.1 - 40X CAV Mode over 16 block transfer)
Data Write (sustained)
DVD Max. 27.7 MBytes/sec. (20X DVD-R)
CD Max. 6.14 MBytes/sec. (40X CD-R)
* Media that is dirty or damaged can affect the transfer rate.
[Access Time / Seek Time] (Random Averages)
| Access Time | DVD-ROM 130 ms | CD-ROM 120 ms |
| Seek Time | DVD-ROM 120 ms | CD-ROM 110 ms |
[Power]
| AC Adapter (supplied) | +12 V DC / 2 A, +5 V DC / 2 A |
| Source | 100 V to 240 V AC, 50 Hz / 60 Hz |
| Rated Output | +12 V DC / 2 A, +5 V DC / 2 A |
[Physical Information]
| Dimensions(including front panel) | 6.54 in. W x 2.20 in. H x 9.25 in. D | 166 mm W x 55.8 mm H x 235 mm D |
| Weight | 2.65 lb | 1.2 kg |
| Operating Temperature | +41 ° F to +95 ° F (+5 ° C to +35 ° C) | |
| Operating Humidity | 5 % to 85 % (no condensation) | |
| Storage Temperature | -41 ° F to +140 ° F(-40 ° C to +60 ° C) | |
| Storage Humidity | 5 % to 90 % (no condensation) |
[Accessories]
■ Software disc (x 1)
■ AC Adapter (x 1)
■ Power Cord (x 1)
■ USB Cable (1.0 m) (x 1)
■ Vertical drive stand (x 1)
■ Operating Instructions (x 1)
Note: Specifications and designs are subject to possible modifications without notice, due to improvements.
CAUTION CLASS 3B VISIBLE AND INVISIBLE LASER RADIATION WHEN OPEN, AVOID EXPOSURE TO THE BEAM.
ATTENTION RADIATIONS LASER VISIBLES ET INVISIBLES DE CLASSE 3B QUAND OUVERT. ÉVITEZ TOUT EXPOSITION AU FAISCEAU.
ADVARSEL KLASSE 3B SYNLIG OG USYNLIG LASERSTRÅLING VED ÅBNING. UNDGÅ UDSÆTTELSE FOR STRÅLING.
VARNING KLASS 3B SYNLIG OCH OSYNLIG LASERSTRÅLNING NÄR DENNA DEL ÄR ÖPPNAD. UNDVIK ATT UTSÄTTA DIG FÖR STRÅLEN.
text_image
Illustration showing various methods to remove a CD or DVD disc, with prohibition symbols indicating removal and disassembly.text_image
Diagram showing connection between a computer and a power bank via USB, with icons for power, DC input, and power outlet.natural_image
Line drawing of a hand inserting a CD into a folder (no text or symbols visible)Remarques:
Alimentation +12 V CC, 2 A +5 V CC, 2 A
AFTER SALES SERVICE FOR PIONEER PRODUCTS
Please contact the dealer or distributor where you purchased this product for its after-sale service (including warranty conditions) or any other information. In case the necessary information is not available, please contact the Pioneer's subsidiaries (regional service headquarters) listed below.
PLEASE DO NOT SHIP YOUR PRODUCT TO THE COMPANIES
at the addresses listed below for repair without advance contact as these locations are not repair facilities.
UNITED STATES
PIONEER ELECTRONICS
SERVICE INC.
P.O. Box 1760
Long Beach, CA 90801-1760
United States of America
CANADA
PIONEER ELECTRONICS OF
CANADA, INC.
300 Allstate Parkway
Markham, Ontario
L 3 R - 0 P 2 Canada
® PIONEER
CORPORATION
Published by Pioneer Corporation
All Rights Reserved
Copyright © 2008 Pioneer Corporation
Publication de Pioneer Corporation.
© 2008 Pioneer Corporation.
Pioneer Electronics (USA) Inc.
Home Entertainment & Business Solutions Group
2265 E. 220 ^th Street, Long Beach, CA 90810 USA
Pioneer Electronics of Canada, Inc.
Industrial Products Division
300 Allstate Parkway, Markham, Ontario, L3R-0P2 Canada
PIONEER ELECTRONICS SERVICE INC.
1925 East Dominquez Street, Long Beach, CA 90810 USA
For DVR-X162Q support, go to:
http://www.pioneerelectronics.com/DVRX162Qsupport/
For software related issues, please contact: Sonic Solutions
http://support.sonic.com/desktop/dms/