DVD-V8000 - DVD player PIONEER - Free user manual and instructions
Find the device manual for free DVD-V8000 PIONEER in PDF.

User questions about DVD-V8000 PIONEER
0 question about this device. Answer the ones you know or ask your own.
Ask a new question about this device
Download the instructions for your DVD player in PDF format for free! Find your manual DVD-V8000 - PIONEER and take your electronic device back in hand. On this page are published all the documents necessary for the use of your device. DVD-V8000 by PIONEER.
USER MANUAL DVD-V8000 PIONEER
Thank you for buying this Pioneer product.
Please read through these operating instructions so you will know how to operate your model properly. After you have finished reading the instructions, put them away in a safe place for future reference.
In some countries or regions, the shape of the power plug and power outlet may sometimes differ from that shown in the
explanatory drawings. However the method of connecting and operating the unit is the same.
K015_En
IMPORTANT

The lightning flash with arrowhead symbol, within an equilateral triangle, is intended to alert the user to the presence of uninsulated "dangerous voltage" within the product's enclosure that may be of sufficient magnitude to constitute a risk of electric shock to persons.
CAUTION
RISK OF ELECTRIC SHOCK DO NOT OPEN
CAUTION:
TO PREVENT THE RISK OF ELECTRIC SHOCK, DO NOT REMOVE COVER (OR BACK). NO USER-SERVICEABLE PARTS INSIDE. REFER SERVICING TO QUALIFIED SERVICE PERSONNEL.

The exclamation point within an equilateral triangle is intended to alert the user to the presence of important operating and maintenance (servicing) instructions in the literature accompanying the appliance.
D3-4-2-1-1_En-A
WARNING
This equipment is not waterproof. To prevent a fire or shock hazard, do not place any container filed with liquid near this equipment (such as a vase or flower pot) or expose it to dripping, splashing, rain or moisture. D3-4-2-1-3_A_En
WARNING
Before plugging in for the first time, read the following section carefully.
The voltage of the available power supply differs according to country or region. Be sure that the power supply voltage of the area where this unit will be used meets the required voltage (e.g., 230 V or 120 V) written on the rear panel. D3-4-2-1-4_A_En
WARNING
This product equipped with a three-wire grounding (earthed) plug - a plug that has a third (grounding) pin. This plug only fits a grounding-type power outlet. If you are unable to insert the plug into an outlet, contact a licensed electrician to replace the outlet with a properly grounded one. Do not defeat the safety purpose of the grounding plug.
D3-4-2-1-6_A_En
This product complies with the Low Voltage Directive 2006/95/EC and EMC Directive 2004/108/EC.
D3-4-2-1-9a_A_En
CAUTION
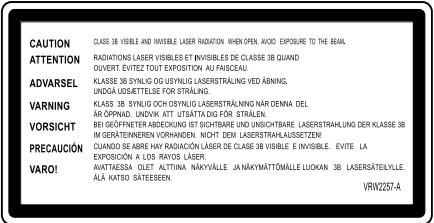
This product is a class 1 laser product, but this product contains a laser diode higher than Class 1. To ensure continued safety, do not remove any covers or attempt to gain access to the inside of the product. Refer all servicing to qualified personnel.
The following caution label appears on your unit. Location: top of the DVD drive
text_image
CAUTION ATTENTION ADVARSEL VARNING VORSICHT PRECAUCTION VARO! CLASS 3B VISIBLE AND INVISIBLE LASER RADIZATION WHEN OPEN. AVOID EXPOSURE TO THE BEAL. RADIATIONS LASER VISIBLES ET INVISIBLES DE CLASSE 3B QUAND OUVERT. ÉVITEZ TOUT EXPOSITION AU PÉASEAU. KLASE 3B SYNLOG OU USYNLYG LÆSERSTRÅLING VED ABNING, UNDÖGA UDSSETTEISE FOR STRÅLING. KLASE 3B SYNLOG OCH OSYNLYG LASERSTRÅLNING NÁR DENNA DEL AR OPPINAD. UNDIVA' ATT USATTA DIG FOR STRÅLEN. BEI GEOPFNETER ADROCKING ST SCHOTBAIE UND INSUCHTRAIRE LASERSTRÄHLING DER KLASE 3B IM GERATEENNEREN VORHANDE, NICHT DEM LASERSTRÄHLAUSSETZEEM CUANDO SE ABRE HAR RADIACIÓN LASER DE CLASE 3B VISIBLE E INVISIBLE. ÉVITE LA EXPOSICIÓN A LOS RAYOS LASER. VARTASSA ULERT. ALTITINA NAKYVALLE JA NAKYMÄTTÖMÄLLE LUOKAN 3B LASERSÄTEILLE ALA KATO SATEEESSEN. VRW2257-A
text_image
CLASS 1 LASER PRODUCTD3-4-2-1-8*_C_En
WARNING
To prevent a fire hazard, do not place any naked flame sources (such as a lighted candle) on the equipment. D3-4-2-1-7a_
Operating Environment
Operating environment temperature and humidity: +5 °C to +35 °C (+41 °F to +95 °F); less than 85 %RH (cooling vents not blocked)
Do not install this unit in a poorly ventilated area, or in locations exposed to high humidity or direct sunlight (or strong artificial light) D3-4-2-1-7c_A_En
VENTILATION CAUTION
When installing this unit, make sure to leave space around the unit for ventilation to improve heat radiation (at least 5 cm at top, 5 cm at rear, and 5 cm at each side).
WARNING
Slots and openings in the cabinet are provided for ventilation to ensure reliable operation of the product, and to protect it from overheating. To prevent fire hazard, the openings should never be blocked or covered with items (such as newspapers, table-cloths, curtains) or by operating the equipment on thick carpet or a bed. D3-4-2-1-7b_A_En
If the AC plug of this unit does not match the AC outlet you want to use, the plug must be removed and appropriate one fitted. Replacement and mounting of an AC plug on the power supply cord of this unit should be performed only by qualified service personnel. If connected to an AC outlet, the cut-off plug can cause severe electrical shock. Make sure it is properly disposed of after removal. The equipment should be disconnected by removing the mains plug from the wall socket when left unused for a long period of time (for example, when on vacation).
CAUTION
The STANDBY/ON switch on this unit will not completely shut off all power from the AC outlet. Since the power cord serves as the main disconnect device for the unit, you will need to unplug it from the AC outlet to shut down all power. Therefore, make sure the unit has been installed so that the power cord can be easily unplugged from the AC outlet in case of an accident. To avoid fire hazard, the power cord should also be unplugged from the AC outlet when left unused for a long period of time (for example, when on vacation). D3-4-2-2-2a_A_En
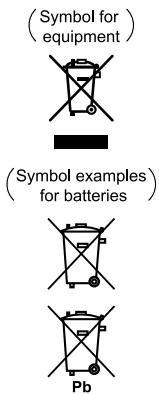
Information for users on collection and disposal of old equipment and used batteries
text_image
(Symbol for equipment) (Symbol examples for batteries) PbThese symbols on the products, packaging, and/or accompanying documents mean that used electrical and electronic products and batteries should not be mixed with general household waste.
For proper treatment, recovery and recycling of old products and used batteries, please take them to applicable collection points in accordance with your national legislation.
By disposing of these products and batteries correctly, you will help to save valuable resources and prevent any potential negative effects on human health and the environment which could otherwise arise from inappropriate waste handling.
For more information about collection and recycling of old products and batteries, please contact your local municipality, your waste disposal service or the point of sale where you purchased the items.
These symbols are only valid in the European Union.
For countries outside the European Union:
If you wish to discard these items, please contact your local authorities or dealer and ask for the correct method of disposal.
K058_B_En
[For UK models]
Replacement and mounting of an AC plug on the power supply cord of this unit should be performed only by qualified service personnel.
IMPORTANT: THE MOULDED PLUG
This appliance is supplied with a moulded three pin mains plug for your safety and convenience. A 5 amp fuse is fitted in this plug. Should the fuse need to be replaced, please ensure that the replacement fuse has a rating of 5 amps and that it is approved by ASTA or BSI to BS1362.
Check for the ASTA mark ASA or the BSI mark on the body of the fuse.
If the plug contains a removable fuse cover, you must ensure that it is refitted when the fuse is replaced. If you lose the fuse cover the plug must not be used until a replacement cover is obtained. A replacement fuse cover can be obtained from your local dealer.
If the fitted moulded plug is unsuitable for your socket outlet, then the fuse shall be removed and the plug cut off and disposed of safely. There is a danger of severe electrical shock if the cut off plug is inserted into any 13 amp socket.
If a new plug is to be fitted, please observe the wiring code as shown below. If in any doubt, please consult a qualified electrician.
WARNING : THIS APPARATUS MUST BE EARTHED.
IMPORTANT: The wires in this mains lead are coloured in accordance with the following code:
Green & Yellow : Earth Blue : Neutral Brown : Live
As the colours of the wires in the mains lead of this appliance may not correspond with the coloured markings identifying the terminals in your plug, proceed as follows;
The wire which is coloured GREEN-AND-YELLOW must be connected to the terminal in the plug which is marked with the letter E or by
the earth symbol ⏚ or coloured GREEN or GREEN-AND-YELLOW.
The wire which is coloured BLUE must be connected to the terminal which is marked with the letter N or coloured BLACK.
The wire which is coloured BROWN must be connected to the terminal which is marked with the letter L or coloured RED.
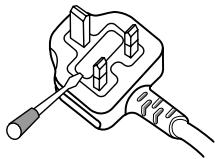
How to replace the fuse: Open the fuse compartment with a screwdriver and replace the fuse.
natural_image
Line drawing of a plug with a screwdriver inserted, no text or symbols presentD3-4-2-1-2-1_B_En
[For USA models]
IMPORTANT NOTICE - THE SERIAL NUMBER FOR THIS EQUIPMENT IS LOCATED IN THE REAR. PLEASE WRITE THIS SERIAL NUMBER ON YOUR ENCLOSED WARRANTY CARD AND KEEP IN A SECURE AREA. THIS IS FOR YOUR SECURITY. D1-4-2-6-1_En
IMPORTANT SAFETY INSTRUCTIONS
1) Read these instructions.
2) Keep these instructions.
3) Heed all warnings.
4) Follow all instructions.
5) Do not use this apparatus near water.
6) Clean only with dry cloth.
7) Do not block any ventilation openings. Install in accordance with the manufacturer's instructions.
8) Do not install near any heat sources such as radiators, heat registers, stoves, or other apparatus (including amplifiers) that produce heat.
9) Do not defeat the safety purpose of the polarized or grounding-type plug. A polarized plug has two blades with one wider than the other. A grounding type plug has two blades and a third grounding prong. The wide blade or the third prong are provided for your safety. If the provided plug does not fit into your outlet, consult an electrician for replacement of the obsolete outlet.
10) Protect the power cord from being walked on or pinched particularly at plugs, convenience receptacles, and the point where they exit from the apparatus.
11) Only use attachments/accessories specified by the manufacturer.
12) Use only with the cart, stand, tripod, bracket, or table specified by the manufacturer, or sold with the apparatus. When a cart is used, use caution when moving the cart/apparatus combination to avoid injury from tip-over.

13) Unplug this apparatus during lightning storms or when unused for long periods of time.
14) Refer all servicing to qualified service personnel. Servicing is required when the apparatus has been damaged in any way, such as power-supply cord or plug is damaged, liquid has been spilled or objects have fallen into the apparatus, the apparatus has been exposed to rain or moisture, does not operate normally, or has been dropped.
P1-4-2-2_En
NOTE: This equipment has been tested and found to comply with the limits for a Class B digital device, pursuant to Part 15 of the FCC Rules. These limits are designed to provide reasonable protection against harmful interference in a residential installation. This equipment generates, uses, and can radiate radio frequency energy and, if not installed and used in accordance with the instructions, may cause harmful interference to radio communications. However, there is no guarantee that interference will not occur in a particular installation. If this equipment does cause harmful interference to radio or television reception, which can be determined by turning the equipment off and on, the user is encouraged to try to correct the interference by one or more of the following measures:
- Reorient or relocate the receiving antenna.
– Increase the separation between the equipment and receiver. - Connect the equipment into an outlet on a circuit different from that to which the receiver is connected.
- Consult the dealer or an experienced radio/TV technician for help.
D8-10-1-2_En
Information to User
Alteration or modifications carried out without appropriate authorization may invalidate the user's right to operate the equipment. D8-10-2
This Class B digital apparatus complies with Canadian ICES-003.
D8-10-1-3_En
CAUTION: This product satisfies FCC regulations when shielded cables and connectors are used to connect the unit to other equipment. To prevent electromagnetic interference with electric appliances such as radios and televisions, use shielded cables and connectors for connections. D8-10-3
D8-10-3a_En
WARNING: Handling the cord on this product or cords associated with accessories sold with the product will expose you to chemicals listed on proposition 65 known to the State of California and other governmental entities to cause cancer and birth defect or other reproductive harm.
Wash hands after handling
D36-P4_A_En
POWER-CORD CAUTION
Handle the power cord by the plug. Do not pull out the plug by tugging the cord and never touch the power cord when your hands are wet as this could cause a short circuit or electric shock. Do not place the unit, a piece of furniture, etc., on the power cord, or pinch the cord. Never make a knot in the cord or tie it with other cords. The power cords should be routed such that they are not likely to be stepped on. A damaged power cord can cause a fire or give you an electrical shock. Check the power cord once in a while. When you find it damaged, ask your nearest PIONEER authorized service center or your dealer for a replacement. \$002_En
FEDERAL COMMUNICATIONS COMMISSION DECLARATION OF CONFORMITY
This device complies with part 15 of the FCC Rules. Operation is subject to the following two conditions: (1) This device may not cause harmful interference, and (2) this device must accept any interference received, including interference that may cause undesired operation.
Product Name: DVD PLAYER
Model Number: DVD-V8000
Responsible Party Name: PIONEER ELECTRONICS SERVICE, INC.
Address: 1925 E. DOMINGUEZ ST. LONG BEACH, CA 90801-1760, U.S.A.
Phone: 310-952-2915
Français
LASERPRODUKT DER KLASSE 1
D3-4-2-1-8*_C_Ge
WARNUNG
Precautions and Warnings .... 17
Regarding installation 17
Operating environment 17
Regarding copyrights 17
Transporting the player 17
Cleaning the pickup lens 17
Condensation 17
Care of Discs 18
Disc / Content Format Playback Compatibility ..... 19
General disc compatibility 19
DVD-R/RW compatibility 19
CD-R/RW compatibility 19
Personal computer-created disc compatibility ..... 19
DVD-Video regions 19
Copy controlled CDs 19
Playback of "DualDisc" media 19
02 Controls and Displays
Controls and Displays 20
Front panel 20
Rear panel 21
Remote control unit 22
Operation using a mouse 23
Main unit display 24
Main unit display information 24
Contrast adjustment 24
Display details 24
Displaying disc information 26
Monitor out functions 26
03 Playing Discs
Playing Discs 28
Basic operations 28
DVD-Video disc menu 29
Video CD PBC menu 29
Switching DVD subtitles 30
Switching DVD audio language 30
Switching the audio channel on VR format DVD-RW discs 30
Switching audio channel on Video CD discs 30
Switching multi-angle DVD images 30
Skipping chapters/tracks 30
Fast forward/reverse scanning 31
Still image playback and frame reverse/advance (DVDs and Video CDs) 31
Slow motion playback of DVDs and Video CDs ...... 31
Search Playback 32
DVD title search 32
Chapter/track search 32
DVD frame search 32
DVD and Video CD time search 33
Search playback using Play Mode menu 33
Search-playback using Disc Navigator 34
Repeat Playback 35
Chapter/track repeat 35
Title repeat 35
All repeat (for DVDs) 35
A-B repeat 35
Repeat playback using the Play Mode menu 36
[A-B Repeat] 36
[Repeat] 36
Programmed Playback 37
Creating a program list 37
Editing a program list 38
Program play/stop/delete 38
Program Memory 38
04 Initial Settings
Initial Settings ...... 39
Setting procedure 39
Digital audio output settings 40
[Digital Out] 40
[Dolby Digital Out] 40
[DTS Out] 40
[96 kHz PCM Out] 41
[MPEG Out] 41
Video output settings 41
[TV Screen] 41
[Component Out] 42
[S-Video Out] 42
[Still Picture] 42
Language settings 43
[Audio Language] 43
[Subtitle Language] 43
[Auto Language] 43
[DVD Menu Lang.] 43
[Subtitle Display] 44
Display settings 45
[On Screen Display] 45
[Angle Indicator] 45
[Background] 45
[Screen Saver] 45
Parental Lock 46
[Password] 46
[Password Change] 46
[Level Change] 46
[Country Code] 47
DVI connections 48
[Resolution] 48
[Aspect Ratio] 49
[Video Memory] 49
Contents
05 Audio and Video Quality Settings
Audio Settings 50
Adjusting the dynamic range (Audio DRC) 50
Virtual surround sound 50
Video Quality Settings 51
Selecting from preset video quality settings .... 51
Video adjustments 52
06 Advanced Setup Menu Osaka Settings for Commercial Use
Advanced Setup Menu
(Settings for Commercial Use) 54
-
To access the ADV. SETUP menu 54
-
Item settings 55
2.1. COMMAND STACK 55
2.2.WEEKLY TIMER 55
2.3. POWER ON START 55
2.4. TITLE PLAY MODE 55
2.5. KEY LOCK 55
2.6. REPEAT MODE 55
2.7. SERIAL PORT 55
2.8.BAUD RATE 55
2.9. REV STEP/REV PLAY 55
2.10. BLACKBOARD LOCK 55
2.11. PLAYER CONTROL PANEL 55
2.12. SETUP LOCK (MOUSE) 55
2.13. GOTO DVD-MENU 56
2.14. MOUSE CURSOR 56
2.15. EXTEND TERMINAL 56
2.16. SYNC OUT (DURING SQ) 56
2.17. EXTERNAL SYNC 56
2.18. MONITOR OSD 56
2.19. AUTO PASS THROUGH 56
2.20.PLAY START MODE 56
2.21. LOAD SETUP incl WEEKLY TIMER 56
2.22. SAVE SETUP incl WEEKLY TIMER 56
2.23. LOAD COMMAND STACK 56
2.24 SAVE COMMAND STACK 56
2.25 LOAD WEEKLY TIMER 57
2.26 SAVE WEEKLY TIMER 57
2.27 SAVE ERROR LOG 57
-
WEEKLY TIMER settings 57
-
Setting POWER ON START 60
-
Setting KEY LOCK 61
5.1. How to set KEY LOCK 61
5.2. KEY LOCK Indicator display table 61
5.3. Temporary KEY LOCK release 62
5.4. KEY LOCK exceptions 62
- EXTEND TERMINAL settings 63
07 Function for Commercial Use
Command Stack Function 64
Inputting a Command Stack 64
-
Selecting input mode 64
-
Entering commands 64
-
Editing Command Stack 67
-
Ending input and saving data 70
Executing a Command Stack 70
-
Entering the execute mode 70
-
Executing the Command Stack 70
Loading/Saving Files Using USB Memory 71
-
File types ...... 71
-
File names for saved files 71
-
Supported file systems for USB memory 71
-
Operation 71
-
Procedures for loading and saving USB memory data 72
5.1 Loading files from a USB memory device ..... 72
5.2 Saving files to a USB memory device ..... 72
Using the Mouse to Control the Player 74
Button selection (DVD and Video CD) 74
About the player control panel 74
Video Blackboard Function 75
Using the video blackboard 75
Other Operation Devices 76
Calibration of pen tablet/touch panel devices 76
Other Functions 77
Pass through function 77
Displaying cumulative Play/ON Time 78
Setting the internal clock 78
Returning main unit settings to default values 78
Confirming the firmware version 79
TV SYSTEM switch 79
External sync function 80
08 Connection
How to Connect 81
Standard connections 81
Connecting to a device equipped with S-video input 81
Connecting to a device equipped with component video input 81
Connecting to a device equipped with DVI connector 82
Connecting to an AV surround amplifier 83
Connections when using monitor out 83
Connections for using the pass through function ..... 83
09 Additional Materials
Serial Interface Specifications 84
Extend Terminal Specifications 89
Main Unit Display During ADV. SETUP
Menu Operations 92
Troubleshooting 94
Language Code List 97
Country Code List 97
Glossary 98
Specifications 99
Features
1. High durability and reliability
The durability and longevity of this player have been enhanced by sealing the drive components, thus protecting optical parts from dust. Reliability has been enhanced by the adoption of a brushless spindle motor for the disc drive, and a stepping motor for the optical drive.
2. Designed for high image quality
High-quality image playback is assured through the use of 12 bit / 216 MHz video DAC, digital filters, and digital noise-reduction technology.
In addition to support for conventional analog video input/output, DVI-D digital video connectors (compliant with HDCP Ver. 1.0) are provided to allow the output of high-definition digital images.
3. Frame search function
The player is equipped with a frame search function to allow the user to cue playback points in more precise units than allowed for by chapter and time searches.
The use of frame-segment playback allows the user to define playback between two specific points, followed by automatic stop.
- Frame search cannot be used with multi-PGC discs (discs that do not provide for OSD of time data), or Video CDs.
4. Weekly Timer / Power On Start functions
The timer function allows the user to set the player for POWER ON and STANDBY/OFF and disc playback at designated times or on designated days of the week. Programmed playback is also supported by using this function in conjunction with the command stack.
The WEEKLY TIMER function can be set for up to 24 POWER ON/OFF times on any single day (pages 57, 60).
5. Command Stack
By presetting segment commands to control playback, automatic switching can be performed between images as desired, providing a convenient tool for demonstrations and display presentations (page 64).
6. External interface
[RS-232C]
The player is equipped with two RS-232C connectors (15-pin (*1) and 9-pin). RS-232C commands can be used to control playback of DVD video, Video CD, and audio CD. The protocol for these commands adopts the same format as used for LaserDiscs, and migrating commands from LaserDisc is simple (page 84).
[Extend Terminal]
Terminal pins other than the RS-232C pins of the Extend Terminal (15-pin) are allocated for use as optional external switch functions. By connecting switches to these pins, DVD-Video menus can be selected and command stacks loaded, and operations performed similarly to the remote control unit (page 89).
7. External sync
Video signal output can be synchronized to an input sync signal (page 80).
8. USB interface
The player is equipped with a USB interface allowing the use of a standard USB mouse (page 23). Additionally, a commercial USB memory device can be connected to store and load player settings and command stack information (page 71). This allows previous settings to be reloaded in the event of a malfunction, and shortens the time necessary for setting up multiple players for demonstrations and displays. Further, USB pen tablet input devices (*2) can be connected directly and used with simple configuration for DVD playback control and onscreen drawing by hand (page 76).
9. Monitor output
A video output is provided with functions allowing On-Screen Display (OSD). In this way, composite, component, S-Video, and DVI-D connectors can be used to output the main video without OSD data, while the monitor connector can be used to connect a control monitor that displays the main image with superimposed control data (page 26).
10. Pass Through function
This unit is equipped with input connectors for composite video and analog audio inputs. Switching between the DVD images and video/audio signals input from exterior sources can be performed easily by means of the front panel buttons, RS-232C commands, or Command Stack (page 77).
11. Player control and video blackboard using mouse or pen tablet input device
In place of the standard remote control unit, the player can be controlled if desired by a standard USB computer mouse or pen tablet (touch panel) device (*2). In addition, when playing DVD images, a pen tablet can be used to draw images and superimpose them on the output (pages 74 to 75).
12. NTSC / PAL dual system support
Supports playback of discs complying with either NTSC or PAL (*3) TV system standards.
13. Rack mount size
Optimally designed for standard rack mounting (2U size, 88 mm (H) x 420 mm (W)). Can also be mounted in EIA 19" racks by using the optional mounting kit.
(*1) The 15-pin connector is used for both the RS-232C interface and Extend Terminal functions.
(*2) Limited to manufacturers or models whose compatibility with this unit has been confirmed.
(*3) When playing PAL discs, the output device (monitor) must be PAL compliant.
Precautions and Warnings
Regarding installation
- Use this component in a level and steady location. Avoid using in wobbly or unstable locations, or places subject to vibration.
- Do not interrupt the ventilation functions of the component. Do not use when set on shaggy or long-pile carpets, or covered with cloths or other coverings, since the ventilation functions may be impaired, resulting in malfunction.
- Do not set other objects on top of this unit.
- Do not install this component in locations exposed to heat. Avoid installing this component above amplifiers or other heat-generating devices. When using in an audio rack or other vertical installation, install in a well-ventilated location below amplifiers or other heat-generating components, to avoid adverse effects from heat.
- When multiple players are simultaneously turned ON/OFF from an external controller, a large surge current is produced. Consult your Pioneer dealer regarding power switch ratings for such uses. Consult the "Specifications" (page 99) for details regarding the current values for each unit.
Important
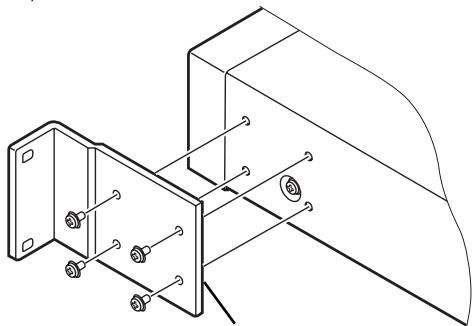
When mounting this unit on an EIA rack, the rack mount kit CB-A802 (sold separately) must be used. See the instructions accompanying the kit for details on how to install the kit. Attempting to use other installation methods may result in damage to the unit or personal injury.
● The rack mount size for this unit is 2U.
- The rack mount kit supports both EIA universal pitch and wide pitch sizes.
natural_image
Technical line drawing of a mechanical bracket with bolts and mounting holes (no text or symbols)Rack mount bracket
Operating environment
Operating environment temperature and humidity conditions:
+5 °C to +35 °C (+41 °F to +95 °F)
Less than 85% RH
■ DO NOT INSTALL IN
- Locations exposed to direct sunlight or strong artificial lights
- Locations exposed to high concentrations of dust or smoke
- Locations subject to vibration
- Locations exposed to strong electromagnetic fields
- Locations near heating appliances
- Locations exposed to large amounts of electrical noise
- Locations subject to generation of electrostatic noise
- Locations subject to high humidity or poor ventilation
- Closed racks
Regarding copyrights
This product incorporates copyright protection technology that is protected by method claims of certain U.S. patents and other intellectual property rights owned by Macrovision Corporation and other rights owners. Use of this copyright protection technology must be authorized by Macrovision Corporation, and is intended for home and other limited viewing uses only unless otherwise authorized by Macrovision Corporation. Reverse engineering or disassembly is prohibited.
Transporting the player
When transporting this unit, always use the original packaging and avoid exposing the unit to vibrations, impacts, or dropping. During transport, do not allow the unit to be exposed to heat or moisture.
Also, before moving the unit, be sure to remove any disc and disconnect all cables and wires. Transporting the player with a disc loaded may result in damage to the disc or internal parts of the player. Moving the unit with cables attached may result in damage to connectors.
Special Precautions
Never move the player when it is operating. During play, discs rotate at very high speeds; lifting or moving the player at such times will result in damage to the disc. Likewise, subjecting the player to strong vibration or impact when a disc is loaded may result in damage to the player or disc. Whenever moving the player, stop playback and remove the disc first. Likewise stop playback and remove the disc before lifting or carrying the player.
This player is equipped with precision optical parts. Take adequate precautions to control temperature and dust in the room where it is installed.
Cleaning the pickup lens
The DVD player's lens should not become dirty in normal use, but if for some reason it should malfunction due to dust or dirt, consult your nearest Pioneer-authorized service center. Although lens cleaners for CD players are commercially available, we do not recommend using them since some may damage the lens.
Condensation
Condensation may form on internal parts of the player (mechanical parts and optical lenses) if it is brought into a warm room from a cool outdoors, or if the temperature of the room is raised too quickly. If condensation is left as is, the player will not operate properly, thus preventing playback. If internal condensation occurs, turn on the power and leave the player unused for 1 to 2 hours to allow it to acclimatize to the room temperature. This will allow the internal parts to rise to the same temperature as the room, thus evaporating any condensation and allowing it to be played once again.
Condensation may also occur in summer, if the outlet from an air cooler is allowed to direct its flow directly onto the player. In this event, change the installation location to avoid the flow from the air cooler.
Care of discs
■ Handling discs
- Do not apply seals or adhesive labels to the surface of a disc. Glue leaking from label edges can cause damage to the player.

- Discs with labels should not be used until confirming that no glue can leak from the edges.
- Do not touch the signal surface of a disc.


- Do not use cracked or broken discs.
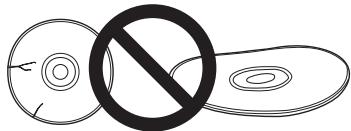
text_image
Diagram showing a crossed-out circle with a diagonal line and a crossed-out rectangular shape, indicating prohibition or exclusion.- Handle discs carefully to avoid scratching or soiling the surfaces.
■ Storing discs
- Always replace discs in their plastic jewel cases or sleeves, and store vertically in a location not exposed to direct sunlight, avoiding high temperatures or humidity, or very cold temperatures.
- Read all manufacturers' warnings supplied with discs.
Cleaning Care of the Unit
- Normal cleaning should consist of dry wiping the unit with a soft cloth. In the event of severe soiling, make a dilution of 1 part neutral deutergent in 5 or 6 parts water. Dip a soft cloth in the solution and wring well, then wipe away the dirt, followed by a gentle wiping with a soft dry cloth.
- Avoid contact of the unit with alcohol, thinner, benzene, insecticides or other similar chemicals, since they may cause the unit's labeling or finish to peel.
- Avoid long term contact of the unit with rubber or vinyl objects, since damage to the cabinet finish may result.
- When using a chemically impregnated cleaning cloth, read the instructions accompanying the cloth and follow all cautionary notes.
- Disconnect the power cord from its outlet before performing cleaning.
■ Care of discs
- Damaged or dirty discs can affect playback performance. Should a disc become marked with fingerprints, dust, etc., clean using a soft, dry cloth, wiping the disc lightly from center to outside edge as shown in the illustration. Wipe lightly from the center of the disc, using straight strokes. Do not wipe the disc surface using circular motions.
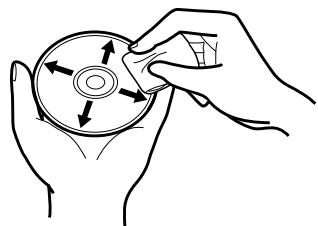
natural_image
Line drawing of hands holding a circular object with directional arrows indicating rotation or movement (no text or symbols)- Never use benzene or other volatile cleaners, including products designed for cleaning or eliminating static electricity from vinyl records.
- If necessary, use a cloth soaked in alcohol, or a commercially available CD/DVD cleaning kit to clean a disc more thoroughly.
- In the event of severe soiling, dip a soft cloth in water, wring it out thoroughly and wipe away the soiling, using straight strokes from center to outside edge. Then dry the disc wiping with a soft dry cloth.
■ Discs to avoid
This unit is designed for use only with conventional circular discs, and cannot be used to play discs of unusual shapes (hearts, pentagrams, etc.). Such discs can result in damage to the player, and should be strictly avoided.


Pioneer denies all responsibility for loss of data and any other direct or incidental damages arising from the use of this player or malfunctions occurring to it.
Disc / Content Format Playback Compatibility
General disc compatibility
This player was designed and engineered to be compatible with software bearing one or more of the following logos:

DVD-Video

DVD-R

DVD-RW

Audio CD

Video CD

CD-R

CD-RW
This player can play discs recorded in either PAL or NTSC format. Use those discs which indicates "NTSC" or "PAL" on the jacket.
Other formats, including but not limited to the following, are not playable in this player:
DVD-Audio / SACD / DVD-RAM DVD-ROM / CD-ROM
- DVD-R/RW and CD-R/RW discs (Audio CDs and Video CDs) recorded using a DVD recorder, CD recorder or personal computer may not be playable on this unit. This may be caused by a number of possibilities, including but not limited to: the type of disc used; the type of recording; damage, dirt or condensation on either the disc or the player's pick-up lens.
DVD-R/RW compatibility
- This unit will play DVD-R/RW discs recorded using the DVD-Video format that have been finalized using a DVD-recorder.
- This unit will play DVD-RW discs recorded using the Video Recording (VR) format.
- When playing a VR format DVD-RW discs that was edited on a DVD recorder, the screen may go momentarily black at edited points and/or you may see scenes from immediately before the edited point.
• This unit cannot record DVD-R/RW discs. - Unfinalized DVD-R/RW discs cannot be played in this player.
- This unit does not support CPRM compliant DVD-R discs.
CD-R/RW compatibility
- This unit will play CD-R and CD-RW discs recorded in CD Audio or Video CD format. However, any other content may cause the disc not to play, or create noise/distortion in the output.
• This unit cannot record CD-R or CD-RW discs. - This unit cannot play CD-R/RW discs that have not been finalized.
DVD is a trademark of DVD Format/Logo Licensing Corporation.
Personal computer-created disc compatibility
- If you record a disc using a personal computer, even if it is recorded in a “compatible format” as listed above, there will be cases in which the disc may not be playable in this machine due to the setting of the application software used to create the disc. In these particular instances, check with the software publisher for more detailed information.
Due to the unique construction of DVD-R/RW and CD-R/RW discs, leaving them for extended periods of time in the pause/still mode at a single place on the disc, or displaying a single menu page may result in the discs' becoming difficult to play at that location on the disc. When playing discs containing important data, users are recommended to construct backup archive discs.
DVD-Video regions
All DVD-Video discs carry a region mark on the case somewhere that indicates which region(s) of the world the disc is compatible with. Your DVD player also has a region mark, which you can find on the rear panel. Discs from incompatible regions will not play in this player. Discs marked ALL will play in any player.

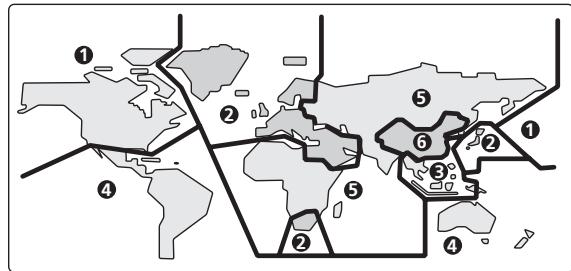
text_image
World map with numbered regions and labeled boundaries, showing Asia-Pacific and North America with marked areas.Copy controlled CDs
This player is designed to comply with music CD standards. Operation and playback of CDs that do not comply with music CD standards cannot be guaranteed.
Playback of "DualDisc" media
"DualDisc" media are discs with video or audio data complying with DVD standards recorded on one side, and with audio data recorded on the other side intended for playback on CD players.
The audio side opposite to the DVD side of these discs do not meet the physical standards of normal CDs, and may not play properly on this unit. The playback of the DVD side of "DualDisc" media is supported, but DVD-audio media cannot be played.
Refer to the manufacturer or your dealer for more information on the specifications and standards of "DualDisc" media.
Controls and Displays
Front panel

text_image
Pioneer 14 15 16 17 18 19 20 21 22 23 24 DVD VIDEO KEY LOCK TITLE, CHIP/TRACK MIN. SEC. FRAME ELAPSED FRAME DISPLAY STOP OPEN/CLOSE PLAY/PUASE SCAN/SHIP STILL/STEP SETUP WIND RETURN MOUSE/MEMORY 1 2 3 4 5 6 7 8 9 10 11 12 13 TOP MENU MENU DVD PLAYER DVD-V8000 PASS THROUGH/1 STANDBY/ON button (⏻)
Press to turn the player ON or set to standby mode.
2 STANDBY indicator
Lights during standby mode.
3 ON indicator
Lights when power is turned ON.
4 Disc tray
5 STOP OPEN/CLOSE button (■/▲)
Press to stop the disc. In stop mode, press to open or close the disc tray.
6 PLAY/PAUSE button (▶/II)
Press to start or resume playback. In the play mode, press to pause playback; press again to resume play.
7 Playback indicator
Lights up during playback.
8 SCAN/SKIP button (◄◄/|◄◄)
Press to jump to the previous chapter or track. Press and hold for fast reverse scanning.
9 SCAN/SKIP button (▶▶/▶▶)
Press to jump to the next chapter or track. Press and hold for fast forward scanning.
10 STILL/STEP button (◀II)
During playback, press to pause playback and display still image; press and hold for reverse slow-motion playback. Press during still image for frame reverse. Press during slow-motion playback to change reverse playback speed. (Enabled only during DVD playback.)
11 STILL/STEP button (II▶)
During playback, press to pause playback and display still image; press and hold to perform slow-motion playback. Press during still image for frame advance. Press during slow-motion playback to change playback speed.
12 PASS THROUGH button/indicator (MONITOR, VIDEO, AUDIO)
Use to switch settings for monitor, video, and audio output (page 77.)
MONITOR:
When the button is pressed so that the indicator lights, video signals input to the VIDEO IN connectors are output at MONITOR VIDEO OUT.
VIDEO:
When the button is pressed so that the indicator lights, video signals input to the VIDEO IN connectors are output at VIDEO OUT.
AUDIO:
When the button is pressed so that the indicator lights, audio signals input to the AUDIO IN connectors are output at AUDIO OUT after audio input level adjustment.
13 USB port (MOUSE/MEMORY)
Use to connect a USB mouse, tablet or USB memory device.
14 KEY LOCK indicator
The indicator will flash when a prohibited operation is requested during key lock mode.
15 DISPLAY button
Press to display disc information.
16 LCD display
See page 24.
17 LCD button
Use to switch the information appearing in the main unit display.
18 Remote control sensor
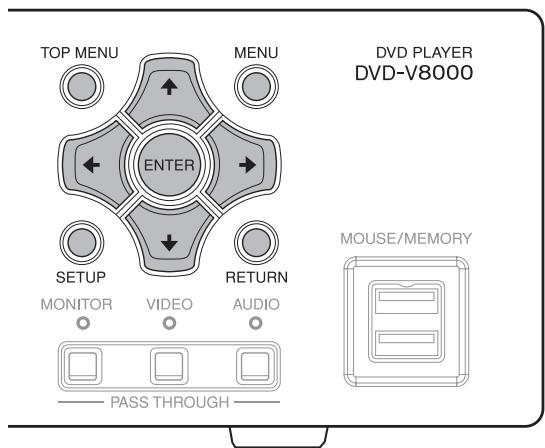
19 SETUP button
Press to display the SETUP menu.
Press and hold for one second to open the ADV. SETUP menu.
Press again to close the SETUP menu or ADV. SETUP menu.
20 TOP MENU button
Press to display the top menu of a DVD disc.
21 Cursor buttons (↑, ↓, ←, →)
Use to select/change items, or to move the cursor.
22 ENTER button
Press to execute the setting or selected item.
23 MENU button
When playing DVD video software, press to display the disc menu.
For DVD-RW media, Video CDs or music CDs, press to display the Disc Navigator.
24 RETURN button
Press to return to previous menu screens when in screens such as SETUP menu screen or menu screen.
Rear panel
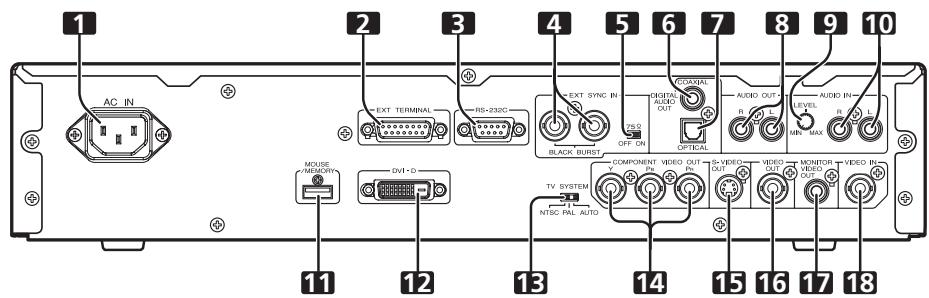
text_image
1 AC IN 2 3 4 5 6 7 8 9 10 EXT TERMINAL RS-232C EXT SYNC IN AUDIO AUDIO OUT AUDIO OUT LEVEL R S MIN MAX R S L BLACK BURST OFF ON OPTICAL COMPONENT VIDEO OUT IN S-VIDEO OUT VIDEO OUT MONITOR VIDEO OUT VIDEO IN TV SYSTEM NTSC PAL AUTO 11 12 13 14 15 16 17 181 Power cord connector (AC IN)
2 Extend Terminal connector (EXT TERMINAL)
External switches can be connected to control the DVD-V8000 (page 89).
The connector can also be used as an RS-232C interface.
3 RS-232C interface connector
A computer can be connected to allow serial-port control of the DVD-V8000 (page 84).
4 External sync signal input connector (EXT SYNC IN)
Input/output terminals for external sync signals (page 80).
5 External sync signal terminator switch (75Ω ON/OFF)
This switch is used to terminate an external sync signal. (Default position: ON)
6 Coaxial digital audio output jack (DIGITAL AUDIO OUT COAXIAL)
Outputs coaxial digital audio signals.
7 Optical digital audio output connector (DIGITAL AUDIO OUT OPTICAL)
Outputs optical digital audio signals.
8 Audio output jacks (AUDIO OUT L, R)
Outputs analog audio signals.
9 AUDIO IN LEVEL adjustment dial
Use to adjust the level of audio signals input to the audio input connectors. Factory default setting is at the center position; rotating the dial to the left (MIN) side reduces the sound level, and rotating the dial to the right (MAX) side increases the sound level.
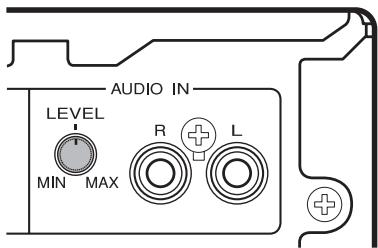
text_image
AUDIO IN LEVEL MIN MAX R LImportant
- The DVD-V8000 is provided with video and audio input connectors, and supports the use of 1 Vp-p composite video signals and 2 Vrms (0 dBfs) analog audio signals. If signals are input with levels greatly exceeding these values, the through output signals may generate video noise and audio distortion.
- The range of adjustment possible with the external audio input level dial is from - to +6 dB. However, it should be used only to the degree that the through audio output signal level is 2 Vrms (0 dBfs) or less. Allowing signal levels greater than 2 Vrms may cause sound distortion.
10 AUDIO IN jacks (L, R)
Outputs analog audio signals (page 77).
11 USB port (MOUSE/MEMORY)
Can be used to connect a USB mouse/pen tablet, or USB memory device.
12 DVI output connector (DVI-D)
Outputs DVI video.
13 TV system switch (TV SYSTEM NTSC/PAL/AUTO)
When playing video discs, this control changes the output television signal format to match the signal format recorded on the disc. (Default: AUTO)
14 Component video output jacks (COMPONENT VIDEO OUT, Y, P_B , P_R )
Outputs component video signals.
15 S-VIDEO output terminal (S-VIDEO OUT)
Outputs S-video signals.
16 Composite video output jack (VIDEO OUT)
Outputs composite video signals (page 26).
17 Monitor video output jack (MONITOR VIDEO OUT)
Outputs monitor video signals.
18 Composite video input jack (VIDEO IN)
Use to input composite video signals from an external source (page 77).
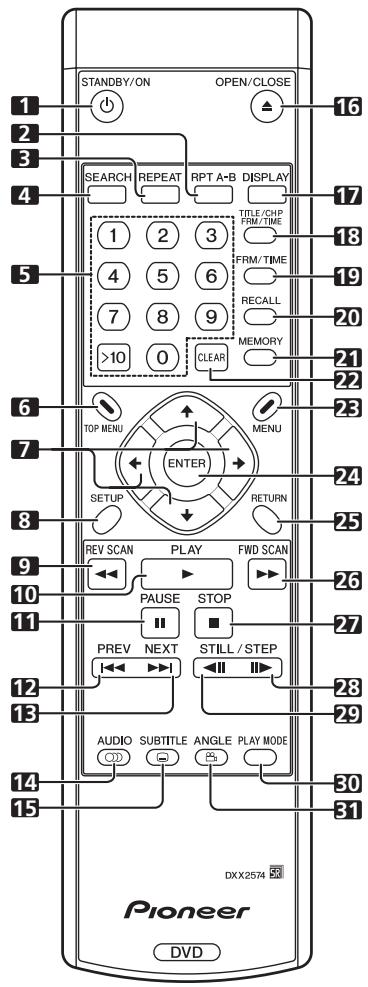
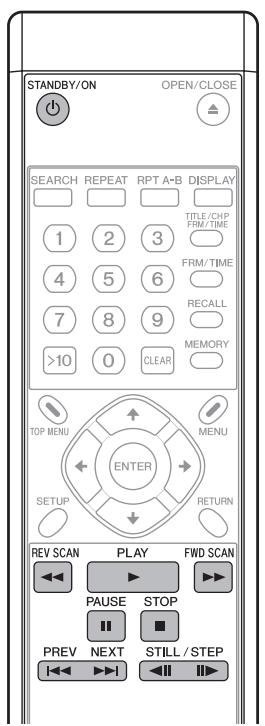
Remote control unit
text_image
STANDBY/ON OPEN/CLOSE 1 2 3 4 SEARCH REPEAT RPT A-B DISPLAY TITLE/CHP FRM/TIME 17 5 6 4 5 7 8 9 >10 0 CREAR FRM/TIME 18 19 20 MEMORY 21 22 23 TOP MENU MENU ENTER RETURN SETUP FWD SCAN REV SCAN PLAY STOP PREV NEXT STILL / STEP 10 11 12 13 AUDIO SUBTITLE ANGLE PLAY MODE 30 31 DXX2574 Pioneer DVD1 STANDBY/ON button (⏻)
Press to turn the player ON and OFF (standby mode).
2 RPT A-B button
Press to repeat play the specified section.
3 REPEAT button
Press to perform repeat play of individual chapters (or tracks), individual titles or all titles.
4 SEARCH button
Commences search.
5 Number buttons (0 to 9, >10)
Press to specify and play the desired title/chapter/track. Press to select an item in the menu screen. To select a 2-digit number, first press >10, and then enter the desired numbers.
6 TOP MENU button
Press to display the top menu of a DVD disc.
7 Cursor buttons (↑, ↓, ←, →)
Selects/changes items, or moves the cursor.
8 SETUP button
Press to open the SETUP menu.
Press and hold for one second to open the ADV. SETUP menu.
Press again to close the SETUP or ADV. SETUP menu.
9 REV SCAN button (◀◀)
Press for fast reverse scanning. Scanning speed will change in 3 levels each time the button is pressed.
10 PLAY button (▶)
Press to start playback.
11 PAUSE button (II)
During playback, press to pause playback of video/audio. Press again to resume normal playback.
12 PREV button (◀◀)
Press to jump to the beginning of the current chapter or track, then to previous chapters/tracks.
13 NEXT button (▶▶)
Press to jump to the next chapter or track.
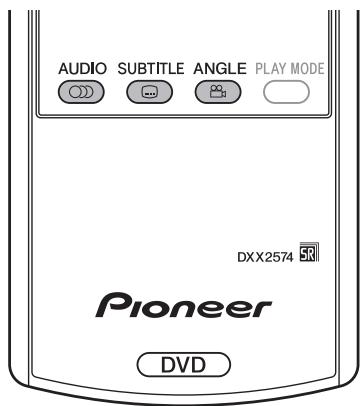
14 AUDIO button
Press to switch the audio of the currently playing track.
15 SUBTITLE button
Press to select a subtitle display.
16 OPEN/CLOSE button (▲)
Press to open or close the disc tray.
17 DISPLAY button
Press to display disc information.
18 TITLE/CHP FRM/TIME button
Press to perform title/chapter/frame/time search.
19 FRM/TIME button
Press to perform frame/time search.
20 RECALL button
Press to display the COMMAND STACK call-up menu.
21 MEMORY button
Press to display COMMAND STACK input menu.
22 CLEAR button
Press to clear repeat playback, random playback, program playback and other settings.
23 MENU button
Press to display DVD disc menu, or the Disc Navigator if a DVD-RW, music CD or Video CD disc is loaded.
24 ENTER button
Press to execute the selected setting or item.
25 RETURN button
Press to return to previous menu screens when in screens such as SETUP menu screen or menu screen.
26 FWD SCAN button (▶▶)
Press to perform fast forward scanning. Scanning speed will change in 3 levels each time the button is pressed.
27 STOP button (■)
Press to stop disc playback.
28 FWD STILL/STEP button (II▶)
During playback, press to pause playback and display still image; press and hold to perform slow-motion playback. Press during still image for frame advance. Press during slow-motion playback to change playback speed.
29 REV STILL/STEP button (◀II)
During playback, press to pause playback and display still image; Press and hold for reverse slow-motion playback. Press during still image for frame reverse. Press during slow-motion playback to change reverse playback speed. (Enabled only during DVD playback.)
30 PLAY MODE button
Press to display the Play Mode menu.
31 ANGLE button (☐)
Press to change the camera angle during DVD multi-angle scene playback.
Loading batteries in the remote control unit
Open the battery compartment cover on the back of the remote control unit and insert two AA/R6P batteries.
- Insert the batteries properly so that the positive (+) and negative (−) polarities of the batteries are aligned with the diagram in the compartment.
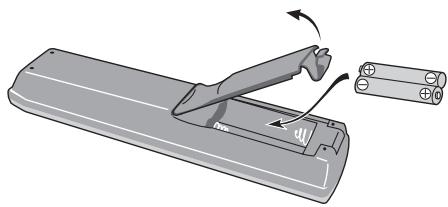
natural_image
Illustration of a remote control device with a clip and connector, showing motion arrows (no text or symbols)
Important
- Do not mix new and old batteries together.
- Do not use different kinds of batteries together—although they may look similar, different batteries may have different voltages.
- Remove batteries when not using a device for a month or more, to prevent the batteries from leaking. In the cases of battery leakage, thoroughly wipe off leaked liquid and insert new batteries.
When disposing of used batteries, please comply with governmental regulations or environmental public instruction's rules that apply in your country/area. D3-4-2-3-1_En
WARNING
Do not use or store batteries in direct sunlight or other excessively hot place, such as inside a car or near a heater. This can cause batteries to leak, overheat, explode or catch fire. It can also reduce the life or performance of batteries. D3-4-2-3-3_En
■ Operating range of remote control unit
Point the remote control unit toward the remote control sensor on the front panel of the main unit to operate. The remote control has a range of up to approximately 7 m, and can be operated in angles up to 30^ to left or right from the front of the remote control sensor.
- The remote control unit may not operate correctly if a strong light such as daylight or a fluorescent light shines directly on the remote control sensor.
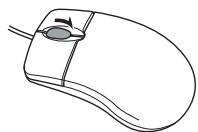
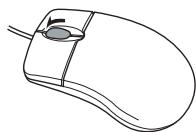
Operation using a mouse
In addition to the remote control unit, a mouse can also be used to operate the DVD-V8000 if desired.
A USB mouse can be connected to either of the MOUSE/MEMORY ports located in the front and rear panels.
The following operations can be performed by using a mouse:
1. SETUP menu
Select and change settings by left clicking on the mouse when the cursor pointer appears as the hand shape (☐). Right click to return to the previous screen.
2. ADV. SETUP menu
See "Advanced Setup Menu (Settings for Commercial Use)" on page 54.
3. Video blackboard function
This mode allows you use the mouse or pen tablet to draw freehand illustrations on the screen.
See "Video Blackboard Function" on page 75.
4. Player control functions
The player control icon appears, and the mouse can be used to issue play commands.
See "About the player control panel" on page 74.
5. Using the scroll wheel during image playback
The DVD-V8000 supports the use of the mouse's scroll wheel to perform operations during video playback.
(1) Clicking the scroll wheel
Click the scroll wheel during playback to display still image. Click the scroll wheel during still image display to resume normal playback.
Play/Still image

(2) Scrolling backwards
Rotate the scroll wheel backwards to fast-forward the play-back. Scroll the wheel backwards during still image display to perform frame advance.
(3) Scrolling forwards
Rotate the scroll wheel forwards to fast-reverse the playback. Scroll the wheel forwards during still image display to perform frame reverse (DVD disc only).
During playback: ▶▶ During still image: II▶
During playback: ◀◀ During still image: ◀II (DVD only)

Note
- The same operations can be performed when playing CDs. Clicking the mouse wheel during playback engages the pause mode, and clicking the wheel during the pause releases the pause and resumes playback. Rotating the mouse wheel during playback engages the fast forward and fast reverse functions; rotating the wheel, however, has no effect when the player is in the pause mode.
Main unit display
Main unit display information
The DVD-V8000 is equipped with a LCD capable of displaying 2 rows of 16 characters, allowing the user to easily confirm operating status (playback, time information, error data, etc.), and settings by looking at the main unit alone. The displayed items can be switched as described in items ① to ④ below by pressing the LCD button on the main unit.
When power is turned on, displays information (①) as listed below.
① Disc type and status
② Playback mode
③ Image output mode
④ DVI output mode
In case of ⑤ or ⑥ below, the indicated items will take precedence over ① to ④ above.
⑤ When setting ADV. SETUP items: the setting item and setting status are displayed
When making settings in ADV. SETUP, the selected item and its setting status are displayed in the main unit display so that settings can be changed without having to connect a monitor to the player.
(Complex setting items such as COMMAND STACK, WEEKLY TIMER and EXTEND TERMINAL are not supported under this feature)
⑥ Error messages: The error contents (or error code) are displayed
If an error is detected by the self-diagnosis circuit when the power is first turned on, or if a mechanical/servo error is detected, the error contents will be displayed.
When the power is turned ON by pressing the STANDBY/ON button while pressing the DISPLAY button, the accumulated power-on time and playback time (time meter) will be displayed on the screen and main unit display (page 78). This information screen reverts to the normal display when a button input is performed.
Although the main unit display backlight turns on during the power on procedure, if no operation or input is performed via the buttons on the main unit or remote control unit, the buttons on the EXTEND TERMINAL, or the mouse for a period of 3 minutes, the backlight will automatically turn off. If a command is made after this, the command will be executed and the backlight will turn on again.
Exceptions: When the LCD button is pressed when the backlight is turned off, the backlight will turn on without the displayed items changing. Press the LCD button once again after the backlight is turned on to change the displayed items.
Contrast adjustment
Press and hold down the LCD button to open the contrast adjustment menu as shown below. The contrast will repeatedly increase and decrease between Min and Max levels while the LCD button is held depressed. Release the LCD button at the desired contrast point to set the contrast to that level.
CONTRAST ADJUST
Min ■■■□□ Max
Display details
① Disc type and status
a) During DVD playback
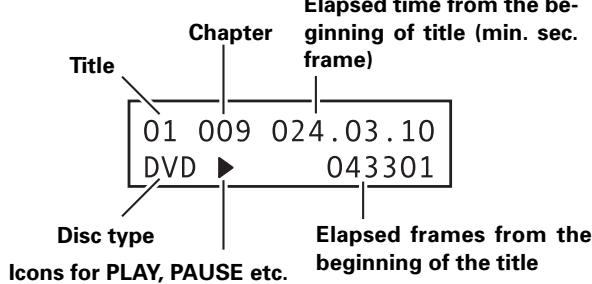
text_image
Chapter Title 01 009 024.03.10 DVD ▶ 043301 Disc type Icons for PLAY, PAUSE etc. Elapsed frames from the beginning of the title Elapsed time from the beginning of title (min. sec. frame)- Depending on the disc title, the elapsed time and frame may not be displayed.
b) During music CD or Video CD playback
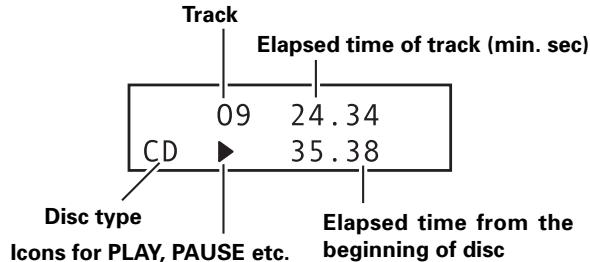
text_image
Track 09 24.34 CD 35.38 Disc type Icons for PLAY, PAUSE etc. Elapsed time from the beginning of disc
Important
- With some tracks, the refreshing of the upper row and lower row elapsed time displays may not occur at the same time.
c) Video CD Playback Control display
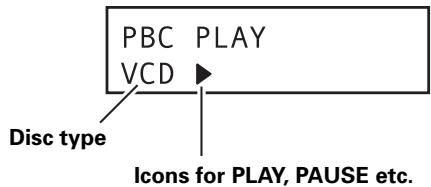
text_image
PBC PLAY VCD Disc type Icons for PLAY, PAUSE etc.② Playback mode display
a) During programmed playback
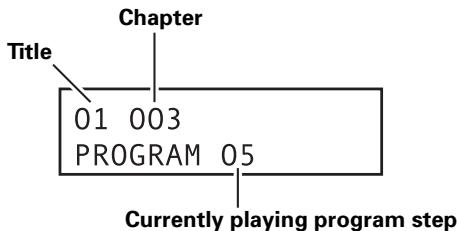
text_image
Chapter Title 01 003 PROGRAM 05 Currently playing program stepb) During repeat playback
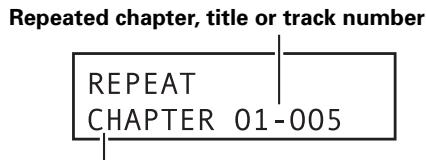
text_image
Repeated chapter, title or track number REPEAT CHAPTER 01-005Repeat mode
(CHAPTER, TRACK, TITLE, ALL, A-B or PROGRAM)
c) Command Stack display
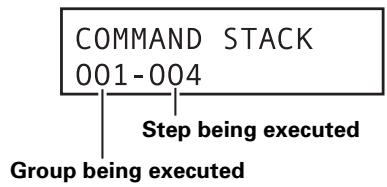
flowchart
graph TD
    A["COMMAND STACK\n001-004"] --> B["Step being executed"]
    B --> C["Group being executed"]
③ Video output mode display
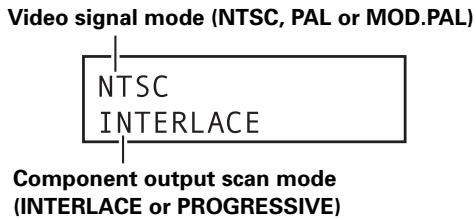
text_image
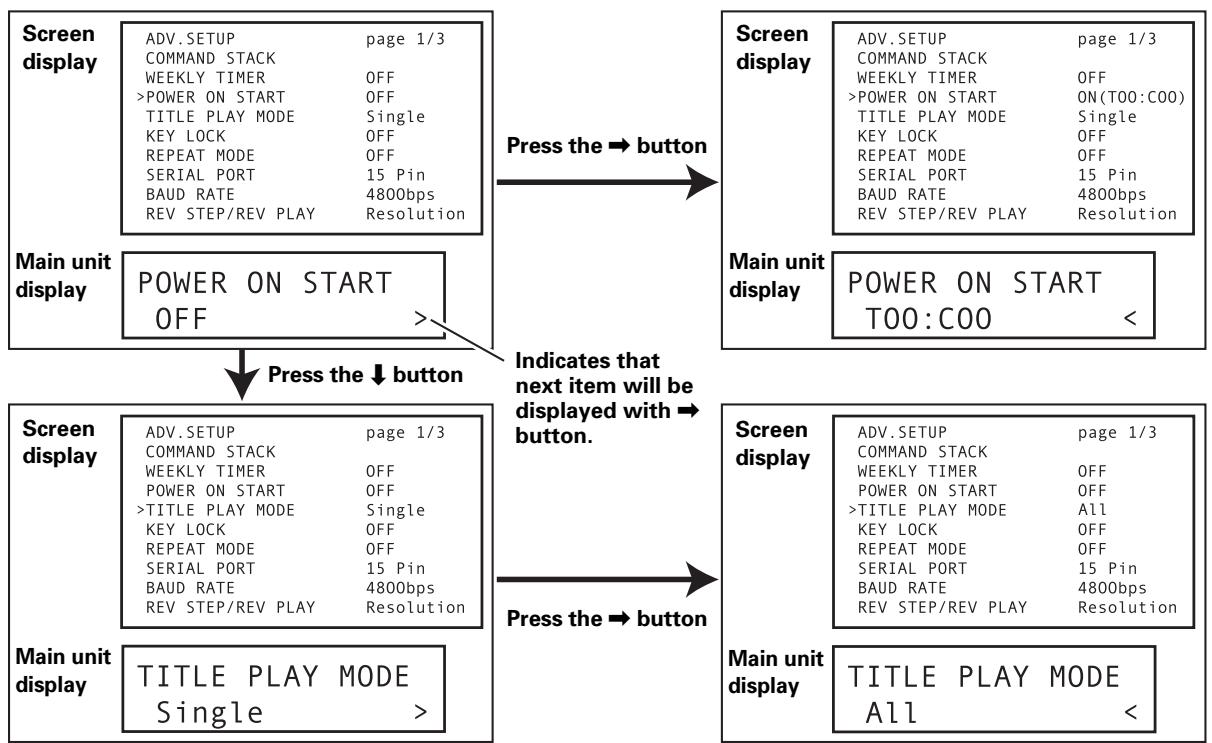
Video signal mode (NTSC, PAL or MOD.PAL) NTSC INTERLACE Component output scan mode (INTERLACE or PROGRESSIVE)ADV. SETUP menu display
When making settings in ADV. SETUP, displays the setting item and its current status.
Using this display, the user can make settings to ADV. SETUP menu items using the main unit's display and buttons.
Example of main unit display during ADV. SETUP
flowchart
graph TD
    A["Screen display"] --> B["ADV. SETUP page 1/3"]
    B --> C["COMMAND STACK"]
    C --> D["WEEKLY TIMER OFF"]
    D --> E["POWER ON START OFF"]
    E --> F["TITLE PLAY MODE Single"]
    F --> G["KEY LOCK OFF"]
    G --> H["REPEAT MODE OFF"]
    H --> I["SERIAL PORT 15 Pin"]
    I --> J["BAUD RATE 4800bps"]
    J --> K["REV STEP/REV PLAY Resolution"]

    L["Main unit display"] --> M["POWER ON START OFF"]
    M --> N["Press the ↓ button"]

    O["Screen display"] --> P["ADV. SETUP page 1/3"]
    P --> Q["COMMAND STACK"]
    Q --> R["WEEKLY TIMER OFF"]
    R --> S["POWER ON START OFF"]
    S --> T["TITLE PLAY MODE Single"]
    T --> U["KEY LOCK OFF"]
    U --> V["REPEAT MODE OFF"]
    V --> W["SERIAL PORT 15 Pin"]
    W --> X["BAUD RATE 4800bps"]
    X --> Y["REV STEP/REV PLAY Resolution"]

    Z["Main unit display"] --> AA["TITLE PLAY MODE Single"]
    AA --> AB["Press the → button"]

    AC["Screen display"] --> AD["ADV. SETUP page 1/3"]
    AD --> AE["COMMAND STACK"]
    AE --> AF["WEEKLY TIMER OFF"]
    AF --> AG["POWER ON START OFF"]
    AG --> AH["TITLE PLAY MODE All"]
    AH --> AI["KEY LOCK OFF"]
    AI --> AJ["REPEAT MODE OFF"]
    AJ --> AK["SERIAL PORT 15 Pin"]
    AK --> AL["BAUD RATE 4800bps"]
    AL --> AM["REV STEP/REV PLAY Resolution"]

    AN["Main unit display"] --> AO["TITLE PLAY MODE All"]
    AO --> AP["Press the → button"]
- See pages 92 to 93 for details regarding main unit display contents when using ADV. SETUP.
④ DVI output mode

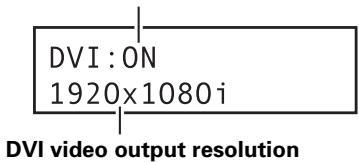
text_image
DVI:ON 1920x1080i DVI video output resolution● Displayed resolution is one of the following: VGA [640x480]
720x480i
720x480p
720x576i
720x576p
1280x720p
1920x1080i
Displaying disc information
Press the DISPLAY button during disc playback to display the track, chapter and title information of the disc, as well as video transmission rate when playing DVD discs.
Disc information is displayed at the top of the screen. Press the DISPLAY button again to change the contents of the displayed information.
During DVD playback
| Play | DVD | |||
| Current / Total | Elapsed | Remain | Total | |
| Title | 1/3 | 2.23 | 138.36 | 138.59 |
| Frame | 4295 | 250470 | ||
| Audio | 1 English | 1 English | 1 Angle | |
| Dolby Digital | 3/2.1CH | Subtitle | ||
| Play | DVD | |||
| Current / Total | Elapsed | Remain | Total | |
| Chapter | 2/36 | 0.06 | 1.40 | 1.46 |
| Frame | 196 | 3180 | ||
| # Tr. Rate : | 6.0Mbps | |||
During DVD-Video playback, the # mark displayed with some DVD-Video discs indicates that the video is playing in 24 fps (frames-per-second) progressive scan mode.
| Still | DVD | ||||
| Current / Total | Elapsed | Remain | Total | ||
| Title | 1/1 | 0.05 00 | 19.55 | 20.00 | |
| Frame | 151 | 36000 | |||
| Audio | 1 English | Subtitle | Angle | 1 | |
During VR format DVD-RW playback
| Play | DVD-RW | Original | ||
| Current / Total | Elapsed | Remain | Total | |
| Title | 1/32 | 0.08 | 30.22 | 30.30 |
| Audio Dolby Digital 2/0CH Subtitle | ||||
| Play | DVD-RW | Original |
| Current / Total | ||
| Chapter | 1/1 | |
| Tr. Rate | ■■■■■ | 4.3Mbps |
During Video CD playback
| Play | VCD | |||
| Current / Total | Elapsed | Remain | Total | |
| Track | 2/16 | 0.23 | 4.20 | 4.43 |
| Play | VCD | |||
| Elapsed | Remain | Total | ||
| Disc | 0.23 | 58.51 | 57.14 | |
During music CD playback
| Play | CD | |||
| Current / Total | Elapsed | Remain | Total | |
| Track | 2/16 | 1.07 | 4.40 | 5.47 |
| Play | CD | |||
| Elapsed | Remain | Total | ||
| Disc | 28.00 | 30.20 | 58.20 | |

Note
- If display setting [On Screen Display] is set to [Off], disc information will not be displayed even if the DISPLAY button is pressed (see page 45).
Monitor out functions
■ Monitor OSD (On Screen Display)
The disc information listed on page 26 is superimposed on all image outputs. However the DVD-V8000 is also equipped with a composite video output connector for the connection of a data monitor in addition to the normal video output, thus allowing disc information to be superimposed on the monitor video output signals alone if desired.
For purposes of this player, the disc information displayed only on the data monitor is called "Monitor OSD".
(See page 83 for connection instructions.)
The ADV. SETUP menu allows the "Monitor OSD" to be set for display at the top of the screen, bottom of screen, or for display OFF. The default is for the Monitor OSD to be displayed at the bottom of the screen (page 56).
■ Monitor OSD display contents
During normal playback (DVD Video)

text_image
T:01/01 ▶ 055387 111600 030.46 031.14 062.00 C:011/021 000.46 002.14 003.00① Current title/Total number of titles, Current frame, Total frames
② Remaining time to current title end Elapsed time from current title start Current title total playing time
③ Current chapter/Total chapters in all titles
④ Remaining time to current chapter end Elapsed time from current chapter start Current chapter total playing time
During normal playback (VR formatted DVD-RW)
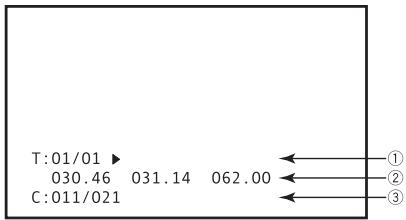
text_image
T:01/01 ▶ 030.46 031.14 062.00 C:011/021① Current title/Total number of titles
② Remaining time to current title end Elapsed time from current title start Current title total playing time
③ Current chapter/Total chapters in all titles
During marker playback (DVD Video)
During playback with marker set when using Command Stack's [SEGMENT PLAY] or [CHAPTER PLAY].
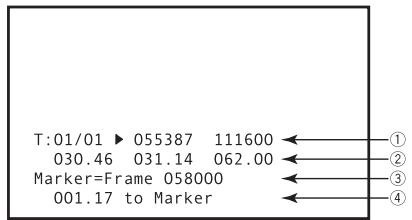
text_image
T:01/01 ▶ 055387 111600 030.46 031.14 062.00 Marker=Frame 058000 001.17 to Marker① Current title/Total number of titles, Current frame, Total frames
② Remaining time to current title end Elapsed time from current title start Current title total playing time
③ Mark address
④ Remaining time to mark address
During menu display

text_image
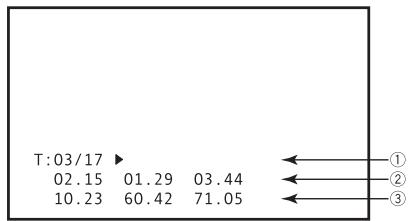
MENUDuring normal playback (CD, Video CD)
text_image
T:03/17 ▶ 02.15 01.29 03.44 10.23 60.42 71.05 ←① ←② ←③① Current track/Total number of tracks
② Remaining time to end of current track Elapsed time from start of current track Total playing time of current track
③ Remaining time to disc end Elapsed time from disc start Total disc playing time
During Playback Control play (Video CD)

text_image
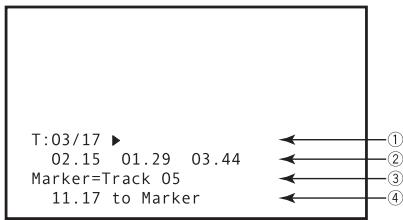
PBCDuring marker playback (CD, Video CD)
During playback with marker set when using RS-232C command.
text_image
T:03/17 ▶ 02.15 01.29 03.44 Marker=Track 05 11.17 to Marker① Current track/Total number of tracks
② Remaining time to end of current track Elapsed time from start of current track Total playing time of current track
③ Mark address
④ Remaining time to mark address

Important
Regarding the Number of display digits
- For frames with more than 6 digits, the last 6 digits only are displayed.
- For times exceeding 999 minutes, the last 3 digits only are displayed.
Playing Discs
Unless otherwise specified, "DVD" as used in this manual refers to DVD-Video and DVD-R/RW media.
- If the player's power is not turned on, press the STANDBY/ON button (⏻) to turn power on.
- Press the STOP OPEN/CLOSE button (■/▲) to open disc tray.
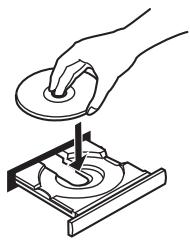
natural_image
Line drawing of a hand using a circular tool to press down a mechanical component (no text or symbols)- Insert disc.
- Place disc, label-side up, along the disc guides on the disc tray.
- Press the PLAY/PAUSE button (▶/Ⅲ) to start playback.
- Some DVDs and Video CDs may display menu screens. For operation instructions, see the sections "DVD-Video disc menu" and "Video CD PBC menu" on page 29.
Basic operations
The table below shows the basic operations involved when playing discs.
| PLAY/PAUSE button (▶/II) | Starts playback. Pauses a disc that is playing, or restarts a paused disc playback. No image is displayed during pause mode. |
| STOP OPEN/CLOSE button (■/▲) | Stops disc that is playing. When a disc is stopped, operates to open/close the disc tray. |
| SCAN/SKIP button (◀◀|◀◀) | Press to skip to previous track/chapter. Press and hold for fast reverse scanning. |
| SCAN/SKIP button (▶▶▶▶) | Press to skip to next track/chapter. Press and hold for fast forward scanning. |
| STILL/STEP button (II▶) | Press for frame advance, press and hold for slow motion playback. |
| STILL/STEP button (◀II) | Press for frame reverse, press and hold for reverse slow motion playback. (DVD only) |
text_image
STANDBY/ON OPEN/CLOSE SEARCH REPEAT RPT A-B DISPLAY TITLE/CHP FRM/TIME 1 2 3 4 5 6 7 8 9 >10 0 CLEAR MEMORY TOP MENU MENU ENTER SETUP RETURN REV SCAN PLAY FWD SCAN PAUSE STOP PREV NEXT STILL/STEP ◀◀ ▶▶▶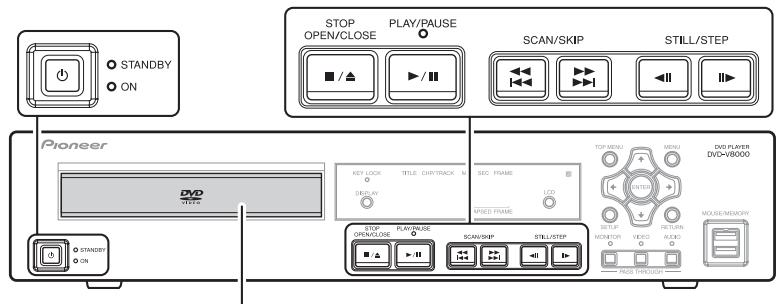
text_image
STANDBY ON Pioneer DVO TITLE STOP OPEN/CLOSE PLAY/PAUSE SCAN/SKIP STILL/STEP KEY LOCK TITLE CHIP/TRACK SEC. FRAME LCD USED FRAME TOP MENU MENU DVD PLAYER DVD+V8000 SETUP RETURN MOUSE/MEMORY STOP OPEN/DOSE PLAY/PUSE SCAN/SHP STILL/STEP PAGE THROUGHDisc Tray
DVD-Video disc menu
Many DVD-Video discs contain menus allowing the direct selection and viewing of specific parts of the disc.
Menus may contain subtitle/audio language selections and/or special options such as slideshows. Depending on the DVD-Video disc, these menus may be automatically displayed when playback has started. However when this is not the case, the menu will only be displayed when the MENU or TOP MENU button is pressed.
| TOP MENU button | Press to display the top menu of a DVD disc. |
| MENU button | Press to display the menu of a DVD. This button may function the same way as TOP MENU. |
| ↑, ↓, ←, → buttons | Use to move the cursor on the screen. |
| ENTER button | Use to confirm the item selected by the cursor. |
| RETURN button | Press to return to previous menu screens. |
| 0 to 9, >10 (number) buttons (Remote control unit) | Use to select numbered menu options (Some discs only). |
Video CD PBC menu
Some Video CDs may contain PBC (Playback Control) menus. When the PLAY button is pressed with a Video CD containing a PBC menu the PBC menu will be displayed. By pressing the number pad buttons, the disc can be played without operating the PBC menu.
| RETURN button | Press during playback to display PBC menu. |
| 0 to 9, >10 (number) buttons (Remote control unit) | Press to plays each track. |
| PREV button (i◀◀) | Press to display the previous menu page (when applicable). |
| NEXT button (▶▶I) | Press to display the next menu page (when applicable). |

Important
- When playing Video CDs with the PBC menu screen displayed, the repeat playback and the track/time search functions are disabled. When repeat playback and track/time search functions are required, do not display the menu, but press the PREV button, NEXT button or a number button when the disc is stopped to start playback in the search mode.
text_image
TOP MENU MENU ENTER SETUP RETURN MONITOR VIDEO AUDIO PASS THROUGH DVD PLAYER DVD-V8000 MOUSE/MEMORY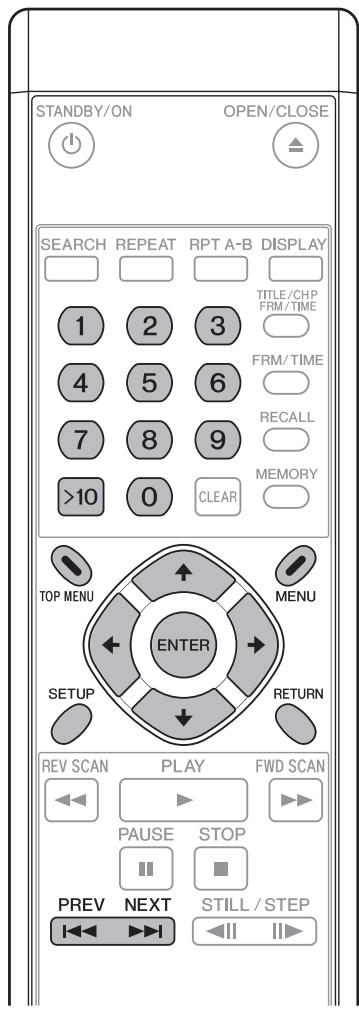
text_image
STANDBY/ON OPEN/CLOSE SEARCH REPEAT RPT A-B DISPLAY TITLE/CHP FRM/TIME 1 2 3 4 5 6 7 8 9 >10 0 CLEAR MEMORY TOP MENU MENU ENTER SETUP RETURN REV SCAN PLAY FWD SCAN PAUSE STOP PREV NEXT STILL / STEP I←→→←→Switching DVD subtitles
Press the SUBTITLE button to display information regarding the currently selected subtitle mode. During playback, pressing the SUBTITLE button repeatedly will switch between available subtitle modes.

Subtitle
1 English

Important
- Some discs may allow subtitles to be changed only through the menu screen. Press the TOP MENU button to display the menu and change the subtitle function there.
● For subtitle languages initial settings, see page 43.
Switching DVD audio language
Press the AUDIO button to display information regarding the currently selected audio language. During playback, pressing AUDIO repeatedly will switch between the available audio languages.

Audio
1 French
Dolby Digital 3/2.1CH

Important
- Some discs may allow switching between audio languages only through the menu screen. Press the TOP MENU button to display and menu and change the audio language there.
● For audio languages initial settings, see page 43.
Switching the audio channel on VR format DVD-RW discs
When playing DVD-RW discs formatted in VR format, press the AUDIO button to display the currently selected audio channel. During playback, pressing the AUDIO button repeatedly will switch between the available audio channels, in the order main, sub and mix.

Audio
1L
Dolby Digital 1+1CH
Switching audio channel on Video CD discs
When playing Video CDs, press the AUDIO button to display the currently selected audio channel. During playback, pressing the AUDIO button repeatedly will switch the audio channel in the order of stereo, left channel, and right channel.

Audio
Stereo
Switching multi-angle DVD images
Some DVDs include multiple camera angles in specific scenes. During the playback of multi-angle scenes, the camera icon [∞] will be displayed. Press the ANGLE button during the playback of multi-angle scenes to switch angles if desired.


Note
- If desired, you may choose not to display the camera icon [☐] in initial settings (page 45).
text_image
AUDIO SUBTITLE ANGLE PLAY MODE DXX2574 SR Pioneer DVDSkipping chapters/tracks
[Front panel operations]
Press the SCAN/SKIP button (▶▶ ▶▶) to move to the next chapter or track.
Press the SCAN/SKIP button (◀◀ | ◀◀) to return to the beginning of the currently playing chapter or track. Press again to return to the beginning of previous chapters or tracks.
[Remote control operations]
Press the NEXT button (▶▶) to move to the next chapter or track.
Press the PREV button (◀◀) to return to the beginning of the currently playing chapter or track. Press again to return to previous chapter or track.
Fast forward/reverse scanning
[Front panel operations]
Press and hold the SCAN/SKIP button (▶▶▶▶) during playback to perform fast forward scan.
Press and hold the SCAN/SKIP button (◀◀◀) during playback to perform fast reverse scan.
[Remote control operations]
Press the FWD SCAN button (▶▶) during playback to perform fast forward scan.
- Press repeatedly during fast forward scan to change the scanning speed in three levels.
Press the REV SCAN button (◀◀) during playback to perform fast reverse scan.
- Press repeatedly during fast reverse scan to change scan speed in three levels.
![PIONEER DVD-V8000 - [Remote control operations] - 1](/content/2024/12/76091/images/c5fc9730523dfdde49ed97b5d6ab25ea3d3dbb7d45793cbf05923a2fde44110d.jpg)
Note
- When playing CDs, audio can be heard during fast forward/reverse scanning.
- When playing Video CDs or DVDs, audio is not heard during fast forward/reverse scanning.
- When playing DVDs, subtitles are not displayed during the fast forward/reverse scanning.
- When playing Video CDs, if fast forward/reverse scanning is performed, normal playback will resume at the beginning or end of the track.
- When playing DVDs, if fast forward/reverse scanning is performed, normal playback may resume at the beginning or end of a chapter, depending on the DVD.
text_image
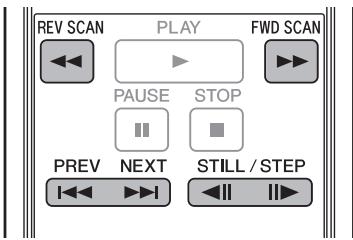
REV SCAN PLAY FWD SCAN PAUSE STOP PREV NEXT STILL / STEPStill image playback and frame reverse/advance (DVDs and Video CDs)
Press the STILL/STEP button (III▶) during playback.
- A still image will be displayed. Press the button again to advance one frame at a time.
● In the case of DVDs, frame reverse can also be performed.
Press the STILL/STEP button (◀II) during playback (DVD only).
- The operation will differ depending on the [REV STEP/REV PLAY] settings in the ADV. SETUP menu (page 55).
[Resolution]:
Frames reverse is performed with emphasis on image quality.
[Smooth]:
Frame reverse is performed with emphasis on speed of reaction to button input.
![PIONEER DVD-V8000 - [Smooth]: - 1](/content/2024/12/76091/images/07a1f5d5c05e68a0f24bd97a8fc726c39992c7ffd8de8f8640cf74597e559420.jpg)
Note
- Audio is not heard during still image play and frame advance/reverse.
- Frames may not advance/reverse one at a time, depending on the disc (for example, movie software recorded at 24 fps (frames-per-second)).
- If a DVD's still images are blurred, set [Still Picture] in initial settings to [Field] (page 42). This setting will help reduce blurring by halving the vertical resolution.
- Some discs may not display still images even if the STILL/STEP button is pressed.
- Pressing the PAUSE button will pause the disc and display the background color (blue or black) instead of the image.
Slow motion playback of DVDs and Video CDs
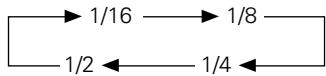
Press and hold the STILL/STEP button (II▶) during playback.
- Pressing the STILL/STEP button (II▶) repeatedly during slow motion playback will change the playback speed in the following order:
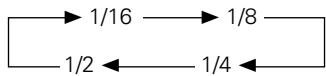
- In the case of DVDs, reverse slow motion playback can also be performed.
During playback, press and hold the STILL/STEP button (◀II) (DVD only).
- Pressing the STILL/STEP button (◀II) during reverse slow motion playback will change the playback speed.
- The operation will differ depending on the [REV STEP/REV PLAY] settings in the ADV. SETUP menu (page 55).
[Resolution]:
[Slow 1] ←→ [Slow 2]
[Smooth]:

Note
● Audio is not heard during slow motion playback.
- Press the PLAY button to resume normal playback.
Search Playback
DVD title search
[During playback]
1. Press the TITLE/CHP FRM/TIME button.
- The title number will be displayed flashing on the screen.
Title 1
2. Input a desired title number using the number pad buttons (0 to 9).
● To select title 3, press [3] on the number pad.
Title 3
- To select title 10, press [1] [0] on the number pad, in order.
Title 10
3. Press the SEARCH button.
● The playback of the specified title will start.
- Playback of the desired title can also be started by pressing the PLAY or ENTER button instead of SEARCH button.
[During stop]
1. Input the desired title number using the number pad buttons (0 to 9, >10).
● To select title 3, press [3] on the number pad.
Title 3
- To select title 10, press [>10] [1] [0] on the number pad, in order.
Title 10
● Playback of the specified title will start.

Note
- On some discs, titles may also be selected by using the menu screen. Press the MENU button and select titles from the menu.
Chapter/track search
[Normal search]
1. Press the TITLE/CHP FRM/TIME button.
- When playing a DVD, pressing this button twice will make the chapter number flash.
- With Video CDs and music CDs, pressing this button once will make the track number flash.
2. Input the desired chapter/track number using the number pad buttons (0 to 9).
- To select chapter/track 31, press [3] [1] on the number pad, in order.
- To select chapter/track 117, press [1] [1] [7] on the number pad, in order.
3. Press the SEARCH button.
- Playback of the specified chapter/track will start.
- Playback of the specified chapter/track can also be started by pressing the PLAY or ENTER button instead of SEARCH button.
[Direct search]
1. Input the chapter/track number using the number pad buttons (0 to 9, >10) during playback.
- For chapter/track 3, press [3] on the number pad.
- For chapter/track 17, press [>10] [1] [7] on the number pad in the described order.
● The playback of the specified title will start.

Note
- Some discs cannot be searched using the number buttons.
- Cancel search by pressing the CLEAR button twice when the title/chapter/track number is displayed flashing on the screen.
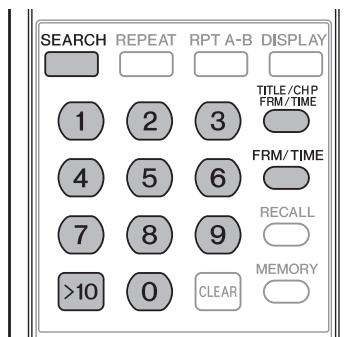
DVD frame search
1. Press the FRM/TIME button to enter the frame input mode.
- The frame number will be displayed flashing on the screen.
Frame : 0
2. Input the desired frame number using the number pad buttons (0 to 9).
- To select frame 219113, press [2] [1] [9] [1] [1] [3] on the number pad, in order.
Frame : 219113
3. Press the SEARCH button.
● The specified frame will be displayed as a still image.

Note
- Accurate frame search may not be possible when using discs including slide shows, or movie software (recorded at 24 fps).
- Depending on the disc, accurate frame search may not be possible for the few frames before or after the borders between titles or chapters.
- Search may not be supported with some titles. In such cases, a message to that effect will be displayed on the screen.

Important
- Frame search cannot be performed on DVD-RW discs recorded in VR format.
● The highest frame that can be designated is 999999.
text_image
SEARCH REPEAT RPT A-B DISPLAY 1 2 3 TITLE/CHP 4 5 6 FRM/TIME 7 8 9 RECALL >10 0 CLEAR MEMORYDVD and Video CD time search
1. Press the FRM/TIME button to enter time input mode.
● The time will be displayed flashing on the screen.
- With DVDs, pressing the button twice will display the time flashing on the screen.
Time : 0.00
2. Input the desired time number using the number pad buttons (0 to 9).
- To select 21 minutes and 43 seconds, press [2] [1] [4] [3] on the number pad, in order.
Time : 21.43
3. Press the SEARCH button.
- Playback will begin from the specified time.
- Playback from the specified time can also be started by pressing the PLAY or ENTER button instead of SEARCH button.
Important
- Playback may not begin precisely at the specified time.
- With DVDs, time search cannot be performed from the stop mode.
● Time search cannot be performed during PBC playback with Video CDs. - The highest time that can be designated is 999 minutes and 59 seconds.
Search playback using Play Mode menu
Search playback can be performed by using [Search Mode] within the Play Mode menu.
- With DVDs, title search, chapter search, frame search and time search can be performed.
● With CDs, track search can be performed. - With Video CDs, track search and time search can be performed.
1. Load a disc and press the PLAY MODE button to display the Play Mode menu.
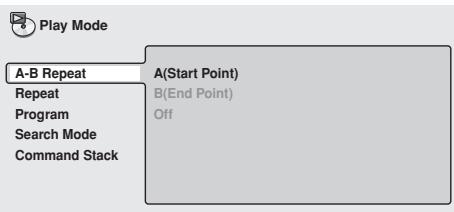
text_image
Play Mode A-B Repeat A(Start Point) Repeat B(End Point) Program Off Search Mode Command Stack2. Press the down cursor button (↓) to select [Search Mode].
![PIONEER DVD-V8000 - Press the down cursor button (↓) to select [Search Mode]. - 1](/content/2024/12/76091/images/2db12e07888c45f46e947e73b9a1b9f3dd2519acc001dececc58a167b05fc985.jpg)
text_image
Play Mode A-B Repeat Repeat Program Search Mode Command Stack Title Search Chapter Search Time Search Frame Search3. Use the cursor buttons (↑, ↓, ←, →) to select the type of search, and press the number pad buttons (0 to 9) to input the desired title/chapter/track/time/frame number.
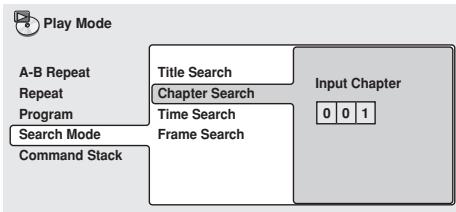
flowchart
graph TD
    A["Play Mode"] --> B["A-B Repeat"]
    A --> C["Repeat Program"]
    A --> D["Search Mode"]
    A --> E["Command Stack"]
    B --> F["Title Search"]
    C --> G["Chapter Search"]
    D --> H["Time Search"]
    E --> I["Frame Search"]
    F --> J["Input Chapter 0 0 1"]
    G --> J
    H --> J
    I --> J
- For time search, specify the minutes and seconds of the currently playing title (for DVDs) or currently playing track (for Video CDs).
Example: Inputting [4] [5] [0] [0] will start playback from 45 minutes 00 seconds.
To start playback at 1 hour, 20 minutes, 30 seconds, input [8] [0] [3] [0], as in 80 minutes 30 seconds.
4. Press the ENTER button.
- Playback from the designated section will begin.
Important
- The disc must be already playing to perform a search for a specified time and/or frame.
- Search cannot be performed with Video CD discs playing in PBC mode.
- Frame search cannot be performed with DVD-RW discs recorded in VR format.
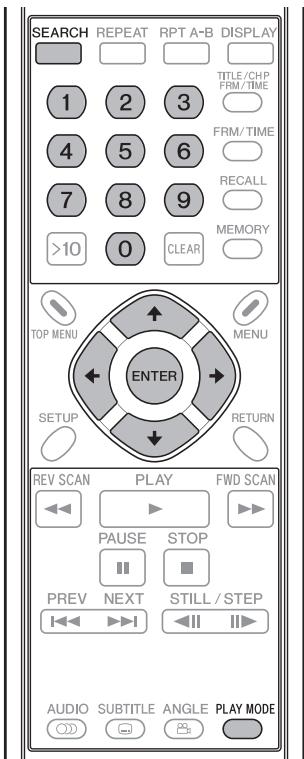
text_image
SEARCH REPEAT RPT A-B DISPLAY TITLE/CHP FRM/TIME FRM/TIME RECALL MEMORY >10 0 CLEAR TOP MENU MENU ENTER SETUP RETURN REV SCAN PLAY FWD SCAN PAUSE STOP PREV NEXT STILL/STEP AUDIO SUBTITLE ANGLE PLAY MODESearch-playback using Disc Navigator
Desired playback points can be searched by browsing the disc using the Disc Navigator.
1. Load disc and press the SETUP button to display SETUP screen.
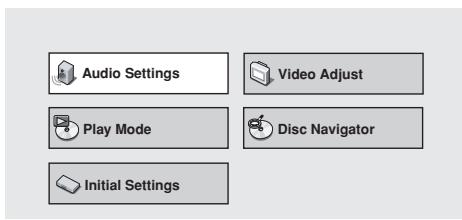
text_image
Audio Settings Video Adjust Play Mode Disc Navigator Initial Settings2. Use the cursor buttons (↑, ↓, ←, →) to select [Disc Navigator], then press the ENTER button.
![PIONEER DVD-V8000 - Use the cursor buttons (↑, ↓, ←, →) to select [Disc Navigator], then press the ENTER button. - 1](/content/2024/12/76091/images/4182a29ef88656f3ea2f6804a2e52614852e4786a97c9e9a6e8051d8b8ba11da.jpg)
text_image
Audio Settings Video Adjust Play Mode Disc Navigator Initial Settings- When a DVD-RW (in VR format), a music CD, or a Video CD is loaded, the Disc Navigator can be displayed by pressing the MENU button.
3. Use the cursor buttons ( , , , ) to select the desired playback section.
- The information displayed by the Disc Navigator will differ depending on the loaded disc.
[DVD]
- The title will be displayed on the left and chapters on the right.
- If a title is selected, the chapters within the title will be displayed.
![PIONEER DVD-V8000 - [DVD] - 1](/content/2024/12/76091/images/6da9b38e68bfabd595802bdfc6ebb825f603d04cdd4560a2914cafec3c2736f5.jpg)
text_image
Disc Navigator Title (1-10) Chapter (1-003) DVD Title 01 Chapter 01 Title 02 Chapter 02 Title 03 Chapter 03 Title 04 Chapter 03 Title 05 Title 06 Title 07 Title 08 ↓[DVD-RW in VR format]
- [Play List] and [Original] can be selected; also, by selecting a title and pressing the right cursor button (→), the contents of the title can be viewed.
![PIONEER DVD-V8000 - [DVD-RW in VR format] - 1](/content/2024/12/76091/images/56d57b4801c77c9f5bdf0c603a19b70b6228db3bff787da36202d832ad72b0bb.jpg)
text_image
Disc Navigator DVD-RW Original Play List Title(1-03) 01. 3/31 FIRST LEAGUE 02. 4/28 SECOND LEAGUE 03. 4/29 FINAL ROUND- Switching between [Original] and [Play List] cannot be performed during disc playback.
- Play Lists are not included in all DVD-RW discs recorded in VR format.
[CD and Video CD]
● The track list will appear.
![PIONEER DVD-V8000 - [CD and Video CD] - 1](/content/2024/12/76091/images/6b308cfa7ebad49601f875ea6daa74302314354f7a9604172823c4cb34911f39.jpg)
text_image
Disc Navigator CD Track (1-10) Track 01 Track 02 Track 03 Track 04 Track 05 Track 06 Track 07 Track 084. Press the ENTER button.
● The selected section will be played.

Important
● Disc Navigator cannot be used unless a disc is loaded.
- Disc navigator cannot be used during PBC menu playback of Video CDs.
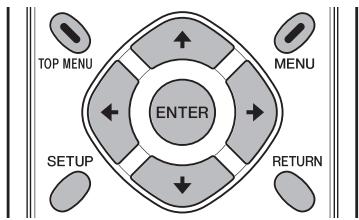
flowchart
graph TD
    A["ENTER"] --> B["TOP MENU"]
    A --> C["MENU"]
    A --> D["SETUP"]
    A --> E["RETURN"]
    B --> F["Up Arrow"]
    C --> G["Down Arrow"]
    D --> H["Left Arrow"]
    E --> I["Right Arrow"]
Repeat Playback
Important
- Depending on the title, some DVD discs may not support repeat playback.
- Repeat playback cannot be performed during PBC playback of Video CDs. To enable repeat playback, start playback without displaying the menu screen (page 29), and then perform the repeat play operation.
- If the camera angle setting is changed during repeat playback, the repeat playback will be canceled.
Chapter/track repeat
Performs repeat play of one chapter or track.
1. During the playback of the chapter or track you wish to repeat, press the REPEAT button so that the [Repeat Chapter] indicator appears.
- For Video CDs and music CDs, [Repeat Track] will be displayed.
- To stop repeat playback, press the CLEAR button. Repeat playback mode will be canceled but normal disc playback will continue.
![PIONEER DVD-V8000 - During the playback of the chapter or track you wish to repeat, press the REPEAT button so that the [Repeat Chapter] indicator appears. - 1](/content/2024/12/76091/images/aa6399ee057708cccb1f95e86c1fda33ca0e56b60be7941e8bdb6e3ee36cb927.jpg)
text_image
STANDBY/ON OPEN/CLOSE SEARCH REPEAT RPT A-B DISPLAY TITLE/CHP FRM/TIME 1 2 3 4 5 6 7 8 9 >10 0 CLEAR MEMORY TOP MENU MENU ENTER SETUP RETURN REV SCAN PLAY FWD SCAN PAUSE STOP PREV NEXT STILL / STEP AUDIO SUBTITLE ANGLE PLAY MODETitle repeat
Performs repeat play of one title.
- For Video CDs and music CDs, the entire CD is considered a single title, with the result that the entire disc will be repeated.
- To stop repeat playback, press the CLEAR button. Repeat mode will be canceled, but normal disc playback will continue.
1. During playback of the title that you wish to repeat, press the REPEAT button so that the [Repeat Title] indicator appears.
All repeat (for DVDs)
Repeats all titles on disc.
- This function is enabled only when the [TITLE PLAY MODE] in the ADV. SETUP menu is set to [AII] (page 55).
1. During playback, press the REPEAT button so that the [Repeat All] indicator appears.
- To stop repeat playback, press the CLEAR button. The repeat mode will be canceled, but normal disc playback will continue.
A-B repeat
By selecting a start point (A) and an end point (B), repeat play can be performed of the section between the two points.
- Sections less than 2 seconds in length cannot be repeated.
1. During playback, press the RPT A-B button at the desired starting point (A) of the section to be repeated.
- Press the CLEAR button to cancel the start point (A).
2. When playback reaches the desired end point (B) press the RPT A-B button again.
- To stop repeat playback, press the CLEAR button. The repeat mode will be canceled, but normal disc playback will continue.
Repeat playback using the Play Mode menu
Also, repeat playback can be performed by using the Play Mode menu.
[A-B Repeat]
By selecting a start point and end point, repeat playback can be performed of the section between the two.
- Sections less than 2 seconds in length cannot be repeated.
1. During playback, press the PLAY MODE button to display the Play Mode menu, then select [A-B Repeat].
![PIONEER DVD-V8000 - During playback, press the PLAY MODE button to display the Play Mode menu, then select [A-B Repeat]. - 1](/content/2024/12/76091/images/64007b8a7ff2f7efedb215ddec849371ccf69621772eddc79787dbcabbaaa946.jpg)
text_image
Play Mode A-B Repeat A(Start Point) Repeat B(End Point) Program Off Search Mode Command Stack2. Select [A(Start Point)], and press the ENTER button at the desired start point (A).
![PIONEER DVD-V8000 - Select [A(Start Point)], and press the ENTER button at the desired start point (A). - 1](/content/2024/12/76091/images/28be1cff319adfaf8d11a6e10ce18e80d19b8248c9b61a3d02925907e2f78e24.jpg)
text_image
Play Mode A-B Repeat A(Start Point) Repeat B(End Point) Program Off Search Mode Command Stack3. Select [B(End Point)], and press the ENTER button at the desired end point (B).
![PIONEER DVD-V8000 - Select [B(End Point)], and press the ENTER button at the desired end point (B). - 1](/content/2024/12/76091/images/47e3193cadcfa6279b9b2eb5741b684afc1c8b3156fc3ec6b4028d8331ba802a.jpg)
text_image
Play Mode A-B Repeat Repeat Program Search Mode Command Stack A(Start Point) B(End Point) Off- If [Off] is selected, the repeat mode will be canceled and playback will continue.
- The repeat mode can also be canceled by pressing the CLEAR button.
[Repeat]
Several methods can be used to perform repeat playback, depending on the type of disc. Repeat playback can also be combined with program playback.
1. During playback, press the PLAY MODE button to display the Play Mode menu, then select [Repeat].
- The available repeat modes will be displayed; choose the desired mode for repeat play.
■ DVD playback
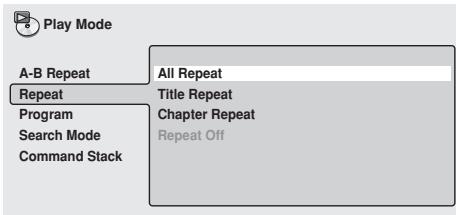
text_image
Play Mode A-B Repeat All Repeat Repeat Title Repeat Program Chapter Repeat Search Mode Repeat Off Command StackAll Repeat
Repeat play is performed for all titles on the disc. This mode is supported only when the [TITLE PLAY MODE] in the ADV. SETUP menu is set to [AII] (page 55).
Title Repeat
The currently playing title is repeated.
Chapter Repeat
The currently playing chapter is repeated.
Repeat Off
Normal playback is resumed.
■ CD/Video CD playback

text_image
Play Mode A-B Repeat Disc Repeat Repeat Track Repeat Program Repeat Off Search Mode Command StackDisc Repeat
The currently playing disc is repeated.
Track Repeat
The currently playing track is repeated.
Repeat Off
Normal playback is resumed.
■ During program playback
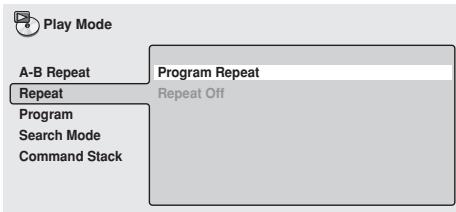
text_image
Play Mode A-B Repeat Repeat Program Search Mode Command Stack Program Repeat Repeat OffProgram Repeat
Currently playing programmed play list is repeated.
Repeat Off
Normal program playback is resumed.
- Normal playback can also be resumed by pressing the CLEAR button during repeat playback.
Programmed Playback
Programmed playback allows the user to program up to 24 steps (titles, chapters or tracks) in a desired order for playback.
Important
- Programmed playback cannot be performed with DVD-RW discs recorded in VR format. In addition, programmed playback cannot be performed during playback of Video CD discs in PBC mode and during menu display of DVDs.
Creating a program list
- Load a disc, and press the PLAY MODE button to display the Play Mode menu, then select [Program].
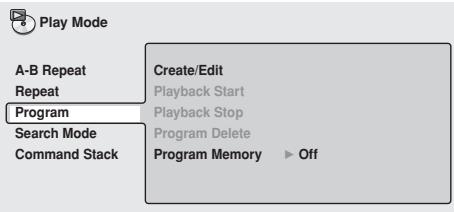
text_image
Play Mode A-B Repeat Create/Edit Repeat Playback Start Program Playback Stop Search Mode Program Delete Command Stack Program Memory ▶ Off- Press the right cursor button (→) to select [Create/Edit] and press the ENTER button.
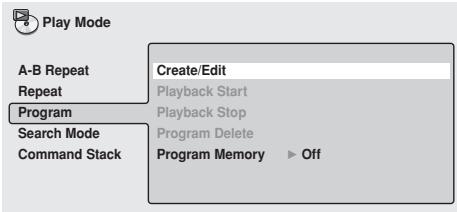
text_image
Play Mode A-B Repeat Create/Edit Repeat Playback Start Repeat Playback Stop Program Search Mode Program Delete Command Stack Program Memory ▶ Off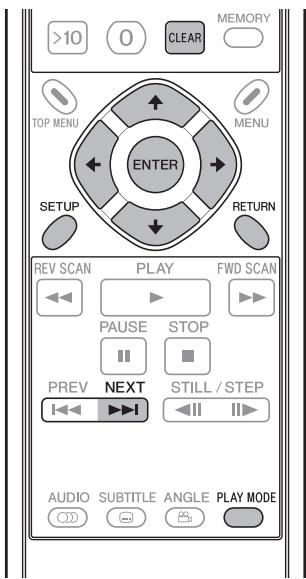
text_image
>10 0 CLEAR MEMORY TOP MENU MENU ENTER SETUP RETURN REV SCAN PLAY FWD SCAN PAUSE STOP PREV NEXT STILL / STEP AUDIO SUBTITLE ANGLE PLAY MODE- Select a title/chapter/track that you wish to include in your programmed play list, then press the ENTER button.
- This operation completes the setting of one step of the program.
[Selecting a DVD title]
Use the up/down cursor buttons (↑, ↓) to select the title you wish to include in your programmed play list, and press the ENTER button.
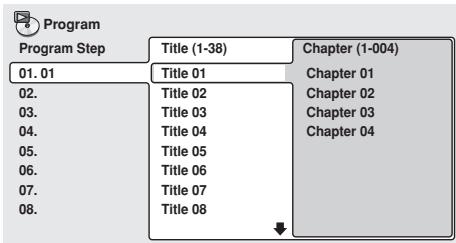
text_image
Program Program Step 01. 01 02. 03. 04. 05. 06. 07. 08. Title (1-38) Title 01 Title 02 Title 03 Title 04 Title 05 Title 06 Title 07 Title 08 Chapter (1-004) Chapter 01 Chapter 02 Chapter 03 Chapter 04[Selecting a DVD chapter]
Press the right cursor button (→) and choose [Chapter], then use the up/down cursor buttons (↑, ↓) to select the chapter you wish to include in your programmed play list, then press the ENTER button.
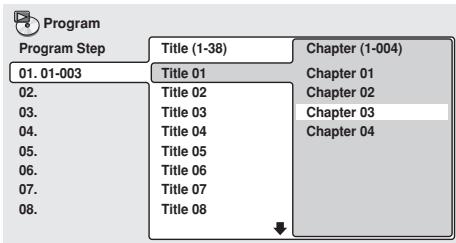
text_image
Program Program Step 01. 01-003 02. 03. 04. 05. 06. 07. 08. Title (1-38) Chapter (1-004) Title 01 Chapter 01 Title 02 Chapter 02 Title 03 Chapter 03 Title 04 Chapter 04 Title 05 Title 06 Title 07 Title 08[Selecting a Video CD/CD track]
Use the up/down cursor buttons (↑, ↓) to select a track you wish to include in your programmed play list, then press the ENTER button.
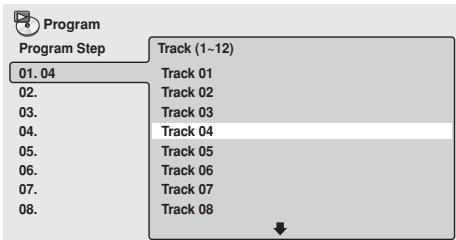
text_image
Program Program Step Track (1~12) 01.04 Track 01 02. Track 02 03. Track 03 04. Track 04 05. Track 05 06. Track 06 07. Track 07 08. Track 08 ↓- Repeat step 3 to program all desired titles/chapters/tracks into the program play list.
Note
● A programmed play list can be created in up to 24 steps.
● The pause mode cannot be included in a program.
- Programmed steps can be added and deleted if desired. See "Editing a program list" (page 38) for detailed instructions.
Important
- If the RETURN button is pressed during creation of a program list, the created program list (input program steps) will be canceled.
To save a program list, press the PLAY MODE or SETUP button to exit the program list input mode.
5. Press the PLAY button (▶) to begin playback of the created program.
Note
- During program play, pressing the NEXT button (▶▶▶) will cause playback to jump to the next program step.
- During program play, pressing the CLEAR button will cancel the program, and normal playback will resume.
- Repeat program play is possible (page 36).
Important
- Pressing the CLEAR button when the disc is stopped will erase the program list.
Editing a program list
- Press the PLAY MODE button to display the Play Mode menu, then select [Program].
- Use the right cursor button (→) to select [Create/Edit], then press the ENTER button.
- To erase a program step, highlight the desired [Program Step] (displayed at left), and press the CLEAR button.
- The selected step will be erased and the remaining steps will be advanced in order.
- To insert a new program step, highlight the [Program Step] (displayed at left) at the point you wish to insert the new step, move the cursor to the right and select title/chapter/track, then press the ENTER button.
- A new step will be inserted at that point in the program list and the remaining steps will be advanced in order.
- To add a new program step, at the very end of a program list, highlight the blank space following the last [Program Step] (displayed at left), move the cursor to the right and select title/chapter/track, then press the ENTER button.
- A new step will be added at the very end of the program list.
- Press the PLAY MODE or SETUP button to exit the program list input mode.
Important
- If the RETURN button is pressed to exit the program list input mode, the changes made to the program list will be canceled.
Program play/stop/delete
1. Press the PLAY MODE button to display the Play Mode menu, then select [Program].
- If a program list has already been created, it can be selected.
![PIONEER DVD-V8000 - Press the PLAY MODE button to display the Play Mode menu, then select [Program]. - 1](/content/2024/12/76091/images/4f595468837597401809adf4a7facf7a429a7961a56bf291e5c84860504c9f3e.jpg)
text_image
Play Mode A-B Repeat Create/Edit Repeat Playback Start Program Playback Stop Search Mode Program Delete Command Stack Program Memory Off■ Playback Start:
Begin playing the contents of an already created program.
■ Playback Stop:
Return to normal (non-program) playback. The contents of the program list will remain stored, however. Program play can also be canceled by pressing the CLEAR button during program play.
■ Program Delete:
Deletes all contents of the program list. A program list can also be deleted by pressing the CLEAR button when the disc is stopped.
Program Memory
Contents of a program list can be preserved even when a disc is removed from the player. When a program list is preserved in this way, loading the corresponding disc will initiate automatic playback of the disc's contents in accordance with the preserved program list. Program lists for up to 20 discs can be preserved in this way. If more than 20 program lists are recorded, the earliest recorded program list will be overwritten with the newly recorded list.
1. Highlight [Program Memory], and move the cursor to the right.
![PIONEER DVD-V8000 - Highlight [Program Memory], and move the cursor to the right. - 1](/content/2024/12/76091/images/bc04ecd71573a0f7b94059444d2e0d891f9d0b6ec944bed2eb6a23fa9efb2cee.jpg)
text_image
Play Mode A-B Repeat Create/Edit On Repeat Playback Start ■ Off Program Playback Stop Search Mode Program Delete Command Stack Program Memory2. Select [On], and press the ENTER button.
- To cancel program memory mode, select [Off] and press the ENTER button.
Initial Settings
Setting procedure
To perform initial settings, press the SETUP button to display the SETUP menu on the television set, and use the cursor buttons (↑, ↓, ←, →) to select items and make settings, then press the ENTER button to confirm settings.

Note
- Initial settings cannot be made when a disc is playing. Stop playback in the event it is necessary to make initial settings.

Important
- New settings will not be stored if the setting menu is exited before completing the setting procedures.
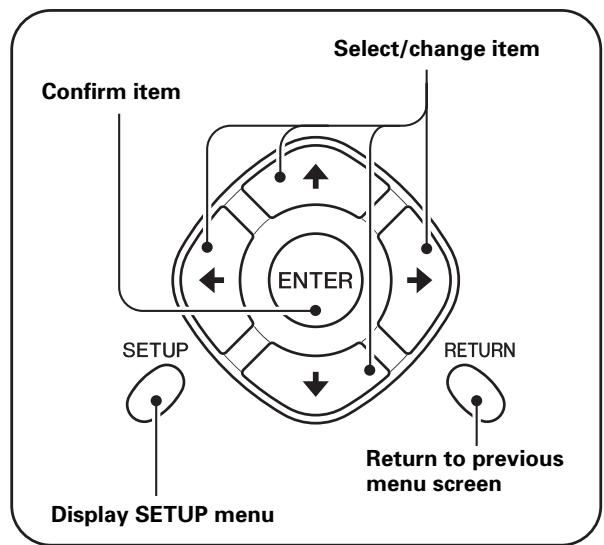
flowchart
graph TD
    A["ENTER"] --> B["Confirm item"]
    B --> C["Select/change item"]
    C --> D["RETURN"]
    D --> E["Return to previous menu screen"]
    E --> F["Display SETUP menu"]
    style A fill:#f9f,stroke:#333
    style B fill:#ccf,stroke:#333
    style C fill:#cfc,stroke:#333
    style D fill:#fcc,stroke:#333
    style E fill:#cff,stroke:#333
    style F fill:#ffc,stroke:#333
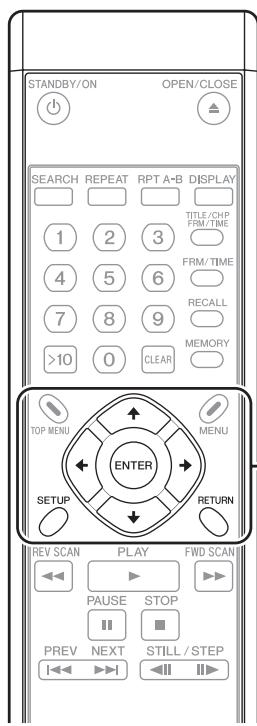
text_image
STANDBY/ON OPEN/CLOSE SEARCH REPEAT RPT A-B DISPLAY TITLE/CHP FRM/TIME 1 2 3 4 5 6 FRM/TIME 7 8 9 RECALL MEMORY >10 0 CLEAR TOP MENU ENTER MENU SETUP RETURN REV SCAN PLAY FWD SCAN PAUSE STOP PREV NEXT STILL/STEP- Press the SETUP button to display SETUP menu.
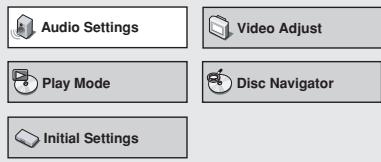
text_image
Audio Settings Video Adjust Play Mode Disc Navigator Initial Settings- Use the cursor buttons (↑, ↓, ←, →) to select [Initial Settings] and press the ENTER button.
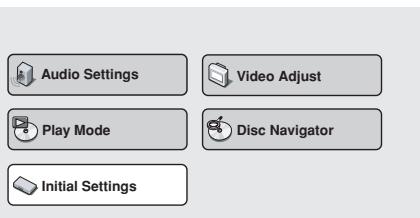
text_image
Audio Settings Video Adjust Play Mode Disc Navigator Initial Settings- Use the cursor buttons (↑, ↓, ←, →) to select and set items, and then press the ENTER button to confirm the settings.
- Repeat this procedure as needed to complete all required settings. - Press the RETURN button to return to the previous menu screen.
- Press the SETUP button to complete Initial Settings.
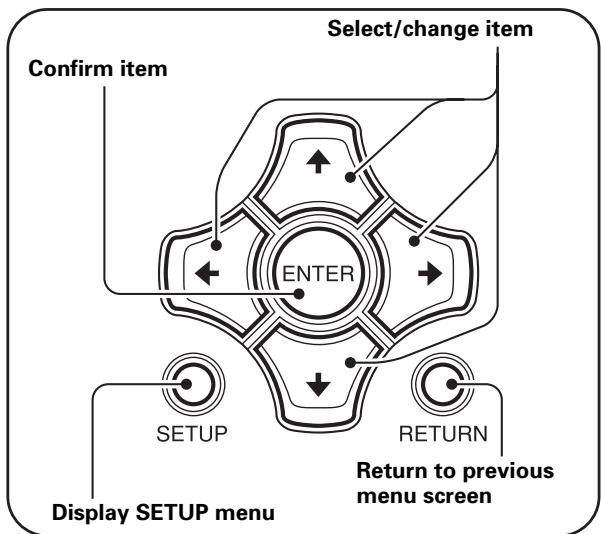
flowchart
graph TD
    A["Display SETUP menu"] --> B["SETUP"]
    B --> C["ENTER"]
    C --> D["RETURN"]
    D --> E["Select/change item"]
    E --> F["Confirm item"]
    style C fill:#f9f,stroke:#333
    style D fill:#ccf,stroke:#333
    style E fill:#cfc,stroke:#333
    style F fill:#fcc,stroke:#333
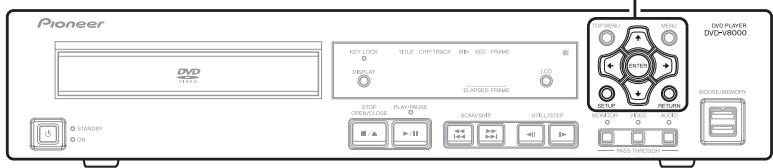
text_image
Pioneer DVD 17:45 KEY LOCK 0 DISPLAY 0 OUTPUT STOP OPEN/CLOSE PLAY/MAKE 0 SCAN/BRIP 0 STILL/STEP 0 RUN/FLU 0 RANGE 0 MOSCELLANEOLOGY 0 ON 0 STRAWBY 0 DVO PLAYER DVD-V8000 RESET 0 MINI 0 CENTER 0 RETURN 0 MOLEC/MEMIDRY 0 PASS THROUGH...Digital audio output settings
1. Press the SETUP button to open the SETUP menu, then use the cursor buttons (↑, ↓, ←, →) to select [Initial Settings] and press the ENTER button
(page 39).
(Use the cursor buttons (↑, ↓, ←, →) to select [Digital Audio Out].)
![PIONEER DVD-V8000 - Press the SETUP button to open the SETUP menu, then use the cursor buttons (↑, ↓, ←, →) to select [Initial Settings] and press the ENTER button - 1](/content/2024/12/76091/images/297f296255d9454c5dd1c635862745cdf2a9d5b3d6f40e86d50cd575e261fd3b.jpg)
text_image
Initial Settings Digital Audio Out Video Output Language Display Options Digital Out Dolby Digital Out DTS Out 96 kHz PCM Out MPEG Out On Dolby Digital Off 96 kHz > 48 kHz MPEG Out > PCM2. Use the cursor buttons (↑, ↓, ←, →) to select and set a desired item, then press the ENTER button to confirm the setting.
[Digital Out]
Use this setting to select whether the connected device requires digital output.
![PIONEER DVD-V8000 - [Digital Out] - 1](/content/2024/12/76091/images/16aa661eb61fa9809311105a202caf42c8508208f939d66f385a8bc9518424f7.jpg)
text_image
Initial Settings Digital Audio Out Video Output Language Display Options Digital Out Dolby Digital Out DTS Out 96 kHz PCM Out MPEG Out ■ On OffOn (Default)
Audio is output from the rear panel DIGITAL AUDIO OUT connector.
Off
Audio is not output from the rear panel DIGITAL AUDIO OUT connector.
[Dolby ^*1 Digital Out]
Use this setting to select whether or not a connected device is compatible with Dolby Digital audio.
![PIONEER DVD-V8000 - [Dolby ^*1 Digital Out] - 1](/content/2024/12/76091/images/a1ce5cbbea206698f5146d28e0eb2ba924366a2d96d5159724c146bf05db19b5.jpg)
text_image
Initial Settings Digital Audio Out Video Output Language Display Options Digital Out Dolby Digital Out DTS Out 96 kHz PCM Out MPEG Out ■ Dolby Digital Dolby Digital > PCMDolby Digital (Default)
Select this when connecting to an amplifier that supports Dolby Digital or when connecting to a Dolby Digital decoder.
Dolby Digital > PCM
Dolby Digital signals are converted and output as linear PCM signals. Select this when connecting to an amplifier that does not support Dolby Digital.
[DTS ^*2 Out]
Use this setting to select whether or not a connected device supports DTS audio.
![PIONEER DVD-V8000 - [DTS ^*2 Out] - 1](/content/2024/12/76091/images/514de779e8efd170e44f93a03e86fa358d0361cd948104e96436ed5a0b1ea887.jpg)
text_image
Initial Settings Digital Audio Out Video Output Language Display Options Digital Out Dolby Digital Out DTS Out 96 kHz PCM Out MPEG Out ■ Off DTSOff (Default)
Use this setting when connecting to an amplifier that does not support DTS.
DTS
Use this setting when connecting to an amplifier that supports DTS or when connecting to a DTS decoder.

Important
- Selecting [DTS] when a non-DTS amplifier is connected may result in the generation of noise.
- DTS sound is not output from the AUDIO OUT (analog audio output) jacks.
[96 kHz PCM Out]
Use this setting to select whether or not a connected device supports 96 kHz PCM audio.
![PIONEER DVD-V8000 - [96 kHz PCM Out] - 1](/content/2024/12/76091/images/ff69074ffd1187b57b5eaee2c4ea4eab861e6e3c4840ffd21548cf5464b64819.jpg)
text_image
Initial Settings Digital Audio Out Video Output Language Display Options Digital Out Dolby Digital Out DTS Out 96 kHz PCM Out MPEG Out ■ 96 kHz > 48 kHz 96 kHz96 kHz > 48 kHz (Default)
96 kHz sampling frequency digital audio is down-sampled to 48 kHz and output. Select this setting when connecting to an amplifier that does not support 96 kHz audio.
96 kHz
Use this setting when connecting to an amplifier that supports 96 kHz audio, or a 96 kHz-compatible DAC.

Note
- Some discs are automatically converted to 48 kHz even when the [96 kHz] setting is selected.
[MPEG Out]
Use this setting to select whether or not a connected device supports MPEG audio.
![PIONEER DVD-V8000 - [MPEG Out] - 1](/content/2024/12/76091/images/6c3798ec274c29841d1ca42e6ab938e4b9fefb78869c41b7769e2b56d90b64ec.jpg)
text_image
Initial Settings Digital Audio Out Video Output Language Display Options Digital Out Dolby Digital Out DTS Out 96 kHz PCM Out MPEG Out MPEG ■ MPEG > PCMMPEG
Use this setting when connecting to an amplifier that supports MPEG, or to an MPEG decoder.
MPEG > PCM (Default)
MPEG signals are converted to linear PCM signals for output. Select this setting when connecting to an amplifier that does not support MPEG.
Video output settings
- Press the SETUP button to open SETUP menu; use the cursor buttons (↑, ↓, ←, →) to select [Initial Settings] and press the ENTER button (page 39).
- Use the cursor buttons (↑, ↓, ←, →) to select [Video Output].

text_image
Initial Settings Digital Audio Out Video Output Language Display Options TV Screen Component Out S-Video Out Still Picture ► 16:9 (Wide) ► Interlace ► S2 ► Frame- Use the cursor buttons (↑, ↓, ←, →) to select and set items, and then press the ENTER button to confirm setting.
[TV Screen]
Set to match the dimensions of the connected television display.
![PIONEER DVD-V8000 - [TV Screen] - 1](/content/2024/12/76091/images/31277b77f2b8cd9dbaecf262d7508a3d51f5539ca13cb25968c03f973b427891.jpg)
text_image
Initial Settings Digital Audio Out Video Output Language Display Options TV Screen Component Out S-Video Out Still Picture 4:3 (Letter Box) 4:3 (Pan&Scan) ■16:9 (Wide) 16:9 (Compressed)4:3 (Letter Box)
Select when connecting to a conventional television set. Video software recorded in widescreen format dimensions will be displayed in a Letter Box format with black bands at top and bottom.
4:3 (Pan&Scan)
Select when connecting to a conventional television display. Video software recorded in widescreen format dimensions will be displayed in the pan-and-scan format.
16:9 (Wide) (Default)
Select when connecting to a widescreen (16:9) television display.
16:9 (Compressed)
Select when connecting to a display supporting progressive-scan with fixed aspect ratio.

Note
- The [4:3 (Letter Box)] and [4:3 (Pan&Scan)] settings can be selected only when these modes are supported by the disc being played.
- When using video software recorded in 4:3 aspect ratio on a display that does not support 4:3, select [16:9 (Compressed)], the original 4:3 image will be displayed in a narrow (16:9) aspect ratio.

Important
- Cannot be selected when DVI device is connected.
Setting [TV Screen] to match your display dimensions
The final display appearance can be set as shown below, depending on the display used and the selection of [TV Screen] settings:
| When using a conventional (4:3 aspect ratio) display | When using a widescreen (16:9 aspect ratio) display | ||
| Setting on DVD-V8000 | Display appearance | Setting on DVD-V8000 | Display appearance |
| 4:3 (Letter Box) | 16:9 aspect ratio video![PIONEER DVD-V8000 - Setting [TV Screen] to match your display dimensions - 1](/content/2024/12/76091/images/a0f8cbbc915f4a95382a30f7cade29b87b3fe57d7a50c4c5756a91a8090476e4.jpg) 4:3 aspect ratio video 4:3 aspect ratio video![PIONEER DVD-V8000 - Setting [TV Screen] to match your display dimensions - 2](/content/2024/12/76091/images/0a20e1b680e0da70e18b7d1436af5280c75f5cd528dc06f9b7766caacce6da99.jpg) | 16:9 (Wide) | 16:9 aspect ratio video when “Full” is selected![PIONEER DVD-V8000 - Setting [TV Screen] to match your display dimensions - 3](/content/2024/12/76091/images/0908de8ac050038989a26177c26728db8984637fea63cebede831adfa95a9d91.jpg) |
| 4:3 (Pan & Scan) | 16:9 aspect ratio video![PIONEER DVD-V8000 - Setting [TV Screen] to match your display dimensions - 4](/content/2024/12/76091/images/2b4b7e3a67f708170c675458feec7727a145d1499d4b227ee84a3e63524713a6.jpg) 4:3 aspect ratio video 4:3 aspect ratio video![PIONEER DVD-V8000 - Setting [TV Screen] to match your display dimensions - 5](/content/2024/12/76091/images/bb8e77beb94ff0c11664b437e6b3c86a177080d810a100b375c88f5914d3d503.jpg) | 4:3 aspect ratio video when “Normal” is selected[IMAGE] | |
Select [16:9 (Compressed)] when connecting to a display supporting progressive-scan with fixed aspect ratio.
| When using a widescreen (16:9 aspect ratio) display | |
| Setting on DVD-V8000 | Display appearance |
| 16:9 (Com-pressed)*Supported only with progressive-scan output. | 4:3 aspect ratio video when “Full” is selected![PIONEER DVD-V8000 - Setting [TV Screen] to match your display dimensions - 6](/content/2024/12/76091/images/48654671028aca8c2f014f3734c4268d6c470cfa794ae66b997fd7beaf0e0238.jpg) |
![PIONEER DVD-V8000 - Setting [TV Screen] to match your display dimensions - 7](/content/2024/12/76091/images/d8b0956d5e04879afcd98a924eb6c4d4388eea3eb3b2c681590346299fa345c9.jpg)
Note
- Some discs do not allow changing aspect ratio. Confirm the disc jacket for information.
[Component Out]
Set to select whether an interlaced scan or progressive scan image is to be viewed on a display connected to the COMPONENT VIDEO OUT connectors.
![PIONEER DVD-V8000 - [Component Out] - 1](/content/2024/12/76091/images/ce31e293edcf838136300d3fa7fe4031652b95500d1ad68fa2fbe3774a2458cc.jpg)
flowchart
graph LR
    A["Initial Settings"] --> B["Digital Audio Out"]
    A --> C["Video Output"]
    A --> D["Language"]
    A --> E["Display"]
    A --> F["Options"]
    B --> G["TV Screen"]
    C --> H["Component Out"]
    D --> I["S-Video Out"]
    D --> J["Still Picture"]
    C --> K["Progressive"]
    K --> L["■ Interlace"]
Progressive
This non-interlaced mode produces high-quality images with fine detail.
Interlace (Default)
Select when connecting to a television display that does not support progressive-scan inputs.
[S-Video Out]
Use this setting to select the type of detection signal superimposed on S-Video signals.
![PIONEER DVD-V8000 - [S-Video Out] - 1](/content/2024/12/76091/images/2e9dc98fb6996d9b33fffe30364c93252244a987e39e383785dee7169f64ba81.jpg)
text_image
Initial Settings Digital Audio Out Video Output Language Display Options TV Screen Component Out S-Video Out Still Picture S1 ■ S2S1
S1 is an S-Video signal incorporating a component for detecting the image aspect ratio (4:3, 16:9). With S1-compatible displays, the appropriate image mode is automatically selected and set.
S2 (Default)
S2 is an S1 signal with an additional component for identification of the image's format (Letter Box, Pan-and-Scan.) With S2-compatible displays, the appropriate image format is automatically selected and set.

Important
- In some cases, the image may be elongated horizontally when the S-Video connector is used to connect this player. In such cases, select [S1].
[Still Picture]
Use to select the still picture playback mode.
![PIONEER DVD-V8000 - [Still Picture] - 1](/content/2024/12/76091/images/8b484ef411becc47e5ec2c492282c899eec8b2351c13561a7e94f0e58ee906f5.jpg)
text_image
Initial Settings Digital Audio Out Video Output Language Display Options TV Screen S-Video Out Component Out Still Picture Field Frame AutoField
Eliminates jitter in still playback, producing stable, blur-free images.
Frame (Default)
The normal mode.
Auto
Automatically switches between [Field] and [Frame].

Note
- Setting to [Field] may not improve the image quality with some discs.
Language settings
-
Press the SETUP button to open the SETUP menu, then use the cursor buttons (↑, ↓, ←, →) to select [Initial Settings] and press the ENTER button (page 39).
-
Use the cursor buttons (↑, ↓, ←, →) to select [Language].
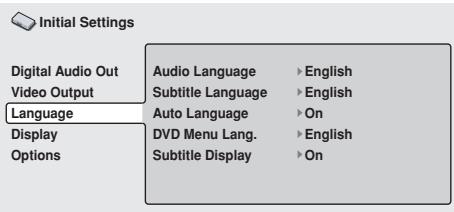
text_image
Initial Settings Digital Audio Out Video Output Language Display Options Audio Language ▶ English Subtitle Language ▶ English Auto Language ▶ On DVD Menu Lang. Subtitle Display ▶ English On- Use the cursor buttons (↑, ↓, ←, →) to select and set an item, then press the ENTER button to confirm the setting.
[Audio Language]
Use to select the audio language for DVD playback.
![PIONEER DVD-V8000 - [Audio Language] - 1](/content/2024/12/76091/images/6da6656a4c59a7914f9acc832c3971e2284d8c4f73455ddd5e954756fcfaeeaf.jpg)
text_image
Initial Settings Digital Audio Out Video Output Language Display Options Audio Language Subtitle Language Auto Language DVD Menu Lang. Subtitle Display English French German Italian Spanish Dutch Other LanguageEnglish (Default)/French/German/Italian/Spanish/Dutch
Audio will be played in English/French/German/Italian/Spanish/Dutch.
Other Language
Select a language from the 136 languages preset in the player. For instructions on how to select languages, read "Selecting other languages" on page 44.

Note
- The playback language may be automatically set by some discs.
- Some discs may provide menu settings for selecting playback language. In these cases, press the MENU button to open the disc menu, and select the playback language there.
[Subtitle Language]
Use to select the language for subtitles displayed during DVD playback.
![PIONEER DVD-V8000 - [Subtitle Language] - 1](/content/2024/12/76091/images/f26820bbacc4865752882042f972e0aa9cbe76bde0fdeda6020659ff4a5baad2.jpg)
text_image
Initial Settings Digital Audio Out Video Output Language Display Options Audio Language Subtitle Language Auto Language DVD Menu Lang. Subtitle Display ■ English French German Italian Spanish Dutch Other LanguageEnglish (Default)/French/German/Italian/Spanish/Dutch Subtitles will be displayed in English/French/German/Italian/Spanish/Dutch.
Other Language
Select a subtitle language from the 136 languages preset in this player. For instructions on how to select a language, see "Selecting other languages" on page 44.

Note
- The subtitle language may be automatically set by some discs.
- Some discs may provide menu settings for selecting the subtitle language. In these cases, press the MENU button to open the disc menu, and select the subtitle language there.
[Auto Language]
Use this setting to select whether or not to make the audio and subtitle language for DVD playback to the ones selected in initial settings.
![PIONEER DVD-V8000 - [Auto Language] - 1](/content/2024/12/76091/images/300d3eba5f8c4370fdffda3ba535c77dbab77dc64281d56d6c8f56cc84c4de89.jpg)
text_image
Initial Settings Digital Audio Out Video Output Language Display Options Audio Language Subtitle Language Auto Language DVD Menu Lang. Subtitle Display ■ On OffOn (Default)
The audio and subtitle languages will be set to those set by the DVD disc.
Off
The audio and subtitle languages will be set to those selected in [Audio Language] and [Subtitle Language] on the player.
[DVD Menu Lang.]
Use to choose the language of the DVD menu displays.
![PIONEER DVD-V8000 - [DVD Menu Lang.] - 1](/content/2024/12/76091/images/0a29121591446a3980a08c4af8982bb2578c652c624b50aacf64d3f3bd52d2d3.jpg)
text_image
Initial Settings Digital Audio Out Video Output Language Display Options Audio Language Subtitle Language Auto Language DVD Menu Lang. Subtitle Display ■ w/Subtitle Lang. Other Languagew/Subtitle Lang. (Default)
Menu screen will be displayed in the language selected in [Subtitle Language].
Other Language
Select a language from the 136 languages preset in the player. For instructions on how to select languages, see "Selecting other languages" on page 44.
[Subtitle Display]
Use to select whether or not to display subtitles during playback of DVD.
![PIONEER DVD-V8000 - [Subtitle Display] - 1](/content/2024/12/76091/images/974062b97a519c9f0dba583f45f751b8dfaa0fb43edf97ea0420cfa919465ee5.jpg)
text_image
Initial Settings Digital Audio Out Video Output Language Display Options Audio Language Subtitle Language Auto Language DVD Menu Lang. Subtitle Display ■ On Off Assist SubtitleOn (Default)
Displays subtitles.
Off
Subtitles will not be displayed. However, some DVDs will automatically display subtitles regardless of this setting.
Assist Subtitle
Assist subtitles will be displayed. However, such subtitles will not be displayed if they are not present on the DVD.

Note
- Assist subtitles are subtitles for those with hearing difficulties.
Selecting other languages
[Example: Audio Language]
1. Select [Other Language].
![PIONEER DVD-V8000 - Select [Other Language]. - 1](/content/2024/12/76091/images/fffa7b1961b17219385bd46d4003e9034692c780479fdefb70acd9a5116ea900.jpg)
text_image
Initial Settings Digital Audio Out Video Output Language Display Options Audio Language Subtitle Language Auto Language DVD Menu Lang. Subtitle Display ■ English French German Italian Spanish Dutch Other Language2. Press the ENTER button.
Selecting from [List of Language]
![PIONEER DVD-V8000 - Selecting from [List of Language] - 1](/content/2024/12/76091/images/6fd9451b2468711ca2f75aaebe8afca0d06672b5f2b754360d13b759dff14c83.jpg)
flowchart
graph TD
    A["Initial Settings"] --> B["Digital Audio Out"]
    B --> C["Video Output"]
    C --> D["Language"]
    D --> E["Display"]
    E --> F["Options"]
    G["Audio Language"] --> H["List of Language"]
    H --> I["English"]
    J["Code"] --> K["0 5 1 4"]
Use the up/down cursors (↑, ↓) to select language.
- Refer to the Language Code List on page 97 and select the desired language there.

Note
- For some languages, only the code number will be displayed.
Selecting from [Code] (language code numbers) Press the right cursor button (→) and input the four-digit [Code] number.
![PIONEER DVD-V8000 - Selecting from [Code] (language code numbers) Press the right cursor button (→) and input the four-digit [Code] number. - 1](/content/2024/12/76091/images/d6cc06619deaf1247416ac21981221998a0af98582c7d2e2aecdb75ff3e384f9.jpg)
flowchart
graph TD
    A["Initial Settings"] --> B["Digital Audio Out"]
    B --> C["Video Output"]
    C --> D["Language"]
    D --> E["Display"]
    E --> F["Options"]
    G["Audio Language"] --> H["List of Language"]
    H --> I["English"]
    H --> J["Code 0 5 1 4"]
- You may directly input the code numbers using the number pad buttons on the remote control unit (A) or use the cursor buttons (↑, ↓, ←, →) to input the code numbers (B).
(A) Inputting the numbers from the highest to lowest digit using the number pad buttons on the remote control unit.
- For language codes, refer to the Language Code List on page 97. Example: For French, press the number pad buttons in the order of [0] [6] [1] [8].
(B) Use cursor button ( , ) to choose the digits, and use cursor button ( , ) to chose the numbers (0 to 9).
- For language codes, refer to the Language Code List on page 97. Example: For French, set numbers to [0618].

text_image
Initial Settings Digital Audio Out Video Output Language Display Options Audio Language List of Language French Code 0 6 1 83. Press the ENTER button.
● The screen will return to the Audio Language menu.
Display settings
-
Press the SETUP button to open the SETUP menu, then use the cursor buttons (↑, ↓, ←, →) to select [Initial Settings] and press the ENTER button (page 39).
-
Use the cursor buttons (↑, ↓, ←, →) to select [Display].
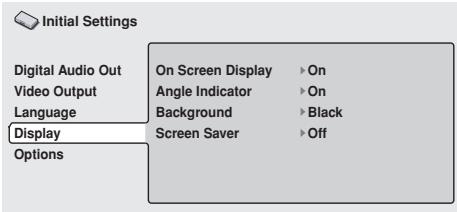
text_image
Initial Settings Digital Audio Out Video Output Language Display Options On Screen Display ▶ On Angle Indicator ▶ On Background ▶ Black Screen Saver ▶ Off- Use the cursor buttons (↑, ↓, ←, →) to select and set items, and then press the ENTER button to confirm setting.
[On Screen Display]
Use to select whether or not to display operation indicators ([PLAY], [STOP], etc.) when operations are performed.
![PIONEER DVD-V8000 - [On Screen Display] - 1](/content/2024/12/76091/images/7a3628fc7bd8e6c6fda796af067b0ee4bc3aef591e2831fe5689af1152e31383.jpg)
text_image
Initial Settings Digital Audio Out Video Output Language Display Options On Screen Display Angle Indicator Background Screen Saver ■ On OffOn (Default)
Operation indicators are displayed on the screen.
Off
Operation indicators are not displayed on the screen.
[Angle Indicator]
Use to select whether or not to display the camera angle icon [∞] during playback of multi-angle scenes on DVD discs.
![PIONEER DVD-V8000 - [Angle Indicator] - 1](/content/2024/12/76091/images/a430e2c977a4c90adedf30caec11f38f0a26ef898d58bb7ac613b7ec4c793265.jpg)
text_image
Initial Settings Digital Audio Out Video Output Language Display Options On Screen Display Angle Indicator Background Screen Saver ■ On OffOn (Default)
The camera angle icon [∞] is displayed.
Off
The camera angle icon [∞] is not displayed.
[Background]
Use to select the display's background color when the player is stopped.
![PIONEER DVD-V8000 - [Background] - 1](/content/2024/12/76091/images/ee231ce9615530c3d19416505d22eba2ca186db0335331403296c95f08b762a4.jpg)
text_image
Initial Settings Digital Audio Out Video Output Language Display Options On Screen Display Angle Indicator Background Screen Saver Blue ■ BlackBlue
A blue background is displayed.
Black (Default)
A black background is displayed.
[Screen Saver]
Use to select whether or not to use a screensaver to prevent ghost images being burned onto the screen due to lengthy display of the same image.
![PIONEER DVD-V8000 - [Screen Saver] - 1](/content/2024/12/76091/images/7ea76601ee1dea93074709266dc26681b9dc399d7c08eecfc099bec1a3485f54.jpg)
text_image
Initial Settings Digital Audio Out Video Output Language Display Options On Screen Display Angle Indicator Background Screen Saver On ■ OffOn
If the same image is displayed without change for about 5 minutes or more, the screensaver is activated and the black background is displayed.
Off (Default)
Screensaver is not activated.
Parental Lock
Some discs containing mature content such as violent scenes may feature a Parental Lock level (check the disc box for these discs). By setting the player's Parental Lock level to a value lower than the level of the disc, playback of these discs can be prevented.
As an example, by setting the player's Parental Lock level to 6, the playback of level 7 discs will be prevented. To play level 7 discs, the Parental Lock level must be preset to level 7 or higher. These Parental Lock levels operate according to lock levels that differ from country to country. By presetting the country code, this “discrimination by country” is made possible.
-
Press the SETUP button to open the SETUP menu, then use the cursor buttons (↑, ↓, ←, →) to select [Initial Settings] and press the ENTER button (page 39).
-
Use the cursor button (↓) to select [Options].
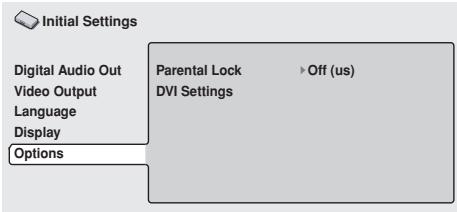
text_image
Initial Settings Digital Audio Out Video Output Language Display Options Parental Lock DVI Settings Off (us)[Password]
First, register your password.
- You must register a password before you can change the Parental Lock level or enter a Country code. Also, when playing a disc with Parental-Lock function, a dialog may be displayed requesting the input of the password. If the registered password is not input, the disc cannot be played.
- Use the cursor buttons (↑, ↓, ←, →) to select [Password].
![PIONEER DVD-V8000 - [Password] - 1](/content/2024/12/76091/images/c2e55f67b6676c8aef82bd683b3cd55ffafd15a38df2bfff4949c29686532ec2.jpg)
text_image
Initial Settings Digital Audio Out Video Output Language Display Options Parental Lock DVI Settings Password Level Change Country Code- Press the ENTER button to select.
![PIONEER DVD-V8000 - [Password] - 2](/content/2024/12/76091/images/14b0bc370cfa4212c8128397085cbaff261a5b0f9913d79f11330d9b310fa9db.jpg)
text_image
Initial Settings Digital Audio Out Video Output Language Display Options Parental Lock: Register Code Number- Use the number pad buttons (0 to 9) on the remote control to enter a 4-digit password, and press the ENTER button to confirm the password.
![PIONEER DVD-V8000 - [Password] - 3](/content/2024/12/76091/images/40f3fd25d4d33ad374c6d5fd6db1aab0b96b3dc3f7d98627ba3b2c152e4e1a24.jpg)
Note
- It is recommended that you write down your password.
- If you have forgotten your password, you must reset all settings to their defaults (page 78), and then set a password again.
- Some discs can be played while skipping only those scenes prohibited by Parental Locked. For further information check the operation guide enclosed with the disc.
[Password Change]
- Use the cursor buttons (↑, ↓, ←, →) to select [Password Change].
![PIONEER DVD-V8000 - [Password Change] - 1](/content/2024/12/76091/images/aa4c570f6fe44ce6e093f5edd7f59330228433cd9c41311bd85e9974cb14d65b.jpg)
text_image
Initial Settings Digital Audio Out Video Output Language Display Options Parental Lock DVI Settings Password Change Level Change Country Code- Press the ENTER button to select.
![PIONEER DVD-V8000 - [Password Change] - 2](/content/2024/12/76091/images/a5fac5ea5806016a439c6225e0e1e45233700a071d5a782018c49a3301328664.jpg)
text_image
Initial Settings Digital Audio Out Video Output Language Display Options Parental Lock : Password Change Password New Password- Input your previously set 4-digit password using the number pad buttons (0 to 9) on the remote control unit, and press the ENTER button to confirm.
![PIONEER DVD-V8000 - [Password Change] - 3](/content/2024/12/76091/images/a82887ef899eace7c08b78548bb9f8f34e7f93fae11baf3f3ec564da9f44e40d.jpg)
text_image
Initial Settings Digital Audio Out Video Output Language Display Options Parental Lock : Password Change Password * * * * New Password _ _ _ _ _- Use the number pad buttons (0 to 9) to enter a new 4-digit password and press the ENTER button to confirm the new password.
[Level Change]
- Use the cursor buttons (↑, ↓, ←, →) to select [Level Change].
![PIONEER DVD-V8000 - [Level Change] - 1](/content/2024/12/76091/images/df38940279b0c03f596e1fbbfc48d71b90a34e818e95d33d0808f28c4da8d161.jpg)
text_image
Initial Settings Digital Audio Out Video Output Language Display Options Parental Lock DVI Settings Password Change Level Change Country Code2. Press the ENTER button to select.
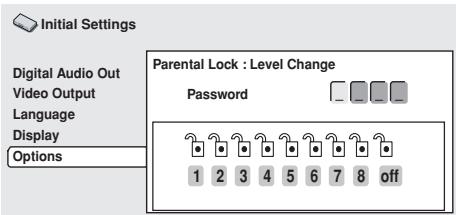
text_image
Initial Settings Digital Audio Out Video Output Language Display Options Parental Lock : Level Change Password 1 2 3 4 5 6 7 8 off3. Input the previously set 4-digit password using the number pad buttons (0 to 9) on the remote control and press the ENTER button to confirm.
● The entered password will be displayed as asterisks [*].
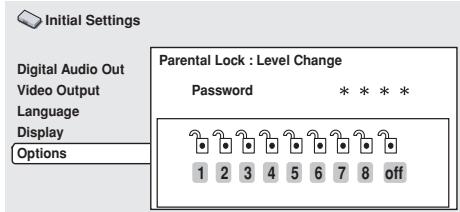
text_image
Initial Settings Digital Audio Out Video Output Language Display Options Parental Lock : Level Change Password * * * * 1 2 3 4 5 6 7 8 off4. Use the right/left cursor buttons ( , ) to select a Parental Lock level.
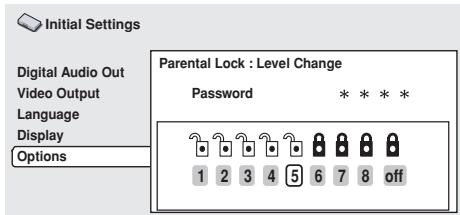
text_image
Initial Settings Digital Audio Out Video Output Language Display Options Parental Lock : Level Change Password * * * * 1 2 3 4 5 6 7 8 off5. Press the ENTER button to select.
[Country Code]
Refer to the Country Code List on page 97 and select the desired country code there.
![PIONEER DVD-V8000 - [Country Code] - 1](/content/2024/12/76091/images/d7b115ca228888c0210e6a3b10f433dc2a8c342ba0053e5b962897d5876cae78.jpg)
Important
- Remove the disc after setting a country code. Settings will be enabled only after a disc is reinserted.
1. Use the cursor buttons (↑, ↓, ←, →) to select [Country Code].
![PIONEER DVD-V8000 - Use the cursor buttons (↑, ↓, ←, →) to select [Country Code]. - 1](/content/2024/12/76091/images/1f19ff2672e7508c49fb67036f18316e9f3f968274b6a05ba1b20b37010b4daa.jpg)
flowchart
graph TD
    A["Initial Settings"] --> B["Digital Audio Out"]
    A --> C["Video Output"]
    A --> D["Language"]
    A --> E["Display"]
    A --> F["Options"]
    B --> G["Parental Lock"]
    B --> H["DVI Settings"]
    G --> I["Password Change"]
    G --> J["Level Change"]
    G --> K["Country Code"]
2. Press the ENTER button to select.
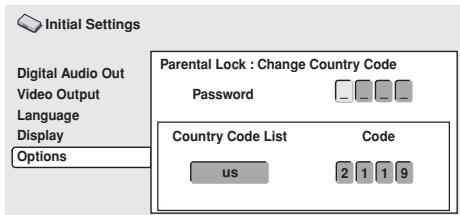
text_image
Initial Settings Digital Audio Out Video Output Language Display Options Parental Lock : Change Country Code Password Country Code List us Code 2 1 1 93. Input the previously set 4-digit password using the number pad buttons (0 to 9) on the remote control unit and press the ENTER button to confirm.
- The entered password will be displayed as asterisks [*].
Selecting from [Country Code List]
![PIONEER DVD-V8000 - Selecting from [Country Code List] - 1](/content/2024/12/76091/images/b13b8664c31ad49164abf6edb9f5ec092b257caa99ffd5a884018843c6761c30.jpg)
text_image
Initial Settings Digital Audio Out Video Output Language Display Options Parental Lock : Change Country Code Password * * * * Country Code List Code us 2 1 1 9Use the up/down cursors buttons (↑, ↓) to select country code.
Selecting from [Code]
Press the right cursor button ( ) and input the four-digit [Code] number.
![PIONEER DVD-V8000 - Press the right cursor button ( ) and input the four-digit [Code] number. - 1](/content/2024/12/76091/images/4625ae4ad3f6f8f3a081e147ca409b2cd445a0d9e6f2e008e5c3c79edd2fe915.jpg)
text_image
Initial Settings Digital Audio Out Video Output Language Display Options Parental Lock : Change Country Code Password * * * * Country Code List Code us 2 1 1 9- You may directly input the code numbers using the number pad buttons on the remote controller (A) or use the cursor buttons (↑, ↓, ←, →) to input the code numbers (B).
(A) Input the numbers from the highest to lowest digit using the number pad buttons on the remote control unit.
- For country codes, refer to the Country Code List on page 97.
Example: For France, press the number pad buttonss in the order [0] [6] [1] [8].
(B) Use the right/left cursor buttons ( , ) to chose the digits, and use the up/down cursor buttons ( , ) to chose the numbers (0 to 9).
- For country codes, refer to the Country Code List on page 97.
Example: For France, set numbers to [0618].
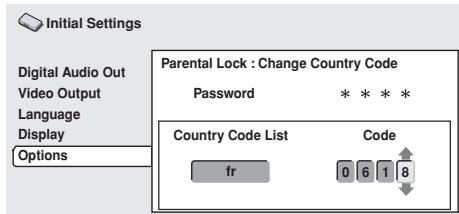
text_image
Initial Settings Digital Audio Out Video Output Language Display Options Parental Lock : Change Country Code Password * * * * Country Code List Code fr 0 6 1 84. Press the ENTER button.
● The screen will return to the Parental Lock menu.
DVI connections
Select the image resolution, aspect ratio and image quality levels to match the device used through a DVI connection.
-
Press the SETUP button to open the SETUP menu, then use the cursor buttons (↑, ↓, ←, →) to select [Initial Settings] and press the ENTER button (page 39).
-
Use the down cursor button (↓) to select [Options].
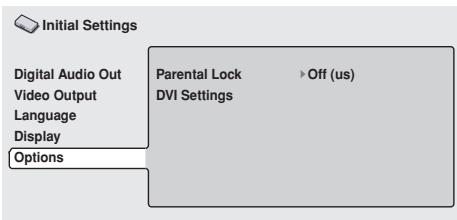
text_image
Initial Settings Digital Audio Out Video Output Language Display Options Parental Lock DVI Settings Off (us)- Use the cursor buttons (↑, ↓, ←, →) to select [DVI Settings].
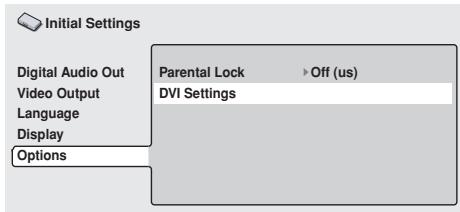
text_image
Initial Settings Digital Audio Out Video Output Language Display Options Parental Lock Off (us) DVI SettingsImportant
- Cannot be selected when DVI device is not connected.
- Use the cursor buttons (↑, ↓, ←, →) to select and set items, and then press the ENTER button to confirm the selection.
[Resolution]
Use to select the image resolution of the DVI output. Use the cursor buttons ( , ) to select resolution, and press the ENTER button to confirm.
This Pioneer logo will only be displayed when connecting to a Pioneer device.
![PIONEER DVD-V8000 - [Resolution] - 1](/content/2024/12/76091/images/a3eb8954c42763365b53dda124cf11633e0cdea54b036dfcd7ce41950da1eef3.jpg)
text_image
Pioneer Resolution 720 x 480P Aspect Ratio 16 : 9 (Wide) Video Memory Direct- Select image resolution from the following:
• VGA (640 x 480 pixel) progressive-scan image - 720 x 480 pixel progressive-scan image
- 720 x 480 pixel interlace-scan image
- 720 x 576 pixel progressive-scan image
- 720 x 576 pixel interlace image
- 1280 x 720 pixel progressive-scan image
-
1920 x 1080 pixel interlace-scan image
-
After setting a new resolution, a confirmation message will be displayed. Confirm the selection once more after reading this message.
- If image is not correctly displayed after changing the resolution, hold the remote control unit's [0] button depressed for 5 or more seconds to reset resolution to the value automatically set when the device was first connected to this player.
Note
- The 720 x 576 pixel progressive/interlace image is selectable only when playing a PAL disc. Also, the VGA or 720 x 480 pixel progressive/interlace image is selectable only when playing a NTSC disc.
- The display image may appear rough or output may be temporarily interrupted during switching of image resolution.
DVD-V8000 digital video signals (complies with EIA/CEA-861-B)
| Resolution | Vertical frequency (Hz) | Horizontal frequency (kHz) | Clock frequency (MHz) | |
| NTSC | VGA | 59.940 | 31.469 | 25.175 |
| 480i | 59.940 | 15.734 | 27.000 | |
| 480p | 59.940 | 31.469 | 27.000 | |
| 720p | 59.939 | 44.955 | 74.175 | |
| 1080i | 59.939 | 33.716 | 74.175 | |
| PAL | 576i | 50.000 | 15.625 | 27.000 |
| 576p | 50.000 | 31.250 | 27.000 | |
| 720p | 50.000 | 37.500 | 74.250 | |
| 1080i | 50.000 | 28.125 | 74.250 |
[Aspect Ratio]
Use to select the aspect ratio of the DVI output.
Use the up/down cursor buttons (↑, ↓) to select [Aspect Ratio] and the right/left cursor buttons (←, →) to select aspect ratio, and then press the ENTER button to confirm.
![PIONEER DVD-V8000 - [Aspect Ratio] - 1](/content/2024/12/76091/images/e8b45d9272954d05a4bb9ccbb977012b58594618377a47bb3b89b76831ab05c8.jpg)
text_image
Pioneer Resolution 720 x 480P Aspect Ratio 16 : 9 (Wide) Video Memory DirectAspect ratio can be selected from the following.
4:3 (Letter Box)
- Select when connecting to a conventional display. Video software produced in widescreen dimensions will be displayed in a Letter Box format (described below). This setting is disabled when not supported by the disc being played.
4:3 (Pan&Scan)
- Select when connecting to a conventional display. Video software produced in widescreen dimensions will be displayed in a pan-and-scan format. This setting is disabled when not supported by the disc being played.
16:9 (Wide)
- Select when connecting to a widescreen (16:9) display.
16:9 (Compressed)
- Select if connecting to a display supporting progressive-can with fixed aspect ratio. When playing video software recorded in 4:3 aspect ratio on a display that does not support 4:3, select this format, the original 4:3 image will be displayed in a narrow (16:9) aspect ratio.
[Video Memory]
Use to select the image quality of the DVI output.
Use the up/down cursor buttons (↑, ↓) to select [Video Memory] and the right/left cursor buttons (←, →) to select image quality, then press the ENTER button to confirm.
![PIONEER DVD-V8000 - [Video Memory] - 1](/content/2024/12/76091/images/cc6aa8f11365377ebd624ea4ca00ec2b2a25e10151dbfa9def847aec54905276.jpg)
text_image
Pioneer Resolution 720 x 480P Aspect Ratio 16 : 9 (Wide) Video Memory DirectImage quality can be selected from the following:
Direct
- Image quality will be directly output as recorded on the source software.
Natural
- The edges of the image are softened. Suitable for movie playback.
Enhanced
- The color is enhanced and the edges of the image are sharpened. Suitable for playback of computer graphics (CG) images or animations.
Memory 1/Memory 2/Memory 3
- Allows selecting of image quality settings recorded in Memory 1, 2 and 3 (settings can be made manually). See page 52 for further information.

Important
- If a resolution setting is selected that is not supported by your DVI display, the playback image may appear distorted, or may not appear at all. For details regarding resolutions supported by your DVI display, consult the manufacturer of your DVI display.
Depending on the disc played, consult the following table when making settings.
- Some displays may show different setting names than those shown in the following table.
| Resolution(DVI Settings) | Disc played | |||
| Squeeze recorded discs | 4:3 aspect ratio recorded discs | |||
| Aspect Ratio(DVI Settings) | Display setting | Aspect Ratio(DVI Settings) | Display setting | |
| 720 x 480 I/P(720 x 576 I/P) | 16 : 9 (Wide) / 16 : 9 (Compressed) | Full/Squeeze(/Through Squeeze) | 4 : 3/16 : 9(Wide) | Standard/Normal*/4 : 3/Through (/Dot-By-Dot) |
| 1280 x 720 P | Normal*/Through(/Dot-By-Dot) | 16 : 9(Compressed) | ||
| 1920 x 1080 I | ||||
* Some displays may be set as "Full/Squeeze".
This unit has been designed to allow connection to a DVI device. Proper operation may not be possible when connected to some HDMI devices.
Audio Settings
Adjusting the dynamic range (Audio DRC)
Audio DRC (Dynamic Range Control) can be selected to enhance quieter sounds while controlling loud peaks. This setting is effective, for example, when watching a movie where the dialogue is difficult to hear, or when you wish to control loud sounds while watching a movie late at night. Audio DRC is supported only for recordings made with Dolby Digital.
1. Press the SETUP button to display the SETUP menu, then select [Audio Settings] and press the ENTER button.
![PIONEER DVD-V8000 - Press the SETUP button to display the SETUP menu, then select [Audio Settings] and press the ENTER button. - 1](/content/2024/12/76091/images/0f981c6010a9f9f50b0595d6371956677590583bcf861d11597eafe5a8b142e6.jpg)
Audio Settings
![PIONEER DVD-V8000 - Press the SETUP button to display the SETUP menu, then select [Audio Settings] and press the ENTER button. - 2](/content/2024/12/76091/images/cc6266e3e50e256208829b12631ca3302fca9af521704019c50a14ba488fa45d.jpg)
Video Adjust
![PIONEER DVD-V8000 - Press the SETUP button to display the SETUP menu, then select [Audio Settings] and press the ENTER button. - 3](/content/2024/12/76091/images/a05c9b3eed882633e020833dcccb657d446e591e4686b793b7344a1c7c1f68a4.jpg)
Play Mode
![PIONEER DVD-V8000 - Press the SETUP button to display the SETUP menu, then select [Audio Settings] and press the ENTER button. - 4](/content/2024/12/76091/images/699294338f3437fc79cf7123691c7288a8e5d344f062eb8fb8dd41aa96cf1314.jpg)
Disc Navigator
![PIONEER DVD-V8000 - Press the SETUP button to display the SETUP menu, then select [Audio Settings] and press the ENTER button. - 5](/content/2024/12/76091/images/465fdc4dd90b7c20a020947c05331b8b7e69034e636439611bf203ade9f1aa6f.jpg)
Initial Settings
2. Select [Audio DRC], and use the right/left cursor buttons ( , ) to select either [On] or [Off], then press the ENTER button.
![PIONEER DVD-V8000 - Select [Audio DRC], and use the right/left cursor buttons ( , ) to select either [On] or [Off], then press the ENTER button. - 1](/content/2024/12/76091/images/14f7fd35273c6a4d3f8d6388e0a8dd7b52416bce6fec71305ca50a9dc54936ca.jpg)
text_image
Audio Settings Audio DRC Off Virtual Surround OffOff (Default)
Cancels Audio DRC. Produces excellent ambience with high performance speakers.
On
Large peak sounds (explosions, etc.) are suppressed, while dialogue and other quieter sounds are enhanced for easier listening.

Note
● Effects may vary depending on the disc used.
- Audio DRC is also applied to sounds output from the digital output connectors (optical/coaxial). In this case, set the [Digital Audio Out] setting [Digital Out] to [On], and set the [Dolby Digital Out] setting to [Dolby Digital > PCM] (page 40).
- The effect of Audio DRC may vary depending on the speaker, display, and AV amplifier's audio adjustments. Make adjustments while listening to the actual results produced.
Virtual surround sound
Setting virtual surround to ON allows the user to enjoy the rich effect of surround sound while using only two speakers. Particularly when playing a Dolby Digital soundtrack, TruSurround technology from SRS produces a “virtual Dolby Digital” effect with realistic 3D soundspace from a pair of stereo speakers.
1. Press the SETUP button to display the SETUP menu, then select [Audio Settings] and press the ENTER button.
![PIONEER DVD-V8000 - Press the SETUP button to display the SETUP menu, then select [Audio Settings] and press the ENTER button. - 1](/content/2024/12/76091/images/ae87b518549cd168bcf37f83f98d22a93496625fa8ac7fc716b551807082bb55.jpg)
text_image
Audio Settings Video Adjust Play Mode Disc Navigator Initial Settings2. Select [Virtual Surround], then use the right/left cursor buttons ( , ) to select [Off], or [☐☐ V/SRS TruSurround], and press the ENTER button.
![PIONEER DVD-V8000 - Select [Virtual Surround], then use the right/left cursor buttons ( , ) to select [Off], or [☐☐ V/SRS TruSurround], and press the ENTER button. - 1](/content/2024/12/76091/images/5f881e343d51d0be0a884ef1c6a18f0b476cce78e9ba5a467c0925196003f69c.jpg)
text_image
Audio Settings Audio DRC Off Virtual Surround OffOff (Default)
Virtual surround is disabled.
V/SRS TruSurround
3D surround sound is enabled.

Note
- This function has no effect when listening to CDs or linear PCM 96 kHz sound.
- The surround sound effect may differ depending on the disc used.
SRS(○)®
TruSurround
* TruSurround, SRS and (●)* symbol are trademarks of SRS Labs, Inc. TruSurround technology is incorporated under license from SRS Labs, Inc.
Video Quality Settings
Selecting from preset video quality settings
This player allows the user to select from preset image quality settings to provide the image quality optimally matching the type of display used. In addition, video adjustments can be made manually and recorded to allow custom adjustment settings.
1. Press the SETUP button to display the SETUP menu, then select [Video Adjust] and press the ENTER button.
![PIONEER DVD-V8000 - Press the SETUP button to display the SETUP menu, then select [Video Adjust] and press the ENTER button. - 1](/content/2024/12/76091/images/6ce0ce75e7f3c3cd85da276f2dd75b0479a6ab12253af2191bb69d3b05aed11c.jpg)
text_image
Audio Settings Video Adjust Play Mode Disc Navigator Initial Settings2. Use the right/left cursor buttons ( , ) to select the desired preset video quality, then press the ENTER button.
- The range of setting contents differs depending on whether the player is connected to a DVI device.
- If the ENTER button is not pressed before a certain period of time has elapsed, the [Video Adjust] menu screen will disappear and the video adjustment setting will be canceled.
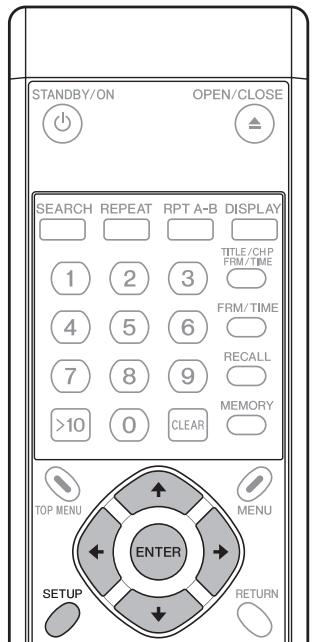
text_image
STANDBY/ON OPEN/CLOSE SEARCH REPEAT RPT A-B DISPLAY TITLE/CHP FRM/TIME 1 2 3 4 5 6 7 8 9 >10 0 CLEAR MEMORY TOP MENU MENU ENTER SETUP RETURN[When not connected to a DVI device]
![PIONEER DVD-V8000 - [When not connected to a DVI device] - 1](/content/2024/12/76091/images/28ec32af083001357c386764f6ceb3b653c68ae763332d0fea18818ccc8010cf.jpg)
TV (CRT)
Video quality suitable for a television set (standard CRT display).
PDP
Video quality suitable for a plasma display.
Professional (Default)
Video quality setting suitable for professional displays; with this setting, video signal processing by the player is suppressed.
Memory 1 / Memory 2 / Memory 3
Select from custom video settings set with the "Video Adjustments" control (page 52).
[When a DVI device is connected]
![PIONEER DVD-V8000 - [When a DVI device is connected] - 1](/content/2024/12/76091/images/2e4991b527a9f1b18c9ab17dbb0ef6bb9f13342bf3ab1b96bf9905410d458d89.jpg)
Direct (Default)
Output is at same image quality as recorded.
Natural
Image contours are given a natural rendering. Optimum for playing movie software.
Enhanced
Colors are saturated and contour contrast is enhanced, producing a sharper image. Optimum for computer graphics images and animation playback.
Memory 1 / Memory 2 / Memory 3
Select from custom video settings set with the "Video Adjustments" control (page 52).
Video adjustments
- Press the SETUP button to display the SETUP menu, then select [Video Adjust] and press the ENTER button.
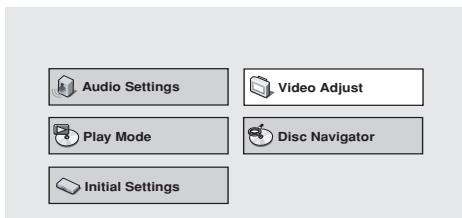
text_image
Audio Settings Video Adjust Play Mode Disc Navigator Initial Settings- Use the left/right cursor buttons ( , ) to select from [Memory 1], [Memory 2], or [Memory 3], then press the down cursor button ( ); select [Detailed Settings] and press the ENTER button.
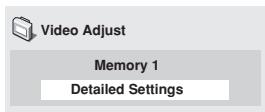
text_image
Video Adjust Memory 1 Detailed Settings- If the ENTER button is not pressed before a certain period of time has elapsed, the [Video Adjust] menu screen will disappear and the selection will be canceled.
text_image
STANDBY/ON OPEN/CLOSE SEARCH REPEAT RPT A-B DISPLAY TITLE/CHP FRM/TIME 1 2 3 4 5 6 7 8 9 >10 0 CLEAR MEMORY TOP MENU MENU ENTER SETUP RETURN- Use the up/down cursor buttons (↑, ↓) to select the item, then use the right/left cursor buttons (←, →) to adjust or select the value.
- See page 53 regarding the contents of setting items.
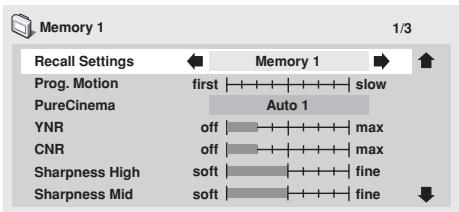
text_image
Memory 1 Recall Settings ← Memory 1 → ↑ Prog. Motion first slow PureCinema Auto 1 YNR off max CNR off max Sharpness High soft fine Sharpness Mid soft fine ↓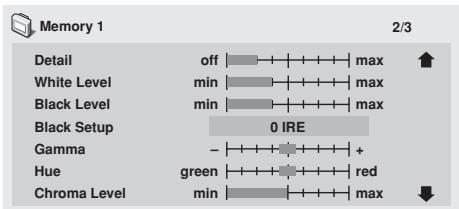
text_image
Memory 1 2/3 Detail off max White Level min max Black Level min max Black Setup 0 IRE Gamma - + Hue green red Chroma Level min max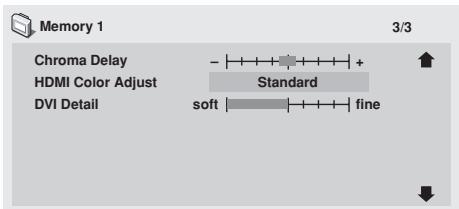
text_image
Memory 1 3/3 Chroma Delay HDMI Color Adjust DVI Detail - Standard soft fine- Pressing the DISPLAY button alternates between the display of the single item selected and the full-screen display.
- After selecting/adjusting the necessary items, press the ENTER button to exit the menu.
● The video memory setting [Memory 1], [Memory 2], [Memory 3] selected in step 2 will be stored.
- If the selected memory bank already has a video memory setting stored in it, the previous contents will be erased (overwritten).
Important
- After completing settings, be sure to press the ENTER button or SETUP button to confirm the selections. If any other button is used to exit the setting menu, the newly set contents will not be stored.
Note
- Some settings may not appear obvious, depending on the disc or display used.
[Setting Items]
Recall Settings
Load the video quality settings stored in [Memory 1], [Memory 2] or [Memory 3].
Prog. Motion
This setting effects only progressive video output. Enabled when using video materials and adjusted for moving or still images. Adjustments are possible only when progressive scan signals are output, but settings are disabled when setting is set to [ON].
PureCinema
Produces optimum setting for progressive scan circuit and DNR operation when playing original film materials on DVD. Normally, set to [Auto1], but if images appear unnatural, set to [Auto2], [On] or [Off]. For more details, see “About PureCinema” (page 53).
YNR
Use to reduce noise in the luminance channel (Y).
CNR
Use to reduce noise in the chroma channel (C).
Sharpness High
Use to adjust image resolution clarity in the high-frequency ranges.
Sharpness Mid
Use to adjust image resolution clarity in the mid-frequency ranges.
Detail
Use to emphasize image contour details.
White Level
Use to adjust the image's white level.
Black Level
Use to adjust the image's black level.
Black Setup
Use to compensate for blocked-up blacks and produce more three-dimensional images.
Gamma
Use to emphasize the perception of dark parts of the image.
Hue
Use to control balance between greens and reds.
Chroma Level
Use to adjust the color saturation level. Effective when viewing animations and other images with broad areas of solid color.
Chroma Delay
Use to adjust imbalance between luminance (Y) signals and color (C) signals (effective only with progressive-scan images).
HDMI Color Adjust (when connected to HDMI display device)
When connected to a HDMI display device, with [Resolution] is set other than [VGA] (720 x 480), this allows the selection of HDMI output color.
Standard: RGB Limited
Enhanced: RGB Full
DVI Detail (when connected to DVI display device)
Emphasizes DVI image contours.

Note
- This effect may not be produced when [Resolution] is set to [VGA] (page 48).
About PureCinema
DVD video signals originate from two types of media:
- Video material: Media recorded at 30 frames-per-second (fps)
● Film material: Media recorded at 24 fps.
Film material: Movies are recorded at 24 fps (24 Hz); when this “PureCinema” mode is used to convert the original 24 fps recording to 60 fps progressive scan, the processing information recorded in the disc is used to produce the same scanning rate as the original movie, thus allowing you to enjoy extremely stable, flicker free images.
The default setting is [Auto1], but if the picture appears to flicker or to produce rough contours, change the setting to [Auto2], [Off] or [On] as appropriate.
When playing back DVD movie software originally recorded as 24 fps "film material," you can see whether the disc is film or video material by displaying the video transmission rate on the disc information screen; if a hash mark (#) appears next to the transmission rate display [Tr.Rate], it is film material.
To display the disc's information screen, press the DISPLAY button (for details, see page 26).
Also, when playing “video material” DVDs, selecting [On] will produce a single composite of odd fields and even fields for progressive scan conversion. This setting is suitable for “video materials” with relatively little movement, or for “video materials” recorded in 30P (Progressive scan) mode. If contours appear with jagged edges or flickering, select [Auto1], [Auto2], or [Off].
This unit has been designed to allow connection to a DVI device. Proper operation may not be possible when connected to some HDMI devices.
Advanced Setup Menu Osaka Settings for Commercial Use
In addition to the normal SETUP menu, DVD-V8000 includes an ADV. SETUP menu for selecting the following 27 special functions:
(1) COMMAND STACK
(2) WEEKLY TIMER
(3) POWER ON START
(4) TITLE PLAY MODE
(5) KEY LOCK
(6) REPEAT MODE
(7) SERIAL PORT
(8) BAUD RATE
(9) REV STEP/REV PLAY
(10) BLACKBOARD LOCK
(11) PLAYER CONTROL PANEL
(12) SETUP LOCK (MOUSE)
(13) GOTO DVD-MENU
(14) MOUSE CURSOR
(15) EXTEND TERMINAL
(16) SYNC OUT(DURING SQ)
(17) EXTERNAL SYNC
(18) MONITOR OSD
(19) AUTO PASS THROUGH
(20) PLAY START MODE
(21) LOAD SETUP incl WEEKLY TIMER
(22) SAVE SETUP incl WEEKLY TIMER
(23) LOAD COMMAND STACK
(24) SAVE COMMAND STACK
(25) LOAD WEEKLY TIMER
(26) SAVE WEEKLY TIMER
(27) SAVE ERROR LOG
| ADV. SETUP | page 1/3 |
| >COMMAND STACK | |
| WEEKLY TIMER | OFF |
| POWER ON START | OFF |
| TITLE PLAY MODE | Single |
| KEY LOCK | OFF |
| REPEAT MODE | OFF |
| SERIAL PORT | 15 Pin |
| BAUD RATE | 4800bps |
| REV STEP/REV PLAY | Resolution |
| ADV.SETUP | page 2/3 |
| >BLACKBOARD LOCK | OFF |
| PLAYER CONTROL PANEL | Selectable |
| SETUP LOCK (MOUSE) | OFF |
| GOTO DVD-MENU | OFF |
| MOUSE CURSOR | ON |
| EXTEND TERMINAL | Standard |
| SYNC OUT(DURING SQ) | OFF |
| EXTERNAL SYNC | OFF |
| MONITOR OSD | Bottom |
| ADV. SETUP page 3/3 | |
| >AUTO PASS THROUGH OFF | |
| PLAY START MODE Title1 | |
| LOAD SETUP incl WEEKLY TIMER | |
| SAVE SETUP incl WEEKLY TIMER | |
| LOAD COMMAND STACK | |
| SAVE COMMAND STACK | |
| LOAD WEEKLY TIMER | |
| SAVE WEEKLY TIMER | |
| SAVE ERROR LOG |
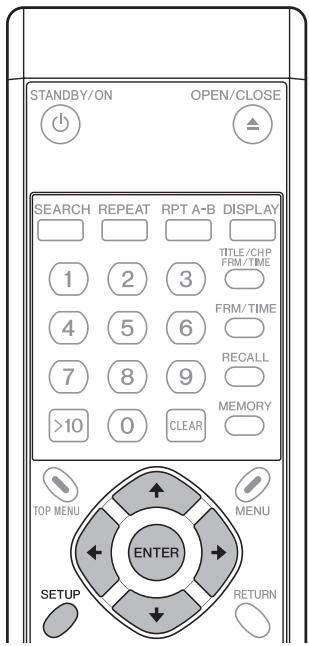
text_image
STANDBY/ON OPEN/CLOSE SEARCH REPEAT RPT A-B DISPLAY TITLE/CHP FRM/TIME 1 2 3 4 5 6 7 8 9 >10 0 CLEAR MEMORY TOP MENU MENU ENTER SETUP RETURN1. To access the ADV. SETUP menu
Press and hold the SETUP button (on remote control unit or main unit) depressed for one second. The screen displays the Advanced Setup (ADV. SETUP) menu as shown in the illustration.
When the cursor is placed on [COMMAND STACK] and the ENTER button pressed, Command Stack entry menu appears. For [WEEKLY TIMER], [POWER ON START], and [KEY LOCK], use the cursor buttons ( , ) to alternate between [ON/OFF]; when [ON] is selected and the ENTER button is pressed, the next menu will allow detailed settings.
For [EXTEND TERMINAL], use the cursor buttons ( , ) to select [Standard/User]. When [User] is selected, pressing the ENTER button will allow settings to be entered at the next menu.
For other items, use the up/down cursor buttons (↑, ↓) on this menu page to select the item, then use the left/right cursor buttons (↔, →) to select the [ON/OFF] or other value.
Note
- ADV. SETUP menu items can be set using the mouse as well as the remote control unit. Place the mouse cursor over the item you wish to set and click the left mouse button to select the item. Clicking on the page number at the upper right of the display screen will change the page being displayed. When an item is selected, clicking the left or right mouse button will allow the item's value to be changed.
- When the [WEEKLY TIMER], [POWER ON START], or [KEY LOCK] menu items are set to [ON], and the left mouse button is clicked, a menu will appear allowing detailed values for each item to be changed.
- On the [EXTEND TERMINAL] menu, when [User] is selected and the left mouse button is clicked, a menu will appear allowing detailed values to be changed.
2. Item settings
2.1. COMMAND STACK
When [COMMAND STACK] is selected and the ENTER button is pressed, the Command Stack entry menu appears. See "Inputting a Command Stack" (page 64).
2.2. WEEKLY TIMER
OFF (default)
Automatic start/stop using the timer is not performed.
ON
Automatic start/stop using the timer is performed. When [ON] is selected and the ENTER button is pressed, the daily power on time/power off time setting menu will appear. See "3.WEEKLY TIMER settings" (page 57).
2.3. POWER ON START
Set to select whether automatic playback is performed when power is turned ON.
OFF (default)
POWER ON START function is disabled.
ON
POWER ON START function is enabled. It is necessary to set the title and chapter to be played at power on. See "4. Setting POWER ON START" (page 60).
2.4. TITLE PLAY MODE
Single (default)
When a NAVI command ("Return to menu", "Search for specific title", "Playback from beginning of title", etc.) follows a title, the specified operation is performed after the title finishes playing. When no command is specified, playback stops.
All
When playback of a single DVD disc title is complete, the next title plays and so on until all titles have played.
2.5. KEY LOCK
The Key Lock function determines whether main unit or remote control unit buttons are "enabled" or "disabled." However, EXTEND TERMINAL commands are always supported, regardless of this setting (except OPEN/CLOSE).
OFF (default)
Commands from remote control and front panel buttons are allowed.
ON
Commands from remote control and front panel buttons are limited. Press the ENTER button to set the "5. Setting KEY LOCK" (page 61).
2.6. REPEAT MODE
The repeat command sets the default repeat mode when starting playback from the stop condition. Alternates between [OFF/CHAPTER/TITLE/DISC]. (When [TITLE PLAY MODE] is set to [All], [DISC] appears as an additional option).
OFF (default)
Normal play mode; no automatic repeat play is performed.
CHAPTER
With DVD discs: repeat play is performed for a single chapter.
With CD and video CD discs: repeat play is performed of a single track.
TITLE
A single title is repeated.
DISC
All contents of the disc are played back repeatedly.
2.7. SERIAL PORT
Sets the serial interface to use either a 15-pin connector or 9-pin connector. Only a single type of connector may be used at one time.
15 Pin (default)
When connecting to a PC using a 15-pin to 9-pin adapter cable.
9 Pin
When connecting to a PC using a commercial 9-pin cross-wired cable.
2.8. BAUD RATE
Sets the baud rate for the RS-232C interface. Baud rate can be set to either 4800 (default), 9600, or 19200 bps.
2.9. REV STEP/REV PLAY
Use to set the mode during DVD reverse playback.
Resolution (default)
Single-frame reverse is performed with emphasis on video quality.
Smooth
Single-frame reverse is performed with emphasis on speed of response to button input.
2.10. BLACKBOARD LOCK
OFF (default)
Clicking the right mouse button enables the Blackboard mode.
ON
Clicking the right mouse button does not enable the Blackboard mode. See "Video Blackboard Function" (page 75).
2.11. PLAYER CONTROL PANEL
Selectable (default)
When the right and left mouse buttons are clicked simultaneously, the control panel display alternates ON/OFF.
Always On
Control panel is displayed constantly.
Always Off
Control panel is not displayed, even when the right and left mouse buttons are clicked simultaneously.
For details, see "About the player control panel" (page 74).
2.12. SETUP LOCK (MOUSE)
OFF
[SETUP] and [ADV. SETUP] buttons are displayed on player control panel.
ON (default)
[SETUP] and [ADV. SETUP] buttons are not displayed on player control panel.
2.13. GOTO DVD-MENU
Determines whether "return to menu" button is displayed onscreen during DVD playback.
OFF (default)
"Return to menu" button is not displayed.
LEFT
During DVD playback, the "return to menu" button is displayed at lower left side of screen.
RIGHT
During DVD playback, the "return to menu" button is displayed at lower right side of screen.
BOTH
During DVD playback, the "return to menu" button is displayed on both sides at bottom of screen.
2.14. MOUSE CURSOR
Select whether mouse cursor is displayed or not.
ON (default)
Mouse cursor is displayed.
OFF
Mouse cursor is not displayed. However, during use of video blackboard function, mouse cursor is displayed even if this setting is OFF.
2.15. EXTEND TERMINAL
Use to set EXTEND TERMINAL button functions.
Standard (default)
The unit responds according to standard presets.
User
The user can set the function enabled by the EXTEND TERMINAL button.
Press ENTER to display the next menu and set the function as desired. See "6. EXTEND TERMINAL settings" (page 63).
2.16. SYNC OUT (DURING SQ)
SYNC OUT is used to set whether a video signal is produced when the player is not outputting its own video signal.
OFF (default)
Video is output constantly; sync signal does not turn off. During stop mode, blue or black background is displayed.
ON
Video is not output except during playback and when displaying menu screens (sync signal is also not produced). However, when an external input signal is being output (for example, by means of the PASS THROUGH button or other commands), that signal will continue to be produced.
2.17. EXTERNAL SYNC
OFF (default)
Unit is not synchronized to external sync signal.
NTSC Mode1, NTSC Mode2
Set this when inputting an NTSC signal as external sync signal for synchronized playback.
PAL Mode1, PAL Mode2
Set this when inputting a PAL signal as external sync signal for synchronized playback. See "External sync function",
"Differences between Mode 1 and Mode 2" (page 80).
2.18. MONITOR OSD
OFF
Monitor OSD is not superimposed on MONITOR VIDEO OUT connector output.
BOTTOM (default)
The monitor OSD is superimposed on the bottom half of the output from the MONITOR VIDEO OUTPUT connector.
TOP
The monitor OSD is superimposed on the top half of the output from the MONITOR VIDEO OUTPUT connector.
2.19. AUTO PASS THROUGH
OFF (default)
Automatic switching of video/audio output is not performed when starting/stopping playback.
ON
Selector is automatically switched to main unit video/audio during DVD playback, and to external input video/audio when playback is stopped.
This setting does not disable switching performed using the main unit's PASS THROUGH button or commands.
This function controls automatic switching at transitions from STOP to PLAYBACK and from PLAYBACK to STOP; after those transitions, however, it is possible to use buttons and commands to perform other switching as well.
2.20. PLAY START MODE
Use to set the function of the main unit's PLAY/PAUSE button and the remote control unit's PLAY button.
Title1 (default)
When player is stopped, pressing the PLAY/PAUSE or PLAY button causes playback to start from the beginning of Title1.
TOP MENU
When player is stopped, pressing the PLAY/PAUSE or PLAY button causes the disc's top menu to be displayed. If no top menu is present on the disc, playback starts from the beginning of Title1.
2.21. LOAD SETUP incl WEEKLY TIMER
Use this function to load main unit setting files from USB memory. See "Loading/Saving Files Using USB Memory" (page 71).
2.22. SAVE SETUP incl WEEKLY TIMER
Use this function to save main unit setting files to USB memory. See "Loading/Saving Files Using USB Memory" (page 71).
2.23. LOAD COMMAND STACK
Use this function to load Command Stack data from USB memory. See "Loading/Saving Files Using USB Memory" (page 71).
2.24. SAVE COMMAND STACK
Use this function to save Command Stack to USB memory. See "Loading/Saving Files Using USB Memory" (page 71).
2.25. LOAD WEEKLY TIMER
Weekly timer settings are read from USB memory.
See "Loading/Saving Files Using USB Memory" (page 71).
2.26. SAVE WEEKLY TIMER
Weekly timer settings are saved in USB memory.
See "Loading/Saving Files Using USB Memory" (page 71).
2.27. SAVE ERROR LOG
Use this function to save main unit error logs to USB memory.
See "Loading/Saving Files Using USB Memory" (page 71).

Important
The following items cannot be changed during playback. Set these items only when the disc is stopped.
• REV STEP/REV PLAY
- EXTEND TERMINAL
- EXTERNAL SYNC
- LOAD SETUP/SAVE SETUP
- LOAD COMMAND STACK/SAVE COMMAND STACK
- LOAD WEEKLY TIMER/SAVE WEEKLY TIMER
- SAVE ERROR LOG

Important
If power is interrupted while the disc is moving, any ADV. SETUP settings that had been changed will not be preserved. When disconnecting the power cord, be sure that the unit is set to standby mode first by using the STANDBY/ON button.
3. WEEKLY TIMER settings
When [WEEKLY TIMER] is set to [ON] and the ENTER button is pressed, the following display appears:
Setting the internal clock to the current time
If the ENTER button is pressed when the pointer is aligned with the first line (date/time) as shown in the accompanying illustration, the year place will flash, and the internal clock's setting menu appears. If the unit is turned OFF for an extended period of time or otherwise when the clock is incorrect, use this mode to reset the clock.
Use the left/right buttons ( , ) to select the item, then the up/down buttons ( , ) or number buttons to set the value. When the SEC place is flashing, pressing the button or ENTER button will complete the setting of the internal clock.
Setting the WEEKLY TIMER
1. Align the pointer with the day of the week you wish to set (e.g., [MON]), and press the ENTER button.
● The ON/OFF time setting menu will appear as shown.
| TIMER ON/OFF MON |
| ON --:-- OFF --:-- |
| 1.TOP MENU |
| 2.TITLE |
| 3.COMMAND STACK |
2. Set the power ON/OFF time.
- Use the remote control unit's number buttons and button to set the desired times for power ON/OFF.
| TIMER ON/OFF MON |
| ON 08:30 OFF 17:30 |
| >1.TOP MENU |
| 2.TITLE |
| 3.COMMAND STACK |

Note
- A maximum of 24 items (3 screens worth) of WEEKLY TIMER setting can be stored. By aligning the cursor at the bottom of the screen and pressing the ↓ button, the next page of settings will be displayed. The (1/3) number on the first line indicates which page you are currently viewing.
- When the ON time item is flashing, pressing the button will cause the weekday item to flash; then the , buttons can be used to change the weekday. This is convenient when you wish to set two or more ON/OFF times on the same weekday.
- If the weekday is set to [ALL], the same power ON/OFF settings can be applied to all days of the week.
- If no OFF time is set, the power will only turn ON.
- An OFF time can be set without setting any ON time if desired; in this case, the unit power turns OFF at the set time, but only if the timer has started from the power ON status.
3. After setting the power ON/OFF times, move the pointer to select the next operation to be performed following power ON from the following three.
Important
● This setting cannot be made if no ON time is set.
- Writing to memory is performed when the timer setting menu is closed. If the power is turned OFF before then, the timer settings will not be preserved.
- DVD discs programmed to begin automatic playback will not operate in accordance with their programmed setting.
(1) TOP MENU
The disc's top menu opens. If the disc has no top menu, the disc stops.
(2) TITLE
Playback begins from designated title and chapter. When [2. TITLE] is selected and the ENTER button is pressed, the following menu appears displaying the [TITLE] and [CHAPTER]. The number buttons, cursor buttons, and ENTER button can then be used to select the desired title and chapter.
| TIMER ON/OFF MON |
| ON 08:30 OFF 17:30 |
| 1.TOP MENU |
| >2.TITLE |
| TITLE 01 CHAPTER 01 |
| 3.COMMAND STACK |
Important
- When a title and chapter have been selected, the selected chapter will be played, and if subsequent chapters exist, playback will continue to those chapters. Playback will end at the end of the selected title.
If repeat play has been set in the ADV. SETUP menu, however, when the selected chapter has completed playing, the set repeat play will occur. - When setting a track on a CD or Video CD, input the desired track number in the menu's [CHAPTER] item. Entries to the [TITLE] item will be ignored.
Note
- If you wish to merely turn the player ON, select [TITLE] and input any title number that does not physically exist on the disc.
(3) COMMAND STACK
Designates a COMMAND STACK group and automatically begins playback. When [3. COMMAND STACK] is selected and the ENTER button is pressed, the [GROUP] menu will appear as shown; use the number buttons, cursor buttons, and ENTER button to select the desired COMMAND STACK group.
| TIMER ON/OFF MON |
| ON 08:30 OFF 17:30 |
| 1.TOP MENU |
| 2.TITLE |
| >3.COMMAND STACKGROUP 001 |
Important
- The selected COMMAND STACK will be automatically repeated during playback.
4. When a play operation is set, the screen returns to the initial menu page.
- For example, when title 2, chapter 6 is set, the menu appears as follows.
To set different ON/OFF and operation items for each day of the week, follow the same procedure as above to set [TUE], [WED], and so on, as required. To set the same times/operations for each day of the week, the [ALL] item can be set, together with the ON/OFF times and operation. In this way, the same operations will be performed each day of the week at the same times.
Note
- When the cursor button is used to select a setting item followed by the CLEAR button, that setting value will be deleted.
Note
WEEKLY TIMER can be set by using either the remote control unit or the mouse.
- When the mouse cursor (hand pointer 👤) appears over an item, clicking the left mouse button allows the selection or setting to be changed.
- Numbers are incremented by 1 each time the left mouse button is clicked, and decremented by 1 with each click of the right mouse button.
- With the cursor over [ENTER], press the left mouse button to validate the selected values.
- With the cursor over [RETURN], press the left mouse button to return the previous mode. Previously entered values will be reset.
- Click on the page number (1/3) at the top right of the screen to change the page.
To set power ON/OFF twice or more on the same weekday
By changing the weekday setting, it is possible to cycle the power ON/OFF multiple times in a single day. With the [ON] time input flashing, press the button to make the weekday flash. Then use the , buttons to change the weekday setting.
When the following kind of setting is made, the power turns ON at 7:30 on Sunday, playback starts from chapter 1 of title 1, and then power turns OFF at 12:00. Then at 13:00 power turns ON again, and chapter 1 of next title 2 is played, after which the power turns OFF at 17:30.
Using this kind of procedure, it is possible to set up to 24 ON/OFF times in a single weekday.
Setting the same ON/OFF times everyday
Setting the weekday to [ALL] results in the same ON/OFF times being allocated for every day of the week.
In the case shown below, the power is set to turn ON each day at 7:30, play chapter 1 of title 1, then turn off at 17:30.
In addition, given the above settings, if you wish for the power to remain off only on Sunday, set the Sunday [OFF] time to the same time as the [ON] time set under [ALL]. In this case, do not set any value in the Sunday [ON] time.
As an example, with the following settings, the power remains OFF on Sundays, while on other weekdays it turns ON at 7:30 and playback starts from chapter 1 of title 1, then power turns OFF at 17:30.
Date change with ON and OFF times
With the following settings, power turns on at 23:00 on Mon-day night, and turns OFF at 2:00 AM on Tuesday morning.
This function sets the operation to be performed when power is turned ON.
On the ADV. SETUP menu, when [POWER ON START] is set to any status other than [OFF], and the ENTER button is pressed, the following menu will appear; use the cursor buttons (↑, ↓) to select item [1], [2], or [3], then press the ENTER button.
POWER ON START
- TOP MENU
-
TITLE
-
COMMAND STACK
1. TOP MENU
When power is turned ON, playback automatically starts from the disc's top menu. Using the cursor up/down buttons (↑, ↓), select [1] and press the ENTER button. When the [=> SET ENTER] message flashes; press the ENTER button once again to confirm the selection. If the loaded disc has no top menu, the disc playback will stop.
POWER ON START
- TOP MENU => SET ENTER
-
TITLE
-
COMMAND STACK
When this is done, the [ENTER] icon on the main unit's display will flash as shown below.
POWER ON START
TOP MENU
ENTER
2. TITLE
When power is turned ON, the player searches for the designated title and chapter and begins playback there. Using the cursor up/down buttons (↑, ↓), select [2], then press the ENTER button. When the following menu appears, use the number buttons or cursor up/down buttons (↑, ↓) and the ENTER button to set the desired title and chapter.
POWER ON START
- TOP MENU
- TITLE TITLE 01 CHAPTER 01
- COMMAND STACK
When this is done, the main unit's display will appear as shown below. First the [TITLE] will appear, and when the ENTER button is used to confirm the selection, the [CHAPTER] will appear.
POWER ON START
TITLE 01

ENTER button
POWER ON START
CHAPTER 01
3. COMMAND STACK
When power is turned ON, the COMMAND STACK is called and playback begins automatically. Using the cursor up/down buttons (↑, ↓), select [3], then press the ENTER button. When the following menu appears, use the number buttons or the cursor up/down buttons (↑, ↓) to designate the COMMAND STACK group, then press the ENTER button to confirm the selection.
POWER ON START
-
TOP MENU
-
TITLE
- COMMAND STACK GROUP 001
When this is done, the main unit's display will appear as shown below.
POWER ON START
GROUP 001

Important
The selected COMMAND STACK will be automatically repeated at time of playback.

Note
POWER ON START can be set by using either the remote control unit or the mouse.
- When the mouse cursor (hand pointer 👤) appears over an item, clicking the left mouse button allows the selection or setting to be changed.
- Numbers are incremented by 1 each time the left mouse button is clicked, and decremented by 1 with each click of the right mouse button.
- With the cursor over [ENTER], press the left mouse button to validate the selected values.
- With the cursor over [RETURN], press the left mouse button to return the previous mode. Previously entered values will be reset.
5. Setting KEY LOCK
5.1. How to set KEY LOCK
When [KEY LOCK] is set to [ON] and the ENTER button is pressed, the following menu will appear. Using the cursor up/down buttons (↑, ↓), select [1. TRAY], [2. REMOTE CONTROL], [3. FRONT KEY], and then use the cursor left/right buttons (↔, →) to set to either [Disable] or [Enable].
KEY LOCK
- TRAY Enable
-
REMOTE CONTROL Enable
-
FRONT KEY Enable
When this is done, the main unit's display will appear as shown below.
TRAY
ENABLE

cursor ←, → buttons
TRAY
DISABLE

1. TRAY
When set to [Disable], the tray cannot be opened by
- The main unit's STOP OPEN/CLOSE button
● The RS-232C's OP, RJ commands - The EXTEND TERMINAL's OPEN/CLOSE command.
5.2. KEY LOCK Indicator display table
The indicator displays for each KEY LOCK setting value are as follows:
2. REMOTE CONTROL
When set to [Disable], commands from the remote control unit cannot be input.
3. FRONT KEY
When set to [Disable], commands from the main unit's front panel buttons cannot be input.
Example 1
TRAY: Disable
REMOTE CONTROL: Disable
FRONT KEY: Enable
With these settings, the remote control unit is disabled, but commands can be input through the main unit's front panel buttons, but the tray cannot be opened by using the STOP OPEN/CLOSE button.
Example 2
TRAY: Enable
REMOTE CONTROL: Disable
FRONT KEY: Disable
With these settings, the remote control unit and front panel buttons are disabled. [TRAY] is [Enable], but since commands are not accepted from the remote control unit and front panel buttons, they cannot be used to open the tray. However, the RS-232C's OP command can be used to open the tray.

Note
KEY LOCK can be set by using either the remote control unit or the mouse.
- When the mouse cursor (hand pointer 👍) appears over an item, clicking the left mouse button selects the item.
- When an item is selected, clicking the right or left mouse buttons allows the item's values to be changed.
| TRAY | REMOTE CONTROL | FRONT KEY | KEY LOCK indicator display |
| Enable | Enable | Enable | Off |
| Disable | Enable | Enable | OffFlashes about 2 seconds when remote control unit's OPEN/CLOSE button is pressed, or if the main unit's STOP OPEN/CLOSE button is pressed during stop mode. |
| Enable | Disable | Enable | LightsFlashes about 2 seconds when remote control unit buttons are pressed. |
| Disable | Disable | Enable | LightsFlashes about 2 seconds when remote control unit buttons are pressed, or if the main unit's STOP OPEN/CLOSE button is pressed during stop mode. |
| Enable | Enable | Disable | LightsFlashes about 2 seconds when main unit's buttons are pressed. |
| Disable | Enable | Disable | LightsFlashes about 2 seconds when main unit's buttons are pressed, or if remote control unit's OPEN/CLOSE button is pressed. |
| Enable | Disable | Disable | LightsFlashes about 2 seconds when buttons on remote control unit or main unit are pressed. |
| Disable | Disable | Disable | LightsFlashes about 2 seconds when buttons on remote control unit or main unit are pressed. |
5.3. Temporary KEY LOCK release
KEY LOCK settings are stored in the player's Flash Memory, so operation statuses are preserved even when power is switched from OFF to ON. However, the KEY LOCK settings can be temporarily released if necessary to change discs or to change other settings.
To temporarily release the unit from KEY LOCK settings, simultaneously hold the main unit's RETURN, ↓, and SCAN/SKIP ◀◀◀◀◀◀ buttons depressed for 2 seconds (this KEY LOCK release operation can be performed during playback if desired).
This releases all KEY LOCK and TRAY LOCK settings, allowing commands and buttons to be used normally. Note that this operation is only a temporary release of the KEY LOCK settings, however, and the settings themselves remain unchanged in the Flash Memory. As a result, if power is turned OFF and then ON again, the previously input KEY LOCK settings will be restored.
From the temporary KEY LOCK release condition, the KEY LOCK settings can also be restored by once again holding the main unit's RETURN, ↓, and SCAN/SKIP ◀◀◀◀◀ buttons depressed simultaneously for 2 seconds.
Important
During the temporary KEY LOCK release condition, if the ADV. SETUP menu is opened and the KEY LOCK settings are changed, the temporary KEY LOCK release status will be restored when the ADV. SETUP menu is closed. To enable the new settings, you must exit the temporary KEY LOCK release status.
5.4. KEY LOCK exceptions
The main unit's LCD button is not affected by the KEY LOCK settings. As a result, even if [FRONT KEY] is set to [Disable], the LCD button will continue to operate normally, allowing switching of the LCD display.

text_image
Pioneer DVD STANDY ON KEY LOCK TITLE CHIP/TRACK MIN SEC FRAME DISPLAY LED ELAPED FRAME STOP OPEN/CLOSE PLAY/MAKE SCAN/SKIP STILL/STEP RETURN TOP MENU MENU DVD PLAYER DVD-V8000 RETURN VIDEO AUDIO STREAMS MOUSE/MEMORY SCAN/SKIP ←← ←← → RETURN6. EXTEND TERMINAL settings
For details regarding EXTEND TERMINAL settings, see "Extend Terminal Specifications" (page 89).
1. Hold the SETUP button depressed for 1 second to display the ADV. SETUP menu.
| ADV. SETUP | page 1/3 |
| >COMMAND STACK | |
| WEEKLY TIMER | OFF |
| POWER ON START | OFF |
| TITLE PLAY MODE | Single |
| KEY LOCK | OFF |
| REPEAT MODE | OFF |
| SERIAL PORT | 15 Pin |
| BAUD RATE | 4800bps |
| REV STEP/REV PLAY | Resolution |
2. Use the ↑, ↓ cursor buttons to select [EXTEND TERMINAL].
| ADV.SETUP | page 2/3 |
| BLACKBOARD LOCK | OFF |
| PLAYER CONTROL PANEL | Selectable |
| SETUP LOCK (MOUSE) | OFF |
| GOTO DVD-MENU | OFF |
| MOUSE CURSOR | ON |
| >EXTEND TERMINAL | Standard |
| SYNC OUT(DURING SQ) | OFF |
| EXTERNAL SYNC | OFF |
| MONITOR OSD | Bottom |
3. Use the , cursor buttons to select [User], then press the ENTER button.
![PIONEER DVD-V8000 - Use the , cursor buttons to select [User], then press the ENTER button. - 1](/content/2024/12/76091/images/23872a138cede2e96f1d810b32473e8b26e3840c47e96aa86721aade51eb8508.jpg)
text_image
Extend Terminal Settings Current New 1. ↑ 2. ↓ 3. ← 4. → 5. ENTER 6. GROUP 1 7. GROUP 2 8. GROUP 3 ↑ PLAY ↓ STOP ← PAUSE → STEP FWD ← STEP REV ★ SCAN FWD ★ SCAN REV → SKIP FWD Move Select ENTER Delete CLEAR Exit SETUP- [Current] indicates present settings, listed from 1 to 30.
- To return from this window to the ADV. SETUP menu, press the RETURN button, and to completely exit the setting menu, press the SETUP button.
- Switch combinations (30 patterns) whose functions can be changed include the following:
Cursor
↑, ↓, ←, →, ↗, ↘, ↙ (8 keys)
Operations
PLAY, STOP, PAUSE, STEP FWD, STEP REV, SCAN FWD, SCAN REV, SKIP FWD, SKIP REV, ENTER, MENU, TOP MENU, RETURN, DISPLAY, AUDIO, ANGLE, SUBTITLE, REPEAT, REPEAT A-B, CLEAR, OPEN/CLOSE, SETUP, MEMORY, RECALL, TT/CH/FR/TM (25 keys)
Numbers
1 to 20, 0, and >10 (22 keys)
Command Stack
GROUP 1 to GROUP 27 (27 keys)
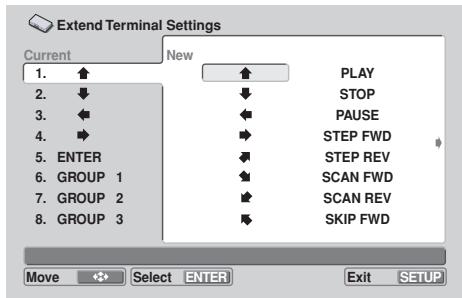
text_image
Extend Terminal Settings Current New 1. ↑ ↑ PLAY 2. ↓ ↓ STOP 3. ← ← PAUSE 4. → → STEP FWD 5. ENTER ← STEP REV 6. GROUP 1 ← SCAN FWD 7. GROUP 2 → SCAN REV 8. GROUP 3 → SKIP FWD Move Select ENTER Exit SETUPUse the cursor buttons (↑, ↓, ←, →) to select the desired button, then press the ENTER button to confirm the selection; the display will change in the [Current] column.
- It is also possible to assign the same function to multiple switch patterns if desired.
Disabling Switch Operations
In addition to assigning a new function to a default button, it is also possible to merely disable the button operation if desired.
- Select the button you wish to disable from the [Current] list, then press the CLEAR button. The display will change to show [nothing] as the function.
- In the following example, the no. 1 button has been disabled (no function assigned). As a result, pressing the button will produce no response.
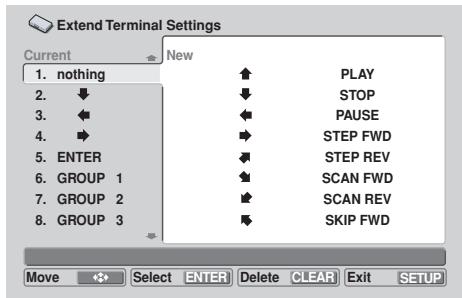
text_image
Extend Terminal Settings Current New 1. nothing PLAY 2. ↓ STOP 3. ← PAUSE 4. → STEP FWD 5. ENTER STEP REV 6. GROUP 1 SCAN FWD 7. GROUP 2 SCAN REV 8. GROUP 3 SKIP FWD Move Select ENTER Delete CLEAR Exit SETUPResetting Default Values
Press the ENTER button at the [Default Setting] item of the [Current] menu to reset all buttons to their default functions.
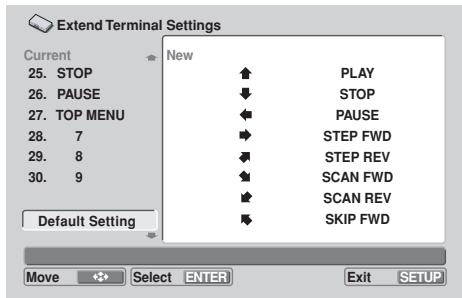
text_image
Extend Terminal Settings Current New 25. STOP PLAY 26. PAUSE STOP 27. TOP MENU PAUSE 28. 7 STEP FWD 29. 8 STEP REV 30. 9 SCAN FWD Default Setting SCAN REV Move Select ENTER Exit SETUPCommand Stack Function
The DVD-V8000 is equipped with a Command Stack function, allowing a series of operations (PLAY, STOP, etc.) to be pre-programmed into the player. The Command Stack can then be called up for automatic performance, or each step can be called individually by the remote control unit. Also, the contents of a recorded Command Stack can be preserved in USB memory, and Command Stacks preserved in USB memory can be called up and executed.

Important
- The Command Stack function cannot be used with CDs and Video CDs.
● The largest stack recordable on the player is 300 steps. - Recorded Command Stack data is preserved in memory even when the power cord is disconnected.
Inputting a Command Stack
1. Selecting input mode
At the ADV. SETUP menu select [Command Stack], or press the remote control unit's MEMORY button to select the input mode.

Important
- To enter the command stack input menu, a DVD disc must be loaded.
Initial COMMAND STACK input menu

text_image
Command Stack Group(1-001) Command(0-000) Group001 001 002 003 004 005 006 007 008 Move Select ENTER Exit SETUP2. Entering commands
1) Press the button to highlight the command column at the right of the menu, then press the ENTER button.
- As shown in the accompanying illustration, 3 selection items will be displayed.

text_image
Command Stack Group(1-001) Group001 001 SEGMENT PLAY CHAPTER PLAY COMMAND 002 003 004 005 006 007 008 Move Select ENTER Return RETURN Exit SETUP2) Use the ↑, ↓ buttons to highlight the command you wish to input, then press the ENTER button.
① SEGMENT PLAY:
Use to designate a start and stop point for frame segment playback.
② CHAPTER PLAY:
Use to designate a start and stop point for chapter play-back.
③ COMMAND:
Use for commands other than ① or ②.
2.1 SEGMENT PLAY command input Example: To play title 1, frames 301 to 513.
1) With the cursor on [SEGMENT PLAY], press the ENTER button.
![PIONEER DVD-V8000 - 1) With the cursor on [SEGMENT PLAY], press the ENTER button. - 1](/content/2024/12/76091/images/ea48cc910bf8372b29cd95b7f614d3303febab169e91ceba7a0f55d9d413364f.jpg)
text_image
Command Stack Group(1-001) Command(0-000) Group001 001 SEGMENT PLAY 002 CHAPTER PLAY 003 COMMAND 004 005 006 007 008 Move Select ENTER Return RETURN Exit SETUP2) With the cursor on [TITLE], press the numeral button [1], then press the ENTER or ↓ button.
● During playback, the title will be displayed.
3) With the cursor on [SEARCH FRAME], press numeral buttons [3], [0], [1], then the ENTER or ↓ button.
- If the ENTER button is pressed during playback, the frame at the point where the button is pressed will be set as the starting point.
4) With the cursor on [MARK FRAME], press numeral buttons [5], [1], [3], then the ENTER button or ↓ button.
- If the ENTER button is pressed during playback, the frame at the point where the button is pressed will be set as the end point.
- Once [MARK FRAME] is input, [SUBTITLE], [AUDIO], and [ANGLE] cannot be input.
5) With the cursor over [OK], press the ENTER button.
- Setting is complete.
![PIONEER DVD-V8000 - 5) With the cursor over [OK], press the ENTER button. - 1](/content/2024/12/76091/images/194c154c6475cc1e0fe55a596b853eb21ee25daac1734e11f710651a518a2479.jpg)
text_image
Command Stack Group(1-001) Command(0-000) Group001 001 TITLE 01 002 SEARCH FRAME 000301 003 MARK FRAME 000513 004 SUBTITLE 005 AUDIO 006 ANGLE 007 OK CANCEL 008 Move Select ENTER Return RETURN Exit SETUP2.1.1 Inputting commands for subtitle, audio, and angle
Example: To set SUBTITLE 1, AUDIO 2, and ANGLE 3 (command to set subtitle, audio and angle without performing search operations).
1) Without entering [TITLE], [SEARCH FRAME], or [MARK FRAME], place cursor over [SUBTITLE] and press numeral button [1], followed by the ENTER or ↓ button.
2) With the cursor over [AUDIO], press numeral button [2] followed by the ENTER or ↓ button.
3) With the cursor over [ANGLE], press numeral button [3] followed by the ENTER or ↓ button.
4) With the cursor over [OK], press the ENTER button.
- Setting is completed.
![PIONEER DVD-V8000 - 5) With the cursor over [OK], press the ENTER button. - 2](/content/2024/12/76091/images/b02bcbb966e0e32d3da08a0b943f6f9fe76769f9ed17c19215ae008c20ca1ee3.jpg)
text_image
Command Stack Group(1-001) Command(0-000) Group001 001 TITLE 00 002 SSEARCH FRAME 000000 003 004 SUBTITLE 01 005 AUDIO 2 006 ANGLE 3 007 OK CANCEL 008 Move Select ENTER Return RETURN Exit SETUP![PIONEER DVD-V8000 - 5) With the cursor over [OK], press the ENTER button. - 3](/content/2024/12/76091/images/e866a31411f61a56d0abe7cedd3372f6786722b1ce5e19f58a21ac8c53b0bd8d.jpg)
Important
● The highest frame that can be designated is 999999.
2.2 Inputting CHAPTER PLAY commands
Example: To play chapters 3 to 7 of title 5, using SUBTITLE 3, AUDIO 2, and ANGLE 1.
1) With the cursor over [CHAPTER PLAY], press the ENTER button.
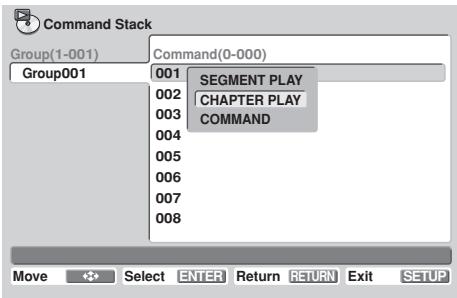
text_image
Command Stack Group(1-001) Command(0-000) Group001 001 SEGMENT PLAY 002 CHAPTER PLAY 003 COMMAND 004 005 006 007 008 Move Select ENTER Return RETURN Exit SETUP2) With the cursor over [TITLE], press numeral button [5], followed by the ENTER or ↓ button.
3) With the cursor over [SEARCH CHAPTER], press numeral button [3], followed by the ENTER or ↓ button.
4) With the cursor over [MARK CHAPTER], press numeral button [8], followed by the ENTER or ↓ button.
- If [7] is selected, chapter 7 itself will not be played back.
5) With the cursor over [SUBTITLE], press numeral button [3], followed by the ENTER or ↓ button.
6) With the cursor over [AUDIO], press numeral button [2], followed by the ENTER or ↓ button.
7) With the cursor over [ANGLE], press numeral button [1], followed by the ENTER or ↓ button.
8) With the cursor over [OK], press the ENTER button.
- Setting is completed.
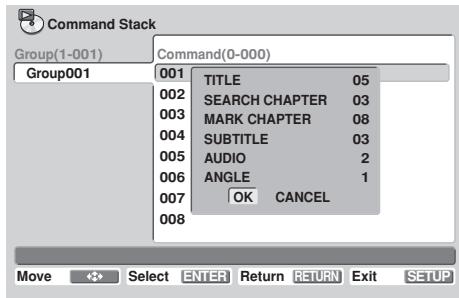
text_image
Command Stack Group(1-001) Command(0-000) Group001 001 TITLE 05 002 SEARCH CHAPTER 03 003 MARK CHAPTER 08 004 SUBTITLE 03 005 AUDIO 2 006 ANGLE 1 007 OK CANCEL 008 Move Select ENTER Return RETURN Exit SETUP2.3 Inputting other commands
1) With the cursor over [COMMAND], press the ENTER button.
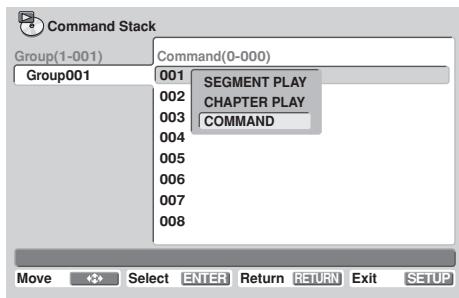
text_image
Command Stack Group(1-001) Command(0-000) Group001 001 SEGMENT PLAY 002 CHAPTER PLAY 003 COMMAND 004 005 006 007 008 Move <<> Select ENTER Return RETURN Exit SETUP2.3.1 Single commands
1) Highlight the desired command (e.g., [PLAY]), and press the ENTER button.
- Setting is completed.
- Other commands, such as [PAUSE], [STOP], [STEP REV], [STEP FWD], and [REPEAT GROUP] can be input in the same way.
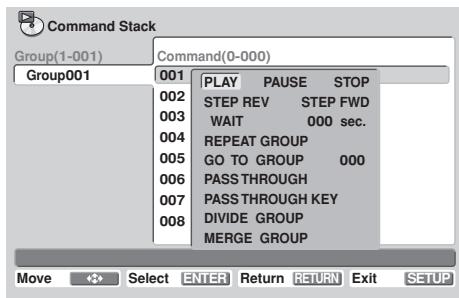
text_image
Command Stack Group(1-001) Command(0-000) Group001 001 PLAY PAUSE STOP 002 STEP REV STEP FWD 003 WAIT 000 sec. 004 REPEAT GROUP 005 GO TO GROUP 000 006 PASS THROUGH 007 PASS THROUGH KEY 008 DIVIDE GROUP MERGE GROUP Move Select ENTER Return RETURN Exit SETUP2.3.2 Setting wait time
Example: Setting a wait time of 5 seconds
1) With the cursor over [WAIT], press numeral button [5], followed by the ENTER button.
- Setting is completed.
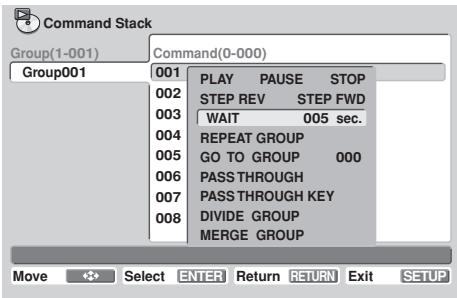
text_image
Command Stack Group(1-001) Command(0-000) Group001 001 PLAY PAUSE STOP 002 STEP REV STEP FWD 003 WAIT 005 sec. 004 REPEAT GROUP 005 GO TO GROUP 000 006 PASS THROUGH 007 PASS THROUGH KEY 008 DIVIDE GROUP MERGE GROUP Move Select ENTER Return RETURN Exit SETUP2.3.3 GO TO command
Example: to jump to a different command group (Group 2)
1) With the cursor over [GO TO GROUP], press numeral button [2], followed by the ENTER or ↓ button.
- Setting is completed.
- A non-existing group value can also be entered (in this case, no jump is executed).
- Since no more than 150 groups can be created, group values above 150 cannot be input.
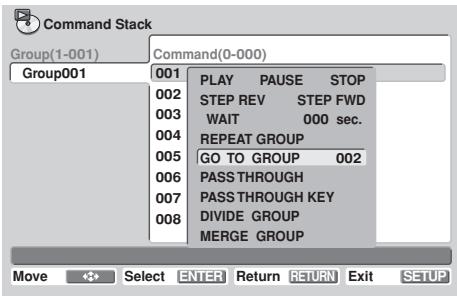
text_image
Command Stack Group(1-001) Command(0-000) Group001 001 PLAY PAUSE STOP 002 STEP REV STEP FWD 003 WAIT 000 sec. 004 REPEAT GROUP 005 GO TO GROUP 002 006 PASS THROUGH 007 PASS THROUGH KEY 008 DIVIDE GROUP MERGE GROUP Move Select ENTER Return RETURN Exit SETUP2.3.4 PASS THROUGH command
Use to switch output between main unit video/audio and external input video/audio.
1) With the cursor over [PASS THROUGH], press the ENTER button.
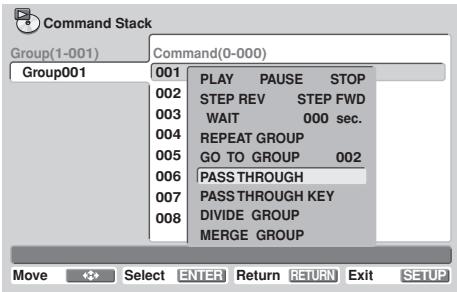
text_image
Command Stack Group(1-001) Command(0-000) Group001 001 PLAY PAUSE STOP 002 STEP REV STEP FWD 003 WAIT 000 sec. 004 REPEAT GROUP 005 GO TO GROUP 002 006 PASS THROUGH 007 PASS THROUGH KEY 008 DIVIDE GROUP MERGE GROUP Move Select ENTER Return RETURN Exit SETUP2) Use the up/down arrow buttons (↑, ↓) to select [MONITOR], then use the right/left arrow buttons (←, →) to select [DVD], [EXTERNAL] or [PRESERVE].
DVD: Switches output to video playback from main unit.
EXTERNAL: Switches output to through output.
PRESERVE: Output is not switched.
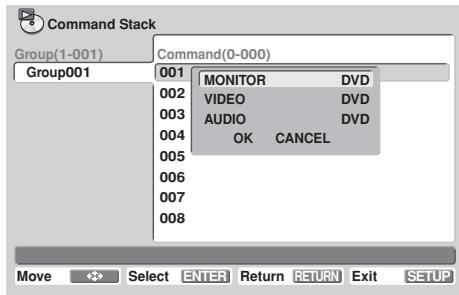
text_image
Command Stack Group(1-001) Command(0-000) Group001 001 MONITOR DVD 002 VIDEO DVD 003 AUDIO DVD 004 OK CANCEL 005 006 007 008 Move Enter Return Return Exit SETUP3) Use the up/down arrow buttons (↑, ↓) to select [VIDEO], then use the right/left arrow buttons (←, →) to select [DVD], [EXTERNAL] or [PRESERVE].
4) Use the up/down arrow buttons (↑, ↓) to select [AUDIO], then use the right/left arrow buttons (←, →) to select [DVD], [EXTERNAL] or [PRESERVE].
5) With the cursor over [OK], press the ENTER button.
- Setting is completed.
- If [CANCEL] is selected followed by ENTER, the display returns to the command selection menu screen.
2.3.5 PASS THROUGH KEY command
This command is used to enable/disable the PASS THROUGH button on the DVD-V8000's front panel.
1) With the cursor over [PASS THROUGH KEY], press the ENTER button.
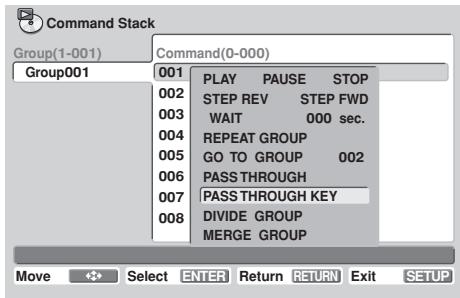
text_image
Command Stack Group(1-001) Command(0-000) Group001 001 PLAY PAUSE STOP 002 STEP REV STEP FWD 003 WAIT 000 sec. 004 REPEAT GROUP 005 GO TO GROUP 002 006 PASS THROUGH 007 PASS THROUGH KEY 008 DIVIDE GROUP MERGE GROUP Move Select ENTER Return RETURN Exit SETUP● The switching window will be displayed.
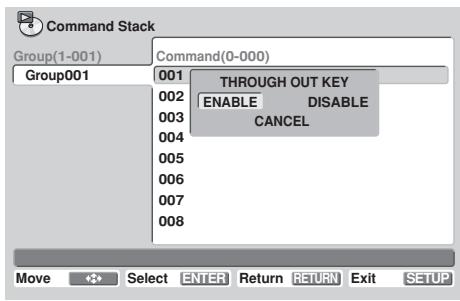
text_image
Command Stack Group(1-001) Command(0-000) Group001 001 THROUGH OUT KEY 002 ENABLE DISABLE 003 CANCEL 004 005 006 007 008 Move Select ENTER Return RETURN Exit SETUP2) Use the right/left arrow buttons ( , ) to select either [ENABLE] or [DISABLE], then press the ENTER button.
ENABLE: Main unit's PASS THROUGH button is enabled. DISABLE: Main unit's PASS THROUGH button is disabled.
- Setting is completed.
- Select [CANCEL] then press the ENTER button to return to the command selection menu.

Note
- When power is first turned on, the PASS THROUGH button is enabled by default.
3. Editing Command Stack
3.1 Dividing into groups
Use this function to divide a group into two groups. The designated command and all following commands will form a new group.
1) Place the cursor over the first command to be separated from the existing group, then press the ENTER button.
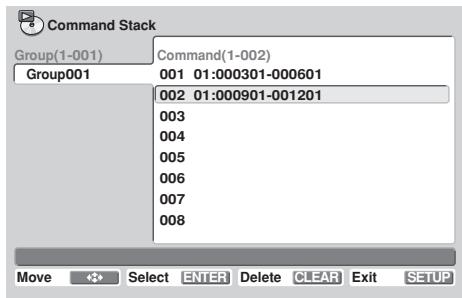
text_image
Command Stack Group(1-001) Command(1-002) Group001 001 01:000301-000601 002 01:000901-001201 003 004 005 006 007 008 Move Select ENTER Delete CLEAR Exit SETUP2) Select [COMMAND] and press the ENTER button.
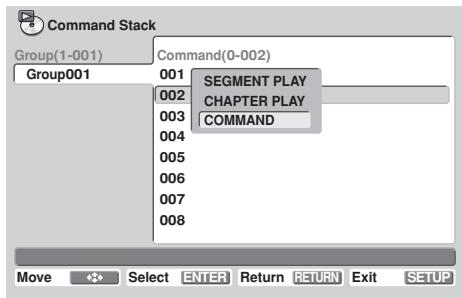
text_image
Command Stack Group(1-001) Command(0-002) Group001 001 SEGMENT PLAY 002 CHAPTER PLAY 003 COMMAND 004 005 006 007 008 Move Select ENTER Return RETURN Exit SETUP3) Select [DIVIDE GROUP].
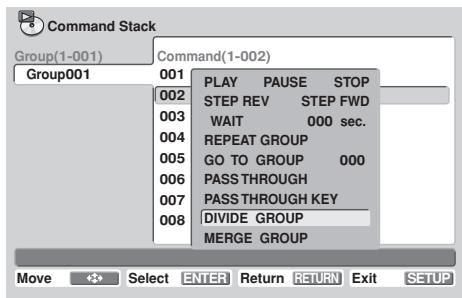
text_image
Command Stack Group(1-001) Command(1-002) Group001 001 PLAY PAUSE STOP 002 STEP REV STEP FWD 003 WAIT 000 sec. 004 REPEAT GROUP 005 GO TO GROUP 000 006 PASS THROUGH 007 PASS THROUGH KEY 008 DIVIDE GROUP MERGE GROUP Move Select ENTER Return RETURN Exit SETUP4) With the cursor over [DIVIDE GROUP], press the ENTER button.
![PIONEER DVD-V8000 - 4) With the cursor over [DIVIDE GROUP], press the ENTER button. - 1](/content/2024/12/76091/images/6800e39972086ba756a2567f0dd71cdb86fda73244e7157841f5ae2b48f04bd0.jpg)
text_image
Command Stack Group(1-002) Command(1-001) Group001 001 01:000901-001201 Group002 002 003 004 005 006 007 008 Move Select ENTER Delete CLEAR Exit SETUP- A new group will be formed, beginning from the selected command.
- In order for the new group to be inserted immediately after the group from which it was divided, a new group number will be added to the following group.
Caution is needed when a setting is present that uses [GO TO GROUP] to cause a jump to occur.
3.2 Merging Groups
Use this function to merge (join) one group with its immediately following contiguous group.
Example: To merge Group001 and Group002
1) Place the cursor over the blank space following the final step in the first group's command column, then press the ENTER button.
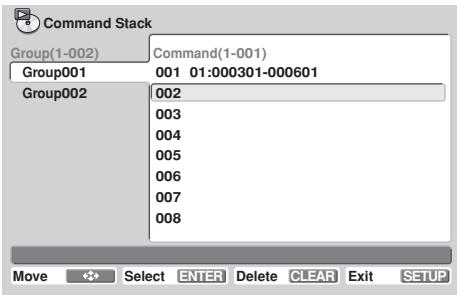
text_image
Command Stack Group(1-002) Command(1-001) Group001 001 01:000301-000601 Group002 002 003 004 005 006 007 008 Move Select ENTER Delete CLEAR Exit SETUP2) Select [COMMAND], then press the ENTER button.
![PIONEER DVD-V8000 - 2) Select [COMMAND], then press the ENTER button. - 1](/content/2024/12/76091/images/4889ab7180c399593c05ccb5efca1bfcd5181d4ea2257c49d018cac285c4a55e.jpg)
text_image
Command Stack Group(1-001) Command(0-001) Group001 001 SEGMENT PLAY Group002 002 CHAPTER PLAY COMMAND 003 004 005 006 007 008 Move Select ENTER Return RETURN Exit SETUP3) Select [MERGE GROUP].
![PIONEER DVD-V8000 - 3) Select [MERGE GROUP]. - 1](/content/2024/12/76091/images/a5423028b7ce6a94bd5d2c212bf2d66c4bd42611b6ab653dcfe47d8d9d97c8e1.jpg)
text_image
Command Stack Group(1-002) Command(1-001) Group001 001 PLAY PAUSE STOP Group002 002 STEP REV STEP FWD 003 WAIT 000 sec. 004 REPEAT GROUP 005 GO TO GROUP 000 006 PASS THROUGH 007 PASS THROUGH KEY 008 DIVIDE GROUP MERGE GROUP Move Enter Return Return Exit SETUP4) With the cursor over [MERGE GROUP], press the ENTER button.
![PIONEER DVD-V8000 - 4) With the cursor over [MERGE GROUP], press the ENTER button. - 1](/content/2024/12/76091/images/dc063d87c5bdeb015bba84f5cacb449ed341c8001add9c58715720f16bfb5f11.jpg)
text_image
Command Stack Group(1-001) Command(1-002) Group001 001 01:000301-000601 002 01:000901-001201 003 004 005 006 007 008 Move Select ENTER Delete CLEAR Exit SETUP- The same thing can be performed without opening the menu, by placing the cursor over the blank space and pressing the CLEAR button.
- Since one group less will exist, if following groups exist, their group numbers will be decremented by one. Caution is needed when a setting is present that uses [GO TO GROUP] to cause a jump to occur.
3.3 Deleting commands
1) With the cursor on the command you wish to delete, press the CLEAR button.
● The selected command will be deleted.
3.4 Deleting a group
Example: To delete Group002
1) With the cursor on the group you wish to delete, press the ENTER button, then select [DELETE GROUP].
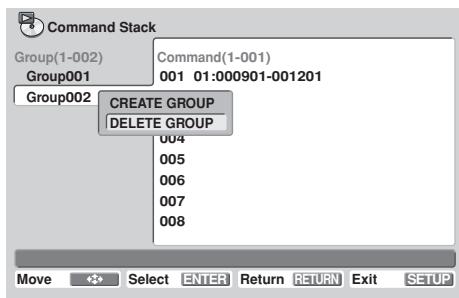
text_image
Command Stack Group(1-002) Command(1-001) Group001 001 01:000901-001201 Group002 CREATE GROUP DELETE GROUP 004 005 006 007 008 Move Select ENTER Return RETURN Exit SETUP2) With the cursor on [DELETE GROUP], press the ENTER button.
![PIONEER DVD-V8000 - 2) With the cursor on [DELETE GROUP], press the ENTER button. - 1](/content/2024/12/76091/images/9400cdff74d7461c2ef63c04e4f72457bd57a1107c274bfdfaab3d8ec880ada1.jpg)
text_image
Command Stack Group(1-001) Command(1-001) Group001 001 01:000301-000601 002 003 004 005 006 007 008 Move Select ENTER Exit SETUP● The selected group will be deleted.
- Since one group will be deleted, if following groups exist, their group numbers will be decremented by one. Caution is needed when a setting is present that uses [GO TO GROUP] to cause a jump to occur.
3.5 Creating a new group
1) With the cursor on the name of the last group present, press the ENTER button.
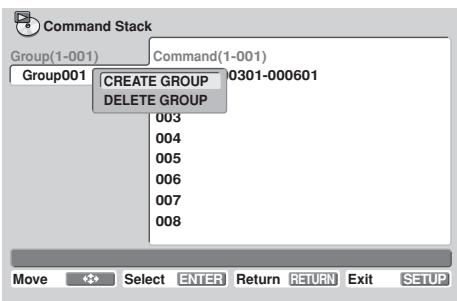
text_image
Command Stack Group(1-001) Command(1-001) Group001 CREATE GROUP 0301-000601 DELETE GROUP 003 004 005 006 007 008 Move Select ENTER Return RETURN Exit SETUP2) With the cursor on [CREATE GROUP], press the ENTER button.
![PIONEER DVD-V8000 - 2) With the cursor on [CREATE GROUP], press the ENTER button. - 1](/content/2024/12/76091/images/9d29ccf90f14b21b615afe788b63c845068e6bf74636e7e58e2a018e4e702fc3.jpg)
text_image
Command Stack Group(1-002) Command(0-000) Group001 001 Group002 002 003 004 005 006 007 008 Move Select ENTER Delete CLEAR Exit SETUP- A new group will be created, and the cursor will move to the command column.
3.6 Command Stack correcting
1) Place the cursor on the command you wish to edit, and press the ENTER button.
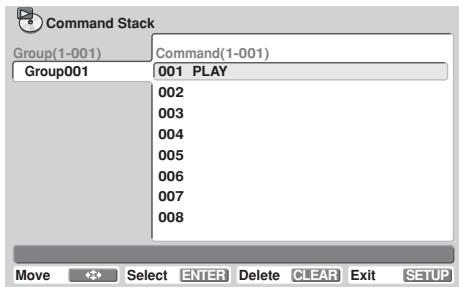
text_image
Command Stack Group(1-001) Command(1-001) Group001 001 PLAY 002 003 004 005 006 007 008 Move Select ENTER Delete CLEAR Exit SETUP2) With the cursor on [STACK CORRECTING], press the ENTER button.
![PIONEER DVD-V8000 - 2) With the cursor on [STACK CORRECTING], press the ENTER button. - 1](/content/2024/12/76091/images/16130e16d01123a480803e8ab51cf598da5ad65b81f3b3d3fde0cd723ef45d0b.jpg)
text_image
Command Stack Group(1-001) Command(1-001) Group001 001 SEGMENT PLAY 002 CHAPTER PLAY 003 COMMAND 004 STACK CORRECTING 005 006 007 008 Move Select ENTER Delete CLEAR Exit SETUP- If any of the remaining three functions (other than [STACK CORRECTING]) is selected, instead of overwriting the command, a new command will be inserted immediately prior to the selected command.
3) Select the newly desired command and press the ENTER button.
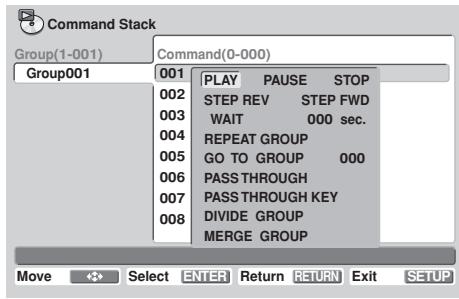
text_image
Command Stack Group(1-001) Command(0-000) Group001 001 PLAY PAUSE STOP 002 STEP REV STEP FWD 003 WAIT 000 sec. 004 REPEAT GROUP 005 GO TO GROUP 000 006 PASS THROUGH 007 PASS THROUGH KEY 008 DIVIDE GROUP MERGE GROUP Move Select ENTER Return RETURN Exit SETUP- The newly selected command will overwrite the old command.
4. Ending input and saving data
When ending input following correction of a command stack, a confirmation message [Save changes ?] will appear.
To save the changes, place cursor on [OK] and press the ENTER button.
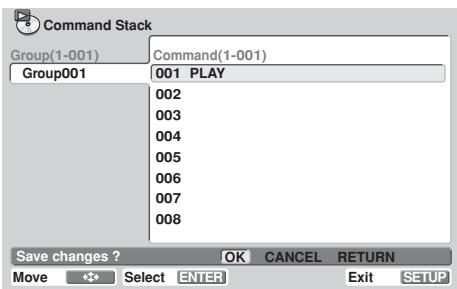
text_image
Command Stack Group(1-001) Command(1-001) Group001 001 PLAY 002 003 004 005 006 007 008 Save changes ? OK CANCEL RETURN Move Select ENTER Exit SETUPTo discard changes, place cursor on [CANCEL] and press the ENTER button.
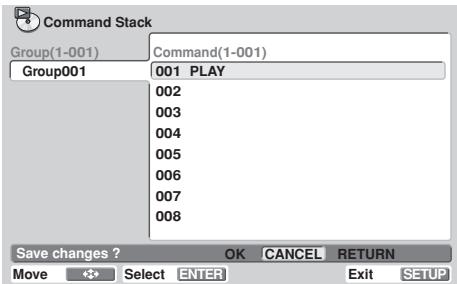
text_image
Command Stack Group(1-001) Command(1-001) Group001 001 PLAY 002 003 004 005 006 007 008 Save changes ? OK CANCEL RETURN Move <-> Select ENTER Exit SETUPTo return to the original input menu, place cursor on [RETURN] and press the ENTER button.
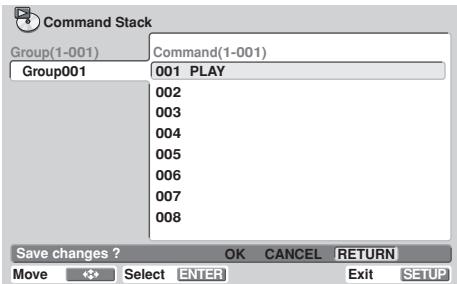
text_image
Command Stack Group(1-001) Command(1-001) Group001 001 PLAY 002 003 004 005 006 007 008 Save changes ? OK CANCEL RETURN Move Select ENTER Exit SETUPExecuting a Command Stack
1. Entering the execute mode
To enable the Command Stack execute mode, from the SETUP menu's [Play Mode] select [Command Stack] and press either ENTER or the remote control unit's RECALL button.

Important
- To execute a Command Stack, it is necessary that a DVD disc be loaded in the player.
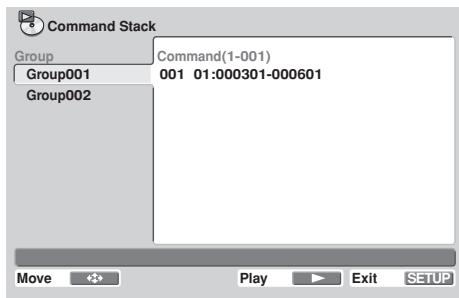
text_image
Command Stack Group Command(1-001) Group001 001 01:000301-000601 Group002 Move Play Exit SETUP2. Executing the Command Stack
2.1 To consecutively execute all commands within a group
Place the cursor over the [Group] command and press Play (▶), or place the cursor over [Command 001] and press either the Play (▶) or ENTER button.
2.2 To execute one of the group's commands as a single step
Place the cursor over the desired command and press the Step (II▶) button.
- Each time the Step (II▶) button is pressed, the next command in sequence will be executed.
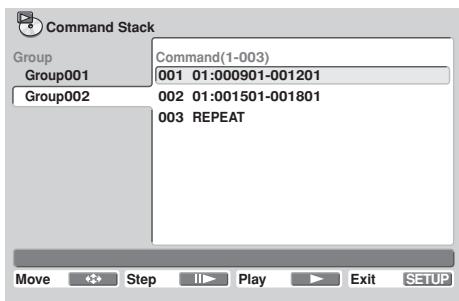
text_image
Command Stack Group Command(1-003) Group001 001 01:000901-001201 Group002 002 01:001501-001801 003 REPEAT Move Step Play Exit SETUP
Note
- Command Stacks can also be invoked by using the [WEEKLY TIMER] (page 57) or [POWER ON START] (page 60).
Loading/Saving Files Using USB Memory
The DVD-V8000 is equipped with the ability to use USB memory to preserve (save) player setting and other files, and to call up (load) those files from USB memory. These functions are convenient, for example, when you wish to use multiple DVD-V8000 with the same settings.
1. File types
■ DVD-8000 Setting files
Settings made on the SETUP menu and ADV.SETUP menu can be saved in USB memory. They can be also loaded to a player from USB memory. The settings include WEEKLY TIMER settings. Setting files saved in USB memory are given the file extension "set".
■ Command Stack files
Command Stack data can be saved in USB memory. They can be also loaded to a player from USB memory. Command Stack files saved in USB memory are given the file extension "cmd".
■ Weekly Timer files
Weekly Timer settings can be saved in USB memory. They can be also loaded to a player from USB memory. Weekly Timer files saved in USB memory are given the file extension "wtd".
■ Error log files (SAVE only)
Error logs stored within the DVD-V8000 can be saved in USB memory. Error log files saved in USB memory are given the file extension "err".
2. File names for saved files
Files saved to USB memory are given names with the format "DVD-V8000-serial-number.ext", where "DVD-V8000-serial-number" is the serial number of your player, and "ext" is the file extension (described in the previous section).
For example, if the serial number of product is ABCD123456, a setting file would be given the name "ABCD123456.set". If a file with the same name already exists on the USB memory, the additional integer "_n" will automatically be appended to the end of the serial number (where "n" is the number 1 to 5), for example, "ABCD123456_5.set".
If file names already exist on the USB with appended integers 1 to 5, you will be prompted as to whether you wish to overwrite the appended integer 5 file name (e.g., "ABCD123456_5.set"). If you reply OK, the file will be overwritten.
As a result of the above conventions, it is possible to save a total of six files for a single product serial number (one without any additional identifying integer, plus five with additional identifying integers).
3. Supported file systems for USB memory
File format systems supported for USB memory include FAT 16, FAT 12, and FAT 32. Devices FAT formatted on a computer can be used.
4. Operation
Operations can be performed by the remote control unit or mouse.
When using the remote control unit, use the arrow buttons (↑, ↓, ←, →) to select, and the ENTER button to confirm selections, and press the RETURN button to return to the ADV. SETUP menu.
When using the mouse, selection is performed by clicking the left button when the mouse cursor appears over an item as a hand pointer ( & ). Once an item is selected, clicking the left mouse button again confirms the selection. When the mouse cursor appears as an arrow ( & ), pressing the right mouse button will cause the display to return to the ADV.SETUP menu.
Also, when viewing the LOAD menu's file list display screen, a maximum of 9 files can be displayed on a single screen; left-click on the [NEXT] and [PREV] icons to display the 9 subsequent and previous files.
Important
- Only files located in the USB root memory can be loaded. Likewise, files for the DVD-V8000 are saved, they are stored on the root directory of the USB memory device.
- Long file names are supported for display when loading files from USB memory, but if the file name includes more than 15 characters, part of it will be truncated. If a file name is truncated, the truncated part will be indicated by an ellipsis (...).
- Only one USB memory device can be supported at a time. Do not attempt to insert two USB memory devices simultaneously.
- When using a USB memory device on the DVD-V8000, always delete any files irrelevant to the DVD-V8000 before attempting to use the load and save commands. Pioneer is not responsible for support in event of trouble arising from errors during loading or saving, resulting in erasure or destruction of files on USB memory devices. The DVD-V8000 is not equipped with a function to delete files from USB memory devices, so please use your own computer to perform this task before connecting the memory device to the DVD-V8000.
- Never disconnect the memory device from its USB port during a load or save operation. When the file load/save operation is completed, the [COMPLETE] message will appear on the screen and on the main unit's display.
If an error occurs during execution of the file save or load command, try removing and reinserting the USB memory device, then perform the command again. If the error persists, reformat the memory device on your computer using the FAT file system.
Pioneer denies all responsibility for damage to USB memory devices, loss of data contained in such devices, and loss of DVD-V8000 setting data resulting from use of this product.
5. Procedures for loading and saving USB memory data
5.1 Loading files from a USB memory device
Example: To load a setting file
1) Go to the third page of the ADV. SETUP menu and select [LOAD SETUP incl WEEKLY TIMER].
| ADV. SETUP page 3/3 |
| AUTO PASS THROUGH OFF |
| PLAY START MODE Title1 |
| >LOAD SETUP incl WEEKLY TIMER |
| SAVE SETUP incl WEEKLY TIMER |
| LOAD COMMAND STACK |
| SAVE COMMAND STACK |
| LOAD WEEKLY TIMER |
| SAVE WEEKLY TIMER |
| SAVE ERROR LOG |
LOAD SETUP&WEEKL
- If the USB memory device is not detected, the [NO USB MEMORY] message will be displayed.
- Use the RETURN button to return to the ADV. SETUP menu.
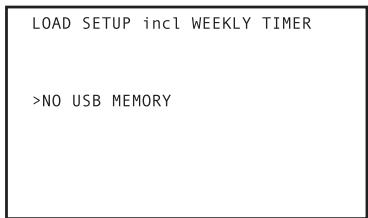
text_image
LOAD SETUP incl WEEKLY TIMER >NO USB MEMORYLOAD SETUP&WEEKL NO USB MEMORY
- When the USB memory device is detected, the files held in the memory will be displayed on the screen (limited to those with the "set" extension).
- Up to 9 files can be displayed on a single screen. Use the up/down (↑, ↓) arrow buttons to select the desired file, and the right/left (←, →) arrow buttons to display the next/previous screens of 9 files each (if present on the memory device).
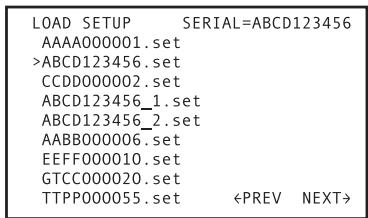
text_image
LOAD SETUP SERIAL=ABCD123456 AAAA000001.set >ABCD123456.set CCDD000002.set ABCD123456_1.set ABCD123456_2.set AABB000006.set EEFF000010.set GTCC000020.set TTPP000055.setLOAD SETUP&WEEKL ABCD123456.set
cursor , buttons
LOAD SETUP&WEEKL CCDD000002.set
3) Select the file you wish to load, and press the ENTER button.
- When loading command stack files, only those files with the "cmd" extension will be displayed.
4) A confirmation message will appear asking whether you wish to load the selected file.
- Use the arrow buttons (↑, ↓, ←, →) to select [YES] or [NO]. When [YES] is selected, the file can be loaded into the player. If [NO] is selected, return to the ADV. SETUP menu.
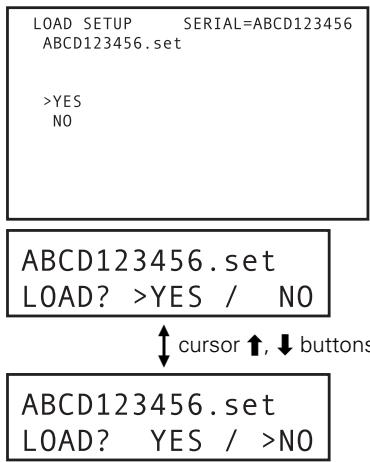
text_image
LOAD SETUP SERIAL=ABCD123456 ABCD123456.set >YES NO ABCD123456.set LOAD? >YES / NO ↑ cursor ↑, ↓ buttons ABCD123456.set LOAD? YES / >NO- File loading begins. During file loading the following message is displayed:
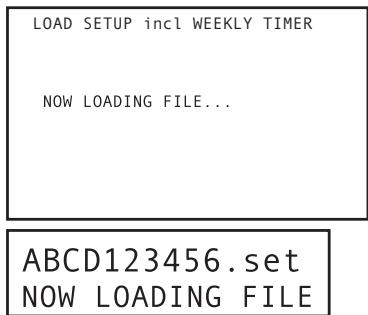
text_image
LOAD SETUP incl WEEKLY TIMER NOW LOADING FILE... ABCD123456.set NOW LOADING FILE...When file loading is completed, the following message is displayed:
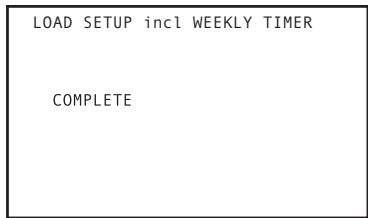
text_image
LOAD SETUP incl WEEKLY TIMER COMPLETEABCD123456.set COMPLETE
6) Press the RETURN or ENTER button to return to the ADV. SETUP menu.
5.2 Saving files to a USB memory device
Example: To save a setting file
1) Go to the third page of the ADV. SETUP menu and select [SAVE SETUP incl WEEKLY TIMER].
ADV. SETUP page 3/3
AUTO PASS THROUGH OFF
PLAY START MODE Title1
LOAD SETUP incl WEEKLY TIMER
SAVE SETUP incl WEEKLY TIMER
LOAD COMMAND STACK
SAVE COMMAND STACK
LOAD WEEKLY TIMER
SAVE WEEKLY TIMER
SAVE ERROR LOG
SAVE SETUP&WEEKL
- If the USB memory device is not detected, the [NO USB MEMORY] message will be displayed.
- Use the RETURN button to return to the ADV. SETUP menu.
SAVE SETUP incl WEEKLY TIMER
NO USB MEMORY
SAVE SETUP&WEEKL NO USB MEMORY
- When the USB memory device is detected, the name of the file to be saved will be displayed at the top of the screen. The file name is composed of the serial number of the player together with an extension. However, if files with the same extension already exist on the USB memory device, the name of the file to be saved will be given an additional integer 1 to 5 as a discriminator (see page 71, "2. File Names for Saved Files").
SAVE SETUP incl WEEKLY TIMER
ABCD123456_5.set
YES
NO
ABCD123456_5.set
SAVE? >YES / NO

ABCD123456 5.set
SAVE? YES / >NO
3) A confirmation message will appear asking whether you wish to save the file.
- Use the arrow buttons (↑, ↓, ←, →) to select [YES] or [NO]. When [YES] is selected, the file can be saved to the memory, but if a file with the same name already exists on the USB memory, the display will ask you to confirm whether the old file should be overwritten. To return to the ADV. SETUP menu, answer either [NO] or press the RETURN button.
4) If a file with the same name already exists on the USB memory, the display will ask for confirmation whether the old file should be overwritten.
- Use the arrow buttons (↑, ↓, ←, →) to select either [YES] or [NO]. If [YES] is selected, the old file will be overwritten (deleted) as the new file is saved. To return to the ADV. SETUP menu, answer either [NO] or press the RETURN button.
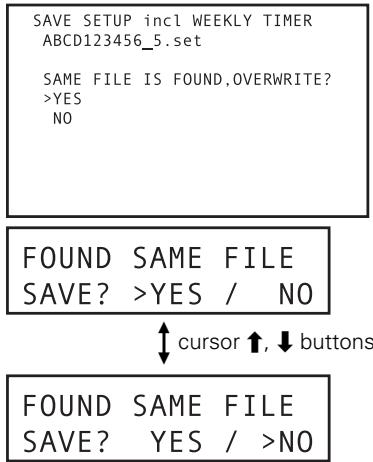
text_image
SAVE SETUP incl WEEKLY TIMER ABCD123456_5.set SAME FILE IS FOUND,OVERWRITE? >YES NO FOUND SAME FILE SAVE? >YES / NO ↑ cursor ↑, ↓ buttons FOUND SAME FILE SAVE? YES / >NO- File saving begins. During file saving the following message is displayed:
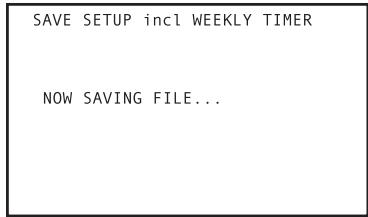
text_image
SAVE SETUP incl WEEKLY TIMER NOW SAVING FILE...ABCD123456.set
NOW SAVING FILE
When file saving is completed, the following message is displayed:
text_image
SAVE SETUP incl WEEKLY TIMER COMPLETE| ABCD123456.set
COMPLETE
6) Press the RETURN or ENTER button to return to the ADV. SETUP menu.
Note
- The file creation time listed for saved files is the time measured by the unit's internal clock.
Using the Mouse to Control the Player
If desired, a USB mouse can be connected to the player to provide more convenient control of player functions.
Button selection (DVD and Video CD)
DVD menu buttons and buttons within video menus can be selected using the mouse.
When the cursor is placed over a button location, the cursor pointer ( ) will change to a hand pointer ( ). Clicking the mouse buttons over the various onscreen menu items when the hand pointer ( ) is displayed will execute the corresponding command in the same way as when using the remote control unit's buttons.
About the player control panel
If the mouse's right and left buttons are clicked simultaneously, or if the right button is clicked while holding the left button depressed, the player's control panel will appear at the bottom of the display.
When the mouse pointer is moved over the player control panel, the arrow cursor ( 👤 ) will change to the hand pointer ( 👥 ). Clicking the mouse buttons over the various onscreen menu items when the hand pointer ( 👍 ) is displayed will execute the corresponding command in the same way as when using the remote control unit's buttons.
- On some commercially sold DVD discs, the placement of onscreen command buttons may differ from the actual cursor positions where those commands are detected. On such discs, use the remote control unit instead of the mouse.
■ When playing DVDs
- Click the left mouse button with the cursor over an onscreen item to execute the corresponding command in the same way as when using the remote control unit.
- If the ADV. SETUP menu's [SETUP LOCK (MOUSE)] function is set to [OFF], the player control panel will display the [SETUP] and [ADV. SETUP] buttons, allowing these menus to be accessed by clicking the mouse button over these items.
- The position of the player control panel can be changed by clicking and dragging point "A" in the illustration. Once the position is changed, it will be preserved in that position until the power is turned OFF.
flowchart
graph TD
    A["Computer Mouse"] --> B["During disc play"]
    B --> C["REV"]
    C --> D["SKIP"]
    C --> E["SCAN"]
    C --> F["STEP"]
    B --> G["FWD"]
    G --> H["PLAY"]
    G --> I["STEP"]
    G --> J["SCAN"]
    G --> K["SKIP"]
    B --> L["RETURN"]
    L --> M["MENU"]
    L --> N["TOP MENU"]
    style A fill:#f9f,stroke:#333
    style B fill:#ccf,stroke:#333
■ When playing Video CDs
Click the mouse's left button to perform the operation indicated by the indicated icon.
The mouse cannot be used for direct selection on PBC playback menu screens. Right-click on the player control panel as shown to display a number at the upper right of the screen. Then the track (or title) number input by pressing the cursor
→ button can be selected.

Important
- The mouse cannot be used to perform operations with discs that prohibit the use of a mouse, or if an input title number does not correspond to a title actually existing on the disc.
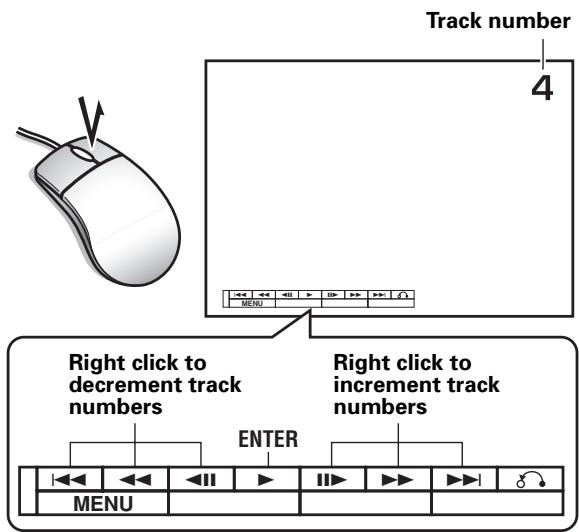
text_image
Track number 4 MENU Right click to decrement track numbers ENTER Right click to increment track numbers MENU
Important
- Player control panel functions are not supported during display of external input video.
Video Blackboard Function
The DVD-V8000 is equipped with a “video blackboard” function that allows the use of a mouse or graphics tablet to make free-hand drawings directly on the screen. Also, during DVD playback, drawings can be made directly on the screen to create composite images in real time with the DVD playback.
Important
- The video blackboard function is supported only for DVDs, and it cannot be used with Video CDs or music CDs.
Using the video blackboard
1.1 Opening the video blackboard
Click the right mouse button to display the mouse cursor and function icons and call the video blackboard function. The function icons can be tuned ON/OFF by clicking the mouse's right button.
Note that the video blackboard function cannot be used when [BLACKBOARD LOCK] is set to [ON] in the ADV. SETUP menu.
1.2 Drawing on screen
Click and drag the left mouse button to create freehand drawing on the screen. The function icons can be used to change the thickness and color of lines.
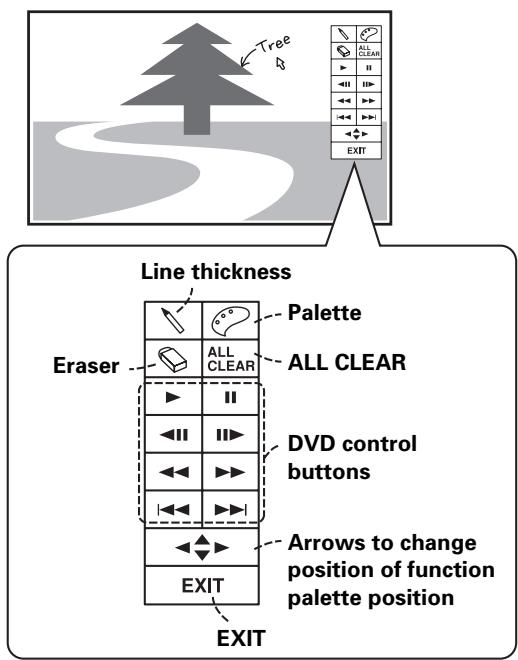
text_image
Tree Line thickness Palette ALL CLEAR Eraser ALL CLEAR DVD control buttons Arrows to change position of function palette position EXIT EXIT1.3 Function icons
1.3.1 Line thickness
Click the mouse's left button to select the thickness of the pen tip in three levels.
1.3.2 Color palette
When using the drawing mode, the mouse's left button can be clicked to change the color used for drawing. Selectable colors include white, black, red, blue, green, yellow, and pink. When in the eraser mode, clicking the mouse's left button switches the function back to the drawing mode.
1.3.3 Eraser
Clicking the mouse's left button switches the function from the drawing mode to eraser mode, allowing onscreen lines to be erased.
When the Eraser is selected, left-clicking on the eraser icon alternates between two eraser sizes.
1.3.4 ALL CLEAR
Clicking the mouse's left button deletes all drawing s on the screen.
1.3.5 DVD control button
Allows control of DVD playback.
1.3.6 Function palette position
Click the mouse's left button to change the position of the palette on the screen (up/down/left/right).
1.3.7 EXIT
Click the mouse's left button to exit the video blackboard function.
Important
● Drawings can be extended to the area occupied by the function icons, but when the function icons are changed from display ON to display OFF, lines drawn in the overlapping area will be erased.
- Under ordinary conditions, the “prohibited operation” icon is displayed when an operation is attempted that is not supported by player or disc. However, when using the video blackboard, these cautionary icons are not displayed, in order to avoid causing the erasure of lines drawn on the screen in the area where the icons would otherwise be displayed.
- Writing on the rightmost edge of the screen may not be possible due to limitations on cursor movement.
Important
- Video Blackboard functions are not supported during display of external input video.
Other Operation Devices
In addition to a USB mouse, the DVD-V8000 can be used with input devices such as pen tablets and touch panel devices. Consult the Pioneer website for information on devices confirmed to operate properly with the DVD-V8000.

Important
- When using a touch panel device with a plasma display, set the display setting to [FULL].
Calibration of pen tablet/touch panel devices
Following the procedures noted below to calibrate an LCD pen tablet or touch panel device. Calibration is performed to correct deviations in the cursor position.
Results of the calibration are stored inside the player, so recalibration is not required each time the unit is turned ON.

Important
- This unit does not support simultaneous use of multiple LCD pen tablets or touch panel devices. In addition, only the last-performed calibration results are effective. As a result, recalibration is required if a device is replaced by another device.
[Calibration]
-
Press the SETUP button to display the SETUP menu, then use the cursor buttons (↑, ↓, ←, →) to select [Initial Settings], and press the ENTER button to confirm (page 39).
-
Press the down cursor button (↓) to select [Options].
![PIONEER DVD-V8000 - [Calibration] - 1](/content/2024/12/76091/images/2a4d67f99d21af017f27812fcdfd5545342e9f168be0bb69bde58e55f2cf1dfd.jpg)
text_image
Initial Settings Digital Audio Out Video Output Language Display Options Parental Lock Off (us) DVI Settings Pointer Calibration- Use the cursor buttons ( , , , ) to select [Pointer Calibration].
![PIONEER DVD-V8000 - [Calibration] - 2](/content/2024/12/76091/images/e61416233f4fa9eb584777ab4b9c12d4a6a793725eca7b0c5c11807f871b32b4.jpg)
text_image
Initial Settings Digital Audio Out Video Output Language Display Options Parental Lock DVI Settings Pointer Calibration Off (us)![PIONEER DVD-V8000 - [Calibration] - 3](/content/2024/12/76091/images/ec5aaba06520ed2bec37089d7be06de51b10cd262fe383fe7e9cd43e0f875629.jpg)
Note
- [Pointer Calibration] will be displayed only when a device supported by the DVD-V8000 is connected.
- Press the ENTER button.
● The calibration menu will be displayed.
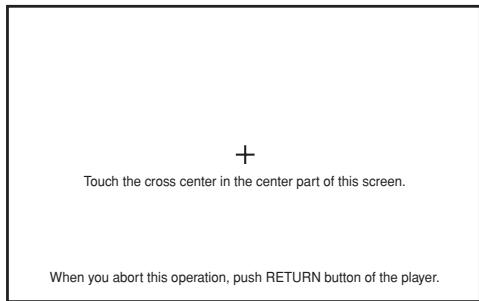
text_image
+ Touch the cross center in the center part of this screen. When you abort this operation, push RETURN button of the player.-
As instructed by the menu, touch the [+] mark at the center of the screen.
-
Next, touch the [+] mark at the upper left of the screen.
-
Next, touch the [+] mark at the lower right of the screen.
- The following display will appear when the [+ mark is touched.
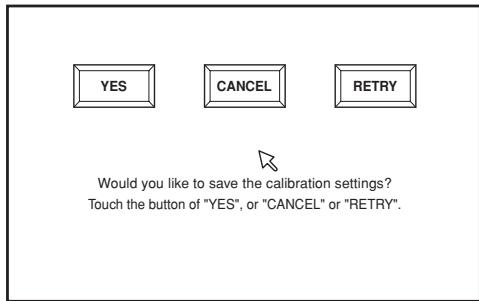
text_image
YES CANCEL RETRY Would you like to save the calibration settings? Touch the button of "YES", or "CANCEL" or "RETRY".-
Press either the [YES] on the screen or ENTER button.
-
The calibration results are stored, and the [Initial Settings] menu is displayed.
- If [CANCEL] is pressed, the calibration results are canceled and not saved.
- If [RETRY] is pressed, the calibration operation is started again.

Important
- If the RETURN button is pressed while performing calibration, the [Initial Settings] menu will be redisplayed, and the results of the calibrated will be canceled. The calibration results will also be canceled if the ENTER button is not pressed before the calibration screen disappears (about 5 minutes).
Other Functions
Pass through function
The DVD-V8000 is equipped with input connectors for composite video and analog audio, and supports simple switching between the currently playing video/audio disc and video/audio signals input from exterior sources.
This function is useful in venues such as museums or event sites where it may be desirable to switch to an image or audio source exterior to the disc currently being played. (See page 83 for connection instructions.)
Control and display specifications
1) Operations with main unit buttons
Every time one of the three front-panel PASS THROUGH buttons (MONITOR, VIDEO, AUDIO) is pressed, switching is performed between the DVD's video (and/or audio) playback, and the exterior input image (and/or audio). The indicator turns off during output of the internal disc video/audio signal, and lights during output of exterior input image (and/or audio) signals.
MONITOR:
When the button is pressed so that the indicator lights, video signals input to the VIDEO IN connectors are output at MONITOR VIDEO OUT.
VIDEO:
When the button is pressed so that the indicator lights, video signals input to the VIDEO IN connectors are output at VIDEO OUT.
AUDIO:
When the button is pressed so that the indicator lights, audio signals input to the AUDIO IN connectors are output at AUDIO OUT after audio input level adjustment.
The through output function defaults to OFF when power is first turned ON.

Exceptions
① When no video signal is input to VIDEO IN
No switching between playback image and exterior input image will occur even if the PASS THROUGH MONITOR or VIDEO button is pressed. In this case, the MONITOR or VIDEO indicator will flash.
② When exterior image input signal is interrupted during output
The MONITOR or VIDEO indicator will flash, and automatic switching will not occur back to the playback image.
2) Switching control using Command Stack
Switching can be controlled by means of Command Stack.
3) Switching control using RS-232C commands
Switching can be controlled by means of RS-232C interface commands.
Also, the functions of the PASS THROUGH buttons can be locked by means of the KL (Key Lock) command.
4) Automatic switching
When [AUTO PASS THROUGH] is set to [ON] on the ADV. SETUP menu, switching is performed automatically to set the selector to DVD when playback is started, and to external input when playback is stopped. Note that if auto switching is set to ON, the external input is selected when playback is stopped, even if no signal is provided to the VIDEO IN connector.

Important
- OSD for Monitor OUT is not displayed when outputting an exterior input video signal.
- The through output function is enabled only for the composite and monitor output connectors. Also, only analog audio is supported.
- When displaying video from external input, the SETUP and ADV. SETUP menus cannot be displayed. In addition, the player control panel (page 74) and video blackboard (page 75) functions are also disabled.
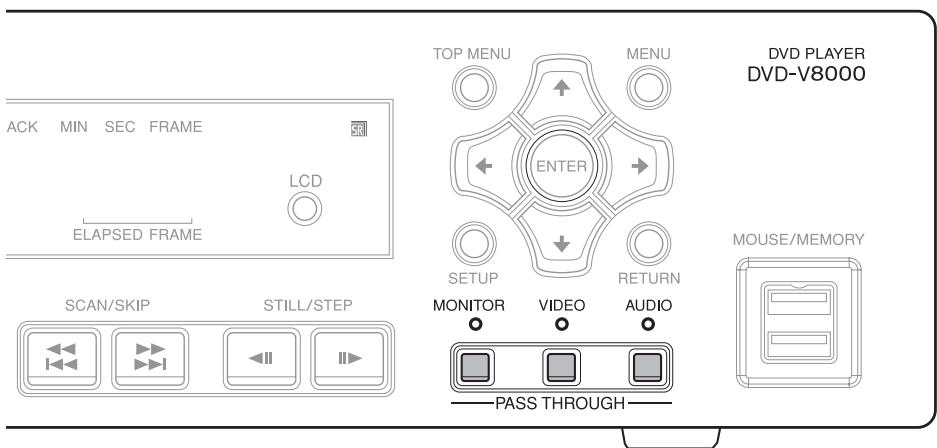
text_image
ACK MIN SEC FRAME LCD ELAPSED FRAME SCAN/SKIP STILL/STEP TOP MENU MENU ENTER SETUP RETURN MONITOR VIDEO AUDIO PASS THROUGH DVD PLAYER DVD-V8000 MOUSE/MEMORYDisplaying cumulative Play/ON Time
This player is provided with a run-time meter to allow the display of cumulative play-time and cumulative on-time for purposes of understanding operating conditions and maintenance times. The cumulative play/on time can be displayed as follows:
1. While depressing the main unit's DISPLAY button, press the STANDBY/ON button to turn on power.
The screen and main unit display will show the following message.
When resetting is performed during maintenance, the figures within brackets [ ] will be reset to [0].
[Screen display example]
OPERATING TIME
POWER ON 000109:37[000025:20]
PLAY 000056:58[000002:25]
[Main unit display example]
POW ON 000109:37
PLAY 000056:58
In these examples, the cumulative on-time is recorded as 109 hours and 37 minutes, and the cumulative play-time is recorded as 56 hours and 58 minutes.
Also, following a maintenance reset, the cumulative on-time will be displayed as 25 hours and 20 minutes, the cumulative-play time will be displayed as 2 hours, 25 minutes.
- When any other operation (e.g., pressing the remote control unit's PLAY button) is performed, the cumulative play/on time display disappears and normal operation resumes.

Important
- These run-time calculations are performed based on the CPU's clock, with the result that accuracy may involve a deviation of 2% .
● The metered time cannot be reset to [0].
Setting the internal clock
The DVD-V8000 is equipped with an internal clock allowing the use of timer functions to perform automatic playback/stop.
Setting of the internal clock is performed by the [WEEKLY TIMER] item on the ADV. SETUP menu. For details, see page 57, "WEEKLY TIMER Setting".

Important
- The internal clock has a deviation within approximately 2 minutes per month (depending on environmental conditions).
- The internal clock function operates by a large-volume capacitor. So long as the power cord is connected to a power outlet, the clock function will operate, even when in standby mode. If the power cord is disconnected, the clock function will continue to operate for 7 to 10 days (when fully charged, at 25 °C).
- WEEKLY TIMER setting data is preserved even if the power cord is disconnected for an extended period of time, regardless of the clock setting.
Returning main unit settings to default values
The main unit settings can be returned to their factory defaults in the following way:
- Set the player to standby mode.
- While depressing the SCAN/SKIP ◀◀◀◀◀ button, press the STANDBY/ON button; power will turn ON and all settings will be reset to their factory default values.

Note
- Previously input Command Stack and play/power on time data are not deleted even when settings are returned to their default values.
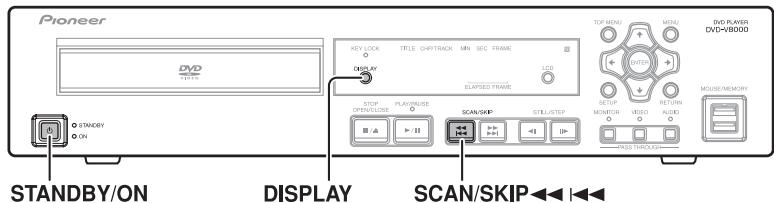
text_image
Pioneer DVD STANDBY/ON ON DISPLAY SCAN/SKIP ◀◀◀ ◀◀◀ STOP OPENCLOSE R > 12 PLAY/SKIP STILL/STEP MONITOR VIDEO AUDIO MOODER/MONORY DISPLAY KEY LOCK TITLE CHIP/TRACK MIN SEC FRAME LED ELAPTED FRAME TOP MENU MENU TWO PLAYER DVD=VB000 MAIN MAIN MAIN MAIN MAIN MAIN MAIN MAIN MAIN MAIN MAIN MAIN MAIN MAINConfirming the firmware version
Using the display
1. Press the SETUP button to display the SETUP menu, then select [Initial Settings] and press the ENTER button.
![PIONEER DVD-V8000 - Press the SETUP button to display the SETUP menu, then select [Initial Settings] and press the ENTER button. - 1](/content/2024/12/76091/images/b6ec6a34a9d2acc50019e0fe1f87e8bf8b71fc158ab711474e4b86a200bde910.jpg)
text_image
Audio Settings Video Adjust Play Mode Disc Navigator Initial Settings2. With [Options] selected, press the DISPLAY button to display the firmware version in the menu window.
![PIONEER DVD-V8000 - With [Options] selected, press the DISPLAY button to display the firmware version in the menu window. - 1](/content/2024/12/76091/images/8ad40e4dc0ee9147fa150a8a2a3ba27b94b24a5546e63a8493edbc418f9a9b8c.jpg)
text_image
Initial Settings Digital Audio Out Video Output Language Display Options Parental Lock Off (us) DVI Settings Region : 2 / Ver : 1.006(16) / AVI : 2.0/2.7 Move Select ENTER Exit SETUPIn the above, "Ver:1.006" is indicated as the firmware version.
Confirming on the main unit display
The DVD-V8000's firmware version can be confirmed on the unit's display, even when no display monitor is connected.
1. When disc is stopped, hold the DISPLAY button depressed for 1 second or more.
- As shown below, the unit's display will show the following information: Reg indicates the region code setting of the player, and Ver indicates the firmware version number; the second line is the player's serial number.
Reg:2 Ver:1.006 ABCD000001AA
For information on the current firmware version, please contact your local Pioneer Sales Representative.
Important
- The firmware display cannot be performed during display of the SETUP menu or ADV. SETUP menu.
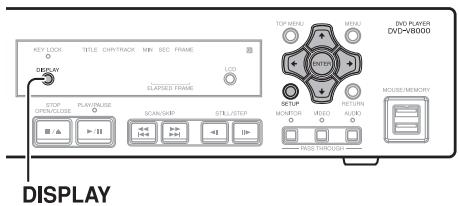
text_image
KEY LOOK TITLE CHY/PACK MIN SEC FRAME DISPLAY STOP OPEN/LOSE PLAY/LOSE SCAN/SHIP STILL/STEP LCD EXPIRED FRAME TOP MEDIA MENU POTATO VIDEO AUDIO MOUNTOR VIDEO AUDIO DVD PLAYER DVD-8000 MOUSE MEMORY DISPLAYTV SYSTEM switch
When playing a video disc, this function automatically changes the output television signal format to match the television signal format recorded on the disc. (Factory default position:
AUTO)
Video CD:
Switches NTSC→PAL or PAL→NTSC.
DVD:
Can switch NTSC→PAL, but cannot switch PAL→NTSC.
When the TV SYSTEM switch is set to AUTO, playback of a DVD or Video CD causes signal conversion to occur as shown in the accompanying table. During CD playback or when no disc is loaded, output is set to the same signal format as was used the previous time.
| Disc used | Video output TV format | |||
| Type | Recorded TV format | TV SYSTEM switch position | ||
| NTSC | PAL | AUTO | ||
| DVD | NTSC | NTSC | MOD. PAL* | NTSC |
| PAL | PAL | PAL | PAL | |
| Video CD | NTSC | NTSC | MOD. PAL* | NTSC |
| PAL | NTSC | PAL | PAL | |
| CD disc, or no disc loaded | NTSC | PAL | NTSC/PAL | |
* MOD. PAL (Modulation PAL); NTSC format signal frequency converted to comply with PAL format display.
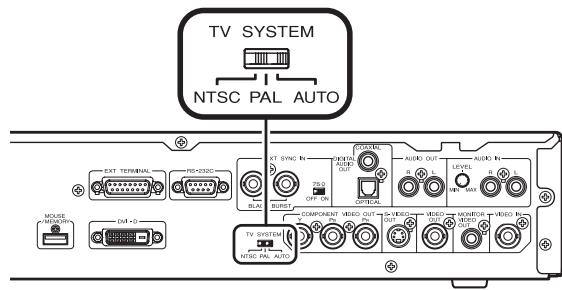
text_image
TV SYSTEM NTSC PAL AUTO EXT TERMINAL RS+V3NC RGB INTS SYNC IN RS OFF ON COMPONENT VIDEO OUT AUDIO OUT AUDIO R LEVEL B L A B L B L L MUSE RETURN USB +2 TV SIGNAL NTSC PAL AUTOAbout MOD. PAL
Most recent PAL display sets automatically detect whether the format of input signals is PAL or NTSC, and adjust the vertical sync accordingly. When using such display sets, images will be projected properly without vertical compression.
Depending on the display, images may appear vertically compressed, and black bands may appear at the top and bottom. This phenomenon is caused when NTSC format signals are converted to PAL format (MOD. PAL), and is not a malfunction.
If your PAL display set is not equipped with a V-hold function, it may not be possible to play NTSC format discs (attempting to play NTSC format discs will result in vertical rolling of the image).
If vertical flutter appears when playing back discs, despite the fact that the display set has a V-hold function, adjust the display's vertical sync control until the image flutter is suppressed.
External sync function
The DVD-V8000 is able to accept an external sync signal (black burst), allowing the video output to be synchronized with external signals. (External sync does not operate when playing discs other than DVDs.)
By means of this function, video switching timing can be performed without the need for connecting a TBC (time base corrector), thus allowing switching between images without causing disruption (vertical roll).
To turn this function ON, switch the ADV. SETUP menu's [EXTERNAL SYNC] setting from [OFF] (default) to match the television format of the disc being played back ([NTSC] or [PAL]). At the same time, set the rear panel TV SYSTEM switch to match the disc being played back (NTSC or PAL).
When synchronizing a single player alone, set its terminator switch to ON. (Factory default position: ON)
Synchronizing two or more players
- When a single sync generator be used to input sync signals to two or more players, set the external sync terminator switch for the terminal player to ON, and those for other connected players to OFF.

Important
- When the external sync function is set to ON, discs other than DVDs cannot be played back.
- The black burst signal's subcarrier component is not locked.
- The video signals from video output connectors will be disrupted during the approximate 5 seconds required for the external sync signal to lock.
- Input the external sync signal before beginning DVD playback, since it will not operate if it is input after playback begins.
- Depending on the sync generator and cables used, connecting numerous players may result in attenuation of the external sync signal, resulting in malfunction.(see Fig.1)
Differences between Mode 1 and Mode 2
When the ADV.SETUP menu's EXTERNAL SYNC is used to select NTSC Mode 1 and PAL Mode 1, the unit's video signal output is delayed by 1 field with respect to the external sync signal.
When NTSC Mode 2 and PAL Mode 2 are selected, no delay is produced with respect to the external sync signal, but the following functional restrictions apply:
- SETUP's Video Adjust command is not supported.
● DVI output is OFF. - Component output is interlaced, and progressive output is not supported.
| NTSC Mode 1, PAL Mode 1 | NTSC Mode 2, PAL Mode 2 | |
| Video output timing with respect to external sync signal | 1 field delay | Sync |
| SETUP's Video Adjust function | Supported | Not supported |
| DVI output | Output | Not output |
| Component output | Interlaced or Progressive | Interlaced |
In either Mode 1 or Mode 2, synchronized output from two DVD-V8000 units with the same settings is achieved without timing deviation.
When switching between the output of a video component other than the DVD-V8000, if the 1-field delay is problematic, select Mode 2.
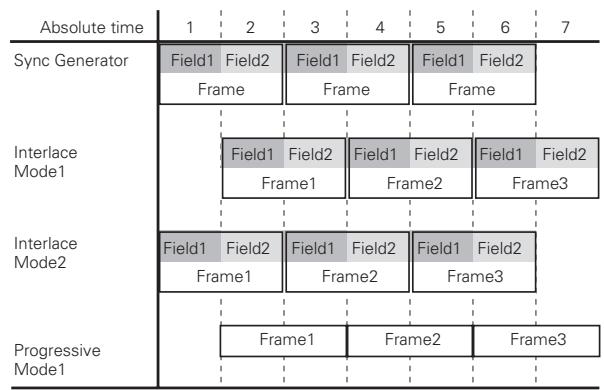

flowchart
graph LR
    A["EXT SYNC IN"] --> B["75Ω OFF ON"]
    B --> C["DVD-V8000"]
    C --> D["Last (terminal) player"]
    D --> E["ON"]
    F["EXT SYNC IN"] --> G["75Ω OFF ON"]
    G --> H["DVD-V8000"]
    H --> I["2nd player"]
    I --> J["OFF"]
    K["EXT SYNC IN"] --> L["75Ω OFF ON"]
    L --> M["DVD-V8000"]
    M --> N["1st player"]
    N --> O["OFF"]
    P["Sync generator"] --> Q["Output"]
Fig.1
How to Connect
The DVD-V8000 has 4 video output options (composite, component, S, DVI) and 3 audio output options (analog stereo, optical digital, coaxial digital), allowing connections to the corresponding devices.

Important
- When making connections to other components or making changes in connections, always turn power off and disconnect the power plug from the outlet beforehand.
- This player supports analog copy protection technology. Connecting this player to a TV via a video deck, or recording DVD video to a VCR and then playing it back may result in improper playback. This player may also not be compatible with some combination TV/VCRs due to the operation of the copy guard system; refer to your display's manufacturer for detailed information.
Standard connections
The connections described below are those for a basic setup using composite output. In this setup, stereo audio is played through the speakers in your television set.
Display
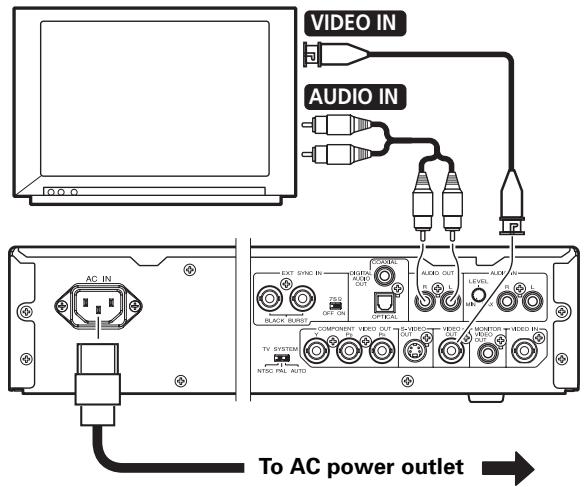
text_image
VIDEO IN AUDIO IN AC IN EXT SYNC IN 750 OFF OUT BLACK BURST OUTPUT AUDIO OUT R. L LEVEL A. L T. L COMPONENT VIDEO OUT 3.5 VIDEO 3.5 VIDEO 3.5 MON/OFF/INTER MON/OFF/INTER MON/OFF/INTER MON/OFF/INTER MON/OFF/INTER MON/OFF/INTER MON/OFF/INTER MON/OFF/INTER MON/OFF/INTER MON/OFF/INTER MON/OFF/INTER MON/OFF/INTER MON/OFF/INTER MON/OFF/INTER MON/OFF/INTER MON/OFF/INTER MON/OFF/INTER MON/OCC PALL AUTO MON/OCC PALL AUTO To AC power outletConnecting to a device equipped with S-video input
If your television set (or other component) is equipped with an S-video input connector, you can connect the player to it with the appropriate S-video cable in place of the ordinary (composite) output to produce higher quality video pictures.
Display
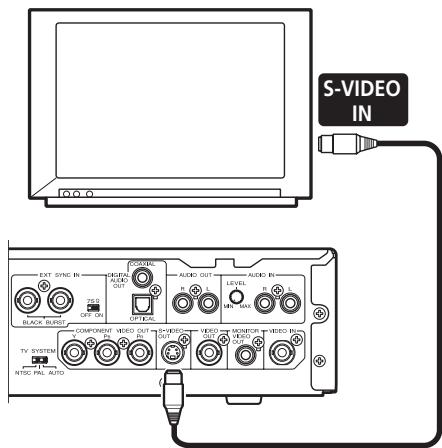
text_image
S-VIDEO IN EAT SYNC IN RANGE AUDIO OUT CONTROL AUDIO OUT AUDIO IN BLACK BURRY OFF ON OPTIONAL R L LEVEL R L MAX COMPONENT VIDEO OUT S-VIDEO OUT VIDEO/MONITOR VIDEO OUT TV SYSTEM VCC INTC PRL AUTOConnecting to a device equipped with component video input
For television sets or other devices equipped with a component image input connector, the player's component video output can be used for connections, producing the highest quality analog connection.
Display
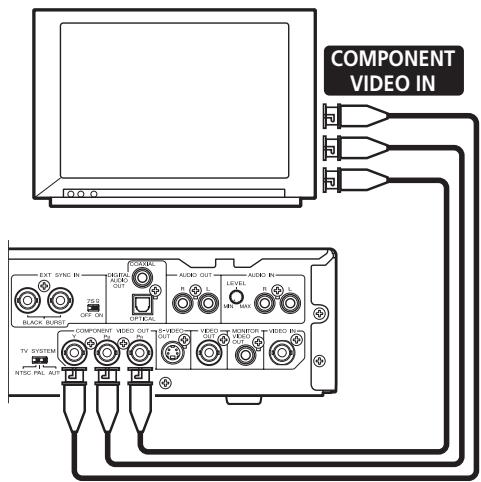
text_image
COMPONENT VIDEO IN EXT SYNC IN OUTPUT OFF OUT CONTROL AUDIO OUT LEVEL MAX IN IN IN IN IN IN IN IN IN IN IN IN IN IN IN IN IN IN IN IN IN IN IN IN IN IN IN IN IN IN IN IN IN IN IN IN IN IN IN IN IN IN IN IN IN IN IN IN IN IN INTC PAL AUTConnecting to a device equipped with DVI connector
DVI (Digital Visual Interface) is a standard that outputs digitalized image data to digital display devices. Using DVI enables the display of high quality images without degradation of the data due to analog conversion.
The DVD-V8000 is equipped with a DVI output connector and can be connected digitally with display devices equipped with DVI input connectors. (Complies with DVI 1.0)
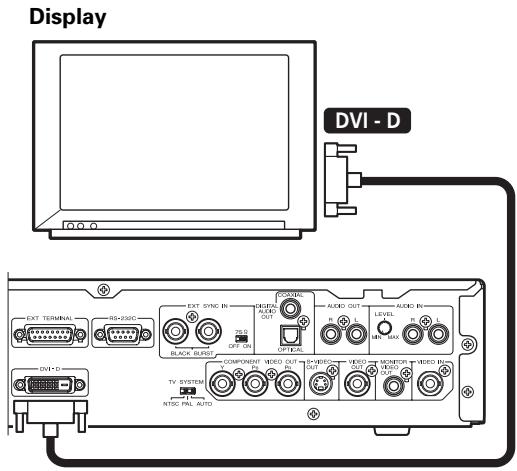
text_image
Display DVI - D EXT TERMINAL RS+320C EXT SYNC IN 75 G BLACK BURST COMPONENT OUT NESC OUT RISC OUT AUX OUT ALAB OUT LEVEL MIN MAX RISC PIN NTSC PAL AUTOWhen connecting to a device with DVI for the first time, the DVI connection screen will be displayed. The player will automatically set the resolution to that recommended by the connected DVI device and display the setting information. Settings can be changed manually if desired, and reset data is stored for up to 5 individual devices even when power is turned off. For manual setting instructions, refer to the section "DVI connections" under Initial Settings (page 48.)

Note
- When connecting this player to a DVI device, the message [DVI] and the set resolution will appear for a few seconds in the main unit's display.
DVI:ON
1920×1080i

Important
- Copyright-protected discs cannot be displayed by DVI devices that do not support HDCP (a content protection system for digital image data).
Resolutions output to DVI devices
● VGA (640 x 480 pixels) progressive image
● 720 x 480 pixel progressive/interlaced image
● 720 x 576 pixel progressive/interlaced image
● 1280 x 720 pixel progressive image
● 1920 x 1080 pixel interlaced image

Important
- If the connected display does not support any of the resolutions listed above, the video images may not be displayed properly.
- 720 x 576 pixel progressive/interlaced images are selectable only during the playback of PAL discs.
Note that VGA, and 720 x 480 pixel progressive scan/interlaced scan video can only be selected when playing NTSC discs. - With some displays, inputting a non-supported display mode signal may result in an inability to display images until the power has been switched off then on again.
Connecting to an AV surround amplifier
Multichannel surround sound can be enjoyed by connecting this player to an AV amplifier equipped with digital input/output connections (e.g., Dolby Digital or DTS).
Connect the AV amplifier to this player's optical digital audio output connector or coaxial digital audio output connector.
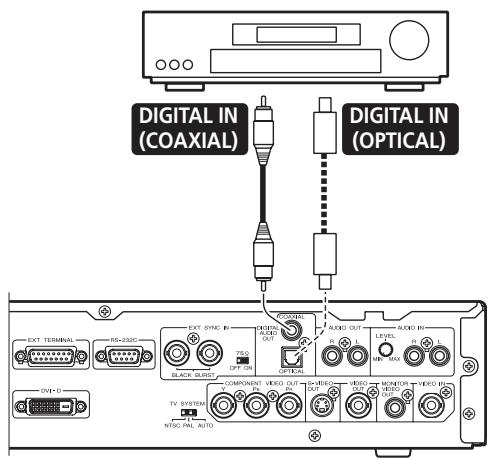
text_image
DIGITAL IN (COAXIAL) DIGITAL IN (OPTICAL) EXT TERMINAL RS-230G EXT SYNC R PUL OFF ON R L AUDIO OUT AUDIO OUT R L LEVEL R L AUDIO OUT R L TV SYSTEM COMPONENT VIDEO OUT VIDEO OUT VIDEO OUT INSC PAL AUTOEven when using digital audio connections, it is recommend to connect the stereo analog connections as well.
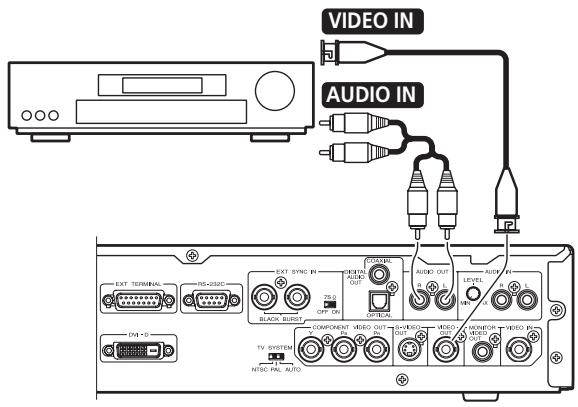
text_image
VIDEO IN AUDIO IN EXT TERMINAL 75+232C EXT SYNC IN 75.0 OFF ON COMPONENT VIDEO OUT 75.0 OFF ON AUDIO OUT a L LEVEL a L MINT a L TV SYSTEM NTEC PAL AUTO AUXOOUT MODEUR MOOD OUT NATO RIO DVI + D
Note
- Video connections can be made using component, S-video and DVI in addition to composite format. However, the same kind of connections used between the DVD-V8000 and the AV amplifier must also be used between the AV amplifier and the display.

Important
- This player's optical digital connector uses a shutter mechanism. When connecting to the optical out connector, be sure to orient the connectors correctly and connect firmly. Forcefully inserting the connector in an incorrect direction may result in warping the shape of the terminal, preventing the shutter from closing even when the cable is disconnected.
Connections when using monitor out
The DVD-V8000 is equipped with composite output connectors for monitor use; in addition to the main video output, these connectors allow the display of disc information for use by the user in monitoring the output.
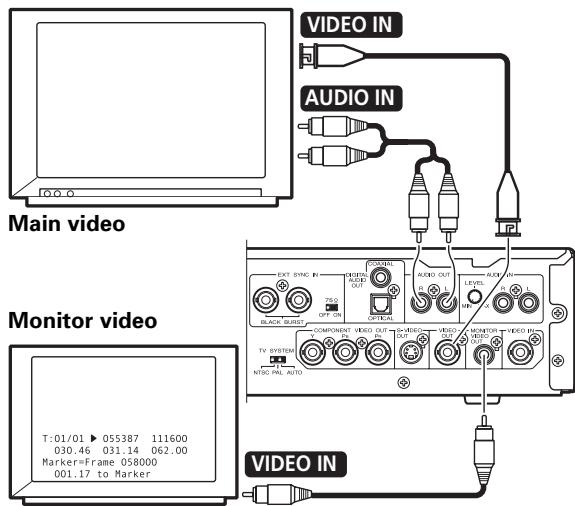
text_image
VIDEO IN AUDIO IN Main video Monitor video T:01/01 ▶ 055387 111600 030.46 031.14 062.00 Marker=Frame 058000 001.17 to Marker EXT SYNC TYPE AUDIO OUT OPT ON BLACK SUST COMPONENT VIDEO OUT TV SYSTEM NTSC PAL AUTO AUDIO OUT LEVEL IN HIV AUX ON VIDEO OUT OFF COMPONENT VIDEO OUT OFF AUDIO OUT OFF MONITOR OUT OFF VIDEO OUT OFF VIDEO IN
Note
- To display disc information on the monitor output, it is necessary to set [Monitor OSD] to [ON] in the ADV. SETUP menu.
Connections for using the pass through function
The DVD-V8000 is equipped with composite video inputs and analog audio input connectors, thus allowing the input of video/audio signals from other DVD players.
In addition, through the use of the PASS THROUGH button and RS-232C commands, switching can be performed between the DVD-V8000's video/audio playback and external input video/audio.
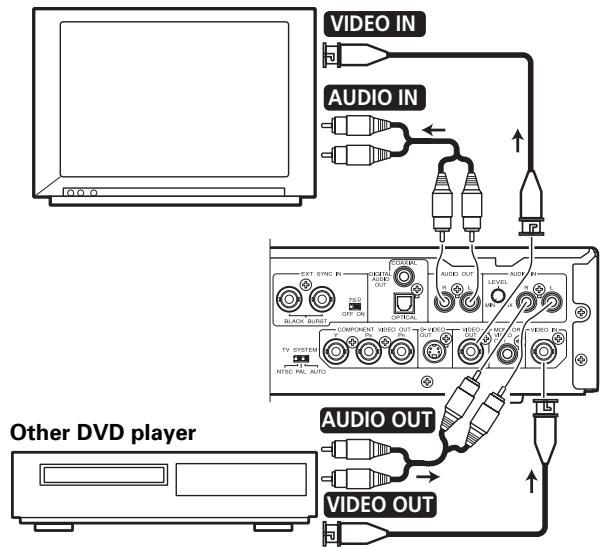
flowchart
graph TD
    A["Other DVD player"] --> B["VIDEO OUT"]
    A --> C["VIDEO IN"]
    B --> D["VIDEO OUT"]
    C --> E["VIDEO IN"]
    D --> F["VIDEO OUT"]
    E --> G["VIDEO IN"]
    F --> H["VIDEO OUT"]
    G --> I["VIDEO IN"]
    H --> J["VIDEO OUT"]
    I --> K["VIDEO IN"]
    J --> L["VIDEO OUT"]

Important
- Through output of externally input video/audio signals must be in the composite video and unbalanced audio formats for proper operation of this feature.
Serial Interface Specifications
In addition to the basic operations via main unit control panel and remote control unit, the DVD-V8000 is equipped with a RS-232C serial control interface supporting connection to a computer. Two types of D-Sub serial connectors are provided (9-pin and 15-pin). The selection of one or the other of the connectors is made via the ADV. SETUP menu.

Important
- The 9-Pin and 15-Pin connectors cannot be accessed simultaneously.
Connector pin assignments are as shown.
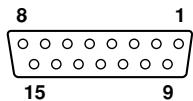

15-pin D-Sub connector
| Pin # | Terminal | Input/Output | Function |
| 1 | GND | -- | ground |
| 2 | TxD | Output | send data |
| 3 | RxD | Input | receive data |
| 4 | DTR | Output | enable data receiving |
| 5 | POWER | Input | external power control |
| 6 | SW1 | Input | Extend Terminal |
| 7 | SW2 | Input | Extend Terminal |
| 8 | SW3 | Input | Extend Terminal |
| 9 | SW4 | Input | Extend Terminal |
| 10 | SW5 | Input | Extend Terminal |
| 11 | SW6 | Input | Extend Terminal |
| 12 | SW7 | Input | Extend Terminal |
| 13 | SW8 | Input | Extend Terminal |
| 14 | DLTST | Input | used only for servicing the unit — reserved |
| 15 | STOP_ST | Output | Stop Status |
9-pin D-Sub connector
| Pin # | Terminal | Input/Output | Function |
| 1 | NC | -- | |
| 2 | RxD | Input | receive data |
| 3 | TxD | Output | send data |
| 4 | DTR | Output | enable data receiving |
| 5 | GND | -- | ground |
| 6 | DSR | Input | data set ready |
| 7 | RTS | Output | request to send |
| 8 | CTS | Input | clear to send |
| 9 | NC |
Control Functions
(a) Serial control
TxD, RxD, DTR
Serial control interface complying with RS-232C standards.
(b) Extend Terminal
SW1, SW2, SW3, SW4, SW5, SW6, SW7, SW8
Simple control of the player can be effected by connecting switches to these terminals.
(c) External power control
The player's power control can be effected via the interface connector's POWER pin.
Control is disabled when key-lock is set. Unset the key-lock before attempting to use the external power control function.
In the standby condition, when an H signal of 100 msec or more is followed by a L signal, the power ON sequence is performed. In the power ON condition, impression of the same series of signals will produce the power OFF sequence, placing the player in the standby condition.
Terminal input voltage is ±12 V or less, with H signal level of 4.5 V or above, and L signal of 0.5 V or below.
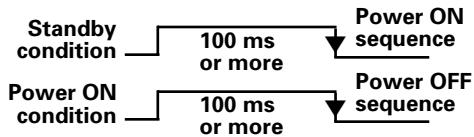
flowchart
graph LR
    A["Standby condition"] --> B["100 ms or more"]
    C["Power ON condition"] --> D["100 ms or more"]
    E["Power ON sequence"] --> F["Power OFF sequence"]
The interface connector's STOP_ST Pin can be used to detect the player's status (play/stop). The "H" signal is detected during player stop, and the "L" signal during playback. Since output collector output is used, pull-up should be to maximum 12 volts (50 mA).
Serial Control Specifications
(1) Signal level
RS-232C level
(2) Data format
Data length: 8 bits
Stop bit: 1 bit
Parity: None
(3) Transmission speed (Baud rate)
Baud rate is selectable from 4800, 9600, 19200 (bps), set via the ADV. SETUP menu.
Factory default setting is 4800 bps.
Computer Connections
The DVD-V8000 is designed with the ability to communicate with a computer using the RS-232C port's Pin 2 and Pin 3 for communication, and the 15-Pin D-Sub connector's Pin 1 or the 9-Pin D-Sub connector's Pin 5 as ground.
Connections between the player and computer are as follows:
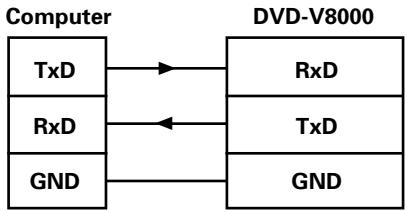
flowchart
graph LR
    A["Computer"] --> B["TxD"]
    A --> C["RxD"]
    A --> D["GND"]
    B --> E["RxD"]
    C --> F["TxD"]
    D --> G["GND"]
    E --> H["DVD-V8000"]
    F --> H
    G --> H
The player can accept computer commands whenever the power is turned ON. As a result, there is no need to connect control lines other than TxD and RxD. However, depending on the computer, proper control operation may not be achieved without hardware processing of CTS inputs.
In such cases, DTR output can be used. Under transmit conditions, DTR is constantly output in positive (+) potential, and should be connected to the computer's CTS input.
Important
- Immediately after turning on the player's power, wait to input commands for at least two seconds until the DTR output becomes positive (+). Commands transmitted before that interval may not be properly received, or may return errors.
Commands and Status
The basic protocol is for the computer to issue a command and the player return with a status.
Example:
| Computer | DVD-V8000 |
| (1) Search for frame 1000 | → (2) Execute search← (3) Finish |
| (4) Play from frame 2000 | → (5) Execute play← (6) Finish |
Actual commands and statuses utilize ASCII character codes. Command mnemonics are expressed as two characters. In most cases, upper case and lower case are not discriminated but upper case characters are used by convention. In order to indicate chapter numbers and speeds, arguments may accompany commands. In this way, commands double as terminators for arguments.
In the simplest protocol, sending a single command will cause the player to immediately execute it. The
Example:
CH
Example:
10SE
This unit is provided with a command buffer, so up to 32 characters worth of commands can be input consecutively.
Example:
10SE 20PL
In this example, when the
The maximum command line is 32 characters.
Important
- If a command setting autostop (e.g., PL, MF, MR) is immediately followed by another command, the next command will be executed without waiting for the completion of the earlier command.
When all commands complete their execution, the player transmits the finish message (R
Error Messages
In the event of a command error, the player will return one of the following error codes:
| Error Code | Message | Contents |
| E00 | Communication error | An error in the communication line:• Framing error• Buffer overflow |
| E04 | Feature not available | Attempt to execute unavailable function.• Wrong command mnemonic.• Not usable in that mode. |
| E06 | Missing argument | Incorrect parameter designated |
| E11 | Disc not exist | Disc is not loaded. |
| E12 | Search error | Search address not found. |
| E15 | Picture stop | Picture has stopped• During auto play picture stop code resulted in still image |
| E16 | Interrupt by Other device | During command execution, main unit button or remote control unit, or external control interrupt was received. |
| E99 | Panic | Fatal error received.• Disc loading not possible.• Stopped due to mechanical error.• Stopped due to faulty play. |
Usable Commands
The DVD-V8000 supports use of commands shown in the following table:
(1) Commands are expressed in two characters (ASCII code).
(2) Other than data for print command (PR), upper case and lower case characters are not discriminated.
Arguments
(1) Arguments are expressed in ASCII decimal code.
(2) Arguments are placed before their respective commands. Commands requiring arguments will return an error code if the argument is missing.
(3) Arguments may be of the following types:
1. Address
Title number, chapter number, track number, index number, frame number, time code, etc.
The decision whether the address is to be treated as frame, time, chapter, track or title is dependent on the setting value designated by the address mode.
If a value is given greater than the maximum valid value, it will not be evaluated correctly.
| Title number | [DVD]N1N2 1 (min) to 99 (max) |
| Chapter number | [DVD]N1N2 0 (min) to 99 (max) |
| Frame number | [DVD](computed as 1 second = 30 frames)N1N2N3N4N5N6N7 1 (min) to 999999 (max) |
| Time code | [DVD]N1N2N3N4N5 0 (min) to 599:59 (max)(N1N2N3 Min N4N5 Sec)[CD/VCD]N1N2N3N4 0 (min) to 99:59 (max)(N1N2 Min N3N4 Sec) |
| Track number | [CD/VCD]N1N2 1 (min) to 99 (max) |
2. Integers
Express parameters for commands with arguments other than addresses as noted above (SU, AG, VS, MS. . .etc.), and are described in ASCII decimals code.
Extend Terminal Specifications
1. Introduction
The terminals SW1 to SW8 for the rear panel's EXT TERMINAL connector each has +3.3 V pull-up voltage. Functions are produced as a result of the combinations possible based on whether each terminal is shorted to GND or not. (See page 84 for pin assignments).
The combination of input ports for SW1 to SW8 result in a maximum of 82 settable switches. For the combinations and their supported functions, see “Default settings” (pages 90 to 91).
Also, the relationship of SW combinations and their supported functions is not fixed; the function setting can be changed for some combinations in the ADV. SETUP menu (page 63).
2. SW and functions (commands)
The Extend Terminal functions can be divided broadly into three types:
① Functions that call command stack [GROUP]
STACK GROUP 1 to 27 are keys used to call and execute previously recorded Command Stack.
② Functions with same function as remote control unit buttons
MENU, TOP MENU, ↑, ↓, ←, →, ENTER, RETURN, PLAY, STOP, PAUSE, STEP FWD/REV, SCAN FWD/REV, SKIP FWD/REV, DISPLAY, RECALL, MEMORY, REPEAT, REPEAT A-B, AUDIO, ANGLE, SUBTITLE, SETUP, 0 to 9, CLEAR, TITLE/CHP/FRM/TIME
However, SCAN FWD/REV operates differently from the remote control unit, since it lacks the scan lock function (fast forward/reverse scan is performed even if the SW is released).
③ Expanded functions from the remote control unit
- 10 to 20 (direct numeral input to 20 during selecting search and menu item selection)
- OPEN/CLOSE
3. Connections to controller (SW interface)
The following is an example of connections with controller:
(1) Simple example without using diode matrix
In this case, the number of switches that can be allocated (usable functions) is reduced.
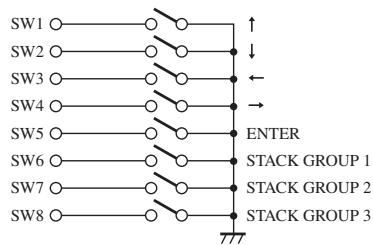
flowchart
graph TD
    SW1 --> A["↑"]
    SW2 --> B["↓"]
    SW3 --> C["←"]
    SW4 --> D["→"]
    SW5 --> E["ENTER"]
    SW6 --> F["STACK GROUP 1"]
    SW7 --> G["STACK GROUP 2"]
    SW8 --> H["STACK GROUP 3"]
    A --> I["???"]
    B --> I
    C --> I
    D --> I
    E --> I
    F --> J["???"]
    G --> J
    H --> J
(2) Example using diode matrix (partial)
In this case, a maximum of 82 switches can be allocated.
Specifications of switches used in connection example:
Connection resistance:
1 Ω or less
Insulation resistance:
1 MΩ or more
Non-lock type
Specifications of diodes used in connection example:
0.7 V or less (IF 1 mA)
Surge current:
100 mA or less
Forward current:
10 mA or less (VR=10 V)
When synchronizing a player with frame-unit accuracy, the use of serial command control is necessary. The parallel controls and remote control unit controls noted here cannot be used for synchronized playback at frame-unit accuracy.
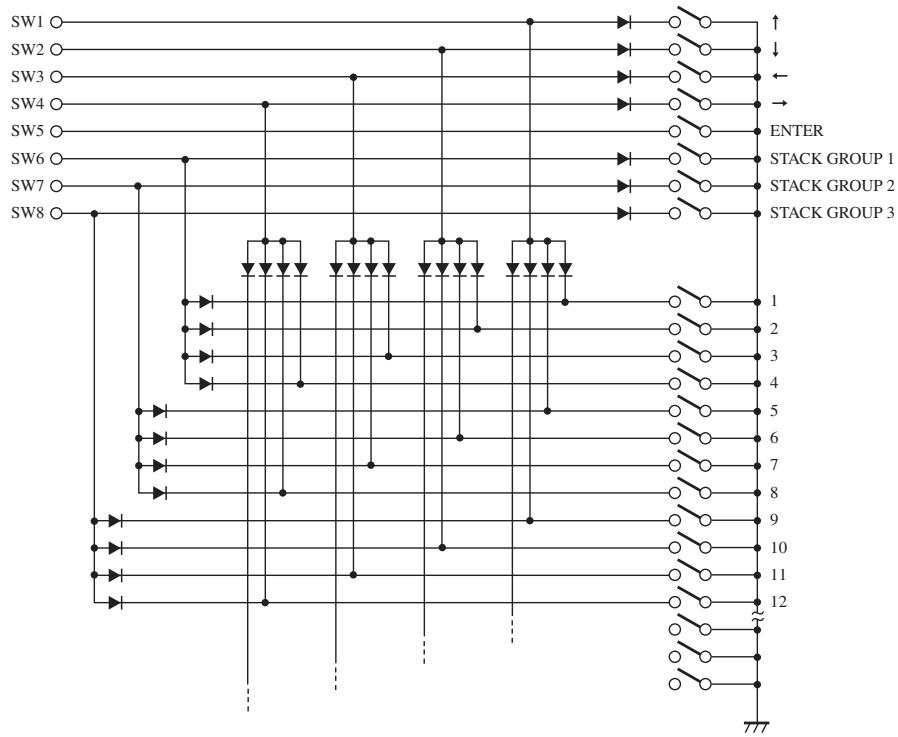
flowchart
graph TD
    SW1 --> A["Switch"]
    SW2 --> A
    SW3 --> A
    SW4 --> A
    SW5 --> A
    SW6 --> A
    SW7 --> A
    SW8 --> A
    A --> B["Diode 1"]
    A --> C["Diode 2"]
    A --> D["Diode 3"]
    B --> E["Switch"]
    C --> F["Switch"]
    D --> G["Switch"]
    E --> H["Output 1"]
    F --> I["Output 2"]
    G --> J["Output 3"]
    H --> K["Stack Group 1"]
    I --> L["Stack Group 2"]
    J --> M["Stack Group 3"]
    K --> N["Output 10"]
    L --> O["Output 11"]
    M --> P["Output 12"]
Default Settings
SW combinations and their default functions are indicated in the following table. Of these, combination patterns no. 1 to 30 are user settable. In the table, a "1" indicates switch ON status. A blank indicates OFF status.
| SW1 | SW2 | SW3 | SW4 | SW5 | SW6 | SW7 | SW8 | Function | |
| 1 | 1 | ↑ | |||||||
| 2 | 1 | ↓ | |||||||
| 3 | 1 | ← | |||||||
| 4 | 1 | → | |||||||
| 5 | 1 | ENTER | |||||||
| 6 | 1 | Stack 1 | |||||||
| 7 | 1 | Stack 2 | |||||||
| 8 | 1 | Stack 3 | |||||||
| 9 | 1 | 1 | 10 | ||||||
| 10 | 1 | 1 | 11 | ||||||
| 11 | 1 | 1 | 12 | ||||||
| 12 | 1 | 1 | OPEN/CLOSE | ||||||
| 13 | 1 | 1 | DISPLAY | ||||||
| 14 | 1 | 1 | 1 | ||||||
| 15 | 1 | 1 | 2 | ||||||
| 16 | 1 | 1 | 3 | ||||||
| 17 | 1 | 1 | 4 | ||||||
| 18 | 1 | 1 | 5 | ||||||
| 19 | 1 | 1 | 6 | ||||||
| 20 | 1 | 1 | ↗ | ||||||
| 21 | 1 | 1 | ↘ | ||||||
| 22 | 1 | 1 | ✓ | ||||||
| 23 | 1 | 1 | ↖ | ||||||
| 24 | 1 | 1 | PLAY | ||||||
| 25 | 1 | 1 | STOP | ||||||
| 26 | 1 | 1 | PAUSE | ||||||
| 27 | 1 | 1 | TOP MENU | ||||||
| 28 | 1 | 1 | 7 | ||||||
| 29 | 1 | 1 | 8 | ||||||
| 30 | 1 | 1 | 9 | ||||||
| 31 | 1 | 1 | 1 | STEP FWD | |||||
| 32 | 1 | 1 | 1 | STEP REV | |||||
| 33 | 1 | 1 | 1 | DISPLAY | |||||
| 34 | 1 | 1 | 1 | SCAN FWD | |||||
| 35 | 1 | 1 | 1 | SCAN REV | |||||
| 36 | 1 | 1 | 1 | SKIP FWD | |||||
| 37 | 1 | 1 | 1 | SKIP REV | |||||
| 38 | 1 | 1 | 1 | Stack 4 | |||||
| 39 | 1 | 1 | 1 | Stack 5 | |||||
| 40 | 1 | 1 | 1 | Stack 6 | |||||
| 41 | 1 | 1 | 1 | 13 | |||||
| 42 | 1 | 1 | 1 | 14 | |||||
| 43 | 1 | 1 | 1 | 15 | |||||
| 44 | 1 | 1 | 1 | 16 | |||||
| 45 | 1 | 1 | 1 | 17 | |||||
| 46 | 1 | 1 | 1 | 18 | |||||
| 47 | 1 | 1 | 1 | 19 | |||||
| 48 | 1 | 1 | 1 | 20 | |||||
| 49 | 1 | 1 | 1 | Stack 7 | |||||
| 50 | 1 | 1 | 1 | Stack 8 | |||||
| 51 | 1 | 1 | 1 | Stack 9 | |||||
| 52 | 1 | 1 | 1 | Stack 10 | |||||
| 53 | 1 | 1 | 1 | Stack 11 | |||||
| 54 | 1 | 1 | 1 | Stack 12 | |||||
| 55 | 1 | 1 | 1 | Stack 13 | |||||
| 56 | 1 | 1 | 1 | Stack 14 | |||||
| 57 | 1 | 1 | 1 | Stack 15 | |||||
| 58 | 1 | 1 | 1 | Stack 16 | |||||
| 59 | 1 | 1 | 1 | Stack 17 | |||||
| 60 | 1 | 1 | 1 | Stack 18 | |||||
| 61 | 1 | 1 | 1 | Stack 19 | |||||
| 62 | 1 | 1 | 1 | Stack 20 | |||||
| 63 | 1 | 1 | 1 | Stack 21 | |||||
| 64 | 1 | 1 | 1 | Stack 22 | |||||
| 65 | 1 | 1 | 1 | Stack 23 | |||||
| 66 | 1 | 1 | 1 | Stack 24 | |||||
| 67 | 1 | 1 | 1 | Stack 25 | |||||
| 68 | 1 | 1 | Stack 26 | ||||||
| 69 | 1 | 1 | Stack 27 | ||||||
| 70 | 1 | 1 | 1 | MENU | |||||
| 71 | 1 | 1 | 1 | RECALL | |||||
| 72 | 1 | 1 | 1 | SETUP | |||||
| 73 | 1 | 1 | 1 | MEMORY | |||||
| 74 | 1 | 1 | 1 | >10 | |||||
| 75 | 1 | 1 | 1 | REPEAT | |||||
| 76 | 1 | 1 | 1 | REPEAT A-B | |||||
| 77 | 1 | 1 | 1 | AUDIO | |||||
| 78 | 1 | 1 | 1 | ANGLE | |||||
| 79 | 1 | 1 | 1 | SUBTITLE | |||||
| 80 | 1 | 1 | 1 | TT/CH/FR/TM | |||||
| 81 | 1 | 1 | 1 | 0 | |||||
| 82 | 1 | 1 | 1 | CLEAR |
Main Unit Display During ADV. SETUP Menu Operations
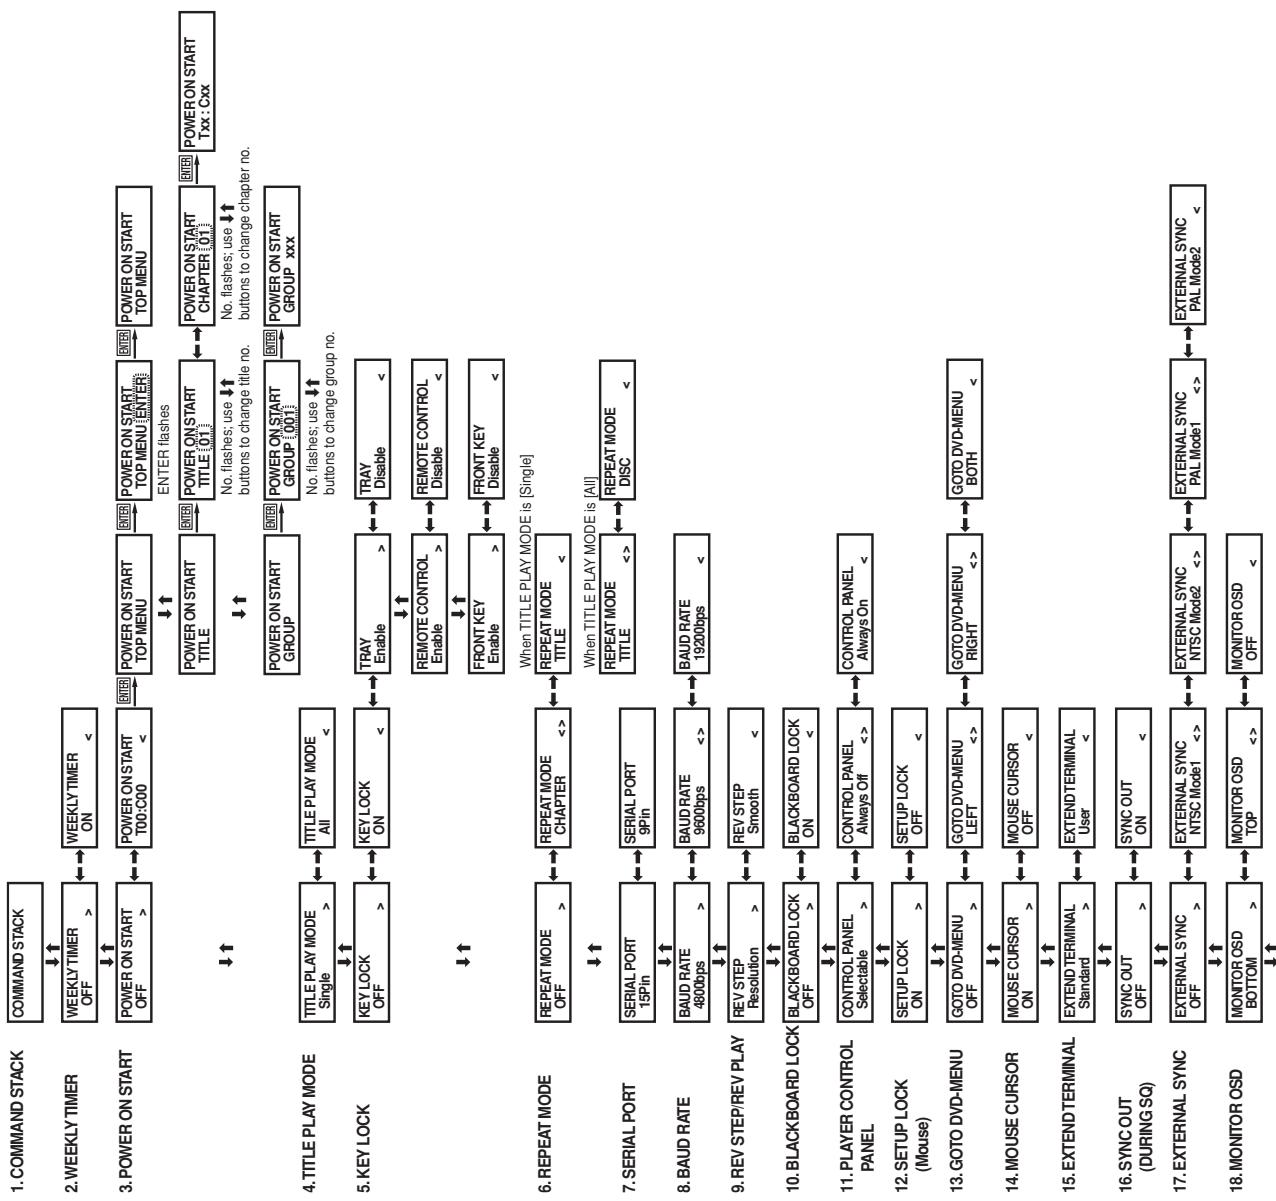
flowchart
graph TD
    A["COMMAND STACK"] --> B["↓↑"]
    B --> C["2.WEEKLY TIMER OFF >"]
    C --> D["↓↑"]
    D --> E["3.POWER ON START OFF >"]
    E --> F["↓↑"]
    F --> G["4.TITLE PLAY MODE TITLE PLAY MODE Single >"]
    G --> H["↓↑"]
    H --> I["5.KEY LOCK KEY LOCK OFF >"]
    I --> J["↓↑"]
    J --> K["6.REPEAT MODE REPEAT MODE OFF >"]
    K --> L["↓↑"]
    L --> M["7.SERIAL PORT SERIAL PORT 15Pin"]
    M --> N["↓↑"]
    N --> O["8.BAUD RATE BAUD RATE 4800bps >"]
    O --> P["↓↑"]
    P --> Q["9.REV STEP/REV PLAY REV STEP Resolution >"]
    Q --> R["↓↑"]
    R --> S["10.BLACKBOARD LOCK BLACKBOARD LOCK OFF >"]
    S --> T["↓↑"]
    T --> U["11 Nicaraguaian CONTROL Panel CONTROL PANEL Selectable >"]
    U --> V["↓↑"]
    V --> W["12.SETUP LOCK (Mouse) SETUP LOCK ON >"]
    W --> X["↓↑"]
    X --> Y["13.GOTO DVD-MENU GOTO DVD-MENU OFF >"]
    Y --> Z["↓↑"]
    Z --> AA["14.MOUSE CURSOR MOUSE CURSOR ON >"]
    AA --> AB["↓↑"]
    AB --> AC["15.EXTEND TERMINAL EXTEND TERMINAL Standard >"]
    AC --> AD["↓↑"]
    AD --> AE["16.SYNC OUT SYNC SYNC OUT ON >"]
    AE --> AF["↓↑"]
    AF --> AG["17.EXTERNAL SYNC EXTERNAL SYNC EXTERNAL SYNC EXTERNAL SYNC EXTERNAL SYNC EXTERNAL SYNC EXTERNAL SYNC EXTERNAL SYNC EXTERNAL SYNC EXTERNAL SYNC EXTERNAL SYNC EXTERNAL SYNC EXTERNAL SYNC EXTERNAL SYNC EXTERNAL SYNC EXTERNAL SYNC EXTERNAL SYNC EXTERNAL SYNC EXTERNAL SYNC EXTERNAL SYNC EXTERNAL SYNC EXTERNAL SYNC EXTERNAL SYNC EXTERNAL SYNC EXTERNAL SYNC EXTERNAL SYNC EXTERNAL SYNC EXTERNAL SYNC EXTERNAL SYNC EXTERNAL SYNC EXTERNAL SYNC EXTERNAL SYNC EXTERNAL SYNC EXTERNAL SYNC EXTERNAL SPCOLATION<br>    subgraph Power ON START TOP MENU<br>        direction TB<br>        E1[POWER ON START TITLE"] --> E2["POWER ON START GROUP"] --> E3["POWER ON START GROUP [001"]] --> E4["POWER ON START GROUP xxx"]
        E1 --> E5["POWER ON START TITLE [01"]] --> E6["POWER ON START CHAPTER [01"]] --> E7["POWER ON START Txx : Cxx"]
        E2 --> E8["POWER ON START TITLE [01"]] --> E9["POWER ON START CHAPTER [01"]] --> E10["POWER ON START Txx : Cxx"]
        E9 --> E11["POWER ON START GROUP [001"]] --> E12["POWER ON START GROUP xxx"]
        E12 --> E13["POWER ON START GROUP [001"]] --> E14["POWER ON START GROUP xxx"]
        E14 --> E15["POWER ON START GROUP [001"]] --> E16["POWER ON START GROUP xxx"]
        E16 --> E17["POWER ON START GROUP [001"]] --> E18["POWER ON START GROUP xxx"]
        E18 --> E19["POWER ON START GROUP [001"]] --> E1A["POWER ON START GROUP [001"]]
        E1A --> E1B["POWER ON START GROUP [001"]]
        E1B --> E1C["POWER ON START GROUP [001"]]
        E1C --> E1D["POWER ON START GROUP [001"]]
        E1D --> E1E["POWER ON START GROUP [001"]]
        E1E --> E1F["POWER ON START GROUP [001"]]
        E1F --> E2A["POWER ON START GROUP [001"]]
        E2A --> E2B["POWER ON START GROUP [001"]]
        E2B --> E2C["POWER ON START GROUP [001"]]
        E2C --> E2D["POWER ON START GROUP [001"]]
        E2D --> E2E["POWER ON START GROUP [001"]]
        E2E --> E2F["POWER ON START GROUP [001"]]
        E2F --> E2G["POWER ON START GROUP [001"]]
        E2G --> E2H["POWER ON START GROUP [001"]]
        E2H --> E2I["POWER ON START GROUP [001"]]
        E2I --> E2J["POWER ON START GROUP [001"]]
        E2J --> E2K["POWER ON START GROUP [001"]]
        E2K --> E2L["POWER ON START GROUP [001"]]
        E2L --> E2M["POWER ON START GROUP [001"]]
        E2M --> E2N["POWER ON START GROUP [001"]]
        E2N --> E2O["POWER ON START GROUP [001"]]
        E2O --> E2P["POWER ON START GROUP [001"]]
        E2P --> E2Q["POWER ON START GROUP [001"]]
        E2Q --> E2R["POWER ON START GROUP [001"]]
        E2R --> E2S["POWER ON START GROUP [001"]]
        E2S --> E2T["POWER ON START GROUP [001"]]
        E2T --> E2U["POWER ON START GROUP [001"]]
        E2U --> E2V["POWER ON START GROUP [001"]]
        E2V --> E2W["POWER ON START GROUP [001"]]
        E2W --> E2X["POWER ON START GROUP [001"]]
        E2X --> E2Y["POWER ON START GROUP [001"]]
        E2Y --> E2Z["POWER ON START GROUP [001"]]
        E2Z --> E2A
    end
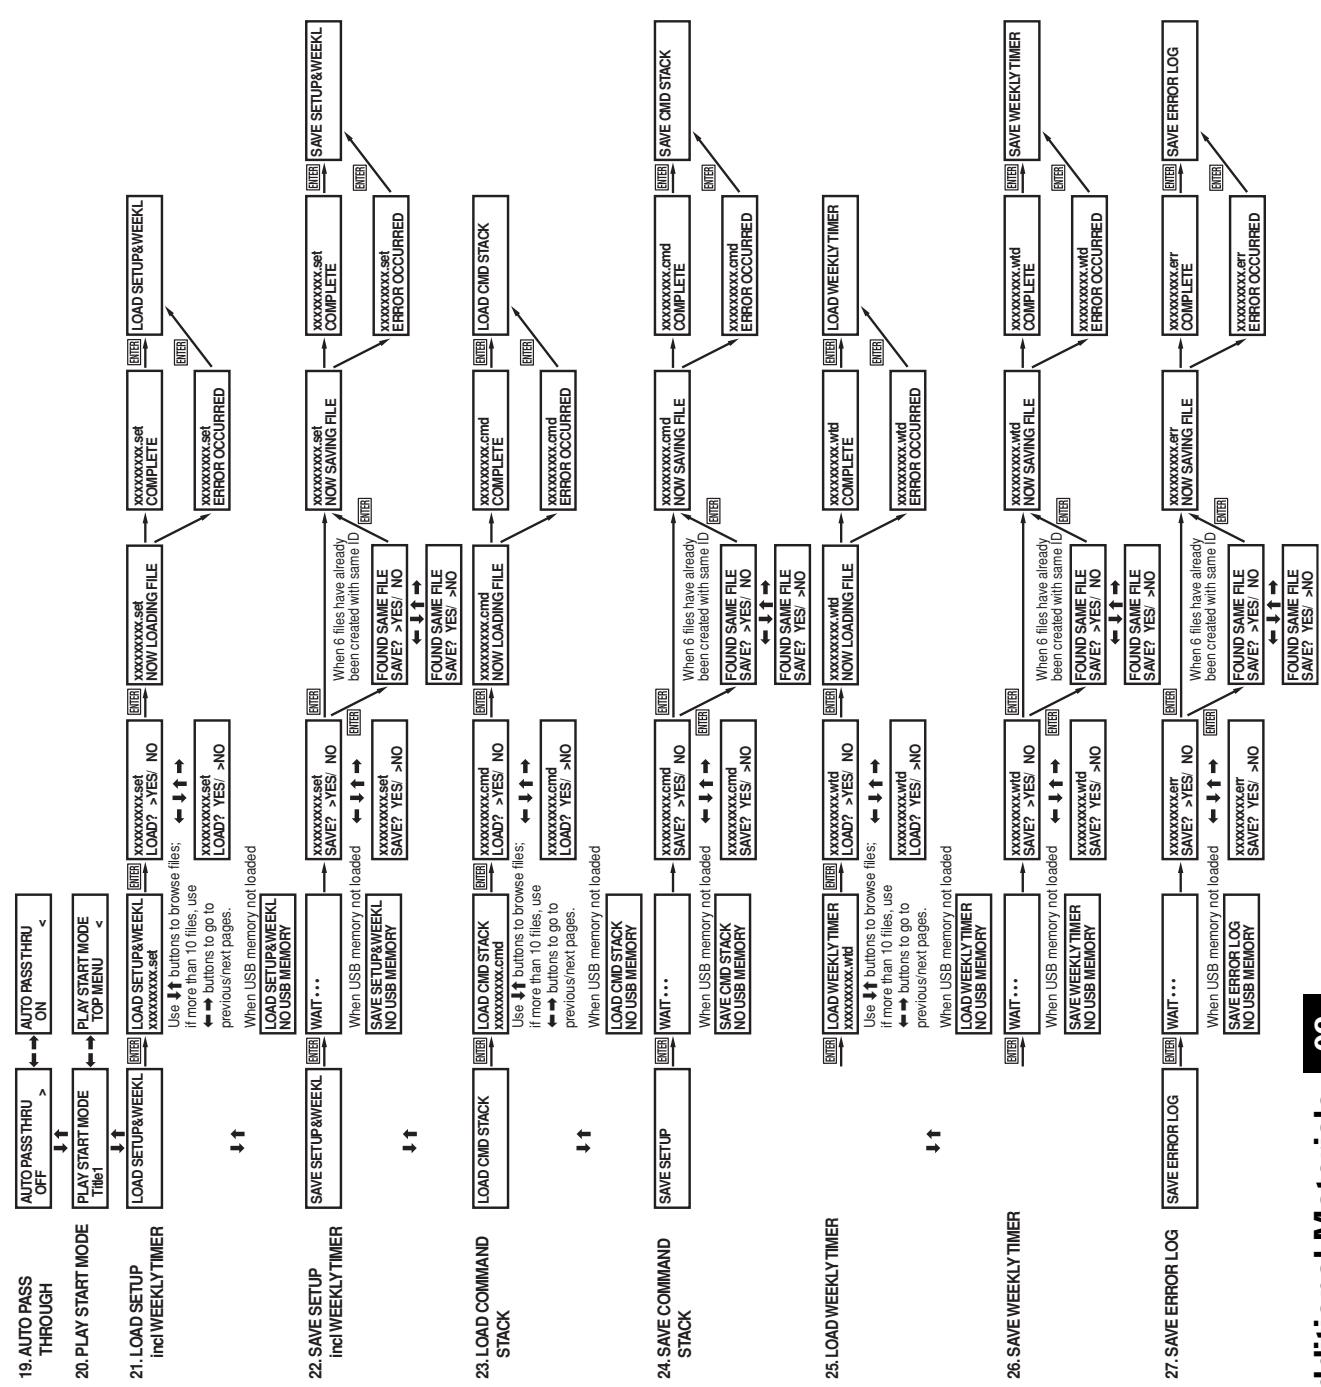
flowchart
graph TD
    A["19. AUTO PASS THROUGH"] --> B["AUTO PASS THRU OFF"]
    B --> C[">"]
    C --> D["AUTO PASS THRU ON"]
    D --> E["<<"]
    E --> F["20. PLAY START MODE"]
    F --> G["PLAY START MODE Title1"]
    G --> H["<<"]
    H --> I["PLAY START MODE TOP MENU"]
    I --> J["<<"]
    J --> K["21. LOAD SETUP incl WEEKLY TIMER"]
    K --> L["LOAD SETUP&WEEKL"]
    L --> M["ENTER"]
    M --> N["LOAD SETUP&WEEKL xxxxxxxxxxx.set"]
    N --> O["ENTER"]
    O --> P["xxxxxxxx.set LOAD? >YES/ NO"]
    P --> Q["ENTER"]
    Q --> R["xxxxxxxx.set NOW LOADING FILE"]
    R --> S["xxxxxxxx.set COMPLETE"]
    S --> T["ENTER"]
    T --> U["LOAD SETUP&WEEKL"]
    U --> V["ENTER"]
    V --> W["xxxxxxxxxxxx.set ERROR OCCURRED"]
    W --> X["ENTER"]
    X --> Y["22. SAVE SETUP incl WEEKLY TIMER"]
    Y --> Z["SAVE SETUP&WEEKL"]
    Z --> AA["ENTER"]
    AA --> AB["WAIT ..."]
    AB --> AC["xxxxxxxx.set SAVE? >YES/ NO"]
    AC --> AD["ENTER"]
    AD --> AE["xxxxxxxxxxxx.set NOW SAVING FILE"]
    AE --> AF["xxxxxxxx.set COMPLETE"]
    AF --> AG["ENTER"]
    AG --> AH["SAVE SETUP&WEEKL"]
    AH --> AI["ENTER"]
    AI --> AJ["SAVE SETUP&WEEKL NO USB MEMORY"]
    AJ --> AK["When USB memory not loaded"]
    AK --> AL["LOAD SETUP&WEEKL NO USB MEMORY"]
    AL --> AM["<<"]
    AM --> AN["SAVE SETUP&WEEKL"]
    AN --> AO["WAIT ..."]
    AO --> AP["xxxxxxxx.set SAVE? >YES/ NO"]
    AP --> AQ["ENTER"]
    AQ --> AR["xxxxxxxxxxxx.set SAVE? YES/ >NO"]
    AR --> AS["FOUND SAME FILE SAVE? >YES/ NO"]
    AS --> AT["XXXXXXXSet ERROR OCCURRED"]
    AT --> AU["ENTER"]
    AU --> AV["23. LOAD COMMAND STACK"]
    AV --> AW["LOAD CMD STACK"]
    AW --> AX["ENTER"]
    AX --> AY["LOAD CMD STACK xxxxxxxxxxx.cmd"]
    AY --> AZ["ENTER"]
    AZ --> BA["xxxxxxxx.cmd LOAD? >YES/ NO"]
    BA --> BB["ENTER"]
    BB --> BC["xxxxxxxx.cmd NOW LOADING FILE"]
    BC --> BD["xxxxxxxx.set COMPLETE"]
    BD --> BE["ENTER"]
    BE --> BF["LOAD CMD STACK"]
    BF --> BG["ENTER"]
    BG --> BH["SAVE CMD STACK NO USB MEMORY"]
    BH --> BI["<<"]
    BI --> BJ["LOAD CMD STACK xxxxxxxxxxx.cmd"]
    BJ --> BK["ENTER"]
    BK --> BL["xxxxxxxx.cmd LOAD? >YES/ NO"]
    BL --> BM["ATTED"]
    BM --> BN["xxxxxxxxxxxx.cmd LOAD? YES/ >NO"]
    BN --> BO["FOUND SAME FILE SAVE? YES/ NO"]
    BO --> BP["XXXXXXXSet ERROR OCCURRED"]
    BP --> BQ["ENTER"]
    BQ --> BR["24. SAVE COMMAND STACK"]
    BR --> BS["SAVE SETUP"]
    BS --> BT["ENTER"]
    BT --> BU["WAIT ..."]
    BU --> BV["xxxxxxxx.cmd SAVE? >YES/ NO"]
    BV --> BW["ENTER"]
    BW --> BX["xxxxxxxx.cmd NOW SAVING FILE"]
    BX --> BY["xxxxxxxxxxxx.com COMPLETE"]
    BY --> BZ["ENTER"]
    BZ --> CA["xxxxxxxxxxxx.com ERROR OCCURRED"]
    CA --> CB["ENTER"]
    CB --> CC["25. LOAD WEEKLY TIMER"]
    CC --> CD["ENTER"]
    CD --> DE["LOAD WEEKLY TIMER xxxxxxxxxxx.wtd LOAD? >YES/ NO"]
    DE --> DF["xxxxxxxxxxxx.wtd NOW LOADING FILE"]
    DF --> DG["xxxxxxxx.wtd COMPLETE"]
    DG --> DH["ENTER"]
    DH --> DI["LOAD WEEKLY TIMER xxxxxxxxxxx.wtd LOAD? YES/ NO"]
    DI --> DJ["xxxxxxxxxxxx.wtd ERROR OCCURRED"]
    DJ --> DK["ENTER"]
    DK --> DL["26. SAVE WEEKLY TIMER"]
    DL --> DM["EXIT"]
    DM --> DN["WAIT ..."]
    DN --> DO["xxxxxxxx.wtd SAVE? >YES/ NO"]
    DO --> DP["ENTER"]
    DP --> Q["xxxxxxxx.wtd NOW SAVING FILE"]
    Q --> R["XXXXXXXXXWTD COMPLETE"]
    R --> S["XXXXXXXXXWTD ERROR OCCURRED"]
    S --> T["XXXXXXXXXWTD ERROR OCCURRED"]
    T --> U["XXXXXXXXXWTD ENABLE WORKLOG"]
    U --> V["SAVE ERROR LOG"]
    V --> W["SAVE ERROR LOG NO USB MEMORY"]
    W --> X["SAVE ERROR LOG NO USB MEMORY"]
    X --> Y["SAVE ERROR LOG NO USB MEMORY"]
    Y --> Z["SAVE ERROR LOG NO USB MEMORY"]
Troubleshooting
Incorrect operations are often mistaken for trouble and malfunctions. If you think there is something wrong with this component, check the points below. Sometimes the trouble may originate from another component. Thus, also check the other electrical appliances also in use.
If the trouble cannot be rectified even after checking the following items, contact your dealer or nearest PIONEER service center.
Disc playback related
| Symptom | Cause/Remedy |
| Can’t play disc. | CD-R/RW or DVD-R/RW discs that have not been finalized cannot be played. DVD-R discs compliant with CPRM cannot be played. SECAM system discs cannot be played. Some CD-R/RW or DVD-R/RW discs may not be playable if recording quality is poor. |
| [Please disable External Sync setting] appears in display and the CD/VCD disc is ejected. | Non-DVD discs cannot be played if the external sync function is set to ON. Go to the ADV. SETUP menu and confirm that [EXTERNAL SYNC] is set to [OFF]. |
| [TV System selector error. External sync type mismatch] appears in display and the disc is ejected. | The TV mode (NTSC/PAL) you are trying to apply external sync to does not agree with the mode of the DVD you are trying to play. Go to the ADV. SETUP menu and set [EXTERNAL SYNC] to [OFF], or adjust the proper TV mode. |
DVI related
| Symptom | Cause/Remedy |
| Playback disc images cannot be displayed as DVI. | Copyright-protected discs cannot be played on DVI displays that do not support HDCP. |
| When DVI resolution is changed, images are disturbed or do not display. | Your DVI display may not support the display resolution you have set. Consult the operation instructions for your display. Holding the remote control unit's [0] number button depressed for 5 or more seconds will reset the resolution to the value initially set when the display was first connected to the player. Also, depending on the display, inputting a signal of non-supported resolution may cause the unit to stop responding until the display's power is disconnected and reconnected. |
| Noise occurs in DVI output images. | Using an excessively long cable may result in the generation of noise; in this event, change to a shorter cable. |
USB memory device related
| Symptom | Cause/Remedy |
| [NO USB MEMORY] is displayed when performing load/save with USB memory device. | USB memory device is not detected properly.Reinsert USB memory device and try again. |
| [Unsupported memory device] appears in the display when connecting a USB memory device. | This memory device is not supported by the DVD-V8000. In general, commercially marketed USB memory devices are manufactured to common specifications and can be used with the DVD-V8000, but operating compatibility has not been confirmed for all devices available on the market, with the result that it is possible some such devices may not be compatible with the DVD-V8000. |
| When saving to USB memory device, screen displays [NO ENTRY AREA] or [NO CAPACITY]. | USB memory device is full; no more files can be written.Use computer to delete unnecessary files. |
| No file displayed when loading from a USB memory device. | File extension may be mistaken. Files that can be displayed include LOAD SETUP files (extension "set") and LOAD COMMAND STACK files (extension "cmd"). |
| File names are distorted/unreadable when loading from USB memory. | Were two-byte characters used in the file name?Two-byte characters cannot be displayed. |
| Error occurs when performing load or save from/to USB memory. | Is write-prevent enabled for the USB memory device?Try reinserting the USB memory device and try again.If error reoccurs, use the computer to reformat the memory using FAT file system. |
Other related
| Symptom | Cause/Remedy |
| Can’t control with RS-232C. | Check the ADV. SETUP menu’s serial port assignment, Baud rate setting, and serial interface specifications. |
| Can’t use external sync. | Go to the ADV. SETUP menu and confirm that the [EXTERNAL SYNC] setting is [ON]. Also, consult the “Important” item regarding the external sync function on page 80. |
| When setup menu is displayed, it disappears after a few seconds. | Periodic resets may occur if the DVI connection has become unstable. Check and confirm that the DVI connection is secure. Also, this kind of symptom may occur if the input for a DVI-connected display is set to something other than DVI. When not using DVI output, disconnect the DVI connections. |
| Mouse doesn’t operate. | In general, commercially marketed USB mouse devices are manufactured to common specifications and can be used with the DVD-V8000, but operating compatibility has not been confirmed for all devices available on the market, with the result that it is possible some such devices may not be compatible with the DVD-V8000. |
| No sound. | Digital audio is not output unless [Digital Audio Out] is set to “ON” in the Initial Settings section (page 40). Also, analog audio is not output if DTS audio has been selected. |
| Internal clock displays wrong time. | The internal clock has an permissible operating deviation of about 2 minutes per month. In addition, if the power cord is disconnected for more than about 7 to 10 days, the internal clock’s time will be cleared and must be reset when the power is restored (page 78). |
In the event errors appear in main unit display
In the event of a hardware error, the DVD-V8000 will display an error code and the name of the error.
Errors may also occur with non-hardware matters, due to disc scratches or soiling, or in the case of R/RW media, due to poor recording quality. The following are the main non-hardware-related errors that may occur.
However, note that these are not all the possible errors, so in the event an error appears in the main unit's display, check to be sure that the disc is not scratched or soiled.
| Error Code: 1B Index 0 Error | Errors that may occur due to disc scratches or soiling, or in the case of R/RW discs, due to poor recording quality. |
| Error Code: 1C Wobble Detect | |
| Error Code: 33 Focus Error | |
| Error Code: 38 Disc Sense | |
| Error Code: 72 SUBQ Read Error | |
| Error Code: 73 ID Read Error | |
| Error Code: 74 SUBQ Read Error | |
| Error Code: 81 TOC Read Error | |
| Error Code: F8 Loading Error | Occurs when disc tray is blocked when attempting to open or close. Check to be sure disc is not impeded. |
| USB OVER CURRENT DISABLE ALL PORT | This error appears when the total current of the connected USB devices exceeds the unit's permissible value (Max. 0.7 A).Remove the connected USB memory device and reconnect the main unit's power cord.This error may also appear in the event of an error in the USB device itself. |
Precautions when using a 15 Pin to 9 Pin RS-232C cable with the DVD-V8000
Proper RS-232C control may not be possible when using a generic RS-232C cable with the DVD-V8000.
To use your own cable, verify cable pin assignments using the diagram below.
Refer to the DVD-V8000 Operating instructions section "Serial Interface Specifications" (page 84) for information on procuring the proper type of cable.
■ Confirming the Cable Type
Method : Verify that there is no continuity between Pin 4 on the 15-pin connector (DB15) and Pin 4 on the 9-pin connector (DB9).
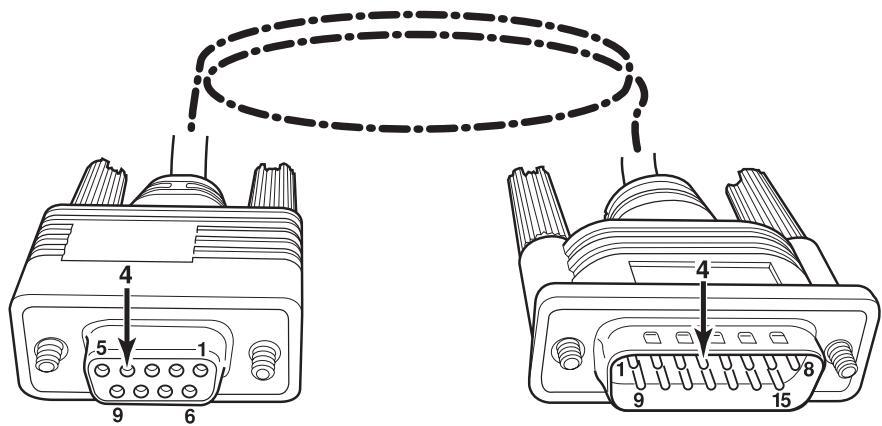
text_image
4 5 1 9 6 4 1 9 8 15Language Code List
Language (Language code letter), Language code
Japanese (ja), 1001
English (en), 0514
French (fr), 0618
German (de), 0405
Italian (it), 0920
Spanish (es), 0519
Chinese (zh), 2608
Dutch (nl), 1412
Portuguese (pt), 1620
Swedish (sv), 1922
Russian (ru), 1821
Korean (ko), 1115
Greek (el), 0512
Afar (aa), 0101
Abkhazian (ab), 0102
Hungarian (hu), 0821
Armenian (hy), 0825
Interlingua (ia), 0901
Interlingue (ie), 0905
Inupiak (ik), 0911
Indonesian (in), 0914
Icelandic (is), 0919
Hebrew (iw), 0923
Yiddish (ji), 1009
Javanese (jw), 1023
Georgian (ka), 1101
Kazakh (kk), 1111
Greenlandic (kl), 1112
Cambodian (km), 1113
Kannada (kn), 1114
Kashmiri (ks), 1119
Kurdish (ku), 1121
Kirghiz (ky), 1125
Latin (la), 1201
Lingala (In), 1214
Laothian (lo), 1215
Lithuanian (lt), 1220
Latvian (lv), 1222
Malagasy (mg), 1307
Maori (mi), 1309
Macedonian (mk), 1311
Malayalam (ml), 1312
Mongolian (mn), 1314
Moldavian (mo), 1315
Marathi (mr), 1318
Malay (ms), 1319
Maltese (mt), 1320
Burmese (my), 1325
Nauru (na), 1401
Nepali (ne), 1405
Norwegian (no), 1415
Occitan (oc), 1503
Oromo (om), 1513
Oriya (or), 1518
Panjabi (pa), 1601
Polish (pl), 1612
Pashto, Pushto (ps), 1619
Quechua (qu), 1721
Rhaeto-Romance (rm), 1813
Kirundi (rn), 1814
Romanian (ro), 1815
Kinyarwanda (rw), 1823
Sanskrit (sa), 1901
Sindhi (sd), 1904
Sangho (sg), 1907
Serbo-Croatian (sh), 1908
Sinhalese (si), 1909
Slovak (sk), 1911
Slovenian (sl), 1912
Samoan (sm), 1913
Shona (sn), 1914
Somali (so), 1915
Albanian (sq), 1917
Serbian (sr), 1918
Siswati (ss), 1919
Sesotho (st), 1920
Vietnamese (vi), 2209
Volapuk (vo), 2215
Wolof (wo), 2315
Xhosa (xh), 2408
Yoruba (yo), 2515
Zulu (zu), 2621
Country Code List
Country, Country code, Country code letter
Argentina, 0118, ar
Australia, 0121, au
Austria, 0120, at
Belgium, 0205, be
Brazil, 0218, br
Canada, 0301, ca
Chile, 0312, cl
China, 0314, cn
Denmark, 0411, dk
Finland, 0609, fi
France, 0618, fr
Germany, 0405, de
Hong Kong, 0811, hk
India, 0914, in
Indonesia, 0904, id
Italy, 0920, it
Japan, 1016, jp
Korea, Republic of, 1118, kr
Malaysia, 1325, my
Mexico, 1324, mx
Netherlands, 1412, nl
New Zealand, 1426, nz
Norway, 1415, no
Pakistan, 1611, pk
Philippines, 1608, ph
Portugal, 1620, pt
Russian Federation, 1821, ru
Singapore, 1907, sg
Spain, 0519, es
Sweden, 1905, se
Switzerland, 0308, ch
Taiwan, 2023, tw
Thailand, 2008, th
United Kingdom, 0702, gb
USA, 2119, us
Glossary
Aspect Ratio
The height-to-width ratio of a television set's screen. Conventional televisions had aspect ratios of 4:3 but widescreen television sets have a 16:9 ratio, for richer viewing enjoyment.
Interlaced
Each frame of displayed playback is divided into two fields: the first field paints the odd-numbered scanning lines, and the persistence of vision of the eye is used to allow the next field of even-numbered scanning lines to be painted, thus completing a single complete frame. This method is used as the standard scanning system in conventional television receivers. In this unit's Operating Instructions, interlaced resolutions are indicated by the "i" following the resolution number (e.g., 525i).
Video output (composite)
A video signal transmitted in the form of a single code composed of luminance signal (Y) and color signal (C). However, the device receiving the signal must separate the luminance (Y) and color (C) components once again. The image quality is determined by the accuracy with which these two components can be divided.
Component output signal
The entire component output signal is composed of the three elements luminance Y, C_B/P_B , and C_R/P_R , with the result that connecting to a television monitor equipped with component inputs will results in the production of a more beautiful image.
Parental Lock
Some commercial DVDs with violent or mature contents are provided with parental viewer control levels (higher and lower). By setting the player's Parental Lock level to a value lower than the level of the disc, playback of these discs can be prevented unless an individually set password is input.
Optical digital output
Audio channels are normally converted to electrical signals and sent from the player to an amplifier or other device; with optical digital output, however, the signals are converted to light signals and transmitted via an optical fiber (the receiving amplifiers and other devices are equipped with optical digital inputs).
Video Recording format (VR mode)
A recording mode in which video images and audio signals are written in real time * straight to to non-specific locations on a DVD-RW disc. (*On a computer, input data is quickly written to a hard disk (or removable media), but it is first stored in the memory. Thereafter, the CPU (OS) establishes the order of the data and writes the data to the hard disk. In contrast, when data is written to the hard disk in the immediate order in which is received, it is called "real-time" recording). Pioneer's DVD recorders calls this "VR mode recording." VR mode includes the normal video quality recording mode, and other modes in which image quality and recording time can be set freely.
Playback Control (PBC)
Signals recorded on Video CDs (Version 2.0) and used to control playback. Using the menu screens recorded on Video-CDs with PBC allows simple conversational control of disc and search functions for more enjoyable playback. High- and Low-resolution still images can also be enjoyed.
Progressive Scan
Each video frame is not divided into two, but instead scanned as a single whole frame. This scanning mode produces beautiful, no-flicker playback particularly when displaying written text on still images, or pictures with numerous graphics and horizontal lines. In this player's Operating Instructions, progressive scan resolutions are followed by a "p" designator (e.g., 525p).
Multi-angle
Some commercial DVD software is recorded with images taken simultaneously from multiple camera angles. With DVD video, up to 9 angles can be recorded.
DVD Video format recording
A recording format in which data is written continuously to the DVD-R/DVD-RW disc using the same format used with commercial DVD software disc bearing the DVD or DVD logos. Pioneer DVD recorders refer to this as Video Mode recording. Video mode includes alternatives for both high-image-quality recording and long-time recording.
DVI
Digital Visual Interface. A standard for transmitting video signals to a digitally-driven display monitor. Since analog signal conversion is not required, high image quality is preserved.
GUI
Graphical User Interface. An environment in which menus are displayed on screen and provide for easy operation.
HDCP
High Definition Copy Protocol. A copy-protection scheme designed to protect copyrighted contents.
HDMI
High Definition Multimedia Interface.
A digital interface standard for next-generation television that expands on the DVI (Digital Video Interface) standard.
OSD
Abbreviation for On-Screen Display. A function that displays current operating conditions on the screen.
S-Video Output
A type of video signal in which the luminance (Y) and color (C) components are transmitted separately. Since no conversion is needed to separate the luminance and color components, it provides a higher quality image than those produced with composite signals.
Specifications
General
System ...... DVD Player
Electrical ratings
USA and Canada ...... AC 120 V, 50 Hz/60 Hz
Europe 220 V to 240 V, 50 Hz/60 Hz
Power consumption 23 W
Standby power consumption 0.8 W
Startup current
USA and Canada 22.1 A or less
Europe 46.3 A or less
Weight 5.3 kg (11.7 lbs)
External dimensions
...... 420 mm (W) × 86.2 mm (H) × 309.2 mm (D)
(including protuberances)
16-9/16 in (W) × 3-3/8 in (H) × 12-3/16 in (D)
Operating temperature ....+5 °C to +35 °C
(+41 °F to +95 °F)
Operating humidity ..... 5 % to 85 % RH (no condensation)
Playback
playable discs ...... DVD-Video, DVD-R, DVD-RW, Video-CD,
DVI 24-Pin DVI-D connector x 1
(conforms to DVI 1.0, supports HDCP Ver.1.0)
Audio Output
Analog ...... Pin jack x 2, 2 Vrms (0 dBfs),
1.5 k Ω or less (AUDIO OUT L, R)
Digital Pin jack x 1, 0.5 Vp-p, 75 Ω
(DIGITAL AUDIO OUT COAXIAL)
Optical fiber connector x 1
(DIGITAL AUDIO OUT OPTICAL)
Video Input
Composite ...... BNC x 1, 1.0 Vp-p, 75 Ω (VIDEO IN)
Audio Input
Analog ...... Pin jack x 2, 2 V rms (0 dBfs), 22 kΩ
or more (AUDIO IN, L/R), With input level control (LEVEL)
External Sync Input
Black burst ...... BNC x 2, 0.286 Vp-p (NTSC),
0.300 Vp-p (PAL), 75 Ω ON/OFF (EXT SYNC IN)
Other
RS-232C connector .... D-sub 9-Pin (male) x 1
(conforms to RS-232C; inch threads)
EXT TERMINAL connector .... Mini D-sub 15-Pin (female) x 1
(inch threads)
MOUSE/MEMORY connectors ....
USB connectors 4P type A (conforms with USB 1.1) x 3
(total current supplied for all three ports: Max 0.7 A)
Accessories:
Remote control unit .... 1
R6 (AA) batteries 2
Power cord 1
Warranty 1 (USA and Canada models only)
Operating Instructions .... 1
- These specifications and designs are subject to change without notice.
Table des matières
[96 kHz PCM Out] 127
[MPEG Out] 127
[Subtitle Language]....129
[Auto Language] 129
[DVD Menu Lang.] 129
[Subtitle Display] 130
[Password Change] 132
[Level Change] 133
[Country Code] 133
Connexions DVI 134
[Resolution] 134
[Aspect Ratio] 135
[Video Memory] 135
Table des matières
text_image
Diagram showing a crossed-out circle with a diagonal line and a crossed-out oval, indicating prohibition or exclusion.natural_image
Line drawing of hands holding a circular object with arrows indicating direction (no text or symbols)text_image
World map with numbered regions and labeled areas, likely illustrating a geographic or regional structure.text_image
AUDIO IN LEVEL MIN MAX R LImportant
text_image
important
Important
Pendant la lecture: ▶▶
| Play | DVD-RW | Original | ||
| Current / Total | Elapsed | Remain | Total | |
| Title | 1/32 | 0.08 | 30.22 | 30.30 |
| Audio Dolby Digital | 2/0CH | Subtitle | ||
| Play | DVD-RW | Original | ||
| Current / Total | ||||
| Chapter | 1/1 | |||
| Tr. Rate | 4.3Mbps | |||
| Play | VCD | |||
| Current / Total | Elapsed | Remain | Total | |
| Track | 2/16 | 0.23 | 4.20 | 4.43 |
| Play | VCD | |||
| Elapsed | Remain | Total | ||
| Disc | 0.23 | 58.51 | 57.14 | |
| Play | CD | |||
| Current / Total | Elapsed | Remain | Total | |
| Track | 2/16 | 1.07 | 4.40 | 5.47 |
| Play | CD | |||
| Elapsed | Remain | Total | ||
| Disc | 28.00 | 30.20 | 58.20 | |

Remarque
text_image
T:03/17 ▶ 02.15 01.29 03.44 Marker=Track 05 11.17 to Markernatural_image
Illustration of a hand using a circular tool to press down a mechanical component (no text or symbols present)[Pendant la lecture]
text_image
Audio Settings Video Adjust Play Mode Disc Navigator Initial Settingstext_image
Audio Settings Video Adjust Play Mode Disc Navigator Initial Settingstext_image
Disc Navigator CD Track (1-10) Track 01 Track 02 Track 03 Track 04 Track 05 Track 06 Track 07 Track 08text_image
Play Mode A-B Repeat All Repeat Repeat Title Repeat Program Chapter Repeat Search Mode Repeat Off Command StackAll Repeat
text_image
Play Mode A-B Repeat Disc Repeat Repeat Track Repeat Program Repeat Off Search Mode Command StackDisc Repeat
text_image
Play Mode A-B Repeat Repeat Program Search Mode Command Stack Program Repeat Repeat OffProgram Repeat
text_image
Play Mode A-B Repeat Create/Edit Repeat Playback Start Program Playback Stop Search Mode Program Delete Command Stack Program Memory Offtext_image
Play Mode A-B Repeat Create/Edit Repeat Playback Start Program Playback Stop Search Mode Program Delete Command Stack Program Memory Off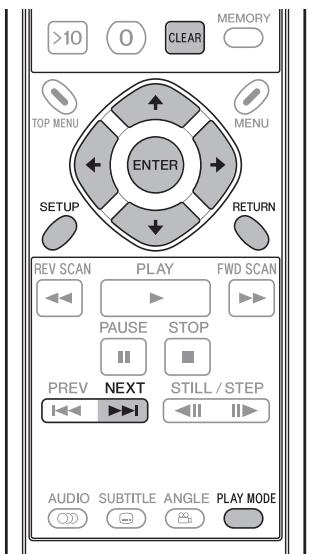
text_image
>10 0 CLEAR MEMORY TOP MENU MENU ENTER SETUP RETURN REV SCAN PLAY FWD SCAN PAUSE STOP PREV NEXT STILL / STEP AUDIO SUBTITLE ANGLE PLAY MODEtext_image
Program Program Step Track (1~12) 01.04 Track 01 02. Track 02 03. Track 03 04. Track 04 05. Track 05 06. Track 06 07. Track 07 08. Track 08text_image
Play Mode A-B Repeat Create/Edit Playback Start Repeat Playback Stop Program Search Mode Program Delete Command Stack Program Memory ▶ Off■ Playback Start (lancement de lecture):
text_image
Play Mode A-B Repeat Create/Edit Playback Start Playback Stop Program Delete Search Mode Command Stack Program Memory On Offtext_image
Audio Settings Video Adjust Play Mode Disc Navigator Initial Settingstext_image
Audio Settings Video Adjust Play Mode Disc Navigator Initial Settingstext_image
Initial Settings Digital Audio Out Video Output Language Display Options Audio Language Subtitle Language Auto Language DVD Menu Lang. Subtitle Display ■ English French German Italian Spanish Dutch Other Languagetext_image
Initial Settings Digital Audio Out Video Output Language Display Options Audio Language Subtitle Language Auto Language DVD Menu Lang. Subtitle Display ■ English French German Italian Spanish Dutch Other Languagetext_image
Initial Settings Digital Audio Out Video Output Language Display Options Audio Language Subtitle Language Auto Language DVD Menu Lang. Subtitle Display English French German Italian Spanish Dutch Other Languagetext_image
Initial Settings Digital Audio Out Video Output Language Display Options Audio Language List of Language French Code 0 6 1 8text_image
Initial Settings Digital Audio Out Video Output Language Display Options Parental Lock : Password Change Password New Passwordtext_image
Audio Settings Video Adjust Play Mode Disc Navigator Initial Settingstext_image
Audio Settings Video Adjust Play Mode Disc Navigator Initial Settingstext_image
Audio Settings Video Adjust Play Mode Disc Navigator Initial Settingstext_image
Audio Settings Video Adjust Play Mode Disc Navigator Initial Settingstext_image
Memory 1 3/3 Chroma Delay - Standard HDMI Color Adjust soft fine DVI DetailNTSC Mode1, NTSC Mode2
text_image
Pioneer DVD KEY LOCK TITLE CHIP/TRACK MIN SEC FRAME DISPLAY LED ELAPED FRAME STOP OPEN/CLOSE PLAY/MAKE SCAN/SKIP STILL/STEP TOP MENU MENU DVD PLAYER DVD-V8000 RETURN STRAWBOW ON STOP VIDEO STRAWBOW STRAWBOW STRAWBOW STRAWBOW STRAWBOW STRAWBOW STRAWBOW STRAWBOW STRAWBOW STRAWBOW STRAWBOW STRAWBOW STRAWBOW STRAWBOW STRAWBOW STRAWBOW STRAWBOW STRAWBOW STRAWBOW STRAWBOW STRAWBOUT STRAWBOUT STRAWBOUT STRAWBOUT STRAWBOUT STRAWBOUT STRAWBOUT STRAWBOUT STRAWBOUT STRAWBOUT STRAWBOUT STRAWBOUT STRAWBOUT STRAWBOUT STRAWBOUT STRAWBOUT STRAWBOUT STRAWBOUT STRAWBOUT STRAWBOUT STRAWBUT STRAWBUT STRAWBUT STRAWBUT STRAWBUT STRAWBUT STRAWBUT STRAWBUT STRAWBUT STRAWBUT STRAWBUT STRAWBUT STRAWBUT STRAWBUT STRAWBUT STRAWBUT STRAWBUT STRAWBUT STRAWBUT STRAWBUT STRAWBOUT6. Réglages EXTEND TERMINAL
text_image
Extend Terminal Settings Current New 1. ↑ ↑ PLAY 2. ↓ ↓ STOP 3. ← ← PAUSE 4. → → STEP FWD 5. ENTER ← STEP REV 6. GROUP 1 ← SCAN FWD 7. GROUP 2 ← SCAN REV 8. GROUP 3 ← SKIP FWD Move Select ENTER Delete CLEAR Exit SETUPPLAY, STOP, PAUSE, STEP FWD, STEP REV, SCAN FWD, SCAN REV, SKIP FWD, SKIP REV, ENTER, MENU, TOP MENU, RETURN, DISPLAY, AUDIO, ANGLE, SUBTITLE, REPEAT, REPEAT A-B, CLEAR, OPEN/CLOSE, SETUP, MEMORY, RECALL, TT/CH/FR/TM (25 boutons)
Nombres
text_image
Extend Terminal Settings Current New 1. nothing PLAY 2. ↓ STOP 3. ← PAUSE 4. → STEP FWD 5. ENTER STEP REV 6. GROUP 1 SCAN FWD 7. GROUP 2 SCAN REV 8. GROUP 3 SKIP FWD Move Select ENTER Delete CLEAR Exit SETUP2.3.4 Instruction PASS THROUGH
text_image
Command Stack Group Command(1-001) Group001 001 01:000301-000601 Group002 Move Play Exit SETUPtext_image
+ Touch the cross center in the center part of this screen. When you abort this operation, push RETURN button of the player.text_image
YES CANCEL RETRY Would you like to save the calibration settings? Touch the button of "YES", or "CANCEL" or "RETRY".text_image
Audio Settings Video Adjust Play Mode Disc Navigator Initial SettingsSW1, SW2, SW3, SW4, SW5, SW6, SW7, SW8
MENU, TOP MENU, ↑, ↓, ←, →, ENTER, RETURN, PLAY, STOP, PAUSE, STEP FWD/REV, SCAN FWD/REV, SKIP FWD/REV, DISPLAY, RECALL, MEMORY, REPEAT, REPEAT A-B, AUDIO, ANGLE, SUBTITLE, SETUP, 0 à 9, CLEAR, TITLE/CHP/FRM/TIME
Courant de surcharge:
100 mA ou moins
Courant direct: 10 mA ou moins (VR = 10 V)
flowchart
graph TD
    SW1 --> A["Switch"]
    SW2 --> A
    SW3 --> A
    SW4 --> A
    SW5 --> A
    SW6 --> A
    SW7 --> A
    SW8 --> A
    A --> B["AND Gate"]
    B --> C["Stack Group 1"]
    B --> D["Stack Group 2"]
    B --> E["Stack Group 3"]
    C --> F["NOT Gate"]
    D --> G["NOT Gate"]
    E --> H["NOT Gate"]
    F --> I["Diode"]
    G --> J["Diode"]
    H --> K["Diode"]
    I --> L["Arrow to Switch"]
    J --> M["Arrow to Switch"]
    K --> N["Arrow to Switch"]
    L --> O["Arrow to Switch"]
    M --> P["Arrow to Switch"]
    N --> Q["Arrow to Switch"]
    O --> R["Arrow to Switch"]
    P --> S["Arrow to Switch"]
    Q --> T["Arrow to Switch"]
    R --> U["Arrow to Switch"]
    S --> V["Arrow to Switch"]
    T --> W["Arrow to Switch"]
    U --> X["Arrow to Switch"]
    V --> Y["Arrow to Switch"]
    W --> Z["Arrow to Switch"]
    X --> AA["Arrow to Switch"]
    Y --> AB["Arrow to Switch"]
    Z --> AC["Arrow to Switch"]
    AA --> AD["Arrow to Switch"]
    AB --> AE["Arrow to Switch"]
Réglages par défaut
Portuguese (pt), 1620
Swedish (sv), 1922
Russian (ru), 1821
Korean (ko), 1115
Greek (el), 0512
Afar (aa), 0101
Abkhazian (ab), 0102
Hungarian (hu), 0821
Armenian (hy), 0825
Interlingua (ia), 0901
Interlingue (ie), 0905
Inupiak (ik), 0911
Indonesian (in), 0914
Icelandic (is), 0919
Hebrew (iw), 0923
Yiddish (ji), 1009
Javanese (jw), 1023
Georgian (ka), 1101
Kazakh (kk), 1111
Greenlandic (kl), 1112
Cambodian (km), 1113
Kannada (kn), 1114
Kashmiri (ks), 1119
Kurdish (ku), 1121
Kirghiz (ky), 1125
Latin (la), 1201
Lingala (In), 1214
Laothian (lo), 1215
Lithuanian (lt), 1220
Latvian (lv), 1222
Malagasy (mg), 1307
Maori (mi), 1309
Macedonian (mk), 1311
Malayalam (ml), 1312
Mongolian (mn), 1314
Moldavian (mo), 1315
Marathi (mr), 1318
Malay (ms), 1319
Maltese (mt), 1320
Burmese (my), 1325
Nauru (na), 1401
Nepali (ne), 1405
Norwegian (no), 1415
Occitan (oc), 1503
Oromo (om), 1513
Oriya (or), 1518
Panjabi (pa), 1601
Polish (pl), 1612
Pashto, Pushto (ps), 1619
Quechua (qu), 1721
Rhaeto-Romance (rm), 1813
Kirundi (rn), 1814
Romanian (ro), 1815
Kinyarwanda (rw), 1823
Sanskrit (sa), 1901
Sindhi (sd), 1904
Sangho (sg), 1907
Serbo-Croatian (sh), 1908
Sinhalese (si), 1909
Slovak (sk), 1911
Slovenian (sl), 1912
Samoan (sm), 1913
Shona (sn), 1914
Somali (so), 1915
Albanian (sq), 1917
Serbian (sr), 1918
Siswati (ss), 1919
Sesotho (st), 1920
Vietnamese (vi), 2209
Volapuk (vo), 2215
Wolof (wo), 2315
Xhosa (xh), 2408
Yoruba (yo), 2515
Zulu (zu), 2621
(saillies comprises)
16-9/16 pouces (L) x 3-3/8 pouces (H) x 12-3/16 pouces (P)
(DIGITAL AUDIO OUT COAXIAL)
(DIGITAL AUDIO OUT OPTICAL)
Entrée vidéo
Composite ...... BNC x1; 1,0 Vc-c, 75 Ω (VIDEO IN)
Entrée audio
0,300 Vc-c (PAL), 75 Ω ON/OFF (EXT SYNC IN)
Divers
Published by Pioneer Corporation.
Copyright © 2008 Pioneer Corporation.
All rights reserved.
PIONEER CORPORATION 4-1, Meguro 1-Chome, Meguro-ku, Tokyo 153-8654, Japan
PIONEER ELECTRONICS (USA) INC.
Business Solutions Division: 2265 East 220th Street, Long Beach, CA 90810, U.S.A. TEL: +1-310-952-2111
Customer Support Division: 1925 East Dominguez St. Long Beach, CA 90810, U.S.A. TEL: +1-800-872-4159
PIONEER ELECTRONICS OF CANADA, INC.
Industrial Products Department: 300 Allstate Parkway, Markham, Ontario L3R OP2, Canada TEL: +1-905-479-4411
PIONEER EUROPE NV MULTIMEDIA DIVISION Pioneer House Hollybush Hill, Stoke Poges, Slough SL2 4QP U.K. TEL: +44-1-753-789-789
PIONEER ELECTRONICS AUSTRALIA PTY. LTD. 178-184 Boundary Road, Braeside, Victoria 3195, Australia TEL: +61-3-9586-6300
PIONEER ELECTRONICS ASIACENTRE PTE. LTD. 253 Alexandra Road, #04-01, Singapore 159936 TEL: +65-6472-1111
PIONEER ELECTRONICS DE MEXICO S.A. DE C.V.
Blvd.Manuel Avila Camacho 138 10 piso Col.Lomas de Chapultepec, Mexico, D.F. C.P. 11000 TEL: 52-55-9178-4270