
DVR106 - DVD player PIONEER - Free user manual and instructions
Find the device manual for free DVR106 PIONEER in PDF.
| Product type | Internal DVD drive |
| Brand | Pioneer |
| Model | DVR106 |
| Form factor | 5.25-inch half-height |
| Dimensions (W x H x D) | 148 x 42.3 x 198 mm |
| Weight | 1.1 kg |
| Power supply | +12 VDC 0.6 A / +5 VDC 1.1 A (via computer) |
| Host interface | IDE (PIO mode 4, multi-word DMA mode 2, Ultra DMA mode 2) |
| Buffer memory size | 2 MB (write/read) |
| Maximum read speed (DVD) | 12X (CAV) for single-layer DVD-ROM |
| Maximum read speed (CD) | 32X (CAV) for CD-ROM |
| Write speed (DVD-R) | 1X, 2X (CLV) |
| Write speed (DVD-R High Speed) | 1X, 2X, 4X (CLV) |
| Write speed (CD-R) | 4X, 8X, 12X, 16X (CLV) |
| Supported disc formats (read) | DVD-ROM (single/dual layer), DVD-R, DVD-RW, DVD+R, DVD+RW, CD-ROM, CD-R, CD-RW, CD-DA, CD-Extra, Photo CD, CD Text |
| Supported disc formats (write) | DVD-R, DVD-R High Speed, DVD-RW, DVD-RW High Speed, DVD+R, DVD+R High Speed, DVD+RW, CD-R, CD-RW, High Speed CD-RW |
| Audio output | Analog stereo (Molex 70553 connector) |
| Audio output level | 0.7 ±0.1 Vrms (load 10 kΩ) |
| Operating mode | Horizontal or vertical (8 cm discs not allowed in vertical) |
| Operating temperature | +5 °C to +45 °C |
| Operating humidity | 5 % to 85 % (non-condensing) |
| Laser class | Above Class 1 (visible and invisible) - Do not open |
| Maintenance and cleaning | Damp cloth only, no chemicals |
| Included accessories | Jumper x1, audio cable x1, mounting screws x4, user manual |
Frequently Asked Questions - DVR106 PIONEER
User questions about DVR106 PIONEER
0 question about this device. Answer the ones you know or ask your own.
Ask a new question about this device
Download the instructions for your DVD player in PDF format for free! Find your manual DVR106 - PIONEER and take your electronic device back in hand. On this page are published all the documents necessary for the use of your device. DVR106 by PIONEER.
USER MANUAL DVR106 PIONEER
Operating Instructions
Mode d'emploi
Bedienungsanleitung
The lightning flash with arrowhead symbol, within an equilateral triangle, is intended to alert the user to the presence of uninsulated 'dangerous voltage' within the product's enclosure that may be of sufficient magnitude to constitute a risk of electric shock to persons.
CAUTION
RISK OF ELECTRIC SHOCK DO NOT OPEN
CAUTION:
TO PREVENT THE RISK OF ELECTRIC SHOCK, DO NOT REMOVE COVER (OR BACK). NO USER-SERVICEABLE PARTS INSIDE. REFER SERVICING TO QUALIFIED SERVICE PERSONNEL.

The exclamation point within an equilateral triangle is intended to alert the user to the presence of important operating and maintenance (servicing) instructions in the literature accompanying the appliance. H002_En
NOTE: This equipment has been tested and found to comply with the limits for a Class B digital device, pursuant to Part 15 of the FCC Rules. These limits are designed to provide reasonable protection against harmful interference in a residential installation. This equipment generates, uses, and can radiate radio frequency energy and, if not installed and used in accordance with the instructions, may cause harmful interference to radio communications. However, there is no guarantee that interference will not occur in a particular installation. If this equipment does cause harmful interference to radio or television reception, which can be determined by turning the equipment off and on, the user is encouraged to try to correct the interference by one or more of the following measures:
- Reorient or relocate the receiving antenna.
- Increase the separation between the equipment and receiver.
- Connect the equipment into an outlet on a circuit different from that to which the receiver is connected.
- Consult the dealer or an experienced radio/TV technician for help.
H010 En
Information to User
H011En
Alteration or modifications carried out without appropriate authorization may invalidate the user's right to operate the equipment.
[For Canadian model]
This Class B digital apparatus complies with Canadian ICES-003.
CAUTION : USE OF CONTROLS OR ADJUSTMENTS OR PERFORMANCE OF PROCEDURES OTHER THAN THOSE SPECIFIED HEREIN MAY RESULT IN HAZARDOUS RADIATION EXPOSURE.
CAUTION : THE USE OF OPTICAL INSTRUMENTS WITH THIS PRODUCT WILL INCREASE EYE HAZARD. H013 En
WARNING!
FEDERAL COMMUNICATIONS COMMISSION DECLARATION OF CONFORMITY
This device complies with part 15 of the FCC Rules. Operation is subject to the following two conditions: (1) This device may not cause harmful interference, and (2) this device must accept any interference received, including interference that may cause undesired operation.
Product Name: DVD-R/RW DVD+R/RW CD-R/RW WRITER Model Number: DVR-A06 Responsible Party Name: PIONEER ELECTRONICS (USA) INC. Customer Support Division Address: 1925 E. DOMINGUEZ ST. LONG BEACH, CA 90810 U.S.A. Phone: (310) 952-2820
Thank you for buying this Pioneer product.
Please read through these operating instructions so you will know how to operate your model properly. After you have finished reading the instructions, put them away in a safe place for future reference. K015 En
WARNING: THE APPARATUS IS NOT WATERPROOFS, TO PREVENT FIRE OR SHOCK HAZARD, DO NOT EXPOSE THIS APPARATUS TO RAIN OR MOISTURE AND DO NOT PUT ANY WATER SOURCE NEAR THIS APPARATUS, SUCH AS VASE, FLOWER POT, COSMETICS CONTAINER AND MEDICINE BOTTLE ETC. H001BEn
The Generation of Acoustical Noise Is Less Than 70dB. (ISO7779/DIN45635)
CAUTION
This product contains a laser diode of higher class than 1. To ensure continued safety, do not remove any covers or attempt to gain access to the inside of the product.
Refer all servicing to qualified personnel.
The following caution label appears on your unit.
Location: on top of the cover.

text_image
CLASS 1 LASER PRODUCT LASER KLASSE 1For pluggable equipment the socket-outlet shall be installed near the equipment and shall be easily accessible.
IMPORTANT NOTICE
Record the model number and serial numbers of this equipment below. The numbers are on the top panel.
Model No. DVR-A06U
Serial No. ____
Keep these numbers for future use. H059 En
WARNING:
Handling the cord on this product or cords associated with accessories sold with the product will expose you to lead, a chemical known to the State of California and other governmental entities to cause cancer and birth defects or other reproductive harm.
Wash hands after handling.
To ensure your personal safety and to maximize the full operating potential of your Drive, read and follow these safety precautions:
ENVIRONMENT - Please do not use the unit at places with much dust, high temperature, or high humidity. Please use the unit at a place where it is not subjected to vibrations or shocks.
POWER - Turn off your system and attached hardware devices before installation.
READ INSTRUCTIONS - Read all safety and operating instructions before the Drive is operated.
RETAIN INSTRUCTIONS - Retain the safety and operating instructions for future reference.
FOLLOW INSTRUCTIONS - Follow all operating and use instructions.
HEED WARNINGS - All warnings must be adhered to.
CLEANING - DO NOT use liquid, aerosol cleaners, or alcohol. Use only a damp cloth to clean the exterior housing.
WATER AND MOISTURE - DO NOT use this product near water.
POWER SOURCES - Operate this product from the type of power source indicated on the marking label. If you are not sure of the type of power available, consult Authorized Pioneer Dealer.
OVERLOADING - DO NOT overload wall outlets and extension cords. Doing so can result in fire or electric shock.
OBJECT AND LIQUID ENTRY - Never push objects of any kind into this product. Touching dangerous voltage points may cause a short resulting in fire or electric shock. Do not spill liquid of any kind on this product.
CONDENSATION - Moisture will form in the operating section of the product causing performance to be impaired if it is brought from cool surroundings into a warmer environment. If you are moving the unit to a location with a warmer temperature, let the product stand for 1-2 hours in the new location before turning it back on.
SERVICING - Do not attempt to repair this product yourself. Opening or removing covers may expose you to dangerous voltage or other hazards. Refer all servicing to qualified service personnel. (Refer to the enclosed Service and Support Card.)
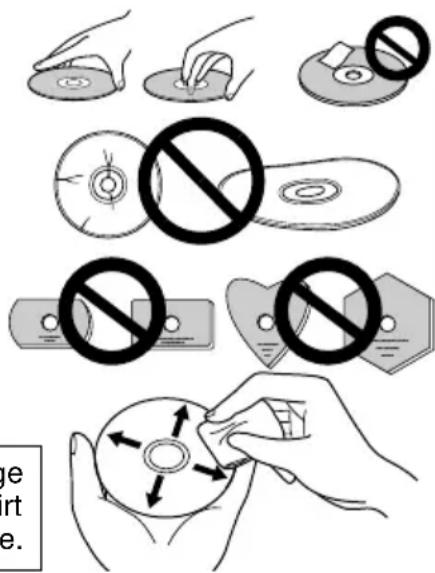
- Avoid touching or scratching the signal surface (shiny side) of the disc.
●Hold the disc by the edges or by the center hold and one edge.
●Do not affix paper or labels to the disc. - Discard warped or cracked discs as they may cause damage to the drive.
●Avoid specially shaped discs such as hearts or polygons. - Remove dust or lint from the disc with a soft cloth by wiping from the inside to the outside edge rather than in a circular motion.
- Do not use record-cleaning or anti-static agents as the solutions may cause damage to a disc.
text_image
Illustration showing various disassembled disc components with prohibition symbols, accompanied by explanatory text.Always be sure to store your discs in proper DVD-R storage cases when not in use, and always be sure to check for dirt or dust on discs (especially on the recording side) before use.
- Write Speed
CLV 1X and 2X at DVD-R
CLV 1X, 2X and 4X at High-Speed DVD-R
CLV 1X at DVD-RW
CLV 1X and 2X at High-Speed DVD-RW
CLV 2.4X at DVD+R
CLV 2.4X and 4X at High-Speed DVD+R
CLV 2.4X at DVD+RW
CLV 4X, 8X, 12X and 16X at CD-R
CLV 4X at CD-RW
CLV 4X and 10X at High-Speed CD-RW
• Maximum Read Speed
CAV 12X at DVD-ROM (single)
CAV 8X at DVD-ROM (dual)
CAV 6X at DVD-R, DVD-RW, DVD+R, DVD+RW
CAV 32X at CD-ROM, CD-R, CD-RW
- Buffer Memory Size :
2 MBytes (Write/Read)
- IDE Data Transfer Mode :
PIO Mode 4/Multi Word DMA Mode 2/Ultra DMA Mode 2
• Supports Video CD
• 5.25inch Half-Height built in type
- Stereo Audio Output
• LCD Tilt Servo Mechanism
• Horizontal/Vertical orientation available
- Low vibration Mechanism by DRA system
• Supports CD text format
Disc Format (Read/Write)
• DVD single layer/dual layer /120 mm disc/80 mm disc
- DVD-R (In case of write, 650nm disc for General only.)
• High-Speed DVD-R (4X-SPEED DVD-R Version 1.0)
- DVD-RW
• High-Speed DVD-RW (2X-SPEED DVD-RW Version 1.0)
• DVD+R (Version 1.0)
• High-Speed DVD+R (4X-SPEED DVD+R Version 1.1)
• DVD+RW (Version 1.1)
- CD-ROM Mode 1
• CD-ROM XA Mode2 (form 1, form2)
• Photo CD (single and multiple session)
- CD-DA
- CD-Extra (CD PLUS)
- CD-R
• CD-RW, High-Speed CD-RW
Note:
Specific application program that support above format is needed to write.
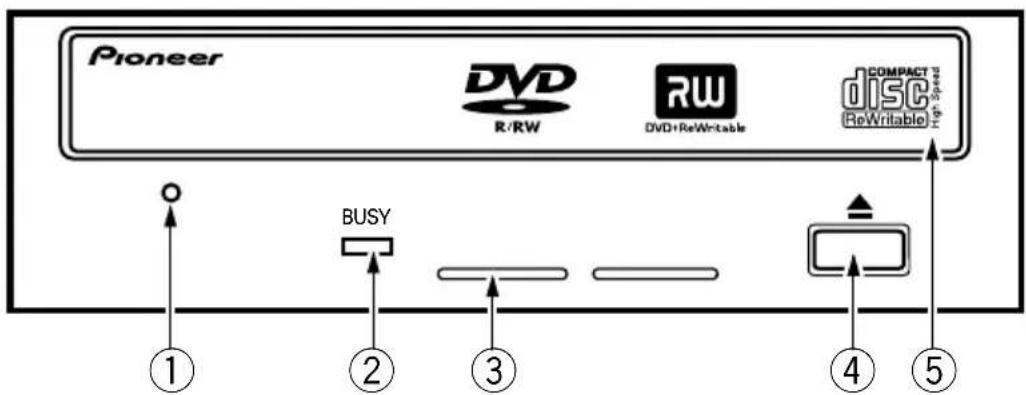
FRONT VIEW
text_image
Pioneer DVD R/RW RW DVD+ReWritable COMPACT disc ReWritable ① ② ③ ④ ⑤ BUSY① Forced Ejection Hole
Insert a stiff rod into the hole and push to eject the tray when the tray doesn't unload by pressing the Eject button. In the normal operation, the eject button should be used to unload the tray. Make sure the power of the drive is turned off and wait more than one minute till the disc rotation is stopped when access the eject hole.
②BUSY Indicator
Operation status is indicated as follows.
During reading Lights
During writing Lights
③Ventilation Hole
Do not block this part.
④Eject Button (▲)
To unload /load the disc, press the button.
⑤Disc Tray
Open the loading tray by pressing the eject button, then place a CD or DVD disc into the slit with the label facing up.
Press the eject button or push the front part of tray to load the tray with the disc.
Do not attempt to pull out the disc tray forcibly.
Precautions on playing 8 cm (3.15") Discs
An 8 cm (3.15") disc cannot be played even an adapter is attached to the disc when the drive is upright condition.
ABOUT REGION CODES
The region code can be changed ONLY 5 times, including the 1st setting. Please be aware the 5th change will be PERMANENT, therefore, please pay attention when changing region codes.
- Region codes are part of the DVD Standard. However, Region codes on DVD discs are optional. DVD discs with no specified Region code can be played on all players.
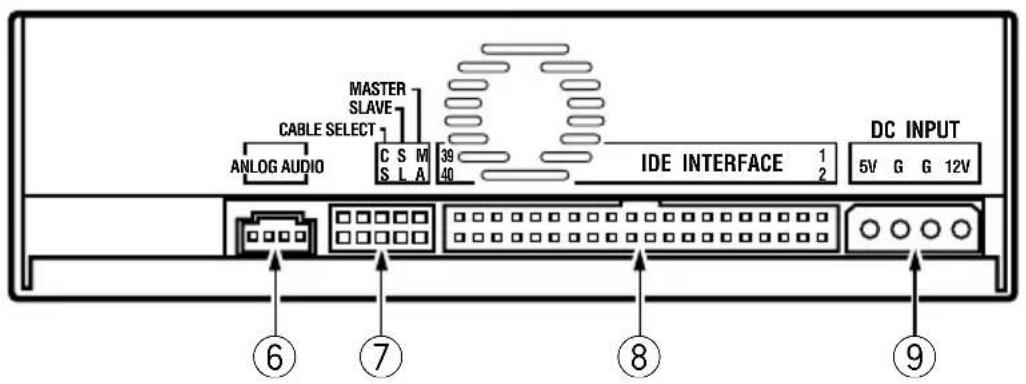
REAR VIEW
text_image
CABLE SELECT MASTER SLAVE ANLOG AUDIO C S M S L A 39 40 IDE INTERFACE 1 2 DC INPUT 5V G G 12V ⑥ ⑦ ⑧ ⑨⑥Audio Output
This is a connector for output of analog audio.
This connector is compatible with `Molex 70553`, choose a suitable connection cable.
| Pin | Name | Function |
| 1 L | Left channel audio output. | |
| 2 G | Ground. | |
| 3 G | Ground. | |
| 4 R | Right channel audio output. | |
⑦Device Configuration Jumper
Switch becomes ON when short socket is put.
Make sure the power of the drive is off before changing jumper setting.
Pin # 1 is ON at the time of shipping from the plant.
| Pin | Name | Function | |
| 1 | MA on The drive is used in master mode. | ||
| 2 | SL on The drive is used in slave mode. | ||
| 3 | CS on Using Cable Select function. | ||
| 4 | Reserved. | ||
| 5 | Reserved. | ||
⑧Host IDE Interface
This is a 40 pin I/O connector according to the ATA specifications.
⑨DC Input
| Pin Name Function | |
| 1 +12 Power supply input for DC +12 V. | |
| 2 G Ground. | |
| 3 G Ground. | |
| 4 +5 Power supply input for DC +5 V. | |
①Turn off the power of the personal computer and remove the power cord from the AC outlet, then remove the cover or the front panel.
②Remove the blank panel installed on the front of the 5.25 inch slot.
③ Install the fixing slide rails on the drive. (When slide rails are required, please contact your shop or the computer manufacturer.)
④Insert the drive into the slot.
⑤When fixing is required, please refer to the instruction manual for the computer.
- Please use screws with a length of 5 mm (3/16 in.) or less for mounting. Using longer screws may cause damage on the drive.
- When the mounting screws are loose etc., the vibrations from disc rotation may generate ripping noise, to prevent it the screws should be tightened securely.

text_image
Pin 1 Audio Cable IDE Interface cable Power cable DC INPUT 1 2 5V G G 12V●Turn off the power supply of the personal computer.
- Connect the power cable from the personal computer. At the time of connection, pay attention to the polarity of the cable.
- Connect the IDE interface cable. At this time, confirm that pin 1 of the IDE connector of the drive is connected correctly to pin 1 of the cable.
- When a sound card is being used, connect the audio output with an audio cable to the sound card.
Be sure to supply electrical power for this product from the personal computer which is connected to it. Do not use any other power supply than the internal one of the personal computer.
[Setting]
This drive is Horizontal and Vertical Use.
[Disc Size]
• 12 cm (4.72") / 8 cm (3.15")*
* 8 cm (3.15") discs cannot be used at upright position.
[Data Transfer Rate]
Data Read (Sustained)
DVD
Max. 16.62 MBytes/sec.
CD
Max. 4.92 MBytes/sec.
(13.7 - 32X CAV Mode over 16 block transfer)
Data Write (Sustained)
DVD
Ave. 5.54 MBytes/sec. (4X DVD-R)
CD
Ave. 2.46 MBytes/sec. (16X CD-R)
Host Interface specification
PIO Mode 4, Multi word DMA Mode 2
16.6 MBytes/sec.
Ultra DMA Mode 2 33.3 MBytes/sec.
- The data transfer rate may not be output due to disc conditions (scratches, etc.).
[Access Time/ Seek Time]
Access time (Random average)
Seek time (Random average)
DVD-ROM 140 ms CD-ROM 130 ms
DVD-ROM 120 ms CD-ROM 100 ms
[Audio Characteristic]
Line Out 0.7 ± 0.1 Vrms (at 10 kΩ load)
[Others]
Power Supply DC +12 V, 0.6 A
DC +5 V, 1.1 A
Dimensions 148 (W) x 42.3 (H) x 198 (D) mm
(including front panel)
5-27/32 (W) x 1-11/16 (H) x 7-25/32 (D) in.
Weight 1.1 kg (2.43 lb)
Operation temperature
+5°C to +45°C (41°F to 113°F)
Operation humidity 5%
to 85% (no condensation)
Storage temperature
-40^ to +60^ (-40^ to 140^)
Storage humidity 5% to 90% (no condensation)
[Accessories]
Short-circuit socket x 1
Audio cable x 1
Mounting screw x 4
Operating instructions x 1
NOTE:
- Specifications and design subject to possible modifications without notice, due to improvements.
text_image
CLASS 1 LASER PRODUCT LASER KLASSE 1text_image
Diagram illustrating the use of a CD or DVD disc with prohibition symbols, showing how to displace disc features.text_image
Pioneer DVD R/RW RW DVD-ReWritable COMPACT DISC ReWritable T ① ② ③ ④ ⑤ BUSYPublication de Pioneer Corporation.
© 2003 Pioneer Corporation.
text_image
CLASS 1 LASER PRODUCT LASER KLASSE 1H018A_Ge
text_image
Diagram illustrating a disassembly or disassembly process with labeled circular components and prohibition symbolstext_image
Pioneer DVD R/RW RW DVD+ReWritable COMPACT DISC ReWritable ① ② ③ ④ ⑤Max. 16.62 MBytes/sec.
CD
Max. 4.92 MBytes/sec.
PIO Modus 4, Multi Word DMA Modus 2 16.6 MBytes/sec.
Ultra DMA Modus 2
33.3 MBytes/sec.
CLASS 1 LASER PRODUCT LASER KLASSE 1
H018A_It
text_image
Diagram illustrating the prohibition of disc disc disc disposal, showing hand positions and circular disc disposal methods.text_image
Pioneer DVD R/RW RW DVD+ReWritable COMPACT DISC ReWritable ① ② ③ ④ ⑤Max. 16.62 Mbyte/sec.
Copyright © 2003 Pioneer Corporation.
text_image
CLASS 1 LASER PRODUCT LASER KLASSE 1H018A_Sp
text_image
Diagram illustrating the use of a CD or DVD disc with prohibition symbols and labeled partstext_image
Pioneer DVD R/RW RW DVD+ReWritable COMPACT DISC ReWritable ① ② ③ ④ ⑤Copyright © 2003 Pioneer Corporation.
text_image
CLASS 1 LASER PRODUCT LASER KLASSE 1text_image
Diagram illustrating three types of mechanical components: cutting, rolling pin, and rolling pad with a prohibition symbol.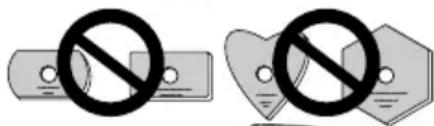
text_image
Two pictograms showing a prohibition symbol crossed out of two heart-shaped labels, indicating no restrictions or exclusion.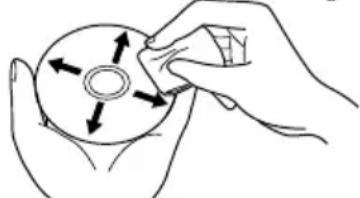
natural_image
Line drawing of hands holding a CD or DVD disc with arrows indicating direction (no text or symbols)- Schrijfsnelheid
text_image
Pioneer DVD R/RW RW DVD+ReWritable COMPACT TV DISC ReWritable ① ② ③ ④ ⑤⑧ Host IDE-interface
Max. 16.62 MBytes/sec.
CD
Max. 4.92 MBytes/sec.
Copyright © 2003 Pioneer Corporation.
text_image
Illustration showing a hand holding a CD or DVD disc with prohibition symbols, indicating no restrictions on the disc.text_image
Pioneer DVD R/RW RW DVD+ReWritable COMPACT disc (ReWritable) ① ② ③ ④ ⑤①強制イジェクト穴
(13.7 \~ 32X CAV Mode over 16 block transfer)
データ書き込み(サスティンド)
DVD Ave. 5.54 MB/s(4X DVD-R)
CD Ave. 2.46 MB/s(16X CD-R)
ホストインターフェース規格
PIO Mode 4, Multi word DMA Mode 2 16.6 MB/s
Ultra DMA Mode 2 33.3 MB/s
AFTER-SALES SERVICE FOR PIONEER PRODUCTS
Please contact the dealer or distributor from where you purchased the product for its after-sales service (including warranty conditions) or any other information. In case the necessary information is not available, please contact the Pioneer's subsidiaries (regional service headquarters) listed below:
PLEASE DO NOT SHIP YOUR PRODUCT TO THE COMPANIES at the addresses listed below for repair without advance contact, for these companies are not repair locations.
AMERICA
Pioneer Electronics (USA), Inc.
Customer Support Division
P.O. Box 1760
Long Beach, CA 90801-1760
U.S.A.
CANADA
Pioneer Electronics of Canada, Inc.
Industrial Products Department
300 Allstate Parkway,
Markham, Ontario
L3R-OP2 Canada
S022D_En
Published by Pioneer Corporation
Copyright (c) 2003 Pioneer Corporation
All rights reserved.
PIONEER ELECTRONICS (USA), INC.
2265 East 220th Street, Long Beach, CA 90810 U.S.A.
TEL: 1-310-952-2000
PIONEER ELECTRONICS OF CANADA
300 Allstate Parkway, Markham, Ontario L3R OP2, Canada
TEL: 1-905-479-4411