
DigitRadio 230 OD - Radio TECHNISAT - Free user manual and instructions
Find the device manual for free DigitRadio 230 OD TECHNISAT in PDF.


| Product type | Portable FM/DAB+ radio with Bluetooth |
| Brand | TechniSat |
| Model | DigitRadio 230 OD |
| Dimensions (W x H x D) | 262 mm x 218.2 mm x 134 mm |
| Weight | 2.6 kg |
| Power supply | 100-240 V~, 50/60 Hz ; Lithium-ion battery 7.2 V / 4800 mAh |
| Audio output power | 2 x 6 W RMS |
| USB port | 5 V, 1 A (charging external devices) |
| Antenna | Telescopic, adjustable |
| Display | Backlit display with information (station, time, date, etc.) |
| Station memory | 10 DAB+ stations and 10 FM stations |
| Operating modes | DAB+, FM, Bluetooth, AUX |
| Additional functions | Alarm, sleep timer, equalizer (presets + My EQ), DRC, Snooze |
| Protection rating | Splash-proof, dust-proof, shock-resistant |
| Package contents | 1 x DIGITRADIO 230 OD, 1 x built-in battery, 1 x user manual |
| Operating conditions | Operating temperature: -20 °C to +60 °C |
| Cleaning | Soft, dry cloth; do not use solvents or running water |
| Warranty | 24 months legal warranty from purchase date |
| Technical support | Phone: +49 (0) 392 592 201 800 (Mon-Fri 8am-8pm) |
Frequently Asked Questions - DigitRadio 230 OD TECHNISAT
User questions about DigitRadio 230 OD TECHNISAT
0 question about this device. Answer the ones you know or ask your own.
Ask a new question about this device
Download the instructions for your Radio in PDF format for free! Find your manual DigitRadio 230 OD - TECHNISAT and take your electronic device back in hand. On this page are published all the documents necessary for the use of your device. DigitRadio 230 OD by TECHNISAT.
USER MANUAL DigitRadio 230 OD TECHNISAT
natural_image
Orange and black scientific instrument with handles and control panel (no visible text or symbols)TechniSat
1 Abbildungen
natural_image
Two black-and-white diagrams showing crossed lines and radiating lines, no text or symbols present.natural_image
Symbol of a trash bin with crossed lines indicating no waste or restriction, plus a solid black rectangle below (no text or symbols)Portable DAB+/FM radio with Bluetooth
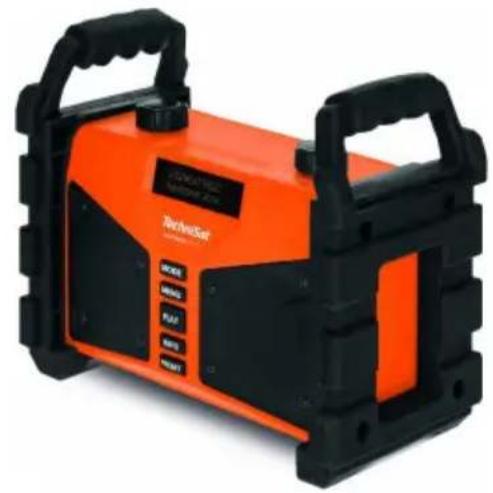
natural_image
Orange and black scientific instrument with handles and control panel (no visible text or symbols)TechniSat
1 Illustrations
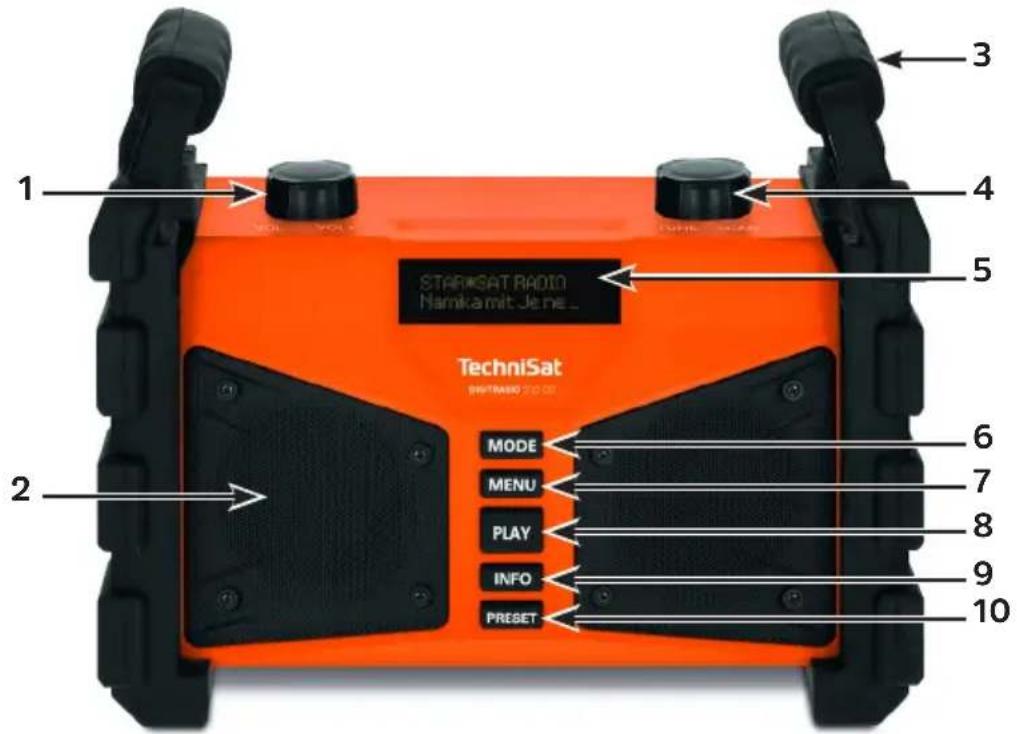
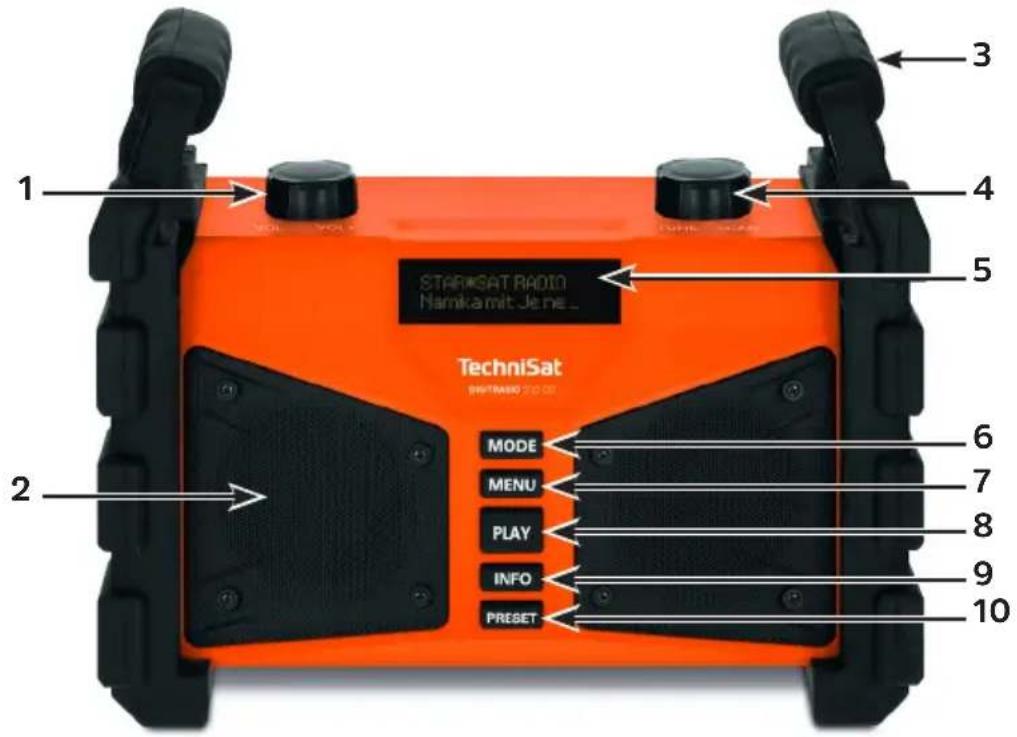
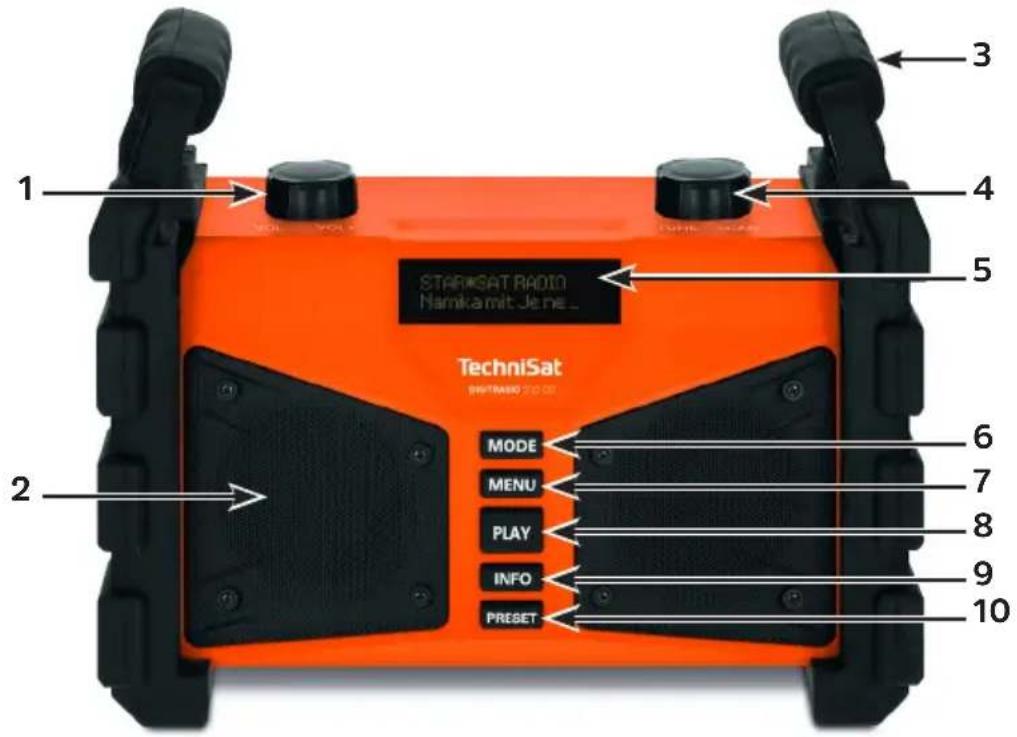
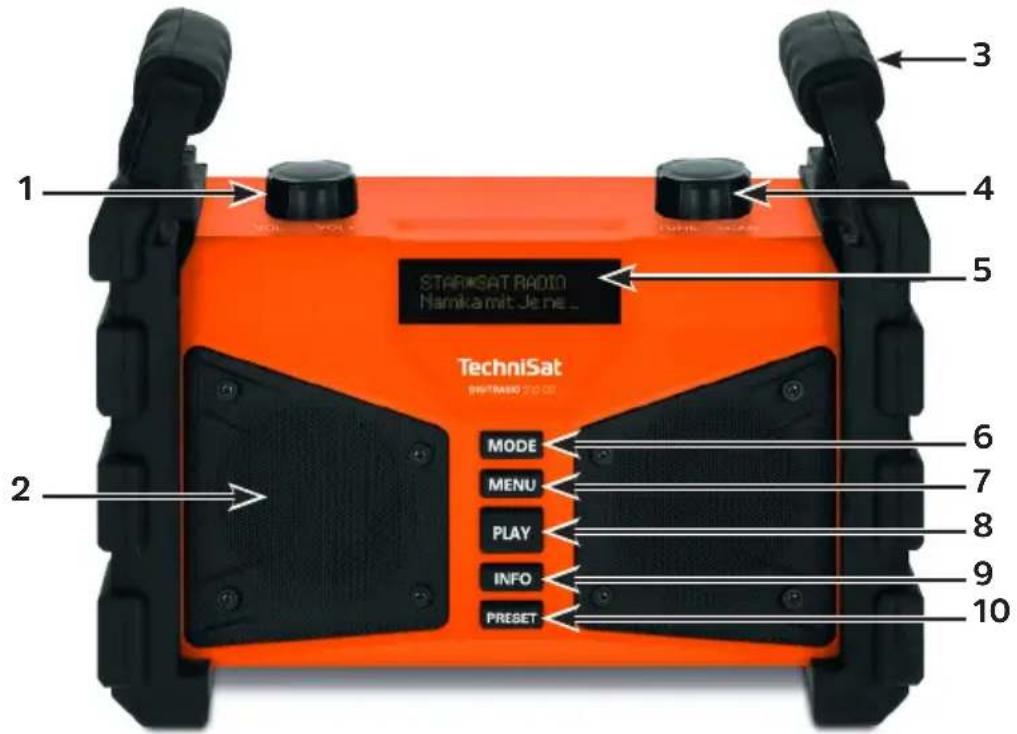
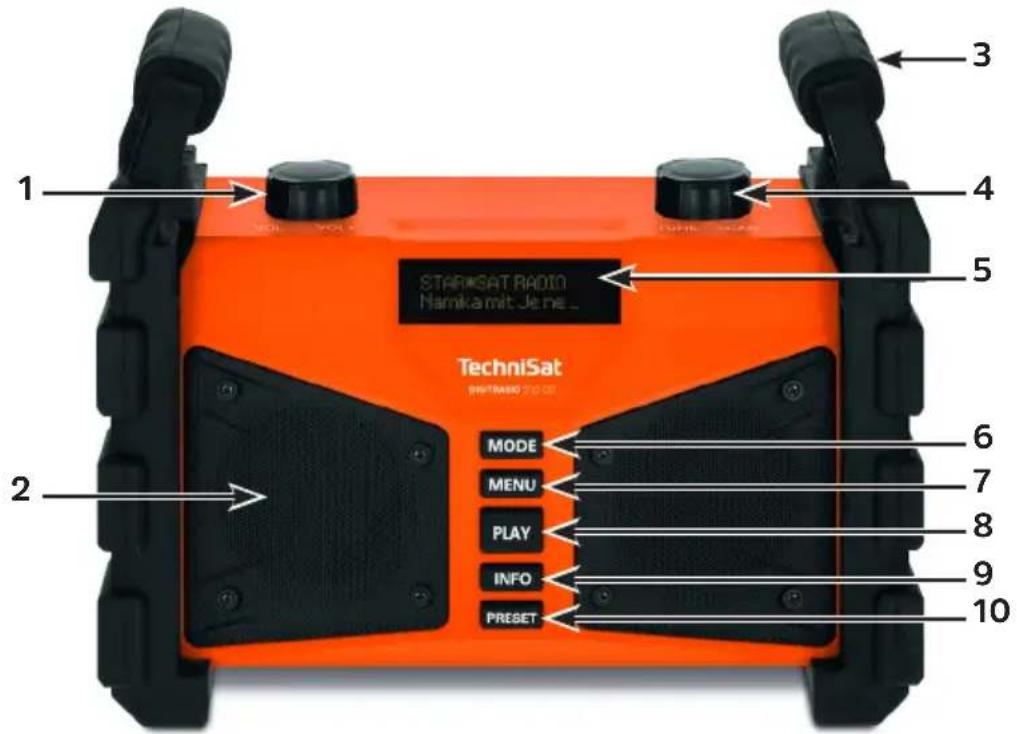
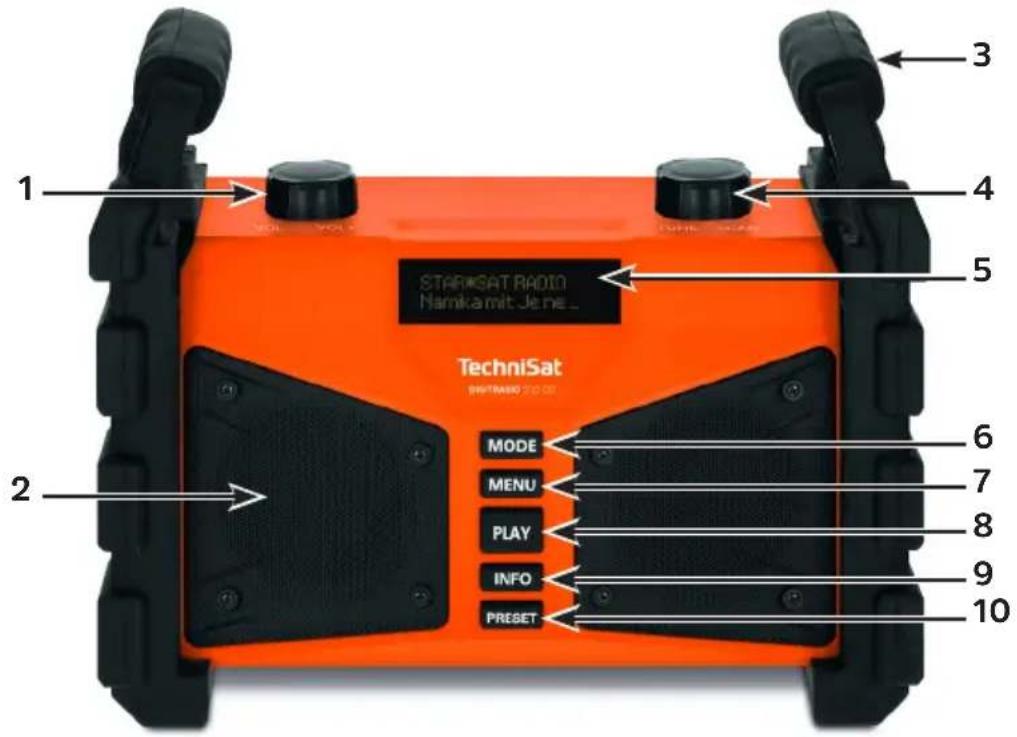
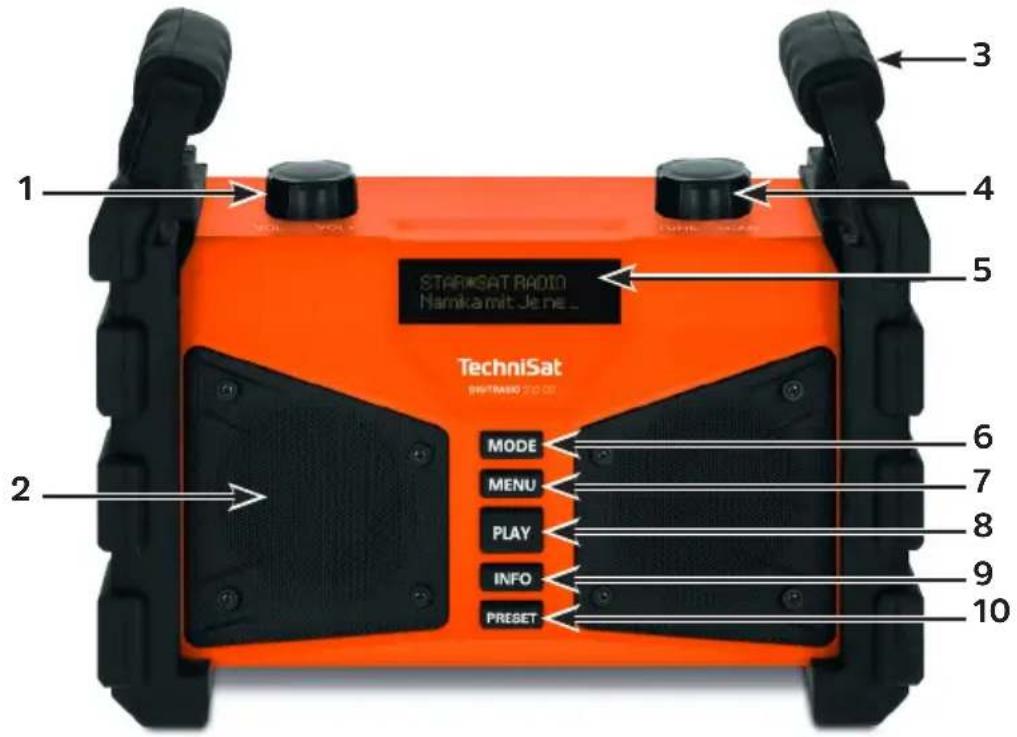
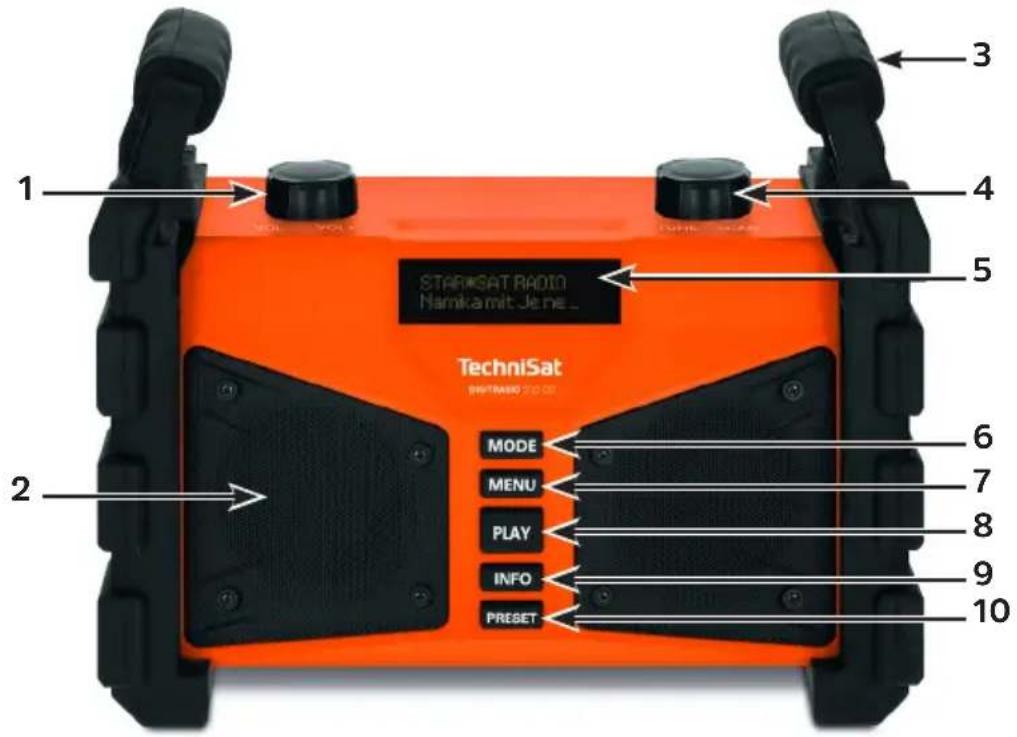
1.1 Front view
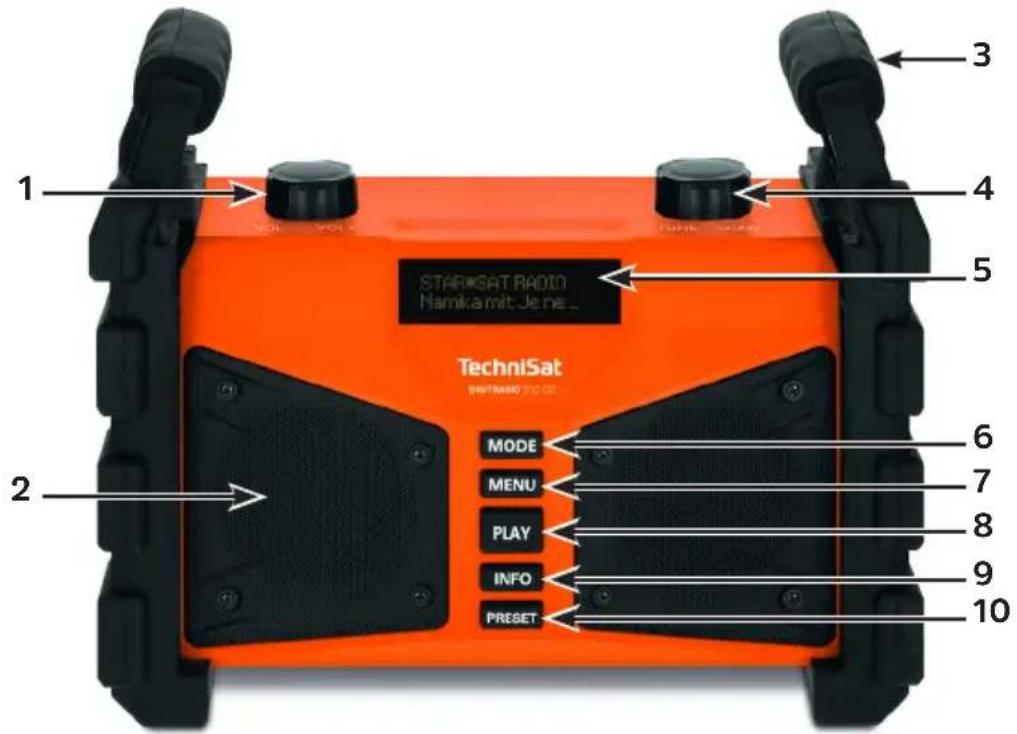
1 On/Standby (press), Volume +/- (rotate)
2 Speaker (stereo)
3 Handles (both sides)
4 TUNE/SCAN knob
5 Display
6 DAB/FM/AUX/Bluetooth mode-changing button
7 MENU for accessing the menu
8 PLAY button to play/pause/pair in Bluetooth mode
9 INFO
10 PRESET (Favourites memory)
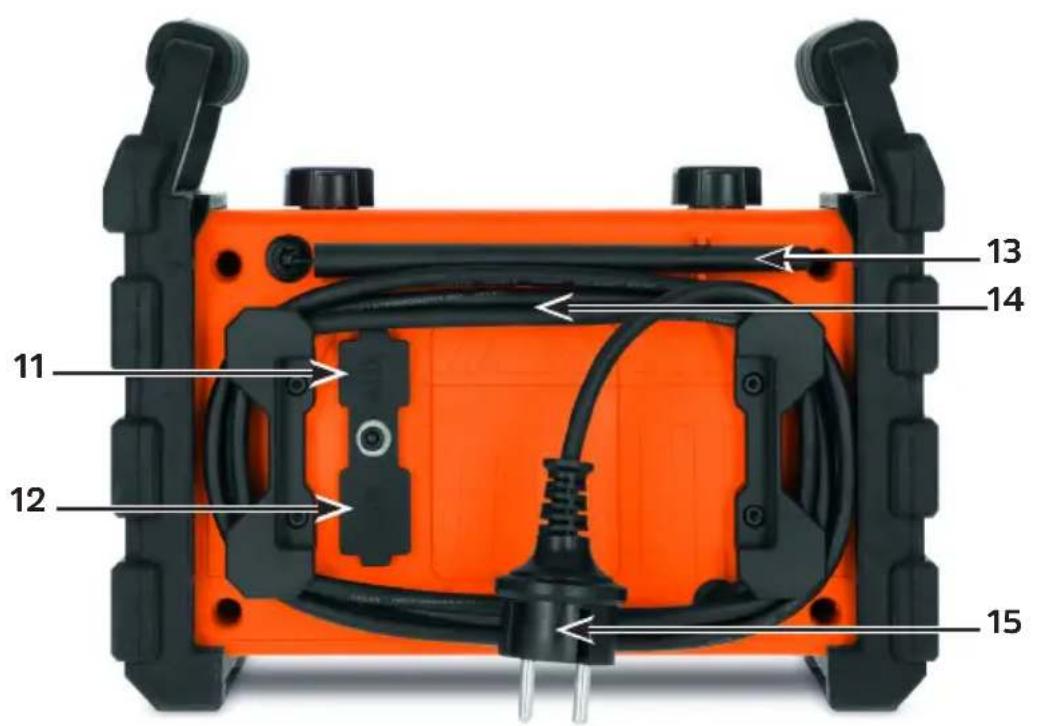
1.2 View from the rear
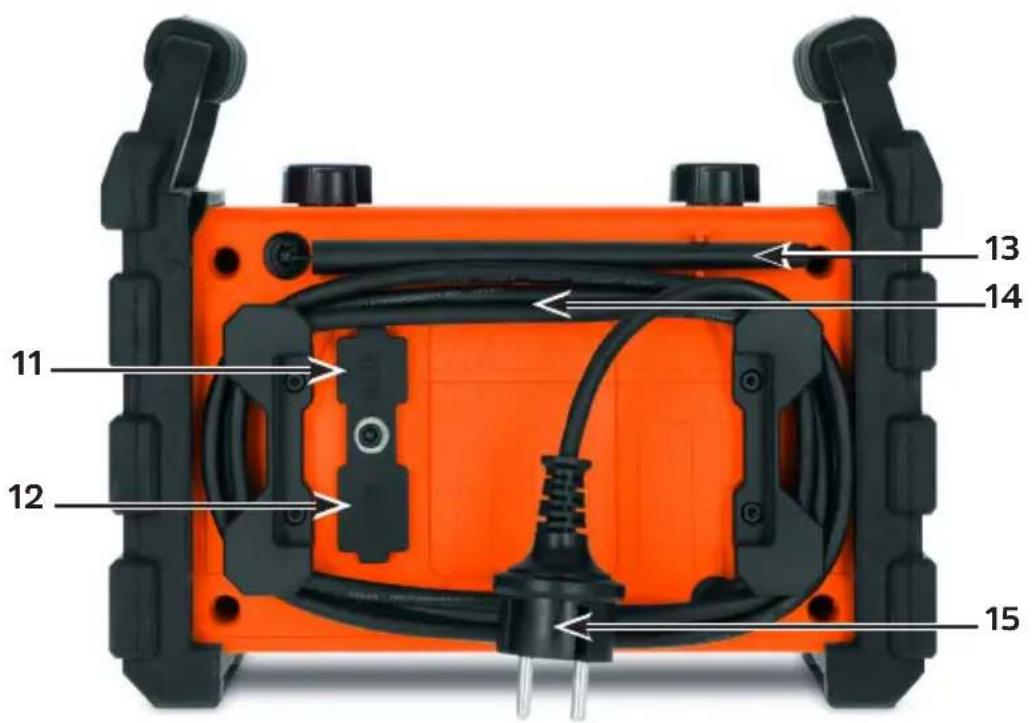
11 AUX input (behind rubber tab)
12 USB output (charging option for external devices)
13 Antenna
14 Screw-down battery compartment lid
15 Mains connection cable
2 Contents
1 Illustrations....68
1.1 Front view....68
1.2 View from the rear 70
2 Contents....72
3 Preface....76
3.1 Target group for this instruction manual....76
3.1.1 Intended use....76
3.2 Important information....76
3.2.1 Safety....77
3.2.2 Disposal 82
3.2.3 Legal notices....86
3.2.4 Service instructions....88
4 Setting up the device....89
5 Description of the DIGITRADIO 230 OD....92
5.1 Scope of delivery....92
5.2 The special features of the DIGITRADIO 230 OD....92
5.3 Preparing the DIGITRADIO 230 OD for operation....93
5.3.1 Charge the battery and connect to the mains power supply....93
72
5.3.2 Aligning the antenna....94
5.4 General device functions....95
5.4.1 Switching on the device 95
5.4.2 Switching off the device 96
5.4.3 Switching between operating modes....97
5.4.4 Adjusting the volume....97
5.4.5 Display....97
5.4.6 Retrieving displays....98
6 Menu operation....99
7 DAB+ (digital radio) function.... 100
7.1 What is DAB+? 100
7.1.1 Data compression....100
7.1.2 Audio stream....101
7.2 DAB+ (digital radio) reception....101
7.2.1 Performing a complete scan 102
7.2.2 Selecting the station....103
7.2.3 Storing DAB+ stations on a memory slot....103
7.2.4 Retrieving DAB+ stations from a memory slot....103
7.2.5 Overwriting/deleting a station memory slot 104
7.2.6 Manual setting....104
7.2.7 Volume adjustment (DRC)....105
7.2.8 Deleting inactive stations....106
8 FM mode....106
8.1 Switching on FM radio mode 106
8.2 FM reception with RDS information....107
8.3 Automatic station scan 107
8.4 Manual station scan....108
8.5 Scan setting 108
8.6 Audio settings....109
8.7 Saving FM stations on a memory slot....109
8.8 Retrieving FM stations from a memory slot....110
8.9 Overwriting/deleting a station memory slot....110
9 Bluetooth....110
9.1 Pairing a device 111
9.2 Bluetooth playback....111
10 AUX input 113
11 System settings.... 114
11.1 Sleep timer....114
11.2 Alarm....115
11.2.1 Setting the alarm time....115
74
11.2.2 Switching off the alarm after being woken....117
11.2.3 Deactivating the alarm....118
11.3 Equaliser....118
11.3.1 My EQ....118
11.4 Time and date settings.... 119
11.4.1 Manually setting the time/date 119
11.4.2 Automatic time updating....120
11.4.3 Setting the time format....121
11.4.4 Setting the date format 122
11.5 Display brightness 122
11.6 Language....123
11.7 Factory settings....124
11.8 Software version....125
12 Cleaning....125
13 Troubleshooting 126
14 Technical specifications / manufacturer's instructions.... 127
3 Preface
This instruction manual will help you to use your radio device, hereinafter referred to as the DIGITRADIO or device, as intended and safely.
3.1 Target group for this instruction manual
The instruction manual is intended for anyone who is installing, operating, cleaning or disposing of the device.
3.1.1 Intended use
The device has been designed to receive DAB+/FM radio programmes and can play music via Bluetooth.
The housing is splashproof, dust-tight and shock-resistant.
3.2 Important information
Please take note of the following information to minimise safety risks, to prevent damage to the device and to make a contribution to environmental protection.
Please read all the safety information carefully and keep it for future reference. Always follow all the warnings and instructions in this instruction manual and on the rear of the device.

Caution - This identifies important information that must be observed to prevent device defects, data loss/misuse or undesired operation.

Tip - This identifies information relating to the described function, as well as to another related function that may have to be taken into account, with reference to the corresponding section in the manual.
3.2.1 Safety
For your own protection you should read the safety precautions carefully before switching on your DIGITRADIO 230 OD. The manufacturer accepts no liability for damage caused by inappropriate handling, or by non-compliance with the safety precautions.

Do not open the device under any circumstances! Touching live parts poses a danger to life!

Any required intervention may only be performed by qualified staff.

The device must only be operated in an appropriate climate.

In the event of extended transportation in the cold and a subsequent change to warm rooms, do not switch on immediately; wait for the temperature to equalise.
If water has penetrated the device, switch it off and inform the Service Department.
Do not expose the device to heat sources that will heat it up more than normal use.
In the event of a thunderstorm, disconnect the device from the mains. Overvoltage can damage the device.
⚠️ If you detect a device defect, odour or smoke, considerable malfunctions, or damage to the housing, switch off the device and inform the Service Department.
⚠️ With the power supply unit, the device may only be connected to a mains voltage of 100V-240V\~, 50/60 Hz.
⚠️ Never try to operate the device with another voltage.
The mains cable must not be connected until installation has been completed according to regulations.
⚠️ If the mains cable is faulty, or if the device has any other damage, it must not be put into operation.
When removing the mains cable from the power outlet, pull on the plug, not the cable.
Do not take the device into the vicinity of baths or swimming pools.
⚠️ Never try to repair a faulty device yourself. Always contact one of our customer service points.

Foreign bodies, e.g. nails, coins, etc. must not be allowed to fall inside the device. Do not touch the connection contacts with metal objects or your fingers. This could lead to short-circuits.

Do not place any open flames on the device, such as burning candles.

Never allow children to use the device unsupervised.

Even when switched off and on standby, the device is still connected to the mains power supply. If you do not intend to use the device for a prolonged period, remove the mains plug from the power outlet. Only pull on the plug, not on the cable.

Do not listen to music or the radio at high volume. Doing so can cause permanent hearing impairment.

This device is not intended to be used by people (including children) with limited physical, sensory or mental capacities or lack of experience and/or knowledge, unless they are supervised by a person responsible for their safety or they have been instructed by them as to how to use the device.
Children must be supervised to ensure that they do not play with the device.
⚠️ It is forbidden to carry out modifications to the device.
⚠️ Damaged devices or accessories must not continue to be used.
Handling rechargeable batteries
Make sure that rechargeable batteries are kept out of children's reach. Children could put rechargeable batteries in their mouths and swallow them. This could lead to serious injuries. Seek medical advice immediately if this occurs! Therefore keep rechargeable batteries out of reach of infants.
⚠️ Only operate the device with the rechargeable battery approved for this device.
Normal batteries may not be recharged. Rechargeable batteries must not be reactivated by other means, not taken apart, heated or thrown into an open fire (danger of explosion!).
⚠️ Clean rechargeable battery contacts and device contacts before inserting.
⚠️ If the rechargeable battery is inserted incorrectly, there is a danger of explosion!
⚠️ Replace only with rechargeable batteries of the correct type and model number
Caution! Do not expose rechargeable batteries to extreme conditions.
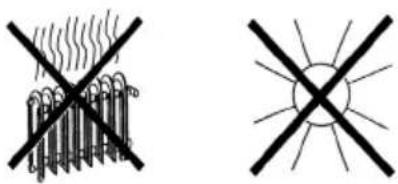
Do not place them on radiators, or expose them to direct sunlight.
Leaking or damaged rechargeable batteries can cause burns if they come into contact with the skin. In this case use suitable protective gloves. Clean the battery compartment with a dry cloth.
⚠️ Remove the rechargeable battery if the device will not be used for a long time.
3.2.2 Disposal
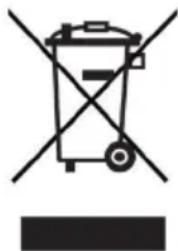
The device packaging is exclusively comprised of recyclable materials. Please sort the components appropriately, and dispose of them in line with your local waste disposal regulations. At the end of its service life, this device must not be disposed of with your regular household waste. It must be taken to a recycling collection point for electrical and electronic equipment.
This is indicated by the symbol on the product, the instruction manual or the packaging.
The materials are recyclable according to their identification.
An important contribution is made to our environment by recycling, recovery of materials or other kinds of recycling for old devices.

Please ask local authorities for the location of the relevant disposal point. Ensure that used batteries/rechargeable batteries, as well as electronic waste, are not disposed of with household waste, but are properly disposed of (returned to the specialist shop, hazardous waste).
natural_image
Symbol of a trash bin with crossed lines indicating no waste or restriction, and a solid black rectangle below (no text or symbols)Batteries/rechargeable batteries may contain poisonous substances which cause harm to health and the environment. Batteries/rechargeable batteries are subject to European Directive 2006/66/EC. They must not be disposed of with normal household waste.

Disposal instructions:
Disposal of packaging:
Your new device was protected by packaging on its way to you. All materials used are environmentally-friendly and recyclable. Please collaborate and dispose of the packaging in an environmentally-friendly way. Ask for information from your dealer regarding current disposal means or your local disposal facility.

Risk of suffocation! Do not give packaging and parts thereof to children. Risk of suffocation by films and other packaging materials.
Device disposal:
Old devices constitute valuable waste. Valuable raw materials can be recovered through environmentally-friendly disposal. Consult your town or local authority as to the possibilities for environmentally-friendly and proper disposal of the device. Prior to disposal of the device, remove the batteries/rechargeable batteries contained therein.

This device is identified in accordance with the Waste Electrical and Electronic
Equipment (WEEE) Directive 2012/19/EU.


At the end of its service life, this device must not be disposed of with your regular household waste. It must be taken to a recycling collection point for electrical and electronic equipment. The symbol on the product, the operating manual or the packaging indicates this. The materials are recyclable according to their identification. An important contribution is made to our environment by recycling, recovery of materials or other kinds of recycling for old devices.

Important information for the disposal of batteries/rechargeable batteries: batteries/rechargeable batteries may contain poisonous substances that harm the environment. Therefore you must always comply with applicable statutory provisions when you dispose of batteries/rechargeable batteries. Never dispose of batteries in normal household waste. Used batteries/rechargeable batteries can be disposed of at your specialist retailer or at special disposal sites free of charge.
3.2.3 Legal notices

TechniSat herewith declares that the radio system model DIGITRADIO 230 OD corresponds to Directive 2014/53/EU. The complete text of the EU Declaration of Conformity is available at the following web address:
TechniSat accepts no liability for product damage as a result of external influences, wear or improper handling, unauthorised repairs, modifications or accidents.

Changes and printing errors reserved. Version 12/18. Copying and duplication are subject to the publisher's consent. The respective current version of the manual can be obtained in PDF format in the download area of the TechniSat homepage at www.technisat.de.

DIGITRADIO 230 OD and TechniSat are registered trademarks of:
D-54550 Daun/Eifel, Germany
www.technisat.de
CE
3.2.4 Service instructions

This product is quality-tested and provided with the legal warranty period of 24 months as from the date of purchase. Please keep your receipt as proof of purchase. In the event of warranty claims please contact the product dealer.

Note!
Should you experience a problem with this device, or for queries and information, our Technical Hotline is available:
Mon. - Fri. 8:00 am - 8:00 pm on tel.:
+49 (0) 3925 9220 1800.
If the device needs to be returned, please use the following address only:
39418 Stassfurt, Germany
The names of the companies, institutions or makes referred to are trademarks or registered trademarks of the respective owners.
4 Setting up the device
Place the device on a firm, secure and horizontal base. Make sure the area is well ventilated.

Caution!
Do not place the radio on soft surfaces such as carpets and blankets, or near to curtains and wall hangings. These could obstruct the ventilation openings. The necessary flow of air could be interrupted as a result. This could potentially lead to fire in the device.
Do not place the device near to sources of heat, such as radiators. Avoid direct sunlight and very dusty environments.
Do not select a location for the device with high air humidity, e.g. a kitchen or sauna, as the precipitation of condensation water could damage the device. The device is designed for use in a dry environment and in a temperate climate.Please note that the device footings could leave coloured marks on some types of furniture surfaces in certain situations. Place a protective layer between your furniture and the device.
Keep the DIGITRADIO 230 OD away from devices that emit intense magnetic fields.
Do not place any heavy objects on the device.
If you move the device from a cold environment to a hot environment, moisture could accumulate inside the device. In this case, wait approximately one hour before putting it into operation.
Lay the mains cable in such a way that nobody can trip over it.
Ensure that the mains cable or the power supply unit are always easily accessible so that the device can be quickly disconnected from the power supply.
The power outlet should be as close to the device as possible.
Insert the plug fully into the socket to ensure connection to the mains.
Use a suitable, easy-to-access mains connection and avoid using multiple socket strips.Do not touch the mains plug with wet hands; electric shock hazard.
In the event of a malfunction or the detection of smoke or odour from the housing, remove the plug from the power outlet immediately.
Remove the plug if the device is not going to be used for a prolonged period, e.g. before going away on a long trip.
If the device is not to be used for a long time, remove the rechargeable battery.
Excessive volume, in particular when using headphones, can damage hearing.
5 Description of the DIGITRADIO 230 OD
5.1 Scope of delivery
Before start-up, please check whether everything has been delivered.
1 x DIGITRADIO 230 OD
1 x rechargeable battery (installed)
1 x instruction manual
5.2 The special features of the DIGITRADIO 230 OD
The DIGITRADIO 230 OD consists of a DAB+/FM receiver with the following functions:
- You can store up to 10 DAB+ and 10 FM stations.
- The radio receives on the FM 87.5–108 MHz (analogue) frequencies and DAB+ 174.9–239.2 MHz (digital).
- The device has a time and date display.
- Rechargeable battery.
- Bluetooth mode
- Alarm and sleep timer
- Charging function for external devices via USB (Power Bank)
5.3 Preparing the DIGITRADIO 230 OD for operation
5.3.1 Charge the battery and connect to the mains power supply.
When used for the first time, the rechargeable battery must be connected and fully charged. Please refer to the information in Section 5.3.1.1.
Insert the mains cable into a socket.
The DIGITRADIO starts and runs an initial scan for stations in your area via DAB+. Ensure that the antenna is correctly aligned as per Section 5.3.2.
Once the station search has successfully completed, the first DAB station on the station list is played. The charge status of the battery can be shown on the display by pressing the INFO button multiple times.
Battery charging - Battery is charging Battery charged - Battery is fully charged.

The battery is charged as soon as the device is connected to the mains. The charge status can be viewed via the display.

Replace a rechargeable battery that is weak in good time or recharge it.
5.3.1.1 Removing the rechargeable battery
Open the battery compartment on the rear of the device by unscrewing the locking screw. The battery compartment lid can then be flipped down.
Carefully remove the white connector and remove the rechargeable battery.
Carry out the sequence in reverse to install the rechargeable battery. When doing so, check that the connector is correctly aligned.
5.3.2 Aligning the antenna
The number and quality of the stations to be received depend on the reception conditions at the installation location. Excellent reception can be achieved with the antenna.
Align the antenna and adjust the angle of inclination to guarantee optimal reception.

Precise alignment of the antenna is often important, especially on the outskirts of a DAB+ reception area. On the Internet you can quickly find the location of the nearest transmission tower by visiting "www.dabplus.de".
i Start the first scan at a window in the direction of the transmission mast. If the weather conditions are poor, DAB+ reception may be limited.
Do not touch the antenna during station playback. This could compromise the reception and lead to sound dropouts.
5.4 General device functions
5.4.1 Switching on the device
Please align the antenna located on the rear of the device in order to guarantee good DAB+/FM reception. To do so, please refer to Section 5.3.2.
First prepare the DIGITRADIO 230 OD for operation as described in Sections 5.3.1 and 5.3.2.
Press the On/Standby button on the top of the device to turn on the DIGITRADIO 230 OD.

After switching on for the first time, the device automatically performs a complete scan in DAB mode. While scanning, the display information shows the progress, as well as the number of digital radio stations detected. After completing the station scan the first DAB+ channel is played.
5.4.2 Switching off the device
With mains operation:
By briefly pressing the On / Standby button you can switch the device to standby mode. [Standby] appears briefly on the display. The date and time are shown on the display. The display brightness in standby mode can be adjusted by following the instructions in Section 11.5.

The battery will continue to charge when the radio is on standby.
In rechargeable battery mode:
In rechargeable battery mode, the device is always switched off by pressing the On/Standby button. In this case, there is no date and time display.
5.4.3 Switching between operating modes
Press the MODE button to switch between DAB+ (Digital Radio), FM, Bluetooth and AUX modes.
5.4.4 Adjusting the volume
Adjust the volume using the volume control knob. Turning to the right increases the volume, turning to the left reduces it. The set volume is shown on the display by way of a bar chart.
5.4.5 Display
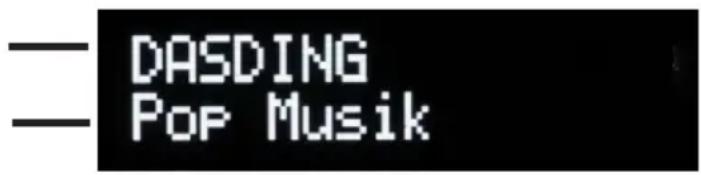
Depending on the selected function or option, the display will show the following information:
Station name, Frequency, Menu name
Displays, Menu options, Volume
5.4.6 Retrieving displays
Press the INFO button repeatedly to scroll through the available display options. The following information is thus available:
In DAB+ mode:
[Running text] (continuous text with additional information provided by broadcasters etc.), [Signal intensity], [Station type], [Ensemble], [Frequency], [Signal quality], [Bit rate and Codec], [Battery Status], [Time] and [Date].
In FM mode:
[Radio text] (if transmitted), [Channel type] (PTY), [Ps] (Programme Service Name or Station Name or Frequency), [Audio Information], [Battery Status], [Time] and [Date].
In Bluetooth mode:
[Connection Status], [Battery Status], [Time], [Date].
In AUX mode:
[Battery Status], [Time], [Date].
6 Menu operation
All the DIGITRADIO 230 OD functions and settings are accessed via the menu. Menu navigation takes place using the MENU buttons and the TUNE/SCAN knob.
The menu is divided into submenus and, depending on the mode (DAB+, FM, Bluetooth or AUX), contains different menu items or functions that can be enabled. To open the menu, simply press the MENU button briefly. To move to submenus, first press the
TUNE/SCAN knob to display a submenu and then press it to retrieve the submenu. An asterisk (*) highlights the current selection.

To close the menu: Press the MENU button several times (depending on which submenu you are in) until the current radio channel is displayed again.

Settings are not saved until the TUNE/SCAN knob has been pressed. If the MENU button is pressed instead of this, the settings are not accepted or saved (the MENU button in this case acts as a "Back" button).

The functions and buttons to be pressed are shown in bold in this instruction manual. Displays in [square brackets].

Some text (e.g. menu items, station information) may be too long to show on the display. These will be then shown as running text shortly thereafter.
7 DAB+ (digital radio) function
7.1 What is DAB+?
DAB+ is a new digital format through which crystal clear sound with no noise can be heard. In contrast to conventional analogue radio stations, DAB+ can be used to broadcast multiple stations on one and the same frequency. This is referred to as an ensemble or multiplex. An ensemble is comprised of the radio station, as well as several service components or data services, which are broadcast individually by the radio stations. There is information at www.digitalradio.de or www.digitalradio.ch, for example.
7.1.1 Data compression
By doing so, digital radio takes advantage of the properties of human hearing. The human ear does not perceive sounds which are found under a specific minimum volume. Data which are found under the so-called audibility threshold can, therefore, be filtered out.
This is possible because, in a digital data stream, the relevant relative volume for other units is saved for every unit of information. Moreover, in an audio signal, the quieter parts are superimposed by louder ones at a specific limit value. All the sound information below the threshold of hearing in a piece of music can be filtered out of the signal to be broadcast.
This leads to a reduction of data in the data stream to be transmitted, with no perceptible difference in sound for the listener (HE AAC v2 process as a supplementary codification process for DAB+).
7.1.2 Audio stream
With digital radio, audio streams are continuous data streams which contain the MPEG 1 audio layer 2 frames and thereby represent acoustic information. This enables standard radio channels to be broadcast and listened to on the receiver side. Digital radio provides you not only with excellent sound quality radio but also additional information. This may refer to the programme being broadcast or be independent information (e.g. news, weather, traffic, tips).
7.2 DAB+ (digital radio) reception
Press the MODE button until [DAB] is shown on the display.

If DAB+ is being started for the first time, a complete scan will be performed. After the scan is complete, the first station is played back in alphanumeric order.
7.2.1 Performing a complete scan

The automatic scan (Complete scan) scans all DAB+ band III channels and thereby finds all stations being broadcast within the reception area.

After the scan is complete, the first station is played back in alphanumeric order.
In order to perform a complete scan, open the menu by pressing the MENU button and use the TUNE/SCAN knob to select the [Full Scan] menu item.
[Scanning...] appears on the display.

During the scan a progress bar and the number of stations found is displayed.

If no station is detected, check the telescopic antenna and, if required, change the installation location (Section 5.3.2).
7.2.2 Selecting the station
To select a DAB+ station, turn the TUNE/SCAN knob and confirm the station selection by pressing the TUNE/SCAN knob.
7.2.3 Storing DAB+ stations on a memory slot

The programme memory can save up to 10 stations in the DAB+ range.
First select the desired station (see Section 7.2.2).
In order to store this station on a memory slot, hold down the PRESET button during playback. Then use the TUNE/SCAN knob to select a station slot (1 - 10). Press the TUNE/SCAN knob to save it.
[Station saved] appears on the display.
Repeat this process to save additional stations.
7.2.4 Retrieving DAB+ stations from a memory slot
To retrieve a station that you have stored in the FAV memory, briefly press the PRESET button and select a station slot (1-10) using the TUNE/SCAN knob.
Press the TUNE/SCAN knob to play the station.

If no station is saved on the selected station slot, [(empty)] appears on the display.
7.2.5 Overwriting/deleting a station memory slot
Simply save a new station on a favourite memory slot as described.

When retrieving the factory settings all memory slots are deleted.
7.2.6 Manual setting
This menu item is used to check the reception channels and can be used to align the antenna.
Press the MENU button briefly and use the TUNE/SCAN knob to select the [Set Manually] option.
Select a channel (5A to 13F) using the TUNE/SCAN knob. The signal intensity will now be shown on the display. If a DAB+ station is being received on a channel, the station ensemble name is displayed. The antenna can now be aligned to the maximum signal intensity.

Stations with a signal intensity below the required minimum signal intensity (vertical bar) are not transmitting a strong enough signal. If required, align the antenna as described in Section 5.3.2.
7.2.7 Volume adjustment (DRC)
With the Volume Adjustment menu item, the compression rate is set which balances the dynamic variations and thereby the accompanying volume variations.
Press the MENU button and use the TUNE/SCAN knob to select the [Adjust Volume] option.
Use the TUNE/SCAN knob to select the compression rate:
DRC high - High compression
DRC low - Low compression
DRC off - Compression switched off.
Confirm by pressing the TUNE/SCAN knob.
7.2.8 Deleting inactive stations
This menu item is for removing old stations and those no longer being received from the station list.
Press the MENU button and use the TUNE/SCAN knob to select the [Delete Inactive Station] option.
The [Clear?] prompt appears to check whether the inactive stations should be deleted.
Select using the [Yes] entry and confirm by pressing the TUNE/SCAN knob.
8 FM mode
8.1 Switching on FM radio mode
Switch to FM mode by pressing the MODE button.
[FM] is shown on the display.
When switching on for the first time, the frequency is set to 87.5 MHz.
i If you have already set or saved a station, the radio plays the last station set.
i In the case of RDS stations, the station name appears.

Align the antenna to improve reception (Section 5.3.2).
8.2 FM reception with RDS information
RDS is a procedure for broadcasting additional information via FM stations. Broadcasters with RDS broadcast their station name or the programme type, for example. This is shown on the display. The device can show the RDS information RT (Radio text), PS (Station name), PTY (Programme type).
8.3 Automatic station scan
Press the TUNE/SCAN knob to start the scan. Please note the scan settings in Section 8.5 when doing so.

If an FM station with sufficient signal intensity is found, the scan stops and the station is played. If an RDS station is being received, the station name appears and, possibly, radio text.

Please use the manual station scan for setting weaker stations.
8.4 Manual station scan
Turn the TUNE/SCAN knob to set the frequency in 0.05 MHz increments.
8.5 Scan setting
With this menu item you can set the sensitivity of the scan.
Press the MENU button and use the TUNE/SCAN knob to select the [Scan Settings] option.
Select whether the scan should only stop for stations with a strong signal [Strong Stations Only] or for all stations (including stations with a weak signal) [All Stations].

With the All Stations setting, the scan stops automatically upon detecting each available station. This can result in weak stations being played with background noise.
8.6 Audio settings
Press the MENU button and use the TUNE/SCAN knob to select the [Audio Settings] option.
Using the TUNE/SCAN knob, select the [Stereo available] item or [Mono only] to play back in stereo or mono only when the FM reception is weak.
Confirm by pressing the TUNE/SCAN knob.
8.7 Saving FM stations on a memory slot

The station memory can save up to 10 stations in the FM range.
First select the desired station (see Section 8.3).
In order to store this station on a memory slot, hold down the PRESET button during playback. Then use the TUNE/SCAN knob to select a station slot (1 - 10). Press the TUNE/SCAN knob to save it.
[Station saved] appears on the display.
Repeat this process to save additional stations.
8.8 Retrieving FM stations from a memory slot
To retrieve a station that you have stored in the FAV memory, briefly press the PRESET button and select a station slot (1-10) using the TUNE/SCAN knob.
Press the TUNE/SCAN knob to play the station.

If no station is saved on the selected station slot, [(empty)] appears on the display.
8.9 Overwriting/deleting a station memory slot
Simply save a new station on the respective memory slot as described.

When retrieving the factory settings all memory slots are deleted.
9 Bluetooth
Briefly press the MODE button until [Bluetooth] appears on the display.

If Bluetooth mode is being launched for the first time, a playback device, e.g. a smartphone or tablet, must be paired with the DIGITRADIO.

If a playback device has already been paired once and it is located in the reception range, it will be automatically connected.
9.1 Pairing a device
Select Bluetooth mode on the DIGITRADIO 230 OD. [Not Connected] appears on the display.
Open the Bluetooth settings on the smartphone/tablet that you wish to pair with the DIGITRADIO 230 OD.
Launch the search for available Bluetooth devices.
From the list of detected Bluetooth devices, select the DIGITRADIO 230 OD item.
Once successfully paired, [Connected] appears on the display.

Please refer to the instruction manual for your smartphone/tablet as to how to use the Bluetooth function on your smartphone/tablet.
9.2 Bluetooth playback
Once you have successfully paired your smartphone/tablet with the DIGITRADIO 230 OD, you can start playing audio.
Open a music app on your smartphone/tablet and start playing music. Depending on the smartphone/tablet, the sound will either be played directly via the DIGITRADIO, or you will first of all have to select the DIGITRADIO as the playback device. Please refer to the instruction manual for your smartphone/tablet as to how to select playback devices via Bluetooth on your smartphone/tablet.
The volume can be adjusted using the volume control knob, or using the volume control on your smartphone/tablet.
You can pause playback using the Play button, or continue by pressing it again. The title can be selected by turning the TUNE/SCAN knob.

Depending on the smartphone/tablet, ring tones or system tones can also be transferred.

Do not set the volume on the smartphone/tablet too low, otherwise background noise may occur.

Your smartphone/tablet can by powered via the USB port on the rear of the DIGITRADIO.

The maximum Bluetooth range in buildings is approx. 10m.

To unpair a paired device, hold down the Play button. [Not Connected] appears on the display and the DIGITRADIO returns to pairing mode.
10 AUX input
Music on external playback devices such as smartphones/tablets that do not have Bluetooth can be played back via the AUX input.
Open the protective cover with the AUX label on the rear of the DIGITRADIO 230 OD.
Connect the external device to the AUX input using a 3.5 mm jack cable (not included with delivery).
Press the MODE button as often as required until [AUX] appears on the display.
Play music on an external playback device.
The volume can be adjusted using the volume control knob, or using the volume control on your external playback device.

Do not set the volume on the external playback device too low, otherwise background noise may occur.

Your external playback device can by powered via the USB port on the rear of the DIGITRADIO.
11 System settings
All the settings referred to in this section apply equally to DAB+/FM, Bluetooth and AUX modes.
11.1 Sleep timer
You can activate the sleep timer if you want the DIGITRADIO 230 OD to switch to standby automatically after a specific time.
Press the MENU button and use the TUNE/SCAN knob to select the [System] > [Sleep Timer] option.
Using the TUNE/SCAN knob, you can set the period as intervals of Off,15, 30, 45, 60 and 90 minutes, after which the device is switched to standby from any operating mode.
Press the TUNE/SCAN knob after selecting a period.

If you access the Sleep Timer menu as described above, the remaining running time is shown.
11.2 Alarm
Press the MENU button and use the TUNE/SCAN knob to select the [System] > [Alarm] option.
11.2.1 Setting the alarm time

The wake-up function cannot be operated until the correct time has been set. Depending on the configuration, this occurs automatically or must be set manually. The time can either be updated manually or via DAB/FM. See Section 11.1 for further information.
Use the TUNE/SCAN knob to select one of the alarm time memories (Alarm 1 or Alarm 2) and press the TUNE/SCAN knob to launch the configuration.
Go through all the points one after the other. Confirm each entry by pressing the TUNE/SCAN knob:
[T On] > Set the time at which you want to be woken up by turning the TUNE/SCAN knob and then press the TUNE/SCAN knob to edit the next item.
[Duration] > Set the duration of the alarm by turning the TUNE/SCAN knob, then press the TUNE/SCAN knob to edit the next item.
[Source] > Set the alarm sound (buzzer or a radio source) by turning the TUNE/SCAN knob and then press the TUNE/SCAN knob to edit the next item.

If you have selected digital radio (DAB) or FM as the alarm sound source, you can then select a station from the favourites list or the last selected channel as the playback source. Then press the TUNE/SCAN knob.
Then select the days on which the alarm should be active. You can choose between Daily, Once, Weekends (Sat. and Sun.) and Working Days (Mon. - Fri.). Then press the TUNE/SCAN knob to continue.

If you have selected Once, you must then enter the date on which the alarm should be active.
The alarm volume can then be set. Use the TUNE/SCAN knob to select the volume with which you wish to be woken up. Then press the TUNE/SCAN knob.
If you want to activate the alarm now, select On and press the TUNE/SCAN knob again. The alarm is now activated.
i A clock icon appears on the display if an alarm is active.
i Please note that the alarm only works in the mains power mode. The alarm does not start in battery mode due to the power save function. However, it can be set and activated.
11.2.2 Switching off the alarm after being woken
Press the ON/OFF button to switch the alarm off.
Press the TUNE/SCAN knob to switch on the Snooze function. By pressing the TUNE/SCAN knob again, you can select the length of the pause as either 5 or 10 minutes. After the snooze time has elapsed, the wake-up tone starts again.
11.2.3 Deactivating the alarm
If you want to disable the alarm, press the MENU button and select [System] > [Alarm] > [Alarm 1/2]. Then, while [Set Alarm 1/2] appears on the display, turn the TUNE/SCAN knob. Now select the OFF option by turning the TUNE/SCAN knob. Then press the TUNE/SCAN knob to save the setting.
11.3 Equaliser
To adapt the sound to your requirements, the treble and bass can be adjusted separately or a factory setting can be selected.
Press the MENU button and use the TUNE/SCAN knob to select the [System] > [Equaliser] option.
Use the TUNE/SCAN knob to select either a factory setting (Normal, Classical, Jazz, Pop, Rock, Speech) or My EQ to set the treble and bass. Press the TUNE/SCAN knob to accept the chosen setting.
11.3.1 My EQ
To set the treble and bass as you wish, press the MENU button and use the TUNE/SCAN knob to select [System] > [Equaliser] > [My EQ].
Select either [Treble] to set the treble on a range of -7 to +7 or [Bass] to set the bass on a range of -7 to +7.
Press the TUNE/SCAN knob to accept the setting.
11.4 Time and date settings
11.4.1 Manually setting the time/date
Depending on the setting for time updates (Section 11.4.2), the time and date have to be set manually.
Press the MENU button and use the TUNE/SCAN knob to select the [System] > [Time] > [Set Date/Time] option.
The first time digits (hours) flash and can be changed using the TUNE/SCAN knob.
Turning to the right increases the value and to the left reduces it.
Press the TUNE/SCAN knob to accept the setting.
The next time digits (minutes) start to flash and can again be changed as described above.
Press the TUNE/SCAN knob after every other setting in order to go to the next setting.
To set the date, proceed in the same way as described above.
After all settings have been carried out and the TUNE/SCAN knob pressed for the final time, [Time Saved] appears on the display.
11.4.2 Automatic time updating
In this submenu, you can determine whether the time update should be done automatically via DAB+ or FM, or whether you wish to enter it manually (Section 11.4.1).
Press the MENU button and use the TUNE/SCAN knob to select the [System] > [Time] > [Auto Update] option.
Use the TUNE/SCAN knob to select the following options:
[Update all] (Update via DAB+ and FM)
[Update from DAB] (Update via DAB+ only)
[Update from FM] (Update via FM only)
[No update] (Time/date must be entered manually, see Section 11.4.1).
11.4.3 Setting the time format
In the Set 12/24 hrs. submenu you can activate the 12 or 24-hour format.
Press the MENU button and use the TUNE/SCAN knob to select the [System] > [Time] > [Set 12/24 Hrs] option.
Use the TUNE/SCAN knob to select the following options:
[Set 24 hrs.]
[Set 12 hrs.]
Press the TUNE/SCAN knob to save the setting.
11.4.4 Setting the date format
In the Set Date Format submenu you can determine the format for displaying the date.
Press the MENU button and use the TUNE/SCAN knob to select the [System] > [Time] > [Set Date Format] option.
Use the TUNE/SCAN knob to select the following options:
[DD-MM-YYYY] (day, month, year)
[MM-DD-YYYY] (month, day, year)
Press the TUNE/SCAN knob to save the setting.
11.5 Display brightness
You can set the display brightness for operation and dimming for standby (only during mains power operation).
Press the MENU button and use the TUNE/SCAN knob to select the [System] > [Lighting] option.
Use the TUNE/SCAN knob to select the following options:
[Operation] regulates brightness in a normal, operating status. You can choose from the [High], [Medium] and [Low] brightness intensities. Use the TUNE/SCAN knob to select a brightness level and press the TUNE/SCAN knob to save
the setting. The setting applies to both mains power operation as well as battery operation.
[Dim Setting] dims the display during operation and on standby (mains power operation to the set value after the time set under [Shut-Off Time]).
[Operating Cycle] specifies the time after which the display during operation drops to the value set under [Dim Setting]. If the [Off] setting is selected, the display always remains at the brightness value set under [Operation].

In Standby (mains power operation), the display is always dimmed to the value set under [Dim Setting].
11.6 Language
Press the MENU button and use the TUNE/SCAN knob to select the [System] > [Language] option.
Use the TUNE/SCAN knob to select one of the available languages and confirm the selection by pressing the TUNE/SCAN knob.
11.7 Factory settings
If you change the location of the device, it is possible that the saved stations can no longer be received. In this case you can reset the device to factory settings to delete all the saved stations and then launch a new scan.
Press the MENU button and use the TUNE/SCAN knob to select the [System] > [Factory Settings] option.
Use the TUNE/SCAN knob to select the [Yes] item to reset the factory settings and press the TUNE/SCAN knob.
All previously stored stations and settings will now be deleted. The device is now in the same status as when delivered.
[Restarting...] appears on the display. Following this, the device automatically performs a complete scan in DAB mode. While scanning, the display information shows the progress, as well as the number of digital radio stations detected. After completing the station scan the first DAB+ channel is played.
11.8 Software version
Under SW Version you can retrieve the currently installed software version.
Press the MENU button and use the TUNE/SCAN knob to select the [System] > [SW Version] option.
12 Cleaning

To prevent the risk of an electric shock, you may not clean the device using a wet cloth or under running water. Prior to cleaning, pull out the mains plug and switch off the device.

You may not use scouring pads, scouring powder and solvents such as alcohol or petrol.

Do not use any of the following substances: saltwater, insecticide, chlorine-based or acidic solvents (ammonium chloride).

Clean the housing using a soft, moist cloth. Do not use spirit, thinners, etc.; you could damage the surface of the device.

Only clean the display with a soft, cotton cloth. If required, use a cotton cloth with small amounts of non-alkaline, diluted, water or alcohol-based soap solution.

Gently clean the surface using the cotton cloth.
13 Troubleshooting
If the device does not operate as intended, check the following table for information.
| Symptom Possible cause/remedy | |
| The device cannot be switched on. | The device is not being supplied with power. Connect the power supply unit correctly to the socket and to the device. Charge the rechargeable battery. |
| No sound can be heard. Increase the volume. | |
| The display does not switch on. Disconnect the device from the mains supply/remove the battery briefly and reconnect the device to the mains. | |
| Poor reception via DAB+/FM. Change the position of the antenna or the DIGITRADIO 230 OD. | |
| The device cannot be operated. Disconnect the device from the mains supply/remove the battery briefly and reconnect the device to the mains. | |
If the malfunction has not been resolved, even after performing the checks described, please contact the Technical Hotline.
14 Technical specifications / manufacturer's instructions
Subject to technical changes and errors.
| Reception channels DAB/DAB+, FM, Bluetooth, AUX |
| Power supply AC Input: 100-240V, 50/60Hz |
| Rechargeable battery 7.2V/4800mAh Li-Ion, |
| USB output 5V, 1A |
| Frequencies FM: 87.5-108 MHz |
| Ambient conditionsOperating temperature | -20° to +60° |
| Audio output performance 2 x 6W RMS | |
| Weight 2.6kg | |
| Dimensions (W x H x D) 262mm x 218.2mm x 134mm | |
Mode d'emploi
DIGITRADIO 230 OD
natural_image
Orange and black scientific instrument with handles and control panel (no visible text or symbols)TechniSat
1 Illustrations
1.1 Vue avant
132132
1 Illustrations....132
8.6 Réglage audio....173

natural_image
Two crossed-out diagrams showing a fire resistance symbol (no text or labels)
natural_image
Symbol of a trash bin crossed with no text or labels, representing environmental restriction (no text present)natural_image
Orange and black scientific instrument with handles and control panel (no visible text or symbols)TechniSat
1 Immagini
1.1 Vista anteriore

natural_image
Two crossed-out diagrams showing a fire resistance symbol (no text or labels)
natural_image
Symbol of a trash bin crossed with no text or numbers, representing waste sorting or disposal (no text present)natural_image
Orange and black scientific instrument with handles and control panel (no visible text or symbols)TechniSat
1 Afbeeldingen
1.1 Vooraanzicht
6 Menubediening....291
natural_image
Two crossed-out diagrams showing a crossed bar with smoke and a sun, no text or symbols present.natural_image
Symbol of a trash bin crossed with no text or numbers, representing environmental restriction (no text present)7.2.7 Volume regelen (DRC)
natural_image
Orange and black scientific instrument with handles and control panel (no visible text or symbols)TechniSat
1 Illustrasjoner
1.1 Frontsiden
8.5 Kanalsøk-innstilling....364
8.6 Mono/Stereo-innstilling....365
11 Systeminnstillinger ....370
natural_image
Two crossed-out diagrams showing a fence with smoke and a sun, no text or symbols present.Ved tordenvær burde du ta apparatet ut av kontakten. Overspenninger kan skade apparatet.
natural_image
Symbol of a trash bin with crossed x-marks and a solid black rectangle below (no text or labels)(Opladbare) batterier kan inneholde helse- og miljøskadelige giftstoffer. (Oppladbare) batterier er omfattet av direktivet 2006/66/EF og skal ikke kastes i vanlig restavfall.

Informasjon om avfallshändtering:
8.6 Mono/Stereo-innstilling
11 Systeminnstillinger
Alle innstillinger i dette punktet gjelder i både DAB+, FM, Bluetooth, og AUX-modus.
natural_image
Orange and black scientific instrument with handles and control buttons (no visible text or symbols)TechniSat
1 Illustrationer
1.1 Set forfra
1 On/Standby (tryk), Lydstyrke +/- (drej)
2 Højttaler (stereo)
3 Bærehåndtag (på begge sider)
4 TUNE/SCAN Drejeknap
5 Display
6 DAB/FM/AUX/Bluetooth Knap til Funktions skift
7 MENU For at åbne Menuen
8 PLAY Afspil/Pause/Bluetooth Parring
9 INFO
10 PRESET (Favoritlager)
1.2 Set bagfra
natural_image
Two crossed-out diagrams showing a fence with smoke and a sun, no text or symbols present.natural_image
Symbol of a trash bin with crossed lines indicating no waste or restriction, and a solid black rectangle below (no text or symbols)11.2.3 Deaktiver alarm
natural_image
Orange and black electronic device with handles and control panel (no visible text or symbols)TechniSat
1 Ilustracje
1.1 Widok z przodu

natural_image
Two symbolic diagrams: one showing a crossed-out bar magnet above a coiled spring, the other showing a sun with radiating lines below (no text or symbols)
natural_image
Symbol of a trash bin with crossed lines indicating no waste or restriction, and a solid black rectangle below (no text or symbols)natural_image
Orange and black scientific instrument with handles and control panel (no visible text or symbols)TechniSat
1 Vyobrazení
1.1 Pohled zpředu
natural_image
Two symbolic diagrams: one showing a crossed-out bar magnet and another showing a sun with radiating lines (no text or symbols)natural_image
Symbol of a trash bin with crossed x- and y-axes, no text or numbers presentnatural_image
Orange and black scientific instrument with handles and control buttons (no visible text or symbols)TechniSat
1 Zobrazenia
1.1 Pohl'ad spredu
natural_image
Two crossed-out diagrams showing a fence with smoke and a sun, no text or symbols present.natural_image
Symbol of a trash bin with crossed lines indicating no waste or restriction, and a solid black rectangle below (no text or symbols)- Abbildungen
- Illustrations
- Front view
- View from the rear
- Contents
- Illustrations....68
- Contents....72
- Preface....76
- Setting up the device....89
- Description of the DIGITRADIO 230 OD....92
- Menu operation....99
- DAB+ (digital radio) function.... 100
- Preface
- Target group for this instruction manual
- Intended use
- Important information
- Safety
- Handling rechargeable batteries
- Disposal
- Disposal instructions:
- Legal notices
- Service instructions
- Setting up the device
- Caution!
- Description of the DIGITRADIO 230 OD
- Scope of delivery
- The special features of the DIGITRADIO 230 OD
- Preparing the DIGITRADIO 230 OD for operation
- Charge the battery and connect to the mains power supply.
- Removing the rechargeable battery
- Aligning the antenna
- General device functions
- Switching on the device
- Switching off the device
- With mains operation:
- In rechargeable battery mode:
- Switching between operating modes
- Adjusting the volume
- Display
- Retrieving displays
- Menu operation
- DAB+ (digital radio) function
- What is DAB+?
- Data compression
- Audio stream
- DAB+ (digital radio) reception
- Performing a complete scan
- Selecting the station
- Storing DAB+ stations on a memory slot
- Retrieving DAB+ stations from a memory slot
- Overwriting/deleting a station memory slot
- Manual setting
- Volume adjustment (DRC)
- Deleting inactive stations
- FM mode
- Switching on FM radio mode
- FM reception with RDS information
- Automatic station scan
- Manual station scan
- Scan setting
- Audio settings
- Saving FM stations on a memory slot
- Retrieving FM stations from a memory slot
- Overwriting/deleting a station memory slot
- Bluetooth
- Pairing a device
- Bluetooth playback
- AUX input
- System settings
- Sleep timer
- Alarm
- Setting the alarm time
- Switching off the alarm after being woken
- Deactivating the alarm
- Equaliser
- My EQ
- Time and date settings
- Manually setting the time/date
- Automatic time updating
- Setting the time format
- Setting the date format
- Display brightness
- Language
- Factory settings
- Software version
- Cleaning
- Troubleshooting
- Technical specifications / manufacturer's instructions
- Mode d'emploi
- Vue avant
- Illustrations....132
- Immagini
- Vista anteriore
- Afbeeldingen
- Vooraanzicht
- Menubediening....291
- Volume regelen (DRC)
- Illustrasjoner
- Frontsiden
- Informasjon om avfallshändtering:
- Mono/Stereo-innstilling
- Systeminnstillinger
- Illustrationer
- Set forfra
- Set bagfra
- Deaktiver alarm
- Ilustracje
- Widok z przodu
- Vyobrazení
- Pohled zpředu
- Zobrazenia
- Pohl'ad spredu
Brand : TECHNISAT
Model : DigitRadio 230 OD
Category : Radio