SICDBW13E - Hi-Fi System Sandstrøm - Free user manual and instructions
Find the device manual for free SICDBW13E Sandstrøm in PDF.


| Product Type | Portable CD Stereo System (Boombox) |
| Model Numbers | SICDBB13E / SICDBW13E |
| Playback Media | CD, CD-R/RW, MP3, WMA, USB drive |
| iPod/iPhone Compatibility | iPod classic, nano, touch; iPhone (via built-in dock) |
| Radio Tuner | FM 88-108 MHz, 30 presets |
| Audio Output Power | 5 W x 2 (RMS) |
| Speaker Impedance | 4 ohms |
| Total Harmonic Distortion | < 1% (typical) |
| Frequency Response | 20 Hz – 20 kHz (CD) |
| Signal-to-Noise Ratio | ≥ 60 dB |
| Power Supply | AC 100-240 V, 50/60 Hz (via mains cable) |
| Battery Power (Boombox) | 8 x LR20 (D size) batteries, not supplied |
| Battery Power (Remote) | 2 x AAA batteries, not supplied |
| Power Consumption | 15 W |
| Standby Power Consumption | < 1 W |
| Dimensions (approx.) | 400 x 250 x 150 mm (estimated) |
| Weight (approx.) | 2.5 kg (estimated) |
| Main Functions | CD/MP3/WMA playback, FM radio, USB playback, iPod/iPhone dock, AUX input, bass expander, sleep timer, programmable play (64 tracks), repeat/random |
| Remote Control Range | Up to 7 m, ±30° angle |
| Cleaning Instructions | Unplug unit; wipe with slightly moist, lint-free cloth; do not use abrasive cleaners |
| Safety Features | Laser Class 1 product; automatic power saving after 15 min idle; timer on/off |
Frequently Asked Questions - SICDBW13E Sandstrøm
User questions about SICDBW13E Sandstrøm
0 question about this device. Answer the ones you know or ask your own.
Ask a new question about this device
Download the instructions for your Hi-Fi System in PDF format for free! Find your manual SICDBW13E - Sandstrøm and take your electronic device back in hand. On this page are published all the documents necessary for the use of your device. SICDBW13E by Sandstrøm.
USER MANUAL SICDBW13E Sandstrøm
SICDBB13E / SICDBW13E
Instruction Manual
CD Portable Stereo
GB
Instruksjonsmanual
Safety Warnings....7
Unpacking....11
Product Overview 12
Boombox....12
Display 12
Remote Control 13
Inserting Batteries....14
Remote Control 14
Boombox....14
-Handling the Batteries....14
-Handling the Remote Control....15
Remote Control Operation Range....15
Connecting to the Mains Supply 16
Mains Power....16
Setting the Clock 16
General Operation....17
Switching ON / OFF 17
Selecting Functions....17
Adjusting the Volume....17
Adjusting the Sound Effect 17
Bass Expander System....17
Sleep Timer....17
Timer Operation 18
Before Setting the Timer 18
Setting the Timer....18
CD Player 19
Playing a CD....19
Skipping and Searching 19
Repeat Play....19
Random Play....19
Programmed Play 20
Checking and Changing Programmed Tracks....20
MP3/WMA Playback 21
iPod/iPhone Playback 22
Navigating Through the iPod Menus....22
Listening to the Radio 23
Storing Radio Stations....23
AUX IN Operation 23
Maintenance 24
Cleaning the Unit....24
Handling Discs 24
Cleaning Discs....24
Storing Discs 24
Hints and Tips....25
Specifications....26
Stille inn tidsuret 34
CD-spiller 35
Spille av en CD 35
- Read all the instructions carefully before using the unit and keep them for future reference.
- Retain the manual. If you pass the unit onto a third party make sure to include this manual.
- Check that the voltage marked on the rating label matches your mains voltage.
Damage
- Please inspect the unit for damage after unpacking.
- Do not continue to operate the unit if you are in any doubt about it working normally, or if it is damaged in any way - switch off, unplug from the mains socket and consult your dealer.
Location of Unit
• The unit must be placed on a flat stable surface and not subjected to vibrations.
- Do not place the unit on sloped or unstable surfaces as the unit may fall off or tip over.
- The mains socket must be located near the unit and should be easily accessible.
- This unit is designed for indoor use only.
Temperature
- Avoid extreme degrees of temperature, either hot or cold. Place the unit well away from heat sources such as radiators or gas / electric fires.
- Avoid exposure to direct sunlight and other sources of heat.
Naked Flames
• Never place any type of candle or naked flame on the top of or near the unit.
Moisture
- To reduce the risk of fire, electric shock or product damage, do not expose this unit to rain, moisture, dripping or splashing. No objects filled with liquids, such as vases, should be placed on the unit.
- If you spill any liquid into the unit, it can cause serious damage. Switch it off at the mains immediately. Withdraw the mains plug and consult your dealer.
Ventilation
• To prevent the risk of electric shock or fire hazard due to overheating, ensure that curtains and other materials do not obstruct the ventilation vents.
- A minimum distance of 5cm around the unit should be maintained to allow for sufficient ventilation.
- Do not install or place this unit in a bookcase, built-in cabinet or in another confined space. Ensure the unit is well ventilated.
Safety
- Always disconnect the unit from the mains supply before connecting / disconnecting other devices or moving the unit.
• Unplug the unit from the mains socket during a lightning storm. - In the interests of safety and to avoid unnecessary energy consumption, never leave the unit switched on while unattended for long periods of time, e.g. overnight, while on holiday or while out of the house. Switch it off and disconnect the mains plug from the mains socket.
Mains Cable
• Make sure the unit or unit stand is not resting on top of the mains cable, as the weight of the unit may damage the mains cable and create a safety hazard.
- If the mains cable is damaged it must be replaced by the manufacturer, its service agent, or similarly qualified persons in order to avoid a hazard.
Interference
- Do not place the unit on or near appliances which may cause electromagnetic interference. If you do, it may adversely affect the working performance of the unit, and cause a distorted sound.
Batteries
- Batteries used in the unit are easily swallowed by young children and this is dangerous.
- Please dispose of batteries correctly by following the guidance in this manual. - Do not expose the battery to direct sunlight or sources of excessive heat.
Supervision
- Children should be supervised to ensure that they do not play with the unit. - Never let anyone especially children push anything into the holes, slots or any other openings in the case - this could result in a fatal electric shock.
DVD
- Class 1 Laser Product This unit utilises a laser. Use of controls, adjustments or performance of procedures other than those specified herein may result in hazardous radiation exposure.
• Before moving the unit, ensure the disc tray is empty.
• Always remove the disc when the unit is not in use.
• Failure to do so will risk severely damaging the disc and the unit. - Do not stack devices, heat from other devices may affect the performance of the unit.


The lightning flash with arrowhead symbol, within an equilateral triangle, is intended to alert the user to the presence of uninsulated "dangerous voltage" within the unit's enclosure that may be of sufficient magnitude to constitute a risk of electric shock.

The exclamation point within an equilateral triangle is intended to alert the user to the presence of important operating and maintenance (servicing) instructions in the manual accompanying the unit.
Service
- To reduce the risk of electric shock, do not remove screws. The unit does not contain any user-serviceable parts. Please leave all maintenance work to qualified personnel.
- Do not open any fixed covers as this may expose dangerous voltages.
Maintenance
- Ensure to unplug the unit from the power supply before cleaning.
- Do not use any type of abrasive pad or abrasive cleaning solutions as these may damage the unit's surface.
• Do not use liquids to clean the unit.
Sikkerhetsadvarsler
NO
Thank you for purchasing your new Sandstrøm CD Portable Stereo.
We recommend that you spend some time reading this instruction manual in order that you fully understand all the operational features offered. You will also find some hints and tips to help you resolve any issues.
Read all the safety instructions carefully before use and keep this instruction manual for future reference.
Unpacking
Remove all items from the packaging. Retain the packaging. If you dispose of it please do so according to local regulations.
The following items are included:

Remote Control x 1 Main Unit x 1

Power Cable x 1

Instruction Manual x 1
Product Overview
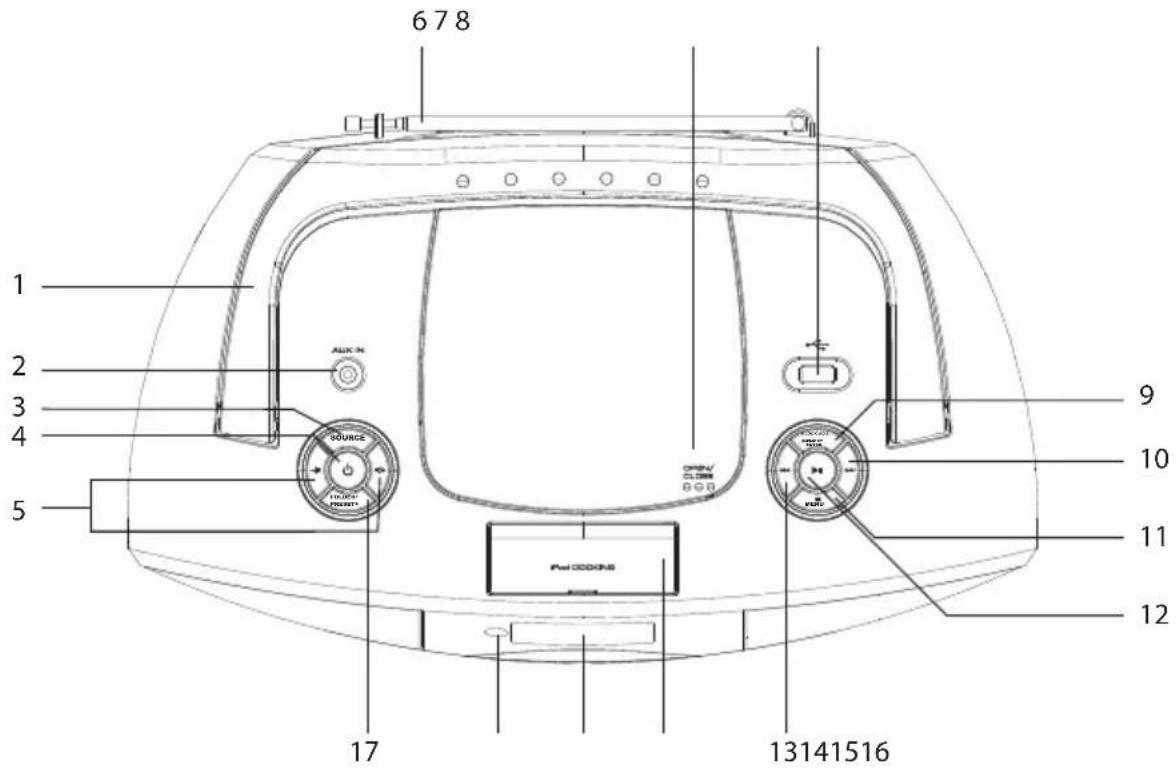
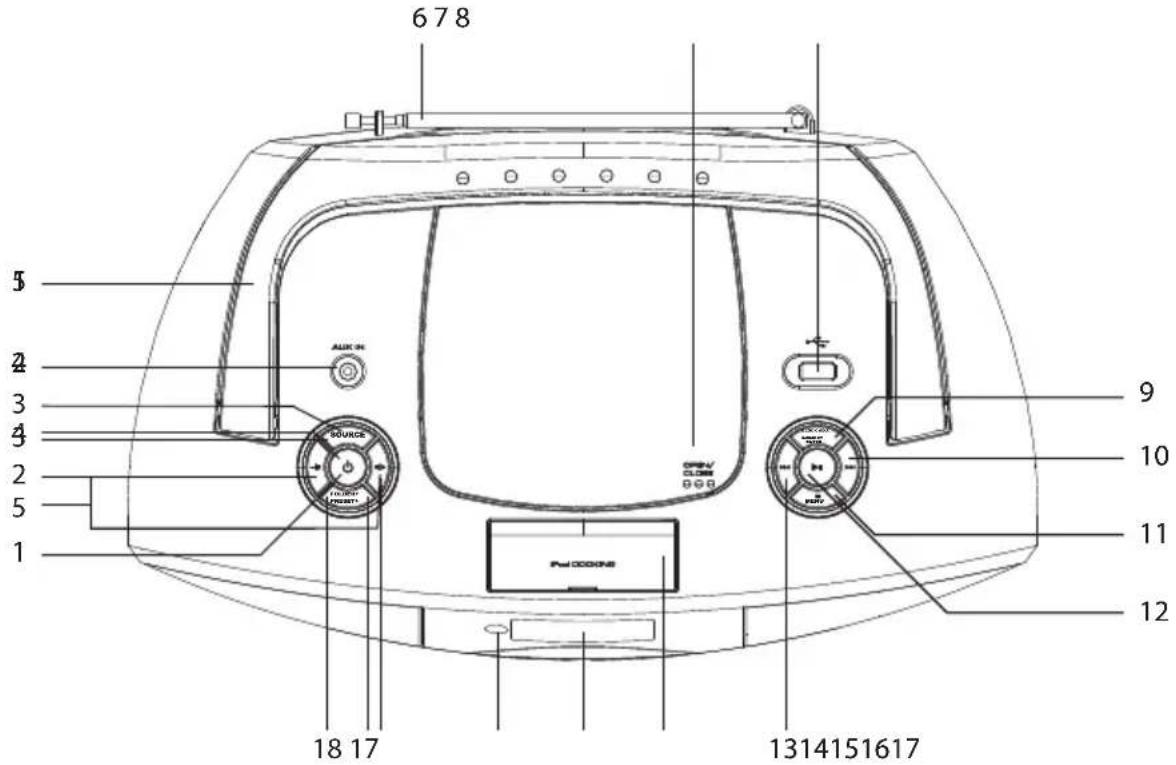
Boombox

- Carry Handle
- AUX IN
- SOURCE Button
- ⏻ Button
- ▶+/-Button
- FM Aerial
- CD Door
- USB Port
-
CLOCK ADJ. / MEMORY / ENTER Button
-
▶Skip forward Button
- ■ STOP / MENU Button
- ▶Play/Pause Button
- |Skip backwards Button
- iPhone / iPod socket
- LCD Display
- Remote Sensor
- Folder + / Preset + Button
Display

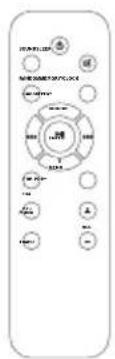
Remote Control
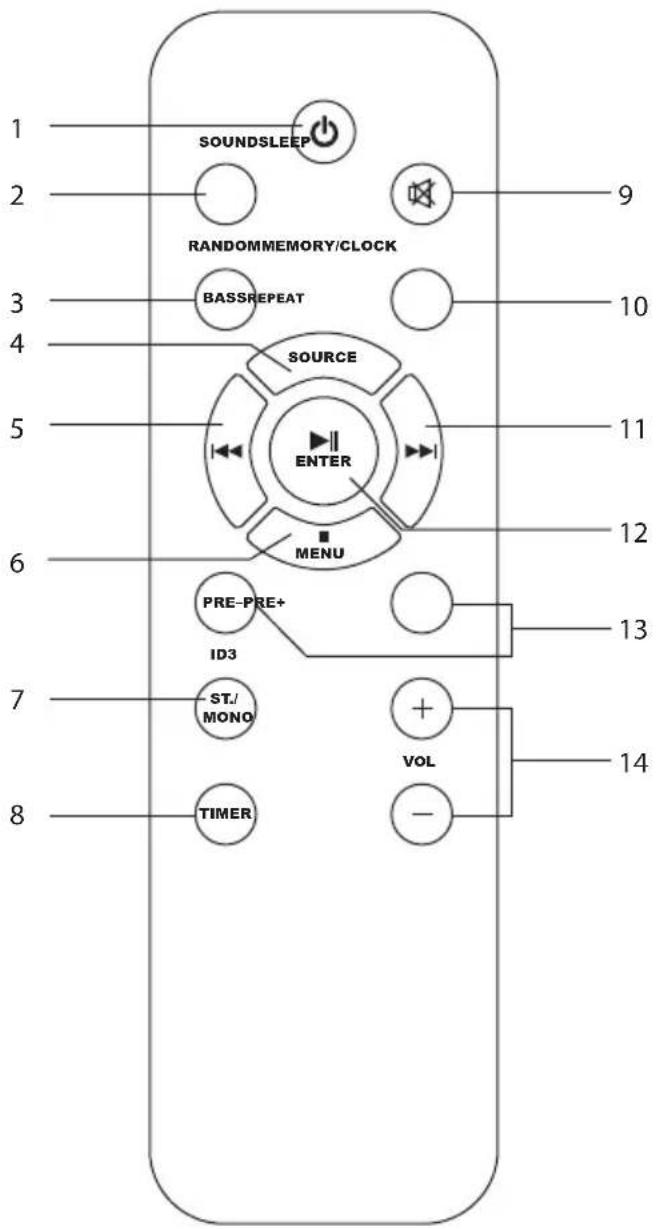
- Button
- SOUND Button
- RANDOM / BASS Button
- SOURCE Button
- Skip backwards Button
- ■ STOP / MENU Button
-
ID3 /Stereo / Mono Button
-
TIMER Button
- SLEEP / ✉ MUTE Button
- MEMORY / CLOCK / REPEAT Button
- ▶Skip forward Button
- ▶IPLAY / PAUSE / ENTER Button
- PRE + / - Button
- VOL + / - Button
Inserting Batteries
Remote Control
The remote control requires 2 x AAA batteries (not supplied)
- Remove the battery compartment cover.
- Insert 2 x AAA batteries into the battery compartment. Make sure you observe the correct polarity.
- Replace the battery compartment cover.
![graph TD A["Input"] --> B["Process Step"] B --> C["Output"]](/content/2026/05/759317/images/e91ecae97688d9658929e330df6ad18ea0b8076add8366ff83fee700991130bf.jpg)
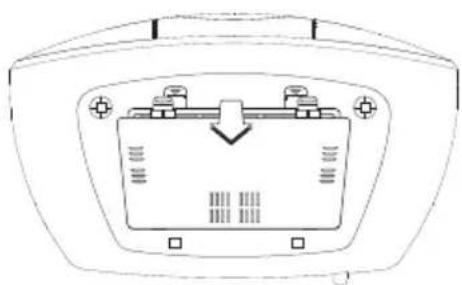
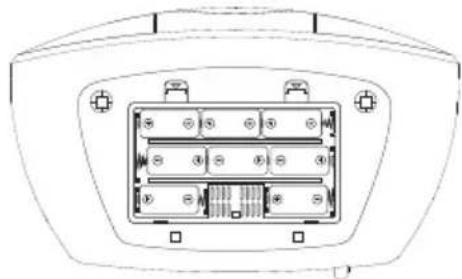
Boombox
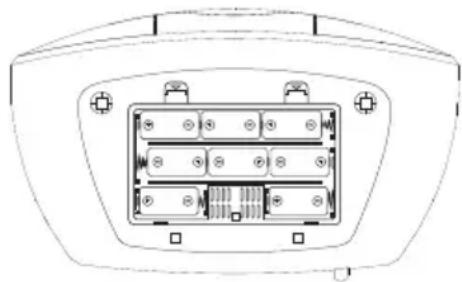
The boombox requires 8 x LR20 batteries (not supplied)
- Remove the battery compartment cover.
- Insert 8 x LR20 batteries into the battery compartment. Make sure you observe the correct polarity.
- Replace the battery compartment cover.

Handling the Batteries
- Improper or incorrect use of batteries may cause corrosion or battery leakage, which could cause fire, personal injury or damage to property.
- Install the battery correctly in the battery compartment. Normally the battery's positive polarity (+) will face up.
- When the battery is exhausted, the remote control will not function.
• Only use the battery type indicated in this manual. - Do not dispose of the used battery as domestic waste. Dispose of it in accordance with local regulations.
Handling the Remote Control
• Do not drop the remote control.
• Do not allow anything to impact the remote control.
• Do not spill water or liquid on the remote control.
• Do not place the remote control on a wet object.
- Do not place the remote control under direct sunlight or near sources of excessive heat.
- Remove the battery from the remote control when not in use for a long period of time, as corrosion or battery leakage may occur and result in physical injury, and/or property damage, and/or fire.
Remote Control Operation Range
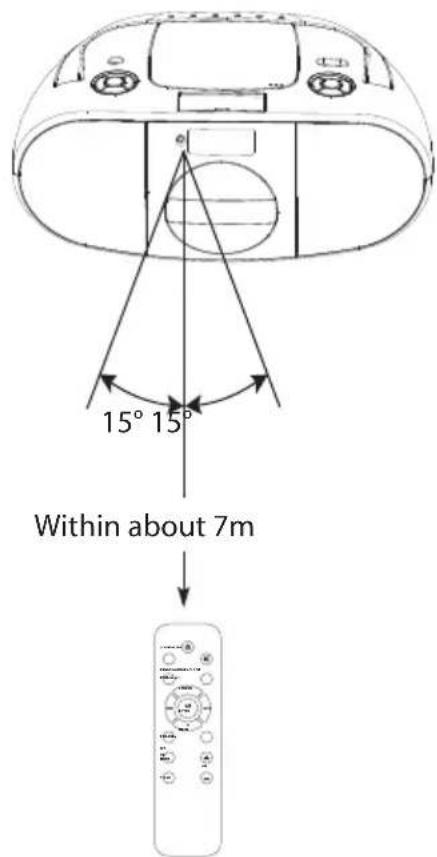
- The remote control sensor on the front unit is sensitive to the remote control's commands up to a maximum of 7 metres away and within a maximum of a 30° arc.
- Please note that the operating distance may vary depending on the brightness of the room.
Connecting to the Mains Supply
Mains Power
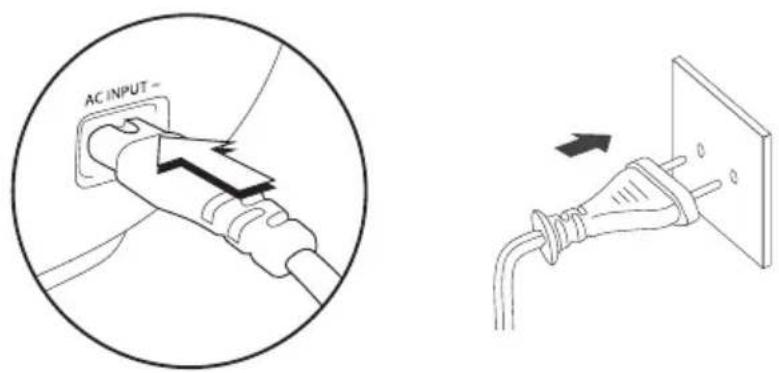
- Plug the power lead into the AC INPUT socket on the back of the boombox.
- Plug into the mains socket and switch on at the mains. 00:00 will start to flash in the display to show the unit has power.
Setting the Clock
Make sure the unit is in Standby before setting the clock.
- Press and hold the Memory / Clock button on the remote control for 2 seconds. 12 HOUR will be displayed.
- Press the ▶▶or |◀hip buttons to select 12 or 24 hour clock mode.
- Press Memory / Clock. The hours will start to flash. Press the ▶ or |skip button to change the hours.
- Press the Memory / Clock. The minutes will start to flash. Press the ▶▶ or |skip button to change the minutes.
- Press the Memory / Clock button to set the time. The display will stop flashing.

HOUR


09:25
General Operation
Switching ON / OFF
- When you first connect the unit to the mains socket, the unit will be in STANDBY mode.
- To switch the unit on press the STANDBY button. The display will light up blue and the word 'HELLO' will scroll across the screen.
- To switch the unit off press the STANDBY button. The display will go dark and the words 'GOOD BYE' will scroll across the screen.
Selecting Functions
Switch the unit on.
- Press the SOURCE button to select iPod - Aux - FM - CD - USB.

If the unit is idle for 15 minutes, it will automatically switch to Power Saving mode. Press the ▶||button to resume.
Adjusting the Volume
- Press the Volume +/- buttons to adjust the volume.
- Press the Mute button on the remote control to turn the sound off. The word 'MUTE' will flash in the display. Press the Mute button or one of the Volume buttons to resume audio listening.
Adjusting the Sound Effect
- Press the Sound button to select the sound effect. FLAT - CLASSIC - ROCK - POP - JAZZ.
Bass Expander System
- Press the Bass button. 'DBBS ON' will appear on the display. To switch the bass expander system off press the Bass button again. 'DBBS OFF' will be displayed.
Sleep Timer
- Press and hold the Sleep button. The word 'Sleep' and the number '90' will appear on the screen. Keep pressing the Sleep button to decrease the sleep time by 10 minute increments (90 - 10mins).
- Your unit will now switch into standby after the selected time is reached.
- To cancel the sleep mode press and hold the Sleep button to enter sleep mode display, and then press the Sleep button until the word 'SLEEP' disappears from the screen.

Timer Operation
Your boombox can be set to switch on and wake you up. The wake up time can be set e.g. you can set it to come on at 7:30am and play music from your iPod at a selected volume. When the unit switches on the volume gradually fades up until it reaches the selected volume. You can also set the time for the unit to switch off. The timer function will activate every day until it is switched off.
Before Setting the Timer
• Make sure the clock is set to the correct time.
- Tune the radio to your desired station, insert your desired CD into the CD compartment, dock your iPod or iPhone or insert your USB device.
GB
Setting the Timer
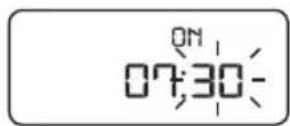
- Press and hold the Timer button for 2 seconds.
- Press the ▶ or ▶skip buttons to select the ON HOURS.
- Press the Timer button to select the ON MINUTES.
- Press the ▶ or ▶skip buttons to select the ON MINUTES.
- Press the Timer button.
- Press the ▶ or ◀ skip buttons to select the function.
- Press the Timer button.
- Press the ▶ or ▶ skip buttons to select the desired volume.
- Press the Timer button. The display will now cycle through all the setting and ⏻ symbol will be displayed.
- To switch off the timer press the Timer button, the symbol will disappear from the display.



CD Player
Press Open/Close to open the CD compartment and insert a CD. Make sure to insert the CD print side up. Press the SOURCE button to select CD.
Playing a CD
- Press the ▶I button to play the CD.
- Press the ▶II button while the CD is playing to pause the CD. Press the ▶II button again to resume playing.
- Press the Stop button to stop the CD. When the last track has played the CD will automatically stop.
If a CD isn't loaded or is damaged or badly scratched 'NO DISC' will be displayed.
- To play a specific track press the ▶ or ▶skip buttons to select the desired track number then press ▶.
Skipping and Searching
- Press the ▶ or ◀ Skip buttons to skip to the next or previous track.
- While a track is playing, press and hold the ▶ or |skip buttons to search forwards or backwards.
Repeat Play
- Press the Repeat button.
Functions
- Repeat - Repeats the track that is playing.
• Repeat All - Repeats the whole CD - Repeat Album - Repeats the whole album (this is only for MP3 and WMA CDs)
- To switch the repeat function off press Repeat repeatedly until the word REPEAT disappears from the display.
Random Play
- Press the Random button. The word 'RANDOM' will be displayed and your unit will now play tracks in a random order.
- To switch random play off press the Random button again. The word 'RANDOM' will disappear from the display.
Programmed Play
You can programme up to 64 tracks to play in any order. The same track can be programmed more than once. Insert a CD and make sure it is stopped.
• Press the Memory/Clock button.
- Press the ▶ or ▶skip buttons to select the folder number you wish to store (MP3/WMA discs only). Press the Memory/Clock button to store the folder.
- Press the ▶ or ▶skip buttons to select the track number you wish to store.
- Press the Memory/Clock button to store the track.
- Repeat this process until you have all your tracks programmed (up to 64).
• To play your programmed tracks pres▶II.

Checking and Changing Programmed Tracks
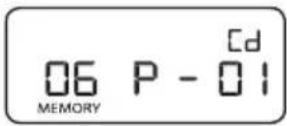
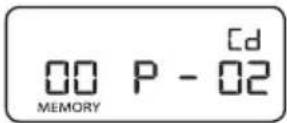
- When the word 'MEMORY' is displayed this shows you have programmed some tracks. To check these tracks press the Memory/Clock button to scroll through the track list.
- To change a track, press the Memory/Clock button until you find the track you want to change, then press the ▶▶ or ▶skip buttons to select another track from the CD.
- The programme will be automatically deleted when you open and close the CD compartment.
This unit can play MP3 and WMA file from a CD or the USB drive.
- Insert an MP3/WMA CD into the CD compartment, or plug your USB stick into the USB socket.
- Press the SOURCE button to select either CD or USB mode.
- Press ▶II to play your music from the first track in the first folder.
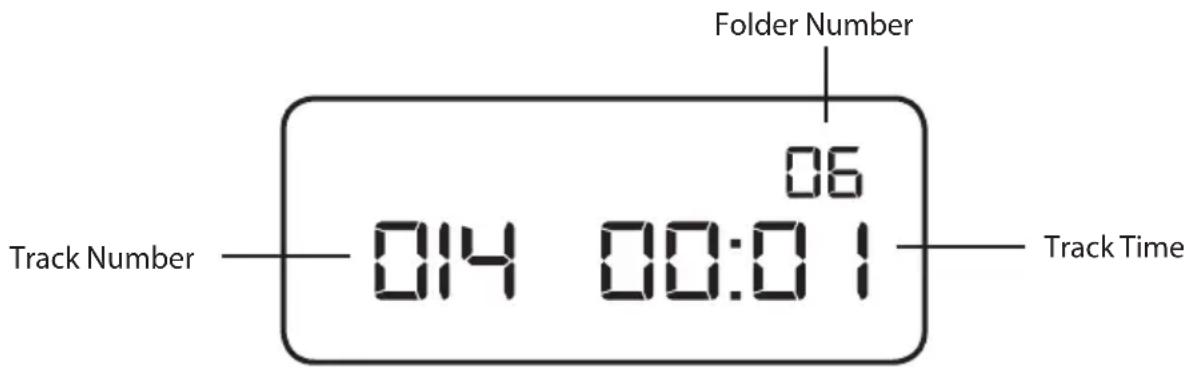
- To select a track from a different folder press PRE + /− to select the folder number.
- Press the Forward or Backwards Skip buttons to select the track number, then press ▶II to play the track.
- To stop the track press the STOP button.
MP3 and WMA files have an ID3-Tag stored on them. This tag stores the music title, artist name and album name. This information can be displayed in this unit. -
Press and hold the ID3 button for 2 seconds while a track is playing. The ID3-Tag information will be displayed. The display will scroll through in the following order:
-
Music Title
- Artist Name
- Album Name
If no information has been stored in the ID3-Tag 'XXX -- NONE' will be displayed.
- To switch the ID3-Tag information off press and hold the ID3 button for 2 seconds. The display will return to the Folder, Track and Track Time display.
iPod/iPhone Playback
You can play music from your iPod or iPhone from this unit. Your iPod or iPhone will charge while docked with your unit if the unit is plugged into the mains.
- Open the iPod docking flap and carefully dock your iPod or iPhone.
- Press the SOURCE button to select iPod mode.
- Press ▶II to play your music from the first track in the first folder.
Navigating Through the iPod Menus
- Press the Menu button repeatedly until you reach the main iPod menu. Pressing the Menu button will always take you to the previous menu.
- Press the PRE + / - button to scroll up or down the menu.
- Press Enter to make a menu selection.

- The unit cannot show any music information of your iPod/iPhone. Please view the music information from your iPod / iPhone display.
- To avoid damaging your iPod / iPhone or the unit, please take care when inserting and removing your iPod / iPhone from the dock.

• If you charge the iPod / iPhone while playing music, it may take a longer time.
• In any time, you can control the iPod / iPhone player on the unit or iPod / iPhone player itself directly.
- Charging function will only work with mains lead connected.
• The iPod / iPhone can be charged when this unit is switched ON or in Standby mode.
Listening to the Radio
- Extend the aerial on the back of the unit.
- Press the SOURCE button to select 'TUNER' mode.
- Press and hold the Forward or Backwards Skip button for a second and the unit will automatically search for the next available radio station. To fine tune the station press the Forward or Backwards Skip buttons.
Storing Radio Stations
Your unit can store up to 30 FM radio stations.
- Tune in the radio station you would like to store as shown above.
- Press the MEMORY / CLOCK button.
- Press the PRE + / - to select the radio station position number (1-30).
- Press the MEMORY / CLOCK button to save the radio station position number.
Repeat the process above to store more radio stations.
-
To listen to a stored radio station make sure you are in 'TUNER' mode. Press the PRE + / - buttons until you find your desired stored station number.
-
To listen to a radio station in 'STEREO' press the ST./MONO button 'ST' will appear in the display. If the signal is weak then press the ST./MONO button again to select 'MONO' this may improve the reception of the radio station.
AUX IN Operation
- Before connecting to the mains socket, use a 3.5mm AUX IN cable (not included) to connect your audio device to the AUX IN socket on the top of the unit.
- Connect the mains cable to the unit and then switch on at the mains socket.
- Press the SOURCE button to select 'AUX' mode.
- Play your auxiliary device.
Maintenance
Cleaning the Unit

Ensure the unit is fully unplugged from the mains socket before cleaning.
• To clean the unit, wipe the case with a slightly moist, lint-free cloth.
• Do not use any cleaning fluids containing alcohol, ammonia or abrasives.
• Do not spray aerosol at or near the unit.
GB
Handling Discs
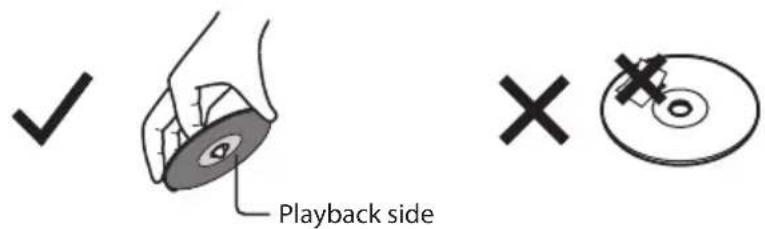
• Do not touch the playback side of the disc.
• Do not attach paper or tape to the disc.
Cleaning Discs
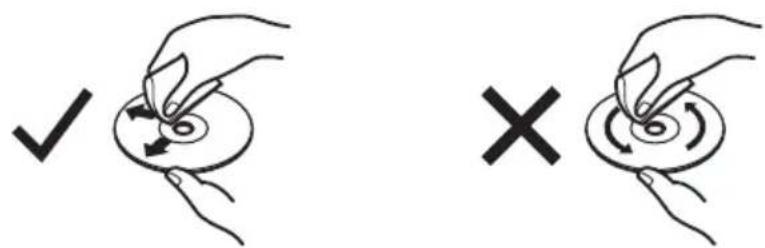
- Fingerprints and dust on the disc cause picture and sound deterioration. Wipe the disc from the centre outwards with a soft cloth. Always keep the disc clean.
- If you cannot wipe off the dust with a soft cloth, wipe the disc lightly with a slightly moistened soft cloth and finish with a dry cloth.
- Do not use any type of solvent such as thinner, benzine, commercially available cleaners or antistatic spray. They may damage the disc.
Storing Discs
• Do not store discs in places subjected to direct sunlight or near heat sources.
- Do not store discs in places subjected to moisture and dust such as a bathroom or near a humidifier.
- Storing discs vertically in a case, stacking discs or placing objects on discs outside of their cases may cause warping.
Hints and Tips
If a problem does occur, it may often be due to something very minor. The following table contains various tips.
| Problem Cause / Solution | |
| PowerSystem does not turn on or does not respond to the remote control. | Make sure mains cable is connected to the mains socket and the unit properly and that it has power.Check that the remote control has a battery. The battery may need to be replaced. |
| iPod/iPhoneThe unit doesn’t play iPod/iPhone files or doesn’t function as expected. | Make sure the iPod/iPhone is connected properly.Standby mode may be activated; press the STANDBY button on the remote control again.Make sure the iPod/iPhone is switched on.Vibrations may have caused the iPod/iPhone to come loose from the docking station.Check no audio cable is plugged in the AUX IN socket. |
| Remote ControlNo functions or short range. | Insert new batteries.Aim remote directly towards the remote sensor.Remove objects between the remote control and the sensor. |
| No soundUnit has no sound. | Sound may be muted. Press Mute or Volume+.An audio cable may be plugged into the AUX IN socket. Remove the cable. |
| Desired station not found | Weak signal. Use the Manual Tune function. |
| Unable to insert USB device | Insert the USB device the other way round. |
| Cannot play some files from USB device | Some USB devices may not be compatible with the unit.Only MP3/WMA file formats are supported. |
| The disc does not play | There is no disc inside the unit (“NO DISC” appears on the display).Insert the disc correctly with the label side facing up.Clean the disc.PAUSEmode may be activated, deactivate it.Condensation may have formed inside the unit due to a sudden change in temperature. Wait about an hour for it to clear and try again. |
| Disc skips | Make sure the unit is on a flat level surface away from any vibration. Vibrations or jarring can cause the disc to skip.The disc may be scratched or dirty, clean the disc. |
Specifications
| Model SICDBB13E / SICDBW13E | |
| Tuner Reception Frequency FM: 88-108MHz | |
| CD PLAYER | |
| Type 2-channel stereo | |
| Sampling Frequency 44.1 kHz | |
| Frequency response 20Hz-20kHz | |
| AC Power AC 100 -240V ~50/60Hz | |
| Speaker Output 4 ohms | |
| Unit Output Power 5W x 2 | |
| Power consumption 15W | |
Features and specifications are subject to change without prior notice.

Fjernkontroll × 1Hovedenhet × 1

Strømledning × 1

Bruksanvisning × 1
Produktoversikt
Boomboks
- Bærehåndtak
- AUX INN
- SOURCE-knapp
- ⏻-knapp
- ▶+/-▶knapp
- FM-antenne
- Plateluke
- USB-kontakt
-
Klokkejust. /Minne/Enter-knapp
-
▶Hopp forover-knapp
- ■Stopp-/menyknapp
- ▶ || Spill/pause-Button
- Hopp bakover-knapp
- iPhone/iPod-kontakt
- LCD-skjerm
- Fjernkontrollsensor
- Mappe + / forhåndsinnstilling +-knapp
Skjerm
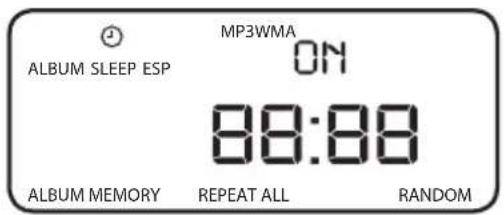
Fjernkontroll

- -knapp
- Lydknapp
- Random/Bass-knapp
- SOURCE-knapp
- Hopp bakover-knapp
- ■Stopp-/menyknapp
-
ID3 /Stereo / Mono-knapp
-
Tidsurknapp
- Sovne / Dempe-knapp
- Minne/klokke/Repetisjons-knapp
- ▶▶Hopp forever -knapp
- ▶Spill/pause/Enter-knapp
- PRE + / - -knapp
- VOL + / --knapp
Sette inn batterier
Fjernkontroll

Behandle batteriet
System for utvidet bass
Bruk av tidsur
Oppbevare plater

Strömkabel x 1

Bruksanvisning x 1
Produktöversikt
Bergsprängare
Hantera batteriet
SE
Timer-hantering
Skivförvaring

Virtakaapeli x 1

Käyttöopas x 1

FI
Kellon asettaminen
Levyjen varastointi

Strømkabel x 1

Opbevaring af diske

Napájecí kabel x 1

Návod k obsluze x 1
Přehled výrobku
Boombox


Manipulace s baterií
Nastavení hodin
Použití časovače
Skladování disků
Sietový kábel, 1 ks


SK
Používanie časovača
Ukladanie diskov
This symbol on the product or in the instructions means that your electrical and electronic equipment should be disposed at the end of its life separately from your household waste. There are separate collection systems for recycling in the EU. For more information, please contact the local authority or your retailer where you purchased the product.
Notes for battery disposal
The batteries used with this product contain chemicals that are harmful to the environment.
To preserve our environment, dispose of used batteries according to your local laws or regulations. Do not dispose of batteries with normal household waste.
For more information, please contact the local authority or your retailer where you purchased the product.
All trademarks are the property of their respective owners and all rights are acknowledged.
SE

"Made for iPod", "Made for iPhone" mean that an electronic accessory has been designed to connect specifically to iPod, iPhone, respectively, and has been certified by the developer to meet Apple performance standards.
Apple is not responsible for the operation of this device or its compliance with safety and regulatory standards.
Please note that the use of this accessory with iPod or iPhone may affect wireless performance.
iPhone, iPod, iPod classic, iPod nano, and iPod touch are trademarks of Apple Inc., registered in the U.S. and other countries.
All other trademarks appearing herein are the property of their respective owners.
- SICDBB13E / SICDBW13E
- DAMAGE
- LOCATION OF UNIT
- TEMPERATURE
- NAKED FLAMES
- MOISTURE
- VENTILATION
- SAFETY
- MAINS CABLE
- INTERFERENCE
- BATTERIES
- SUPERVISION
- DVD
- SERVICE
- MAINTENANCE
- SIKKERHETSADVARSLER
- THANK YOU FOR PURCHASING YOUR NEW SANDSTRØM CD PORTABLE STEREO
- UNPACKING
- PRODUCT OVERVIEW
- REMOTE CONTROL
- INSERTING BATTERIES
- BOOMBOX
- HANDLING THE BATTERIES
- HANDLING THE REMOTE CONTROL
- REMOTE CONTROL OPERATION RANGE
- CONNECTING TO THE MAINS SUPPLY
- MAINS POWER
- SETTING THE CLOCK
- GENERAL OPERATION
- SWITCHING ON / OFF
- SELECTING FUNCTIONS
- ADJUSTING THE VOLUME
- ADJUSTING THE SOUND EFFECT
- BASS EXPANDER SYSTEM
- SLEEP TIMER
- TIMER OPERATION
- BEFORE SETTING THE TIMER
- GB
- SETTING THE TIMER
- CD PLAYER
- PLAYING A CD
- SKIPPING AND SEARCHING
- REPEAT PLAY
- FUNCTIONS
- RANDOM PLAY
- PROGRAMMED PLAY
- CHECKING AND CHANGING PROGRAMMED TRACKS
- IPOD/IPHONE PLAYBACK
- NAVIGATING THROUGH THE IPOD MENUS
- LISTENING TO THE RADIO
- STORING RADIO STATIONS
- AUX IN OPERATION
- CLEANING THE UNIT
- HANDLING DISCS
- CLEANING DISCS
- STORING DISCS
- HINTS AND TIPS
- SPECIFICATIONS
- PRODUKTOVERSIKT
- FJERNKONTROLL
- SETTE INN BATTERIER
- BEHANDLE BATTERIET
- SYSTEM FOR UTVIDET BASS
- BRUK AV TIDSUR
- OPPBEVARE PLATER
- PRODUKTÖVERSIKT
- HANTERA BATTERIET
- TIMER-HANTERING
- SKIVFÖRVARING
- KELLON ASETTAMINEN
- LEVYJEN VARASTOINTI
- OPBEVARING AF DISKE
- PŘEHLED VÝROBKU
- MANIPULACE S BATERIÍ
- NASTAVENÍ HODIN
- POUŽITÍ ČASOVAČE
- SKLADOVÁNÍ DISKŮ
- SK
- POUŽÍVANIE ČASOVAČA
- UKLADANIE DISKOV
- NOTES FOR BATTERY DISPOSAL
- SE
Brand : Sandstrøm
Model : SICDBW13E
Category : Hi-Fi System