
MDF100E - Deep fryer MATSUI - Free user manual and instructions
Find the device manual for free MDF100E MATSUI in PDF.


| Product Type | Deep Fryer |
| Brand | Matsui |
| Model | MDF100E |
| Power Rating | 1500W (230V) / 1600W (240V) |
| Voltage | 230-240V ~ 50/60Hz |
| Oil Capacity | Between MIN and MAX marks (approx. 1.5-2.0 L) |
| Temperature Control | Variable, up to 190°C |
| Frying Basket | Removable, with handle and release button |
| Lid | Removable, with viewing window and filter |
| Filter | Replaceable, located under steam vents |
| Indicators | Power indicator and READY temperature indicator |
| Material | Plastic body, metal basket |
| Viewing Window | Yes, in lid |
| Cleaning | Wash basket and lid in soapy water; wipe exterior; do not immerse main unit |
| Safety Features | Auto-off when temperature control set to OFF; safety instructions for chip pan fires |
| Usage | Domestic use only |
| Weight | Approx. 3.0 kg |
Frequently Asked Questions - MDF100E MATSUI
User questions about MDF100E MATSUI
0 question about this device. Answer the ones you know or ask your own.
Ask a new question about this device
Download the instructions for your Deep fryer in PDF format for free! Find your manual MDF100E - MATSUI and take your electronic device back in hand. On this page are published all the documents necessary for the use of your device. MDF100E by MATSUI.
USER MANUAL MDF100E MATSUI
natural_image
Line drawing of a toaster oven with a circular frame (no text or symbols)Contents
GB
Unpacking and Preparing Your Fryer for Use......5
Product Overview....5
Positioning the Fryer....6
Operation......6
Cooking Home-battered Foods......8
Hints on Using Your Fryer 8
Cleaning & Maintenance 9
Frying Guidelines 10
When Cooking has been Completed....10
Troubleshooting....11
Specifications....11
Safety First! 47
Innhold
NO
Unpacking and Preparing Your Fryer for Use
- Remove all packaging from the unit. Retain the packaging. If you dispose of it please do so according to local regulations.
- Open the fryer by pressing the Open-Lid button.
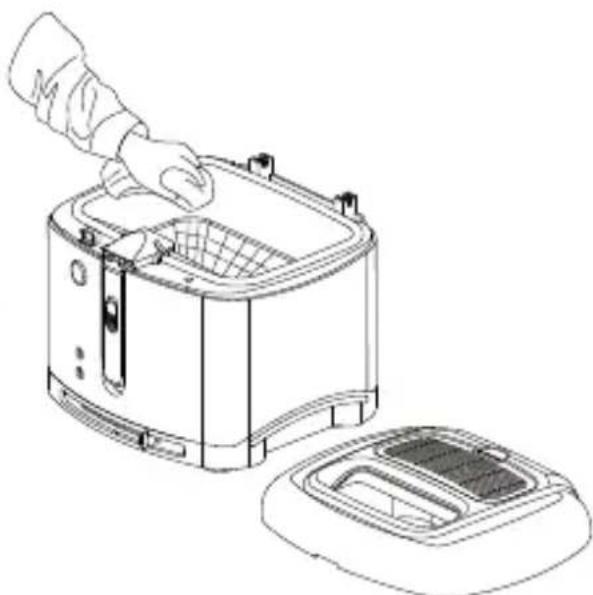
- Remove the lid and frying basket. Wash the basket in warm soapy water. Wipe the lid and container with a damp cloth.

• The lid may be washed in soapy water but remove the filter before doing so.
- The container should NEVER be immersed in water. Ensure all parts are completely dry before use.
Product Overview

- Open Lid Button
- Frying Basket Handle Release Button
-
Power Indicator
-
READY - Temperature Indicator
- Temperature Controller
-
Lid (removable)
-
Viewing window
- Frying Basket
- Oil Tank
- Frying Basket Handle
Positioning the Fryer
- Place the fryer on a firm, flat, heat-resistant work surface.
- To avoid possible marking or damage to anything around the fryer, and to avoid possible fire hazards, keep the area above and around the fryer clear.
- Do not put the fryer or the mains cable close to any other cooking or heating appliances. Do not place above the stove.
Operation
- Make sure that the appliance is unplugged and switched off.
- Press the Open-Lid button.
-
Remove the frying basket and fill the oil tank with oil until the level is between the MIN and MAX level marks shown on the inside of the tank. Check the level of oil before using the fryer on each separate occasion.
-
Put the food that you wish to fry into the basket.

- Ensure that the basket is not overloaded!
- Ensure that all ice is removed from the frozen food!
-
Ensure that all water has been thoroughly drained from your food before frying!
-
Ensure the Temperature Controller is set to the Off position. Plug the unit into a standard mains socket (230-240V) and switch the power on.
- Slide the Temperature Controller to the desired temperature. The Power Indicator and the READY-Temperature Indicator will light up.
- When the set temperature has been reached the READY-Temperature Indicator will switch off.
- Open the lid and lower the frying basket containing the food to be fried carefully into the oil tank. Ensure that the handle is locked in place facing upwards and the basket is located above the hot oil.
- Close the lid. Lower the frying basket into the hot oil by pulling back the Handle Release Button and slowly lowering the handle.

Never leave the unit unattended while cooking!
- The viewing window in the lid will allow you to see the cooking progress of the food is making without opening the lid. It is normal for steam to cloud the window for a short time at the start of the frying process but this will gradually disappear.

During frying you may hear slight clicking noises and you may see the READY-Temperature Indicator going on and off several times. This indicates that the temperature is being maintained and is quite normal. Hot steam may also escape through the filter in the top of the lid. This is also a normal occurrence.

natural_image
Line drawing of a toaster with steam rising from the top (no text or symbols)- At the end of the frying time (the frying time is specified on the package of the food or in the recipe) carefully open the lid. Lift up the frying basket using the handle.

When opening the fryer lid, hot steam will be released.

natural_image
Line drawing of a hand pressing a toaster with steam rising from the top (no text or symbols)-
Let the oil drain from the fried food.
-
To switch off the unit, slide the Temperature Control to OFF and unplug the mains plug.

- Allow time for your fryer to heat up to the proper temperature again if you are frying more than one basket of food. Let your fryer cool down completely (approx. 2 hours) before attempting to move it and always unplug the plug from the mains socket when you have finished frying.
• Do not carry or move the fryer if the oil is still hot. - Choose the right frying temperature and check the condition of the food to be fried.
- The frying basket must not be more than two-thirds full. Do not overfill the basket. Dry wet foods with a cloth before frying.
Cooking Home-battered Foods

This method requires extreme care.

- Coat the food in batter and leave it to drain to remove any excess batter.
- Ensure the correct cooking temperature has been reached.
- Follow the steps (3) to (13) of the "OPERATION" section.
Hints on Using Your Fryer
• Use a recommended oil - do not mix oils.
• Take into account the type of food when you set the frying temperature. Generally, pre-cooked foods need a higher cooking temperature than raw foods.
- If you need to add oil, do so between batches. Allow a short time for the oil to heat up to the right temperature.
- Ensure there is enough room to open the appliance lid and operate the frying basket.
- Cook food thoroughly. Remember that the food may have turned golden brown before it has cooked through.
- Use the fryer in well ventilated conditions. All food contains moisture which turns to steam during frying. Most of this steam escapes through the filter in the lid. Be careful when opening the lid as steam may still be present and it may scald.
- Do not lean over the fryer when cooking food or when opening the lid.
- Check the progress of the food through the viewing window.
Cleaning & Maintenance
Filtering and changing the oil
Make sure that the fryer is completely cool and unplugged. On average, oil can be used 8 to 12 separate times before it will need to be changed. If you are frying fish or battered foods then you will need to change the oil more often. Filter the oil to get rid of any food that has fallen into the oil.
Cleaning
Clean your fryer thoroughly after every use once your fryer has cooled down. Remove the lid and frying basket. Wash the basket in warm soapy water. Wipe the lid and container with a damp cloth.

- The lid may be washed in soapy water but remove the filter before doing so.
- The main unit must NEVER be immersed in water. Ensure all parts are completely dry before use.
natural_image
Line drawing of a kitchen toaster with handle and lid, showing internal components (no text or symbols)Storing the oil
Store the oil in an air tight container at room temperature away from heat and light sources.
Changing the filter

The filter is located under the steam vents.
• The filter is located under the steam vents on the underside of the lid.
- The life of the filter depends on the type of food fried. On average, you should replace the filter after about 15 separate uses. Always make sure the plastic grill which covers the filter is clipped properly back into position on the lid after you have changed the filter.
• Never use the fryer without a filter fitted.
When Cooking has been Completed
Return the basket to the fryer, shift the Temperature Controller to the "OFF" position. Switch of the mains socket and unplug the fryer. Remove the mains cable and store it in a suitable place. Now leave the appliance to completely cool before cleaning.
GB

If you are using solid fat, remove the basket from the fryer before the fat in the tank solidifies. Wash the basket in hot soapy water. Take great care as the fat may splatter when it comes into contact with the water. Alternatively, leave the basket on a heatproof surface to cool after removing if from the fryer.
Frying Guidelines
The frying times stated in these charts are a guide only. Frying times will vary depending on the size of food pieces, spacing of the food in the frying basket, freshness of the food and personal taste. As you become familiar with your fryer you can adjust cooking times to suit your personal preference. For larger or smaller quantities adjust the time accordingly.
Please refer to cooking times on the food packaging.
| Food Amount Temp. Time | |||
| Frozen Chips (thin) | 500g 190°C 5-7 mins | ||
| Frozen Chips (chunky) | 500g 190°C 8-10 mins | ||
| Frozen fish Fingers | 6 pieces 190°C 3-5 mins | ||
| Frozen fish 500g (2 pieces) | 170°C 15 mins | ||
| Fresh Chips 550g 190°C 3-5 mins |

Remember to pre-heat the oil. Preheating at 190^ C will normally take about 8-9 minutes.
Troubleshooting
| Problem Solution | |
| Oil overflows | |
| Not changing the oil regularly enough.The food basket is overloaded.The oil is filled to above the MAX mark.The oil is reacting with frozen or wet food. | Change the oil after about every 8-12 separate uses.Do not fill the food basket above the rim.Ensure the oil level is frying between the MIN and MAX marks.Dry out the food or remove any frost before frying. |
| The fryer does not work | |
| It is not plugged in.Temperature controller is in the OFF position. | Make sure your fryer is plugged in and that the cord is in good working order.Turn the temperature regulator to the desired temperature. |
| Food is not frying properly | |
| Basket may be overloaded.Food may be too thick or have too much ice on it.Oil temperature may not be set high enough.Frying time may not be long enough. | Reduce the amount of food in the basket.Scrape off the ice and cut up any big pieces of food.Set the Temperature Controller to a higher temperature.Fry the food for a longer time, and / or refer to the recipe for the appropriate cooking time. |
Specifications
| Power: | 230V - 1500W240V - 1600W |
Features and specifications are subject to change without prior notice.
natural_image
Line drawing of a toaster with steam rising from the top (no text or symbols)natural_image
Line drawing of a hand pressing a grater with steam rising (no text or symbols)natural_image
Line drawing of a kitchen toaster with handle and lid, no text or symbols presentOppbevare oljen
Oppbevar oljen i en lufttett beholder ved romtemperatur borte fra varme- og lyskilder.
Bytte filteret

Filteret sitter under dampventilene.
natural_image
Line drawing of a toaster with steam rising from the top (no text or symbols)SE
natural_image
Line drawing of a hand using a toaster to press or smoke from a tray (no text or symbols)natural_image
Line drawing of a kitchen toaster with handle and lid, no text or symbols presentFörvaring av oljan
natural_image
Line drawing of a toaster with steam rising from the top (no text or symbols)natural_image
Line drawing of a hand pressing a griddle into a toaster (no text or symbols)natural_image
Line drawing of a kitchen toaster with handle and lid, showing internal components (no text or symbols)natural_image
Line drawing of a toaster with steam rising from the top (no text or symbols)natural_image
Line drawing of a hand pressing down on a toaster with steam rising (no text or symbols)natural_image
Line drawing of a kitchen toaster with handle and lid, no text or symbols presentOpbevaring af olien
natural_image
Line drawing of a toaster with steam rising from the top (no text or symbols)natural_image
Line drawing of a hand using a toaster to press or smoke from a tray (no text or symbols)natural_image
Line drawing of a toaster oven with a hand placing the lid on top (no text or symbols)Skladování oleje
- Tlačidlo na otvorenie veka
-
Tlačidlo na uvoľnenie rukoväti fritovacieho košíka
-
Indikátor napájania
- Indikátor teploty – READY
- Regulátor teploty
-
Veko (snímatelné)
-
Priezor
- Fritovací košík
- Nádoba na olej
- Rukovät fritovacieho košíka
Umiestnenie fritézy
natural_image
Line drawing of a toaster with steam rising from the top (no text or symbols)natural_image
Line drawing of a hand pressing a toaster with steam rising from the top (no text or symbols)natural_image
Line drawing of a kitchen toaster with handle and lid, no text or symbols presentSK
Uskladnenie oleja
This is not sealed unit. Overflowing of hot oil may occur if incorrectly used. Please read the instruction book carefully before using. Do not overfill the oil container. Do not put heavily iced food or wet food into hot oil.
- Do not touch any hot surface, use the handles provided.
• To protect against electrical shock, do not immerse power cord, plugs, or this appliance in water or any other liquids. - This appliance is not to be used by children.
- Unplug from the mains supply when not in use and before cleaning the appliance.
- Do not operate any appliance with a damaged power cord or plug or if it has been damaged in any manner.
- The use of accessory attachments which have not been recommended may cause injuries.
- Do not use outdoors.
- Do not move the fryer when it is turned on or when it contains hot oil.
- Dry foods as thoroughly as possible before lowering into the hot oil as water and frost on foods will result in high oil splattering during the cooking cycle.
- Your fryer is designed for domestic se only and should not be used for commercial purposes.
• Do not use on a soft or unsteady surface. - Do not use your fryer under wall cupboards and keep away from curains and similar fittings. Never leave the appliance unattended while in use.
• Do not attempt to fry with butter, margarine or olive oil.
• Do not leave unattended while in use.
- Do not attempt to remove fried foods from the basket with your hands or anything other than the proper utensils.
- Keep the lid tightly closed during use.
- Please fill the basket outside the deep fat fryer in order to prevent splashes.
- Do not use the fryer without the frying basket, without oil or with an insufficient oil level (below MIN or above MAX.)
Chip Pan fires
- The two main causes or fryer fires are the oil overheats and catches fire spontaneously or the oil spills over because either it has been filled past the MAX mark or the food inside is wet causing the oil to bubble up and overflow.
• If your deep fat fryer should catch fire:
- Raise the alarm to make sure that everyone in the household is aware of the fire. Call the Fire Brigade.
• Turn off the heat source to the pan, if it is safe to do so! - Do not reach over the pan to get at the controls.
• Do not attempt to move the pan. - Never put water anywhere near the fire! - the consequences could be disastrous.
- This type of fire is extinguished by placing a cover over the pan. This could be the lid, a fire blanket ot a damp (not wet) tea towel. CONSIDER YOUR OWN SAFETY FIRST!

natural_image
Symbol of a trash bin crossed with a diagonal line, no text or numbers presentGB
This symbol on the product or in the instructions means that your electrical and electronic equipment should be disposed at the end of its life separately from your household waste. There are separate collection systems for recycling in the EU.
For more information, please contact the local authority or your retailer where you purchased the product.
NO
- Contents
- Innhold
- Unpacking and Preparing Your Fryer for Use
- Product Overview
- Positioning the Fryer
- Operation
- Cooking Home-battered Foods
- Hints on Using Your Fryer
- Cleaning & Maintenance
- Filtering and changing the oil
- Cleaning
- Storing the oil
- Changing the filter
- When Cooking has been Completed
- Frying Guidelines
- Troubleshooting
- Specifications
- Oppbevare oljen
- Bytte filteret
- Förvaring av oljan
- Opbevaring af olien
- Skladování oleje
- Umiestnenie fritézy
- Uskladnenie oleja
- Chip Pan fires
- GB
- NO
Brand : MATSUI
Model : MDF100E
Category : Deep fryer