ZSM2101X - Grill Zelmer - Free user manual and instructions
Find the device manual for free ZSM2101X Zelmer in PDF.

| Product Type | Sandwich Maker with Interchangeable Plates |
| Model | ZSM2101X |
| Brand | Zelmer |
| Interchangeable Plates | 3 sets: for sandwiches, waffles, and grilling |
| Non-stick Coating | Yes, special layer prevents sticking |
| Indicator Lights | Red (power on), Green (heater on) |
| Power | Approx. 800 W (typical for similar models) |
| Voltage | 230 V AC, 50 Hz (as per nameplate) |
| Dimensions (approx.) | 25 x 25 x 10 cm |
| Weight (approx.) | 2 kg |
| Cord Length | Approx. 80 cm |
| Cord Storage | Yes, rewinding handle at bottom |
| Cool-touch Handle | Yes |
| Safety Features | Automatic shut-off not specified; requires supervision |
| Cleaning | Wipe with damp cloth; plates washable in water with mild detergent |
| Intended Use | Household, indoor use only |
| Accessories | 3 pairs of interchangeable plates (sandwich, waffle, grill) |
| Repairability | Repairs by qualified personnel only |
| Spare Parts | Contact authorized service center |
| Warranty | Standard manufacturer warranty (specific period not given) |
| Package Contents | Sandwich maker, 3 plate sets, user manual |
Frequently Asked Questions - ZSM2101X Zelmer
User questions about ZSM2101X Zelmer
0 question about this device. Answer the ones you know or ask your own.
Ask a new question about this device
Download the instructions for your Grill in PDF format for free! Find your manual ZSM2101X - Zelmer and take your electronic device back in hand. On this page are published all the documents necessary for the use of your device. ZSM2101X by Zelmer.
USER MANUAL ZSM2101X Zelmer
/ sandwich maker with
interchangeable plates
zelmer

natural_image
Front view of a black and white Zelmer VR headset with a red indicator light and warning symbol (no readable text or symbols beyond branding)PL INSTRUKCJA UŻYTKOWANIA
OPIEKACZ Z WYMIENNYMI
WKŁADKAMI 2–6
CZ NÁVOD K POUŽITÍ
SENDVIČOVAČ S VÝMĚNNÝMI
DESKAMI 7–11
SK NÁVOD NA OBSLUHU
SENDVIČOVAČ S VÝMENNÝMI
VLOŽKAMI 12–16
HU HASZNÁLATI UTASÍTÁS
SZENDVICSSÜTŐ CSERÉLHETŐ
BETÉTEKKEL 17–21
RO INSTRUCTIUNI DE UTILIZARE
APARAT PENTRU SANDVIŞURI
CU PLĂCI DETAŞABILE 22–26
ИНСТРУКЦИЯ ПО ЭКСПЛУАТАЦИИ
ТОСТЕР СО СМЕННЫМИ
ФОРМАМИ 27–31
BG ИНСТРУКЦИЯ ЗА УПОТРЕБА
ТОСТЕР СЪС СМЕНЯЕМИ
ПЛОЧИ 32–36
UA ІНСТРУКЦІЯ З КОРИСТУВАННЯ
ТОСТЕР ЗІ ЗМІННИМИ
ФОРМАМИ 37–41
EN USER MANUAL
SANDWICH MAKER WITH
INTERCHANGEABLE PLATES 42–46
natural_image
Close-up of a black plastic tray with a white arrow pointing to a small component on the side (no text or symbols visible)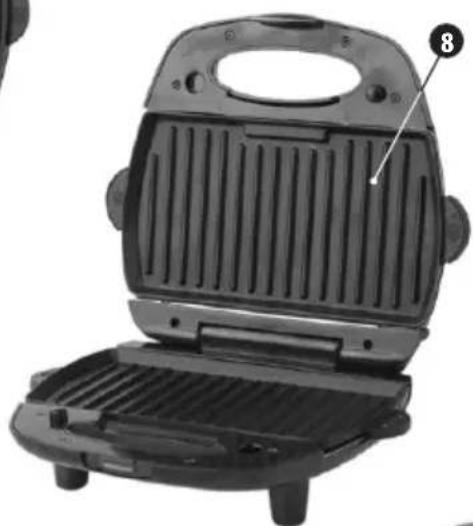
natural_image
Interior view of a grater with visible grille and side legs (no text or symbols)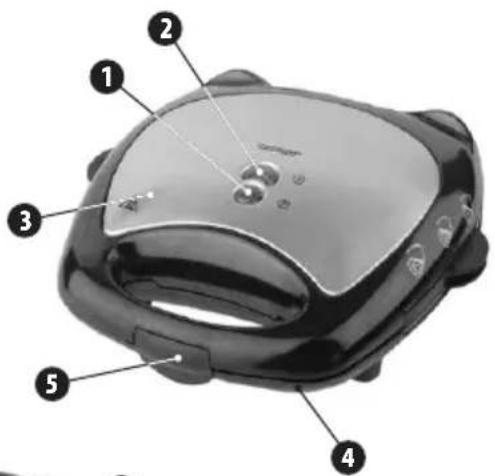
natural_image
Black-and-white photo of a flat-screen grater with open lid and side legs, showing internal geometric patterns (no text or symbols)natural_image
Close-up of a black metal tray with a white arrow pointing to a small component on the side (no text or symbols visible)Funkce a obsluha
natural_image
Close-up of a black plastic door with a white arrow pointing to a small component on the side (no text or symbols visible)Obsluha a fungovanie sendvičovača
natural_image
Close-up of a black plastic door with a white arrow pointing to a small piece of wood or metal (no text or symbols visible)Montarea/demontarea componentelor
natural_image
Close-up of a black plastic tray with a white arrow pointing to a small piece of material (no text or symbols visible)natural_image
Close-up of a black plastic door with a white arrow pointing to a small piece, no visible text or symbols.natural_image
Close-up of a black plastic door with a white arrow pointing to a slot on the side panel (no text or symbols visible)natural_image
Close-up of a black plastic door with a white arrow pointing to a slot on the side panel (no text or symbols visible)Congratulations on your choice of our appliance, and welcome among the users of Zelmer products.
Please read this instruction manual carefully. Pay special attention to important safety instructions. Keep this instruction manual for future reference.
Safety precautions
Read this entire manual carefully before using the appliance.

DANGER! / WARNING!
Risk of injury
• Always use the appliance on a dry and stable work surface.
- Do not operate the appliance, when you find the supplying cord damaged or when the casing or heating plates are visibly damaged. Check the appliance visually before each operation.
- If the supply cord is damaged, it must be replaced by the manufacturer, its service agent or similarly qualified persons in order to avoid a hazard.
- The appliance can be repaired by qualified staff only. Incorrectly performed repair may cause serious hazard to the user. In case of any defects, it is advised to return the appliance to an authorised service facility.
- Do not touch hot surfaces. Handle with care as the appliance may generate hot steam when operating. Be careful with the handle of the heating plates, they are hot during operation! Risk of burns!
- Never immerse the sandwich maker (or any part of it), supply cord and/or plug in water or any other liquid to avoid the risk of electric shock.
- This appliance can be used by children aged from 8 years and above and persons with reduced physical, sensory or mental capabilities or lack of experience and knowledge if they have been given supervision or instruction concerning use of the appliance in a safe way and understand the hazards involved.
Children shall not play with the appliance. Cleaning and user maintenance shall not be made by children unless they are older than 8 and supervised.
- Keep the appliance and its cord out of reach of children less than 8 years.
- Switch off and unplug the appliance before you exchange the heating plates, and wait until the heating plates cool down.
- When not in use and/or before cleaning, unplug the appliance from the socket and allow it to cool down.
- Do not cover the sandwich maker with or put into it packaging made of metal foil or other materials, as it involves a risk of electric shock or fire.
- The temperature of accessible surfaces may be high when the appliance is operating. Do not touch
the surface marked with the symbol.


WARNING!
Risk of property damage
The appliance must be plugged only to an alternating current socket with power corresponding to the power stated on the name plate of the appliance.
Never unplug or move the appliance by pulling the supply cord.
Do not drag the supply cord over sharp edges. Do not let it bend.
Never let the supply cord hang over sharp edges of a table or worktop. Do not let it touch hot surfaces or be knotted.
The appliance is not intended to be operated by means of an external timer or separate remote-control system.
Never leave the appliance unattended when in use as bread may burn.
It is best to remove toasted bread with wooden, dull-edged utensils. Metallic objects such as knives, forks, etc. may damage cooking plates.
Never place the appliance on or near gas or electric cookers or in places where it might touch a hot oven or microwave.
Never cover the appliance when it is hot or connected to the mains supply.
Use original accessories (plates) only recommended by the manufacturer.

Information on the product and hints on its use
The appliance is intended solely for household use, indoors.
Technical parameters
The sandwich maker technical parameters are included at the name plate.
The appliance characteristics
The sandwich maker provides possibility to prepare hot sandwiches with stuffing, wafers and can be used for grilling. You can toast one or two sandwiches of toast bread. Three exchangeable heating plates are covered with a special layer, which prevents the toasted products against sticking to the heating surface. The sandwich maker comprises two pilot lights, signalling:
- red - connection to the mains supply,
- green - the heater is on.
Appliance elements
1 Red pilot light
2 Green pilot light
3 Upper casing
4 Lower casing
5 Hook
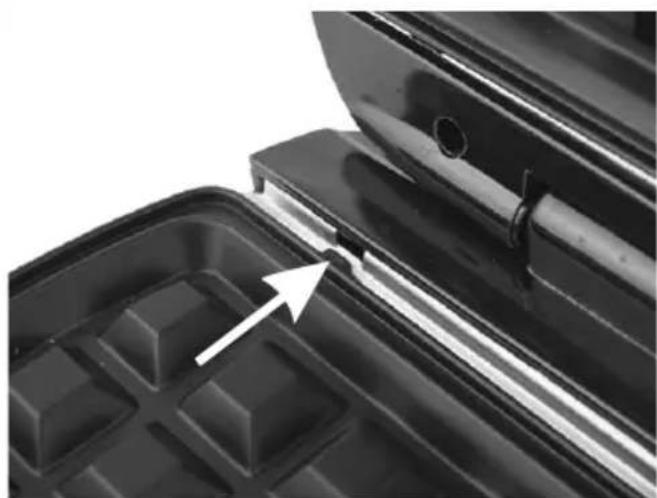
6 Releasing button (a – upper, b – lower)
7 Heating plates for wafers
8 Heating plates for grilling
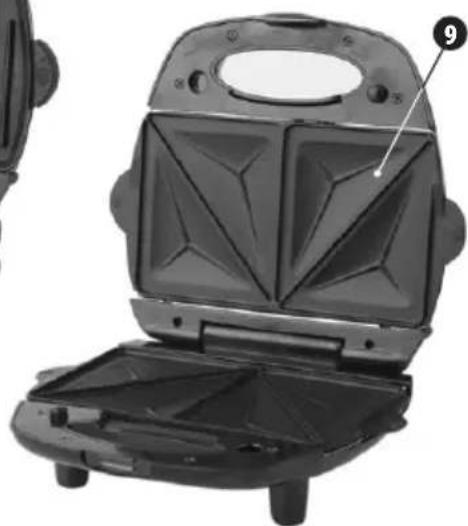
9 Heating plates for sandwiches


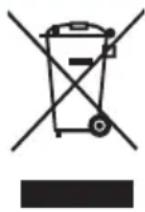
Assembling and disassembling of heating plates
Removing heating plates
Remove the lower heating plate holding the handles from both sides and pressing the releasing button (6).
Remove the upper heating plate holding the handles from both sides and pressing the releasing button (6).
Inserting heating plates
Insert two protrusions of the plate into the grooves in the rare part of the base or the cover, and then press the plate towards the base, until it clicks. Make sure the heating plates are properly assembled.
natural_image
Close-up of a black plastic tray with a white arrow pointing to a small piece of material (no text or symbols visible)Handling and operation
Before first usage:
remove form the package,
check if the voltage on the nameplate corresponds with the voltage of the mains,
clean the appliance wiping the outer and inner surface with a damp cloth or paper towel; wash the plates in water with a gentle detergent (see "Cleaning and maintenance"),
assemble the dried plates in the appliance,
switch it on for approximately 15 minutes in order to remove all remains from manufacturing process. Switch off the sandwich maker then, and let it cool down completely and wash the plates again.
For further usage:
place the sandwich maker on dry, flat surface near the mains supply outlet,
when you toast first time on given day, cover carefully all the surface of both plates with vegetable oil or melted roasting fat using the brush for dough, before you start, then heat the appliance,
insert the plug into the mains supply outlet (both pilot lights –red and green – shall glow),
wait until the green light is off (it lasts about 3–5 minutes), which means that heating plates reached the toasting temperature,
since then the green light shall go on and off – which means that the sandwich maker keeps the desired toasting temperature.
Preparing the sandwiches (heating plates for sandwiches)
open the sandwich maker,
put the slice of toast bread, app. 1 cm trick with its buttered side to the lower plate,
put other ingredients on the slice,
cover the ingredients with the second slice of bread with buttered side to the top, and close the toaster carefully.
In case it is difficult to close the sandwich maker, remove the exceeding ingredients. The sandwich maker can not be closed by force, as it can result in damage.
open the sandwich maker after some minutes (the toasting time depends on the recipe you apply to prepare the products and on the user's likes) and carefully remove the toasted sandwich.
Preparation of wafers (heating plates for wafers)
when you toast first time on given day, cover carefully all the surface of both plates with vegetable oil or melted roasting fat using the brush for dough, before you start, then heat the appliance,
pour the dough on exactly on the centre of the wafer plate, so that it covers the lower plate and distribute it evenly on whole surface,
close the cover, but do not lock the hook (closing the hook does not allow the wafers grow),
bake the wafers about 7–10 minutes, do not open the toaster during first minute of baking,
when the wafers are ready, remove them carefully, not to touch the heating surface with a sharp, pointed or metal object.
Preparation of grill (heating plates for grilling)
cover carefully all the surface of both plates with vegetable oil or melted roasting fat using the brush for dough, before you start, then heat the appliance,
put the products on the lower heating plate and close the cover. The sandwich maker can not be closed by force, as it can result in damage.
after some minutes (the toasting time depends on the recipe you apply to prepare the products and on the user's likes) open the sandwich maker and remove the grilled products carefully.
When removing the products from the sandwich maker please be careful:
not to get burnt – the heating plate and the handles are hot!,
not to damage the surface of the heating plates – it is necessary to use wooden or plastic utensils, resistant for high temperature,
switch off the sandwich maker after toasting, unplugging it from the mains supply outlet,
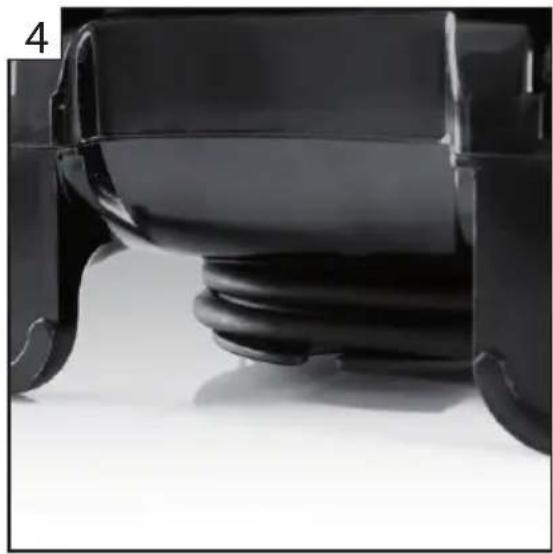
rewind the supplying cord at the special handle located at the bottom of the sandwich maker.

careful with eating the sandwiches directly after toasting, not to get burnt, as the sandwiches, stuffing or other ingredients can be hot.
Cleaning and maintenance
The sandwich maker does not require any special maintenance.
Keep the sandwich maker clean as it is in contact with food.
Unplug and cool down completely before cleaning.
At first wipe the sandwich maker with a soft and a bit damp cloth and the dry it with a dry, clean cloth.
Do not use the cleaning agents, which can scratch or damage the external surfaces and the protective layer of heating plates.
After each usage remove the accumulated crumbs and wipe the surface of the heating plates with a paper towel to absorb and remove the fat accumulated during roasting.
Ecology – Environment protection
Each user can protect the natural environment. It is neither difficult nor expensive.
In order to do it: put the cardboard packing into recycling paper container; put the polyethylene (PE) bags into container for plastic.
When worn out, dispose the appliance to particular disposal centre, because of the dangerous elements of this appliance, which can be hazardous for natural environment.
Do not dispose the appliance with the municipal waste!
The manufacturer does not accept any liability for any damages resulting from unintended use or improper handling.
The manufacturer reserves his rights to modify the product any time in order to adjust it to law regulations, norms, directives, or due to construction, trade, aesthetic or other reasons, without notifying in advance.
Notes
natural_image
Stacked black plastic grates with ribbed lids, no visible text or symbols
natural_image
Close-up of a robotic food processor with visible control buttons and motion lines (no readable text or symbols)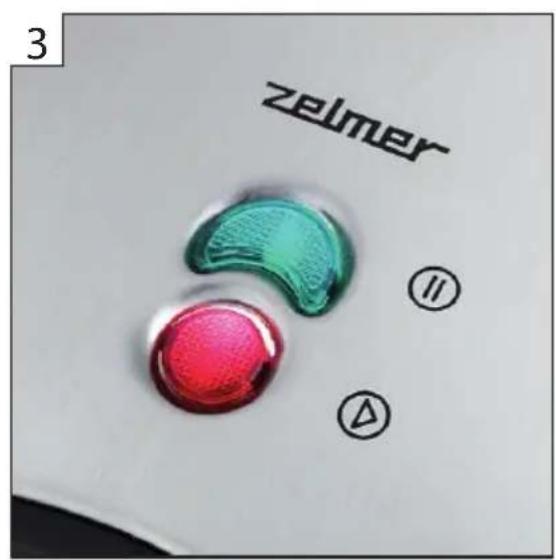
natural_image
Close-up of a black plastic car seat with visible tread and cushion (no text or symbols)PL 1. 3 wymienne komplety wkładek: do kanapek, gofrów i grillowania 2. Nienagrzewający się uchwyt 3. Lampki sygnalizacyjne 4. Schowek na przewód
CZ 1. 3 výměnné desky: sendvičovač, vaflovač a gril
2. Termoizolační madlo 3. Signalizační kontrolky
4. Prostor pro kabel
SK 1. 3 výmenné vložky: sendvičovač, vaflovač a gril
2. Nezohrievajúci sa držiak 3. Signalizačné kontrolky 4. úložný priestor na napájací kábel
HU 1. 3 cserélhető betét: szendvicssütő, gofri sütő és grill 2. Hőszigetelt fogantyú 3. Jelzőlámpák 4. Kábeltartó
RO 1. 3 plăci interschimbabile: sandvișuri, vafe și gril
2. Mânerul nu se încălzește 3. Indicatoare de semnalizare 4. Locaș pentru cordonul de alimentare


- zelmer
- Funkce a obsluha
- Obsluha a fungovanie sendvičovača
- Montarea/demontarea componentelor
- Safety precautions
- DANGER! / WARNING!
- Risk of injury
- WARNING!
- Risk of property damage
- Information on the product and hints on its use
- Technical parameters
- The appliance characteristics
- Appliance elements
- Assembling and disassembling of heating plates
- Removing heating plates
- Inserting heating plates
- Handling and operation
- Before first usage:
- For further usage:
- Preparing the sandwiches (heating plates for sandwiches)
- Preparation of wafers (heating plates for wafers)
- Preparation of grill (heating plates for grilling)
- When removing the products from the sandwich maker please be careful:
- Cleaning and maintenance
- Ecology – Environment protection
- Notes
Brand : Zelmer
Model : ZSM2101X
Category : Grill