
MTG-5825 - Microwave Concept - Free user manual and instructions
Find the device manual for free MTG-5825 Concept in PDF.


| Product Type | Microwave oven with grill |
| Brand | Concept |
| Model | MTG-5825 |
| External Dimensions (W x H x D) | 513 mm x 305 mm x 414 mm |
| Internal Dimensions (W x H x D) | 328 mm x 206 mm x 350 mm |
| Internal Capacity | 25 L |
| Weight | 14.5 kg |
| Voltage / Frequency | 230 V ~ 50 Hz |
| Power Input | 1450 W |
| Microwave Power | 900 W |
| Microwave Frequency | 2450 MHz |
| Grill Power | 1000 W |
| Tray Diameter | 315 mm |
| Noise Level | < 63 dB(A) |
| Functions | Microwave, Grill, Combi, Auto Reheat, Weight/Time Defrost, Quick Start, Multiphase Cooking, Delayed Start, 8 Auto Menus |
| Control Type | Electronic touch control with rotary dial |
| Child Lock | Yes, hold STOP/CLEAR button |
| Safety Features | Grounding required, automatic shut-off, door interlock, overheat protection |
| Cleaning and Maintenance | Clean after each use; do not immerse in water; use mild detergent; avoid abrasives |
| Repair and Service | Contact authorized service center for any internal repairs or bulb replacement |
| Warranty Note | Failure to follow instructions may void warranty |
Frequently Asked Questions - MTG-5825 Concept
User questions about MTG-5825 Concept
0 question about this device. Answer the ones you know or ask your own.
Ask a new question about this device
Download the instructions for your Microwave in PDF format for free! Find your manual MTG-5825 - Concept and take your electronic device back in hand. On this page are published all the documents necessary for the use of your device. MTG-5825 by Concept.
USER MANUAL MTG-5825 Concept
MTG5825
CZ
SK PL RUHU
LVEN DE RO
PODĚKOVÁNÍ
POPIS OVLÁDACÍHO PANELU
POPIS OVLÁDACIEHO PANELA
OPIS PANELU STEROWNICZEGO
A MÜKÖDTETÖPANEL LEÍRÁSA
TRAUCĚJUMU NOVĚRŠANA
Thank you for purchasing a Concept product. We hope you will be satisfied with our product throughout its service life.
Please study the entire Operating Manual carefully before you start using the product. Keep the manual in a safe place for future reference. Make sure other people using the product are familiar with these instructions.
| TECHNICAL PARAMETERS | |
| Voltage 230 V ~ 50 Hz | |
| Power input 1450 W | |
| Microwave power 900 W | |
| Microwave frequency 2450 MHz | |
| Grill power 1000 W | |
| External dimensions 513 mm (w) x 305 mm (h) x 414 mm (d) | |
| Internal dimensions 328 mm (w) x 206 mm (h) x 350 mm (d) | |
| Internal capacity of the oven 25 l | |
| Tray diameter 315 mm | |
| Weight | 14,5 kg |
| Noise level | < 63 dB(A) |
IMPORTANT SAFETY PRECAUTIONS:
• Use the unit only as described in this operating manual.
- Remove all the packaging and marketing materials from the unit before use.
• Make sure the mains voltage corresponds to the values on the rating plate. Use grounded wall outlets only.
• Do not leave the unit unattended during operation.
- Place the unit only on a stable and heat-resistant surface, out of reach of other heat sources. This surface should have a sufficient load capacity to carry the unit with its content.
• Do not cover the unit. There is a risk of overheating.
• Do not remove the feet.
• Do not put anything on the unit.
- Only use dishes designed for microwave ovens (non-metallic, with no metal print and decorations). Plastic vessels and paper wrappings could be deformed or ignited by the heat, so watch them carefully during cooking.
• Do not store anything inside the oven.
• Do not move a unit that is switched on or has hot contents in it.
• Do not touch hot surfaces. Use the handles and buttons. Use potholders to handle hot accessories.
- Keep the unit a safe distance from other appliances; at least 8 cm on the sides and back and 30 cm above the unit. Make sure there is a safe distance between the unit and flammable materials, such as furniture, curtains, lace, blankets, paper, clothing etc.
- Keep the unit clean. Do not let foreign objects get into the holes of the grilles. This could cause a short circuit, damage to the unit or fire.
• Do not put oversized food or metal objects inside the oven. These could cause a fire.
- When disconnecting the unit from the wall outlet, never pull the power cord. Grasp the plug and disconnect it by pulling.
• Do not allow children or unskilled people to handle the unit. Use the unit out of the reach of these individuals.
- Persons with limited movement capabilities, reduced sensory perception, insufficient mental capacity or those who are unaware of the proper handling should use the product only under the supervision of a responsible person familiar with its operation.
• Take extra care when using the unit near children.
- Don't let anyone use the unit as a toy.
• Make sure the power cord does not hang over the working area and children cannot reach it.
• Do not use the product outdoors or on wet surfaces. Electric shock hazard!
• Use only accessories recommended by the manufacturer.
- Never use an appliance with a damaged power cord or plug. Contact an authorised service centre immediately to have defective components repaired or replaced.
- Do not pull or move the product by grasping the power cord.
- Keep the unit away from heat sources, such as radiators, ovens etc. Do not expose the unit to direct sunlight or moisture.
• Do not touch the unit with wet or damp hands.
• Turn off the product and disconnect the plug from the mains outlet in case of any failure.
- Do not touch the moving parts during the operation of the unit.
• The unit is suitable for domestic use only. It is not designed for commercial operation.
• The unit is only designed for the cooking, heating and defrosting of meals and food.
- Do not immerse the power cord, plug or appliance into water or any other liquid.
- Check the appliance and power cord for damage regularly. Do not switch on a damaged unit.
- Turn the unit off and let it cool down for at least 30 minutes before cleaning and after use.
- WARNING! A large volume of steam may be released when you open the door. Be careful. There is a risk of scalding!
- If you see smoke, switch off the unit and unplug the power cord from the wall outlet. Keep the door closed to prevent the possible spreading of fire.
- Do not use the unit without food in it. Otherwise it could be damaged.
- When preparing or heating food or drink for babies, mix it well and check the temperature to prevent scalding.
- Microwave heating may cause delayed boiling, so be careful when handling heated liquid.
- Do not use the unit for heating eggs in the shells or whole boiled eggs; these could explode even after the end of heating.
- Foods with skin or jackets (sausages, potatoes, fruit etc.) should be punctured several times before heating.
- Do not use the unit for frying meals. Hot oil could damage parts of the unit or cause burns to the skin.
- Do not use the unit when the door or packing is damaged. Have it repaired in an authorised service centre.
- Because of microwave radiation it is dangerous for unauthorised persons to perform any servicing or repairs, e.g. removing of the cover that protects against the microwave irradiation.
- Do not use the unit for preparing or heating food in sealed vessels, as they may explode.
• This type of appliance is not designed for kitchen furniture fittings.
• Do not repair the appliance yourselves. Contact an authorised service centre.
Failure to follow the manufacturer's instructions may lead to refusal of warranty repair.
-
This appliance is not intended for use by persons (including children) with reduced physical, sensory or mental capabilities, or lack of experience and knowledge, unless they have been given supervision or instruction concerning use of the appliance by a person responsible for their safety.
-
Children should be supervised to ensure that they do not play with the appliance.
GROUNDING INSTRUCTIONS
This appliance has to be grounded. It is equipped with a supply cable with a grounding conductor and grounding plug. It must be connected to a socket that is correctly installed and grounded. In the case of a short circuit this grounding reduces the risk of electric shock. It is recommended to connect the unit to a separate electric circuit. The use of high voltage is dangerous, and any damage to the oven can cause a fire or other emergency.
WARNING!
Incorrect use of the protective conductor can cause the risk of electric shock.
Note: If you have any questions concerning the grounding or electrical connection, contact a qualified electrician or servicing technician. Neither the manufacturer nor the distributor is responsible for injury or damage caused by incorrect electric connection. The conductors in the supply cable are colored as follows:
Green and yellow = ground
Blue = neutral
Brown = live
RADIO INTERFERENCE
Operation of the unit can cause interference with your radio, TV or similar appliances. This can be reduced or eliminated by taking the following measures:
- Clean the door and sealing surfaces of the oven.
- Readjust the receiver antenna of the radio or TV.
- Change the position of the unit in relation to the receiver.
-
Place the unit further from the receiver.
-
Plug the unit in a different socket to make sure other appliances are connected to different circuits.
PRODUCT DESCRIPTION
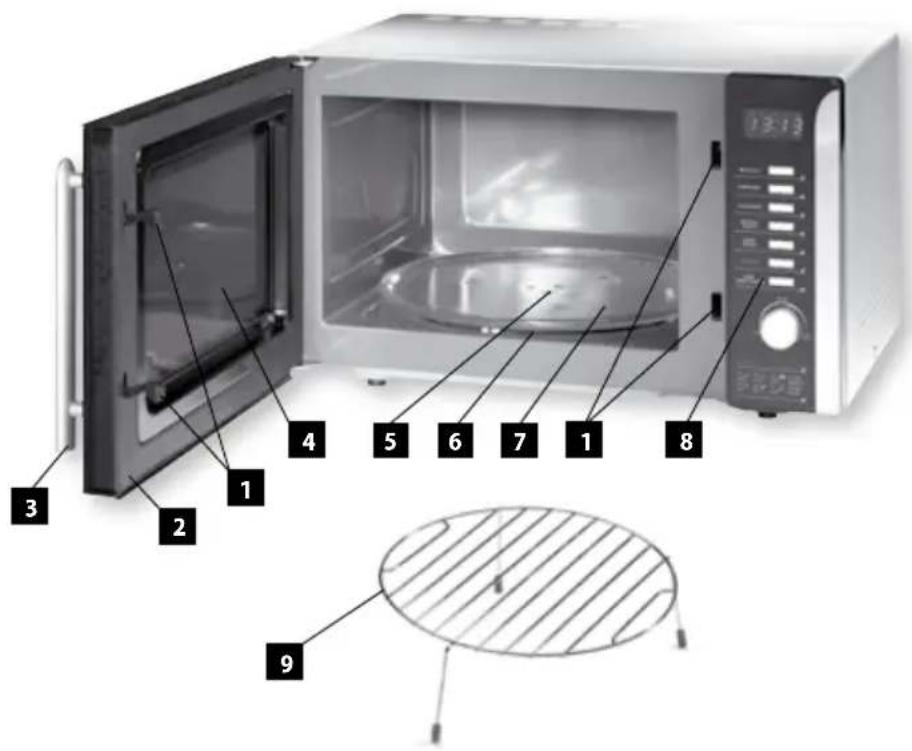
- Safety closing system
- Door
- Door handle
- Window of the door of the oven
- Pivot of the drive of the disc
- Travelling wheel
- Rotary glass disc
- Control panel
- Grill stand
DESCRIPTION OF THE CONTROL PANEL
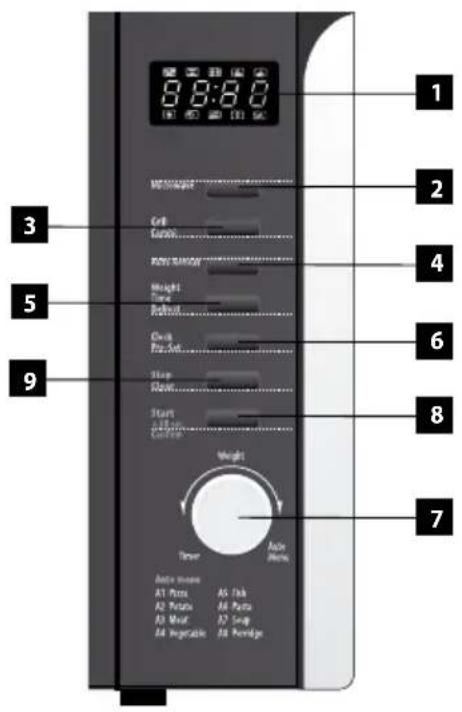
- Display
- Microwave cooking button (MICROWAVE)
- Grill and combined cooking button (GRILL/COMBI)
- Reheating button (AUTO REHEAT)
- Defrost button (WEIGHT/TIME DEFROST)
- Button for setting of clock and delayed start (CLOCK/PRE-SET)
- Button for setting of time, food weight and preset programs (TIMER/WEIGHT/AUTO MENU)
- Button for turn-on and confirmation of selection (START/+30SEC/CONFIRM)
- Button for turn-off and resetting (STOP/CLEAR)
OPERATING INSTRUCTIONS
Installation
- Remove all the packaging and marketing materials from the unit before use. Do not remove the plastic film which is glued on the inner side of the door.
- Check the unit and the power cord for damage. Do not switch on a damaged unit. The door of the unit and its seal must not be deflected or damaged; the hinges and the safety closing system must not be broken or damaged.
- Place the unit only on a stable and heat-resistant surface, out of reach of other heat sources. This surface should have a sufficient load capacity to carry the unit with its content.
- Keep the unit a safe distance from other appliances; at least 8 cm on the sides and back and 30 cm above the unit. Make sure there is a safe distance between the unit and flammable materials, such as furniture, curtains, lace, blankets, paper, clothing etc.
- Do not switch on the unit without properly fitting the travelling wheel and the rotary glass disc.
- The power cable plug must be easily accessible so that it can be unplugged from the mains if necessary.
NOTE
Prior to using a new unit, wipe the surface and the inside with a wet cloth for hygienic reasons. Wash all the removable parts in warm water with a detergent.
WARNING!
Open the door slowly and carefully. When opening the door during operation, or after preparation, a large volume of steam is released, and condensed hot water may drip from the door's lower edge. There is a risk of scalding.
Principles of cooking in a microwave oven
Place the food evenly. Place thicker sections at the edges.
Watch the heating time. Heat for the shortest of the prescribed times, and if necessary, make it longer. Overheated
food can ignite.
Cover the food when heating. Covers prevent spattering and enable more even heating.
Turn around pieces of food such as chicken or hamburger while heating. Big pieces, such as roast meat, must be turned more than once.
Move meatballs and similar food from the edge towards the center and vice versa halfway through heating.
Selection of dishes
Ideal dishes for microwave ovens are transparent, for microwaves. They allow the energy to travel through the cover and the food. Microwaves can't penetrate metal, which is why metal or metal-decorated dishes shall not be used.
Do not use products made of recycled paper in the microwave oven, as these can contain small metal parts that may cause sparks or fire.
We recommend circular or oval dishes more than square or rectangular ones, as the food in the corners tends to be overheated.
List of selected dishes
Type of dishes Cooking in a microwave oven
Heat-resistant glassware Yes
Non-heat-resistant glassware No
Heat-resistant earthenware Yes
Plastic plates suitable for the microwave oven Yes
Kitchen paper Yes
Metallic dish No
Metallic tray No
Aluminium foil and wrappings of MT foil No
Wooden dishes No
Time setting
- Press the CLOCK/PRE-SET button.
- Turn the TIMER/WEIGHT/AUTO MENU button to set the current hour.
- Press the CLOCK/PRE-SET button.
- Turn the TIMER/WEIGHT/AUTO MENU button to set the current minutes.
- Press the CLOCK/PRE-SET button to confirm. Symbol ":" starts blinking.
Note: Pressing the CLOCK/PRE-SET button during cooking displays the time of day for 5 seconds.
Function of microwave cooking
- Put the food in the oven and close the door.
- Push the MICROWAVE button. The value P100 is displayed.
- Press the MICROWAVE button repeatedly or turn the TIMER/WEIGHT/AUTO MENU button to set the required power within the range from 100% to 10% (P100, P80, P50, P30, P10).
- Press the START/+30SEC/CONFIRM button to confirm.
- Turn the TIMER/WEIGHT/AUTO MENU button to set the required time of cooking within the range from 5 seconds to 95 minutes.
- Press the START/+30SEC/CONFIRM button to turn on the unit.
- If you need to interrupt cooking, e.g. so as to stir the food, press the STOP/CLEAR button and open the door. After closing the door press the START/+30SEC/CONFIRM button - cooking will continue.
Note:
- If you open the door during cooking, it is interrupted automatically. After closing the door press the START/+30SEC/CONFIRM button - cooking will continue.
If you need to extend the time during cooking, press the START/+30SEC/CONFIRM button as needed.
- If you need to stop the current program before the set time elapses, press the STOP/CLEAR button. By pressing this button again the set time is cleared and the time of day displays.
- When the cooking time elapses the unit turns off automatically.
- Open the door and take out the food.
WARNING!
If the food is taken out from the oven sooner than the set cooking time elapses, or if you do not use the oven, always clear the set program.
Grill or Combined Cooking function
For this function use the grill stand and lay the grill food on it.
- Put the food in the oven and close the door.
- Press the GRILL/COMBI button. The letter G is displayed.
- Press the GRILL/COMBI button repeatedly or turn the TIMER/WEIGHT/AUTO MENU button to set the required function: G, C-1 or C-2.
| Function Microwave cooking Grill | |||
| G | 0 % 100 % | ||
| C-1 | 55 % 45 % | ||
| C-2 | 36 % 64 % | ||
- Press the START/+30SEC/CONFIRM button to confirm.
- Turn the TIMER/WEIGHT/AUTO MENU button to set the required time of cooking within the range from 5 seconds to 95 minutes.
- Press the START/+30SEC/CONFIRM button to turn on the unit.
- Approximately halfway through the cooking time an acoustic signal is heard. Turn over the food so that it bakes evenly from both sides.
- When the cooking time elapses the unit turns off automatically.
- Open the door and take out the food.
Quick Start function
Option A
- Put the food in the oven and close the door.
- Press the START/+30SEC/CONFIRM button to turn on the unit for 30 seconds with 100% power.
- By the additional pressing of the START/+30SEC/CONFIRM button you can extend the time of cooking up to 95 minutes.
- When the cooking time elapses the unit turns off automatically.
- Open the door and take out the food.
Option B
- Put the food in the oven and close the door.
- Turn the TIMER/WEIGHT/AUTO MENU button counter-clockwise to set the required time of cooking.
- Press the START/+30SEC/CONFIRM button to turn on the unit with 100% power.
- When the cooking time elapses the unit turns off automatically.
- Open the door and take out the food.
Reheat function
- Put the food in the oven and close the door.
- Press the AUTO REHEAT button, the display shows 200.
- Press the START/+30SEC/CONFIRM button to turn on the unit.
- When the cooking time elapses the unit turns off automatically.
-
Open the door and take out the food.
-
Turn the TIMER/WEIGHT/AUTO MENU button or press the AUTO REHEAT again to set the approximate weight of the food (200, 400, 600 g).
Defrost-by-Weight function
- Put the food in the oven and close the door.
- Press the WEIGHT/TIME DEFROST button to turn on the weight defrosting function. DEF1 appears on the display.
- Turn the TIMER/WEIGHT/AUTO MENU button to set the approximate weight of the food to be defrosted (100 - 2000 g).
- Press the START/+30SEC/CONFIRM button to turn on the unit.
- Approximately halfway through the defrosting time turn the food over and press the START/+30SEC/CONFIRM button to continue in the program.
- When the defrosting time elapses the unit turns off automatically.
- Open the door and take out the food.
Defrost-by-Time function
- Put the food in the oven and close the door.
- Press the WEIGHT/TIME DEFROST button to turn on the time defrosting function. DEF2 appears on the display.
- Turn the TIMER/WEIGHT/AUTO MENU button to set the defrosting time within the range from 5 seconds to 95 minutes.
- Press the START/+30SEC/CONFIRM button to turn on the unit.
- Approximately halfway through the defrosting time turn the food over and press the START/+30SEC/CON button to continue in the program.
- When the defrost time elapses the unit turns off automatically.
- Open the door and take out the food.
Multiphase Cooking function
Cooking of some meals requires several phases (e.g. long moderate cooking with short intensive cooking at the end, or defrosting and subsequent cooking).
a) 2 phases of cooking
- Put the food in the oven and close the door.
- Push the MICROWAVE button. The value P100 is displayed.
- Turn the TIMER/WEIGHT/AUTO MENU button to set the required power within the range from 100% to 10% (P100, P80, P50, P30, P10).
- Press the START/+30SEC/CONFIRM button to confirm.
- Turn the TIMER/WEIGHT/AUTO MENU button to set the required time of cooking within the range from 5 seconds to 95 minutes.
- Push the MICROWAVE button. The value P100 is displayed.
- Turn the TIMER/WEIGHT/AUTO MENU button to set the required power within the range from 100% to 10% (P100, P80, P50, P30, P10).
- Press the START/+30SEC/CONFIRM button to confirm.
-
Turn the TIMER/WEIGHT/AUTO MENU button to set the required time of cooking within the range from 5 seconds to 95 minutes.
-
Press the START/+30SEC/CONFIRM button to turn on the unit.
- If you need to interrupt cooking, e.g. so as to stir the food, press the STOP/CLEAR button and open the door. After closing the door press the START/+30SEC/CONFIRM button - cooking will continue.
Note: If you need to extend the time during cooking, press the START/+30SEC/CONFIRM button as needed.
If you need to stop the current program before the set time elapses, press the STOP/CLEAR button. By pressing this button again the set time is cleared and the time of day displays.
-
When the cooking time elapses the unit turns off automatically.
-
Open the door and take out the food.
b) Defrosting + cooking
- Put the food in the oven and close the door.
- Press the WEIGHT/TIME DEFROST button to turn on the time defrosting function. DEF2 appears on the display.
- Turn the TIMER/WEIGHT/AUTO MENU button to set the defrosting time within the range from 5 seconds to 9 minutes.
- Push the MICROWAVE button. The value P100 is displayed.
- Turn the TIMER/WEIGHT/AUTO MENU button to set the required power within the range from 100% to 10% (P100, P80, P50, P30, P10).
- Press the START/+30SEC/CONFIRM button to confirm.
- Turn the TIMER/WEIGHT/AUTO MENU button to set the required time of cooking within the range from 5 seconds to 95 minutes.
- Press the START/+30SEC/CONFIRM button to turn on the unit.
- Approximately halfway through the defrosting time turn the food over and press the START/+30S button to continue in the program.
- If you need to interrupt cooking, e.g. so as to stir the food, press the STOP/CLEAR button and open the door. After closing the door press the START/+30SEC/CONFIRM button - cooking will continue.
Note: If you need to extend the time during cooking, press the START/+30SEC/CONFIRM button as needed.
If you need to stop the current program before the set time elapses, press the STOP/CLEAR button. By pressing this button again the set time is cleared and the time of day displays.
- When the cooking time elapses the unit turns off automatically.
- Open the door and take out the food.
Delayed Start function
- Select the required program of cooking or defrosting and set its power and time or the weight of the food. You can also select 2 phases of cooking.
- Do not start the program!
- Press the CLOCK/PRE-SET button.
- Turn the TIMER/WEIGHT/AUTO MENU button to set the hour of starting.
- Press the CLOCK/PRE-SET button.
- Turn the TIMER/WEIGHT/AUTO MENU button to set the minutes of starting.
- Press the CLOCK/PRE-SET button to confirm. Symbol ":" starts blinking.
Note: Pressing the CLOCK/PRE-SET button during cooking displays the time of day for 5 seconds.
- Press the CLOCK/PRE-SET button.
- Turn the TIMER/WEIGHT/AUTO MENU button to set the required hour of the start of the program.
- Press the CLOCK/PRE-SET button.
- Turn the TIMER/WEIGHT/AUTO MENU button to set the required minutes of the start of the program.
- Press the START/+30SEC/CONFIRM button to start the countdown.
Note: Before starting the program the time of day must be set. Before starting the program always make sure that there is food in the oven. This function cannot be used for defrosting.
Preset programs
The unit offers a total of 8 preset programs.
| Number of program Function Approximate weight | ||
| A-1Pizza | Making of pizza 200, 400 g | |
| A-2Potato | Cooking of potatoes 200, 400, 600 g | |
| A-3Meat | Cooking of meat 250, 350, 450 g | |
| A-4Vegetable | Cooking of vegetables 200, 300, 400 g | |
| A-5Fish | Cooking of fish 250, 350, 450 g | |
| A-6Pasta | Cooking of pasta 50 g (+ 450 ml water), 100 g (+ 800 ml water) | |
| A-7Soup | Cooking of soup 200, 400 ml | |
| A-8Porrige | Cooking of porridge 550, 1,100 g | |
- Put the food in the oven and close the door.
- Turn the TIMER/WEIGHT/AUTO MENU button clockwise to select the required program of cooking A-1 through A-8.
- Press the START/+30SEC/CONFIRM button to confirm.
- Turn the TIMER/WEIGHT/AUTO MENU button to set the approximate weight of the food to be cooked.
- Press the START/+30SEC/CONFIRM button to turn on the unit.
- When the cooking time elapses the unit turns off automatically.
- Open the door and take out the food.
Child lock
- You may activate the child lock by holding the STOP/CLEAR button. You will hear a beeping sound. The control panel buttons are blocked now.
- You may de-activate the child lock by holding the STOP/CLEAR button again.
CLEANING AND MAINTENANCE
Clean the unit after each use to prevent the accumulation of grease, burned-on remnants of food, and unpleasant smells.
Turn the unit off, unplug the power cord from the wall outlet, and let the unit cool before cleaning and after use.
Do not immerse the power cord, plug, or appliance into water or any other liquid.
Wash the replaceable parts in tepid water with detergent and rinse in clean water.
Clean the inner and outer surfaces and door sealing with a wet cloth. You can use a liquid cleaning agent. Do not use sponges, steel wool, abrasive cleaners or solvents (gasoline, thinners, etc.). You might damage the protective layer.
You can remove odors from the inside by pouring lemon juice and the skin from a lemon into a microwave bowl
filled with water, and leaving the bowl for 5 minutes in the oven while operating. Dry the inside with a soft cloth afterwards.
If you need to replace the inner light bulb, contact the distributor.
If you do not keep the unit clean, the surfaces can be damaged, which may lead to a shorter service life and dangerous situations.
TROUBLESHOOTING
| Problem Cause Solution | ||
| The unit does not work. Plug inserted into the mains outlet incorrectly or insufficiently. | Check the plug connection. | |
| The mains outlet is not live. Check for voltage, e.g. by connecting another appliance. | ||
| The oven door is not closed properly. Check the door. Remove possible dirt or foreign objects. | ||
REPAIR & MAINTENANCE
Any extensive maintenance or repair that requires access to the inner parts of the product must be performed by an expert service centre.
ENVIRONMENTAL PROTECTION
- Packaging materials and obsolete appliances should be recycled.
• The transport box may be disposed of as sorted waste.
• Polyethylene bags shall be handed over for recycling.
Appliance recycling at the end of its service life:
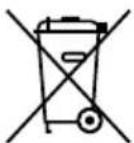
A symbol on the product or its packaging indicates that this product should not go into household waste. It must be taken to the collection point of an electric and electronic equipment recycling facility. By making sure this product is disposed of properly, you will help prevent the negative effects on the environment and human health that would otherwise result from inappropriate disposal of this product. You can learn
more about recycling this product from your local authorities, a household waste disposal service or in the shop where you bought this product.
DANKE FÜR IHR VERTRAUEN
DESCRIEREA PANOULUI DE CONTROL


- PODĚKOVÁNÍ
- POPIS OVLÁDACÍHO PANELU
- POPIS OVLÁDACIEHO PANELA
- OPIS PANELU STEROWNICZEGO
- A MÜKÖDTETÖPANEL LEÍRÁSA
- IMPORTANT SAFETY PRECAUTIONS:
- Failure to follow the manufacturer's instructions may lead to refusal of warranty repair.
- GROUNDING INSTRUCTIONS
- WARNING!
- RADIO INTERFERENCE
- PRODUCT DESCRIPTION
- DESCRIPTION OF THE CONTROL PANEL
- OPERATING INSTRUCTIONS
- Installation
- NOTE
- Principles of cooking in a microwave oven
- Selection of dishes
- List of selected dishes
- Time setting
- Function of microwave cooking
- Note:
- Grill or Combined Cooking function
- Quick Start function
- Option A
- Option B
- Reheat function
- Defrost-by-Weight function
- Defrost-by-Time function
- Multiphase Cooking function
- a) 2 phases of cooking
- b) Defrosting + cooking
- Delayed Start function
- Preset programs
- Child lock
- CLEANING AND MAINTENANCE
- Do not immerse the power cord, plug, or appliance into water or any other liquid.
- REPAIR & MAINTENANCE
- ENVIRONMENTAL PROTECTION
- Appliance recycling at the end of its service life:
- DANKE FÜR IHR VERTRAUEN
- DESCRIEREA PANOULUI DE CONTROL
Brand : Concept
Model : MTG-5825
Category : Microwave