AH2500D - Loudspeaker Laney - Free user manual and instructions
Find the device manual for free AH2500D Laney in PDF.


| Product type | Powered speaker (active speaker) with built-in mixer |
| Brand | Laney |
| Model | AH2500D |
| Power supply | 100-110V~50/60Hz or 200-240V~50/60Hz (factory preset) |
| Input channels | 4 mono channels (balanced/unbalanced XLR/Jack combo) + 1 stereo input (6.35mm Jack and RCA) |
| Equalization | 2 bands per channel + 2 bands master (active) |
| Effects processor | 16 built-in effects, selection via UP/DOWN and SELECT buttons, master level control |
| Bluetooth connectivity | Yes, pairing with external devices (name: Laney Audiohub) |
| Media player | Built-in MP3 player for SD card and USB key, playback controls (previous/next/pause/loop) |
| Phantom power | 48V for condenser microphones (XLR inputs only) |
| Output | Mix Out (6.35mm jack) for additional amplifier or recorder |
| Protection limiter | Yes, with indicator light |
| Fuse | Yes, replace only with specified model |
| Cleaning | Dry cloth only |
| Safety | Do not expose to water, do not open the cover, keep away from heat sources |
| Repairability | No user-serviceable parts - refer to qualified technician |
| General information | Manual available in multiple languages, use on stable and flat surface |
Frequently Asked Questions - AH2500D Laney
User questions about AH2500D Laney
0 question about this device. Answer the ones you know or ask your own.
Ask a new question about this device
Download the instructions for your Loudspeaker in PDF format for free! Find your manual AH2500D - Laney and take your electronic device back in hand. On this page are published all the documents necessary for the use of your device. AH2500D by Laney.
USER MANUAL AH2500D Laney
Thank you very much for purchasing your new Laney product and becoming part of the worldwide Laney family. Each and every Laney unit is designed and built with the utmost attention to care and detail, so I trust yours will give you many years of enjoyment.
Laney products have a heritage which stretches back to 1967 when I first began building valve amplifiers in my parents' garage.
Since then we have moved on from strength to strength developing an extensive range of guitar, bass, public address, multi instrument and keyboard amplification products along with a list of Laney endorsees that includes some of the world's most famous and respected musicians.
At the same time we believe we have not lost sight of the reason Laney was founded in the first place - a dedication to building great sounding amplification for working musicians.
Warm Regards,

natural_image
Simple line drawing of a stylized banana or leaf with curved stem (no text or symbols)Lyndon Laney
Chairman and Founder.
INTRODUCTION
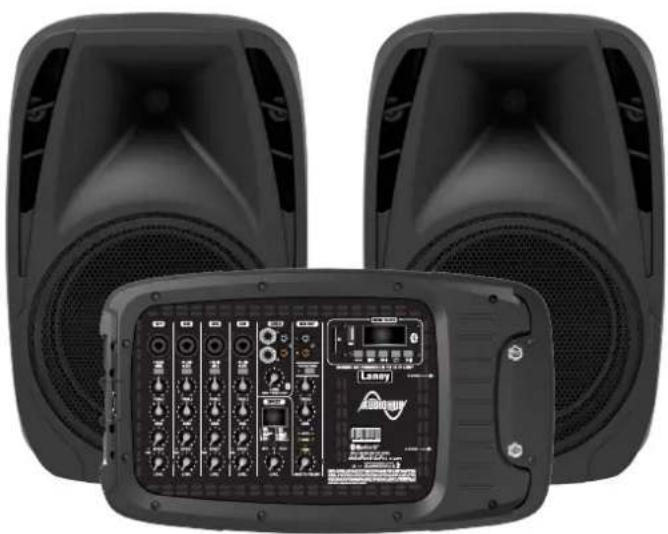
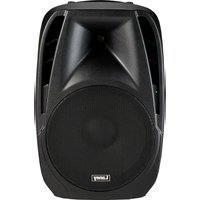
The Laney Audiohub Venue AH2500D is designed to be an all-in-one audio solution for a wide variety of everyday applications – from classroom, dance studio to a business seminar or any kind of musical performance.
The Audiohub Venue gives you all the ease and convenience of everything you need to get the job done with the minimum of fuss.
Its sleek detachable mixer section offers a wide selection of inputs/outputs including a Bluetooth® equipped media player. The accompanying Mic, XLR cable, a pair of speaker leads and power cord supplied, are all housed in a neat clip off compartment. Both enclosures include handles and 35mm pole Sockets.
The Audiohub Venue – Clarity & Convenience.
natural_image
Front and back view of a black audio amplifier with two speakers and a display panel (no visible text or symbols)This manual contains important information regarding correct and safe operation of your active system. Please read it thoroughly in order to get the best performance and reliability from your new Laney product.
SETTING UP
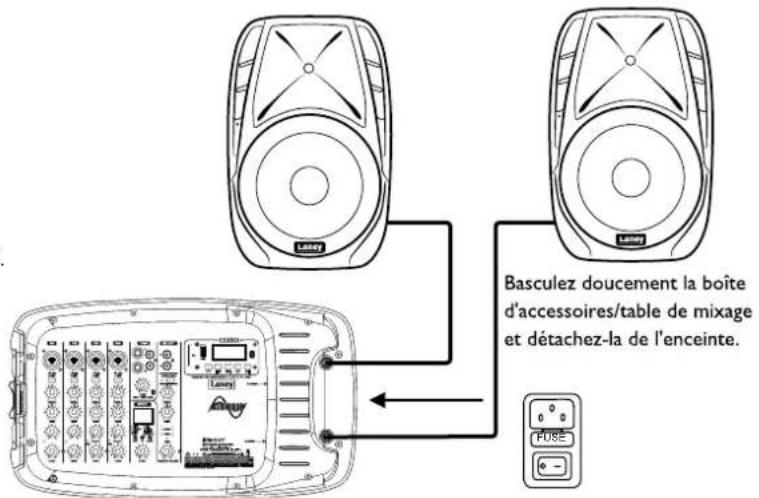
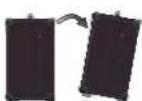
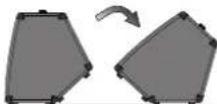
ACCESS TO THE MIXER AND ACCESSORY BOX: POWER AND SPEAKER CONNECTIONS:
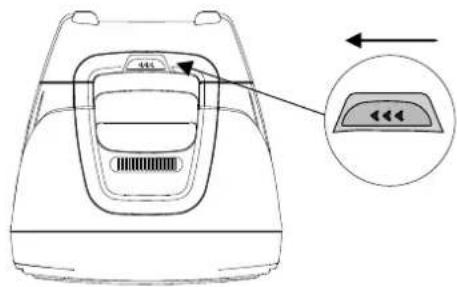
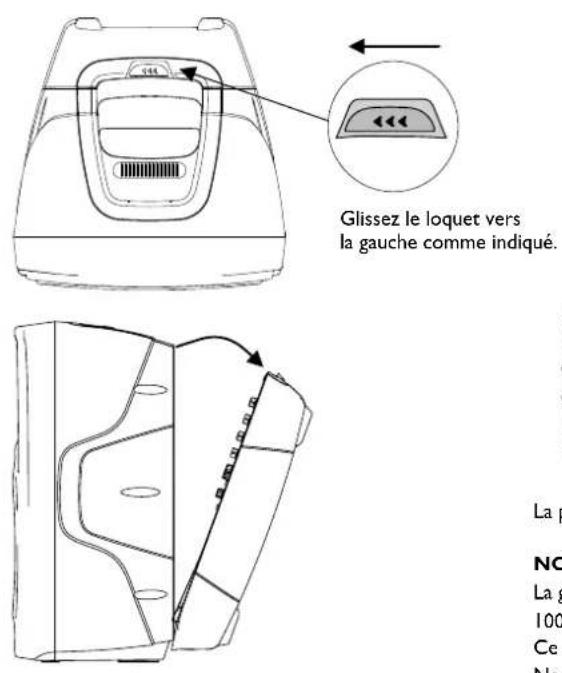
Slide the catch to the left as indicated.
natural_image
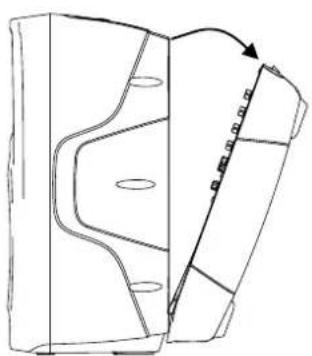
Technical line drawing of a mechanical component with no visible text or symbolsGently tilt the mixer/accessory box then unhook from the cab.
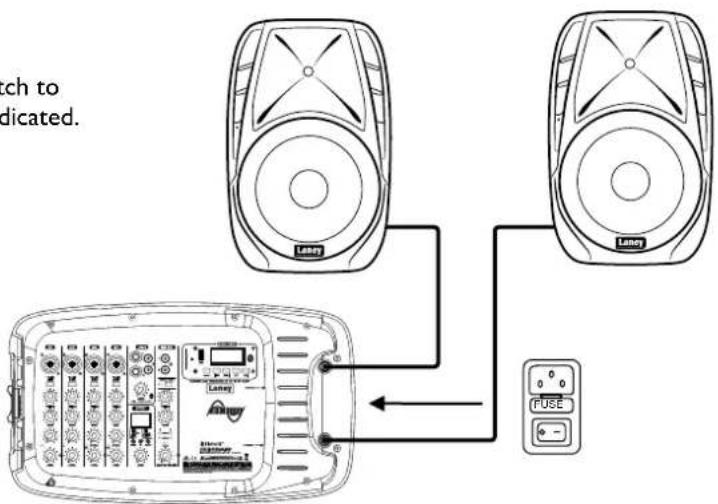
The mains inlet, power switch and fuse are located to the right of the mixer.
PLEASE NOTE:
The accepted input voltage range is preset to:
100-110V\~50/60Hz or 200-240V\~50/60Hz.
This cannot be changed by the user.
Only replace the fuse with the type stated!
SUPPLY VOLTAGE AND FUSE RATING:
220-240V\~50.60Hz T3.15A L 250V
MAXIMUM POWER CONSUMPTION - 300 WATTS
SUPPLY VOLTAGE AND FUSE RATING:
100-110V\~50/50Hz T3.15A L 250V
MAXIMUM POWER CONSUMPTION - 300 WATTS
Always switch off and disconnect the power cord when not in use.
www.Laney.co.uk
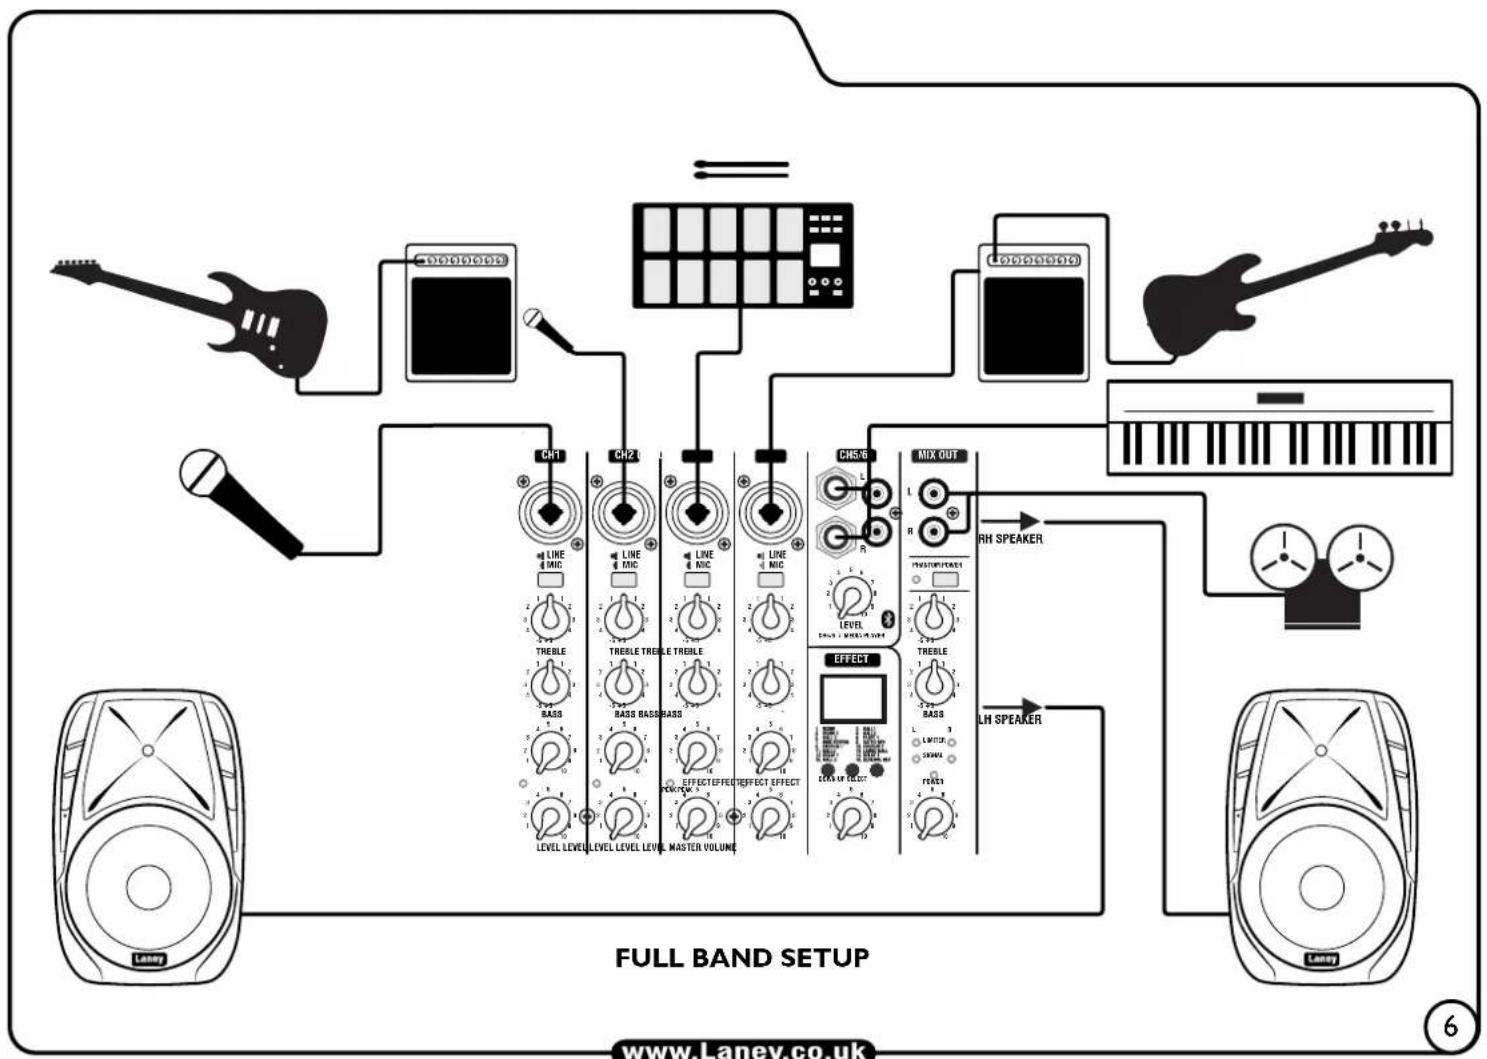
APPLICATIONS
flowchart
graph TD
    A["CH1 0"] --> B["TREBLE"]
    C["CH4"] --> D["TREBLE TREBLE TREBLE"]
    E["CH5/6"] --> F["BASS"]
    G["MIX OUT"] --> H["BASS BASS"]
    I["LEVE LEVEL LEVEL MASTER VOLUME"] --> J["EFFECT"]
    K["RH SPEAKER"] --> L["LH SPEAKER"]
    M["Liangy"] --> N["Lanay"]
    style A fill:#f9f,stroke:#333
    style C fill:#f9f,stroke:#333
    style E fill:#f9f,stroke:#333
    style G fill:#f9f,stroke:#333
    style I fill:#f9f,stroke:#333
    style K fill:#f9f,stroke:#333
    style M fill:#f9f,stroke:#333
    style N fill:#f9f,stroke:#333
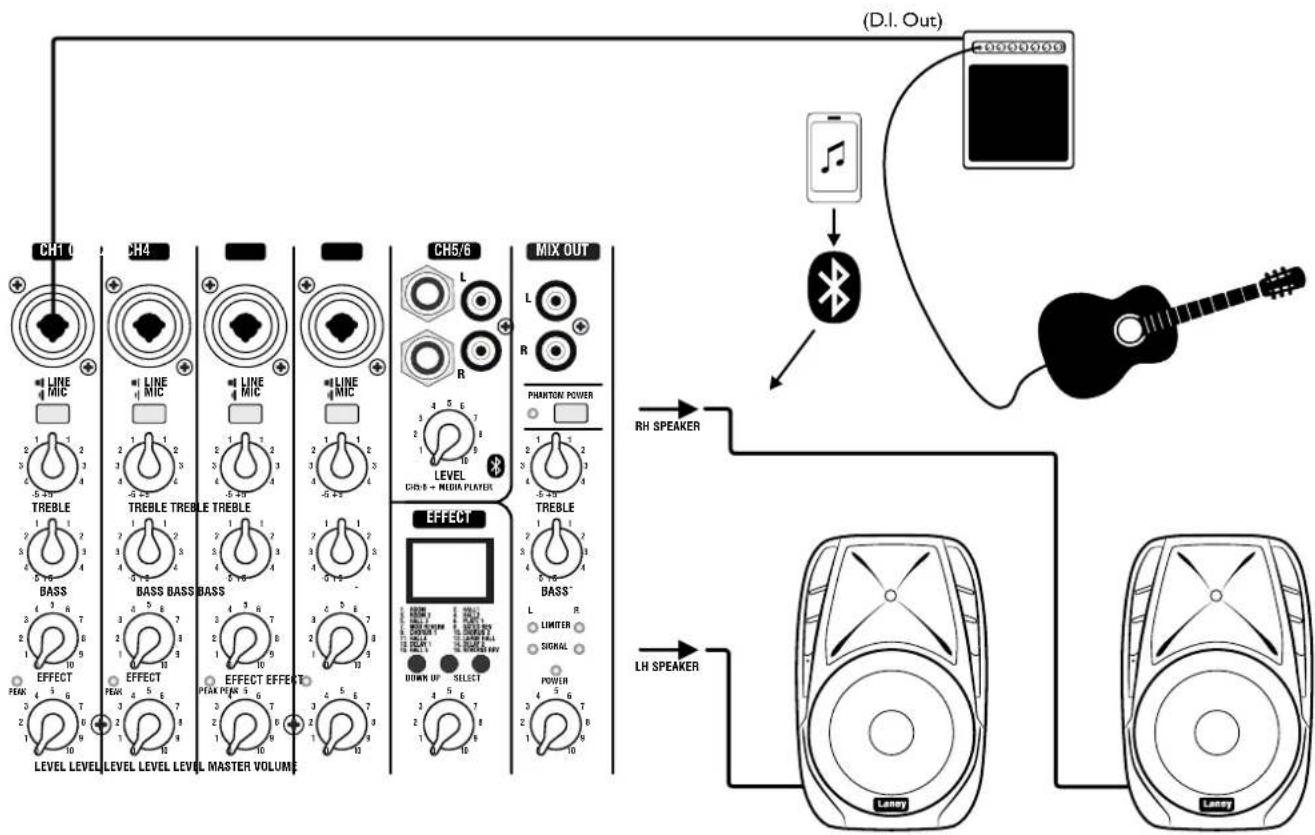
SOLO PERFORMANCE
www.Laney.co.uk
flowchart
graph TD
    A["Music Player"] --> B["Audio Recorder"]
    B --> C["Chips"]
    C --> D["Treble"]
    D --> E["Bass"]
    E --> F["Level Level"]
    F --> G["LAYER"]
    G --> H["Master VOLUME"]
    H --> I["Effect"]
    I --> J["MIX OUT"]
    J --> K["RH SPEAKER"]
    K --> L["LH SPEAKER"]
    L --> M["Speaker"]
    N["Audio Recorder"] --> O["Chips"]
    O --> P["Treble"]
    P --> Q["Bass"]
    Q --> R["Level Level"]
    R --> S["LAYER"]
    S --> T["Master VOLUME"]
    T --> U["Effect"]
    U --> V["MIX OUT"]
    V --> W["RH SPEAKER"]
    W --> X["LH SPEAKER"]
    X --> Y["LAYER"]
    Y --> Z["Speaker"]
    style A fill:#f9f,stroke:#333
    style N fill:#f9f,stroke:#333
    style O fill:#f9f,stroke:#333
    style P fill:#f9f,stroke:#333
    style Q fill:#f9f,stroke:#333
    style R fill:#f9f,stroke:#333
    style S fill:#f9f,stroke:#333
    style T fill:#f9f,stroke:#333
    style U fill:#f9f,stroke:#333
    style V fill:#f9f,stroke:#333
    style W fill:#f9f,stroke:#333
    style X fill:#f9f,stroke:#333
    style Y fill:#f9f,stroke:#333
    style Z fill:#f9f,stroke:#333
CONTROL PANEL
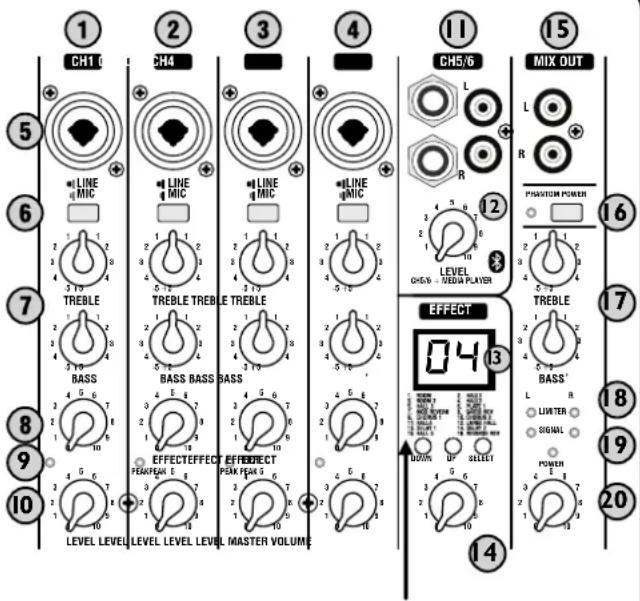
I-4: MONO INPUT CHANNELS.
-
COMBI INPUT: For use with both low level/low impedance devices eg. - mic (200-600ohms), electro-acoustic guitar or line level devices. This input will accept a balanced/unbalanced signal via XLR, or 6.35mm jack plug.
-
MIC/LINE SELECTION: Provides the correct internal gain structure for your connected device. The switch is 'IN' for Mic level devices and 'OUT' for line level devices
-
EQ: 2 band active EQ for tonal correction of the signal. Setting both controls to good starting point.
-
FX SEND: This control determines how much (if any) of each channel is sent through the onboard echo FX processor - also see (13).
-
PEAK: Adjust the level controls and signal level from your source(s) so the LED illuminates only briefly on peaks in the music. Using the system with this LED on all or most of the time will result in poor sound quality.
-
LEVEL: Controls the channel level to the master volume - also see (20).
-
CH 5/6: A multi input line level Stereo channel. Choose from 2x 6.35mm jack, or left/right RCA inputs. Any combination, or all can be used together.
-
LEVEL: Control the level of signal from channel 5/6 and a Bluetooth device if connected.
-
FX PROCESSOR: Containing 16 high quality effects, this processor adds the professional touch to your signal chain. The required effect is chosen using the DOWN buttons and confirmed using the SELECT button.
-
Master FX level: This control allows for quick overall adjustment of the FX level without having to individually adjust the Input FX sent control (8).
-
MIX OUT: A convenient way of connecting your AH2500D to another device such as an additional amp/speaker setup or recording device.
-
PHANTOM POWER: Turns on Phantom Power to all Mic channels should it be needed. Please note that
the Phantom will only be applied to the XLR of the Combi inputs. Phantom power should only be used v condenser mic's.
-
MASTER EQ: 2 band active EQ for adjusting the signal. Setting both controls to 0 is a good starting point.
-
LIMITER LED: This will illuminate when the Limiter is active. The Limiter will protect the output stage from potential overload.
-
POWER LED: This will illuminate when the unit is powered up.
-
MASTER VOLUME: Controls the overall level of your AH2500D Audiohub system.
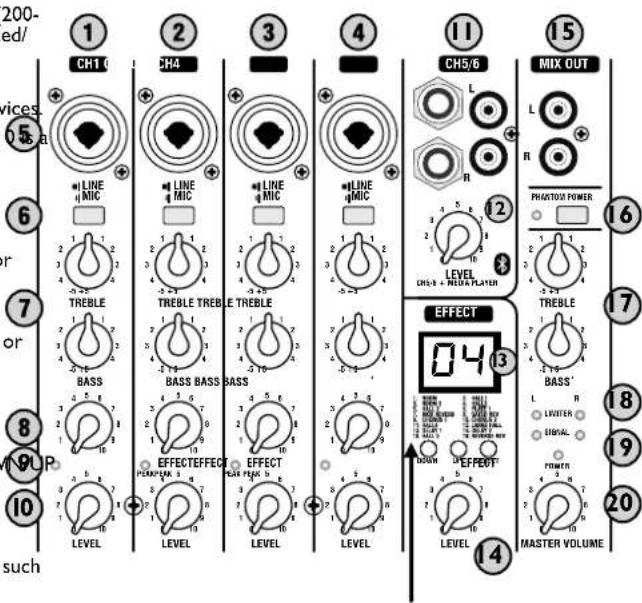
AVAILABLE ONBOARD EFFECTS:
-
ROOM
-
ROOM 2
-
HALL 3
-
MOD REVERB
-
CHORUS 1
-
HALL 4
-
DELAY 1
-
HALL 5
-
HALL 1
-
HALL 2
-
PLATE 1
-
GATED REVERB
-
CHORUS
-
LARGE HALL
-
DELAY 2
-
REVERSE REVERB
MEDIA PLAYER
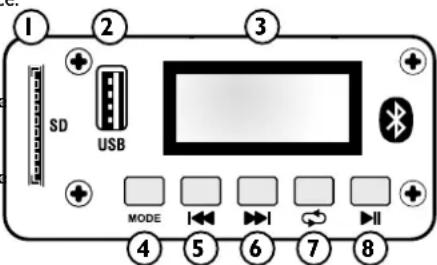
Use the onboard player for playing MP3 encoded audio tracks from Micro SD card/USB Stick or Bluetooth device.
The media player is automatically powered up when the amplifier is switched on.
I. SD CARD SLOT: Insert your Micro SD card here.
(Automatically detected on insertion, or if removed & reinserted uses smart technology to resume play from the previous point).
- MEMORY STICK SLOT: Connect your USB thumb-drive here.
(Automatically detected on insertion, or if removed & reinserted uses smart technology to resume play from the previous point).
NOTE:
The Media Player will play the music tracks on a USB Stick/Micro SD Card in alphabetical / numerical order.
The USB socket is for the playback of recorded tracks only, not for charging a USB device.
-
DISPLAY SCREEN
-
MODE: Use this to toggle the Media input source between SD/USB and Bluetooth.
Micro SD card, USB Stick - auto detected upon insertion - if a Micro SD Card is inserted while a USB thumb drive is already connected, the Micro SC will become the 'live' audio source.
-
PREVIOUS: Press to skip to the preceding track.
-
NEXT: Press to skip to the next track.
-
LOOP: Use this to enable/disable the looped playback modes. When using this button with an SD card or USB thumb drive, there are 3 options: ALL - Plays all the tracks on the root of the device in date order, then the sub folders.
ONE - Plays one track repeatedly (cycle to the required track to play using NEXT button (8).
FOD - Plays all track in the current active folder.
- PLAY/PAUSE: Use this control to play or pause your music.
CONNECT TO AN EXTERNAL BLUETOOTH DEVICE:
a. Select Bluetooth via the MODE button (4).
b. On your Bluetooth capable device, make sure Bluetooth is enabled. Scan down the list of available devices - search for: 'Laney Audiohub' and select.
No password required.
c. Your Audiohub is now connected to your Bluetooth device which can be controlled using the PLAY/PAUSE, PREVIOUS, NEXT & LOOP BUTTONS.
Only one Audiohub can be paired to your Bluetooth capable device at once, so remember to de-select if you plan to use a different Audiohub device next time.
BLOCK DIAGRAM
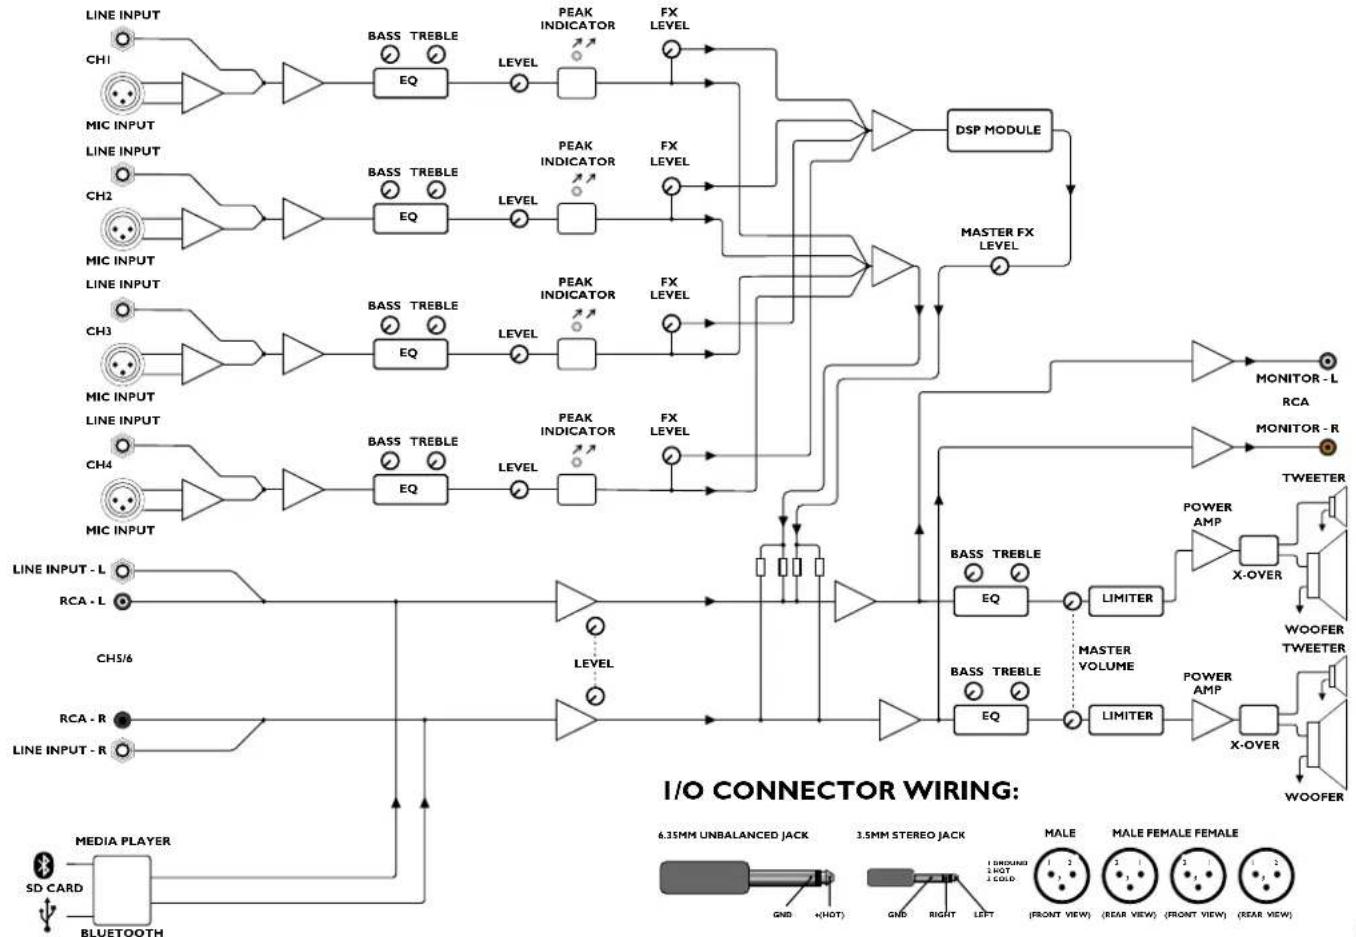
flowchart
graph TD
    subgraph_Input_1["LINE INPUT"]
        CH1 --> EQ1["BASS TREBLE"]
        MIC1["MIC INPUT"] --> EQ2["EQ"]
        CH2 --> EQ3["BASS TREBLE"]
        MIC2["MIC INPUT"] --> EQ4["EQ"]
    end

    subgraph_Input_2["LINE INPUT"]
        CH3 --> EQ5["BASS TREBLE"]
        MIC3["MIC INPUT"] --> EQ6["EQ"]
        CH4 --> EQ7["BASS TREBLE"]
        MIC4["MIC INPUT"] --> EQ8["EQ"]
    end

    subgraph_Output_1["LINE INPUT - L"]
        CH5/6 --> LEVEL
        RCA_L["RCA - L"] --> LEVEL
        LINE6["LINE INPUT - R"] --> LEVEL
    end

    subgraph_Output_2["LINE INPUT - R"]
        CH5/6 --> LEVEL
        RCA_R["RCA - R"] --> LEVEL
        LINE6 --> LEVEL
    end

    subgraph_Media_Player["Media Player"]
        SD_CARD["SD CARD"]
        BLUETOOTH["BLUETOOTH"]

    EQ1 --> PEAK_INDICATOR
    EQ2 --> PEAK_INDICATOR
    EQ3 --> PEAK_INDICATOR
    EQ4 --> PEAK_INDICATOR
    EQ5 --> PEAK_INDICATOR
    EQ6 --> PEAK_INDICATOR
    EQ7 --> PEAK_INDICATOR
    EQ8 --> PEAK_INDICATOR
    EQ9 --> PEAK_INDICATOR
    EQ10 --> PEAK_INDICATOR
    EQ11 --> PEAK_INDICATOR
    EQ12 --> PEAK_INDICATOR
    EQ13 --> PEAK_INDICATOR
    EQ14 --> PEAK_INDICATOR
    EQ15 --> PEAK_INDICATOR
    EQ16 --> PEAK_INDICATOR
    EQ17 --> PEAK_INDICATOR
    EQ18 --> PEAK_INDICATOR
    EQ19 --> PEAK_INDICATOR
    EQ20 --> PEAK_INDICATOR
    EQ21 --> PEAK_INDICATOR
    EQ22 --> PEAK_INDICATOR
    EQ23 --> PEAK_INDICATOR
    EQ24 --> PEAK_INDICATOR
    EQ25 --> PEAK_INDICATOR
    EQ26 --> PEAK_INDICATOR
    EQ27 --> PEAK_INDICATOR
    EQ28 --> PEAK_INDICATOR
    EQ29 --> PEAK_INDICATOR
    EQ30 --> PEAK_INDICATOR
    EQ31 --> PEAK_INDICATOR
    EQ32 --> PEAK_INDICATOR
    EQ33 --> PEAK_INDICATOR
    EQ34 --> PEAK_INDICATOR

    EQ1 --> LEVEL
    EQ2 --> LEVEL
    EQ3 --> LEVEL
    EQ4 --> LEVEL
    EQ5 --> LEVEL
    EQ6 --> LEVEL
    EQ7 --> LEVEL
    EQ8 --> LEVEL
    EQ9 --> LEVEL
    EQ10 --> LEVEL
    EQ11 --> LEVEL
    EQ12 --> LEVEL
    EQ13 --> LEVEL
    EQ14 --> LEVEL
    EQ15 --> LEVEL
    EQ16 --> LEVEL

    SPDMODModule["DSP MODULE"]
    MASTERFX_LEVEL["MASTER FX LEVEL"]
    MONITOR_L["MONITOR-L"]
    MONITOR_R["RCA"]
    TWEETER["TWEETER"]
    POWER_AMP["X-OVER"]
    WOOFERTWEETER["WOOFERTWEETER"]

    BASS_TREBLE_EQ1["EQ"]
    BASS_TREBLE_EQ2["EQ"]
    BASS_TREBLE_EQ3["EQ"]
    BASS_TREBLE_EQ4["EQ"]
    BASS_TREBLE_EQ5["EQ"]
    BASS_TREBLE_EQ6["EQ"]
    BASS_TREBLE_EQ7["EQ"]
    BASS_TREBLE_EQ8["EQ"]
    BASS_TREBLE_EQ9["EQ"]
    BASS_TREBLE_EQ10["EQ"]

    style I/O Connector_Wiring fill:#f9f9f9,stroke:#333,stroke-width:2px

    style MediaPlayer fill:#f9f9f9,stroke:#333,stroke-width:2px

    note right of I/O Connector_WIRING:
- 6.35MM UNBALANCED JACK; 3.5MM STEREO JACK; MALE; MALE FEMALE FEMALE; GND +HOT; GND RIGHT LEFT; (FRONT VIEW); (REAR VIEW); (FRONT VIEW); (REAR VIEW)
- GND +HOT; GND RIGHT LEFT; (FRONT VIEW); (REAR VIEW); (FRONT VIEW); (REAR VIEW)
- GND +HOT; GND RIGHT LEFT; (FRONT VIEW); (REAR VIEW)
- GND +HOT; GND RIGHT LEFT;
- GND +HOT; GND RIGHT LEFT;
- GND +HOT; GND RIGHT LEFT;
- GND +HOT; GND RIGHT LEFT;
- GND +HOT; GND RIGHT LEFT;
- GND +HOT; GND RIGHT LEFT;
- GND +HOT; GND RIGHT LEFT;
- GND +HOT; GND RIGHT LEFT;
- GND +HOT; GND RIGHT LEFT;
- GND - HOT; GND RIGHT LEFT;
- GND - HOT; GND RIGHT LEFT;
- GND - HOT; GND RIGHT LEFT;
- GND - HOT; GND RIGHT LEFT;
- GND - HOT; GND RIGHT LEFT;
- GND - HOT; GND RIGHT LEFT;
- GND - HOT; GND RIGHT LEFT;
- GND - HOT; GND RIGHT LEFT;
- GND - HOT; GNP; (FROUNING SHOT & COLD)
- (FRONT VIEW)
- (REAR VIEW)
- (FRONT VIEW)
- (REAR VIEW)
- (FRONT VIEW)
- (REAR VIEW)
- (FRONT VIEW)
- (REAR VIEW)
- (FRONT VIEW)
- (REAR VIEW)
- (FRONT VIEW)
- (REAR VIEW)
- (FRONT VIEW)
- (REAR VIEW)
- (FRONT VIEW)
- (REAR VIEW)
- (FRONT VIEW)
- (REAR VIEW)
- (FROUNING SHOT & COLD)
- (FRONT VIEW)
- (REAR VIEW)
- (FRONT VIEW)
- (REAR VIEW)
- (FRONT VIEW)
- (REAR VIEW)
- (FROUNING SHOT & COLD)
- (FRONT VIEW)
- (REAR VIEW)
- (FRONT VIEW)
- (REAR VIEW)
- (FROUNING SHOT & COLD)
- (FRONT VIEW)
- (REAR VIEW)
- (FRONT VIEW)
- (REAR VIEW)
- (FROUNING SHOT & COLD)
- (FRONT VIEW)
- (REAR VIEW)
- (FRONT VIEW)
- (REAR VIEW)
- (FLOR VOUT)
- (FLOR VOUT)
- (FLOR VOUT)
- (FLOR VOUT)
- (FLOR VOUT)
- (FLOR VOUT)
- (FLOR VOUT)
- (FLOR VOUT)
- (FLOR VOUT)
- (FLOR VOUT)
- (FLOR VOUT)
- (FLOR VOUT)
- (FLOR VOUT)
- (FLOR VOUT)
- (FLOR VOUT)
(FLOR VOUT)
(FLOR VOUT)
(FLOR VOUT)
(FLOR VOUT)
(FLOR VOUT)
(FLOR VOUT)
(FLOR VOUT)
(FLOR VOUT)
(FLOR VOUT)
(FLOR VOUT)
(FLOR VOUT)
(FLOR VOUT)
(FLOR VOUT)
(FLOR VOUT)
(FLOR VOUT)
(FLOR VOUT)
(FLOR V OUT)
(FLOR VOUT)
(FLOR VOUT)
(FLOR VOUT)
(FLOR VOUT)
(FLOR VOUT)
(FLOR VOUT)
(FLOR VOUT)
(FLOR VOUT)
(FLOR VOUT)
(FLOR VOUT)
(FLOR VOUT)
(FLOR VOUT)
(FLOR VOUT)
(FLOR VOUT)
(FLOR VOUT)
(FLOR VOUT)
(FLON VOUT) [MANOCH TURKEYE]
    note right of I/O CONNECTOR_WIRING:
- 6.35MM UNBALANCED JACK; 3.5MM STEREO JACK; MALE; MALE FEMALE FEMALE; GND +HOT; GND RIGHT LEFT; (FRONT VIEW); (REAR VIEW); (FRONT VIEW); (REAR VIEW);
- GND +HOT; GND RIGHT LEFT; (FRONT VIEW); (REAR VIEW); (FRONT VIEW); (REAR VIEW);
- GND +HOT; GND RIGHT LEFT; (FRONT VIEW); (REAR VIEW); (FRONT VIEW); (REAR VIEW);
- GND +HOT; GND RIGHT LEFT; (FRONT VIEW); (REAR VIEW); (FRONT VIEW); (REAR VIEW);
- GND + HOT; GND RIGHT LEFT; (FRONT VIEW); (REAR VIEW); (FRONT VIEW); (REAR VIEW);
- GND + HOT; GND RIGHT LEFT; (FRONT VIEW); (REAR VIEW); (FRONT VIEW); (REAR VIEW);
- GND + HOT; GND RIGHT LEFT; (FRONT VIEW); (REAR VIEW); (FRONT VIEW); (REAR VIEW);
- GND + HOT; GNP; [MANOCH TURKEYE]
www.Laney.co.uk
MOUNTING
All cabinets should be balanced and steady.
Don't over-extend poles/tripods; ensure at least 4 x the pole diameter is still inside the outer pole.
Make sure the legs have a good splay on tripods, but do not obstruct doorways or other access-ways.
If a pole mount is used, make sure that the thumb screw on the cabinet is tight.
Keep lights away from speakers; heat can cause fires/speaker damage.
Don't run cables across access-ways; if you have to, run them above doors or use approved cable covers.
Be aware of total power usage. Overloading a mains socket is potentially dangerous, and likely to cause a power out during use.
Keep lighting cables away from ALL sound cables including mains, use separate circuit for lights if possible.
Keep power and signal cables apart.
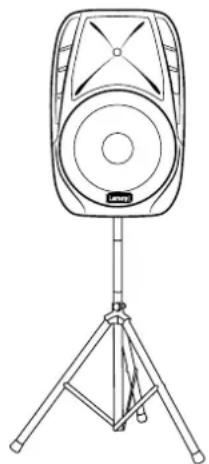
natural_image
Line drawing of a speaker on a tripod stand (no text or symbols)(Stand not included)
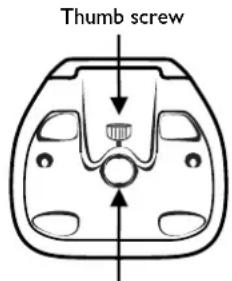
35mm pole cup
SPECIFICATIONS AND FEATURES
| Power Rating | : 2x 500W |
| Amplifier Type | : Class D |
| Power Supply | : SMPS (100-120 or 220-240 fixed) |
| Power Consumption | : 300W (Maximum) |
| Features | |
| Inputs | : 4x balanced Combi XLR/Jack with mic/line switch, 2x 6.3mm single ended jack inputs, 2x RCA inputs, Media player with Bluetooth 5.0, USB and SD card |
| Outputs | : RCA mix out. 2x 6.3mm Jack speaker outputs |
| Controls | : CH1-4 gain, 2 band eq, effect send, mic/line switch, CH5-6 gain, Master 16 digital effect section with level Master 2 band eq, master volume, Phantom power. |
| Speaker | |
| HF Driver | : 1" Compression Driver |
| LF Driver | : 10" Woofer |
| Coverage | : 90°H X 40°V |
| Enclosure | |
| Cabinet | : Robust polypropylene cabinet with carry handle |
| Finish | : Black |
| Grille | : Powdercoated steel |
| Other | : 35mm Distance Pole |
| Unit dimensions (HWD) | : 49 x 31.5 x 31.5 CM19.3" x 12.4" x 12.4" |
| Unit weight | : 18.7Kg, 41.2 lbs |
| Carton dimensions (HWD) | : 55.5 x 63.5 x 36.5 CM21.9" x 25" x 14.4", 0.129 M3 |
| Packed weight | : 19.7Kg, 43.4 lbs |
In the interest of continued development, Laney reserves the right to amend product specification without prior notification.

USER MANUAL
TRANSLATIONS
WWW.LANEY.CO.UK
DESIGNED & ENGINEERED IN THE UK BY LANey
ACCÈS A LA TABLE DE MIXAGE
ET A LA BOITE D'ACCESSOIRES:
FR
BRANCHEMENTS DE L'ALIMENTATION ET DES ENCEINTES:
SUPPLY VOLTAGE AND FUSE RATING:
220-240V—50,60Hz 13.15A L 250V
MAXIMUM POWER CONSUMPTION - 300 WATTS
SUPPLY VOLTAGE AND FUSE RATING:
100-110V \~ 50.80Hz T3.15A L 250V MAXIMUM POWER CONSUMPTION - 300 WATTS
SUPPLY VOLTAGE AND FUSE RATING:
220-240V - 50,60Hz | 13.15A L 250V MAXIMUM POWER CONSUMPTION - 300 WATTS
SUPPLY VOLTAGE AND FUSE RATING:
100-110V\~50/60Hz T3.15A L 250V MAXIMUM POWER CONSUMPTION - 300 WATTS
natural_image
Technical line drawing of a mechanical component with no visible text or symbolsnatural_image
Technical line drawing of a mechanical component with no visible text or symbols-
COMBINATION INPUT: For use with low-level/low-impedance devices, such as a microphone (200-600 ohms), an electro-acoustic guitar, or line-level devices. This input accepts a balanced/unbalanced signal via XLR or a 6.35 mm jack plug.
-
MICROPHONE/LINE SELECTION: Provides the correct internal gain structure for your connected device. The switch is set to 'IN' for microphone-level devices and to 'OUT' for line-level devices.
-
EQ: Active 2-band equalizer for tone correction of the signal. Setting both controls to 0 is a good starting point.
-
FX SEND: This control determines how much (if applicable) of each channel is sent by the built-in echo effect processor - see also (13). 9. PEAK: Adjust the level controls and the signal level of your source(s) so that the LED lights up only briefly during peaks in the music. Using the system with this LED continuously or nearly continuously on will result in poor sound quality.
-
LEVEL: Controls the channel level relative to the master volume - see also (20).
-
CH 5/6: A stereo channel with multiple line-level inputs. Choose from 2x 6.35 mm jack connections or left/right RCA inputs. Any combination, or all inputs simultaneously, can be used.
-
LEVEL: Controls the signal level of channel 5/6 and any connected Bluetooth device.
-
FX PROCESSOR: This processor contains 16 high-quality effects and gives your signal chain a professional look. The desired effect is selected using the DOWN/UP buttons and confirmed with the SELECT button.
-
Master FX level: This control allows you to quickly and fully adjust the FX level without having to adjust the Input FX sent control (8) separately.
-
MIX OUT: A convenient way to connect your AH2500D to another device, such as an additional amplifier/speaker setup or recording device.
-
PHANTOM POWER: Switches on phantom power for all microphone channels when needed. Please note that phantom power is only applied to the XLR inputs of the combo inputs. Phantom power should only be used with condenser microphones.
-
MASTER EQ: Active 2-band equalizer for adjusting the signal. Setting both controls to 0 is a good starting point.
-
LIMITER LED: This lights up when the limiter is active. The limiter protects the power amplifier against potential overload.
-
POWER LED: This lights up when the device is switched on.
-
MASTER VOLUME: Controls the overall volume level of your AH2500D Audiohub system.
ONBOARD-EFFEKTE:
-
ROOM
-
ROOM 2
-
HALL 3
-
MOD REVERB
-
CHORUS 1
-
HALL 4
-
DELAY 1
-
HALL 5
-
HALL 1
-
HALL 2
-
PLATE 1
-
GATED REVERB
-
CHORUS 2
-
LARGE HALL
-
DELAY 2
-
REVERSE REVERB
REPRODUTOR DE MÍDIA

natural_image
Technical line drawing of a mechanical part with cutouts and a curved arrow indicating direction (no text or symbols)轻轻倾斜调音台/附件盒,然后从音响脱钩
电源和扬声器连接
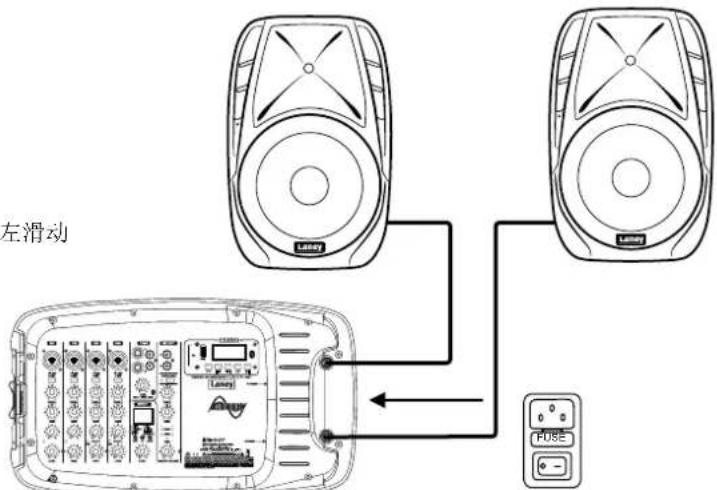
电源插座,电源开关和保险丝位于调音
台的右侧
请注意:
可接受的输入电压范围预设为:
100-110V 50 / 60Hz或200-240V 50 / 60Hz
用户无法更改。
只能使用指定类型的保险丝!
不使用时,请务必关闭电源并断开电源线。
220\~240V电压选择
220-240V - 50/60Hz T3.15A L 250V MAXIMUM POWER CONSUMPTION - 300 WATTS
100\~110V电压选择
100-110V\~50/60Hz T3.15A L 250V MAXIMUM POWER CONSUMPTION - 300 WATTS
有源调音台操作界面
CN
1-4: MONO INPUT频道。
In order to take full advantage of your new product and enjoy long and trouble-free performance, please read this owner's manual carefully, and keep it in a safe place for future reference.
1) Unpacking: On unpacking your product please check carefully for any signs of damage that may have occurred whilst in transit from the Laney factory to your dealer. In the unlikely event that there has been damage, please re-pack your unit in its original carton and consult your dealer. We strongly advise you to keep your original transit carton, since in the unlikely event that your unit should develop a fault, you will be able to return it to you dealer for rectification securely packed.
2) Amplifier Connection: In order to avoid damage, it is advisable to establish and follow a pattern for turning on and off your system. With all system parts connected, turn on source equipment, tape decks, cd players, mixers, effects processors etc, BEFORE turning on your amplifier. Many products have large transient surges at turn on and off which can cause damage to your speakers.
By turning on your bass amplifier LAST and making sure its level control is set to a minimum, any transients from other equipment should not reach your loud speakers. Wait till all system parts have stabilised, usually a couple of seconds. Similarly when turning off your system always turn down the level controls on your bass amplifier and then turn off its power before turning off other equipment.
3) Cables: Never use shielded or microphone cable for any speaker connections as this will not be substantial enough to handle the amplifier load and could cause damage to your complete system.
4) Servicing: The user should not attempt to service these products. Refer all servicing to qualified service personnel.
| Intended to alert the user to the presence of uninsulated 'Dangerous Voltage' within the products enclosure that may be sufficient to constitute a risk of electrical shock to persons.Ca symbole est utilise pur indiquer a l'utilisateur de ce produit de tension non-isoles dangereuse pouvant être d'intensite suffisante pour constituer un risque de choc électrique.Este simbolo tiene el proposito de alertar al usuario de la presencia de 'voltaje' peligroso' que no tiene aislamiento dentro de la caja del producto que puede tener una magnitud suficiente como para constituir riesgo de corrientazo.Dieses Symbol soll den Anwender vor unsolierten gefährlichen Spannungen innerhalb des Gehauses warnen, die von Ausrichender Starke sind, um einen elektrischen Schlag verursachten zu können. | |
| Intended to alert the user of the presence of important operating and maintenance (Servicing) instructions in the literature accompanying the product.Dieses Symbol soll den Anwender vor unsolierten gefährlichen Spannungen innerhalb des Gehauses warnen, die von Ausrichender Starke sind, um einen elektrischen Schlag verursachten zu können.Este simbolo tiene el proposito de la alertar al usuario de la presencia de instrucciones importantes sobre la operacion y mantenimiento en la literatura que viene conel producto.Dieses Symbol soll den Benutzer auf wichtige Instruktionen in der Bedienungsanleitung aufmerksam machen, die Handhabung und Wartung des Produkts betreffen. | |
| CAUTION: | Risk of electrical shock - DO NOT OPEN.To reduce the risk of electrical shock, do not remove the cover. No user serviceable parts inside. Refer servicing to qualified personnel. |
| ATTENTION: | Riaques de choc électrique - NE PAS OUVIRIAfin de reduire le risque de choc électrique, ne pas erliever le couverde. Il ne se trouve a l'interieur aucune pièce pouvant être reparee par l'utiliseur. Confler l'entretien a un personnel qualifie. |
| PRECAUCION: | Riesgo de corrientazo - no abraPara dominir al risego de corrientazo, no abra la cubierta. No hay piezas adentro que el pueda reparar. Deje todo mantenimiento a los tecnicos calificado. |
| VORSICHT: | Risiko - Elektrischer Schlag! Nicht offen!Lim das Risiko eines elektrischen Schilges zu vermeiden, nicht die Abdeckung entfernen. Es befinden sich keine Teile darin, die vom Anwender repariert werden Komsten. Reparaituren nur von qualifiziertem Fachpersonal durchführen lassen. |
| WARNING: | To prevent electrical shock or fire hazard, do not expose this appliance to rain or moisture. Before using this appliance please read the operating instructions for further warnings. |
| ADVERTISSEMENT: | Afin de prevenir les risques de decharge électrique ou de feu, n'exposes pas cet appareil a la pluie ou a l'humidite. Avant d'utiliser cet appareil, lesz les advertisements supplémentres situées dans le guide. |
| ADVERTENCIA: | Para evitar corrientazos o peligro de incendio, no deja expuesto a la livra o humedad este aparato Antes de usar este aparato, lea mas advertidas en la guía de operacion. |
| ACHTUNG: | Lim einen elektrischen Schalg oder Feugefahr zu vermeiden, sollte dieses Gerat nicht dem Regen oder Feuchtigkeit ausgesetzt werden. Vor Industriebnahme unbedingt die Bedienungsanleitung lessen. |
FCC COMPLIANCY STATEMENT

This device complies with Part 15 of the FCC rules.
Operation is subject to the following two conditions:
1) This device may not cause harmful interference
2) This device must accept any interference received, that may cause undesired operation.
Warning: Changes or modification to the equipment not approved by Laney can void the user's authority to use the equipment. Note: This equipment has been tested and found to comply with the limits for Class 8 digital device, pursuant to Part I5 of the FCC Rules. These limits are designed to provide reasonable protection against harmful interference in a residential installation. This equipment generates, uses and can radiate radio frequency energy and if not installed and used in accordance with the instructions, may cause harmful interference to radio communications. However, there is no guarantee that interference will not occur in a particular installation. If this equipment does cause harmful interference to radio or television reception, which can be determined by turning the equipment off and on, the user is encouraged to try and correct the interference by one or more of the following measures.
Reorient or relocate the receiving antenna.
Increase the separation between the equipment and receiver
Connect the equipment into an outlet on a circuit different from that to which the receiver is connected.
Consult the dealer or an experienced radio/TV technician for help

This product conforms to the requirements of the following European Regulations, Directives & Rules:
CE Mark (93/68/EEC), Low Voltage 2014/35/EU, EMC (2014/30/EU), RoHS (2011/65/EU), RED (2014/30/EU), ErP 2009/125/EU
In order to reduce environmental damage, at the end of its useful life, this product must not be disposed of along with normal household waste to landfill sites. It must be taken to an approved recycling centre according to the recommendations of the WEEE (Waste Electrical and Electronic Equipment) directive applicable in your country.

SIMPLIFIED EU DECLARATION OF CONFORMITY
Hereby, Laney Electronics Ltd. declares that the radio equipment is in compliance with Directives 2014/53/EU, 2011/65/EU,
2009/125/EU
Full text of the EU declaration of conformity is available at the following internet address:
support.laney.co.uk/approvals

The Bluetooth® word mark and logos are registered trademarks owned by the Bluetooth SIG, inc. and any use of such marks by Headstock Distribution Ltd is under license. Other trademarks and trade names are those of their respective owners. Laney is a registered trademark of Headstock Distribution Ltd.
INCORPORATED RADIO EQUIPMENT DEVICE TECHNICAL SPECIFICATION:
Frequency Range:
Transmit Power:
Receiver Sensitivity:
Operating Protocol: Bluetooth Class 2
IMPORTANT SAFETY INSTRUCTIONS
WARNING: When using electrical products, basic cautions should always be followed, including the following.
- Read these instructions.
-
Make the instructions.
-
Keep these instructions sale.
-
Heed all warnings.
-
Follow all instructions.
-
Do not use this apparatus near water.
-
Clean only with a dry cloth.
-
Do not block any of the ventilation openings. Install in accordance with manufacturer's instructions.
-
Do not install near any heat sources such as radiators, heat registers, stoves or other apparatus (including amplifiers) that produce heat.
-
An apparatus with Class I construction shall be connected to a mains socket outlet with a protective connection. Do not defeat the safety purpose of the polarized or grounding-type plug. A polarized plug has two blades with one wider than the other. A grounding type plug has two blades and a third grounding prong. The wide blade or third prong is provided for your safety. If the provided plug does not fit into your outlet, consult an electrician for replacement of the obsolete outlet.
-
Protect the power cord from being walked on or pinched, particularly at plugs, convenience receptacles, and the point they exit from the apparatus.
apparices.
-
Only use attachments/accessories provided by the manufacturer.
-
Use only with a cart, stand, tripod, bracket, or table specified by the manufacturer, or sold with the apparatus. When a cart is used, use caution when moving the cart's apparatus combination to avoid injury from sip-over.
-
The mains plug or appliance coupler is used as the disconnect device and shall remain readily operable. The user should allow easy access to any mains plug, mains coupler and mains switch used in conjunction with this unit thus making it readily operable. Unplug this apparatus during lightning storms or when unused for long periods of time.
-
Refer all servicing to qualified service personnel. Servicing is required when the apparatus has been damaged in any way, such as when power supply cord or plug is damaged, liquid has been spilled or objects have fallen into the apparatus, the apparatus has been exposed to rain or moisture, does not operate normally, or has been dropped.
-
Never break off the ground pin. Connect only to a power supply of the type marked on the unit adjacent to the power supply cord.
-
If this product is to be mounted in an equipment rack, rear support should be provided.
-
Note for UK only: If the colours of the wires in the mains lead of this unit do not correspond with the terminals in your plug, proceed as follows:
follows:
a) The wire that is coloured green and yellow must be connected to the terminal that is marked by the letter E, the earth symbol coloured green or
coloured green and yellow.
k) The wire dot is colored blue must be connected to the terminal that is marked with the latter N or the colour block.
By The W# C #A is bound to blue must be connected to the terminal that is marked with the letter IV of the colour black. The wire that is coloured brown must be connected to the terminal that is marked with the letter I, as the colour and
- This electrical apparatus should not be exposed to dripping or splashing and care should be taken not to place
objects containing liquids, such as vases, upon the apparatus.
- Exposure to extremely high noise levels may cause a permanent hearing loss. Individuals vary considerably in susceptibility to noise-induced hearing loss, but nearly everyone will lose some hearing if exposed to sufficiently intense noise for a sufficient time.
The U.S. Government's Occupational Safety and Health Administration (OSHA) has specified the following permissible noise level exposures: According to OSHA, any exposure in excess of the above permissible limits could result in some hearing loss. Earplugs or protectors to the ear canals or over the ears must be worn when operating this amplification system in order to prevent a permanent hearing loss, if exposure is in excess of the limits as set forth above. To ensure against potentially dangerous exposure to high sound pressure levels, it is recommended that all persons exposed to equipment capable of producing high sound pressure levels such as this amplification system be protected by hearing protectors while this unit is in operation.
- Symbols & nomenclature used on the product and in the product manuals, intended to alert the operator to areas where extra caution may be necessary, are as follows:

Intended to alert the user to the presence of high 'Dangerous Voltage' within the products enclosure that may be sufficient to constitute a risk of electrical shock to persons.
Intended to alert the user of the presence of important operating and maintenance (Servicing) instructions in the literature accompanying the product.
Risk of electrical shock - DO NOT OPEN. To reduce the risk of electrical shock, do not remove the cover. No user serviceable parts inside. Refer servicing to qualified personnel.
To prevent electrical shock or fire hazard, do not expose this appliance to rain or moisture. Before using case read the operating instructions.
If your appliance features a tilting mechanism or a kickback style cabinet, please use this design feature with caution. Due to the ease with which the amplifier can be moved between straight and tilted back positions, only use the amplifier on a level, stable surface. DO NOT operate the amplifier on a desk, table, shelf or otherwise unsuitable non-stable platform.

The results of the results of the consensus on the composition of assumptions, the results expressed in this paper are not intended to be considered
PLEASE COMPLETE FOR FUTURE REFERENCE
LANEYAMPLIFICATION
LANEYAMPLIFICATION
LANEYAMPS
LANEYTV
DESIGNED & ENGINEERED IN THE UK BY LANEY
WWW.LANEY.CO.UK
- INTRODUCTION
- SETTING UP
- ACCESS TO THE MIXER AND ACCESSORY BOX: POWER AND SPEAKER CONNECTIONS:
- PLEASE NOTE:
- CONTROL PANEL
- I-4: MONO INPUT CHANNELS.
- AVAILABLE ONBOARD EFFECTS:
- MEDIA PLAYER
- NOTE:
- CONNECT TO AN EXTERNAL BLUETOOTH DEVICE:
- MOUNTING
- SPECIFICATIONS AND FEATURES
- TRANSLATIONS
- FR
- ONBOARD-EFFEKTE:
- REPRODUTOR DE MÍDIA
- 台的右侧
- 有源调音台操作界面
- CN
- FCC COMPLIANCY STATEMENT
- IMPORTANT SAFETY INSTRUCTIONS
Brand : Laney
Model : AH2500D
Category : Loudspeaker