
BOCP7D88SW - Monitor AMAZON - Free user manual and instructions
Find the device manual for free BOCP7D88SW AMAZON in PDF.

| Brand | Amazon |
| Model | BOCP7D88SW |
| Category | Gaming Monitor |
| Screen Size | 27 inches (69 cm diagonal) |
| Screen Type | LCD TFT |
| Native Resolution | 1920 x 1080 (Full HD) |
| Max Refresh Rate | 165 Hz (HDMI/DP) |
| Response Time | 1 ms (MPRT enabled) |
| Pixel Size | 0.3114 mm (H) x 0.3114 mm (V) |
| Display Colors | 16.7 million |
| Video Connectors | HDMI 2.0 x 2, DisplayPort 1.4 x 1 |
| Audio Output | 3.5 mm headphone jack |
| Power | 100-240 V, 50/60 Hz (adapter included) |
| Power Consumption (on) | 21 W (normal) |
| Power Consumption (standby) | ≤ 0.5 W |
| Power Consumption (off) | ≤ 0.3 W |
| VESA Mount | 100 x 100 mm (M4 x 10 mm screws) |
| Adjustments | Tilt -5°/+20°, rotation 90° (pivot), swivel ±45°, height 100 mm |
| Gaming Features | Adaptive-Sync, MPRT, Action/Racing/Sports modes, crosshair, refresh rate counter |
| Maintenance | Soft cloth without solvent, do not spray directly |
| Safety | Do not expose to moisture, do not open the casing, use the provided adapter |
| Package Contents | Monitor, stand arm, stand base, power adapter, HDMI cable, quick installation guide |
Frequently Asked Questions - BOCP7D88SW AMAZON
User questions about BOCP7D88SW AMAZON
0 question about this device. Answer the ones you know or ask your own.
Ask a new question about this device
Download the instructions for your Monitor in PDF format for free! Find your manual BOCP7D88SW - AMAZON and take your electronic device back in hand. On this page are published all the documents necessary for the use of your device. BOCP7D88SW by AMAZON.
USER MANUAL BOCP7D88SW AMAZON
24 Inch or 27 Inch Gaming Monitor, FHD 1080P, 165Hz, VESA Compatible, Adaptive sync, 1ms response
natural_image
Line drawing of a flat-screen monitor with two legs and a base (no text or symbols)EN ...... Page 3
FR ...... Page 18
ES ...... Página 33
DE . . . . . . . . . . . . . . . . . . . . . . . . . . . . . . . . . . . . . . . . . . . . . . .
IT ...... Pagina 63
NL ...... Pagina 78
日本語……ページ 93
Contents
Safety Instructions 4
Package Contents....5
Parts Overview....5
Setting Up the Monitor 6
Using the Monitor....7
Cleaning and Maintenance 12
Troubleshooting....13
Specifications 14
Symbol Explanation....15
Legal Notices....16
Feedback and Help....17
Safety Instructions
Read the following instructions carefully and keep them for future use.
- Only use the power adapter provided with the monitor. Do not use the power adapter with other products.
- Do not place the monitor near a window. Exposure to rain, moisture, or direct sunlight can cause serious damage to the monitor.
- Do not cover the ventilation openings at the back of the monitor with items, such as newspapers, tablecloths, or curtains.
- Do not press on the LCD screen. Excessively forceful pressing can cause permanent damage to the display.
- Do not remove the case or attempt to repair the machine by yourself. All maintenance tasks should be performed by an authorized technician.
- Store the monitor in a room with a temperature between -4^-140^ (-20°C–60°C). Permanent damage may result if the monitor is stored outside of this range.
- Unplug the monitor's power adapter immediately and contact an authorized technician if:
a. The connection between the monitor and the computer is worn or damaged.
b. Liquid spills onto the monitor or the monitor is exposed to rain.
c. The monitor or case is damaged.
- This equipment is not suitable for use in locations where children are likely to be present.
- Read these instructions to ensure correct and safe installation and interconnection of the equipment.
- The electrical plug/appliance couple is used as a disconnect device. The disconnect device must remain readily operable.
- This monitor should be operated from the type of power indicated on the rating label. If you are not sure the type of power available, consult your dealer or local power company.
- If your monitor's power adapter has a grounded plug, use it with a grounded outlet.
- This monitor is intended to be used in dry indoor areas only.
WARNING Risk of Suffocation! Keep any packaging materials away from children and pets—these materials are a potential source of danger (for example, suffocation).
Safe Listening Instructions
To avoid possible hearing damage:
Do not listen at high volume levels for long periods of time.
▶ Gradually increase the volume, rather than jumping to a very high level all at once.
Do not increase the volume further when the volume is adjusted to be able to hear clear and comfortable without distortion.
Package Contents
Monitor
Support arm
▶ Support base
Quick Setup Guide Power adapter
HDMI cable
Parts Overview
24" and 27" Monitor - Front
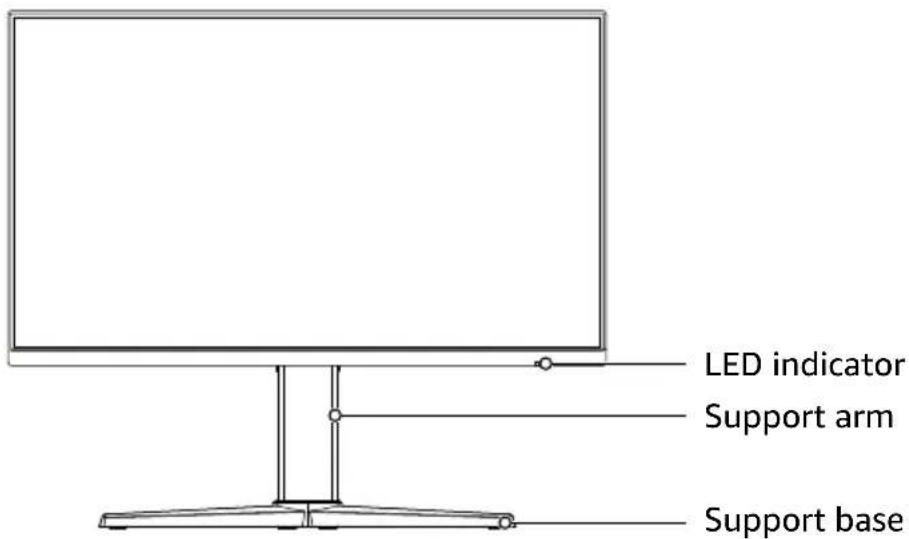
24" and 27" Monitor - Back
Setting Up the Monitor
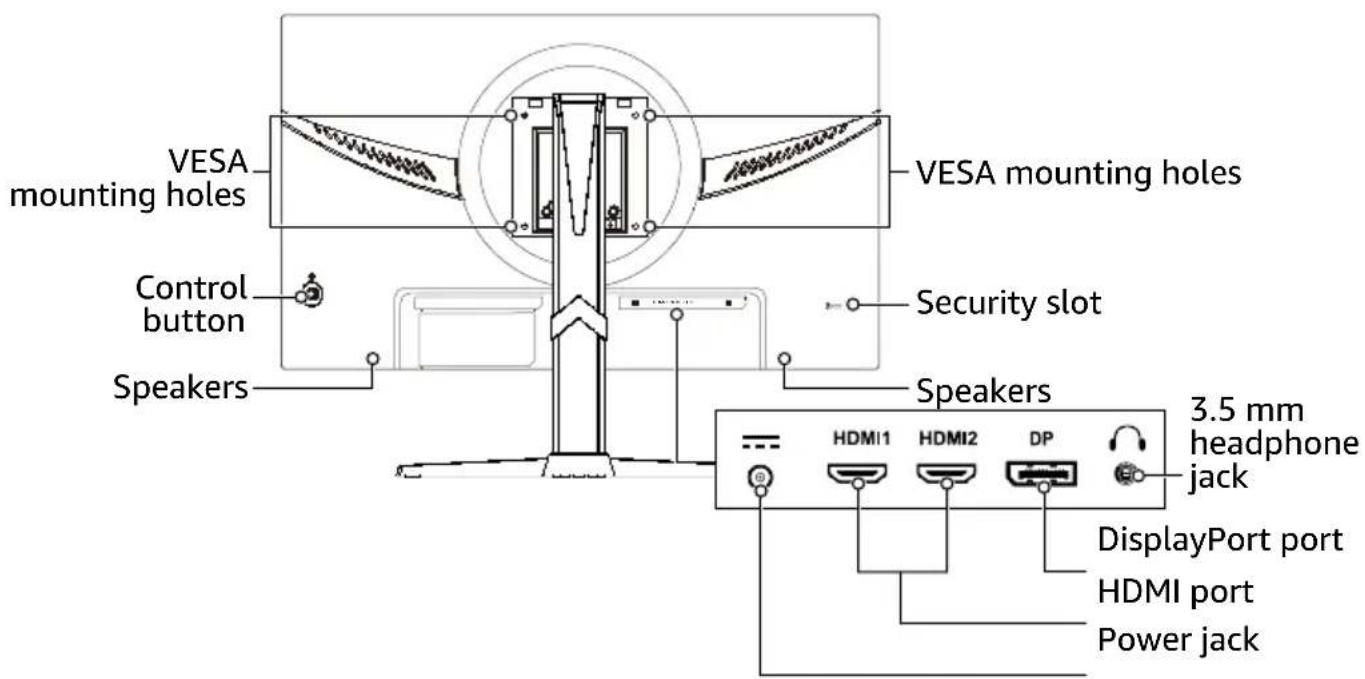
Attaching the Monitor Base
- Carefully place the monitor face-down on a soft surface to prevent it from getting scratched.
- Align the bolts on the support arm with the holes on the support base, then rotate the support arm counterclockwise to interlock the pieces.

- Turn the bolt ring clockwise on the bottom of the support base until it is tight, then fold it down.
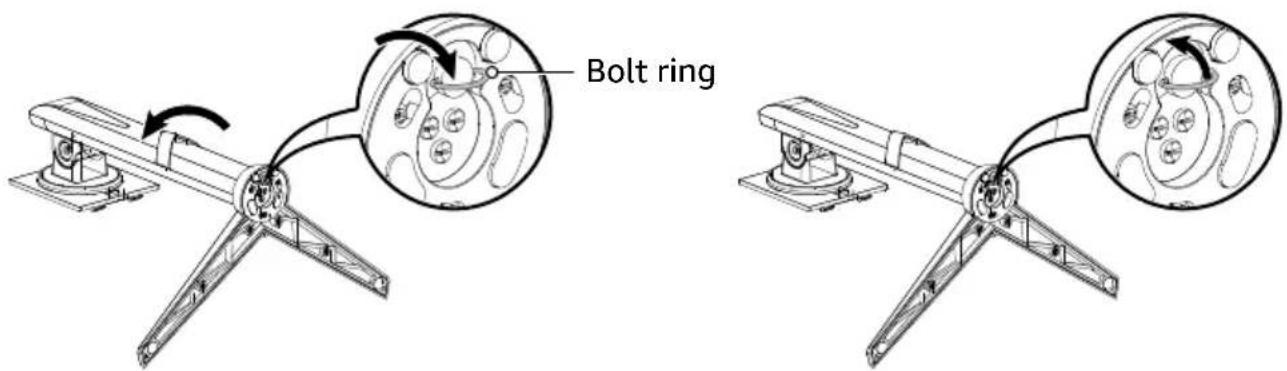
- Angle the stand assembly into the back of your monitor and push it into place.
natural_image
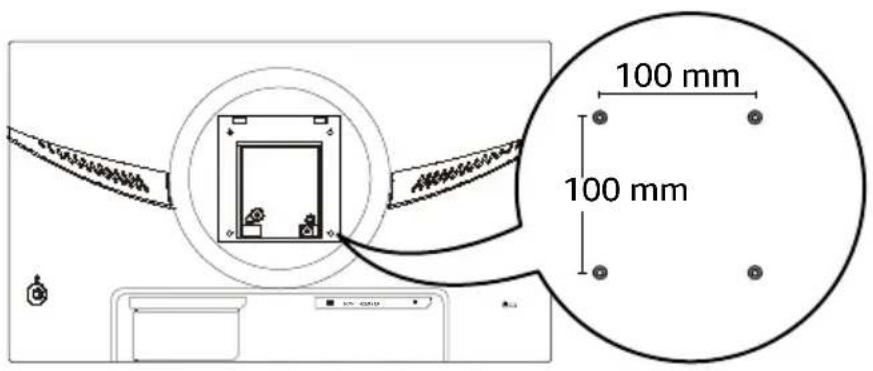
Technical line drawing of a robotic arm with directional arrows indicating motion or force (no text or symbols present)Installing with a Wall Mounting Kit
Use a VESA mounting kit (not included) that accommodates a 100 × 100 mm hole pattern and has four M4 × 10 mm screws to secure the monitor to a mount.
Using the Monitor
Powering the Monitor
- Connect the power adapter from the monitor's power jack to a power outlet.

flowchart
graph LR
    A["Device 1"] --> B["Device 2"]
    B --> C["Switch"]
    C --> D["Central HDMI Interface"]
    D --> E["HDMI1"]
    D --> F["HDMI2"]
    D --> G["DP"]
-
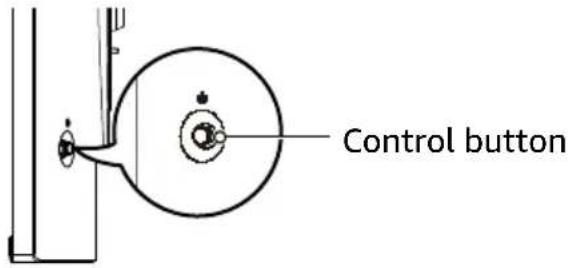
To turn on the monitor, briefly press the control button.
-
To turn off the monitor, press and hold the ⏻ control button.
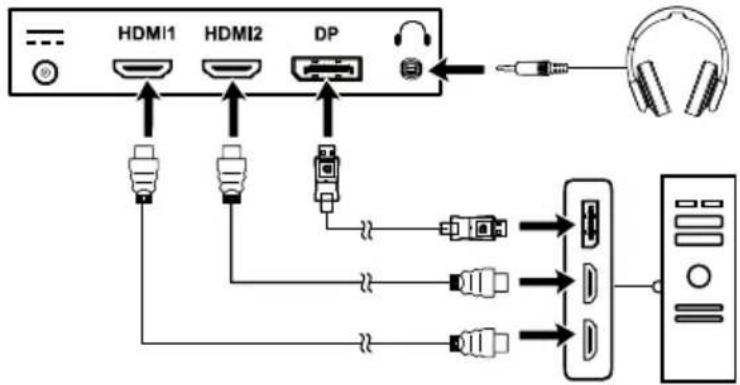
Connecting to a Computer
-
Turn off your computer and monitor, then unplug their power cords.
-
Choose a connection type:
▶ DisplayPort (best quality): Connect a DisplayPort cable (not included) from your monitor's DP port to your computer.
HDMI (better quality): Connect an HDMI cable (included) from your monitor's HDMI port to your computer.
flowchart
graph TD
    A["Device"] --> B["HDMI1"]
    A --> C["HDMI2"]
    A --> D["DP"]
    B --> E["Audio Input"]
    C --> F["Audio Input"]
    D --> G["Audio Input"]
    H["Headphones"] --> I["External Audio System"]
    J["External Audio System"] --> K["External Audio System"]
    L["External Audio System"] --> M["External Audio System"]
- Reconnect your computer's and monitor's power cords.
- Turn on your monitor and computer. Your monitor should switch to the correct source automatically. If needed, choose your input source by navigating to System > Input in the monitor's menu. See "Using the Control Button" on page 10 for more information.
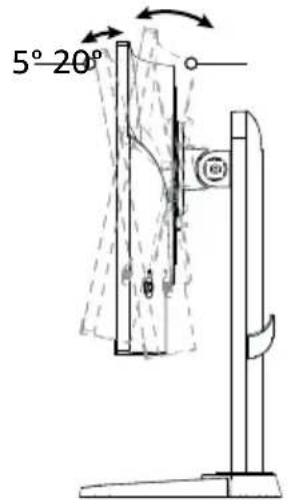
Adjusting the Viewing Angle
When adjusting the monitor, avoid touching the screen and hold the stand in place to prevent it from falling over.
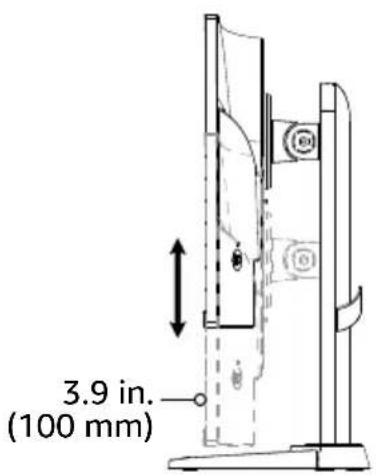
Forward/Backward and Height
The monitor tilts forward up to 5^ or backward up to 20^ . The height adjusts up to 3.9 in. (100 mm). Push the monitor up or down to adjust the height.
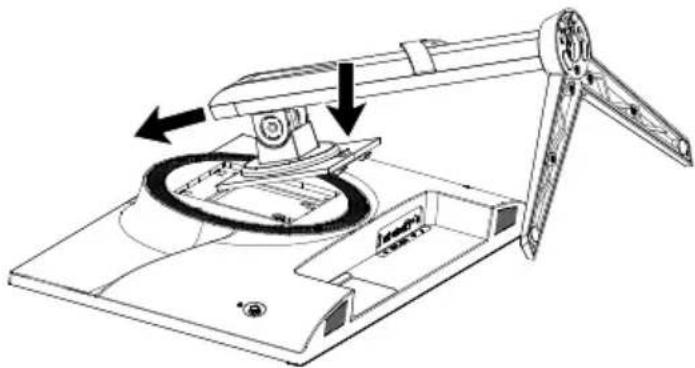
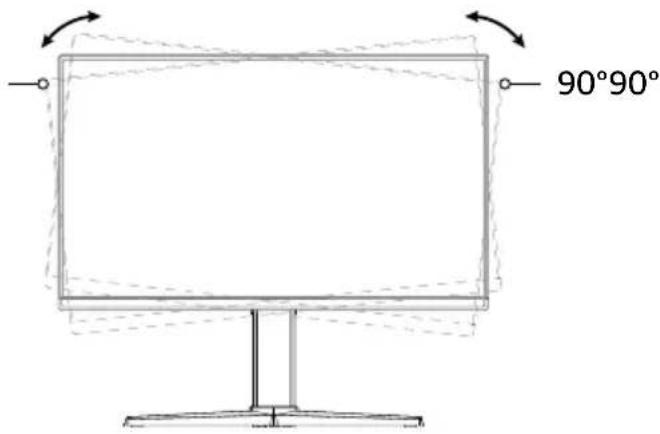
Pivoting
- Lift your monitor to its highest position, then push it back to tilt it at a 20^ angle.
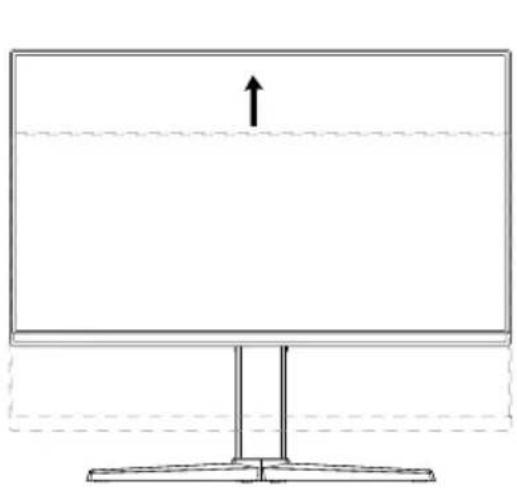
natural_image
Simple line drawing of a monitor with a stand and an upward arrow, no text or symbols present.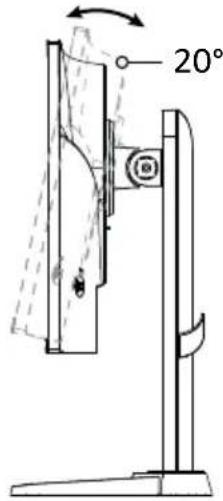
- Rotate the monitor clockwise or counterclockwise until it it is turned 90°.
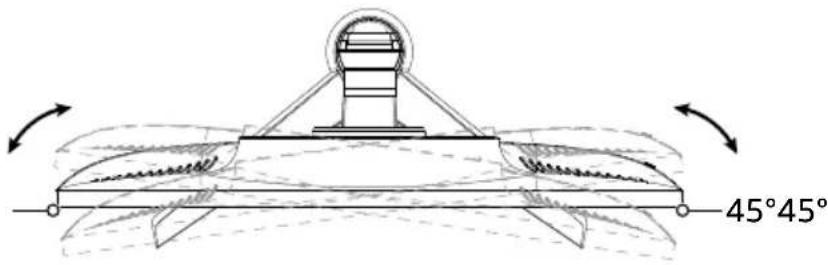
Swiveling
Swivel the monitor for the most comfortable viewing angle, up to 45° to the left or right.
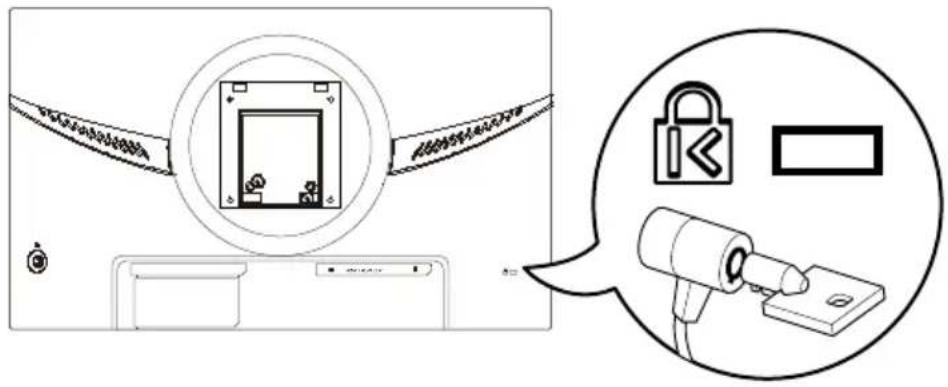
Installing a Cable Lock
The monitor can be secured to a fixed object with a cable lock (not included).
Using the Control Button
Use the control button to navigate the monitor's main menu:
▶ Short press: Turn monitor on or open the menu when the monitor is turned on.
▶ Long press: Turn monitor off
Up/Down/Left/Right: Press to open the menu, then use the directional arrows to adjust settings. When finished, press Left to go back a level until the menu is closed.

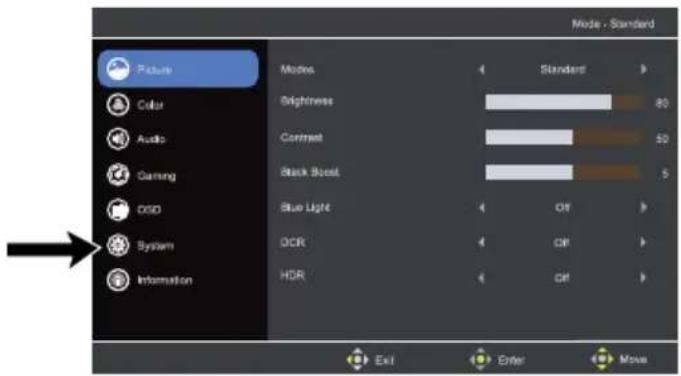
Adjusting the Settings
Short press or push the control button up, down, left, or right to open the main menu. Use the options in the following Picture, Color, Audio, Gaming, OSD (on-screen display), System, and Information menus to adjust your monitor's settings.
When you're finished, press the control button left repeatedly to exit the main menu. See "Using the Control Button" for more information on navigating the menu.
Picture
Modes: Optimize picture quality for general content. Choose between Action, Racing, Sports, User, Standard, ECO, Graphics, or HDR.
Brightness: Adjust the balance between light and dark shades. Choose a setting from 0 (dimmest) to 100 (brightest).
Contrast: Adjust the degree of difference between light and dark areas. Choose a setting from 0 (least contrast) to 100 (most contrast).
Black Boost: Boost the amplitude of the dark color levels of the display, making blacks less black. The higher the level, the higher the boost.
Blue Light: When turned on, this filters out blue light by adjusting the ratio of blue light that is displayed.
- DCR (Dynamic Contrast Ratio): Adjust the backlight based on what is displayed on your screen.
HDR (High Dynamic Range): Adjust the HDR auto or off. The default is off.
Color
▶ Gamma: Adjust the luminance tone. The default value is 2.2 (standard value for Windows).
Color Space: Choose sRGB, Rec. 709, HDR, EBU, SMPTE-C or Standard. Default is standard.
Color Temp.: Change the color temperature. Choose between Warm, Normal, Cool or User. The default is Warm.
Audio
Volume: Adjust the volume.
▶ Mute: Turn the sound on or off.
Gaming
Over Drive: Prevent motion blur in fast-moving images. Choose between Off, Normal, or Extreme.
Adaptive-Sync: When turned on, this eliminates tearing and stuttering. The default is On.
▶ MPRT: Turn MRPT on or off. The default is off.
Refresh Rate Num: Display the screen's current refresh rate.
Aim Point: Show an Aim point of the screen for shooting games.
OSD (On-Screen Display)
Language: Set the OSD menu language. Choose between English / Русский / Deutsch / Français / Español / Italiano / Hollands / Finnish / Turkish / Polish / Portuguese / Brazilian Portuguese / 繁體中文 (Traditional Chinese) / 簡体中文 (Simplified Chinese) / 日本語 (Japanese) / 한국어
- OSD Timeout: Adjust the delay before turning off the OSD menu.
Transparency: Adjust the transparency of the OSD menu.
System
Input: Select the source from an available input source.
▶ Auto Source: Automatically searches for available input sources.
Wide Mode: Select your screen's aspect ratio.
▶ Display Data Channel (DDC) / Command Interface (CI): Set your monitor settings through software on your computer.
Information
Show your machine's basic information.
Reset All Settings: Reset all settings to factory defaults.
Cleaning and Maintenance
To clean the monitor's screen:
- Turn off the monitor and unplug the power adapter.
- Spray a solvent-free cleaning solution onto a soft cloth and gently wipe the screen.

CAUTION
Do not spray or pour any liquid directly onto the screen or its bezel.
Do not use any ammonia- or alcohol-based cleaners on the monitor's screen or bezel.
Troubleshooting
Problem
No picture (LED is on)
Solutions
▶ Make sure that your computer is turned on.
Make sure that your cable (DisplayPort or HDMI) is correctly and securely connected to your monitor and computer.
Make sure that your cable is not damaged. Open the menu to increase the Brightness and Contrast settings, or reset the monitor to default settings.
Make sure that you have selected the correct input source. From the menu, navigate to System > Input.
Problem
No picture (LED is off)
Solutions
Make sure that the power adapter is connected and receiving power.
Press and hold the control button to turn on the monitor.
Problem
Abnormal picture
Solutions
Different input sources may have differing aspect ratios. Try adjusting the aspect ratio in the menu.
Problem
Color display is abnormal
Solutions
Check your cable connection (DisplayPort or HDMI) to make sure that the connection is secure.
Make sure that your cable (DisplayPort or HDMI) is not damaged or does not have any bent pins.
▶ Try another cable.
Adjust the picture's Mode or Color Temp. to change the display's color.
Problem
No sound or sound is too low
Solutions
Make sure that the monitor's speakers are not muted.
- Raise the volume on your computer.
Specifications
24" Monitor
| Driving System TFT Color LCD | |
| Viewable Image Size 23.8 in. W (60 cm) | |
| Pixel Pitch 0.2745 mm (H) x 0.2745 mm (V) | |
| Response Time 1ms MPRT (motion clearness on) | |
| Horizontal Scan Range | HDMI: 30–224KHzDisplayPort: 30–224KHz |
| Vertical Scan Range | HDMI: 48–165HzDisplayPort: 48–165Hz |
| Scan Size (Max.) | Horizontal: 527 mmVertical: 296 mm |
| Display Colors 16.7M Colors | |
| Max Resolution 1920 x 1080 @ 165Hz (HDMI/DP) | |
| Plug & Play VESA DDCCI/DDC2B | |
| Power Consumption | On Mode: 18W (typical)Standby Mode: ≤0.5WOff Mode: ≤0.3W |
| Connector Types | HDMI 2.0 x 2DP 1.4 x 1Audio 3.5 mm jack out (headphone output) |
| Video | HDMI interfaceDP interface |
| Power Source Input: 100–240 V~ 50/60 Hz | |
| Environmental Conditions | Operating Temp: 32° to 104°F (0° to 40°C)Storage Temp: -4° to 140°F (-20° to 60°C)Operating Humidity: 20% to 80% |
| VESA Pattern 100 x 100 mm | |
Note: Power consumption data is based on ErP standard test conditions.
Note: Power consumption is based on ErP standard test conditions.
27" Monitor
| Driving System TFT Color LCD | |
| Viewable Image Size 27 in. W (69 cm) | |
| Pixel Pitch 0.3114 mm (H) x 0.3114 mm (V) | |
| Response Time 1ms MPRT (motion clearness on) | |
| Horizontal Scan Range | HDMI: 30–224KHzDisplayPort: 30–224KHz |
| Vertical Scan Range | HDMI: 48–165HzDisplayPort: 48–165Hz |
| Scan Size (Max.) | Horizontal: 598 mmVertical: 336 mm |
| Display Colors 16.7M Colors | |
| Max Resolution 1920 x 1080 @ | 165Hz (HDMI/DP) |
| Plug & Play VESA DDCCI/DDC2B | |
| Power Consumption | On Mode: 21W (typical)Standby Mode: ≤0.5WOff Mode: ≤0.3W |
| Connector Types | HDMI 2.0 x 2DP 1.4 x 1Audio 3.5 mm jack out (headphone output) |
| Video | HDMI interfaceDP interface |
| Power Source Input: 100–240 V~ 50/60 Hz | |
| Environmental Conditions | Operating Temp: 32° to 104°F (0° to 40°C)Storage Temp: -4° to 140°F (-20° to 60°C)Operating Humidity: 20% to 80% |
| VESA Pattern 100 x 100 mm | |
For B0CP7RHXM1/B0CP7QZKP7/B0CP7SD8SW/B0CP7SGVBB
| Importer's Name/Trademark, Commercial Registration Number & Address | UK: Amazon EU SARL, UK Branch, 1 Principal Place, Worship St, London EC2A 2FA, United Kingdom, BR017427EU: Amazon EU S.à r.l., 38 Avenue John F. Kennedy, L-1855 Luxembourg 00134248 |
Symbol Explanation
For B0CP7RHXM1/B0CP7QZKP7/B0CP7SD8SW/B0CP7SGVBB
| CE | This symbol stands for "conformité Européenne", which means "Conformity with EU-directives". With the CE marking the manufacturer confirms that this product complies with applicable European directives and regulations. |
| UKCA | This symbol stands for "United Kingdom Conformity Assessed". With the UKCA-marking, the manufacturer confirms that this product complies with applicable regulations and standards within Great Britain. |
Legal Notices
FCC – Supplier's Declaration of Conformity
| Unique Identifier | Amazon Basics 24 Inch or 27 Inch Gaming Monitor, FHD 1080P, 165Hz, VESA Compatible, Adaptive sync, 1ms response B0CP7TNX8C/B0CP7SV7XV |
| Responsible Party Amazon.com Services LLC. | |
| U.S. Contact Information 410 Terry Ave N. Seattle, WA 98109, United States | |
| Telephone Number (206) 266-1000 | |
FCC Compliance Statement
- This device complies with Part 15 of the FCC Rules. Operation is subject to the two following conditions:
(1) this device may not cause harmful interference, and
(2) this device must accept any interference received, including interference that may cause undesired operation.
- Changes or modifications not expressly approved by the party responsible for compliance could void the user's authority to operate the equipment.
FCC Interference Statement
This equipment has been tested and found to comply with the limits for a Class B digital device, pursuant to part 15 of the FCC Rules. These limits are designed to provide reasonable protection against harmful interference in a residential installation.
This equipment generates, uses, and can radiate radio frequency energy and, if not installed and used in accordance with the instructions, may cause harmful interference to radio communications. However, there is no guarantee that interference will not occur in a particular installation. If this equipment does cause harmful interference to radio or television reception, which can be determined by turning the equipment off and on, the user is encouraged to try to correct the interference by one or more, of the following measures:
▶ Reorient or relocate the receiving antenna.
- Increase the separation between the equipment and the receiver.
Connect the equipment into an outlet on a circuit different to which the receiver is connected.
Consult the dealer or an experienced radio/TV technician for help.
Canada IC Notice
This Class B digital apparatus complies with Canadian CAN ICES-003 (B)/NMB-003 (B) standard.
Disposal (for Europe only)
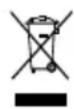
The Waste Electrical and Electronic Equipment (WEEE) Directive aims to minimize the impact of electrical and electronic goods on the environment and human health, by increasing re-use and recycling and by reducing the amount of WEEE going to landfill.
The symbol on this product or its packaging signifies that this product must be disposed separately from ordinary household wastes at its end of life. Be aware that this is your responsibility to dispose of electronic equipment at recycling centres in order to conserve natural resources. Each country should have its collection centres for electrical and electronic equipment recycling. For information about your recycling drop off area, please contact your related electrical and electronic equipment waste management authority, your local city office, or your household waste disposal service.
Trademark
HDMI ^TM
The terms HDMI, HDMI High-Definition Multimedia Interface, and the HDMI Logo are trademarks or registered trademarks of HDMI Licensing Administrator, Inc.
Feedback and Help
We would love to hear your feedback. To ensure we are providing the best customer experience possible, please consider writing a customer review.
Scan QR Code below with your phone camera or QR reader:
US:


UK: amazon.co.uk/review/review-your-purchases
If you need help with your Amazon Basics product, please use the website or number below.

US: amazon.com/gp/help/customer/contact-us
UK: amazon.co.uk/gp/help/customer/contact-us

+1 877-485-0385 (US Phone Number)
Table des matières
natural_image
Technical line drawing of a robotic arm with motion arrows indicating movement (no text or symbols)natural_image
Pure technical diagram of a mechanical component without any text, numbers, or symbolsBouton de commande
natural_image
Pure technical diagram of a mechanical component without any text, numbers, or symbolsBouton de commande
FR: amazon.fr/review/review-your-purchases#
CA: amazon.ca/review/review-your-purchases#
CA: amazon.ca/gp/help/customer/contact-us
Contenido
natural_image
Technical line drawing of a robotic arm with motion arrows indicating movement (no text or symbols)natural_image
Simple line drawing of a monitor with a stand and an upward arrow, no text or symbols present.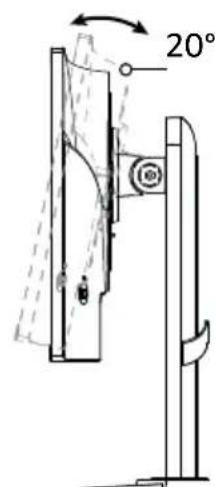
ES: amazon.es/review/review-your-purchases#
MX: amazon.mx/review/review-your-purchases#
ES: amazon.es/gp/help/customer/contact-us
MX: amazon.mx/gp/help/customer/contact-us
Inhalt
natural_image
Technical line drawing of a robotic arm with rotating components and directional arrows indicating motion (no text or symbols)amazon.de/review/review-your-purchases#
amazon.de/gp/help/customer/contact-us
Indice
natural_image
Technical line drawing of a robotic arm with rotating components and directional arrows indicating motion (no text or symbols)OSD (On-Screen Display)
Lingua: per impostare la lingua del menu ODS. Scegliere fra English / Русский / Deutsch / Français / Español / Italiano / Hollands / Finnish / Turkish / Polish / Portuguese / Brazilian Portuguese / 繁體中文 (Traditional Chinese) / 簡体中文 (Simplified Chinese) / 日本語 (Japanese) / 한국어
Intervallo OSD: per regolare il ritardo che precede la chiusura automatica del menu ODS.
Trasparenza: per regolare la trasparenza del menu ODS.
Sistema
amazon.it/review/review-your-purchases#
Specifications....89
▶ Monitor
▶ Steun
Voet
Snelstartgids
Voedingsadapter
HDMI-kabel
natural_image
Technical line drawing of a robotic arm with rotating base and connecting rod (no text or symbols)natural_image
Technical line drawing showing a monitor with an upward arrow and a 20° angle measurement on the right side (no text or symbols beyond basic geometry)amazon.nl/review/review-your-purchases#
amazon.nl/gp/help/customer/contact-us
目次
安全に関する注意事項.... 94
パッケージ内容 95
各部の名称.... 95
モニターのセットアップ…… 96
モニターの使用 97
清掃とメンテナンス.... 102
トラブルシューティング.... 103
仕様 104
記号の説明.... 105
法定通知.... 106
フィードバックとサポート 107
安全に関する注意事項
natural_image
Technical line drawing of a robotic arm with rotating components and directional arrows indicating motion (no text or symbols)壁面取付キットを使った設置
natural_image
Simple line drawing of a monitor with a stand and an upward arrow, no text or symbols present.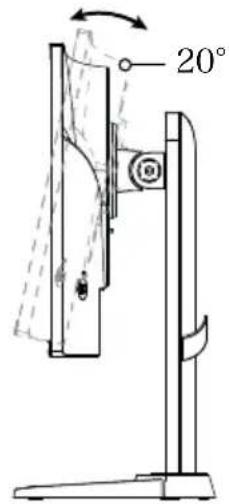
コントロールボタンの使用
amazon.co.jp/review/review-your-purchases#
amazon.co.jp/gp/help/customer/contact-us
販売元:アマゾンジャパン合同会社
URL: https://www.amazon.co.jp/
amazon basics
amazon.com/AmazonBasics
MADE IN CHINA
FABRIQUÉ EN CHINE
HECHO EN CHINA

- Contents
- Safety Instructions
- Safe Listening Instructions
- Package Contents
- Parts Overview
- 24" and 27" Monitor - Front
- 24" and 27" Monitor - Back
- Setting Up the Monitor
- Attaching the Monitor Base
- Installing with a Wall Mounting Kit
- Using the Monitor
- Powering the Monitor
- Connecting to a Computer
- Adjusting the Viewing Angle
- Forward/Backward and Height
- Pivoting
- Swiveling
- Installing a Cable Lock
- Using the Control Button
- Adjusting the Settings
- Picture
- Color
- Audio
- Gaming
- OSD (On-Screen Display)
- System
- Information
- Cleaning and Maintenance
- CAUTION
- Troubleshooting
- Problem
- Solutions
- Specifications
- Symbol Explanation
- Legal Notices
- FCC Compliance Statement
- FCC Interference Statement
- Canada IC Notice
- Disposal (for Europe only)
- Trademark
- HDMI TM
- Feedback and Help
- Table des matières
- Contenido
- Inhalt
- Indice
- Sistema
- 目次
- 安全に関する注意事項
- 壁面取付キットを使った設置
- コントロールボタンの使用
- amazon basics
Brand : AMAZON
Model : BOCP7D88SW
Category : Monitor