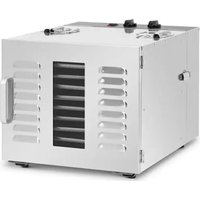
WIE-PD-110 - Tumble dryer Wiesenfield - Free user manual and instructions
Find the device manual for free WIE-PD-110 Wiesenfield in PDF.


| Product type | Pollen dryer |
| Brand | Wiesenfield |
| Model | WIE-PD-110 |
| Rated voltage | 230 V ~ / 50 Hz |
| Rated power | 1000 W |
| Protection class | I |
| Dimensions (L × D × H) | 430 × 605 × 400 mm |
| Weight | 14.7 kg |
| Temperature range | 30 °C to 40 °C (recommended for pollen) |
| Timer | Yes, adjustable (continuous operation possible) |
| Preheating | 5 to 10 minutes before use |
| Tray capacity | Multiple shelves (not specified) |
| Use | Gentle drying of pollen and flowers |
| Safety | Grounding mandatory, supervision required |
| Maintenance | Clean grids and interior after each use; do not immerse |
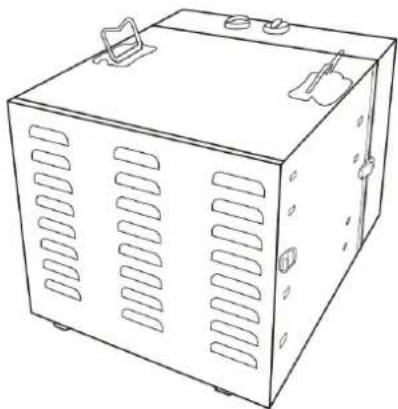
| Main parts | Door, shelves, control panel, feet, cabinet |
| Included accessories | Drying grids |
| Optional accessories | Oven thermometer (not included) |
| Rehydration | Possible (soak in cold water 3-5 min or 2-6 h in fridge) |
| Storage of dried pollen | Airtight containers, cool (≤ 16 °C) and dark place |
Frequently Asked Questions - WIE-PD-110 Wiesenfield
User questions about WIE-PD-110 Wiesenfield
0 question about this device. Answer the ones you know or ask your own.
Ask a new question about this device
Download the instructions for your Tumble dryer in PDF format for free! Find your manual WIE-PD-110 - Wiesenfield and take your electronic device back in hand. On this page are published all the documents necessary for the use of your device. WIE-PD-110 by Wiesenfield.
USER MANUAL WIE-PD-110 Wiesenfield
natural_image
Line drawing of a rectangular metal enclosure with perforated windows and mounting clips (no text or symbols)2. Option Warmwasser:
natural_image
Simple line drawing of a plug with a spring and a handle, labeled A (no text or symbols on the diagram itself)natural_image
Simple line drawing of a wall socket with four cutouts and an arrow pointing to one (no text or symbols)B
Abbildung
natural_image
Line drawing of a wall-mounted electrical outlet with two switches and a plug (no text or symbols)B
This User Manual has been translated using machine translation. We have made every effort to ensure the translation is accurate, but please note that automated translations are not perfect and are not meant to replace human translators. The official version of the User Manual is in English. Any differences between the translated version and the original English are not legally binding. If you have any questions about the accuracy of the translation, please refer to the English version, which is the official reference. More language versions are available upon request via info@expondo.com.
Technical data
| Parameter description Parameter value | |
| Product name Pollen dryer | |
| Model | WIE-PD-110 |
| Rated voltage [V~] / frequency [Hz] 230 / 50 | |
| Rated power [W] 1000 | |
| Protection class | I |
| Dimensions [width * length * height; mm] 430*605*400 | |
| Weight [kg] 14.7 | |
Description
natural_image
Line drawing of a rectangular metal enclosure with ventilation slots and mounting clips (no text or symbols)This product is used to gently dry pollen to retain its nutritional value and biological activity.
The user is liable for any damage resulting from unintended use of the device.
Operation

CAUTION! Edges may be sharp!

IMPORTANT!
• ALWAYS monitor the product while in use. NEVER leave the product unattended during operation.
- Read and fully understand all instructions and safety warnings before using the unit.
- Use in a well-ventilated area: Ensure there is adequate airflow around the unit for safe and efficient operation.
• DO NOT block the air vents: Keep the air vents at the rear or on the door of the product unobstructed to allow proper air circulation and prevent overheating.
Operation panel
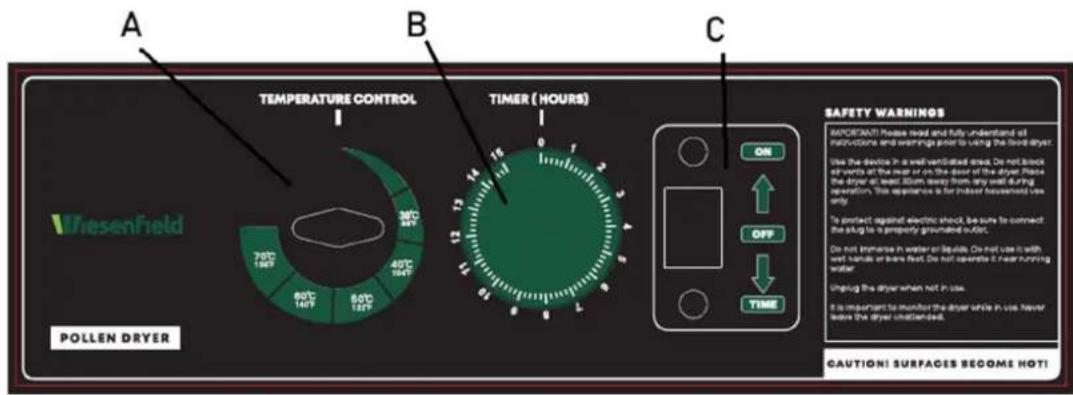
A- Temperature control knob
B- Timer knob
C- On/Off/Time power switch
Operation instructions
1. Ensure a Clean, Stable Setup
Place the product on a clean, dry, and stable surface before operation.
2. Power Off the Device
Set the Power Switch and Timer Knob to the "OFF" position before connecting the product to the power supply.
3. Connect to a Power Source
Plug the product into a standard wall outlet. Ensure the cord is secure and free from obstructions.
4. Allow Proper Air Circulation
Position the Pollen Dryer at least 12 inches (30.5 cm) away from any walls or objects to ensure optimal air circulation. DO NOT block the air vents located at the rear or on the door of the product.
5. Prepare and Load the Racks
- Remove the Racks from the Dehydrator Cabinet.
- Evenly spread pollen onto the Racks, ensuring the pollen is not clumped or overlapping. This allows air to circulate freely around the pollen.
- Avoid using wet pollen. If necessary, gently remove any excess moisture by patting the pollen with a soft, clean paper towel. Excess moisture can reduce drying efficiency and cause temperature fluctuations.
6. Turn on the Device
Switch the Power Button to the "ON" or "TIME" position.
7. Set the Desired Temperature
- Adjust the Temperature Control Knob to a heat setting suitable for pollen drying (typically 30–40°C).
- If available, use an oven thermometer (not included) to monitor the internal temperature for accuracy. Adjust as needed to maintain a consistent drying environment.
8. Set the Drying Time
- Turn the Timer Knob to the desired drying duration.
- If continuous operation is required, ensure the device remains on by switching to the "ON" position.
9. Preheat Before Loading Racks
Preheat the product for 5–10 minutes before loading the Racks back into the Cabinet.
10. Secure the Door
Attach the door to the Cabinet by aligning it with the top lip of the Cabinet. Ensure the sides of the door are closed securely to maintain proper airflow and temperature stability.
11. Manage Condensation
During operation, small water droplets may form on the surface of the pollen. Carefully blot these with a clean towel or paper towel to prevent moisture buildup. Use caution, as parts of the product may become hot during use.

NOTICE! Drying times may vary depending on several factors, including relative humidity, ambient air temperature, and the thickness of the pollen layer on the Racks. The actual operating temperature of the product is influenced by the ambient temperature (recommended 70^ F or 21^ C). If the product is used in an environment where the ambient temperature differs significantly from 70^ F ( 21^ C), the temperature indicated on the Temperature Control Knob may not be fully accurate. Adjustments to the temperature settings may be necessary to maintain optimal conditions for pollen drying.
Operation tips
- Avoid Overlapping Pollen: Spread pollen evenly and flat on the drying trays to ensure proper airflow and even drying.
- Monitor Dryness: Begin checking the pollen after 6 hours, then every 2 hours until it is fully dry and free of any visible moisture.
- Ensure Complete Dryness: Inspect the pollen to confirm it is thoroughly dried before removing it from the dryer. Open or inspect a few samples for internal dryness. If any moisture remains, continue drying until fully dry.
- Label and Document: Label each container with the pollen type, date of drying, and initial weight. Maintain a journal to refine your drying techniques and record observations for future batches.
5. Proper Storage:
- Allow the pollen to cool before packaging.
• Use airtight containers for storage, as proper sealing is critical for maintaining quality. - Pollen can be stored longer in a cool, dark, and dry location. The ideal storage temperature is 60^ F ( 16^ C) or lower.
6. Packaging Recommendations:
- Place dried pollen in plastic freezer bags before transferring them to metal or glass containers.
-
Remove as much air as possible before sealing. Vacuum sealing is ideal for preserving the quality of dried pollen.
-
Drying and Shrinkage Considerations: Pollen will reduce in volume and weight during the drying process. To prevent excessive loss or handling issues, avoid spreading overly small quantities.
Drying flowers
The flowers should be dry to start with, best if picked after the dew has dried and before the night damp sets in. Dry the flowers as soon as possible after picking.
The best condition for drying flowers is a dry, warm, dark, clean, and well-ventilated area, which makes the product an ideal setting. Flowers will retain the best colour and condition when dried quickly.
A low temperature should be used to retain the natural oils.
Strip off the leaves or if you prefer to keep the foliage. Discard any brown or damaged leaves.
Place on the Tray in a single layer, avoiding overlapping.
Drying times will vary considerably depending on the size of the flower and the amount of foliage. Dry at 100^ F ( 38^ C).
Rehydrating
1. Rehydration Process:
Dried pollen can be rehydrated by soaking in cold water for 3–5 minutes. Use a 1:1 ratio of water to pollen (e.g., 1 cup of water for 1 cup of dried pollen). Once rehydrated, the pollen is ready for use.
2. Warm Water Option:
Soaking in warm water will speed up the rehydration process, but it may reduce the pollen's quality.
3. Extended Soaking:
For better hydration, dried pollen can be soaked in cold water for 2–6 hours in the refrigerator.
DO NOT soak pollen at room temperature, as this may encourage the growth of harmful bacteria.
4. Storage and Consumption:
Consume rehydrated pollen as soon as possible after opening the storage container. Any unused portions should be stored in the refrigerator to prevent contamination or spoilage.
Cleaning and maintenance
Clean the Racks and interior of the Cabinet before using the product for the first time and after each use to maintain pollen quality and prevent contamination.

WARNING! Before cleaning or servicing the Dehydrator, make sure it is unplugged, and the power switch is set to the "OFF" position.
1. Turn Off the Device
Set the Power Switch and Timer Knob to the "OFF" position. Disconnect the electrical cord from the power outlet.
2. Allow Cooling
Ensure the product has completely cooled down before cleaning to avoid burns or damage to the components.
3. Remove the Racks
Carefully remove the Racks from the Cabinet of the product to prevent spilling or damaging any remaining pollen particles.
4. Wipe the Cabinet
Use a damp, soft sponge or cloth to gently wipe the inside and outside of the Cabinet clean.

CAUTION! Be aware of sharp edges! Avoid splashing water onto the Heating Element (located behind the protective Screen at the back of the Cabinet). Water may damage the electrical components and increase the risk of electrical shock. DO NOT immerse the product in water.
5. Clean the Racks
Wash the Racks with warm, soapy water. Rinse thoroughly with clean water to ensure no residue is left that could contaminate the pollen. Dry the Racks immediately with a soft, clean towel to prevent moisture buildup.
Disposing of used devices
Do not dispose of this device in municipal waste systems. Hand it over to an electric and electrical device recycling and collection point. Check the symbol on the product, instruction manual, and packaging. The plastics used to construct the device can be recycled following their markings. By choosing to recycle you are making a significant contribution to the protection of our environment.
Contact local authorities for information on your local recycling facility.
Grounding instructions
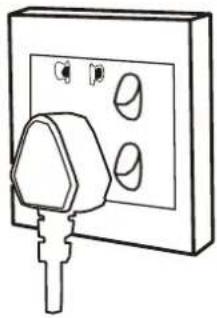
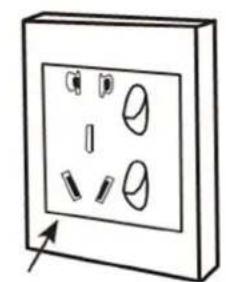
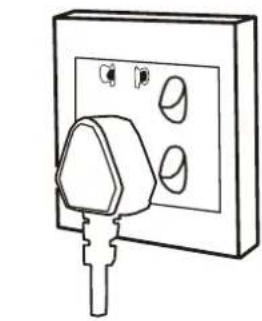
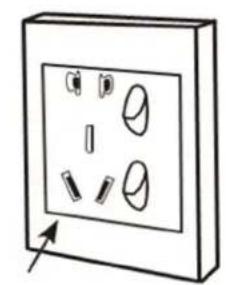
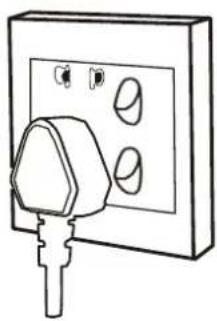
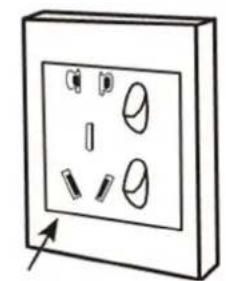
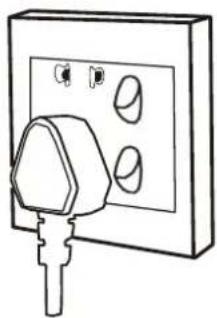
This appliance must be grounded while in use to protect the operator from electric shock. The appliance is equipped with a 3-conductor cord and a 3-prong grounding (Figure A) type plug to fit the proper grounding-type receptacle (Figure B). For safety, the plug must be firmly plugged in (Figure C). DO NOT modify the plug in any way.
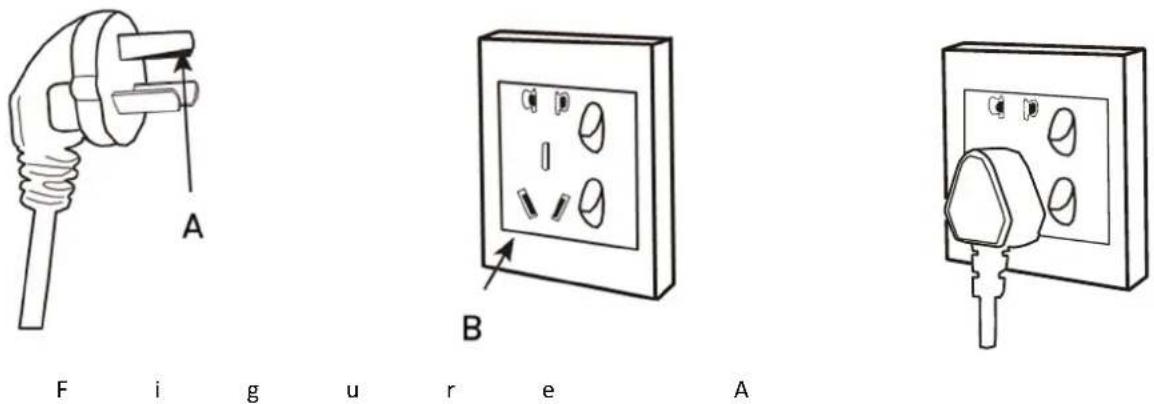
A- Grounding prong
B- Circuit grounding conductor
Troubleshooting
| Problem | Possible | cause |
| Moisture in the container Incomplete drying. Dried pollen left Test | pollen for dryness before |
Prev
| at room temperature too long after cooling, moisture has re-entered the pollen. | removing it from the product. Cool quickly and package immediately. | |
| Mold on pollen | Incomplete drying. Pollen is not checked for residual moisture within a week of drying. The storage container is not airtight, allowing moisture to re-enter the pollen. Storage conditions are too warm or humid, leading to moisture absorption by the pollen. Case hardening may occur if the pollen is dried at a temperature that is too high, causing the outer layer of the pollen to dry quickly while the interior remains moist. | Test several batches of pollen for dryness. Check the storage container within 1 week for signs of moisture. If moisture is present, redry the pollen to prevent spoilage. Use airtight containers for storing pollen to protect it from humidity and contamination. Store pollen in cool, dry areas at temperatures of 70°F (21°C) or below. Dry pollen at appropriate temperatures to avoid over- or under-drying. |
| Brown spots on pollen | Too high of drying temperature used. Pollen was over-dried. | Dry pollen at appropriate temperatures. Check often for dryness. |
| Pollen sticking to the Racks | Pollen is not turned over. | After one hour of dehydrating, use a spatula and flip the pollen. |
Parts diagram
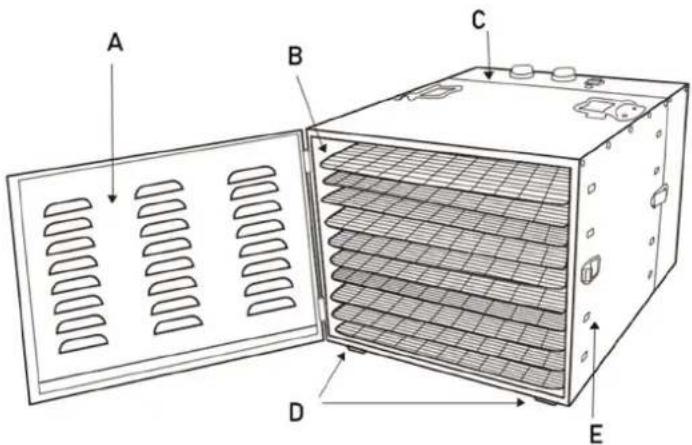
| Part number Description | |
| A | Door |
| B | Racks |
| C | Control |
| D | Rubber |
| E | Dehydrator |
panel feet cabinet

natural_image
Line drawing of a rectangular industrial or storage unit with multiple vented cutouts and mounting clips (no text or symbols)natural_image
Line drawing of a rectangular industrial enclosure with ventilation slots and mounting clips (no text or symbols)natural_image
Line drawing of a rectangular industrial or storage unit with multiple vented cutouts and mounting clips (no text or symbols)natural_image
Line drawing of a rectangular metal enclosure with perforated windows and mounting clips (no text or symbols)natural_image
Line drawing of a rectangular industrial enclosure with ventilation slots and mounting clips (no text or symbols)natural_image
Line drawing of a rectangular industrial or storage unit with perforated panels and two cliplets (no text or symbols)natural_image
Line drawing of a rectangular metal enclosure with ventilation slots and mounting clips (no text or symbols)natural_image
Line drawing of a rectangular metal enclosure with perforated windows and mounting clips (no text or symbols)C- On/Off/Aikavirtakytkin
Käyttöohjeet
natural_image
Line drawing of a rectangular industrial or storage unit with perforated panels and mounting clips (no text or symbols)A- Temperaturregulator
B- Timerknop
natural_image
Simple line drawing of a plug with a spring and a handle, labeled A (no text or symbols on the diagram itself)Figuur
A
natural_image
Simple line drawing of a wall-mounted electrical outlet with four internal components and an arrow indicating direction (no text or symbols)B
Figuur
natural_image
Line drawing of a wall-mounted electrical socket with a key inserted (no text or symbols)natural_image
Line drawing of a rectangular metal enclosure with perforated windows and mounting tabs (no text or symbols)A- Knott for temperaturinnstilling
B- Timerknapp
C- På/Av/Tid strømbryter
Bruksanvisning
- Sørg for et rent, stabilt oppsett
Plasser produktet på en ren, tørr og stabil overflate før bruk.
- Slå av enheten
natural_image
Line drawing of a rectangular metal enclosure with ventilation slots and mounting clips (no text or symbols)natural_image
Line drawing of a rectangular industrial or storage unit with perforated panels and two cliplets (no text or symbols)5. Limpe as prateleiras
natural_image
Line drawing of a rectangular metal enclosure with perforated windows and mounting clips (no text or symbols)A- Ovládač teploty
B- Gombík časovača
natural_image
Line drawing of a rectangular industrial or storage unit with perforated panels and mounting clips (no text or symbols)natural_image
Simple line drawing of a plug with a handle and labeled point A (no text or symbols beyond label)Фигура А Фигура С
natural_image
Simple line drawing of a wall-mounted electrical socket with four internal components and an arrow indicating direction (no text or symbols)B
Фигура Б
natural_image
Line drawing of an electrical outlet with a plug and three switches (no text or symbols)natural_image
Line drawing of a rectangular metal enclosure with perforated windows and mounting clips (no text or symbols)natural_image
Simple line drawing of an electrical plug with a spring and labeled component A (no text or symbols beyond label)Εικόνα Α
natural_image
Simple line drawing of a wall-mounted electrical socket with four internal components and an arrow indicating direction (no text or symbols)B
Εικόνα Β
natural_image
Line drawing of an electrical outlet with a hexagonal socket and three switches (no text or symbols)Εικόνα Γ
A- Προεξοχή γείωσης
natural_image
Line drawing of a rectangular metal enclosure with perforated windows and a clip (no text or symbols)A- Gumb za kontrolu temperature
B- Gumb mjerača vremena
C- On/Off/Time prekidač
Upute za rad
- Osigurajte čistu i stabilnu postavku
Stavite proizvod na čistu, suhu i stabilnu površinu prije rada.
- Isključite uređaj
2. Opcija tople vode:
natural_image
Line drawing of a rectangular metal enclosure with ventilation slots and a clip (no text or symbols)natural_image
Line drawing of a rectangular industrial or storage unit with multiple slots and mounting clips (no text or symbols)natural_image
Line drawing of a rectangular metal enclosure with ventilation slots and clip handles (no text or symbols)A- Gumb za nadzor temperature
B- Gumb časovnika
C- Stikalo za vklop/izklop/čas
Navodila za uporabo
2. Možnost tople vode:
For the disposal of the device please consider and act according to the national and local rules and regulations.
CONTACT
expondo Polska sp. z o.o. sp. k.

- Option Warmwasser:
- Description
- Operation
- Operation panel
- Operation instructions
- Ensure a Clean, Stable Setup
- Power Off the Device
- Connect to a Power Source
- Allow Proper Air Circulation
- Prepare and Load the Racks
- Turn on the Device
- Set the Desired Temperature
- Set the Drying Time
- Preheat Before Loading Racks
- Secure the Door
- Manage Condensation
- Operation tips
- Proper Storage:
- Packaging Recommendations:
- Drying flowers
- Rehydrating
- Rehydration Process:
- Warm Water Option:
- Extended Soaking:
- Storage and Consumption:
- Cleaning and maintenance
- Turn Off the Device
- Allow Cooling
- Remove the Racks
- Wipe the Cabinet
- Clean the Racks
- Disposing of used devices
- Grounding instructions
- Troubleshooting
- Parts diagram
- Käyttöohjeet
- Bruksanvisning
- Limpe as prateleiras
- Upute za rad
- Opcija tople vode:
- Navodila za uporabo
- Možnost tople vode:
- CONTACT
Brand : Wiesenfield
Model : WIE-PD-110
Category : Tumble dryer