USER MANUAL WCR72 SCHEPPACH
natural_image
Line drawing of a mechanical device with circular components and a power button (no text or symbols)
WCR72
| DE | FensterputzroboterOriginalbetriebsanleitung | 6 |
| GB | Window cleaner robotTranslation of original instruction manual | 20 |
| FR | Robot lave-vitresTraduction de la notice originale | 33 |
1
2
3
4
flowchart
graph TD
    A["20 cm"] --> B["Step 3"]
    B --> C["Step 4"]
    C --> D["Step 5"]
    D --> E["Step 6"]
    E --> F["Final knot"]
5
natural_image
Technical line drawing of a mechanical device before and after assembly, showing internal components and motion indicators (no text or symbols)
6

7
8
natural_image
Diagram of a mechanical or electrical component with circular components and a small inset showing a droplet (no text or symbols)
9

10
natural_image
Line drawing of a remote control with three arrows indicating direction (no text or symbols)
natural_image
Diagram of a handbag with a droplet inside, showing no text or symbols
11

flowchart
graph TD
    A["Circle with triangle symbol"] --> B["Arrow"]
    B --> C["Arrow"]
    C --> D["Arrow"]
    D --> E["Arrow"]
    E --> F["Arrow"]
    F --> G["Arrow"]
    G --> H["Arrow"]
flowchart
graph TD
    A["Path 1"] --> B["Path 2"]
    B --> C["Decision Node"]
    style A stroke-dasharray: 5 5
    style C fill:#fff,stroke:#000
    note right of C
        Arrow left
        Arrow right
    end
flowchart
graph TD
    A["Circle with arrow"] --> B
    B --> C
    C --> D
    D --> E
    E --> F
    F --> G
    G --> H
    H --> I
    I --> J
    J --> K
    K --> L
    L --> M
    M --> N
    N --> O
    O --> P
    P --> Q
    Q --> R
    R --> S
    S --> T
    T --> U
    U --> V
    V --> W
    W --> X
    X --> Y
    Y --> Z
12
Günzburger Straße 69
D-89335 Ichenhausen
Verehrter Kunde,
Explanation of the symbols on the product
Symbols are used in this manual to draw your attention to potential hazards. The safety symbols and the accompanying explanations must be fully understood. The warnings themselves will not rectify a hazard and cannot replace proper accident prevention measures.
 | Warning - Read the operating manual to reduce the risk of injury. |
 | Protection class II (double insulation) |
 | Removable supply unitThis device may only be connected to the mains power supply using a separate power supply designed for this purpose. |
 | The power supply must not be exposed to rain: |
 | Only suitable for indoor use: |
 | SMPS containing a short-circuit-proof safety transformer (absolute or conditional). |
 | SMPS (switching mode power supply): |
 | The device is only intended for use at altitudes of up to 5000 metres. |
 | The product complies with the applicable European directives. |
Table of contents: Page:
- Introduction....22
- Description of the product 22
- Scope of delivery 22
- Proper use 22
- General safety instructions.... 23
- Residual risks 24
- Technical data....25
- Unpacking 25
- Layout 25
- Start-up 26
- Cleaning functions 27
- Electrical connection 28
- Cleaning....29
- Storage 29
- Maintenance 29
- Repair & ordering spare parts 29
- Disposal and recycling....30
- Troubleshooting 32
- Declaration of conformity 51
1. Introduction
Manufacturer:
Scheppach GmbH
Günzburger Straße 69
D-89335 Ichenhausen
Dear Customer,
We hope your new product brings you much enjoyment and success.
Note:
In accordance with the applicable product liability laws, the manufacturer of this product assumes no liability for damage to the product or caused by the product arising from:
- Improper handling
- Failure to comply with the operating manual
• Repairs carried out by third parties, unauthorised specialists
• Installing and replacing non-original spare parts
- Improper use
- Failures of the electrical system due to failure to observe the national electrical requirements and regulations.
Note:
The operating manual is part of this product. It includes important instructions for the safe, proper and economic operation of the product, for avoiding danger, for minimising repair costs and downtimes and for increasing the reliability and extending the service life of the product. In addition to the safety instructions in this operating manual, you must also observe the regulations applicable to the operation of the product in your country. Familiarise yourself with all operating and safety instructions before using the product. Only operate the product as described and for the specified areas of application. Keep the operating manual in a good place and hand over all documents when passing the product on to third parties.
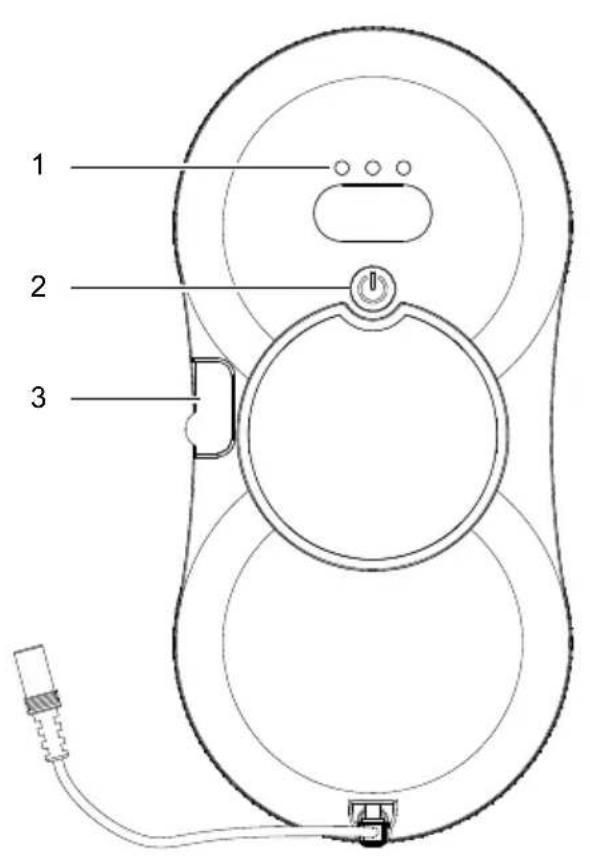
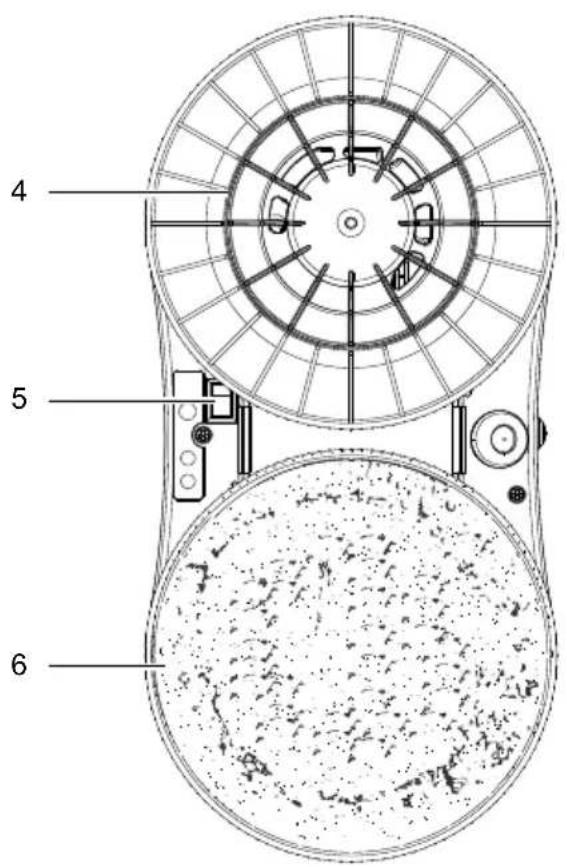
2. Description of the product
- Operating display
- On/off switch
- Filling opening
- Cleaning ring
- Main switch
- Cleaning pad
-
Power supply
-
Safety rope including carabiner hook
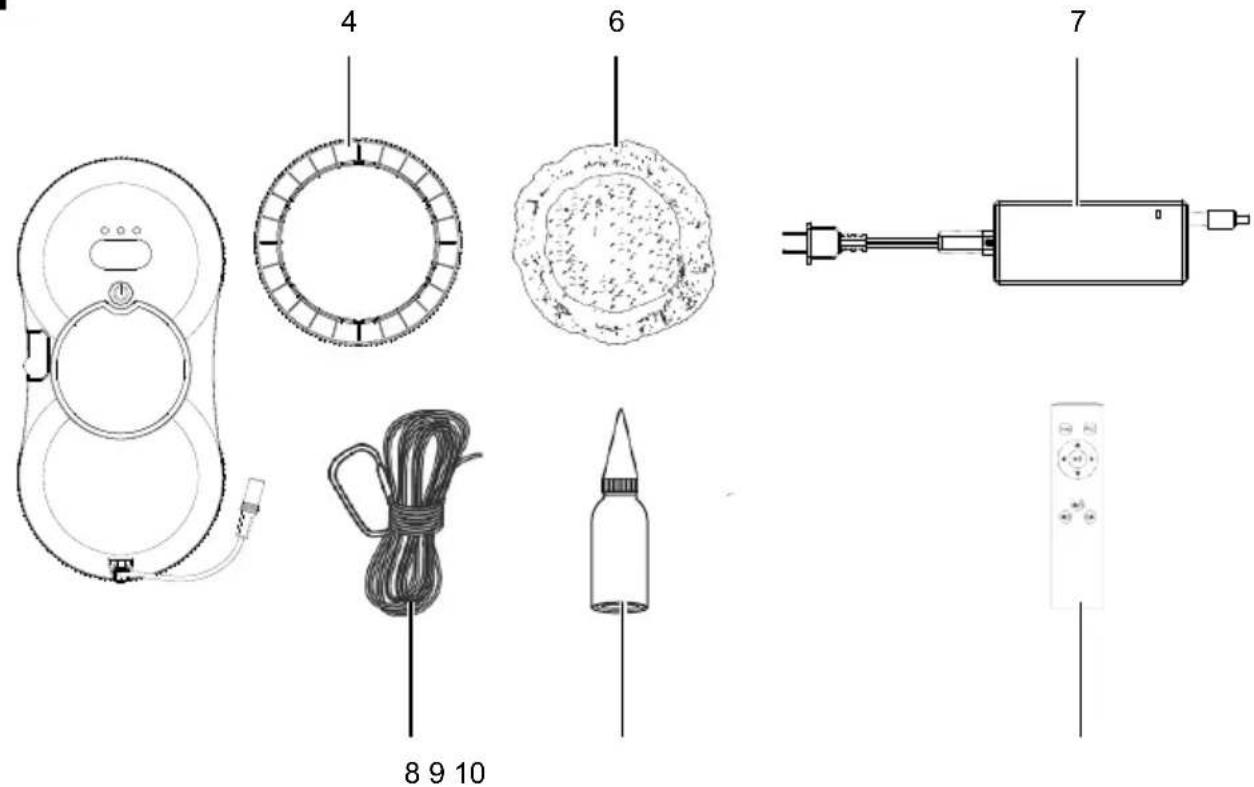
3. Scope of delivery
Item Quantity Designation
| 1x Window cleaning robot |
| 4. 4x Cleaning ring |
| 6. 10x Cleaning pads |
| 7. 1x Power supply |
| 8. 1x Safety rope including carabiner hook |
| 9. 1x Refilling bottle |
| 10. 1x Remote control |
| Operating manual |
4. Proper use
This product is intended exclusively for cleaning framed windows and glass surfaces.
It is not suitable for cleaning frameless windows or glass surfaces.
Special care must be taken if the silicone seals on the frame are damaged, as the product may leak or fall during cleaning.
The user must always monitor the cleaning process to ensure safe and reliable operation.
The product may only be used in the intended manner. Any use beyond this is improper. The user/operator, not the manufacturer, is responsible for damages or injuries of any type resulting from this.
An element of the intended use is also the observance of the safety instructions, as well as the assembly instructions and operating information in the operating manual.
Persons who operate and maintain the product must be familiar with the manual and must be informed about potential dangers.
The liability of the manufacturer and resulting damages are excluded in the event of modifications of the product.
The product may only be operated with original parts and original accessories from the manufacturer.
The safety, operating and maintenance specifications of the manufacturer, as well as the dimensions specified in the technical data, must be observed.
Please note that our products were not designed with the intention of use for commercial or industrial purposes. We assume no guarantee if the product is used in commercial or industrial applications, or for equivalent work.
The manufacturer is not liable for damage caused by improper use or incorrect operation.
Explanation of the signal words in the operating manual

DANGER
Signal word to indicate an imminently hazardous situation which, if not avoided, will result in death or serious injury.

WARNING
Signal word to indicate a potentially hazardous situation which, if not avoided, could result in death or serious injury.

CAUTION
Signal word to indicate a potentially hazardous situation which, if not avoided, could result in minor or moderate injury.
ATTENTION
Signal word to indicate a potentially hazardous situation which, if not avoided, could result in product or property damage.
5. General safety instructions
Failure to follow all instructions listed below may result in electric shock, fire and/or serious injury.
Save all warnings and instructions for future reference.
The term “power tool” used in the safety instructions refers to mains-powered power tools (with a mains cable) and battery-powered power tools (without a mains cable).
General safety
- Use this product strictly in accordance with the instructions.
- The manufacturer accepts no liability for personal injury or property damage resulting from improper use.
- The device must not be left unattended while it is connected to the mains.
- Keep children away from the device when it is switched on or cooling down.
• Children must not use the product, play with it or use it as a toy.
- This device can be used by people with reduced physical, sensory or mental capabilities or with a lack of experience or knowledge, if they are supervised or if they have been trained in the safe use of the device and understand the resultant hazards. Children may not play with the device.
- The liquid or vapour must not be directed towards devices with electrical components, such as the inside of ovens.
Power supply and adapters
- Only use the detachable power supply supplied with this device to charge the battery.
- This portable device consumes a lot of energy. The power switch must be turned off after use.
- Ensure adequate ventilation and heat dissipation for the adapter. Do not wrap up the power supply.
- Do not use the adapter in damp environments and do not touch it with wet hands.
- Always pull the mains plug directly from the socket – never from the extension cable.
- Never disconnect the power supply by unscrewing an extension cable – risk of electric shock!
- Do not use damaged power adapters, charging cables or mains plugs.
- Do not take apart the power supply. If defective, the entire power supply must be replaced.
- Do not place heavy objects on mains cables or adapters. Avoid kinking and twisting the cable.
- Never clean the power supply with water.
Battery
- Improper handling of the battery may result in burns or injury from chemical substances.
- Do not expose the battery to fire or temperatures above 60 °C.
- Disconnecting the power supply is required before handling or removing the battery.
- Used batteries must be taken to a suitable collection point or an authorised recycling centre. Disposal must be carried out in accordance with legal regulations.
• Non-rechargeable batteries must not be recharged.
- Different types of batteries or new and used batteries must not be mixed.
- If the device is to be stored unused for a long period of time, the batteries should be removed.
- Do not disassemble the battery and avoid short circuits.
- The built-in battery may only be replaced by the manufacturer or an authorised service partner.
Operating environment
- Do not expose the product to direct sunlight or heat sources (e.g. radiators, heaters, microwaves, gas cookers).
- Protect the product from strong magnetic fields.
- Do not use the product in hazardous environments such as near open flames, in bathrooms with free-flowing water or by swimming pools.
- The product can be used to clean exterior windows if it is properly secured with the carabiner hook, there is no strong wind, and it is not raining or snowing.
- Before use, use the carabiner hook to attach the safety rope to a sturdy handrail or similar fixture in the room. Ensure that the product is securely fastened.
- Do not immerse the product in liquids or store it in a damp environment for long periods of time.
- Secure any hanging or exposed cables, curtains, tablecloths or cords in the work area to prevent damage or electric shock.
- Do not use the product on cracked glass. Reflective or coated glass can be easily scratched by dirt on the glass during operation.
- Do not use the product on glass surfaces less than 3 mm thick or mirrors less than 4 mm thick.
- Do not use the product on framed glass surfaces if the frame thickness is less than 5 mm.
Operation and maintenance
- Do not leave the product unattended during use. Ensure that there are no persons, animals or valuable, fragile objects below the work area.
- Ensure that the product is connected to the power supply during operation. The product has a safety battery that charges during use. The backup battery supplies the product with power when it is disconnected from the mains or there is a power failure.
- Ensure that the product is completely disconnected from the mains and switched off before cleaning the housing or performing maintenance work.
- Do not continue to use the product if the product or power supply is damaged.
- Do not touch the mains cable with wet hands.
- In the event of damage, contact customer service or your dealer to have the product repaired professionally.
- Do not clean damaged glass surfaces or surfaces with an uneven texture, as the product will not be able to generate sufficient suction power in these areas.
- Ensure that the mains voltage matches the mains voltage specified on the power supply's type plate.
Warning! This power tool generates an electromagnetic field during operation. This field can impair active or passive medical implants under certain circumstances. In order to prevent the risk of serious or deadly injuries, we recommend that persons with medical implants consult with their physician and the manufacturer of the medical implant prior to operating the power tool.
6. Residual risks
The product has been built according to state-of-the-art and the recognised technical safety rules. However, individual residual risks can arise during operation.
• Health hazard due to electrical power, with the use of improper electrical connection cables.
• Furthermore, despite all precautions having been met, some non-obvious residual risks may still remain.
- Residual risks can be minimised if the "Safety Instructions" and the "Intended Use" together with the operating instructions as a whole are observed.
- Avoid accidental starting of the product: the operating button may not be pressed when inserting the plug in a socket. Use the tool attachment that is recommended in this operating manual. This is how to ensure that your product provides optimum performance.
- Keep your hands away from the working area when the product is in operation.
7. Technical data
| Rated voltage 180-240V~, 50/60Hz |
| Rated current 1,5A |
| Nominal power 72 W |
| Built-in Li-ion battery 650 mAh/7.4V |
| Charging time 3 hours |
| Power failure protection time | 20 minutes |
| Power consumption in off state | 0.3 W |
| Power consumption in standby mode | 0.5 W |
| Time until reaching off state 1 min |
| Time until reaching standby mode | 1 min |
| Dimensions 295 × 145 × 68 mm |
| Total cable length | 4.2 m |
| Safety rope | 4 m |
| Suction capacity | 2800 Pa |
| Control | Remote control |
| Remote control batteries (1.5 V) (2x) | AAA |
| Edge detection | Automatic |
| Fall protection | Power failure protection + safety cable 4 m |
| Cleaning mode | Intelligent route planning modes |
| Water tank capacity | 35 ml |
| Water spraying process | manual/automatic |
| Cleaning speed | 6 minutes/ m^2 |
| Protection class | II |
| Weight | 980 g |
Power supply
| Input voltage | 180-240 V |
| Input AC frequency | 50/60 Hz |
| Power consumption | 72 W |
| Output voltage | 24 V |
| Output current | 3 A |
| average operational efficiency | 88 % |
| Efficiency at low load (10 %) | 88 % |
| Power consumption at idle | 0.21 W |
Subject to technical changes!
8. Unpacking
- Open the packaging and carefully remove the product.
- Remove the packaging material, as well as the packaging and transport safety devices (if present).
- Check whether the scope of delivery is complete.
- Check the product and accessory parts for transport damage. In the event of complaints the carrier must be informed immediately. Later claims will not be recognised.
- If possible, keep the packaging until the expiry of the warranty period.
- Familiarise yourself with the product by means of the operating manual before using for the first time.
- With accessories as well as wearing parts and replacement parts use only original parts. Spare parts can be obtained from your specialist dealer.
- When ordering please provide our article number as well as type and year of manufacture for the product.
⚠ WARNING!
The product and the packaging material are not children's toys! Do not let children play with plastic bags, films or small parts! There is a danger of choking or suffocating!
9. Layout
9.1 Inserting batteries\* into the remote control (10) (Fig. 2)
- Lower the battery compartment cover gently and slide it open.
- Insert two AAA batteries according to the (+/-) markings. Be sure to connect the negative terminal to the spring first.
- Carefully close the battery compartment again.
* : may not be included in the scope of delivery
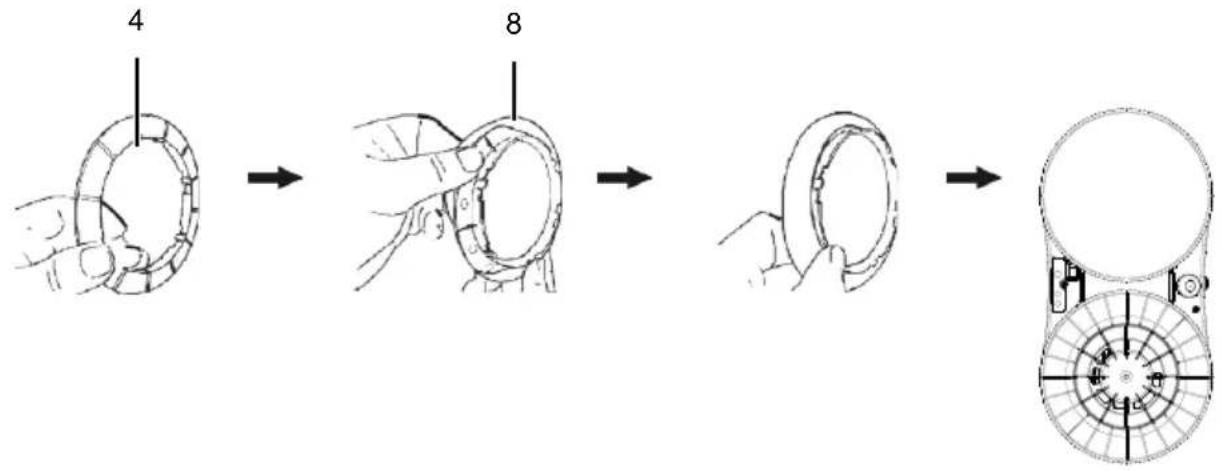
9.2 Inserting cleaning pads (6) (Fig. 3)
Attention: Wash and dry cleaning pads before first use!
- Place the dry and clean cleaning pad (6) on the cleaning ring (4).
- Place the cleaning pad (6) with the cleaning ring (4) correctly onto the cleaning wheel. Pay attention to the locking tabs.
- Ensure that the cloth is securely in place and that no air can escape.
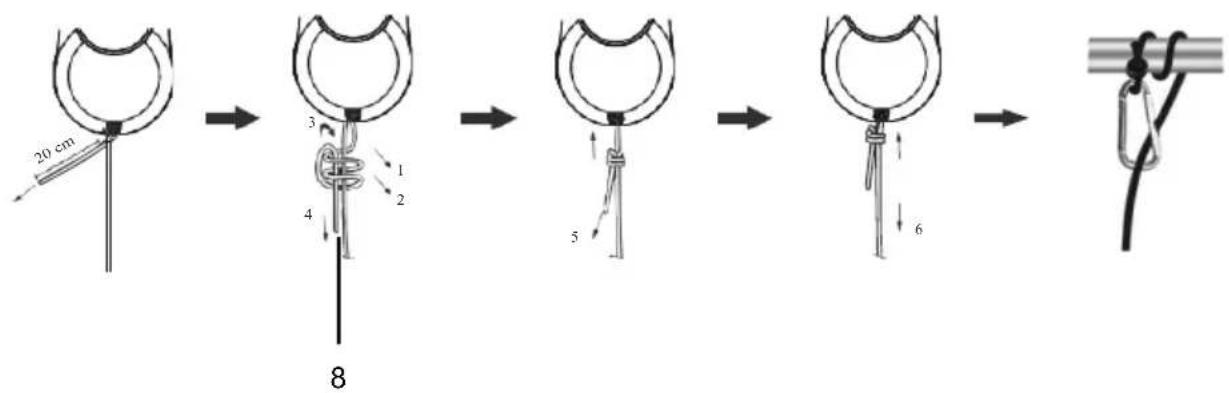
9.3 Attaching the safety rope (8) (Fig. 4)
Check the safety rope (8) for damage before each use. Securely attach one end to the product and the other end to a sturdy object in the interior using the carabiner. This prevents the product from injuring people or damaging objects if it falls.
- Check the safety rope (8) for damage and secure knots. Please follow the instructions in Figure 4.
- Securely attach the carabiner to a sturdy object inside the vehicle.
- If there is no possibility of securing the product, use it only under constant supervision and ensure that no persons or objects are in the danger zone under the window.
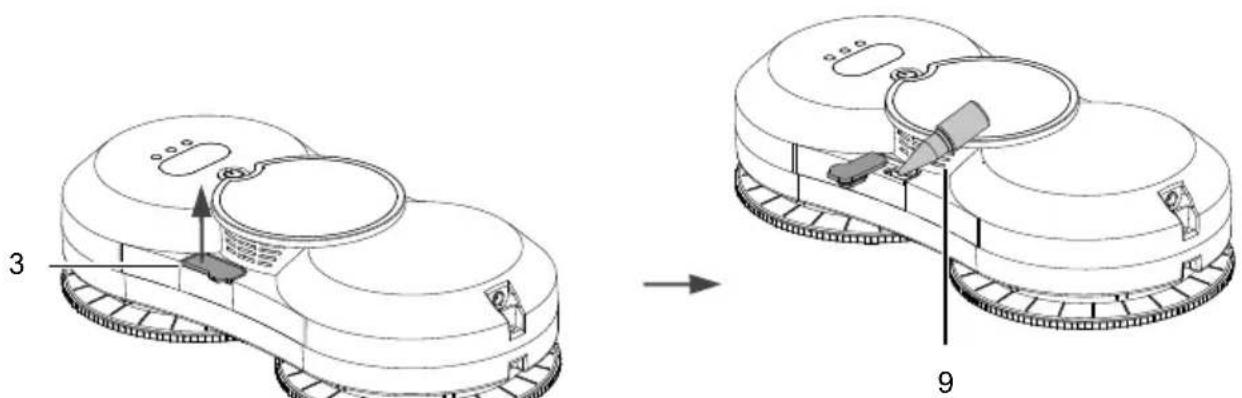
9.4 Filling the water tank (Fig. 5)
- Open the silicone cover of the filling opening (3).
- Fill with clean water (without additives or cleaning agents).
- Fill the tank only to approx. 80% (approx. 25 ml) to keep the air pressure stable. Pay attention to the level indicator and use the bottle supplied (9).
10. Start-up
⚠ Attention!
Always make sure the product is fully assembled before commissioning!
The window cleaning robot is equipped with a vacuum motor that securely attaches the product to the glass surface and allows it to move freely on vertical glass surfaces. An integrated backup battery briefly supplies the product with power in the event of a power failure to prevent it from falling.
The product has two cleaning wheels with suction cups, which are responsible for both movement and cleaning. The microfibre cleaning cloths are easy to remove and replace, and deliver excellent cleaning results.
The window cleaning robot can automatically plan the cleaning route (see the chapter "Intelligent route planning modes"), recognise window frames and clean the entire glass surface. In manual mode, the product can also be controlled by remote control.
Use the product with particular caution if the window seals or silicone joints are damaged or aged. In this case, the cleaning process must be supervised by a person at all times to prevent the product from falling.
10.1 Connecting the power supply (Fig. 6)
- Insert the connector plug into the socket on the product and tighten it.
- Connect the mains cable (7) to a power outlet.
- Ensure that the integrated emergency power battery is fully charged before using it for the first time. The operating indicator (1) lights up as follows:
- Orange = Product is charging.
- Green = Battery fully charged.
- Blue = The product is ready for use
- Red = Battery empty. Please charge the built-in battery.
The window cleaning robot is equipped with an integrated battery (Uninterrupted Power System). This continues to supply the product with power for approx. 20 minutes in the event of a power failure, so that it does not immediately fall off the glass.
- In the event of a power failure, the product stops, remains attached to the glass surface and emits a warning tone.
- The operating indicator (1) flashes alternately red/blue.
- In this case, carefully pull the product back over the safety rope (8). Hold the safety rope (8) as close to the glass as possible to prevent it from falling.
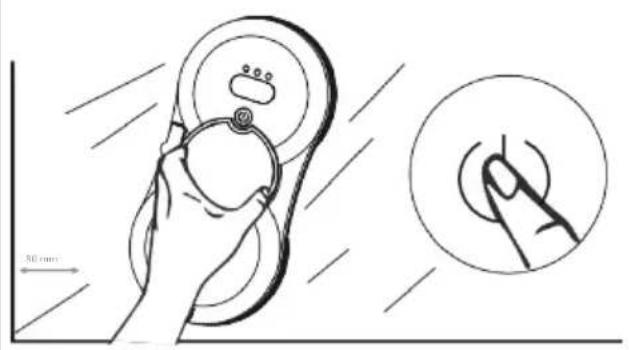
10.2 Attaching the product to the glass and switching it on (Fig. 7-10)
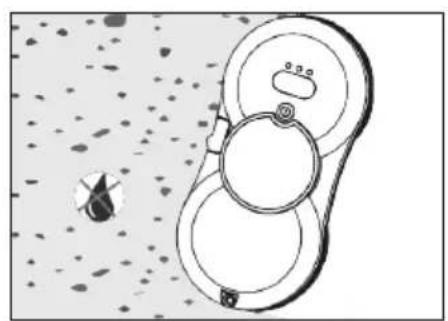
- Ensure that the window area and work area are free of objects (e.g. plants, decorations or other items on the window sill) to prevent damage.
- Before cleaning, check the area where the product is to be attached for small particles. If present, remove the particles to avoid scratches on the glass.
- Switch on the main switch (5) on the underside of the product.
-
Press and hold the on/off switch (2) for two seconds until the fan starts running.
-
Place the product on the glass surface, leaving a small gap between it and the frame (approximately 10 cm).
-
Ensure that the product is securely attached before releasing it.
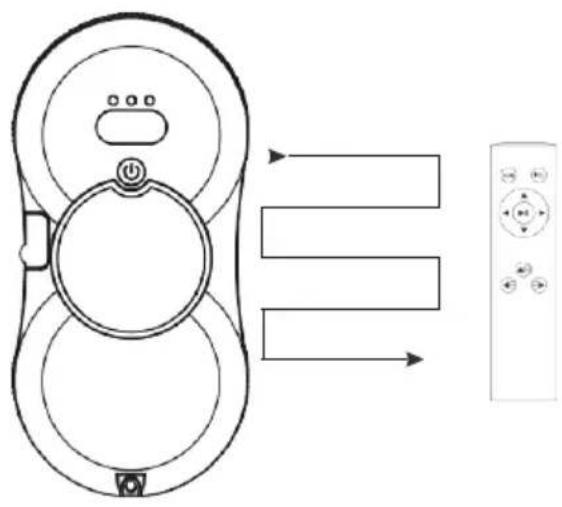
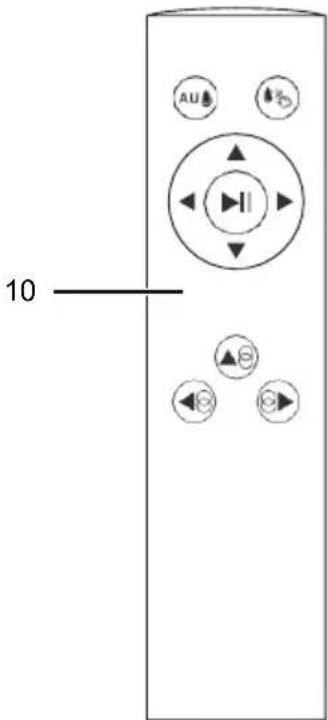
10.3 Operating the remote control (10) (Figs. 11-12)
The remote control (10) allows you to conveniently start and control the window cleaning robot and select different cleaning modes.
The remote control (10) has various buttons that you can use to control the product:
- Start/Pause: Start or pause the cleaning process.
• Automatic cleaning modes: Choice between different systematic cleaning methods (e.g. from top to bottom, from left to bottom, from right to bottom).
- Manual control: Move up, down, left, or right.
• Automatic water spraying: Activates the intermittent water spray function. Water can only be sprayed when the product is moving upwards or to the right.
- Manual water spraying: Enables manual spraying of water.
button Function Usage
| Start/Pause | Starts or pauses cleaning | To start a cleaning process or for short interruptions. |
| Up Manual upward movement | For targeted cleaning of glass areas or corrections. |
| Down Manual downward movement | For targeted cleaning of glass areas or corrections. |
| Left | Manual movement to the left | For manual control on the left side or spot cleaning. |
| Right Manual movement to the right | For manual control on the right-hand side or spot cleaning. |
| Auto top-bottom | Automatic top-to-bottom cleaning | Clean the entire surface from top to bottom |
| Auto left-bottom | Automatic cleaning from left to bottom | Clean the entire surface from left to right |
| Auto right-bottom | Automatic cleaning from right to bottom | Clean the entire surface from right to bottom |
| Autom. spraying | Automatic water spraying on/off | For continuous wet cleaning, e.g. for heavier soiling. |
| Manual spraying | Manual spraying | For selective moistening of stubborn dirt. |
10.4 After the cleaning process
- The product emits two beeps when the cleaning process is complete.
- Hold the product with one hand and press the on/off button (2) for two seconds to switch it off.
- Carefully remove the product from the glass.
- Release the safety rope (8).
- Switch off the main switch (5) on the underside of the product.
- Store the product and accessories in a dry and well-ventilated place.
11. Cleaning functions
The window cleaning robot has various cleaning modes that can be selected depending on the degree of soiling and the glass surface.
11.1 Dry cleaning
• Always carry out the first cleaning process dry, without water or cleaning agents.
- This removes loose dust or sand before moisture turns the dirt particles into mud and impairs the cleaning result.
- Dry cleaning is particularly suitable in sunny weather or when humidity is low.
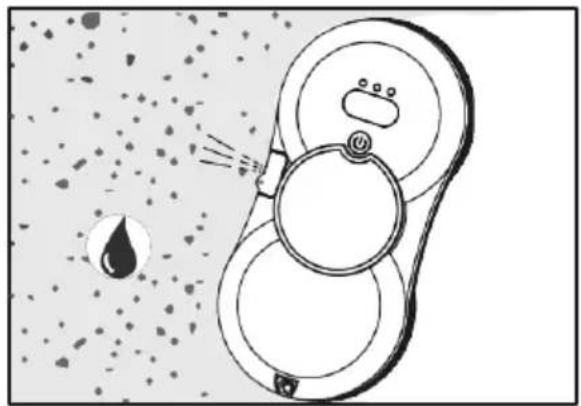
11.2 Wet cleaning
- For a more thorough clean, the product can be used with water.
- Only fill with clean water.
- Spray the water directly onto the cleaning cloth or glass surface, not onto the product.
11.3 Automatic water spraying function
- In automatic cleaning mode, the product may spray water intermittently onto the glass surface.
- Activation: Press the "Autom spray" button on the remote control the product will emit two beeps and spray mode will be activated.
- Deactivation: Press the "Autom. spray" button again → the product will emit a single beep and stop spraying.
11.4 Manual water spraying
- During automatic cleaning mode, water can also be sprayed onto the glass surface manually.
- To do this, press the "Manual spray" button on the remote control.
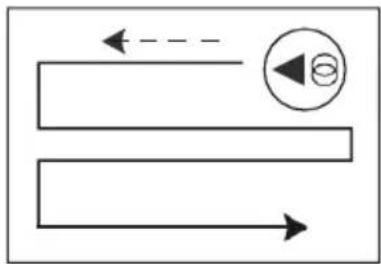
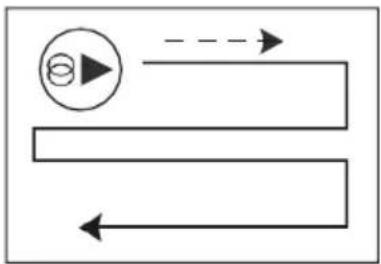
11.5 Intelligent route planning modes (Fig. 11)
The window cleaning robot is equipped with an intelligent route planning function. This ensures that the entire glass surface is cleaned systematically and efficiently, without missing any areas. Depending on the glass surface and position, different cleaning modes can be selected:
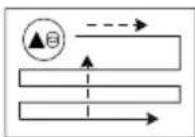
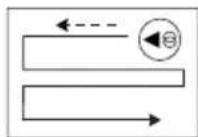
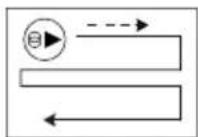
- From top to bottom: The robot starts at the top edge of the window, moves systematically downwards and cleans the entire surface.
- From left to bottom: The robot starts at the top left of the window, works its way to the right and then downwards.
- From right to bottom: The robot starts at the top right of the window, cleans to the left and then moves downwards.
Instructions for use:
- Before starting, place the product in a suitable position (at a distance of approximately 80 mm from the window frame) to ensure that the automatic route planning works correctly.
- If the glass surface is particularly dirty or uneven, cleaning can be supplemented by manual control using the remote control (10).
- In the event of unusual obstacles or highly reflective glass, it may be necessary to manually support the product.
12. Electrical connection
The electrical motor installed is connected and ready for operation. The connection complies with the applicable VDE and DIN provisions.
The customer's mains connection as well as the extension cable used must also comply with these regulations.
Damaged electrical connection cable
The insulation on electrical connection cables is often damaged.
This may have the following causes:
- Pressure points, where connection cables are passed through windows or doors.
- Kinks where the connection cable has been improperly fastened or routed.
- Places where the connection cables have been cut due to being driven over.
• Insulation damage due to being ripped out of the wall socket.
• Cracks due to the insulation ageing.
Such damaged electrical connection cables must not be used and are life-threatening due to the insulation damage.
Check the electrical connection cables for damage regularly. Ensure that the connection cables are disconnected from electrical power when checking for damage.
Electrical connection cables must comply with the applicable VDE and DIN provisions. Only use connection cables of the same designation.
The printing of the type designation on the connection cable is mandatory.
For single-phase AC motors, we recommend a fuse rating of C 16A or K 16A for products with a high starting current (from 3000 watts)!
Connection type Y
If it is necessary to replace the mains connection cable, this must be done by the manufacturer or their representative to avoid safety hazards.
The power supply may only be operated at a mains voltage specified on the type plate.
13. Cleaning
Danger!
Pull out the mains plug before carrying out any cleaning work.
- Keep protective devices, air vents and the motor housing as free of dust and dirt as possible. Rub the product clean with a clean cloth or blow it off with compressed air at low pressure.
• We recommend that you clean the product directly after every use.
- Clean the product at regular intervals using a damp cloth and a little soft soap. Do not use any cleaning products or solvents; they could attack the plastic parts of the product. Make sure that no water can penetrate the interior of the product. Water penetration increases the risk of an electric shock.
13.1 Cleaning/washing cleaning pad (6)
- Remove the cleaning pads (6) from the product after each use.
- Carefully shake off coarse dust and dirt.
- Wash the cleaning pads (6) by hand with warm water (max. 40 °C) and a mild detergent.
- Rinse the cleaning pads (6) thoroughly to remove all traces of cleaning agent.
- Gently squeeze out excess water – do not wring or twist vigorously, as this may damage the material.
Drying
Allow the cleaning pads (6) to dry completely in the air. Do not use a tumble dryer and do not place the cleaning pads (6) on radiators or in direct sunlight.
- Do not use bleach, fabric softener or aggressive chemicals, as these damage the fibres and reduce cleaning performance.
- Replace heavily worn or damaged cleaning pads (6) with new ones in good time.
- Store clean and dry cleaning pads (6) in a clean, dry container or bag.
14. Storage
Store the product and its accessories in a dark, dry and frost-free place that is inaccessible to children. The optimum storage temperature lies between 5 and 30 °C.
Store the product in its original packaging. Cover the product to protect it from dust or moisture. Store the operating manual with the product.
15. Maintenance
The interior of the product has no further internal parts that require maintenance. The product should only be opened by qualified personnel (e.g. to replace the built-in battery).
15.1 Replacing the remote control battery (10)
- Lower the battery compartment cover gently and slide it open.
- Insert the batteries according to the (+/-) markings. Be sure to connect the negative terminal to the spring first.
- Carefully close the battery compartment again.
Dispose of empty batteries in an environmentally friendly manner – take them to a suitable collection point or recycling centre.
15.2 Checking the safety rope (8)
The safety rope serves as an additional fall protection device and prevents the window cleaning robot from falling off the glass in the event of a power failure or malfunction. To ensure safety at all times, the safety rope must be checked and maintained regularly.
- Check the entire safety rope, including the carabiner (8), for cracks, fraying or wear.
- Ensure that knots at the product's attachment point are tight and secure.
- Check the connection at the fixing point in the room for stability.
- Do not use the product if damage or loose connections are identified.
16. Repair & ordering spare parts
After repairs or maintenance, make sure that all safety-related parts are installed and are in perfect condition. All parts which may cause injury must be kept where they are inaccessible to children or others.
Attention: According to the German Product Liability Act, no liability is accepted for damage caused by improper repairs or by not using original spare parts.
Such work should be performed by a customer service centre or an authorised specialist. The same applies to accessory parts.
Spare parts and accessories can be obtained from our Service Centre. To do this, scan the QR code on the front page.
Connections and repairs
Connections and repair work on the electrical equipment may only be carried out by electricians.
Please provide the following information in the event of any queries:
• Type of current for the motor
• Machine data - type plate
16.1 Ordering spare parts
Please provide the following information when ordering spare parts:
- Model designation
- Item number
- Type plate data
Spare parts / accessories
Cleaning pad - Article no.: 7907700701
Power supply - Article no.: 5907755001
Remote control - Article no.: 5907755002
With this product, it is necessary to note that the following parts are subject to natural or usage-related wear, or that the following parts are required as consumables.
Wearing parts*: Cleaning pad
* may not be included in the scope of delivery!
17. Disposal and recycling
Notes for packaging

The packaging materials are recyclable. Please dispose of packaging in an environmentally friendly manner.
Notes on the electrical and electronic equipment act (ElektroG)
Waste electrical and electronic equipment does not belong in household waste, but must be collected and disposed of separately!
• Used batteries or rechargeable batteries that are not installed permanently in the old device must be removed non-destructively before disposal! Their disposal is regulated by the battery act.
- Owners or users of electrical and electronic devices are legally obliged to return them after use.
- The end user is responsible for deleting their personal data from the old device being disposed of!
- The symbol of the crossed-out dustbin means that waste electrical and electronic equipment must not be disposed of with household waste.
- Waste electrical and electronic equipment can be handed in free of charge at the following places:
- Public disposal or collection points (e.g. municipal works yards)
- Points of sale of electrical devices (stationary and online), provided that dealers are obliged to take them back or offer to do so voluntarily.
- Up to three waste electrical devices per type of device, with an edge length of no more than 25 centimetres, can be returned free of charge to the manufacturer without prior purchase of a new device from the manufacturer or taken to another authorised collection point in your vicinity.
- Further supplementary take-back conditions of the manufacturers and distributors can be obtained from the respective customer service.
- If the manufacturer delivers a new electrical device to a private household, the manufacturer can arrange for the free collection of the old electrical device upon request from the end user. Please contact the manufacturer's customer service for this.
• These statements only apply to devices installed and sold in the countries of the European Union and which are subject to the European Directive 2012/19/EU. In countries outside the European Union, different regulations may apply to the disposal of waste electrical and electronic equipment.
![SCHEPPACH WCR72 - Information on the battery act [BattG] - 1](/content/2026/05/755820/images/f790c864f969143da40a89ad2eaf9c89e75ab8f7937b0225afc7cde126af8b11.jpg)
Old batteries and rechargeable batteries do not belong in household waste, but must be collected or disposed of separately!
- For safe removal of batteries or rechargeable batteries from the electrical device and for information on their type or chemical system, please refer to the additional information in the operating or assembly instructions.
- Owners or users of batteries and rechargeable batteries are legally obliged to return them after use. The return is limited to household quantities.
- Old batteries may contain pollutants or heavy metals that can harm the environment or human health. Recycling old batteries and using the resources they contain helps to protect these two important issues.
- The symbol of the crossed-out dustbin means that batteries and rechargeable batteries must not be disposed of with household waste.
-
If the signs Hg, Cd or Pb are also located below the dustbin symbol, this stands for the following:
-
Hg: Battery contains more than 0.0005% mercury
- Cd: Battery contains more than 0.002% cadmium
- Pb: Battery contains more than 0.004% lead
- Rechargeable batteries and batteries can be returned free of charge to the following places:
- Public disposal or collection points (e.g. municipal works yards)
- Sales points for batteries and rechargeable batteries
- Take-back points of the common take-back system for old device batteries
- Take-back point of the manufacturer (if not a member of the common take-back system)
• These statements are only valid for rechargeable batteries and batteries sold in the countries of the European Union and subject to the European Directive 2023/1542/EC. In countries outside the European Union, different regulations may apply to the disposal of rechargeable batteries and batteries.
Notes on lithium-ion batteries

Remove the battery before disposing of the device!
- Do not dispose of the battery in household waste, in a fire (risk of explosion) or in water. Damaged batteries can harm the environment and your health if toxic vapours or liquids escape.
- Defective or used batteries must be recycled in accordance with Directive 2023/1542/EC.
- Hand in the device and the battery charger at a recycling centre. The plastic and metal parts used can be separated by type and thus recycled.
- Dispose of batteries when discharged. We recommend covering the poles with an adhesive strip to protect against a short circuit. Do not open the battery.
- Dispose of batteries according to local regulations. Return batteries to a used battery collection point where they can be recycled in an environmentally friendly manner. Ask your local waste disposal company about this.
18. Troubleshooting
The following table shows fault symptoms and describes remedial measures in the event of your product failing to work properly. If you cannot localise and rectify the problem with this, please contact your service workshop.
| Fault Possible cause Remedy |
| Product does not start | Battery empty | Charge battery |
| Battery defective | Check the battery, have it repaired by a certified electrician if necessary |
| On/off switch defective | Repair by an authorised service centre |
| Engine defective | Repair by an authorised service centre |
| Product slips and cannot reach higher up to the window frame | The cleaning pad may be too wet Use | a dry cleaning pad. |
| Ensure that the product has not cleaned the window too frequently, otherwise the glass surface will become slippery. |
| Product does not move smoothly or moves irregularly. | The cleaning pad is too dirty Please change the cleaning pad. |
| The screw on the cleaning wheel may be loose | Please tighten the wheel. |
| After cleaning, a circular mark remains on the glass surface | The cleaning pad is too dirty Please change the cleaning pad. |
| What should you do if the robot stops in a higher area without a power supply and flashes red? | Check whether the electrical contact is poor or the cable is broken. | Pull the product back using the safety rope.Repair by an authorised service centre. |
| Check whether there is an obstruction on the glass. | Remove the obstacle. |
| The fan is not working Battery empty Charge battery | |
| Product does not spray water during cleaning. | Water tank is empty Fill with water | |
| Manual mode is active | In manual mode, the Spray button must be pressed manually. |
Günzburger Straße 69
D-89335 Ichenhausen
Cher client,
Scheppach GmbH, Günzburger Str. 69, 89335 Ichenhausen
| DE | EU-KonformitätserklärungOriginalkonformitätserklärungWir erklären in alleiniger Verantwortung, dass das hier beschriebene Produkt mit den geltenden Richtlinien und Normen übereinstimmt. | Der hier beschriebene Gegenstand der Erklärung erfüllt die Vorschriften der Richtlinie 2011/65/EU des Europäischen Parlaments und des Rates vom 8. Juni 2011 zur Beschränkung der Verwendung bestimmter gefährlicher Stoffe in Elektro- und Elektronikgeräten.*Technische Unterlagen verfügbar bei: ** |
| Artikelnummer*** | Artikelbezeichnung: Fensterputzroboter WCR72 | Marke**** |
| GB | EU Declaration of ConformityTranslation of the original Declaration of ConformityWe declare under our sole responsibility that the product described here complies with the applicable directives and standards. | The object of the declaration described here fulfils the regulations of the directive 2011/65/EU of the European Parliament and Council from 8th June 2011, on the restriction of the use of certain hazardous substances in electrical and electronic equipment.*Technical documentation available at: ** |
| Item number*** | Item designation: Window cleaner robot WCR72 | Brand**** |
| FR | Déclaration UE de conformitéTraduction de la déclaration de conformité originaleNous déclarons, sous notre propre responsabilité, que le produit décrit ici est conforme aux directives et normes en vigueur. | L'appareil décrit ci-dessus dans la déclaration est conforme aux réglementations de la directive 2011/65/EU du Parlement Européen et du Conseil du 8 juin 2011 visant à limiter l'utilisation de substances dangereuses dans la fabrication des appareils électriques et électroniques.*Dossier technique auprès de:** |
| Référence *** | Désignation de l'article: Robot lave-vitres WCR72 | Marque **** |
| ***5907755924 | ****SCHEPPACH |
| **:Georg KohlerGünzburger Str. 69D-89335 Ichenhauseni.V.Andreas Pachi.V.Andreas Pecher /Head of Project ManagementVSSSIS.I.V. Simon Schunk /Division Manager Product CenterIchenhausen, 05.02.2026 | X 2011/65/EU*X EU 2023/826X 2009/125/EC X 2014/30/EU X 2014/35/EU X (EU) 2019/1782☐ 2014/68/EU☐ 89/686/EWG_96/58/EG☐ 90/396/EWG X (EU) 2023/1542 | ☐ 2006/42/EG ☐ Annex IVNotified Body: Notified Body No.: Certificate No.: | ☐ 2000/14/EG_2005/88/EG Noise: measured L_WA = guaranteed L_WA = ☐ Annex V ☐ Annex VI Notified Body: Notified Body No.: |
| ☐ 2016/1628/EUEmission No.: |
| EN 60335-1-2012/A16:2023; EN 60335-2-54:2008/2021; EN 62233:2008; EN IEC 55014-1:2021; EN IEC 55014-2:2021; EN IEC 61000-3-2:2019/A2:2024; EN 61000-3-3:2013/A2:2021; EN 50564:2001Charger:EN IEC 55014-1:2021; EN IEC 55014-2:2021;EN IEC 61000-3-2:2019/A2:2024; EN 61000-3-3:2013/A1:2019/A2:2021Battery:IEC 62133-2:2017; IEC 62133-2:2017/AMD:2021 |
Garantie DE
Apparent defects must be notified within 8 days from the receipt of the goods. Otherwise, the buyer loses its rights of claim due to such defects are invalidated. We guarantee for our machines in case of proper treatment for the time of the statutory warranty period from delivery in such a way that we replace any machine part free of charge which provably becomes unusable due to faulty material or defects of fabrication within such period of time. With respect to parts not manufactured by us we only warrant insofar as we are entitled to warranty claims against the upstream suppliers. The costs for the installation of the new parts shall be borne by the buyer. The cancellation of sale or the reduction of purchase price as well as any other claims for damages shall be excluded.
Garantie FR

