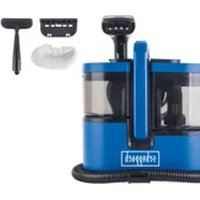
SWC1200 - Vacuum Cleaner SCHEPPACH - Free user manual and instructions
Find the device manual for free SWC1200 SCHEPPACH in PDF.


| Product type | Steam vacuum cleaner |
| Brand | Scheppach |
| Model | SWC1200 |
| Supply voltage | 220-240 V ~ 50/60 Hz |
| Rated current | 7.8 A |
| Rated power | 1800 W |
| Protection class | I |
| Protection rating | IPX4 |
| Clean water tank capacity | 1.6 L |
| Waste water tank capacity | 1.5 L |
| Max. suction pressure | 16 kPa |
| Steam temperature | ≥ 100 °C |
| Hot water temperature | ≥ 60 °C |
| Spray power | 330 ml/min |
| Spray pressure | 1 bar |
| Mains cable length | 4 m |
| Suction hose length | 1.35 m |
| Operating radius | 5.35 m |
| Weight | Approx. 4 kg |
| Operating modes | Cold water, hot water, steam with suction, steam only |
| Included accessories | Suction hose, steam nozzle, washing brush, steam attachment, textile cover, wiper, stain remover |
| Waste water filter | Washable (max. 60 °C), not machine washable |
| Textile cover | Washable (max. 60 °C) |
| Use | Indoor only, non-professional |
Frequently Asked Questions - SWC1200 SCHEPPACH
User questions about SWC1200 SCHEPPACH
0 question about this device. Answer the ones you know or ask your own.
Ask a new question about this device
Download the instructions for your Vacuum Cleaner in PDF format for free! Find your manual SWC1200 - SCHEPPACH and take your electronic device back in hand. On this page are published all the documents necessary for the use of your device. SWC1200 by SCHEPPACH.
USER MANUAL SWC1200 SCHEPPACH
natural_image
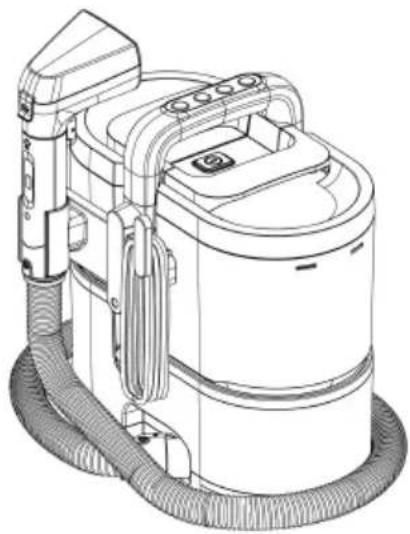
Technical line drawing of a portable industrial machine with hoses and control panel (no text or symbols)

SWC1200
DE Fleckenreiniger | Originalbetriebsanleitung . 5
GB Spot cleaner | Translation of the original instructions .... 17
FR Nettoyeur détacheur | Traduction de la notice originale....26
1
2
Inhaltsverzeichnis
Günzburger Straße 69
D-89335 Ichenhausen
Hinweis:
7a. 1 x Halterung (Handgriff)
7b. 2 x Schraube
Halterung (Handgriff):
Günzburger Straße 69
D-89335 Ichenhausen
Division Manager Product Center
Andreas Pecher
Head of Project Management
Garantiebedingungen
Revisionsdatum 26.11.2021
https://www.scheppach.com/de/service
1 Introduction ...... 17
2 Proper use.... 18
3 Product description (Fig. 1-16).... 18
4 Scope of delivery (Fig. 2) 18
5 Unpacking 18
6 Technical data.... 19
7 Safety instructions.... 19
8 Assembly.... 20
9 Before commissioning.... 21
10 Operation 21
11 Working instructions.... 22
12 Electrical connection 22
13 Cleaning and maintenance 23
14 Storage and transport (Fig. 16) 23
15 Repair and ordering spare parts 24
16 Disposal and recycling 24
17 Troubleshooting 25
18 EU Declaration of Conformity.... 25
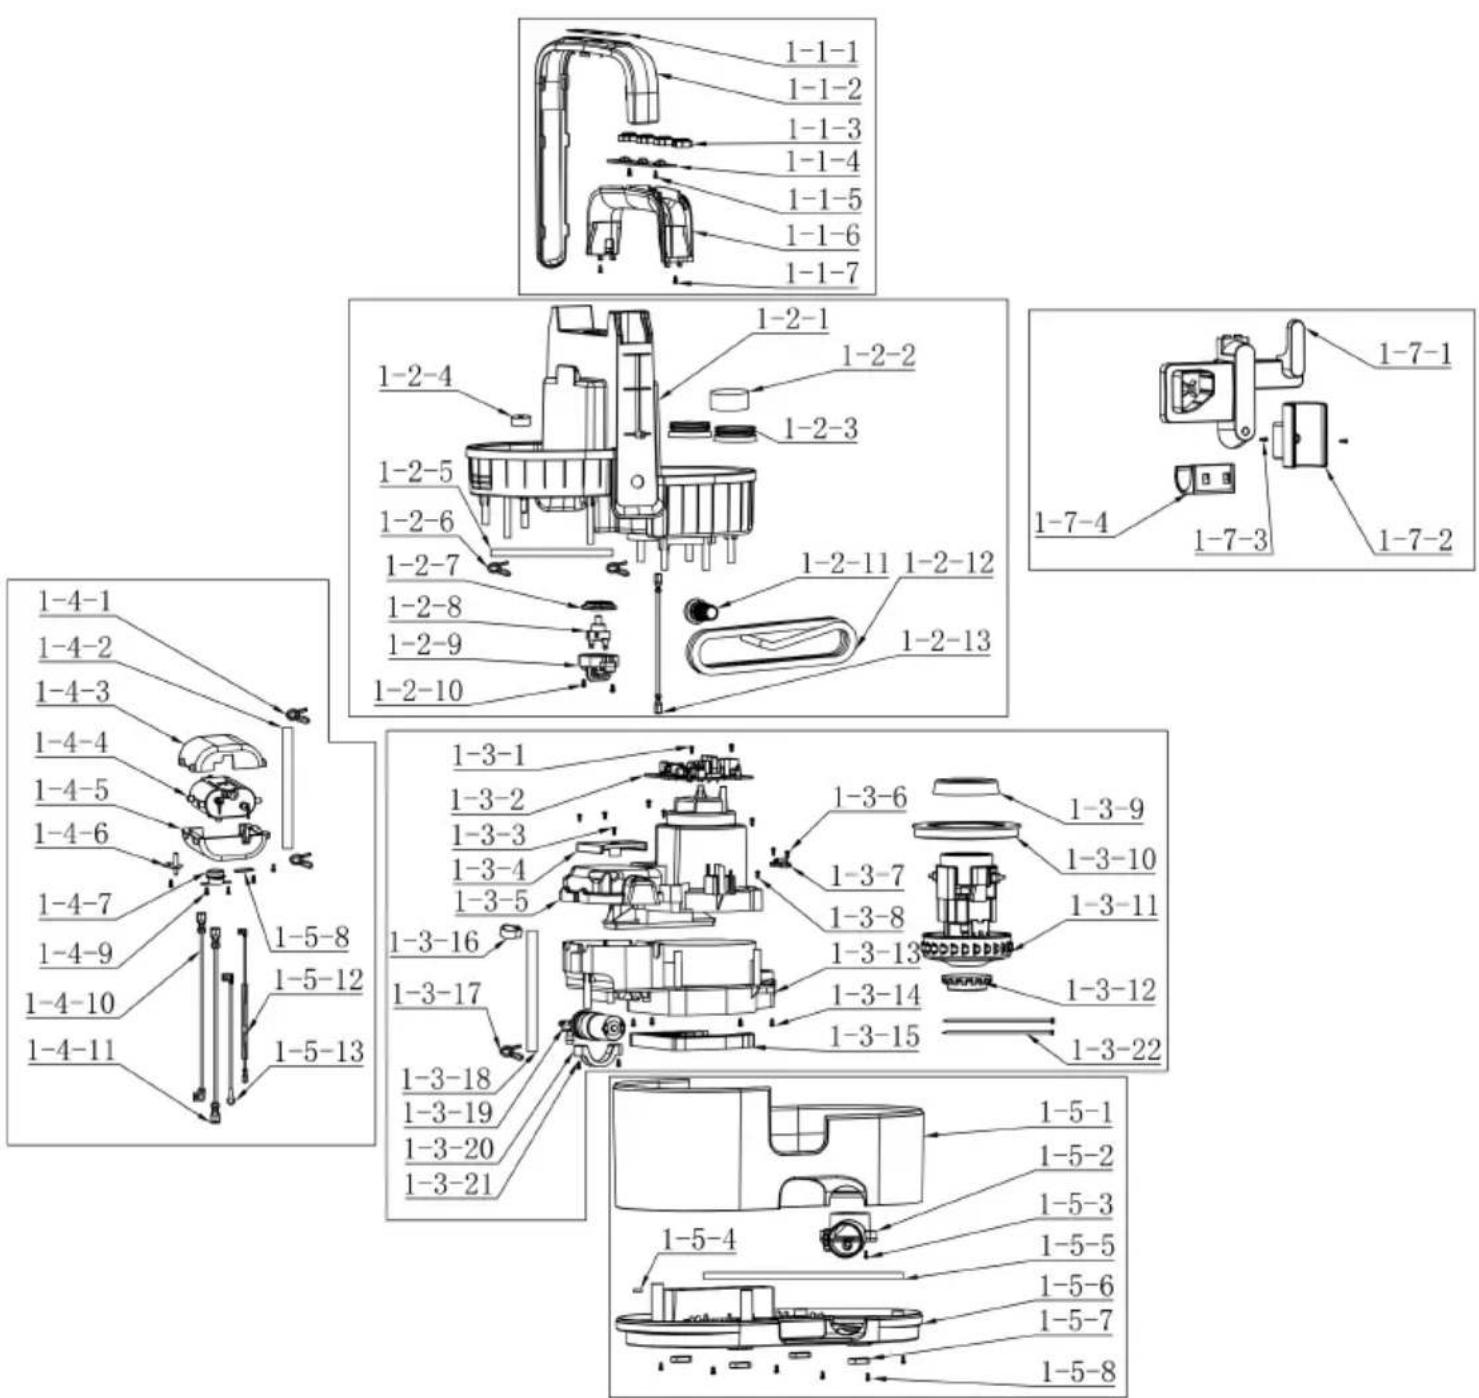
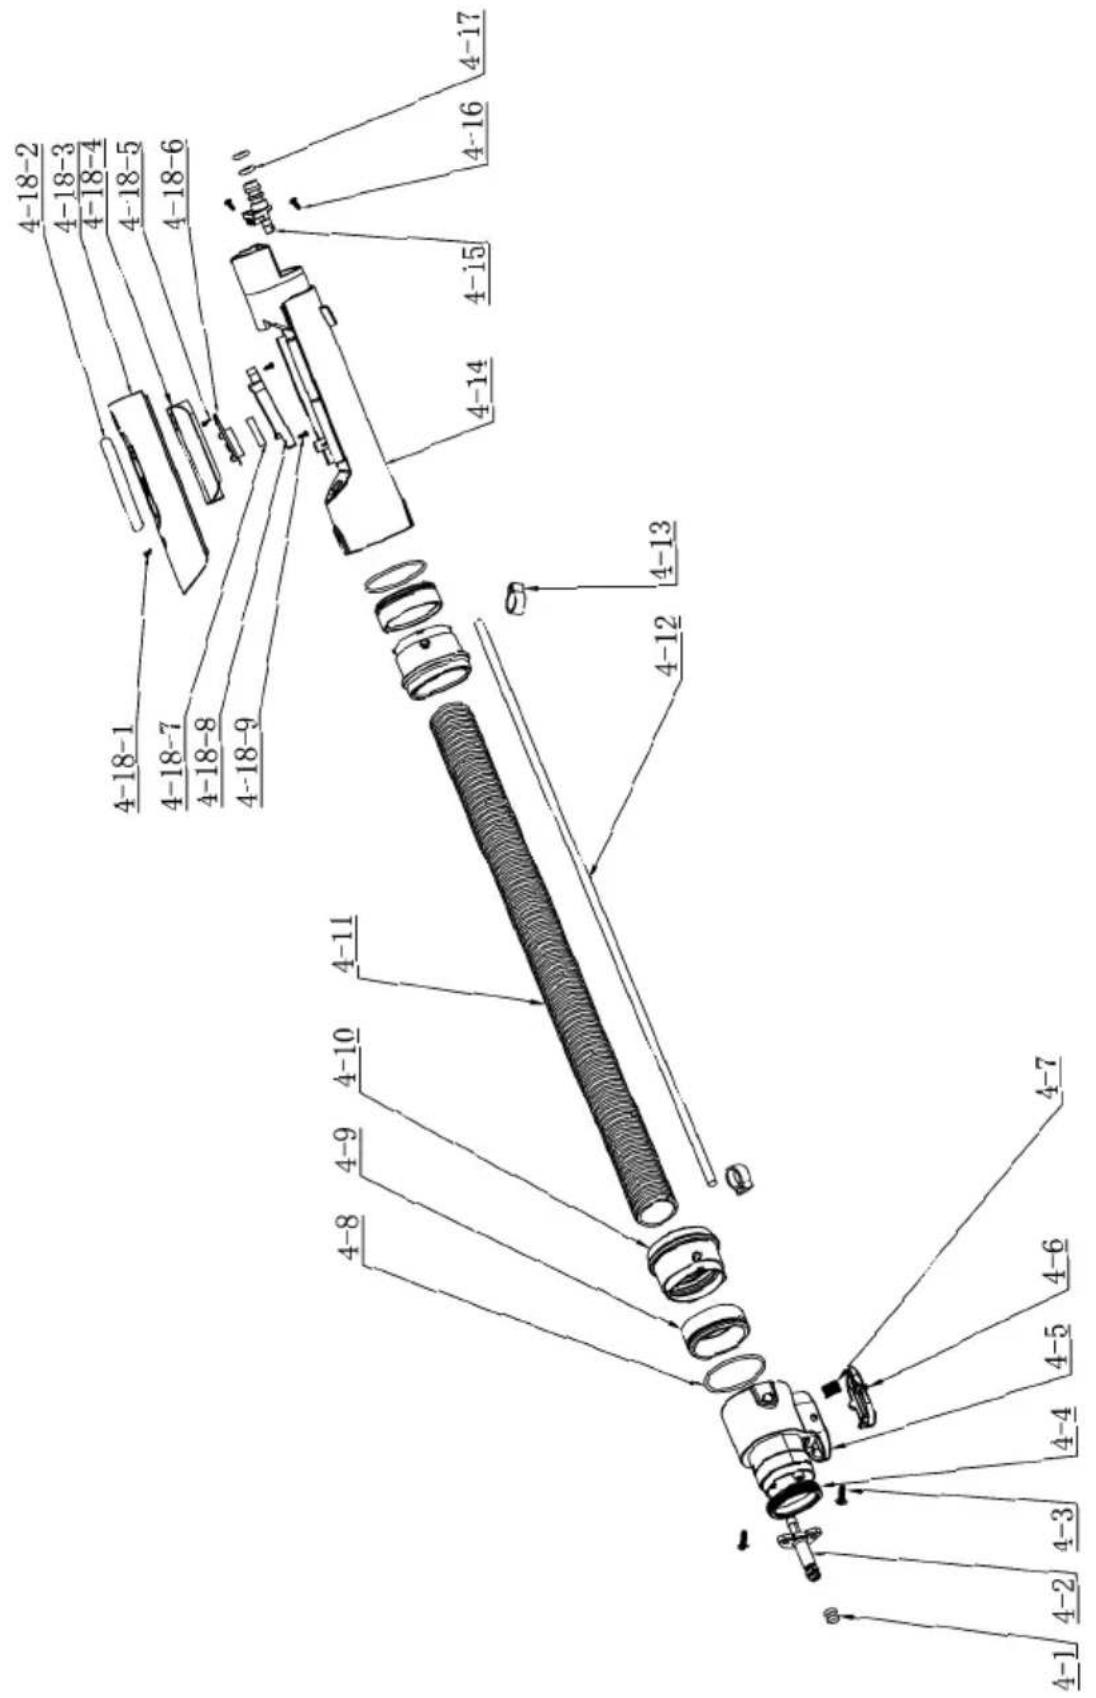
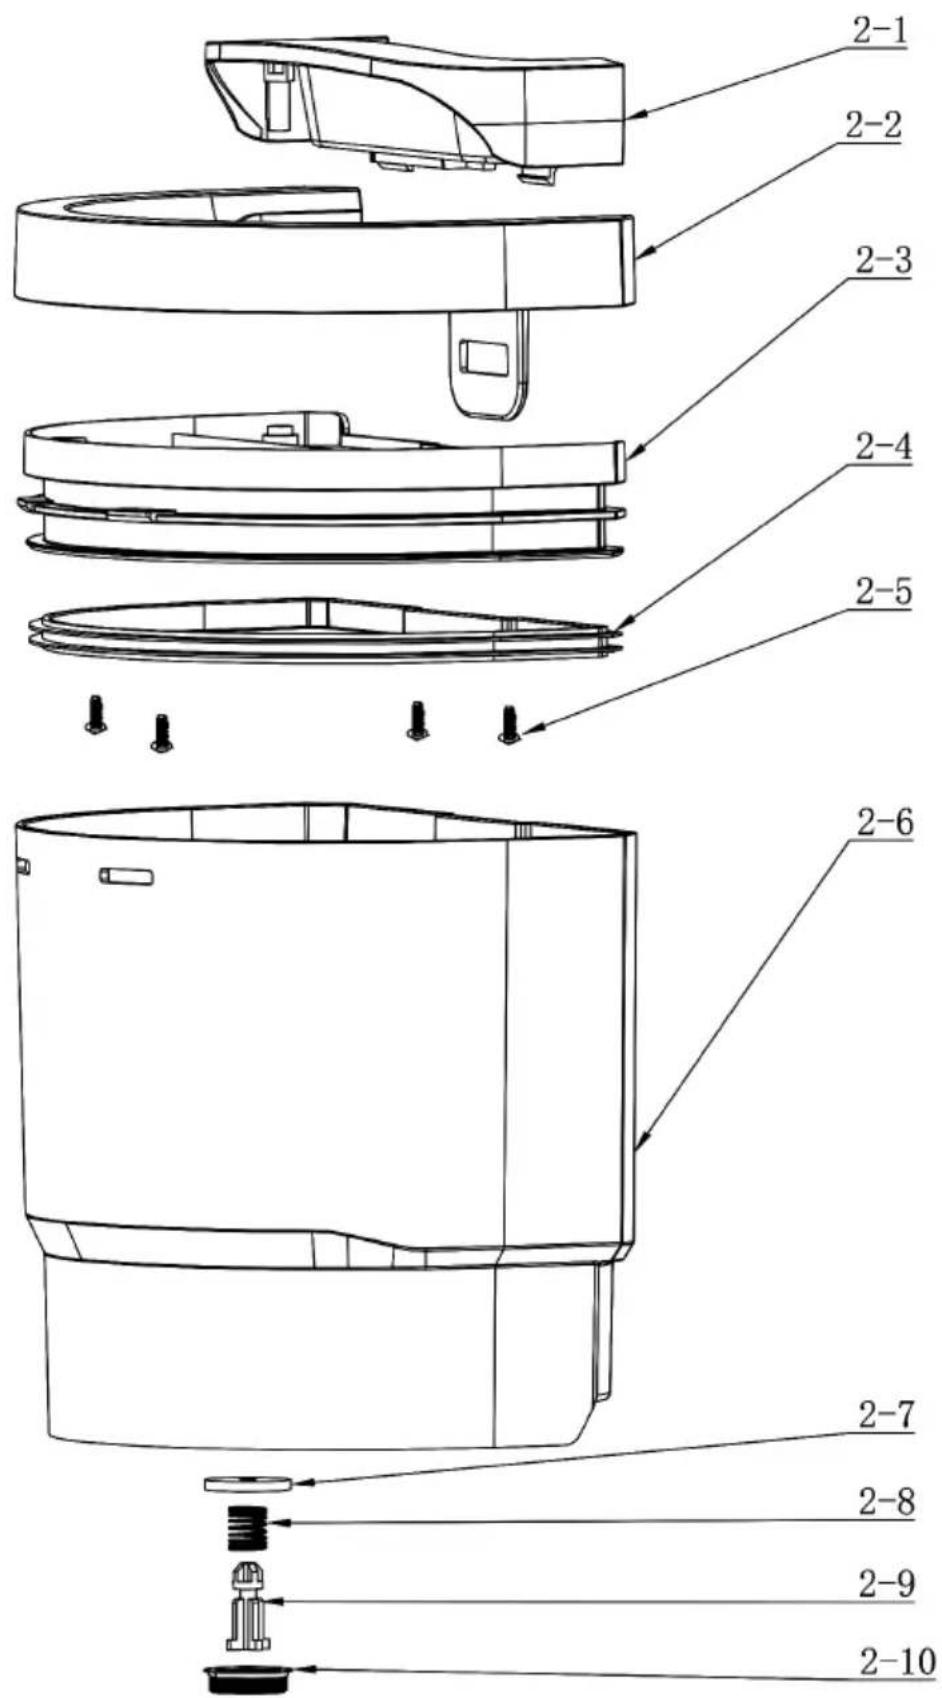
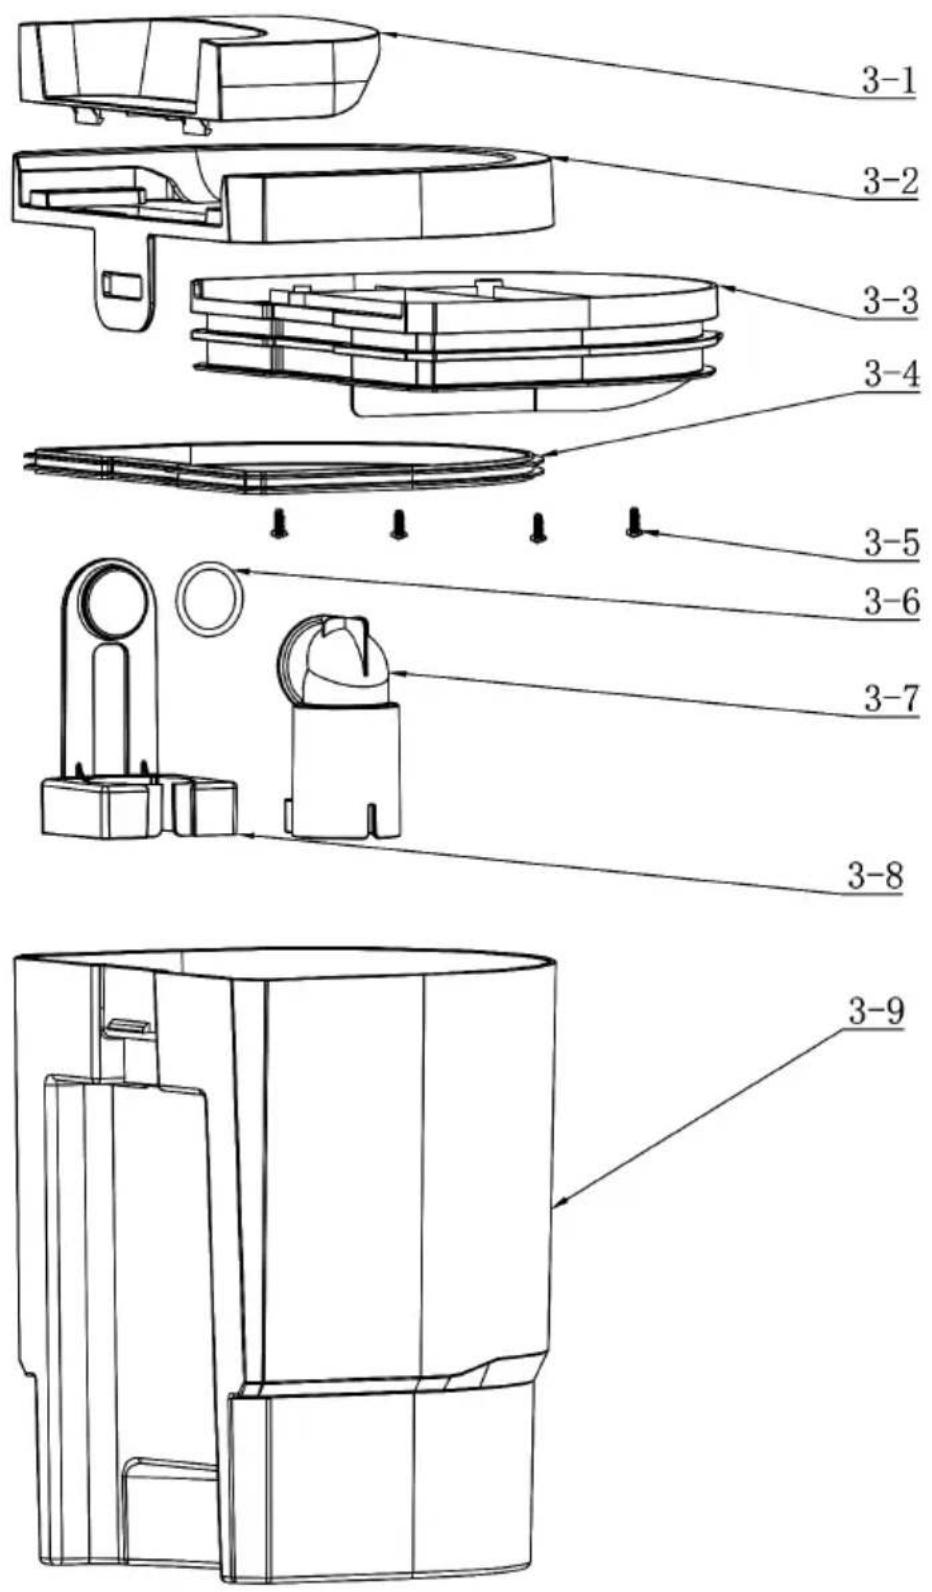
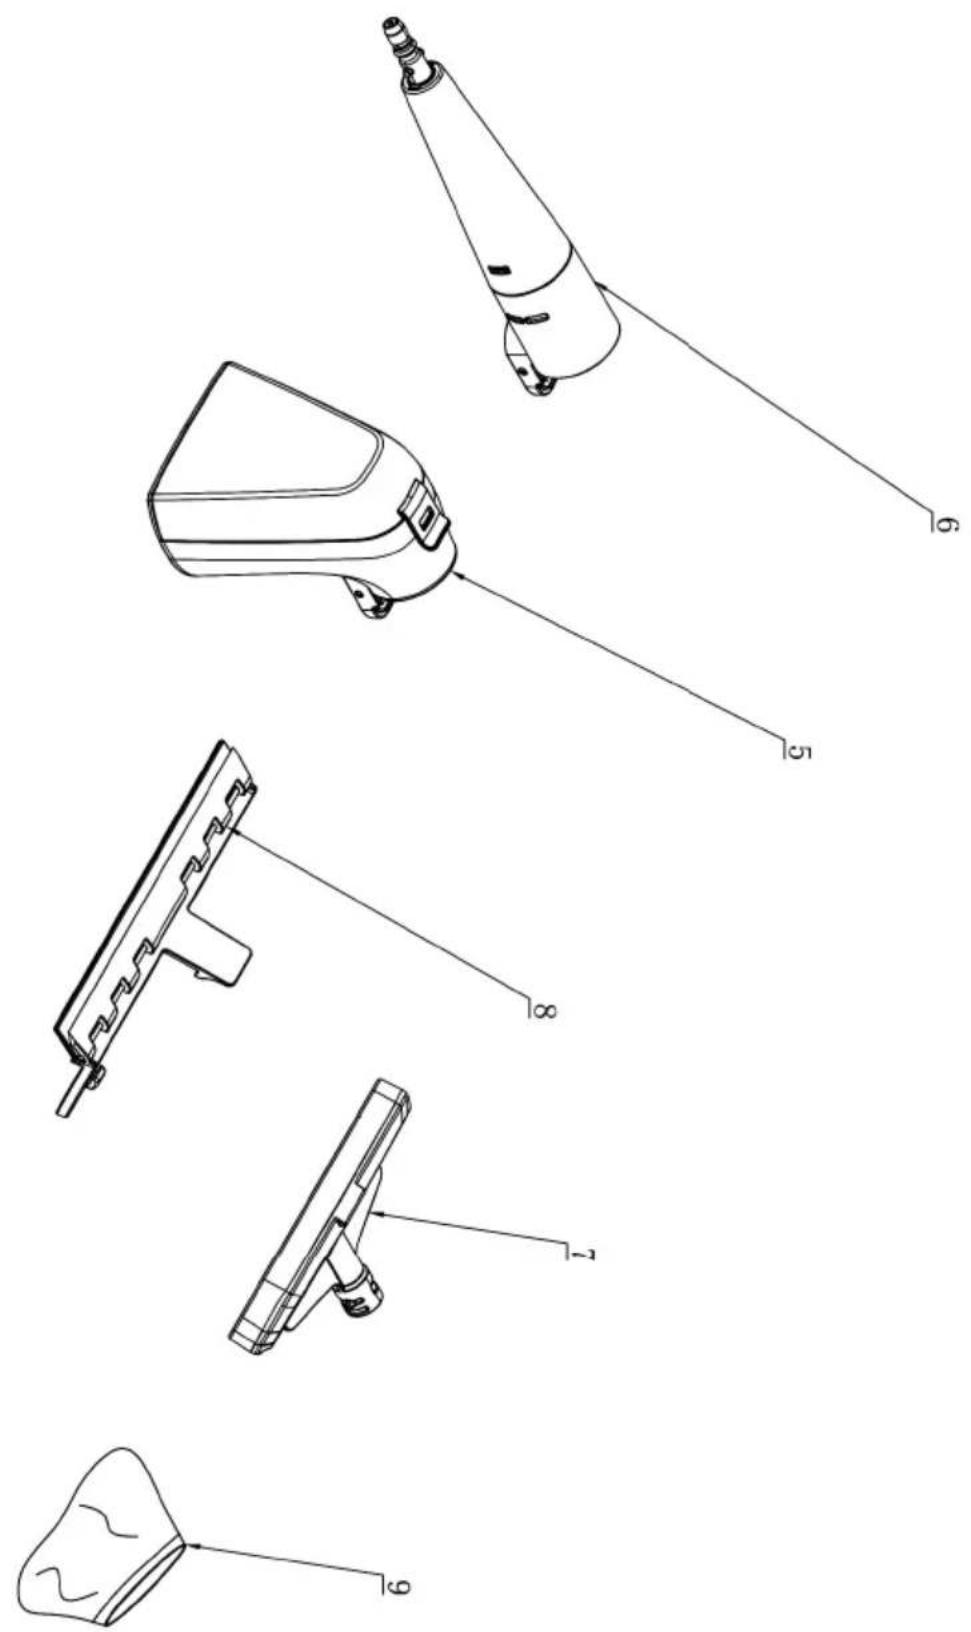
19 Exploded view 36
Explanation of the symbols on the product
Symbols are used in this manual to draw your attention to potential hazards. The safety symbols and the accompanying explanations must be fully understood. The warnings themselves will not rectify a hazard and cannot replace proper accident prevention measures.
| Before commissioning, read and observe the operating manual and safety instructions! | |
| Risk of scalding! | |
| On/off switch | |
| Spray button | |
| Cold water suction mode | |
| Hot water suction mode | |
| Steam suction mode |

Steam mode
The product complies with the applicable European directives.
Explanation of the signal words in the operating manual
DANGER
Signal word to indicate an imminently hazardous situation which, if not avoided, will result in death or serious injury.
WARNING
Signal word to indicate a potentially hazardous situation which, if not avoided, could result in death or serious injury.
CAUTION
Signal word to indicate a potentially hazardous situation which, if not avoided, could result in minor or moderate injury.
ATTENTION
Signal word to indicate a potentially hazardous situation which, if not avoided, could result in product or property damage.
1 Introduction
Manufacturer:
Scheppach GmbH
Günzburger Straße 69
D-89335 Ichenhausen
Note:
In accordance with the applicable product liability laws, the manufacturer of this product assumes no liability for damage to the product or caused by the product arising from:
- Improper handling
- Failure to comply with the operating manual
• Repairs carried out by third parties, unauthorised specialists
• Installing and replacing non-original spare parts - Improper use
- Failures of the electrical system due to failure to observe the national electrical requirements and regulations.
Note:
The operating manual is part of the product and contain important information for safe, proper and economical operation. Please also observe the applicable national regulations. Read all operating and safety instructions carefully before use and only use the product as described. Keep the manual and pass it on when you give the product to someone else.
2 Proper use
The product is intended for gentle and thorough cleaning of various surfaces with water or steam. It enables easy removal of dirt without the use of chemical cleaning agents. The product is intended for indoor use only and must not be used in potentially explosive atmospheres.
The product may only be used in the intended manner. Any use beyond this is improper. The user, not the manufacturer, is responsible for damages or injuries of any type resulting from this.
An element of the intended use is also the observance of the safety instructions, as well as the assembly instructions and operating information in the operating manual.
Persons who operate and maintain the product must be familiar with the manual and must be informed about potential dangers.
The liability of the manufacturer and resulting damages are excluded in the event of modifications of the product.
The product may only be operated with original parts and original accessories from the manufacturer.
The safety, operating and maintenance specifications of the manufacturer, as well as the dimensions specified in the technical data, must be observed.
Please note that our products were not designed with the intention of use for commercial or industrial purposes. We assume no guarantee if the product is used in commercial or industrial applications, or for equivalent work.
Any other use not expressly permitted in these instructions may result in damage to the product and pose a serious danger to the user.
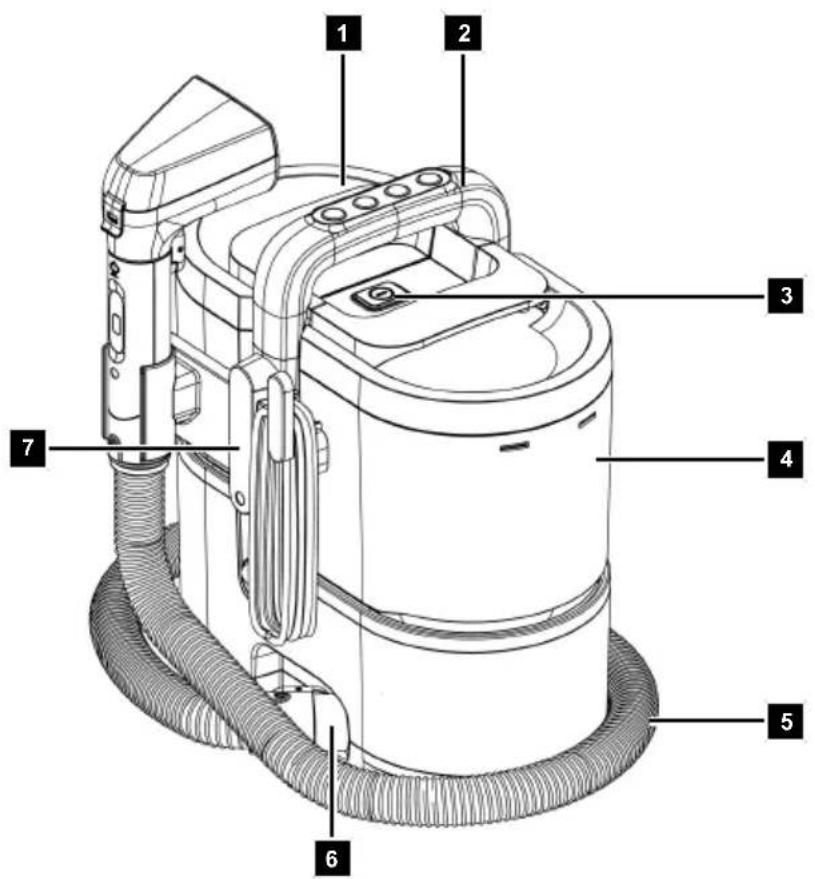
3 Product description (Fig. 1-16)
- Fresh water tank
1a. Lid
1b. Handle
1c. Clip tab - Carrying handle
2a. Cold water suction mode
2b. Hot water suction mode
2c. Steam suction mode
2d. Steam mode - On/off switch
- Waste water tank
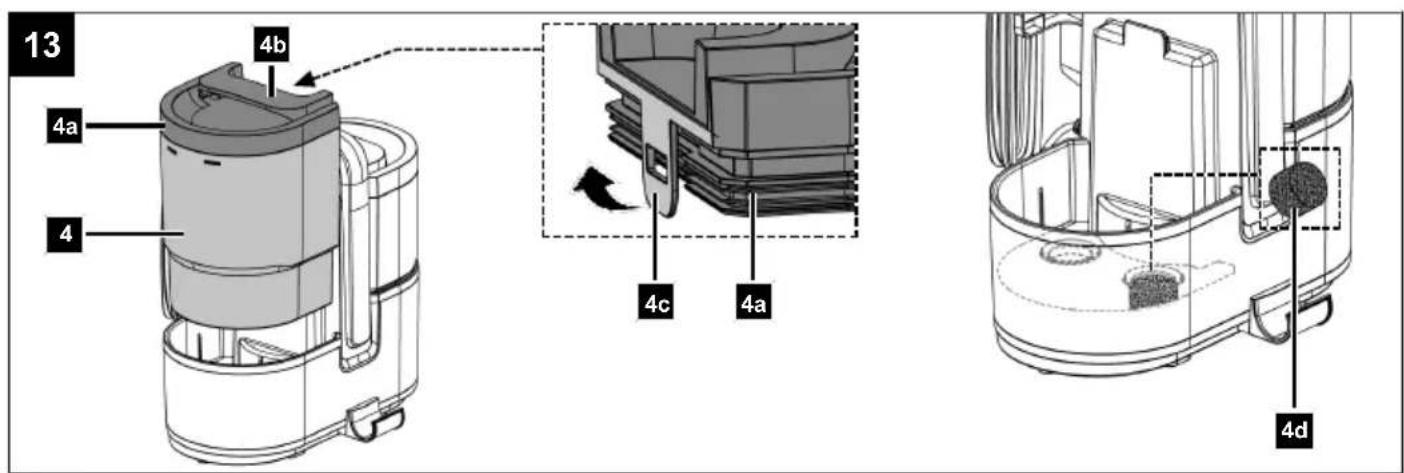
4a. Lid
4b. Handle
4c. Clip tab
4d. Dirty water filter - Vacuum hose
5a. Hose coupling
5b. Release button
5c. Handle
5d. Spray button
5e. Holder (suction hose) -
Suction connection
-
Holder (mains connection cable)
7a. Holder (handle)
7b. Screw - Steam nozzle
8a. Release button - Washing brush
9a. Release button
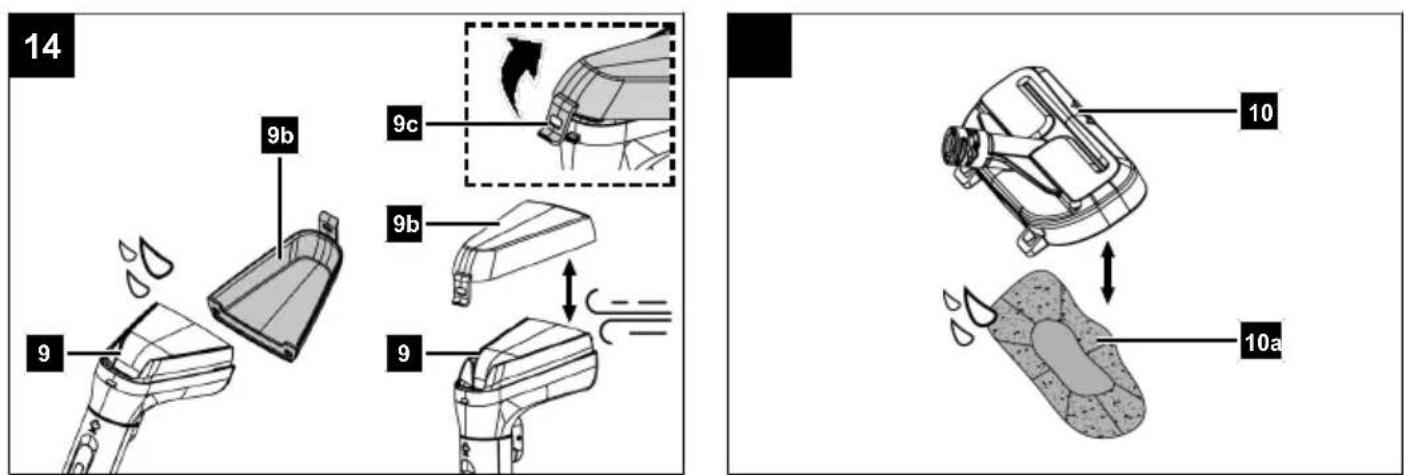
9b. Lid
9c. Clip fastener - Steam attachment
10a. Textile cover
10b. Window wiper
10c. Clip fastener
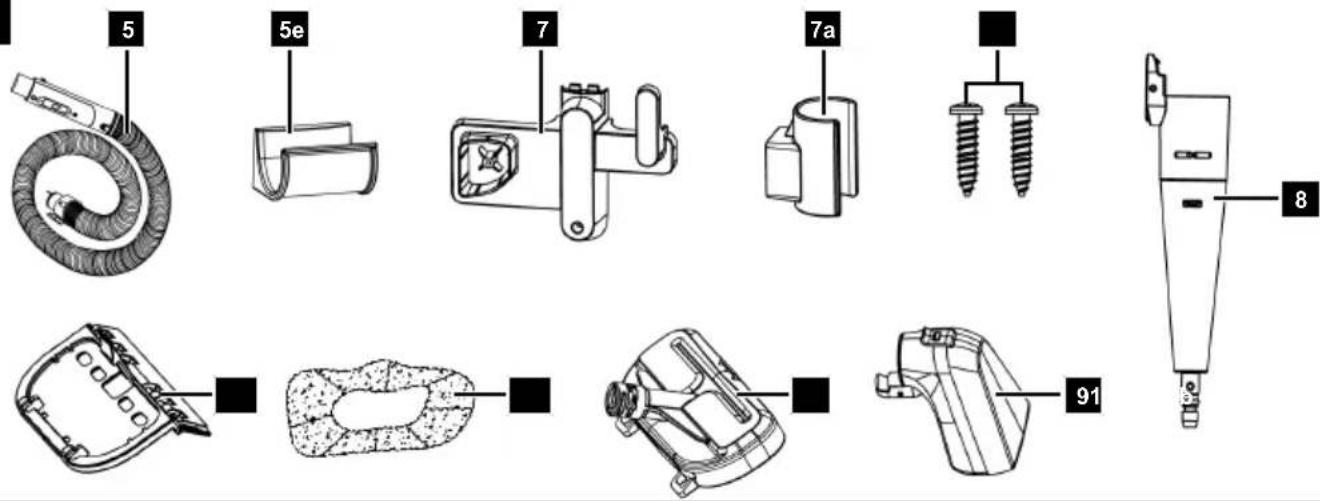
4 Scope of delivery (Fig. 2)
Item Quantity Designation
- 1 x Vacuum hose
5e. 1 x Holder (suction hose)
- 1 x Holder (mains connection cable)
7a. 1 x Holder (handle)
7b. 2 x Screw
-
1 x Steam nozzle
-
1 x Washing brush
-
1 x Steam attachment
10a. 1 x Textile cover
10b. 1 x Window wiper
1 x Spot cleaner
1 x Operating manual
5 Unpacking
WARNING
The product and the packaging material are not children's toys!
Do not let children play with plastic bags, films or small parts! There is a danger of choking or suffocating!
- Open the packaging and carefully remove the product.
- Remove the packaging material, as well as the packaging and transport safety devices (if present).
- Check whether the scope of delivery is complete.
- Check the product and accessory parts for transport damage. Immediately report any damage to the transport company that delivered the Product. Later claims will not be recognised.
- If possible, keep the packaging until the expiry of the warranty period.
- Familiarise yourself with the product by means of the operating manual before using for the first time.
- With accessories as well as wearing parts and replacement parts use only original parts. Spare parts can be obtained from your specialist dealer.
- When ordering please provide our article number as well as type and year of manufacture for the product.
6 Technical data
| Rated voltage 220-240 V~/50/60 Hz | |
| Rated current 7.8 A | |
| Nominal power 1800 W | |
| Protection class I | |
| Protection category IPX4 | |
| Connection type Y | |
| Power consumption when switched off | 0 W |
| Power consumption in standby mode | 0.4 W |
| Time until switched-off state is reached | 0 min |
| Time until standby mode is reached 10 min | |
| Length of mains connection cable 4.0 m | |
| Suction hose length 1.35 m | |
| Operational radius 5.35 m | |
| Tank capacity: Fresh water tank Waste water tank | 1.6 l 1.5 l |
| Max. suction pressure 16 Kpa | |
| Steam function temperature ≥100 C° | |
| Hot water function temperature ≥60 C° | |
| Spray output 330 ml/min | |
| Spray pressure | 1 bar |
| Textile cover/dirty water filter washable (max. temperature) | Yes (60°C) |
| Textile cover/dirty water filter Machine washable | no |
| Operating frequency Wireless radio transmission | 433.04-434.79 MHz |
| Max. transmitted power | 0.54 mW |
| Weight | approx. 4 kg |
Subject to technical changes!
7 Safety instructions
General power tool safety warnings

WARNING
Read all safety warnings, instructions, illustrations and specifications provided with this power tool.
Failure to follow all instructions listed below may result in electric shock, fire and/or serious injury.
Save all warnings and instructions for future reference.
The term "power tool" in the warnings refers to your mains-operated (corded) power tool or battery-operated (cordless) power tool.
7.1 Safety instructions for steam cleaners
a) Do not touch the hot components of the product!
b) Floors and stairs may be damp after application. There is an increased risk of slipping. Allow damp floors to dry completely before walking on them.
c) The product can be used by persons with reduced physical, sensory or mental capabilities or with a lack of experience or knowledge, if they are supervised or if they have been trained in the safe use of the product and understand the resultant hazards.
d) Children may not play with the Product.
e) The product must not be left unattended while it is connected to the mains.
f) Disconnect the mains plug from the socket before carrying out any work on the product, as well as during breaks in work, cleaning and when not in use.
g) Do not point the product and nozzles directly at electrical appliances and equipment containing electrical components during operation. These must not come into contact with liquids or steam.
h) Do not use the product if it has been dropped. Check the product for visible damage and leaks.
i) When the product is switched on or is cooling down, keep it away from children.
7.2 Safety instructions for handling batteries

WARNING
The battery may only be removed by authorised specialists.
a) When inserting batteries, always ensure correct polarity!
b) Do not allow batteries to heat up!
c) Do not short-circuit batteries.
d) If the batteries are defective, liquid may leak out. Avoid contact! In case of accidental contact, rinse with water. If the liquid gets into your eyes, seek additional medical attention. Leaking battery fluid can cause skin irritation, burns and chemical burns.
e) Do not charge non-rechargeable batteries.
f) Keep batteries out of the reach of children.
7.3 It will help you avoid accidents and injuries
- Never leave a product ready for operation unattended at the workplace.
• People and animals must not be suctioned with the product. - Never point the product or nozzles at yourself or others, especially your eyes and ears, during operation. There is a danger of injury.
- Do not suck up any hot, glowing, flammable, explosive or hazardous substances. These include hot ash, petrol, solvents, acids or alkalis. There is a risk of fire and injury.
- Check the product and accessories regularly for damage. Do not use a damaged product or accessories.
7.4 To avoid accidents and injuries due to electric shock
- Switch off the product:
- when the product is not in use, is being transported or is unattended.
- when checking the device, it is raining or when removing blockages.
-
when cleaning or performing maintenance or changing accessories.
– after contact with foreign objects or in the event of abnormal vibrations. -
Do not immerse the product in water and do not operate it in a damp environment.
- Never immerse the product in water or other liquids for cleaning.
- Do not touch the product with damp or wet hands!
7.5 This way, product damage and any resulting personal injury can be avoided
- Ensure that the product is correctly assembled and that the filters are in the correct position.
- Do not work without a filter. The product may become damaged.
- Only use original spare parts and accessories (see "Spare parts/accessories") supplied and recommended by our Service Centre. Using third-party parts leads to a loss of guarantee claims.
- Only have repairs carried out by authorised service centres.
- Follow the instructions for cleaning and maintaining the product.
- Store the product in a dry place and out of reach of children.
Residual risks
The product has been built according to state-of-the-art and the recognised technical safety rules. However, individual residual risks can arise during operation.
• Health hazard due to electrical power, with the use of improper electrical connection cables.
• Furthermore, despite all precautions having been met, some non-obvious residual risks may still remain.
- Residual risks can be minimised if the "Safety Instructions" and the "Intended Use" together with the operating instructions as a whole are observed.
- Prevent the product being unintentionally started up.
- Keep your hands away from the working area when the product is in operation.
- Comply with the stipulated maintenance and safety instructions in the operating instructions.

WARNING
This power tool generates an electromagnetic field during operation. This field can impair active or passive medical implants under certain circumstances. In order to prevent the risk of serious or deadly injuries, we recommend that persons with medical implants consult with their physician and the manufacturer of the medical implant prior to operating the power tool.
8 Assembly
Tool required:
- Phillips screwdriver*
* = may not be included in the scope of delivery!
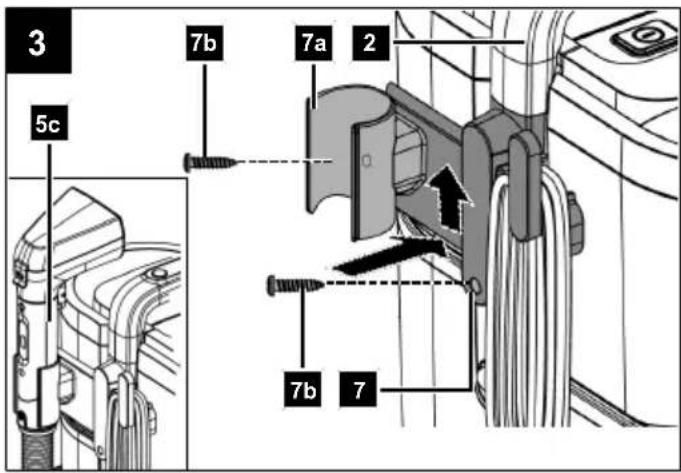
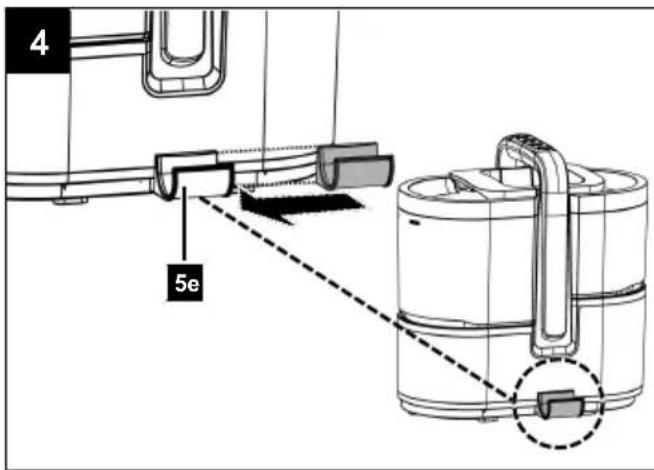
8.1 Fitting the holders (Fig. 3, 4)
Holder (mains connection cable):
- Insert the holder (7) for the mains connection cable into the recess on the carrying handle (2).
- Secure the holder (7) to the housing with a screw (7b).
Holder (handle):
- Insert the holder (7a) for the handle (5c) into the receptacle of the holder (7) for the mains connection cable.
- Secure the holder (7a) with a screw (7b).
Holder (suction hose):
- Insert the holder (5e) for the suction hose into the receptacle on the housing.
- Push the holder (5e) to the left to lock it into the holder.
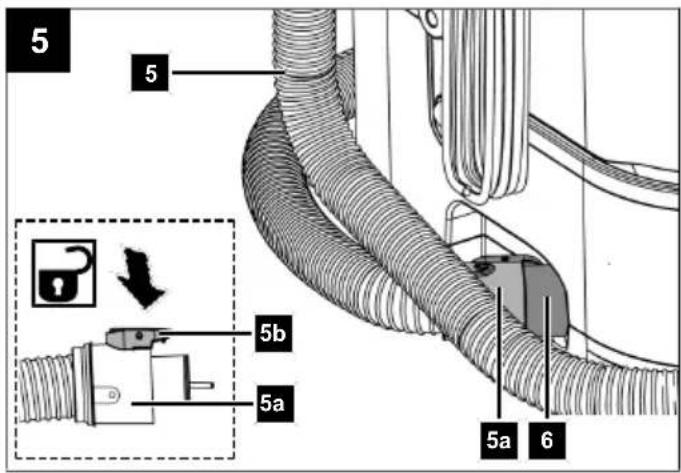
8.2 Connecting/disconnecting the suction hose (5) (Fig. 5)
Connect:
- Push the hose coupling (5a) of the suction hose (5) all the way into the suction connection (6) until it clicks into place.
- Check that the suction hose (5) is installed correctly by gently pulling on the hose coupling (5a).
Undoing:
- Press the release button (5b) and pull the hose coupling (5a) out of the suction connection (6).
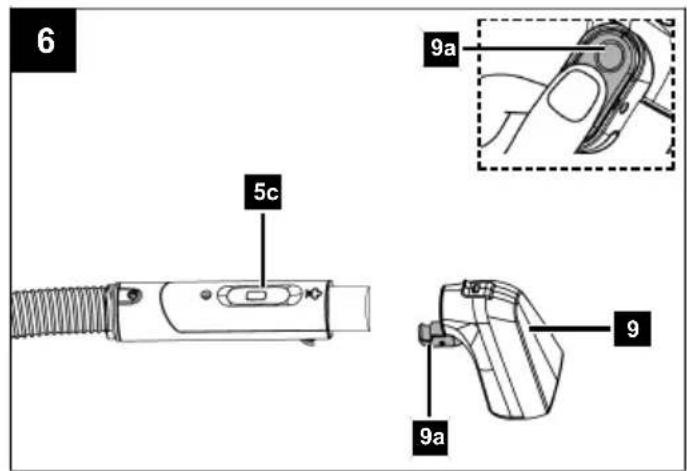
8.3 Fitting/removing the washing brush (9) (Fig. 6)
Assembling:
- Attach the washing brush (9) to the handle (5c) until the release button (9a) clicks into place.
Removing:
- Press the release button (9a) and pull the washing brush (9) out of the handle (5c).
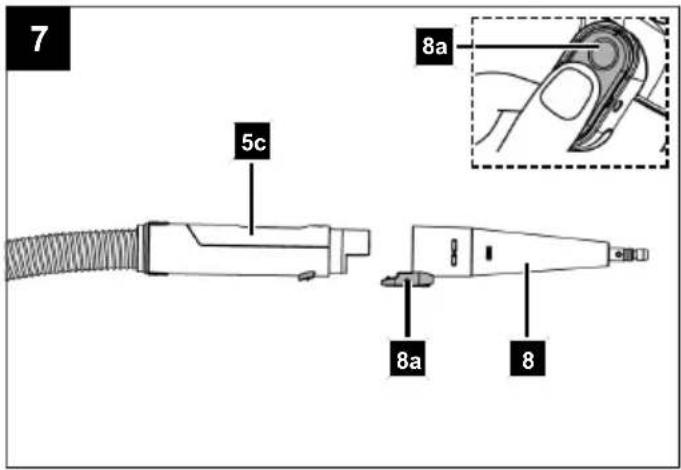
8.4 Fitting/removing the steam nozzle (8) (Fig. 7)
Assembling:
- Attach the steam nozzle (8) to the handle (5c) until the release button (8a) clicks into place.
Removing:
- Press the release button (8a) and pull the steam nozzle (8) out of the handle (5c).
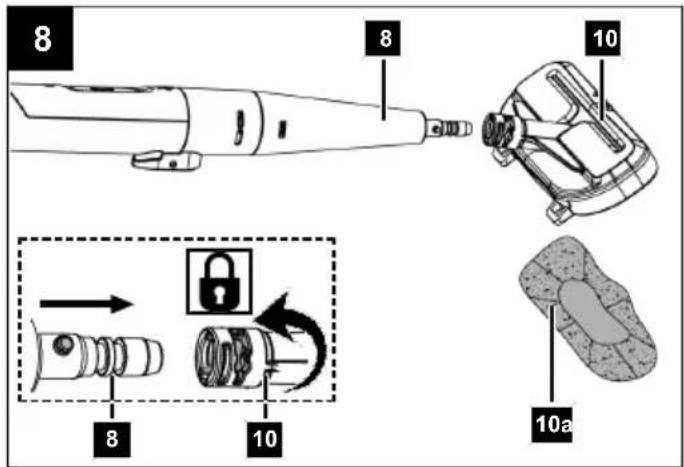
8.5 Fitting/removing the steam attachment (10) (Fig. 8)
Assembling:
-
Fit the steam nozzle (8) as described in 8.4.
-
Slide the steam attachment (10) onto the steam nozzle (8) and lock both parts in place by turning clockwise.
Removing:
- Disassembly takes place in reverse order.
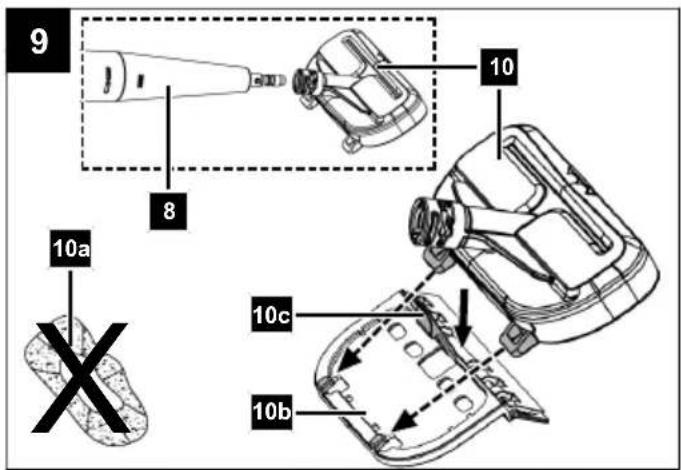
8.6 Fitting/removing the window wiper (10b) (Fig. 9)
In order to use the window wiper (10b), it must be combined with the steam attachment (10).
Assembling:
- Fit the steam attachment (10) to the steam nozzle (8) as described in 8.5.
- If necessary, remove the fabric cover (10a) from the steam attachment (10).
- Insert the tabs of the window wiper (10b) into the tabs of the steam attachment (10).
- Press the steam attachment (10) and window wiper (10b) together until the clip fastener (10c) audibly clicks into place.
Removing:
- Press the clip fastener (10c) outwards.
- Lift the steam attachment (10) out of its anchorage.
9 Before commissioning
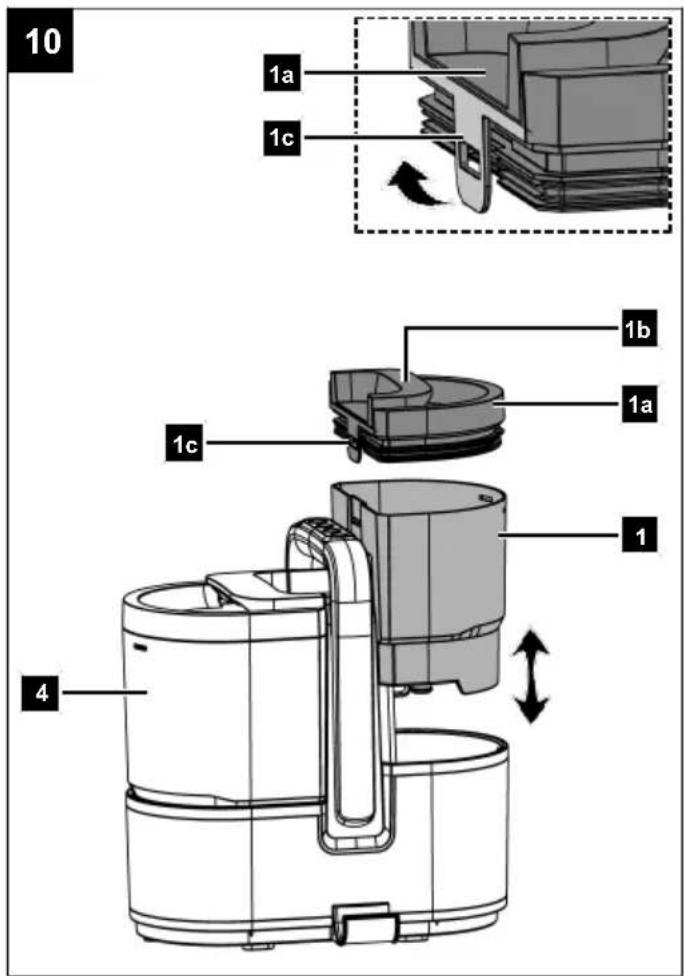
9.1 Filling the fresh water tank (1) (Fig. 10)
ATTENTION
The tank must not be opened during operation.
Switch off the product and unplug the mains plug before opening the tank.
The fresh water tank (1) supplies the water required for cleaning, which is collected in the dirty water tank (4) after being sucked up.
- Remove the fresh water tank (1) from the housing using its handle (1b).
- Gently pull the clip tab (1c) on the lid (1a) to open the fresh water tank (1).
- Lift the cover (1a), overcoming the resistance of the rubber seal.
- Fill the tank with fresh water up to the specified mark (max. 1.5 litres).
- Insert the tabs on the lid (1a) into the recesses on the fresh water tank (1).
-
Close the lid (1a) so that the clip tab (1c) snaps into place.
-
Put the fresh water tank (1) back into the housing.
- Check that it is securely fastened.
10 Operation
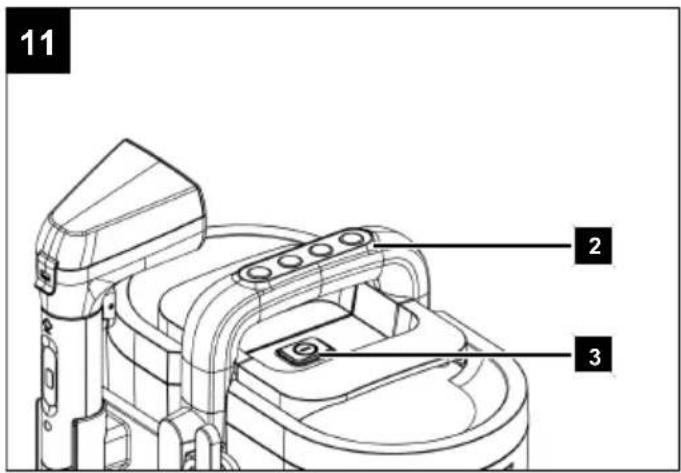
10.1 Switching the product on/off (Fig. 11)
- Insert the mains plug into a properly fused mains socket.
- Do not work without a filter. The product may become damaged.
Switching on
- To switch on the product, press the on/off switch (3). The buttons on the carrying handle (2) will start to flash alternately.
Switching off
- To switch off the product, press the on/off switch (3). The button illumination will go out.
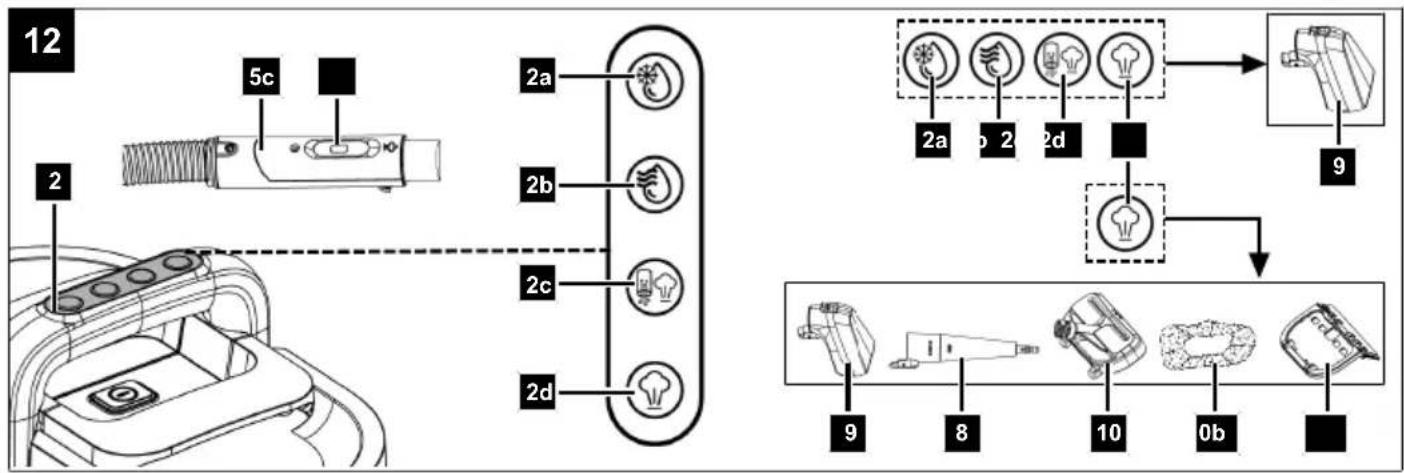
10.2 Cleaning with and without suction function (Fig. 12)
WARNING
Danger of burning!
The nozzle and the escaping steam become very hot during operation!
ATTENTION
The use of cleaning additives is not permitted.
Harmful vapours may be produced.
- Switch on the product as described in 10.1.
- Select a function on the carrying handle (2) and press the corresponding button:
With suction function:

Cold water suction mode (2a) for use with the washing brush (9)
• The suction function starts automatically.
- When the spray button (5d) on the handle (5c) is pressed, cold water comes out of the washing brush (9).

Hot water suction mode (2b) for use with the washing brush (9)
- The button lights up red.
The product heats up to operating temperature (≥ 60°C).
• The suction function starts automatically. - When the spray button (5d) on the handle (5c) is pressed, hot water comes out of the washing brush (9).

Steam suction mode (2c)
for use with the washing brush(9)
- The button lights up red. The product heats up to operating temperature (≥ 100°C).
- The button lights up white. The product is heated and ready for use. The suction function starts automatically.
- When the spray button (5d) on the handle (5c) is pressed, hot steam is emitted from the washing brush (9).
Without suction function:

Steam mode (2d)
(possible with all attachments)
- The button lights up red. The product heats up to operating temperature (≥ 100°C).
- The button lights up white. The product is heated up and ready for use.
- No suction function.
- When the spray button (5d) on the handle (5c) is pressed, hot steam is emitted from the selected attachment.
- Briefly press the spray button (5d) on the handle (5c) to start the water or steam output. The LED on the handle (5c) flashes three times.
- Press the spray button (5d) on the handle (5c) again to stop the water or steam output. The LED on the handle (5c) flashes three times.
- Switch off the product as described in 10.1.
- Keep an eye on the level of the fresh water tank (1) while working and top up with clean water in good time.
- Keep an eye on the level of the waste water tank (4). At the latest when the water level has reached the specified mark, the tank must be emptied as described in 10.3.
Note:
When changing to another function, small amounts of residual water or condensate may be discharged.
10.3 Emptying the waste water tank (4) (Fig. 13)
When the water level reaches the specified mark, the tank must be emptied.
- Remove the waste water tank (4) from the housing using its handle (4b).
- Gently pull the clip tab (4c) on the lid (4a) to open the waste water tank (4).
- Lift the cover (4a), overcoming the resistance of the rubber seal.
- Empty the tank.
- Clean the tank under running water.
- Insert the tabs on the lid (4a) into the recesses on the waste water tank (4).
-
Close the lid (4a) so that the clip tab (4c) snaps into place.
-
Put the dirty water tank (4) back into the housing.
- Check that it is securely fastened.
11 Working instructions
11.1 Using the washing brush (9) (Fig. 12)
Use the washing brush (9) to clean larger areas.
- Fit the washing brush (9) as described in 8.3.
- Select the desired function on the carrying handle (2).
- Press the spray button (5d) on the handle (5c) to release water or steam.
11.2 Using the steam nozzle (8) (Fig. 12)
For selective application, the steam nozzle can be used without the attachment.
- Fit the steam nozzle (8) as described in 8.4.
- Select steam mode (2d) on the carrying handle (2).
- Press the spray button (5d) on the handle (5c) to release steam.
11.3 Using the steam attachment (10) (Fig. 12)
Use the steam attachment (10) to smooth or refresh delicate fabrics.
- Fit the steamer attachment (10) as described in 8.5.
- Cover the steam attachment (10) with the fabric cover (10a).
- Select steam mode (2d) on the carrying handle (2).
- Press the spray button (5d) on the handle (5c) to release steam.
11.4 Using the window wiper (10b) (Fig. 12)
Use the window wiper (10b) to clean windows or glass surfaces.
- Fit the steam nozzle (8) as described in 8.4.
- Fit the steamer attachment (10) as described in 8.5.
- Connect the window wiper (10b) to the steam attachment (10) as shown in 8.6.
- Select steam mode (2d) on the carrying handle (2).
- Press the spray button (5d) on the handle (5c) to release steam.
12 Electrical connection
The electrical motor installed is connected and ready for operation. The connection complies with the applicable VDE and DIN provisions. The customer's mains connection as well as the extension cable used must also comply with these regulations.
12.1 Damaged electrical connection cables
The insulation on electrical connection cables is often damaged.
This may have the following causes:
- Pressure points, where connection cables are passed through windows or doors,
- Kinks where the connection cable has been improperly fastened or routed,
- Places where the connection cables have been cut due to being driven over,
• Insulation damage due to being ripped out of the wall socket, - Cracks due to the insulation ageing.
Such damaged electrical connection cables must not be used and are life-threatening due to the insulation damage.
Check the electrical connection cables for damage regularly. Ensure that the connection cables are disconnected from electrical power when checking for damage.
Electrical connection cables must comply with the applicable VDE and DIN provisions. Only use connection cables of the same designation.
The printing of the type designation on the connection cable is mandatory.
Safety information for replacing damaged or defective mains connection cables
Connection type Y
If it is necessary to replace the mains connection cable, this must be done by the manufacturer or their representative to avoid safety hazards.
12.2 AC motor
Connections and repair work on the electrical equipment may only be carried out by electricians.
- Before commissioning, ensure that the mains voltage matches with the operating voltage on the type plate.
- Extension cables up to 25 m long must have a cross-section of 1.5 mm ^2 .
13 Cleaning and maintenance

WARNING
Have maintenance and repair tasks that are not described in this operating manual, carried out by a specialist workshop. Use only original spare parts.

WARNING
Improper maintenance or cleaning work can cause injuries!

WARNING
The product may start unexpectedly and cause injuries and burns during cleaning, repair and maintenance work.
- Switch the product off.
– Pull out the mains plug. - Allow the product to cool.
13.1 Cleaning
- Keep protective devices, air vents and the motor housing as free of dust and dirt as possible. Rub the product clean with a clean cloth or blow it off with compressed air at low pressure. We recommend that you clean the product directly after every use.
- Ventilation openings must always be free.
- Do not use any cleaning products or solvents; they could attack the plastic parts of the product. Make sure that no water can penetrate the product interior.
13.1.1 Cleaning the dirty water filter (4d) (Fig. 13)
The dirty water filter (4d) is located under the dirty water tank (4) and must be cleaned regularly.
- Empty the dirty water tank (4) as described in 10.3.
- Remove the dirty water filter (4d), which is located at the bottom of the housing below the dirty water tank (4).
- Clean the dirty water filter (4d) thoroughly under running water at a maximum temperature of 60^ C.
- Reinsert the dirty water filter (4d) and then the dirty water tank (4) into the housing.
13.1.2 Cleaning the washing brush (9) (Fig. 14)
- Open the clip fastener (9c) on the cover (9b) and remove it from the washing brush (9).
- Clean the washing brush (9) and the cover (9b) under running water.
- Allow the washing brush (9) and the cover (9b) to dry completely.
- Insert the tabs of the washing brush (9) into the cover (9b) and press both parts together until the clip fastener (9c) clicks into place.
13.1.3 Cleaning the fabric cover (10a) (Fig. 15)
- Remove the fabric cover (10a) from the steam attachment (10).
- Clean the fabric cover (10a) thoroughly under running water at a maximum temperature of 60^ C.
- Allow the fabric cover (10a) to dry completely.
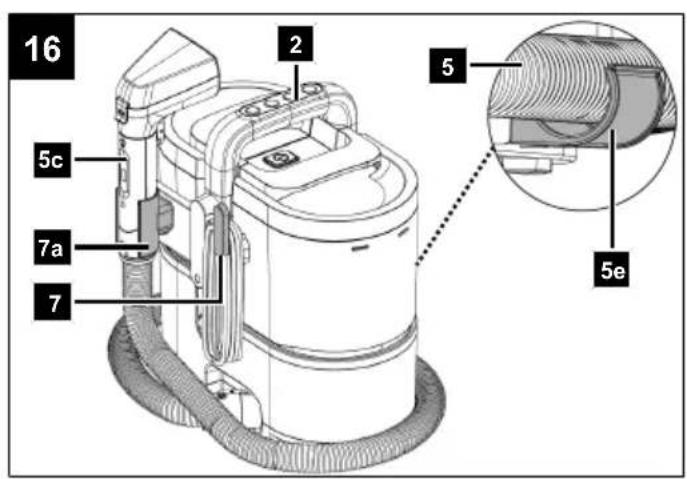
14 Storage and transport (Fig. 16)

WARNING
Danger of injury and burning!
The product can start unexpectedly and cause injuries.
- Switch off the engine before carrying out any cleaning or maintenance work.
- Allow the engine to cool down.
– Pull out the mains plug.
- Wind the mains connection cable onto the holder (7).
- Stow the suction hose (5) by feeding it through the holder (5e) and hooking it into the holder (7a) using the handle (5c).
14.1 Storage
Preparation for storage
- Clean and check the product for damage.
Store the product and its accessories in a dark, dry and frost-free place that is inaccessible to children.
The optimum storage temperature is between 5°C and 30°C.
Store the product in its original packaging.
Cover the product to protect it from dust or moisture.
Store the operating manual with the product.
14.2 Transport
- The product may only be lifted or transported by the carrying handle (2).
- Ensure that the load is well secured when transporting the product in a vehicle.
15 Repair and ordering spare parts
After repairs or maintenance, make sure that all safety-related parts are installed and are in perfect condition. All parts which may cause injury must be kept where they are inaccessible to children or others.
ATTENTION
According to the German Product Liability Act, no liability is accepted for damage caused by improper repairs or by not using original spare parts.
Such work should be performed by a customer service centre or an authorised specialists. The same applies to accessory parts.
Spare parts and accessories can be obtained from our Service Centre. To do this, scan the QR code on the front page.
Connections and repairs
Connections and repair work on the electrical equipment may only be carried out by electricians.
15.1 Service information
With this product, it is necessary to note that the following parts are subject to natural or usage-related wear, or that the following parts are required as consumables.
Wearing parts*:
- Dirty water filter
- Washing brush
- Window wiper
* = may not be included in the scope of delivery!
16 Disposal and recycling
Notes for packaging


The packaging materials are recyclable. Please dispose of packaging in an environmentally friendly manner.
Notes on the disposal of electrical and electronic equipment

Waste electrical and electronic equipment does not belong in household waste, but must be collected and disposed of separately!
• Used batteries that are not installed permanently in the old device must be removed non-destructively before disposal! Their disposal is regulated by the battery act.
- Owners or users of electrical and electronic devices are legally obliged to return them after use.
- The end user is responsible for deleting their personal data from the old device being disposed of!
- The symbol of the crossed-out dustbin means that waste electrical and electronic equipment must not be disposed of with household waste.
- Waste electrical and electronic equipment can be handed in free of charge at the following places:
– Public disposal or collection points (e.g. municipal works yards)
- Points of sale of electrical devices (stationary and online), provided that dealers are obliged to take them back or offer to do so voluntarily.
- Up to three waste electrical devices per type of device, with an edge length of no more than 25 centimetres, can be returned free of charge to the manufacturer without prior purchase of a new device from the manufacturer or taken to another authorised collection point in your vicinity.
– Further supplementary take-back conditions of the manufacturers and distributors can be obtained from the respective customer service.
- If the manufacturer delivers a new electrical appliance to a private household, the manufacturer can arrange for the free collection of the old electrical appliance upon request from the end user. Please contact the manufacturer's customer service for this.
• These statements only apply to devices installed and sold in the countries of the European Union and which are subject to the European Directive 2012/19/EU. In countries outside the European Union, different regulations may apply to the disposal of waste electrical and electronic equipment.
Notes on lithium-ion batteries

Remove the battery before disposing of the device!
- Do not dispose of batteries in household waste, in a fire (risk of explosion) or in water. Damaged batteries can harm the environment and your health if toxic vapours or liquids escape.
- Defective or used batteries must be recycled in accordance with Regulation (EU) 2023/1542.
- Hand in the battery and the battery charger at a recycling centre. The plastic and metal parts used can be separated by type and thus recycled.
- Dispose of batteries when discharged. We recommend covering the poles with an adhesive strip to protect against a short circuit. Do not open the battery.
- Dispose of batteries in accordance with local regulations. Return batteries to a used battery collection point where they can be recycled in an environmentally friendly manner. Ask your local waste disposal company about this.
17 Troubleshooting
The following table shows fault symptoms and describes remedial measures in the event of your product failing to work properly. If you cannot localise and rectify the problem with this, please contact your service workshop.
| Fault Possible cause Remedy | ||
| The product cannot be switched on. | No power supply. Plug in the mains plug. | |
| On/off switch defective. Please contact our | service department. | |
| Engine defective. | ||
| Faulty power supply. | Check the electrical system for compliance with the specifications on the type plate. | |
| Suction power decreases | Dirty water tank overfilled. Empty the dirty water tank. | |
| Product becomes louder | ||
| Product does not produce steam. | No water in the fresh water tank. | Fill the fresh water tank. |
| The product is still heating up. | Wait until the heating process is complete. | |
| Product does not spray water. | Incorrect attachment. | Use the washing brush. |
| Too much water/steam is being released. | Excessive steam supply. | Press the spray button to stop the steam supply. |
| Excess water may escape when steam is first drawn. | Wait approx. 1 minute in steam mode until the excess water has drained out. | |
18 EU Declaration of Conformity
Translation of the original Declaration of Conformity
Manufacturer:
Scheppach GmbH
Günzburger Straße 69
D-89335 Ichenhausen
We declare under our sole responsibility that the product described here complies with the applicable directives and standards.
Brand: SCHEPPACH
Art. designation: Spot cleaner -
SWC1200
Art. no. 5907756948
EU directives:
2014/30/EU, 2011/65/EU*, 2014/35/EU, 2014/53/EU, 2009/125/EG, (EU) 2023/826,
* The object of the declaration described above fulfils the regulations of the directive 2011/65/EU of the European Parliament and Council from 8th June 2011, on the restriction of the use of certain hazardous substances in electrical and electronic equipment.
Applied standards:
EN 60335-1:2012/A16:2023;
EN 60335-2-54:2008/A2:2021;
EN 60335-2-10:2003/A1:2008;
EN IEC 60335-2-2:2023/A11:2023;
EN 62233:2008;
EN IEC 55014-1:2021;
EN IEC 55014-2:2021;
EN IEC 61000-3-2:2019/A2:2024;
EN 61000-3-3:2013/A2:2021;
EN 301 489-1 V2.2.3:2019;
EN 301 489-3 V2.3.2:2023;
EN 300 220-2 V3.1.1:2017;
EN 50663:2017;
EN 50564:2011;
EN 62479:2010
Documentation authorised representative:
Georg Kohler
Günzburger Str. 69
D-89335 Ichenhausen
Division Manager Product Center
Andreas Pecher
Head of Project Management
Sommaire
Günzburger Straße 69
D-89335 Ichenhausen
Remarque :
Günzburger Straße 69
D-89335 Ichenhausen
Division Manager Product Center
Andreas Pecher
Head of Project Management
Garantie DE
Obvious defects must be reported within 8 days after receipt of the goods, otherwise the purchaser loses all claims due to such defects. We guarantee our machines, if handled correctly, for the duration of the statutory warranty period from handover in such a way that we will replace free of charge any machine part that demonstrably becomes unusable within this period as a result of material or manufacturing defects. For parts that we do not manufacture ourselves, we only provide a warranty to the extent that we are entitled to warranty claims against the upstream suppliers. The purchaser shall bear the costs of fitting the new parts. Claims for conversion and reduction and other claims for damages are excluded.
Garantie FR

- SWC1200
- Inhaltsverzeichnis
- Halterung (Handgriff):
- Garantiebedingungen
- Explanation of the symbols on the product
- Explanation of the signal words in the operating manual
- DANGER
- WARNING
- CAUTION
- ATTENTION
- Introduction
- Note:
- Proper use
- Product description (Fig. 1-16)
- Scope of delivery (Fig. 2)
- Item Quantity Designation
- Unpacking
- Safety instructions
- Safety instructions for steam cleaners
- Safety instructions for handling batteries
- It will help you avoid accidents and injuries
- To avoid accidents and injuries due to electric shock
- This way, product damage and any resulting personal injury can be avoided
- Residual risks
- Assembly
- Fitting the holders (Fig. 3, 4)
- Holder (mains connection cable):
- Holder (handle):
- Holder (suction hose):
- Connecting/disconnecting the suction hose (5) (Fig. 5)
- Connect:
- Undoing:
- Fitting/removing the washing brush (9) (Fig. 6)
- Assembling:
- Removing:
- Fitting/removing the steam nozzle (8) (Fig. 7)
- Fitting/removing the steam attachment (10) (Fig. 8)
- Fitting/removing the window wiper (10b) (Fig. 9)
- Before commissioning
- Filling the fresh water tank (1) (Fig. 10)
- The tank must not be opened during operation.
- Operation
- Switching the product on/off (Fig. 11)
- Switching on
- Switching off
- Cleaning with and without suction function (Fig. 12)
- Danger of burning!
- The use of cleaning additives is not permitted.
- With suction function:
- Steam suction mode (2c)
- Without suction function:
- Steam mode (2d)
- Emptying the waste water tank (4) (Fig. 13)
- Working instructions
- Using the washing brush (9) (Fig. 12)
- Using the steam nozzle (8) (Fig. 12)
- Using the steam attachment (10) (Fig. 12)
- Using the window wiper (10b) (Fig. 12)
- Electrical connection
- Damaged electrical connection cables
- Safety information for replacing damaged or defective mains connection cables
- Connection type Y
- AC motor
- Cleaning and maintenance
- Cleaning
- Cleaning the dirty water filter (4d) (Fig. 13)
- Cleaning the washing brush (9) (Fig. 14)
- Cleaning the fabric cover (10a) (Fig. 15)
- Storage and transport (Fig. 16)
- Danger of injury and burning!
- Storage
- Preparation for storage
- Transport
- Repair and ordering spare parts
- Connections and repairs
- Service information
- Disposal and recycling
- Notes for packaging
- Notes on the disposal of electrical and electronic equipment
- Waste electrical and electronic equipment does not belong in household waste, but must be collected and disposed of separately!
- Notes on lithium-ion batteries
- Remove the battery before disposing of the device!
- Troubleshooting
- EU Declaration of Conformity
- Translation of the original Declaration of Conformity
- Manufacturer:
- EU directives:
- Applied standards:
- Documentation authorised representative:
- Sommaire
- Garantie DE
- Garantie FR
Brand : SCHEPPACH
Model : SWC1200
Category : Vacuum Cleaner