ELS18B - Sweeper SCHEPPACH - Free user manual and instructions
Find the device manual for free ELS18B SCHEPPACH in PDF.

User questions about ELS18B SCHEPPACH
0 question about this device. Answer the ones you know or ask your own.
Ask a new question about this device
Download the instructions for your Sweeper in PDF format for free! Find your manual ELS18B - SCHEPPACH and take your electronic device back in hand. On this page are published all the documents necessary for the use of your device. ELS18B by SCHEPPACH.
USER MANUAL ELS18B SCHEPPACH
natural_image
Black-and-white photo of a L3 lawn mower with visible brand label 'Scheppao' and power cord (no additional text or symbols)
ELS1800
ELS18B
| DE | Elektro-KunstrasenkehrmaschineOriginalbetriebsanleitung | 6 |
| GB | Electric artificial grass sweeperTranslation of the original instruction manual | 15 |
| FR | Balayeuse électrique pour gazon artificielTraduction de la notice originale | 24 |


⚠CAUTION!: Read the manual carefully before operating this machine!
natural_image
Close-up of a hand operating a mechanical gear assembly (no visible text or symbols)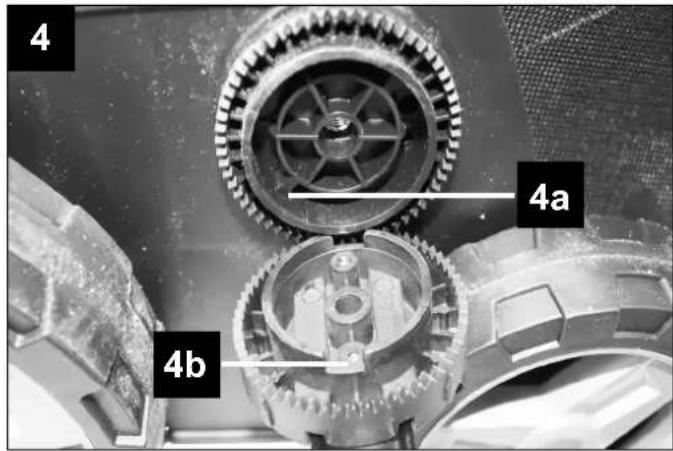
natural_image
Close-up of a black cable with a labeled clamp (labeled C) and part number 8, no text or symbols beyond labels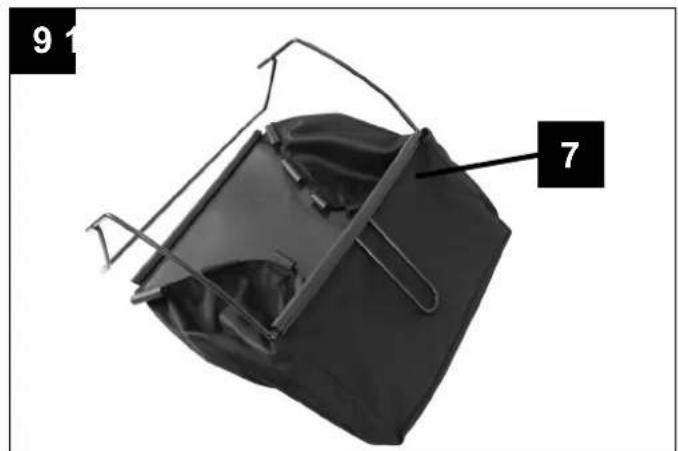
natural_image
Black fabric bag with metal frame and labeled parts (numbered 7 and 9), no readable text or symbols on the bag itself.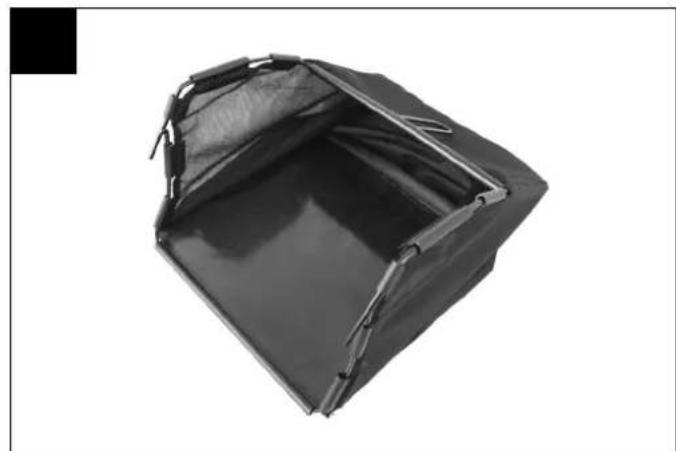
natural_image
Black rectangular container with open lid, no visible text or symbols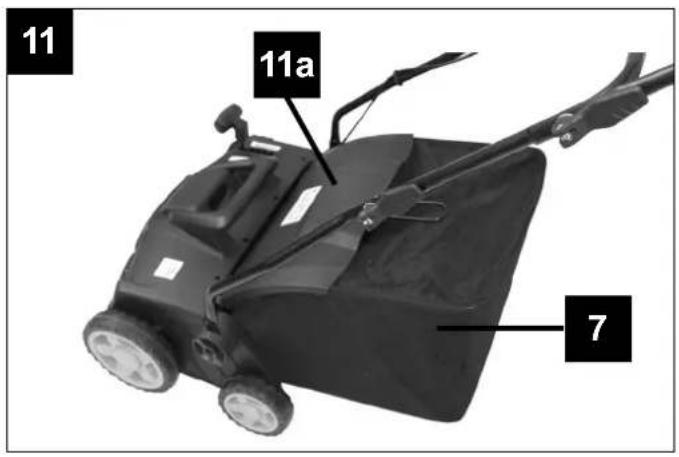
natural_image
Close-up of a mechanical component with labeled parts (10 and 12), showing internal structure and mounting holes (no readable text or symbols beyond labels)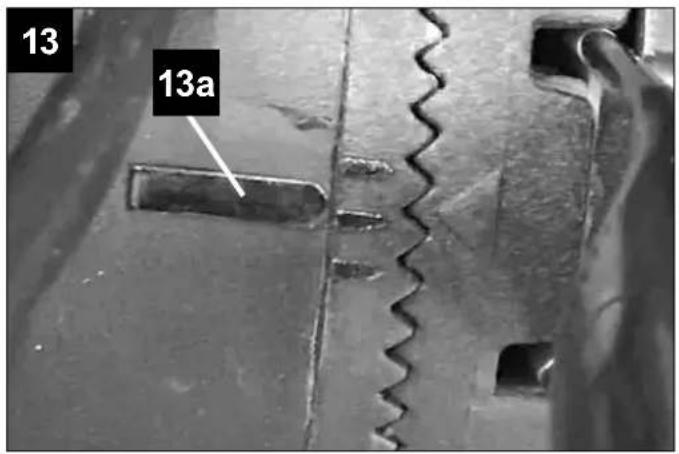
natural_image
Close-up of a mechanical assembly with a white plastic component and a metallic base (no visible text or symbols)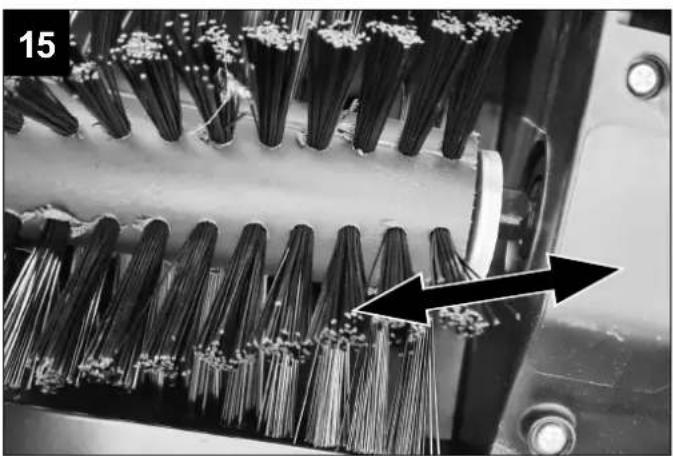
natural_image
Close-up of a mechanical device with bundled wires and connectors, showing no visible text or symbols.Günzburger Straße 69
D-89335 Ichenhausen
Verehrter Kunde,
Explanation of the symbols on the equipment
Symbols are used in this manual to draw your attention to potential hazards. The safety symbols and the accompanying explanations must be fully understood. The warnings themselves will not rectify a hazard and cannot replace proper accident prevention measures.
 | Attention! Read the usage instructions before commissioning. |
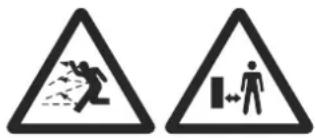 | Keep third parties (persons and animals) away from the danger zone. |
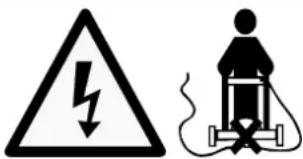 | ATTENTION! Danger of electric shock. Do not drive over the connection cable! |
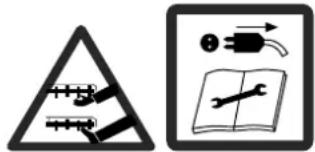 | The rotation of the brush continues for a while after switching off - unplug the plug from the socket before maintenance work or if the line is damaged. |
 | Wear hearing and eye protection. |
 | Protection class II - double insulation |
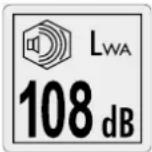 | Guaranteed sound power level |
 | The product complies with the applicable European directives. |
Table of contents: Page:
- Introduction...... 17
- Device description (Fig 1-2).... 17
- Unpacking 17
- Intended use....17
- Safety information 18
- Residual risks 20
- Technical data 20
- Before starting the equipment 20
- Montage 20
- Operation....21
- Electrical connection 21
- Cleaning and maintenance.... 22
- Disposal and recycling 22
- Troubleshooting guide 23
- Declaration of conformity 35
1. Introduction
Manufacturer:
Scheppach GmbH
Günzburger Straße 69
D-89335 Ichenhausen
Dear customer,
we hope your new tool brings you much enjoyment and success.
Note:
According to the applicable product liability laws, the manufacturer of the device does not assume liability for damages to the product or damages caused by the product that occurs due to:
- Improper handling,
• Non-compliance of the operating instructions,
• Repairs by third parties, not by authorized service technicians,
• Installation and replacement of non-original spare parts,
• Application other than specified, - A breakdown of the electrical system that occurs due to the non-compliance of the electric regulations and VDE regulations.
We recommend:
Read through the complete text in the operating instructions before installing and commissioning the device. The operating instructions are intended to help the user to become familiar with the machine and take advantage of its application possibilities in accordance with the recommendations. The operating instructions contain important information on how to operate the machine safely, professionally and economically, how to avoid danger, costly repairs, reduce downtimes and how to increase reliability and service life of the machine.
In addition to the safety regulations in the operating instructions, you have to meet the applicable regulations that apply for the operation of the machine in your country. Keep the operating instructions package with the machine at all times and store it in a plastic cover to protect it from dirt and moisture. Read the instruction manual each time before operating the machine and carefully follow its information. The machine can only be operated by persons who were instructed concerning the operation of the machine and who are informed about the associated dangers. The minimum age requirement must be complied with. In addition to the safety instructions in this operating manual and the separate regulations of your country, the generally recognised technical rules relating to the operation of identical devices must also be observed.
We accept no liability for accidents or damage that occur due to a failure to observe this manual and the safety instructions.
2. Device description (Fig 1-2)
- Shift lever
- Safety switch
- Upper push bar
- Mains connection/mains cable
- Tensioning lever
- Middle push bar
- Catch basket
- Lower push bar
- Handle height adjustment
- Working height adjustment
- Rear wheel
- Front wheel
A. Allen key size 5
B. Cable strain relief
C. Cable clamp
D. Brush
3. Unpacking
- Open the packaging and remove the device carefully.
- Remove the packaging material as well as the packaging and transport bracing (if available).
- Check that the delivery is complete.
- Check the device and accessory parts for transport damage.
- If possible, store the packaging until the warranty period has expired.
ATTENTION!
The device and packaging materials are not toys! Children must not be allowed to play with plastic bags, film and small parts! There is a risk of swallowing and suffocation!
4. Intended use
- The machine is designed and built according to the state-of-the-art and the safety-related standards. Nevertheless, the use of the machine might involve risks such as personal injury, danger to life for the user or third parties, or damage to the machine and other material property.
- The machine is to be used only in a technically flawless condition as well as in accordance with the manufacturer's instructions and in a safety and risk-conscious manner while adhering to the operating instructions! In particular, failures which may impair the safety must be resolved immediately (by you or an expert)!
- Sweeping of flat and dry surfaces – e.g. entries, terraces, courtyards, etc.
©
- Always guide the implement at a walking pace with both hands on the handle. Be especially careful when you turn the implement around or draw it towards you. Danger of stumbling!
- Start or actuate the starting lever with care and in conformity with the directions in these Instructions.
- Do not tilt the implement when starting, other than it has to be lifted. In this case tilt the implement only to the extent that is absolutely necessary and always lift the implement on the side that is opposite to the operator.
- Never operate the implement without the attached collection bag or impact protector. Danger of injury! Always keep well away from the ejector opening.
- Do not operate the implement in the vicinity of inflammable liquids or gases as this could give rise to the danger of a fire or explosion.
Work intervals:
- After the implement has been turned off, the brushing cylinder will continue to rotate for a few seconds. Keep hands and feet well away.
- Only remove plant parts when the implement is standing completely still. Ensure that the grass ejector opening is clean and free.
- Switch off the power when the implement is to be transported, lifted or tilted and when traversing other surfaces than grass.
- Never leave the implement unattended at the place of work.
- Always switch off the implement and disconnect the power plug:
- Whenever you leave the implement
- Before you clean the ejector opening or unblock or unclog the implement
- When the implement is not being used
- During all maintenance and cleaning work
- When the power cable is damaged or has become tangled
- When the implement hits an obstruction during work or when unusual vibrations arise. Establish the cause and see if the implement has been damaged. Do not repair it yourself! Have the implement repaired by an authorised workshop!
- Store the implement in a dry place well out of reach of children.
Caution!
The following states how to avoid damage to the implement and any resulting harm to people:
Take care of your implement
- Switch off the power when the implement is to be carried across steps.
- Inspect the implement each time before it is to be used. Never operate the implement if safety devices (e.g. impact protector, parts of the brushing facility or bolts are missing, worn out or damaged. Check especially the power cable and starting lever for damage. To avoid imbalance, all tools and bolts must be exchanged as complete sets.
- Only use spare parts and accessories that have been supplied or recommended by the manufacturer. The use of alien parts results in the immediate loss of all guarantee claims. Ensure that all nuts, bolts and screws are firmly tightened and that the implement is in a safe working state.
- Never try to repair the implement yourself, other than you have been trained accordingly. All work that has not been listed in these Instructions must only be carried out by authorised servicing agencies.
- Treat the implement with the greatest care. Always keep the tool clean for better and safer work. Follow the maintenance instructions.
- Never overload the implement. Always work within the specified capacity range. Do not use low-power machines for heavy-duty work. Do not operate the implement for purposes for which it is not intended.
Electrical safety:
Caution!
The following states how to avoid accidents and injuries due to electric shock:
- Before each use, carry out a visual inspection of the power and extension cables for signs of damage or ageing.
- If the power cable for this equipment is damaged, it must be replaced by the manufacturer, a customer service agent of the same or a similarly qualified person in order to prevent hazards.
- Keep the power cable well away from the brushing tools. Should the power cable become damaged during work, then instantly disconnect the power cable from the mains.
Do not touch the power cable before it has been disconnected from the mains.
- Keep the extension cables away from the teeth. The teeth may damage the cables and result in contact with live parts.
- Check that the mains voltage is the same as indicated on the rating plate.
- Wherever possible connect the implement to a power socket with a residual- current circuit breaker that has a rated current of not more than 30 mA.
- Avoid body contact with earthed parts (e.g. metal fences, metal posts).
- Only use approved extension cables of the type H05VV-F or H05RN-F with a maximum length of 75 m and which have been approved for open-air use. The stranded cord diameter of the extension cable must be at least 2.5 mm ^2 .
Always unreel a cable drum to its full length so that the entire cable can be checked for damage.
- Use the envisaged cable suspension when attaching an extension cable.
- Never pull the cable to disconnect the plug from the socket. Protect the cable from heat, oil and sharp edges.
- If the connecting cable is damaged, first disconnect the extension cable from the socket. You can then disconnect the connecting cable of the equipment.
- If the power cable for this equipment is damaged, it must be replaced by the manufacturer, a customer service agent of the same or a similarly qualified person in order to prevent hazards.
6. Residual risks
Even if you use this electric power tool in accordance with instructions, certain residual risks cannot be rules out. The following hazards may arise in connection with the equipment's construction and layout:
1 Damage to hearing if no suitable ear protection is used.
2 Health damage caused by hand-arm vibrations if the equipment is used over a prolonged period or is not properly guided and maintained.
⚠ Warning!
This electric tool generates an electromagnetic field during operation. This field can impair active or passive medical implants under certain conditions. In order to prevent the risk of serious or deadly injuries, we recommend that persons with medical implants consult with their physician and the manufacturer of the medical implant prior to operating the electric tool.
7. Technical data
Main voltage 230-240V\~ 50Hz
| Power Input 1800W | |
| Working width | 360 mm |
| Scarifing depth | -12 / +6 mm |
| L_pA sound pressure level | 90,20 dB |
| L_wA sound power level | 105,17 dB |
| K uncertainty | 3 dB |
| Vibration at the handlebars | 1,679 m/s ^2 |
| K uncertainty | 1.5 m/s ^2 |
| Protection class | II |
| Protection type | IPX4 |
Weight 12,5 kg
Keep the noise emissions and vibrations to a minimum.
- Only use appliances which are in perfect working order.
• Service and clean the appliance regularly. - Adapt your working style to suit the appliance.
- Do not overload the appliance.
- Have the appliance serviced whenever necessary.
- Switch the appliance off when it is not in use.
- Wear protective gloves.
8. Before starting the equipment
Before you connect the equipment to the mains supply make sure that the data on the rating plate are identical to the mains data.
⚠ Warning!
Always pull the power plug before making adjustments to the equipment.
The sweeper is delivered unassembled. The grass basket and the complete push bar must be assembled and mounted before using the sweeper. Follow the operating instructions step-by-step and use the pictures provided as a visual guide to easily assemble the machine.
9. Montage
⚠ Important!
You must fully assemble the appliance before using it for the first time!
Guide rail assembly (fig. 3 - 8)
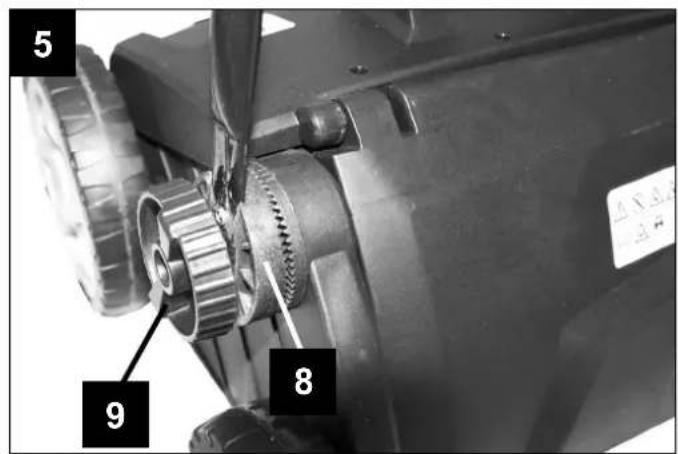
- Loosen the grip screw on the height adjustment (9).
- Fit the lower handles (8) as shown in figures 4+5. Make sure that the springs (4a/4b) go into the opposite groove respectively
- Subsequently tighten the grip screw again (fig. 5).
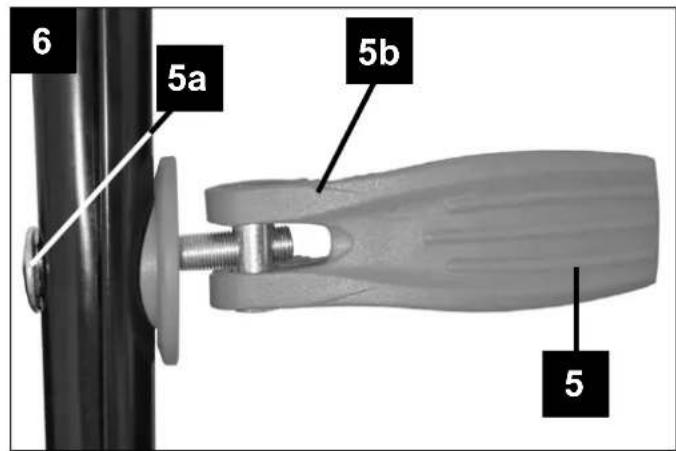
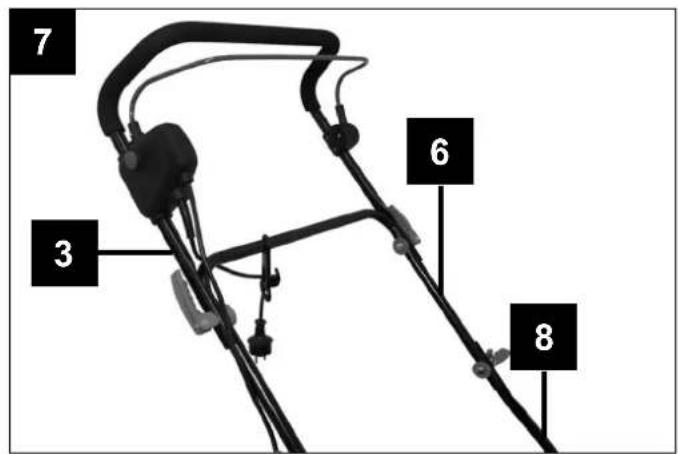
- Connect the upper push bars (3) with the middle push bar (6) and the two lower push bars (8). To do this, use four tensioning levers (5), fastening screws (5a) and washers (5b). (figs. 6+7)
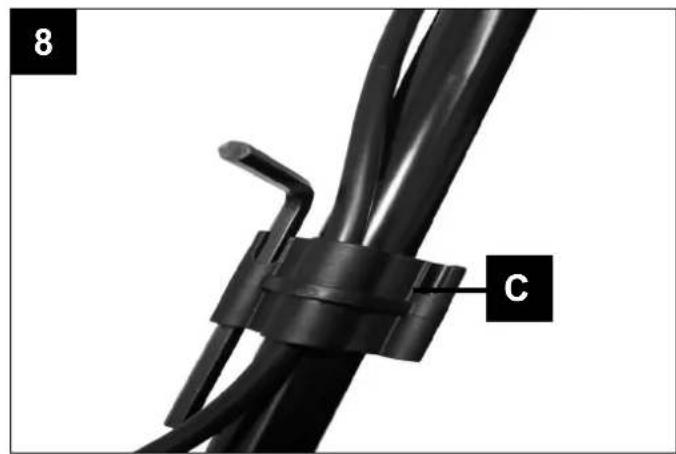
- Fasten the switch cable with the two cable clamps (C) to the handle. (fig. 8)
Installing the catch basket
- Slide the catch basket (7) over the frame for the catch basket and put the rubber tabs over (Fig. 9, 10)
- Hang the catch basket (7) into the device. To do this, lift the discharge flap (11a) and hang the catch basket (7) into the appropriate brackets on the device. (fig. 11)
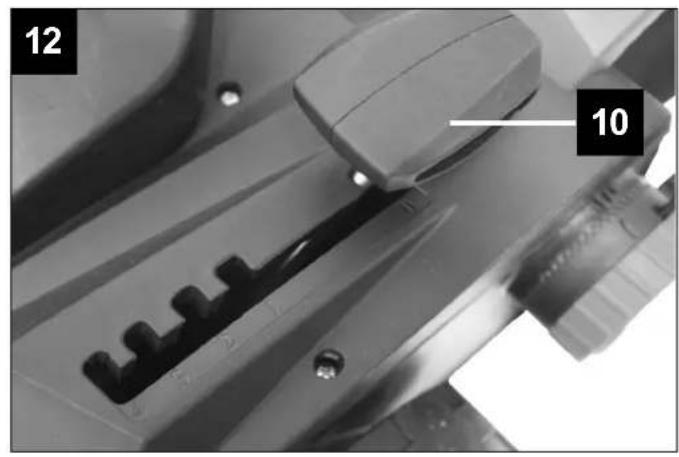
Adjusting the working depth (fig. 12)
The working depth is set using the depth adjustment (10) on the two front wheels. To do this, gently pull the depth adjustment (10) away to the left, bring it to the desired position and let it latch into that position.
$$ 0 = + 6 \mathrm{mm} $$
$$ 1 = - 3 \mathrm{mm} $$
$$ 2 = - 6 \mathrm{mm} $$
$$ 3 = - 9 \mathrm{mm} $$
$$ 4 = - 1 2 \mathrm{mm} $$
Adjusting the steering bar (fig. 5 + 13)
- First loosen the grip screws (fig. 5), so that you can adjust the steering bar.
- Set the desired height, as shown in fig. 13. (You can choose between three levels).
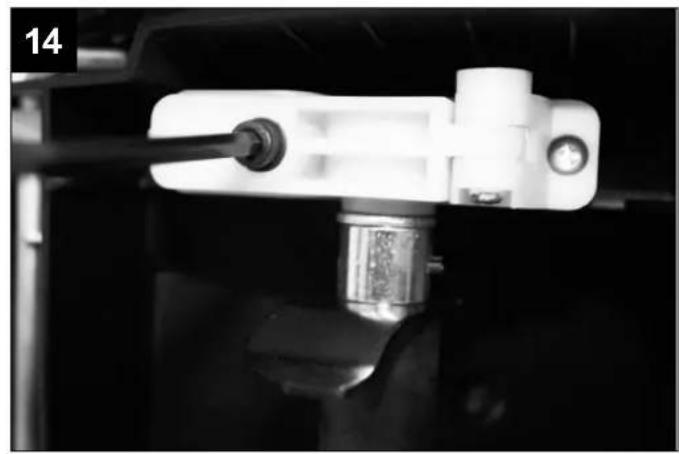
Replacing brush (fig. 14, 15)
ATTENTION!
Be sure to wear gloves!
Remove the Allen screws and lift the brush on this end. Pull the brush in the direction of the arrow, out of the drive square. Slide the new brush in the direction of the arrow back into the drive square and then press it into the bracket. Use the Allen screws to fasten the roller back onto the housing.
10. Operation
To prevent accidental start-up of the equipment, the shift lever (fig. 1 / Item 1) is equipped with a safety switch (fig. 1 / Item 2) which must be pressed before the lever switch (fig. 1 / Item 1) can be pressed.
If the lever switch is released, the equipment switches off.
Repeat this process several times so that you are sure that the machine functions properly. Before you perform any repair or maintenance work on the machine, ensure that the brush unit is not rotating and that the power supply is disconnected.
⚠️ Important!
Never open the ejector flap when the motor is running. A rotating brush unit can cause injuries. Always fasten the ejector flap carefully. The flap flips back to the "Closed" position by the tension springs!
Always ensure that a safe distance (provided by the long handles) is maintained between the user and the housing.
⚠ Danger! Before taking off the grass basket, switch off the motor and wait until the brush has come to a stop.
To remove the grass basket, lift up the ejector flap with one hand, while unhooking the basket with the other.
11. Electrical connection
The electrical motor installed is connected and ready for operation. The connection complies with the applicable VDE and DIN provisions. The customer's mains connection as well as the extension cable used must also comply with these regulations.
- The product meets the requirements of EN 61000-3-11 and is subject to special connection conditions. This means that use of the product at any freely selectable connection point is not allowed.
- Given unfavourable conditions in the power supply the product can cause the voltage to fluctuate temporarily.
- The product is intended solely for use at connection points where the following prerequisites apply: a) A maximum permitted supply impedance “Z” (Zmax = 0,433 Ω) must not be exceeded. b) A continuous current-carrying capacity of the mains of at least 100 A per phase must be given.
- As the user, you are required to ensure that the connection point at which you wish to operate the product meets one of the two requirements, a) or b), mentioned above. As necessary, consult your electric power company.
Important information
In the event of an overloading the motor will switch itself off. After a cool-down period (time varies) the motor can be switched back on again.
Damaged electrical connection cable
The insulation on electrical connection cables is often damaged.
This may have the following causes:
- Passage points, where connection cables are passed through windows or doors.
- Kinks where the connection cable has been improperly fastened or routed.
- Places where the connection cables have been cut due to being driven over.
- Insulation damage due to being ripped out of the wall outlet.
- Cracks due to the insulation ageing. Such damaged electrical connection cables must not be used and are life-threatening due to the insulation damage.
Check the electrical connection cables for damage regularly. Make sure that the connection cable does not hang on the power network during the inspection.
Electrical connection cables must comply with the applicable VDE and DIN provisions. Only use connection cables of the same designation.
The printing of the type designation on the connection cable is mandatory.
If the power cord of this device is damaged, it must be replaced by a special power cord, which is available from the manufacturer or its service department.
AC motor:
The mains voltage must be 220 - 240 V\~.
- Extension cables up to 25 m long must have a cross-section of 1.5 mm ^2 .
Connections and repairs of electrical equipment may only be carried out by an electrician.
Please provide the following information in the event of any enquiries:
• Type of current for the motor
• Machine data - type plate
12. Cleaning and maintenance
⚠ Danger!
Always pull out the mains power plug before starting any cleaning work.
Cleaning
- Keep all safety devices, air vents and the motor housing free of dirt and dust as far as possible. Wipe the equipment with a clean cloth or blow it with compressed air at low pressure.
- We recommend that you clean the device immediately each time you have finished using it.
- Clean the equipment regularly with a moist cloth and some soft soap. Do not use cleaning agents or solvents; these could attack the plastic parts of the equipment. Ensure that no water can seep into the device. The ingress of water into an electric tool increases the risk of an electric shock.
Carbon brushes
In case of excessive sparking, have the carbon brushes checked only by a qualified electrician.
Danger! The carbon brushes should not be replaced by anyone but a qualified electrician.
Maintenance
- A worn out or damaged brushing unit should be replaced by an authorised expert.
• Take care that all fastening elements (screws, nuts, etc.) are firmly tightened, so that you can work safely with the scarifier. - Store the scarifier in a dry place.
- For longer life, all screw-fastened parts, such as wheels and axles should be cleaned and subsequently oiled.
- Regular servicing of the scarifier not only secures longer endurance and performance, but also contributes to an accurate and simple scarification of your lawn.
- At the end of the season, carry out a general check of the scarifier, and remove all residue collected. Before the start of every season, it is absolutely necessary to check the state of the scarifier. Contact our Customer Service if repair work is necessary.
Service information
Please note that the following parts of this product are subject to normal or natural wear and that the following parts are therefore also required for use as consumables.
Wear parts*: Brush, Carbon brushes
* Not necessarily included in the scope of delivery!
13. Disposal and recycling
Notes for packaging


The packaging materials are recyclable. Please dispose of packaging in an environmentally friendly manner.
Notes on the electrical and electronic equipment act [ElektroG]
![SCHEPPACH ELS18B - Notes on the electrical and electronic equipment act [ElektroG] - 1](/content/2026/05/755807/images/dc839ba0bbf9ddc08c7ff3e240fab6ab596167138585e55ebe3e27357ada25c0.jpg)
Waste electrical and electronic equipment does not belong in household waste, but must be collected and disposed of separately!
- Used batteries or rechargeable batteries that are not installed permanently in the old appliance must be removed non-destructively before disposal. Their disposal is regulated by the battery law.
- Owners or users of electrical and electronic devices are legally obliged to return them after use.
- The end user is responsible for deleting their personal data from the old device being disposed of!
- The symbol of the crossed-out dustbin means that waste electrical and electronic equipment must not be disposed of with household waste.
-
Waste electrical and electronic equipment can be handed in free of charge at the following places:
-
Public disposal or collection points (e.g. municipal works yards)
- Points of sale of electrical appliances (stationary and online), provided that dealers are obliged to take them back or offer to do so voluntarily.
- Up to three waste electrical devices per type of device, with an edge length of no more than 25 centimetres, can be returned free of charge to the manufacturer without prior purchase of a new device from the manufacturer or taken to another authorised collection point in your vicinity.
-
Further supplementary take-back conditions of the manufacturers and distributors can be obtained from the respective customer service.
-
If the manufacturer delivers a new electrical appliance to a private household, the manufacturer can arrange for the free collection of the old electrical appliance upon request from the end user. Please contact the manufacturer's customer service for this.
- These statements only apply to devices installed and sold in the countries of the European Union and which are subject to the European Directive 2012/19/EU. In countries outside the European Union, different regulations may apply to the disposal of waste electrical and electronic equipment.
14. Troubleshooting guide
| Fault Possible causes Rectification | ||
| Motor does not start | No electricity in plugCable defectiveSwitch, switch/plug block defectiveConnections to motor or capacitor disconnectedHousing clogged | Check line and fuseHave machine checked by a customer service centerHave machine checked by a customer service centerHave machine checked by a customer service centerIf necessary adjust working depth. Clean housing so that the brush can run freely |
| Engine performance drops | Housing cloggedBrush badly worn | Clean housingReplace brush |
| Motor is running, brush is not rotating | Toothed belt is torn By customer service workshop | |
Günzburger Straße 69
D-89335 Ichenhausen
Chers clients,
Scheppach GmbH, Günzburger Str. 69, 89335 Ichenhausen
| [6552] | EU-KonformitätserklärungOriginalkonformitätserklärungWir erklären in alleiniger Verantwortung, dass das hier beschriebene Produkt mit den geltenden Richtlinien und Normen übereinstimmt. | Der hier beschriebene Gegenstand der Erklärung erfüllt die Vorschriften der Richtlinie 2011/65/EU des Europäischen Parlaments und des Rates vom 8. Juni 2011 zur Beschränkung der Verwendung bestimmter gefährlicher Stoffe in Elektro- und Elektronikge-räten. *Technische Unterlagen verfügbar bei: ** | ||
| Artikelnummer*** | Artikelbezeichnung: Elektro-KunstrasenkehrmaschineELS1800, ELS18B | Marke**** | ||
| [CKED] | EU Declaration of ConformityTranslation of the original Declarationof ConformityWe declare under our sole responsibility that the product described herecomplies with the applicable directives and standards. | The object of the declaration described here fulfils the regulations of the directive 2011/65/EU of the European Parliament and Council from 8th June 2011, on the restriction of the use of certain hazardous substances in electrical and electronic equipment. *Technical documentation available at: ** | ||
| Item number*** Item designation: Electric artificial grass sweeper ELS1800,ELS18B | Brand**** | |||
 | Déclaration UE de conformitéTraduction de la déclaration de conformitéoriginaleNous déclarons, sous notre propre responsabilité, que le produit décrit ici est conforme aux directives et normes en vigueur. | L'appareil décrit ci-dessus dans la déclaration est conforme aux réglementations de la directive 2011/65/EU du Parlement Européen et du Conseil du 8 juin 2011 visant à limiter l'utilisation de substances dangereuses dans la fabrication des appareils électriques et électroniques. *Dossier technique auprès de: ** | ||
| Référence*** Désignation | de l'article: Balayeuse électrique pour gazonartificiel ELS1800, ELS18B | Marque**** | ||
| ***59098059953; 58098029913 | ****SCHEPPACH | |||
** :David RümpeleinGünzburger Str. 69D-89335 Ichenhausen i. V. Andreas Pacher /Head of Project Management i. V. Andreas Pacher /Head of Project Management i.V. Simon Schunk /Division Manager Product Center i.V. Simon Schunk /Division Manager Product Center | ☐ 2011/65/EU*☐ 2014/30/EU☐ 2016/1628/EU☐ 2014/29/EU☐ 2014/35/EU☐ 2004/22/EG☐ 2014/68/EU☐ 89/686/EWG_96/58/EG☐ 90/396/EWG☐ 2023/826/EU | ☐ 2006/42/EG☐ Annex IVNotified Body:Notified Body No.:Certificate No.: | ☐ 2000/14/EG_2005/88/EGNoise:measured L_WA = 105,17 dBguaranteed L_WA = 108 dB☐ Annex V☐ Annex VINotified Body:Notified Body No.: | |
| ☐ 2016/1628/EU | Emission No.: | |||
| EN IEC 55014-1:2021; EN IEC 55014-2:2021; EN IEC 61000-3-2:2019+A1:2021; EN IEC 61000-3-11:2019;EN 60335-1:2012+AC:2014+A11:2014+A13:2017+A1:2019+A2:2019+A14:2019+A15:2021+A16:2023;EN 62233:2008; EN ISO 12100:2010; EN IEC 62841-4-7:2022+A11:2022+AC:2023-05 | ||||
Garantie DE
Apparent defects must be notified within 8 days from the receipt of the goods. Otherwise, the buyeris rights of claim due to such defects are invalidated. We guarantee for our machines in case of proper treatment for the time of the statutory warranty period from delivery in such a way that we replace any machine part free of charge which provably becomes unusable due to faulty material or defects of fabrication within such period of time. With respect to parts not
manufactured by us we only warrant insofar as we are entitled to warranty claims against the upstream suppliers. The costs for the installation of the new parts shall be borne by the buyer. The cancellation of sale or the reduction of purchase price as well as any other claims for damages shall be excluded.