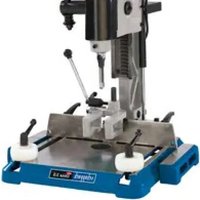
Chisa 3.0 - Drill SCHEPPACH - Free user manual and instructions
Find the device manual for free Chisa 3.0 SCHEPPACH in PDF.


| Product type | Mortiser (wood drill) |
| Brand | Scheppach |
| Model | Chisa 3.0 |
| Table dimensions (W/D) | 690 x 310 mm |
| Table height | 45 mm |
| Weight | 38 kg |
| Power supply | 230 V / 50 Hz |
| Nominal power (P1) | 370 Watts |
| Motor speed | 1380 rpm |
| Spindle speed | 1380 rpm |
| Maximum drilling stroke | 135 mm |
| Maximum drilling depth | 76 mm |
| Maximum drill bit size | 12 mm |
| Chuck capacity | 1 - 13 mm |
| Chisel capacity | 6 - 12 mm |
| Chisel shank / socket | 19.05 mm |
| Distance stop – chisel center | 85 mm |
| Maximum wood height | 135 mm |
| Operating mode | S6 / 40% |
| Electrical protection | 16 A time-delay |
| Connector | Schuko |
| Delivery contents | Mortiser with motor, stop with hold-down, 2 table extensions, 2 guide pieces, pneumatic spring, handle, locking sleeve, stop adjustment lever, tool holder, wood chisel with drill bit, chuck key, small parts bag, user manual |
| Maintenance | Cleaning after each use, greasing moving parts, sharpening chisel and drill bit |
| Safety | Mandatory safety devices, motor stop before adjustments, chip extraction, comply with VDE/DIN standards |
| Warranty | Legal duration, defective parts replaced free of charge subject to proper use |
Frequently Asked Questions - Chisa 3.0 SCHEPPACH
User questions about Chisa 3.0 SCHEPPACH
0 question about this device. Answer the ones you know or ask your own.
Ask a new question about this device
Download the instructions for your Drill in PDF format for free! Find your manual Chisa 3.0 - SCHEPPACH and take your electronic device back in hand. On this page are published all the documents necessary for the use of your device. Chisa 3.0 by SCHEPPACH.
USER MANUAL Chisa 3.0 SCHEPPACH
natural_image
Industrial milling machine with a central drill bit and control panel (no visible text or symbols)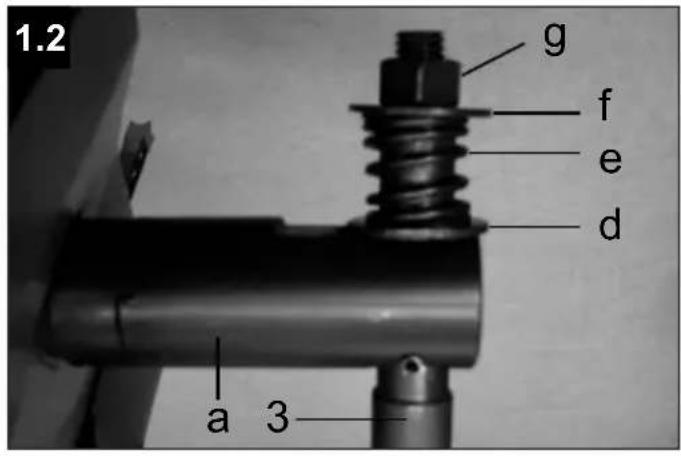
Abmessung B/T/H mm....580/430/780
workpiece stop with blank holder
2 table extensions
2 workpiece guides
gas spring
operating handle
catch socket
workpiece stop adjustment lever
tool holder
chisels with drill
feed key
small parts bag
operating manual
Technical data
Dimensions W/D/H mm....580/430/780
Table size W/L mm....310 x 320
Table height mm....45
Table adjustment W/D mm....690 x 310
Drill stroke mm 130
Distance drill – fence mm 85
Drill depth max. mm 76
Drill size max. mm.... 12
Workpiece height max. mm 135
Spindle speed 1/min.... 1380
Chisel capacity mm....6 - 12
Chisel shank/Bushing size mm....19,05
GB
Maximum chisel stroke mm 135
Distance fence – centre chisel mm 85
Chuck capacity mm.... 1 - 13
Weight kg 38
| Motor 230 V/ 50 Hz | |
| Consumption power P1 W 370 | |
| Spindle speed 1380 | |
| Plug Schuko | |
Subject to technical modifications!
General notes
- After unpacking, check all parts for any transport damage. Inform the supplier immediately of any faults.
- Later complaints cannot be considered.
- Make sure the delivery is complete.
- Before putting into operation, familiarize yourself with the machine by carefully reading these instructions.
- Use only original scheppach accessories, wearing or replacement parts. You can find replacement parts at your scheppach dealer.
- When ordering, include our item number and the type and year of construction of the machine.
Note
In accordance with valid product liability laws, the manufacturer of this device shall not be responsible for damage to and from this device which results from:
- Improper care.
• Noncompliance with the Operating Instructions.
• Repairs made by unauthorized persons.
- The installation and use of any parts which are not original schrts.
- Improper use and application.
- Failure the electrical system as a result of non-compliance with the legal and applicable electrical directives and VDE regulations 0100, DIN 57113 / VDE 0113.
We recommend
that you read through the entire operating instructions before putting into operation.
These operating instructions are to assist you in getting to know your machine and utilize its proper applications.
The operating instructions contain important notes on how you work with the machine safely, expertly, and economically, and how you can avoid hazards, save repair costs, reduce downtime and increase the reliability and service life of the machine.
In addition to the safety requirements contained in these operating instructions, you must be careful to observe your country's applicable regulations.
The operating instructions must always be near the machine. Put them in a plastic folder to protect them from dirt and humidity. They must be read by every operator before beginning work and observed conscientiously. Only persons who have been trained in the use of the machine and have been informed of the various dangers may work with the machine. The required minimum age must be observed.
In addition to the safety requirements contained in these operating instructions and your country's applicable regulations, you should observe the generally recognized technical rules concerning the operation of woodworking machines.
⚠ In these operating instructions we have marked the places that have to do with your safety with this sign.
Safety notes ⚠️
- Please pass on safety notes and instructions to all those who work on the machine.
- The machine must only be used in technically perfect condition in accordance with its designated use and the instructions set out in the operating manual, and only by safety-conscious persons who are fully aware of the risks involved in operating the machine. Any functional disorders, especially those affecting the safety of the machine, should therefore be rectified immediately.
- Only tools which correspond to the European norm, EN 847-1, may be used.
- Observe all safety instructions and warnings attached to the machine.
- See to it that safety instructions and warnings attached to the machine are always complete and perfectly legible.
- Caution when working: There is a danger to fingers and hands from the rotating cutting tool.
- Make sure that the machine stands stable on firm ground.
- Check all power supply lines. Do not use defective lines.
- Keep children away from the machine when it is connected to the power supply.
-
Operating personal must be at least 18 years of age. Trainees must be at least 16 years of age, but may only operate the machine under adult supervision.
-
Persons working on the machine may not be diverted from their work.
- The machine must be equipped with a table length extension if a second person is working at the circular sawbench removing cut workpieces. The second person may not stand anywhere else but at the take-off table end.
- The working space on the machine must be free of chips and wood scrap.
- Wear only close-fitting clothes. Remove rings, bracelets and other jewelry.
- Pay attention to the rotational direction of the motor – see Electrical Connection.
- The safety mechanisms on the machine may not be removed or rendered unusable.
- Cleaning, changing, calibrating, and setting of the machine may only be carried out when the motor is switched off. Pull the power supply plug and wait for the rotating tool to completely stop.
- Switch the machine off and pull power supply plug when rectifying any malfunctions.
- When working on the machine, all safety mechanisms and covers must be mounted.
- Switch the machine off and pull power supply plug when rectifying any malfunctions.
- When leaving the work place, switch the motor off. Pull the power supply plug.
- Cut off the external power supply of the machine or plant even if only minor changes of place are envisaged. Properly reconnect the machine to the supply mains before recommissioning.
- Connection and repair work on the electrical installation may be carried out by a qualified electrician only.
- All protection and safety devices must be replaced after completing repair and maintenance procedures.
Use only as authorized ⚠️
The machine corresponds to the valid EC guideline.
- To transport the machine, grasp the table firmly at the front and at the rear using both hands and lift the machine.
- If an original base is not used, the machine must be placed firmly upon a stable stand resembling a table. The working height should be 850 mm.
- The machining range and surrounding areas of the machine must be clear of interfering foreign matter to prevent accidents occurring.
- Workpieces must be completely free of foreign objects, i.e. nails or screws.
- The morticing machine is designed exclusively for the machining of wood and materials similar to wood. Only original scheppach tools and accessories may be used. Please observe the „Special Tool Accessories“.
- The machine must only be used in technically perfect condition in accordance with its designated use and the instructions set out in the operating manual, and only by safety-conscious persons who are fully aware of the risks invol-
ved in operating the machine. Any functional disorders, especially those affecting the safety of the machine, should therefore be rectified immediately.
- Relevant accident prevention regulations and other, generally recognized safety-technical rules must also be adhered to.
- The scheppach machine may only be used, maintained, and operated by persons familiar with it and instructed in its operation and procedures. Arbitrary alterations to the machine release the manufacturer from all responsibility for any resulting damages.
- The scheppach machine may only be used with original accessories and original tools made by the manufacturer.
- Any other use exceeds authorization. The manufacturer is not responsible for any damages resulting from unauthorized use; risk is the sole responsibility of the operator.Remaining hazards
Remaining hazards ⚠️
The machine has been built using modern technology in accordance with recognized safety rules. Some remaining hazards, however, may still exist.
- The rotating work piece can cause injuries to fingers and hands if it is incorrectly fed.
- Thrown work pieces can lead to injury if the work piece is not properly secured or fed, such as working without a limit stop.
- The use of incorrect or damaged mains cables can lead to injuries caused by electricity.
- The operating instructions supplied with the spe-
cial accessories must be observed and carefully read when scheppach special accessories are used.
- Even when all safety measures are taken, some remaining hazards which are not yet evident may still be present.
- Remaining hazards can be minimized by following the instructions in „Safety Precautions“, „Proper Use“ and in the entire operating manual.
Montage
Equipment Fig. 1
1 motor
2 switch
3 operating handle
4 chisels and drills
5 support table
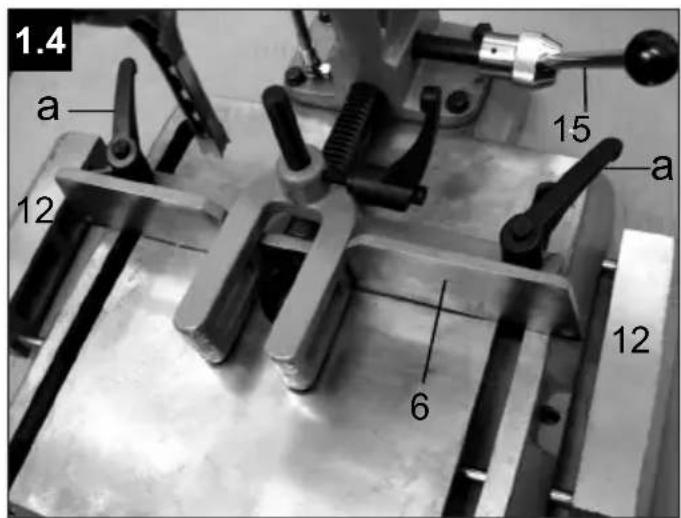
6 workpiece stop
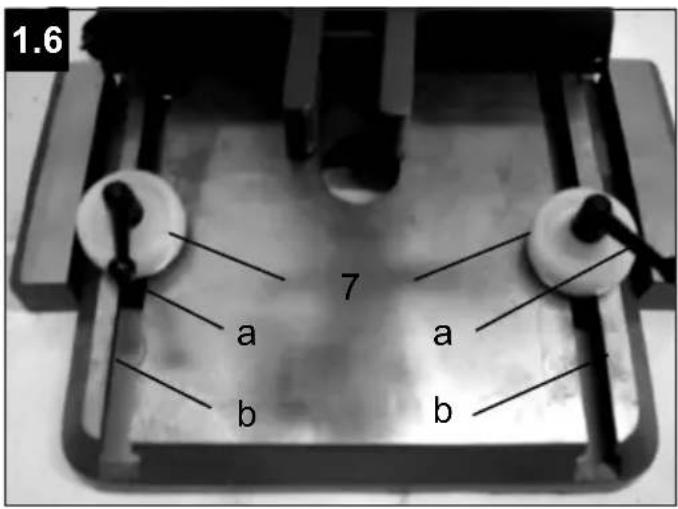
7 workpiece guide rollers
8 workpiece blank holder
9 depth gauge
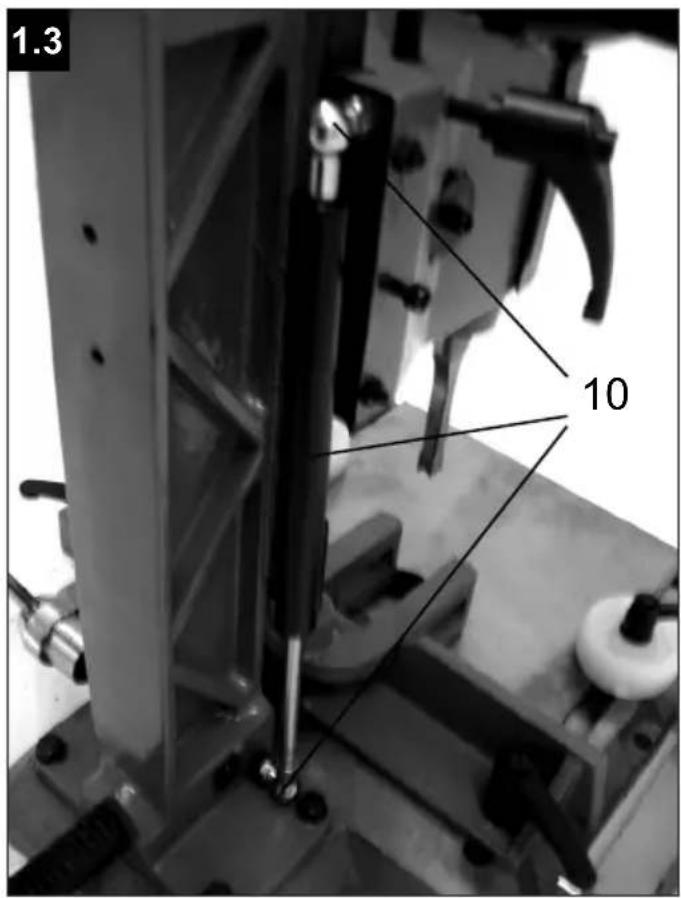
10 gas spring
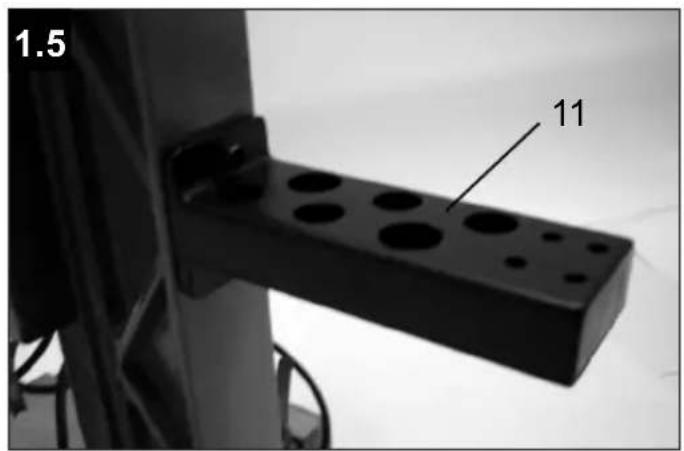
11 tool holder
12 table extension
13 tool change cover
14 lock screw
15 workpiece stop adjustment lever
All assembly and retrofitting work may only be performed when the mains plug has been disconnected.
Operating handle assembly Fig. 1.1-1.2
Mount the catch socket (a) on the machine head with the spring (b) and special screw (c). (Fig. 1.1) Connect the control lever (3) and catch socket (a) with washer (d), compression spring (e), washer (f) and hexagonal nut (g). (Fig. 1.2)
Gas spring assembly Fig. 1.3
Place the drive unit upright.
Press the gas spring (10) up and down in the ball head.
Workpiece stop assembly Fig. 1.4
Insert the workpiece stop (6) into the gearing (k), Insert and adjust the adjustment lever to the rear (15), secure it to the table with 2 toggle bolts (a), Insert table extensions (12) on both sides of the table.
Tool holder assembly Fig. 1.5
Assemble the tool holder (11) with 2 Allen screws M8x20.
Workpiece guides assembly Fig 1.6
Place the two workpiece guides (7) in the groove (a) on the table and tighten with the clamping lever (b).
Putting into Operation
Please observe the safety instructions!
The machine may only be put into operation when all of the protective and saftey devices have been mounted.
Installing chisel and bit
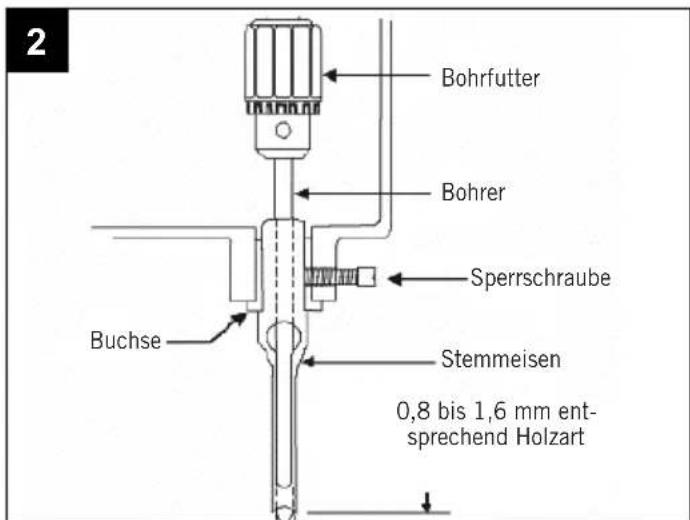
- Release the lock screw, as shown in Fig. 2.
-
Insert chisel bushing (with the hole facing forward) into the head. Tighten the screw just enough to hold the chisel in place.
-
Place the chisel in the bushing. Firmly tighten the screw. Attention: The slot in the side of the chisel must show to the left or to the right, never to the front or to the back. This will allow the ejection of chips when making mortises.
- Push the chisel through the chisel opening upwards into the chuck and lock it with the chuck key.
- Adjust the bit at a distance of 0.8 to 1.6 mm between the chisel points, dictated by the type of wood.
Operating instructions
Operating instructions Fig. 3-4
Set the depth stop (9. Fig. 3) to the desired depth.
Place the workpiece on the table, put the stop in the center of the drill tip and clamp it firmly with the 2 toggle bolts (a Fig. 4).
With the two workpiece guides (7. Fig. 4) secure your workpiece. Ensure that the workpiece can move.
Set the blank holder (8. Fig. 4) just above the value of the workpiece and clamp it tightly.
- Place the work piece on the table and clamp it with the vice. With the right hand wheel, move the table forward and backward, with the left hand wheel move the table to the left and to the right.
- Adjust the table stops, Fig. 5, according to the length of cut required, then tighten the thumb screws.
- Turn the machine on and feed the chisel and bit steadily into the work piece by pulling the operating handle down. Attention: The speed of pulling the handle down must be efficient but smooth, in order to avoid burning at the bit. Yet if the chisel and bit are pulled down too quickly, the machine could be overloaded. The different rates of feed for different woods must be learned through experience.
- After the first cut, the work piece is moved along with the left hand wheel for each successive cut. The direction of movement must allow the chips to clear freely. Move the work piece so that the slot in the chisel is releasing the chips into the already cut part of the work piece – see Fig. 5.
Attention:
Not observing this working method can lead to overheating and a possible breakage of chisel and bit.
When cutting deep mortises, make the cut in several stages of approx. 25 mm depth each, to allow chips to clear. To prevent breakout at the back of the work piece when cutting through mortises, use a piece of scrap material under the work piece as support.
Electrical Connection ⚠️
The electric motor is connected in a ready-to-operate state. The connection corresponds to the relevant VDE and DIN regulations.
The mains connection at the customer's work place and the extension cable used must correspond to these regulations.
Important information
The 230 V / 50 Hz electric motor is designed for the S6 / 40% operating mode.
The motor automatically switches off if it is overloaded. The motor can be switched on again after a cooling-down period (varies timewise).
Faulty electrical connecting leads
Insulation damage often occurs at electrical connecting leads.
Causes include:
- Pressure marks caused when connecting leads are run through windows or the cracks of doors.
- Folds caused by the improper attachment of running of the connecting leads.
- Cutsresulting from the crossing of the connecting lead.
- Insulation damages caused by the ripping out of the connecting lead from the wall socket.
- Cracks due to the ageing of the insulation. Faulty electrical connecting leads such as these may not be used and are highly dangerous due to the insulation damage.
Check electrical connecting leads regularly for damage. Ensure that the connecting lead is not attached to the mains supply when you are checking it.
Electrical connecting leads must correspond to the relevant VDE and DIN regulations. Only use connecting leads with the code H 07 RN. The type designation must be printed on the connecting lead by regulation.
Single-phase motor
- The supply voltage must be 230 volt – 50 Hz.
- Extension leads up to 25 m in length must have a cross-section of 1.5 mm2. Extension leads whose length is over 25 m must have a cross-section of at least 2.5 mm2.
- The mains connection is fused with a 16 A slow-blow fuse.
Connections or repairs on the electrical equipment may only be carried out by an electrician.
Please give the following information if you have any enquiries.
- Motor manufacturer
- Kind of current
- Machine type label data If your are sending back the motor, always send the complete drive unit with the switch.
Maintenance
The mortiser requires only minor maintenance, such as cleaning and lubrication and routine adjustment and sharpening of the chisel and bit.
Dust the machine down after each use and, as necessary, use light applications of oil or grease to lubricate linkages, moving parts, etc. sharpening chisel and bit
Sharpening chisel and bit
The chisel and bit should be kept sharp for best performance. Blunt edges will give inaccurate mortises and can lead to overheating and breakage to chisel or bit. If chisel and bit are badly worn and become difficult to sharpen, they should be replaced.
-
Sharpen the bit by using a small, smooth file, following the original shape of the bit. File the inside edge of the spur, the sides of the brad point, and the cutting edge inwards toward the flute of the bit – see Fig. 6. Do not file the outside edge of the spur as this will affect the diameter of the bit.
-
Sharpen the chisel with a mortise chisel cutter with the correct size pilot. (Pilot size will differ depending on the size of your chisel.) Depending on the degree of wear, two or three turns of the cutter should be enough to sharpen the chisel, as shown in Fig. 7.
-
Use a small, triangular, smooth file to relieve the inner corners of the chisel – see Fig. 8. Remove any burrs from the outside of the chisel with a fine oilstone.
Dimensions L/L/H mm 580/430/780
Taille table mm....310 x 320
Subject to change without notice
Documents registar: Andreas Pecher
Günzburger Str. 69, D-89335 Ichenhausen
DE
Nur für EU-Länder.
Only for EU countries.
Do not dispose of electric tools together with household waste material! In observance of European directive 2012/19/EU on wasted electrical and electronic equipment and its implementation in accordance with national law, electric tools that have reached the end of their life must be collected separately and returned to an environmentally compatible recycling facility.
FR
Apparent defects must be notified within 8 days from the receipt of the goods. Otherwise, the buyer's rights of claim due to such defects are invalidated. We guarantee for our machines in case of proper treatment for the time of the statutory warranty period from delivery in such a way that we replace any machine part free of charge which provably becomes unusable due to faulty material or defects of fabrication within such period of time. With respect to parts not manufactured by us we only warrant insofar as we are entitled to warranty claims against the upstream suppliers. The costs for the installation of the new parts shall be borne by the buyer. The cancellation of sale or the reduction of purchase price as well as any other claims for damages shall be excluded.
Garantie FR

- Technical data
- General notes
- Note
- We recommend
- Safety notes ⚠️
- Use only as authorized ⚠️
- The machine corresponds to the valid EC guideline.
- Remaining hazards ⚠️
- The machine has been built using modern technology in accordance with recognized safety rules. Some remaining hazards, however, may still exist.
- Montage
- Equipment Fig. 1
- All assembly and retrofitting work may only be performed when the mains plug has been disconnected.
- Operating handle assembly Fig. 1.1-1.2
- Gas spring assembly Fig. 1.3
- Workpiece stop assembly Fig. 1.4
- Tool holder assembly Fig. 1.5
- Workpiece guides assembly Fig 1.6
- Putting into Operation
- Installing chisel and bit
- Operating instructions
- Operating instructions Fig. 3-4
- Attention:
- Electrical Connection ⚠️
- Important information
- Faulty electrical connecting leads
- Single-phase motor
- Connections or repairs on the electrical equipment may only be carried out by an electrician.
- Maintenance
- Sharpening chisel and bit
- DE
- FR
- Garantie FR
Brand : SCHEPPACH
Model : Chisa 3.0
Category : Drill