MR760-E - Lawn mower SCHEPPACH - Free user manual and instructions
Find the device manual for free MR760-E SCHEPPACH in PDF.

| Product type | Battery-powered ride-on lawn mower |
| Brand | Scheppach |
| Model | MR760-E |
| Total weight | 165 kg |
| Power supply | Lead acid battery 48 V DC, 50 Ah |
| Rated voltage | 48 V |
| Battery capacity | 50 Ah |
| Charging time | Approx. 8 hours |
| Drive motor | 1000 W, 3000 rpm |
| Blade motor | 2 x 1200 W, 3500 rpm |
| Cutting width | 76 cm |
| Cutting height | 38 to 114 mm, 7 levels |
| Forward speed | 0 - 8 km/h |
| Reverse speed | 3.2 km/h |
| Front wheels | 13x5.00-6, pressure 2.7 bar |
| Rear wheels | 16x6.5-8, pressure 1.9 bar |
| Sound pressure level | 89.4 dB(A) |
| Sound power level | 99.4 dB(A) |
| Vibrations (hand-arm) | 1.786 m/s² |
| Functions | Mowing, mulching, side discharge, LED lights, cruise control, USB ports |
| Safety | Parking brake, seat contact switch, automatic stop when reversing, max slope 15° |
Frequently Asked Questions - MR760-E SCHEPPACH
User questions about MR760-E SCHEPPACH
0 question about this device. Answer the ones you know or ask your own.
Ask a new question about this device
Download the instructions for your Lawn mower in PDF format for free! Find your manual MR760-E - SCHEPPACH and take your electronic device back in hand. On this page are published all the documents necessary for the use of your device. MR760-E by SCHEPPACH.
USER MANUAL MR760-E SCHEPPACH
natural_image
Black electric motor with visible wheels and steering wheel (no text or symbols)
MR760-E
| DE | Akku-AufsitzrasenmäherOriginalbedienungsanleitung | 11 |
| GB | Battery-powered lawn tractorTranslation of original instruction manual | 31 |
| FR | Tondeuse autoportée rider à batterieTraduction des instructions d'origine | 50 |
| IT | Trattorino tosaerba a batteriaLa traduzione dal manuale di istruzioni originale | 70 |
| HR | Akumulatorska traktorska kosilicaPrijevod originalnog priručnika za uporabu | 90 |
| SI | Akumulatorska kosilnica na nitkoPrevod originalnih navodil za uporabo | 108 |
1
7

natural_image
Technical line drawing of a mechanical assembly with spring and frame components (no text or symbols)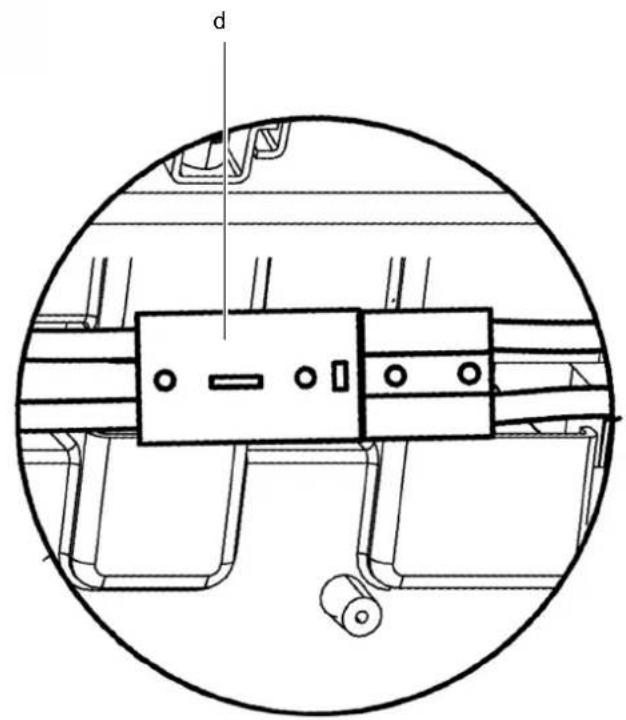

natural_image
Technical line drawing of a lawn mower assembly with visible tire, chain, and guard system components (no text or labels)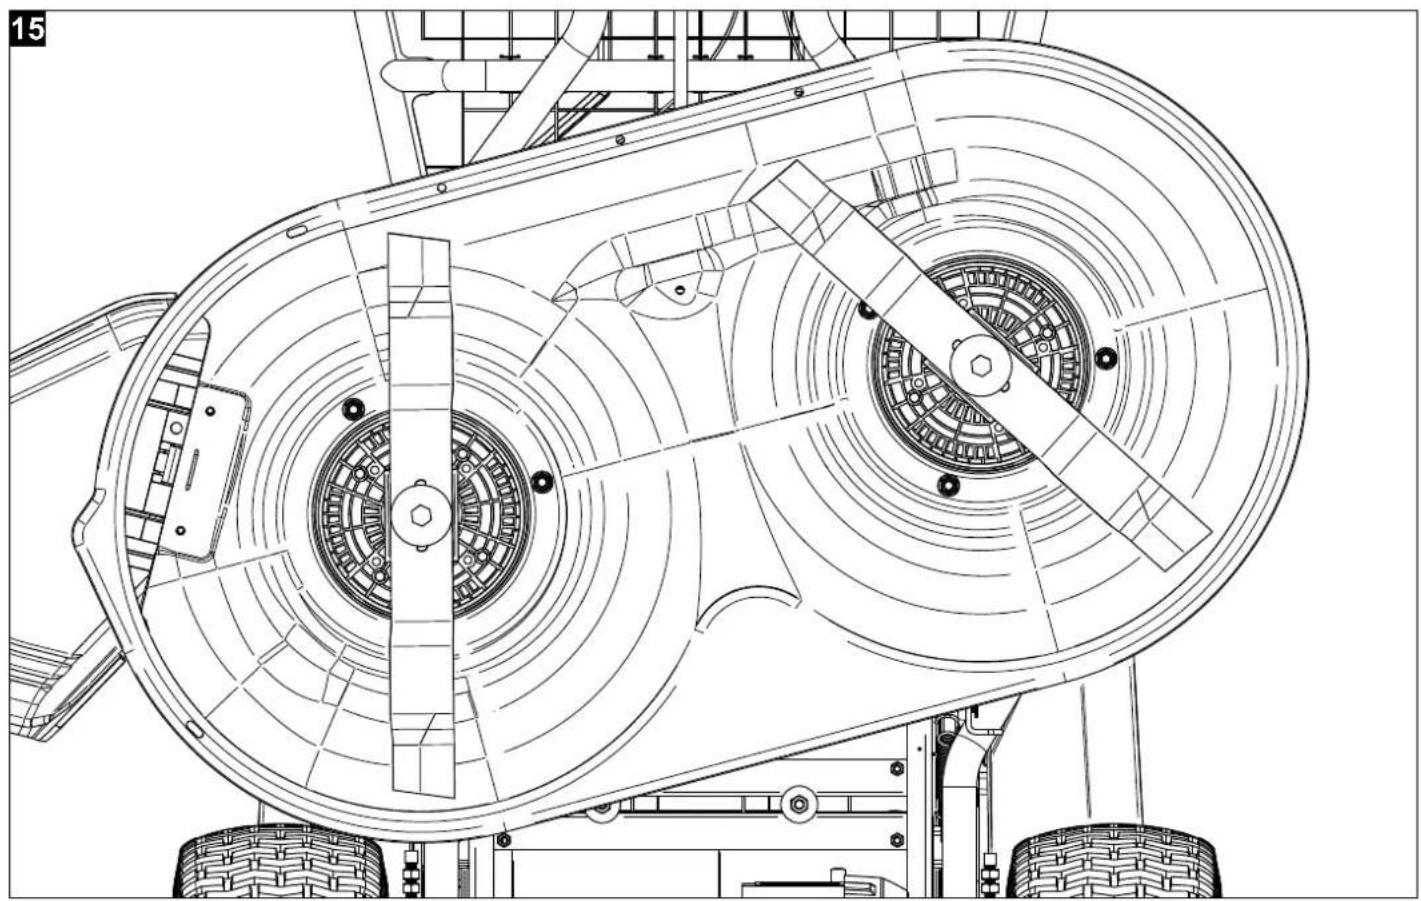
natural_image
Technical line drawing of a mechanical assembly with concentric circular components and tire tracks (no text or symbols)16
natural_image
Technical line drawing of a wheeled vehicle with wheels and suspension components (no text or symbols)Günzburger Straße 69
D-89335 Ichenhausen
VEREHRTER KUNDE,
Explanation of the symbols on the product
Symbols are used in this manual to draw your attention to potential hazards. The safety symbols and the accompanying explanations must be fully understood. The warnings themselves will not rectify a hazard and cannot replace proper accident prevention measures.
 | Observe all safety instructions before use. |
 | Read and understand all text in the operating instructions before start up. |
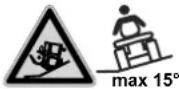 | Risk of injury! Do not drive or mow on slopes steeper than 15° (26.8%) inclination. Do not drive or mow in the lengthwise direction. Tipping hazard! |
 | Danger due to parts flying off while the engine is running.The safety distance must be observed. |
 | Make sure that other persons maintain a sufficient safety distance. Keep uninvolved persons at least 30 metres away from the work area. |
 | Do not expose the machine to rain. The product may only be stationed, stored and operated in dry ambient conditions. |
 | Do not climb onto the mowing unit, the side discharge, the wheels or the housing of the battery-powered ride-on lawnmower. |
 | Remove the battery from the battery-powered ride-on mower before performing maintenance, repair and cleaning work! |
 | Before working on the device, remove the ignition key and observe the instructions in this manual. |
 | Keep your hands and feet away from the rotating mowing blades. |
 | Keep your hands and feet away from the rotating mowing blades. |
 | Use hearing and eye protection! |
 | Charge socket! Only charge the battery-powered ride-on lawnmower at an ambient temperature of between 0 - 40°C. |
 | Min. - max. cutting height adjustment |
 | Guaranteed sound power level |
 | Warning against hazardous electrical voltage. |
 | The product complies with the applicable European directives. |
 | Do not look into the LED headlights of the battery-powered ride-on lawnmower! |
 | Switch the mowing unit on and off.Up: Mowing unit onDown: Mowing unit off |
 | Locking brake |
 | Do not throw old equipment away with household waste. |
| DANGER! | Signal word to indicate an imminently hazardous situation which, if not avoided, will result in death or serious injury. |
| WARNING! | Signal word to indicate a potentially hazardous situation which, if not avoided, could result in death or serious injury. |
| CAUTION! | Signal word to indicate a potentially hazardous situation which, if not avoided, could result in minor or moderate injury. |
| NOTE | Signal word to indicate a potentially hazardous situation which, if not avoided, could result in product or property damage. |
Table of contents: Page:
- Introduction......33
- Device description....33
- Scope of delivery (fig. 2)....33
- Proper use 34
- Safety information 34
- Technical data 39
- Unpacking 39
- Assembly....40
- Before commissioning....40
- Control panel functions (Fig. 12, Fig. 1)...... 41
- Operation....42
- Charging and storage....44
- Transport 45
- Cleaning and maintenance....45
- Disposal and recycling 47
- Troubleshooting....49
- Declaration of conformity 131
1. Introduction
MANUFACTURER:
Scheppach GmbH
Günzburger Straße 69
D-89335 Ichenhausen
DEAR CUSTOMER,
We hope your new tool brings you much enjoyment and success.
NOTE:
In accordance with the applicable product liability laws, the manufacturer of this device assumes no liability for damage to the device or caused by the device arising from:
- Improper handling,
• Non-compliance with the operating manual, - Repairs carried out by third parties, unauthorised specialists.
- Installing and replacing non-original spare parts,
• Application other than specified, - Failure of the electrical system in the event of the electrical regulations and VDE provisions 0100, DIN 57113 / VDE0113 not being observed.
Please consider:
Read through the complete text in the operating manual before installing and commissioning the device.
The operating manual is intended to help the user to become familiar with the machine and take advantage of its application possibilities in accordance with the recommendations.
The operating manual includes important instructions for safe, proper and economic operation of the device, for avoiding danger, for minimising repair costs and downtimes, and for increasing the reliability and extending the service life of the device.
In addition to the safety instructions in this operating manual, you must also observe the regulations applicable to the operation of the device in your country.
Keep the operating manual package with the machine at all times and store it in a plastic cover to protect it from dirt and moisture. They must be read and carefully observed by all operating personnel before starting the work.
The device may only be used by personnel who have been trained to use it and who have been instructed with respect to the associated hazards. The required minimum age must be observed.
In addition to the safety instructions in this operating manual and the separate regulations of your country, the generally recognised technical rules relating to the operation of such machines must also be observed.
We accept no liability for accidents or damage that occur due to a failure to observe this manual and the safety instructions.
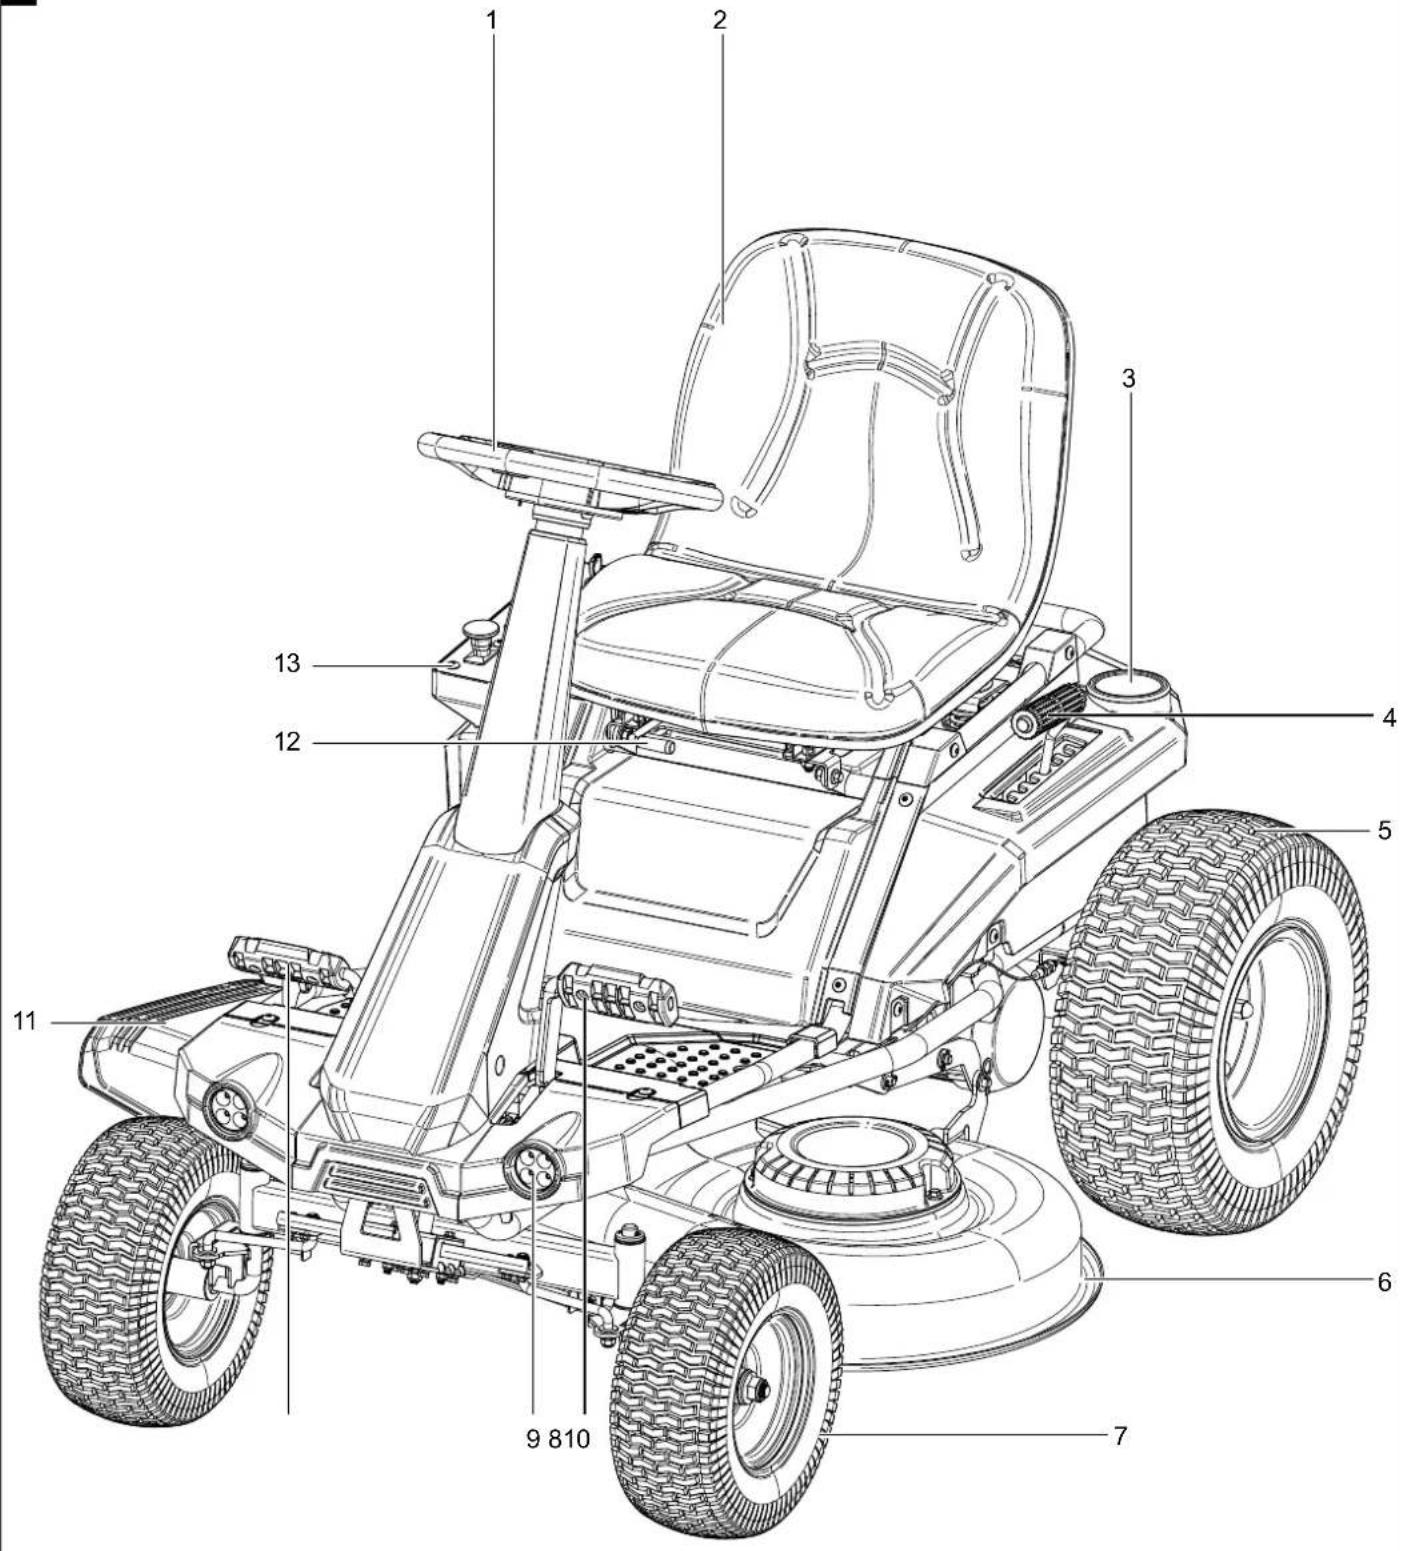
2. Device description
- Steering wheel
- Driver's seat
- Cup holder
- Cutting height setting
- Rear wheels
- Mowing unit
- Wheels, front
- Brake pedal
- LED headlights
- Forward pedal
- Side discharge
- Seat adjustment
- Operating panel
- Locking brake
- Reverse pedal
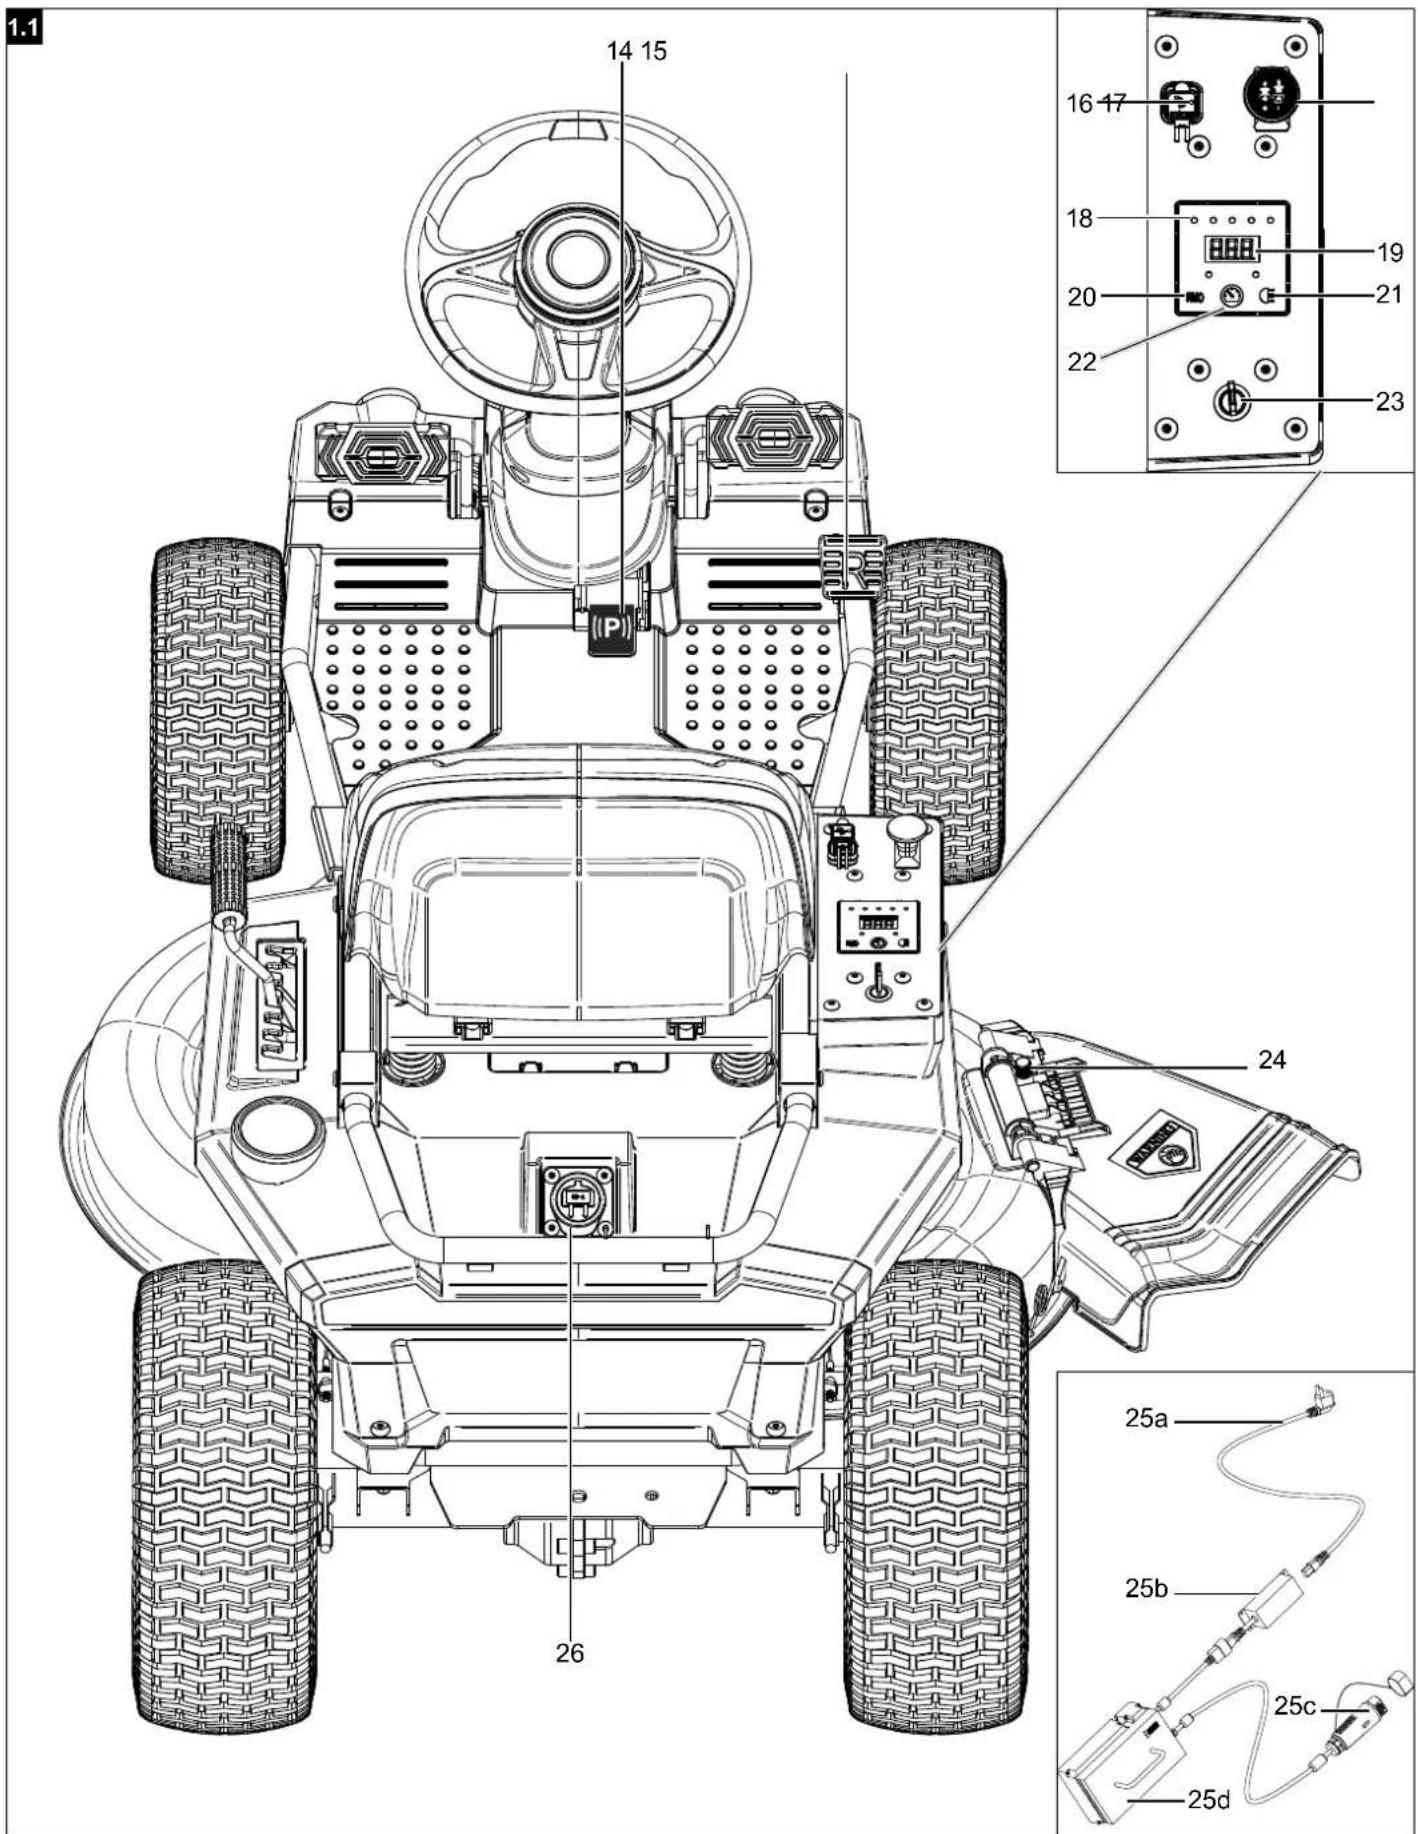
- USB sockets
- Mowing unit on/off
- Charge status indicator
- Operating hours indicator
- Reverse mowing option on/off
- LED headlights on/off
- Cruise control on/off
- Ignition lock
- Side discharge locking pin
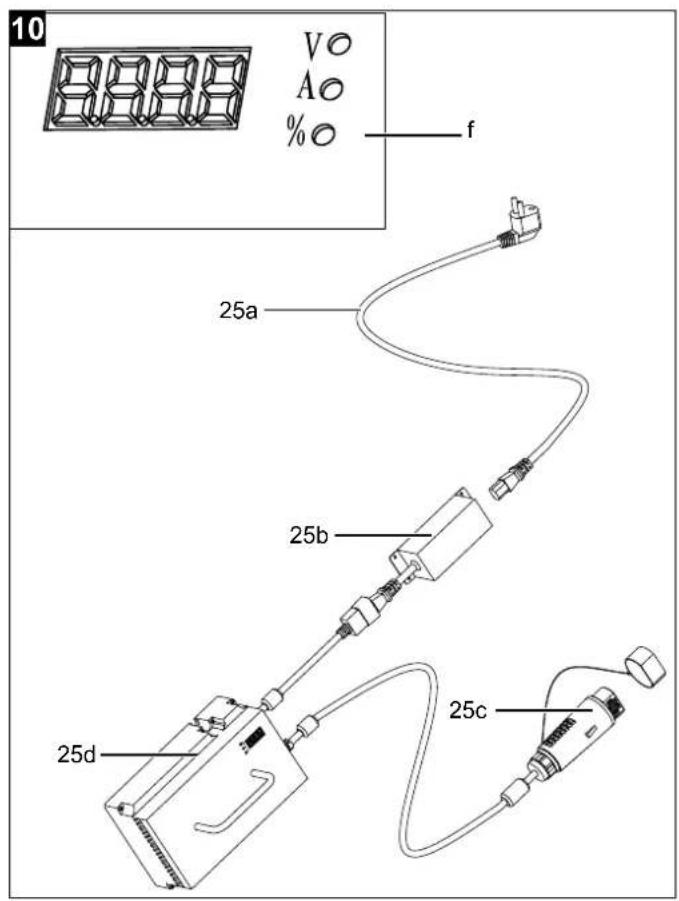
25a. Power supply cable
25b. Transformer
25c. Charging plug
25d. Battery charger - Battery charging socket
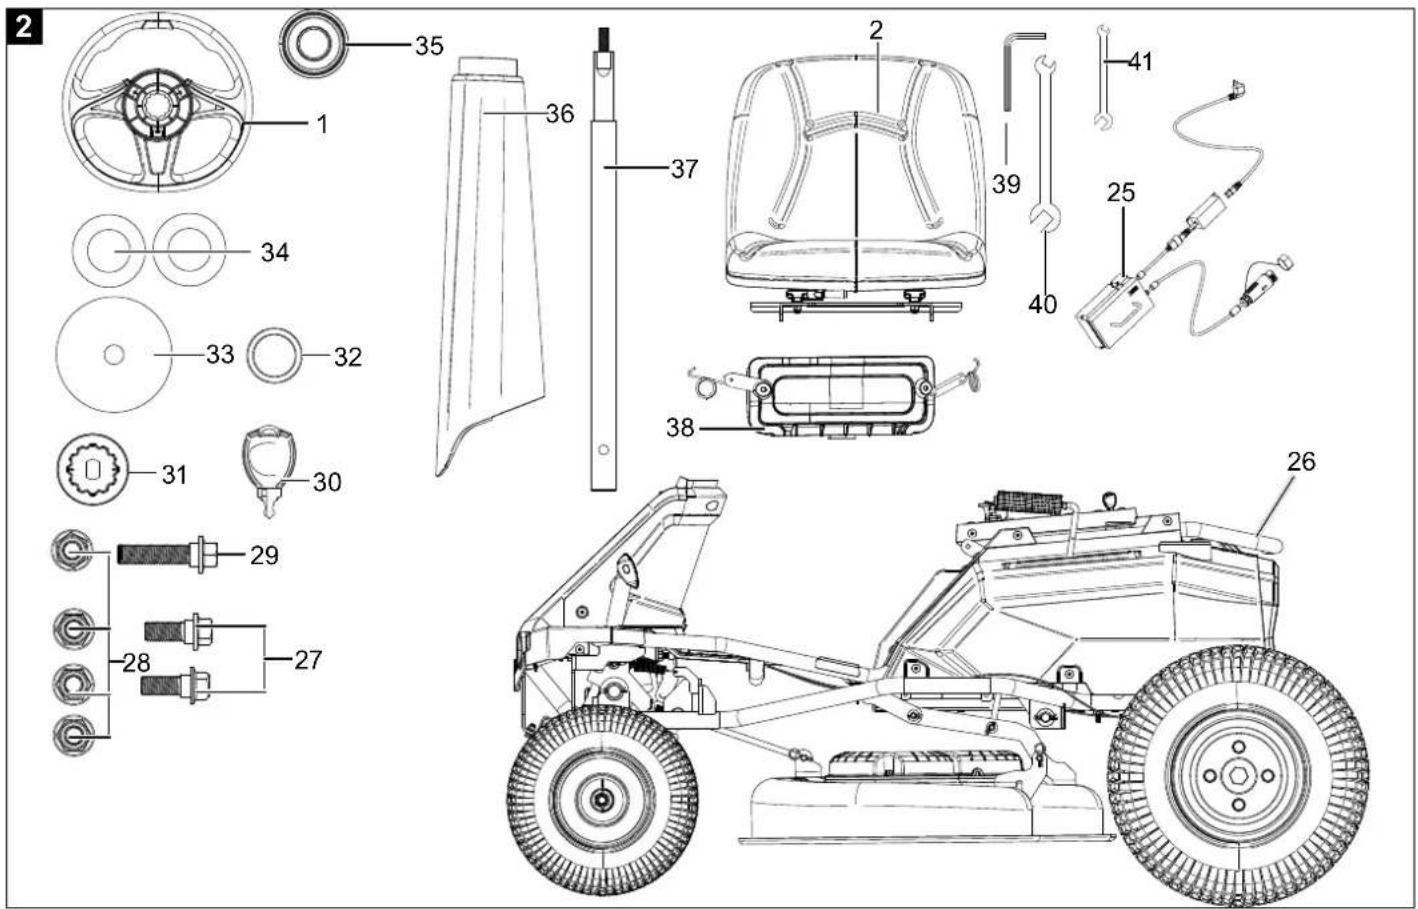
3. Scope of delivery (fig. 2)
- Driver's seat (2)
- Charge station (25)
- Battery-powered ride-on lawnmower (26)
- 2x M8x20 screws (27)
- 4x M8 nuts (28)
- 1x M8x36 screw (29)
- 2x ignition keys (30)
• Steering wheel mounting (31) - Plastic sleeve (32)
- Spring washer (33)
• 2x plastic washers (34) - Steering wheel (1)
• Steering wheel cover (35)
• Steering rod cover (36) - Steering rod (37)
- Mulching insert (38)
- Allen key, 5 mm (39)
• Double open-ended spanner 13-15 mm (40)
• Double open-ended spanner 10-13 mm (41)
4. Proper use
The machine complies with the applicable EC machinery directive.
Attention – Danger of accident!
The battery-powered ride-on lawnmower is intended for lawn mowing only, no other use is permitted.
Before starting any work, all protective and safety devices must be in place.
- The operator is responsible for third parties in the area of operations.
- The machine has been designed to be operated by one person.
- Observe all safety information and danger notices on the machine.
- Ensure that all of the safety information and danger notices on the machine are complete and in legible condition.
- Only use the machine when in a technically fault-less condition, appropriately and in compliance with the operating manual and with full knowledge of safety and hazards!
- In particular, rectify malfunctions that could impair safety immediately (or commission rectification works accordingly)!
- The manufacturer's safety, operating and maintenance specifications as well as the dimensions given in the technical data must be observed.
- Relevant accident prevention regulations and other generally recognized safety and technical rules must also be observed.
- The machine may only be used, maintained or repaired by trained persons who are familiar with it and have been informed of the dangers. Any liability of the manufacturer for damages resulting from arbitrary changes to the machine is excluded.
- The machine may only be operated with original accessories and original tools from the manufacturer.
- Any use beyond this is improper use. The manufacturer is not responsible for the resultant damages, the user bears this risk alone.
- If you are not sure whether working conditions are safe or unsafe, do not work with the machine.
- The lawnmower is suitable for private use around home gardens or allotments. Private use of the lawn mower refers an annual operating time generally not exceeding that of 50 hours, during which time the machine is primarily used to maintain small-scale, residential lawns and home/hobby gardens. Public facilities, sporting halls, and agricultural/forestry applications are excluded.
Due to physical danger to the user or other persons, the device must not be used, for example:
• for cutting climbing plants,
• for chipping and shredding tree and hedge cuttings,
- for cleaning pavements (vacuuming, blowing away),
• for clearing snow with the aid of the mowing unit,
• for lawn care on roof plantings,
• for levelling ground elevations, such as molehills,
- The device is not permitted for public highways.
- The carriage of persons (especially children) and animals is not permitted.
- Never climb onto the mowing unit.
- For safety reasons, the lawn mower may not be used as a drive unit for other work tools or toolkits of any kind.
⚠ WARNING
For your own safety, please thoroughly read this manual and the general safety instructions before turning the machine on. If you give the machine to third parties, always include these instructions.
Please observe that our equipment was not designed with the intention of use for commercial or industrial purposes. We assume no guarantee if the equipment is used in commercial or industrial applications, or for equivalent work.
5. Safety information
Attention!
When using equipment, several safety warnings must be observed to prevent injuries and damage. For this reason, please carefully read this operating manual / safety instructions. Keep them in a safe place so that the information is available at all times. If you hand the device over to another person, please hand over this operating manual / safety instructions as well. We accept no liability for accidents or damage that occur due to a failure to observe this manual and the safety instructions.
Who is not permitted to use the device:
- Children, persons with reduced physical, sensory or mental capabilities or insufficient experience and knowledge or persons who are not familiar with the instructions must never be allowed to use the device.
- Never allow children or young people under the age of 16 to use the device. Contact your local governmental agency for information regarding minimum age requirements for operating the mower.
- Only use the device when you are rested and in a good physical and mental state. If you have health problems, you should ask your doctor whether it is possible to work with the device.
Do not operate the device after taking alcohol, drugs or medication that impairs the ability to react.
⚠️ Personal safety
- Stay alert, watch what you are doing and use common sense when operating a power tool. Do not use a power tool while you are tired or under the influence of drugs, alcohol or medication. A moment of inattention while operating power tools may result in serious personal injury.
- Use personal protective equipment. Always wear eye protection. Protective equipment such as a dust mask, non-skid safety shoes, hard hat or hearing protection used for appropriate conditions will reduce personal injuries.
- Prevent unintentional starting. Ensure the switch is in the off-position before connecting to power source and/or battery pack, picking up or carrying the tool. Keeping your finger on the switch or having the device switched on when you connect it to the power supply may result in accidents.
- Remove any adjusting key or wrench before turning the power tool on. A tool or spanner that is located in a rotating device part may result in injuries.
- Do not overreach. Keep proper footing and balance at all times. This enables better control of the power tool in unexpected situations.
- Dress properly. Do not wear loose clothing or jewellery. Keep your hair and clothing away from moving parts. Loose clothes, jewellery or long hair can be caught in moving parts.
- If devices are provided for the connection of dust extraction and collection facilities, ensure these are connected and properly used. Use of dust collection can reduce dust-related hazards.
- Do not let familiarity gained from frequent use of power tools allow you to become complacent and ignore power tool safety rules. A careless action can cause severe injury within a fraction of a second.
Clothing and equipment
- Always wear sturdy footwear with non-slip soles during work. Never work barefoot or in sandals, for example.
- The device may only be operated with long trousers and tight-fitting clothing.
- Never wear loose clothing that can get caught on moving parts (control levers) – also no jewellery, no ties and no scarves.
- When carrying out maintenance and cleaning work, as well as when transporting the device, always wear sturdy gloves and tie up and secure long hair (bandana, cap, etc.).
- Suitable safety goggles must be worn when sharpening the mowing blade.
During work
- Never work while people, especially children, or animals are nearby. Make sure that grass is never ejected towards third parties.
- Do not work with the device during rain, thunderstorms and especially when there is a risk of lightning.
⚠️ Work area safety
- Completely check the terrain where the device will be used and remove all stones, sticks, wires, bones and other foreign objects that may be thrown up by the device. Obstacles (e.g. tree stumps, roots) can easily be overlooked in the tall grass.
- Therefore, before working with the device, mark all foreign objects (obstacles) hidden in the lawn that cannot be removed.
- Look out for depressions (holes) in the terrain and other non-visible danger spots. Obstacles can easily be overlooked in the tall grass.
- Use the device with special care when working near slopes, terrain edges, ditches and dykes. In particular, ensure that there is sufficient distance to such danger points.
• Take special care at blind spots, bushes, trees and other obstacles behind which there may be people, especially children, or animals. - Stop the battery-powered ride-on lawnmower immediately and turn off the mowing blades if anyone enters the mowing area.
• Always keep an eye on the area in front of the vehicle. Watch out for obstacles so that you can avoid them in time. - Before reversing, always check the area behind the battery-powered ride-on lawnmower and disengage the attachment device if fitted. Never mow backwards unless absolutely necessary. When mowing in reverse, take extra care and thoroughly check the entire area behind the battery-powered ride-on lawnmower before starting to mow.
- When working within a group, you must always let others know in good time what you intend to do. Observe the safety distance!
- Before any change of direction, reduce the driving speed so that the user remains in control of the device at all times and also so that the battery-powered ride-on lawnmower cannot tip over.
- When operating near roads and when crossing traffic routes, attention must be paid to other road users.
- Special care is needed when mowing near roads, cycle paths and footpaths. Ejected parts can cause serious injuries and damage.
- Keep work area clean and well lit. Cluttered or dark areas invite accidents.
- Do not operate power tools in explosive atmospheres, such as in the presence of flammable liquids, gases or dust. Power tools create sparks which may ignite the dust or fumes.
- Keep children and bystanders away while operating a power tool. Distractions may cause you to lose control of the device.
Power tool use and care
- Do not overload the device. Use the correct power tool for your application. The correct power tool will do the job better and safer at the rate for which it was designed.
-
Do not use the power tool if the switch does not turn it on and off. Any power tool that cannot be controlled with the switch is dangerous and must be repaired.
-
Remove the connector from the socket and/or remove the removable rechargeable battery before setting the device, changing accessories or putting the device away. Such preventive safety measures reduce the risk of starting the power tool accidentally.
- Store idle power tools out of the reach of children and Do not let people use the device who are not familiar with it or who have not read these instructions. Power tools are dangerous in the hands of untrained users.
- Maintain power tools and accessories. Check for misalignment or binding of moving parts, breakage of parts and any other condition that may affect the power tool's operation. Have damaged parts repaired before using the device. Many accidents are caused by poorly maintained power tools.
- Keep cutting tools sharp and clean. Properly maintained cutting tools with sharp cutting edges are less likely to bind and are easier to control.
- Use the power tool, accessories and tool bits etc. in accordance with these instructions, taking into account the working conditions and the work to be performed. Use of the power tool for operations different from those intended could result in a hazardous situation.
- Keep handles and grasping surfaces dry, clean and free from oil and grease. Slippery handles and gripping surfaces do not allow for safe operation and control of the power tool
Battery safety
- Only use battery charging devices recommended by the manufacturer to charge the battery. A battery charging unit suitable for one type of rechargeable battery may cause a fire, electric shock, overheating or leaking of corrosive liquids from the battery when used with another rechargeable battery.
- Only use the batteries intended for your tool. The use of other rechargeable batteries can result in injuries and cause a fire.
- When the rechargeable battery is not in use, it must be kept away from other metallic objects such as staples, coins, keys, nails, screws or other small metallic objects which could cause a short circuit of the contacts. A short circuit between the battery contacts can result in combustion processes or fires.
- A battery in poor condition can cause liquids to leak out. Avoid contact with the liquid. In case of inadvertent contact, rinse with water. If liquid comes into contact with the eyes, also consult a doctor. Liquids which leak from the battery can cause irritation or burns.
-
Do not use any damaged or modified batteries or tools. Damaged or modified batteries can exhibit unpredictable behaviour and result in fire, explosion or danger of injury.
-
Do not expose the rechargeable battery or tool to fire or excessive temperatures. Fire or temperatures above 130^ may cause an explosion.
- Observe all instructions for the charging process and do not charge the rechargeable battery or the tool outside of this temperature range. Improper charging or charging outside the specified temperature range can damage the battery and increase the danger of fire.
- Do not change the rechargeable battery at locations where vapours or flammable substances are present or which are very humid. Use a socket protected with a residual current circuit breaker (RCD - Residual Current Device) in order to reduce the risk of electric shock if a humid environment cannot be avoided.
- Keep the battery charging cable out of the reach of children.
Electrical safety
- The battery charging device connector must be compatible with the socket. Never modify the connector. Do not use any adapter for the earthed cable of the battery charging device. The unmodified connector, which is suitable for the socket, reduces the danger of an electric shock.
- The power tool connector must be compatible with the power socket. Never modify the connector. Do not use adapters with power tools that are earthed. The unmodified connector, which is suitable for the socket, reduces the danger of an electric shock.
- Avoid physical contact with grounded or earthed surfaces, such as pipes, radiators, ovens or refrigerators. The danger of electric shock increases if the body comes into contact with the ground or floor.
- Do not expose the power tools to rain or moisture. Water that enters the power tool increases the danger of electric shocks.
- Do not pull on the cable to unplug the battery charging device connector. Keep the battery charging device cable away from heat, oil, solvents, sharp objects or edges and moving parts. Damaged or entangled cables increase the danger of electric shocks.
- Do not insert the cable incorrectly. Do not use the cable to carry the tool, to pull it or to unplug the connector from the socket. Keep the cable away from heat, oil, sharp edges or moving parts. A damaged or entangled cable increases the danger of an electric shock.
- If the power tool is to be used outdoors, use an extension cable that is suitable for outdoor use. Using an extension cable suitable for outdoor use reduces the danger of electric shock.
- If using a power tool in a humid environment is unavoidable, use a power socket protected by a differential switch (RCD-Residual Current Device, residual current circuit breaker). Using an RCD reduces the danger of an electric shock.
- Only connect the battery charging device to sockets with the mains voltage and frequency specified on the type plate.
Using and handling the rechargeable tools
- Only charge the rechargeable batteries with charging units recommended by the manufacturer. A charging unit that is suitable for a particular type of rechargeable battery poses a fire hazard when used with other rechargeable batteries.
- Only use the rechargeable batteries in power tools that are designed for them. The use of other rechargeable batteries can lead to injuries and a risk of fire.
- Keep the unused rechargeable battery away from paper clips, coins, keys, nails, screws or other small metal objects that could cause a short-circuit between the contacts. A short-circuit between the contacts of the rechargeable battery could result in burns or fires.
- Liquid may leak from the rechargeable battery if used incorrectly. Avoid contact with it. In case of accidental contact, rinse with water. If the liquid gets into your eyes, seek additional medical attention. Leaking battery fluid may cause skin irritation or burns.
- Do not use a damaged or modified rechargeable battery. Damaged or modified rechargeable batteries can behave unpredictably and cause fire, explosion or injury.
- Do not expose a rechargeable battery to fire or excessive temperatures. Fire or temperatures above 130^ may cause an explosion.
- Follow all charging instructions and never charge the rechargeable battery or rechargeable tool outside the temperature range specified in the operating manual. Incorrect charging or charging outside the approved temperature range can destroy the battery and increase the risk of fire.
Service
- Have your power tool serviced by a qualified repair person using only identical replacement parts. This ensures that safety of the device is maintained.
- Never attempt to service damaged rechargeable batteries. Any type of rechargeable battery maintenance shall be carried out only by the manufacturer or an authorised customer service centre.
⚠ Safety instructions for battery-powered ride-on lawnmowers
- The safety rules must be followed when this product is used. Read these instructions for your own safety and those of outsiders before using the product. Please keep the instructions for future reference.
-
Only permit responsible adults who are familiar with and understand the instructions to use the product.
-
Familiarise yourself with the controls and the proper use of the product.
- Always use protective devices. Do not use the product when the discharge chute on the side is not attached and functioning properly. The mulching cover must be installed correctly and functioning properly during the mulching process.
- Be aware of possible dangers when not using the product or changing accessories. Following these instructions reduces the danger of fires, electric shocks and physical injuries.
- Never transport persons or children, even if the blades are not in operation. Passengers or children could fall off and be severely injured or impair safe operation of the product.
- Never forget that the user is responsible for accidents and dangers which may occur to the property of others or to other persons.
- Never allow children or persons with impaired physical, mental or sensory capabilities or persons who are not familiar with these instructions operate, clean or maintain the product. Local legislation governs the minimum age of the operator. Children must be sufficiently supervised to ensure that they do not play with the product.
- Follow all of the manufacturer's instructions for installation and safe operation of the lawnmower. Only use suitable and approved spare parts. The use of impermissible accessories can lead to injuries.
- Never impair the intended function of a safety device and do not compromise the protection provided by a safety device. Check that the safety devices are operating properly on a regular basis.
- Never use the product while people, in particularly children or animals are within 15m as there is a danger that objects could be flung from the blade.
- Do not use the product if there is a danger of a lightning strike.
- Do not use in poor lighting conditions. The user requires an unhindered view of the work area in order to identify any potential dangers.
- Keep hands and feet away from the cutting area which is beneath the mowing unit and in the ejector chute on the side. Keep away from the opening of the side ejector chute at all times. Do not reach beneath the mowing unit.
- Follow the instructions for replacing the accessory parts.
- Wear long, heavy trousers, clothing with long sleeves and non-slip boots. Do not wear short trousers, sandals or work barefooted. Avoid wearing loose clothing or clothing with cords or straps.
-
Wear protective or safety goggles with side protection. Use a face mask if the work is dusty.
-
Objects hit by the blades can severely injure people. Thoroughly check the area where the machine is to be used and remove all stones, sticks, metal, wires, bones, toys and other objects. Remember that threads and wires can get caught on the blades.
- Always visually inspect the product before use in order to ensure that the blade, blade nuts and the cutting assembly are not worn or damaged.
- Never eject material in the direction of persons. Plan the mowing path in order to avoid material being ejected in the direction of persons, roads, pavements, windows and cars. Also avoid the material from being ejected against a wall, it could be flung against the user.
- Switch the blade off if the product is not being used.
- Never use the product in enclosed spaces.
- Stop the blades when crossing gravel areas in order to avoid whirling up gravel and stones. Move the product slowly and carefully in order to avoid a loss of control.
- Switch the motor off according to the instructions and keep hands and feet away from the cutting range. Do not hold your hands or feet near or beneath rotating parts.
- Do not mow backwards unless absolutely necessary. Always look down and behind before and while moving backwards.
- Be careful when approaching corners which cannot be seen, shrubs, trees, overhanging bushes or other objects which could impair your view.
- Drive slowly before turning.
- Do not leave the product in operation unattended. Always apply the locking brake, switch the blade off, stop the motor and remove the start key before dismounting.
- Watch out for traffic when working near roads. Do not operate the mower on roads.
- Slopes are a major factor in loss of control and falling accidents which can lead to severe or fatal injuries. Caution is advised when mowing on slopes. Do not mow the area if you cannot drive down the slope or feel uncomfortable. Never use the product on steep slopes with a gradient of more than 15°. Create a copy or cut out “Slope management” at the end of the manual in order to determine if your slope is too steep for safe operation.
Transportation of lead batteries
- Transport rechargeable batteries as per your local and national provisions and rules.
- Follow all special requirements for packaging and labelling if you have rechargeable batteries transported by third parties. Ensure that the rechargeable batteries do not come into contact with other rechargeable batteries or conductive materials by protecting the free connections with insulating tape, non-conductive caps or adhesive tape. Damaged or leaking rechargeable batteries must not be transported. More information can be obtained from your transport company.
Safety instructions about pulling loads
- Use common sense when pulling. Pulling a load on a slope which is too heavy is dangerous. Tyres can lose traction and this results in a loss of control over the product.
- Follow the recommendations of the manufacturer for wheel weights or counterweights.
- The total weight of the trailer must not exceed the maximum trailer load of 113 kg (250 lbs.).
- Only attach trailer equipment to the trailer plate.
- Never allow children or other persons onto the trailer equipment.
- The braking distance increases with speed and the weight of the pulled load. Drive slowly and allow for additional time and distance for stopping.
- Do not turn sharply when pulling. Take particular care when turning or when working with adverse surface conditions. Be careful when working in reverse.
Work deployment:
⚠ Warning – Danger of injury!
- Note the working range of the mowing blade. Never out hands and feet on or under rotating parts. Never touch the rotating mowing blade. Always keep clear of the discharge opening. A sufficient safety distance must always be maintained.
- Only work in daylight or with good, artificial lighting.
- When driving outside the lawn or when not mowing, disengage the mowing blade and move the mowing unit to the highest cutting position.
- Objects hidden in the turf (lawn sprinkler systems, piles, water valves, foundations, electrical lines, etc.) must be bypassed. Never drive over such foreign objects.
- While driving, the steering wheel should always be held firmly with both hands.
- Special care should be taken when driving on lawns and other uneven surfaces, as the steering wheel can turn on its own due to holes, hills, bumps, etc.
• Danger of injury to hands and fingers!
• Always drive at an appropriate speed.
Switch off the battery-powered ride-on lawnmower and wait until the mowing blade comes to a complete stop, engage the locking brake and remove the ignition key:
- before releasing blockages or rectifying obstructions in the ejector chute,
- before checking, cleaning or working on the battery-powered ride-on lawnmower,
- if the mowing blade encounters a foreign object. Look for damage to the machine and cutting tool and have the necessary repairs carried out before starting again,
- if the device starts to vibrate unusually strongly. Immediate review is required.
- when leaving or transporting the device.
Residual risks and accident prevention standards
Neglect of ergonomic principles
Negligent use of personal protective equipment (PPE)
Careless use or omission of personal protective equipment may result in serious injury.
- Wear prescribed protective equipment.
Human behaviour, misconduct
- Always concentrate fully on all work.
⚠️ Residual risk can never be ruled out.
Danger from noise
Hearing damage
Prelonged unprotected work with the device may cause hearing damage.
- Always wear hearing protection as a matter of principle.
Behaviour in an emergency
In case of an accident, initiate the necessary first aid measures and seek medical assistance as quickly as possible.
Customer service
- Only have the power tool repaired by qualified personnel with original spare parts. This makes it possible to maintain the safety of the power tool.
- Do not carry out repairs to the battery. Repairs must be carried out by the manufacturer or by a specialised customer service centre.
6. Technical data
Drive
Traction motor operating speed....3000 min ^-1
Traction motor rated output 1000 W
Driving speed V 0 - 8 km/h
Driving speed R....3.2 km/h
Front wheels....13x5,00-6
Air pressure front wheels....2.7 bar
Rear wheels....16x6.5-8
Air pressure rear wheels....1.9 bar
Total weight.... 165 kg
Mowing unit
Blade motor operating speed 3500 min ^-1
Blade motor rated output....2* 1200 W
Cut height 38-114 mm
Cutting height adjustment....7-level
Cutting width....76 cm
Battery
Battery type .... Lead acid
Rated voltage 48V DC
Capacity....50 Ah
charging time....Approx. 8 hours
Technical changes reserved!
Information about noise level measured in accordance with applicable standards:
Sound pressure L_pA = 89.4 dB
According to ISO 5395-3
Measurement uncertainty K = 3 dB
Sound pressure L_wA = 99.4 dB
According to ISO 5395-3
Measurement uncertainty K = 1.08 dB
Wear hearing protection.
Excessive noise can result in a loss of hearing.
Vibration a_h (body) = 1.128 m/s
According to ISO 5395-1
Vibration a_h (Hand-Arm - Steering Wheel) = 1.786 m/s²
According to ISO 5395-1
Measurement uncertainty K 1.5 m/s ^2
Keep the noise level and vibration to a minimum!
- Only use faultless products.
- Maintain and clean the product at regular intervals.
- Adapt your working methods to the product.
- Do not overload the product.
- Have the product checked if necessary.
- Switch the product off if it is not in use.
- Wear protective gloves.
Use of the battery powered ride-on lawnmower over a long period can lead to vibration-related circulatory disorders (Raynaud syndrome).
Information about the duration of use cannot be provided in this case, since this can vary from person to person.
The following factors can influence the condition:
- Circulatory problems in the user's hands
- Low outdoor temperatures
- Long periods of use
We therefore recommend you wear warm work gloves and take regular breaks.
7. Unpacking
- Open the packaging and remove the packaging material.
- Check whether the scope of delivery is complete.
- Check the device and accessory parts for transport damage.
- Remove the plastic catches.
- Pump up all 4 tyres (5 + 7) using a commercially available foot pump (not included in scope of delivery). The correct tyre pressure is 2.7 bar in the front wheels (7) and 1.9 bar in the rear wheels (5).
- Attention - Danger of cutting! Wear protective gloves!
-
Carefully remove the battery-powered ride-on lawnmower from the pallet with 3 other people.
-
Grip the device by the frame - not by the plastic casing!
- If possible, keep the packaging until the expiry of the warranty period.
⚠️ DANGER
The device and the packaging are not children's toys! Do not let children play with plastic bags, films or small parts! There is a danger of choking or suffocating!
8. Assembly
⚠ WARNING!
Risk of injury and damage!
The use of incorrect spare parts and accessories can lead to injuries and damage. These could come loose and be flung away. They can also reduce the power of the product.
- Only use original spare parts and accessories from the manufacturer. Original spare parts or accessories can be obtained from your dealer.
- Failure to do so may reduce the power of the product and parts may come loose.
- Failure to observe this will invalidate the manufacturer's warranty.
Some parts of the mower come disassembled. For quick and easy assembly, read and follow the instructions below.
ATTENTION!
Remove the ignition key before carrying out any work on the device!
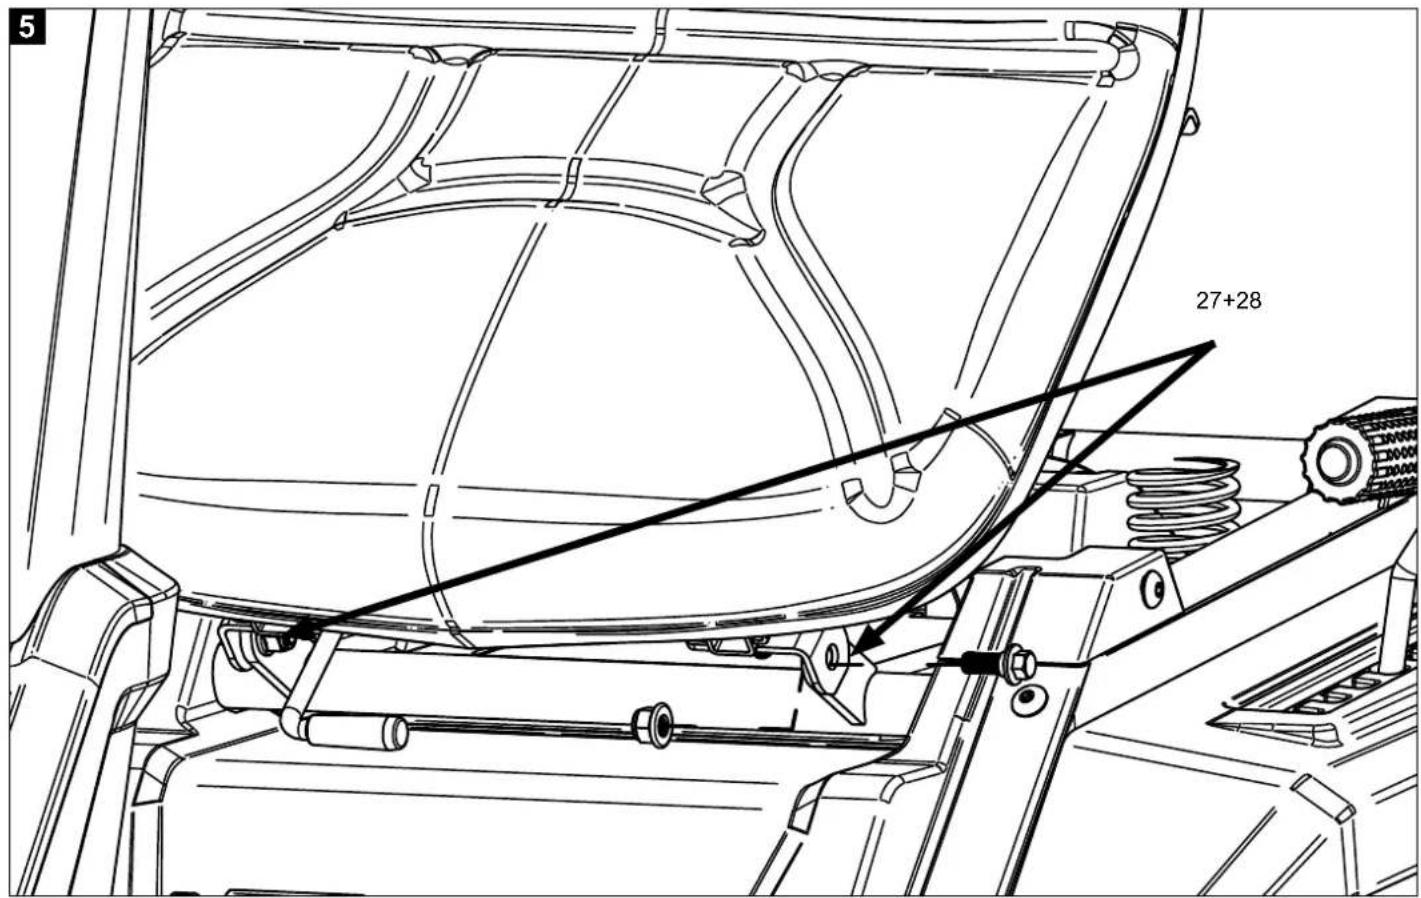
8.1 Fitting the seat (Fig. 5 & 6)
- Mount the seat (2) by first tightening the 2 screws M8x16 (27) and M8 nuts (28) by hand using the open-end spanner.
- Now tighten the 2 screws (27) using the open-end spanner.
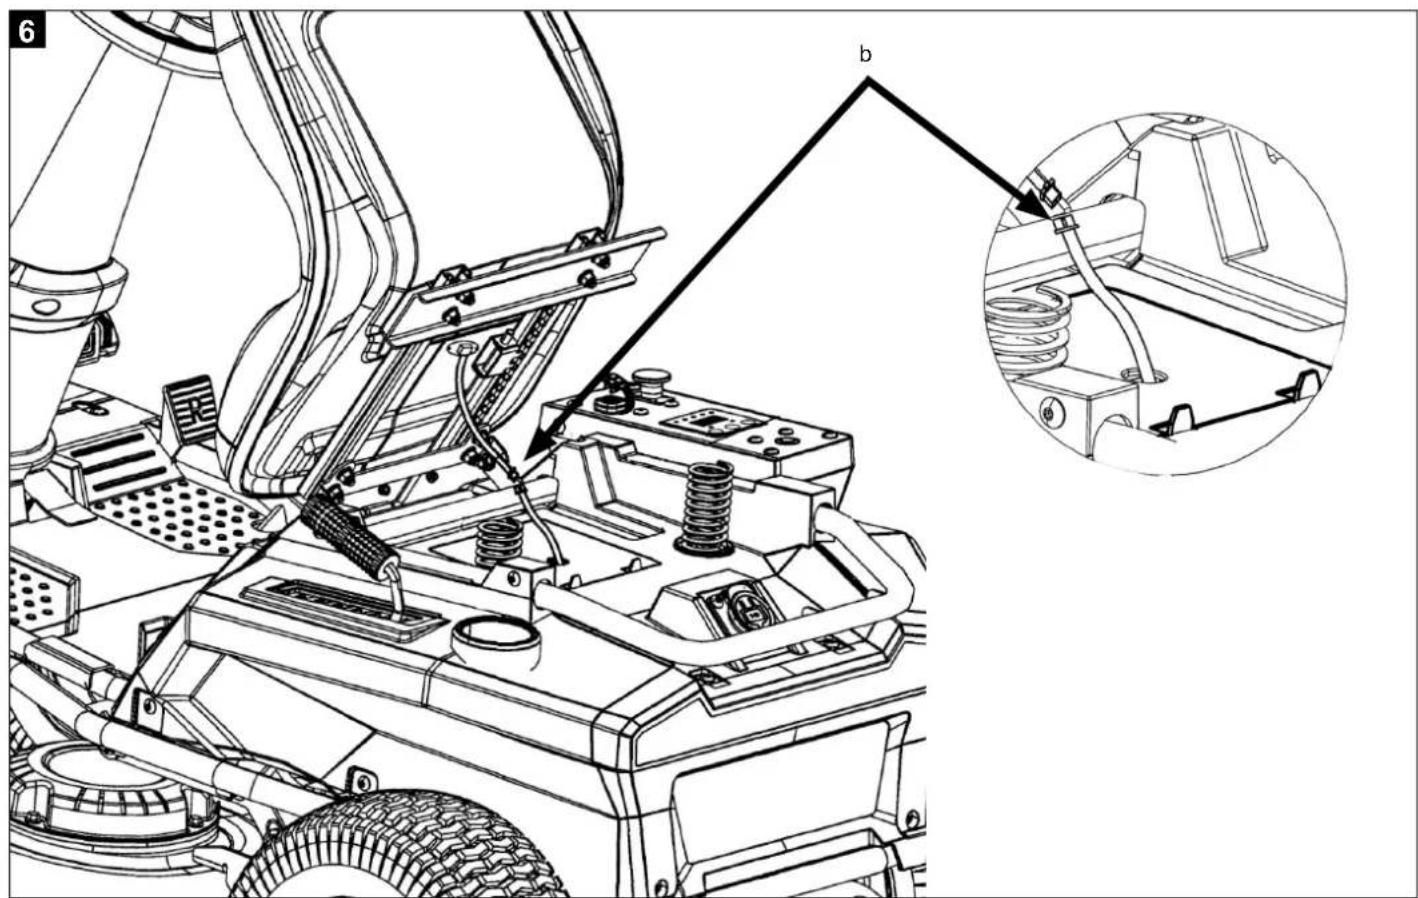
- Now connect the cable of the seat contact switch (b) (Fig. 6).
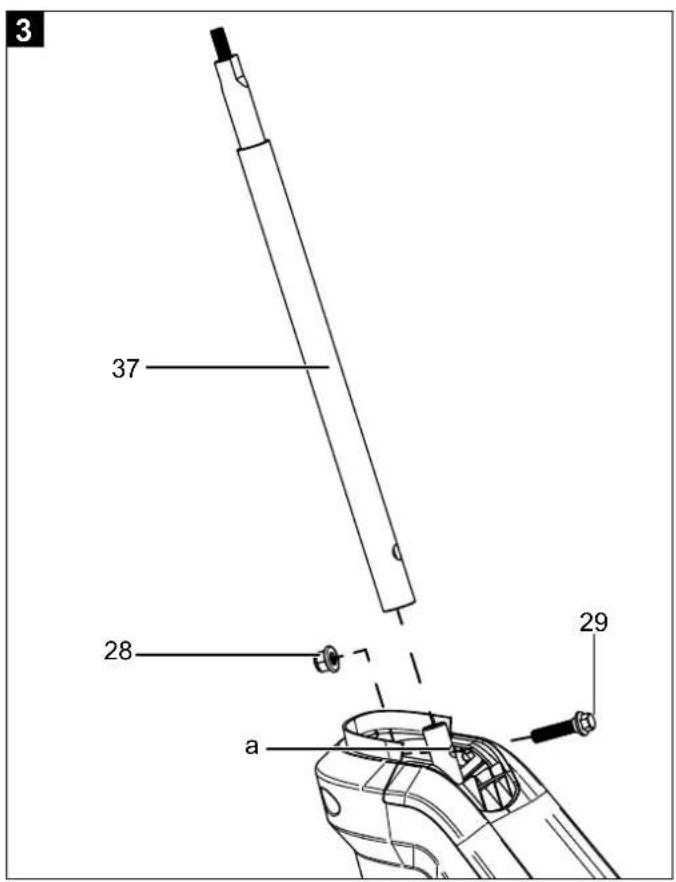
8.2 Fitting the steering rod (Fig. 3)
- Insert the steering rod (37) into the steering socket (a).
- Make sure that the drill holes are on top of each other.
- Then put the M8x25 screw (29) through the steering rod and place on the M8 nut (28).
- Tighten the screw using the open-end spanner.
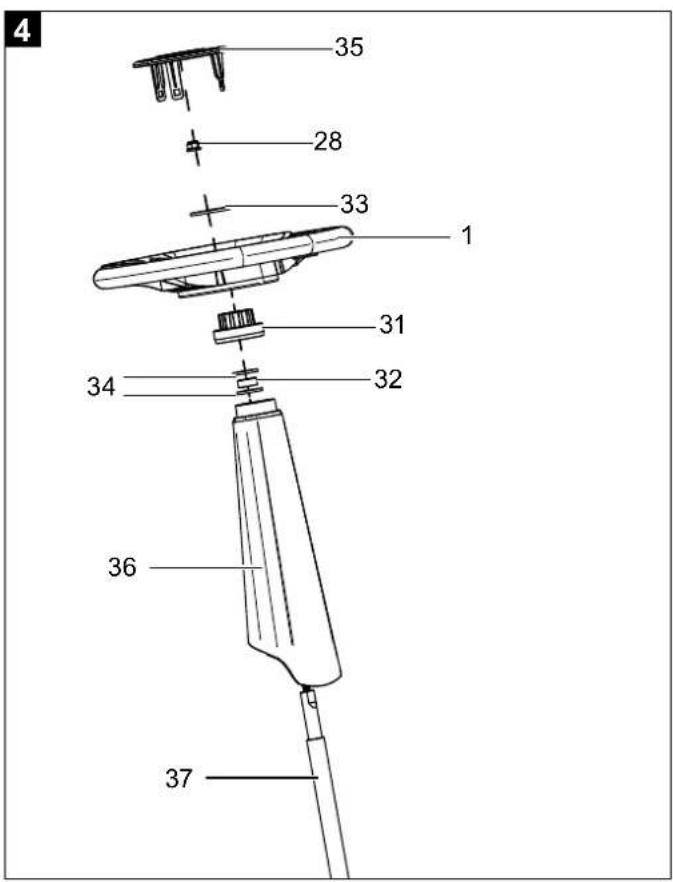
8.3 Fitting the steering wheel (Fig. 4)
- Slide the steering rod cover (36) over the previously mounted steering rod (37).
- Place a plastic washer (34) on the steering rod.
-
Place the plastic sleeve (32) on the steering rod.
-
Place the second plastic washer (34) on the steering rod.
- Next, place the steering wheel mounting (31) on the steering rod.
- Place the steering wheel (1) on the steering wheel mounting (31).
- Now insert the spring washer (33) into the steering wheel (1) and attach the steering wheel using the M8 nut (28).
- Place the steering wheel cover (35) in the middle of the steering wheel (1) until it engages.
8.4 Connecting the mower to the rechargeable batteries (Fig. 7)
- Remove the cover (c) carefully.
- Connect the cables (d) underneath to each other in order to connect the mower to the rechargeable battery.
- The mower is now operational.
9. Before commissioning
ATTENTION!
Always make sure the device is fully assembled before commissioning!
Before each commissioning, check the product for the following:
- Faultless condition and completeness of the guards and the cutting device
- Tight fit of all screw connections
- Smooth running of all moving parts.
Check before each commissioning,
- whether the cutting tool and the entire cutting unit (mowing blade, blade coupling, blade brake, mounting bolts, mowing unit housing) are in perfect condition. Particular attention must be paid to secure seating, damage and wear.
- whether the safety devices are in perfect condition and function properly.
- whether tyres (air pressure, damage, wear) and frame are in perfect condition. Screw connections must be checked for tightness. In particular, all maintenance work listed in the maintenance schedule under the heading "Before each commissioning" must be carried out.
Replace defective parts and all other worn and damaged parts before using the device. Illegible or damaged danger and warning information on the device must be renewed.
If necessary, consult a specialist dealer.
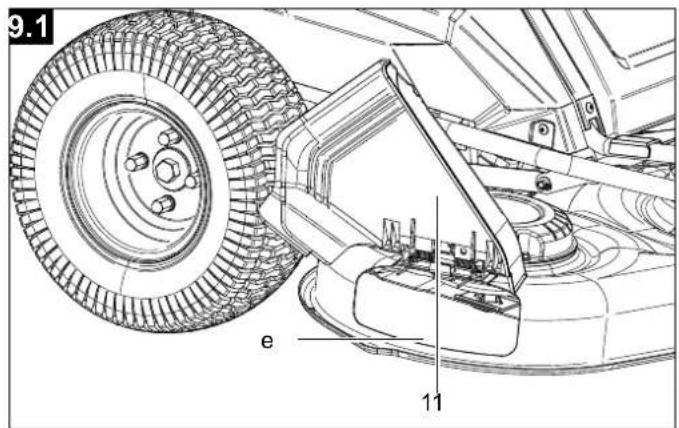
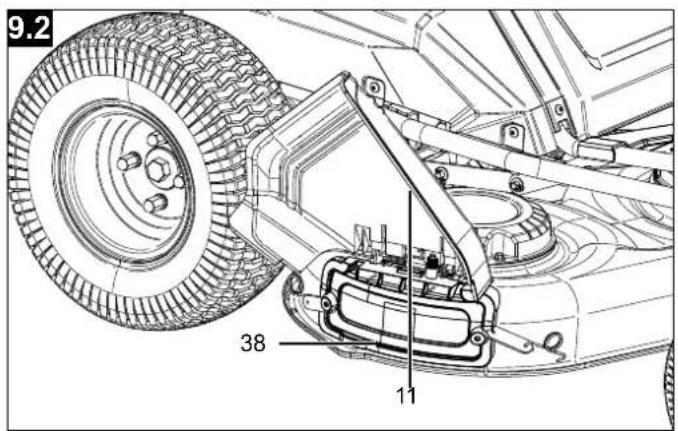
9.1 Inserting / removing the mulching insert (Fig.
9.1; 9.2; 9.3)
Depending on the assignment, you can choose between mowing with the mulching insert (38) and mowing with the side discharge (11) open.
- Pull the side discharge locking pin (24) upwards and lift the side discharge (11).
- The side discharge opening (e) can be found here.
- Now hook the mulching insert (38) into the eyelets provided on the mowing unit using the hooks on the mulching insert.
- Now fold the side discharge (11) down again.
- In order to mow with the side discharge (11) open, unhook the mulching insert (38) as described above.
9.2 Checking the tyre pressure
The correct tyre pressure is the essential prerequisite for a perfectly balanced cutting tool and thus also for an evenly mown lawn.
- Check the tyre pressure with a commercially available foot pump at regular intervals.
- If necessary, refill with air using a commercially available foot pump (not included in scope of delivery). The correct tyre pressure is 2.7 bar in the front wheels (7) and 1.9 bar in the rear wheels (5).
Note: If you notice that the tyres or wheels are damaged, please contact the customer service or a specialist workshop.
9.3 Checking the seat contact switch (fig. 1)
The seat contact switch ensures that the motor switches off as soon as there is no one in the driver's seat.
- Sit on the driver's seat (2).
- Depress the brake pedal (8) and activate the locking brake (14).
- Activate the mower by inserting the ignition key (30) into the ignition lock (23). Set the key to "ON".
- Switch the mowing unit (6) on by pulling the mower on/off knob (17) up.
- Take the weight off the driver's seat (2) by standing up (do not get off!)
- The engine must switch off!
Note: If you notice that the contact switch is not working correctly, please contact the customer service or a specialist workshop.
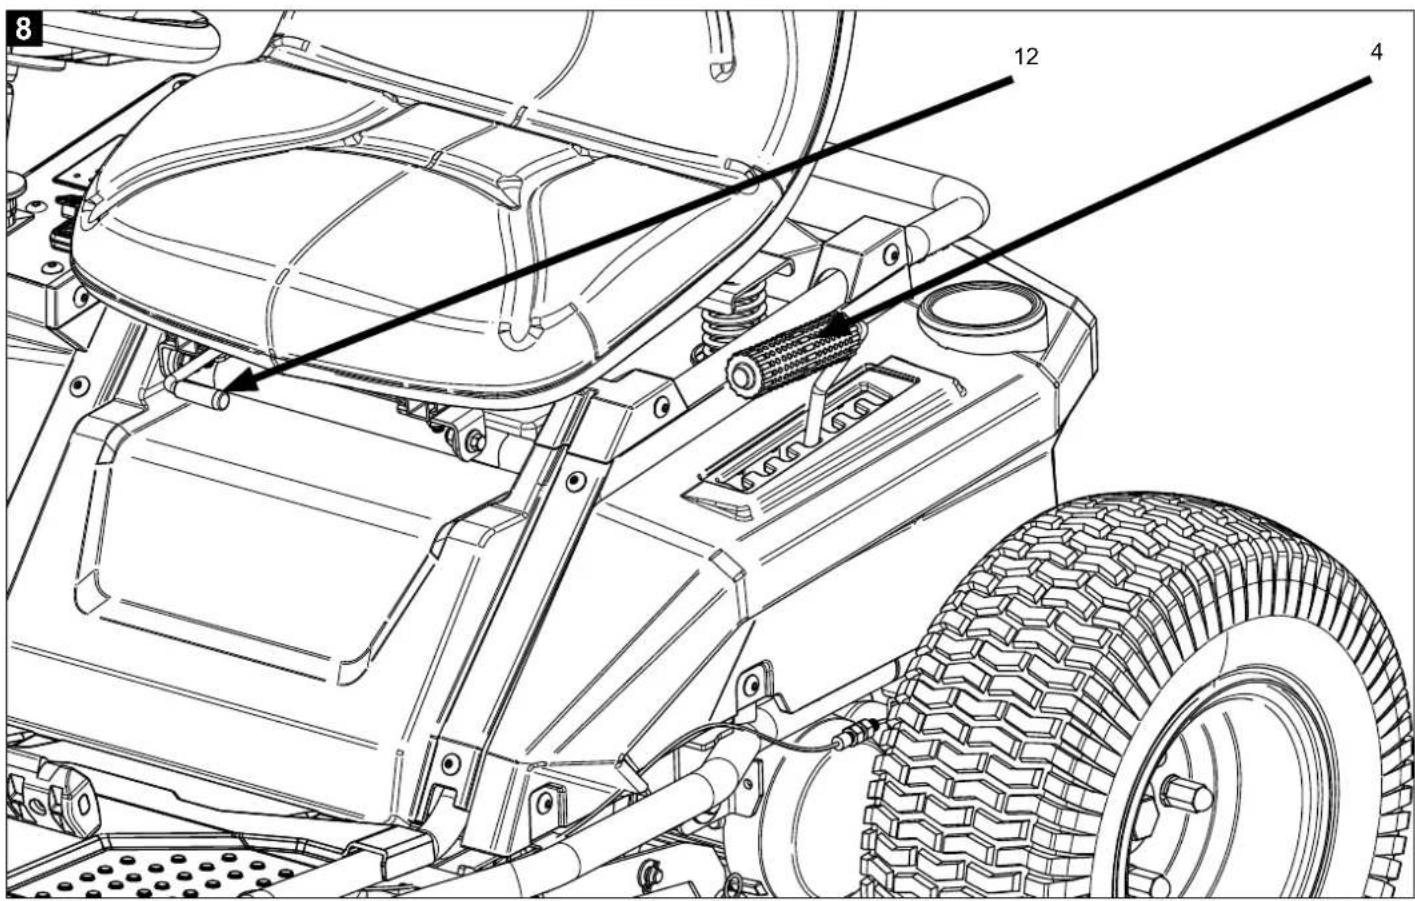
9.4 Adjusting the correct seat position (Fig. 8)
- Sit on the driver's seat (2).
- Pull the seat adjustment lever (12) upwards and hold it in this position.
- You can now correct the seat by moving it forwards or backwards.
- Adjust the seat position so that you sit safely and comfortably and can easily reach the controls.
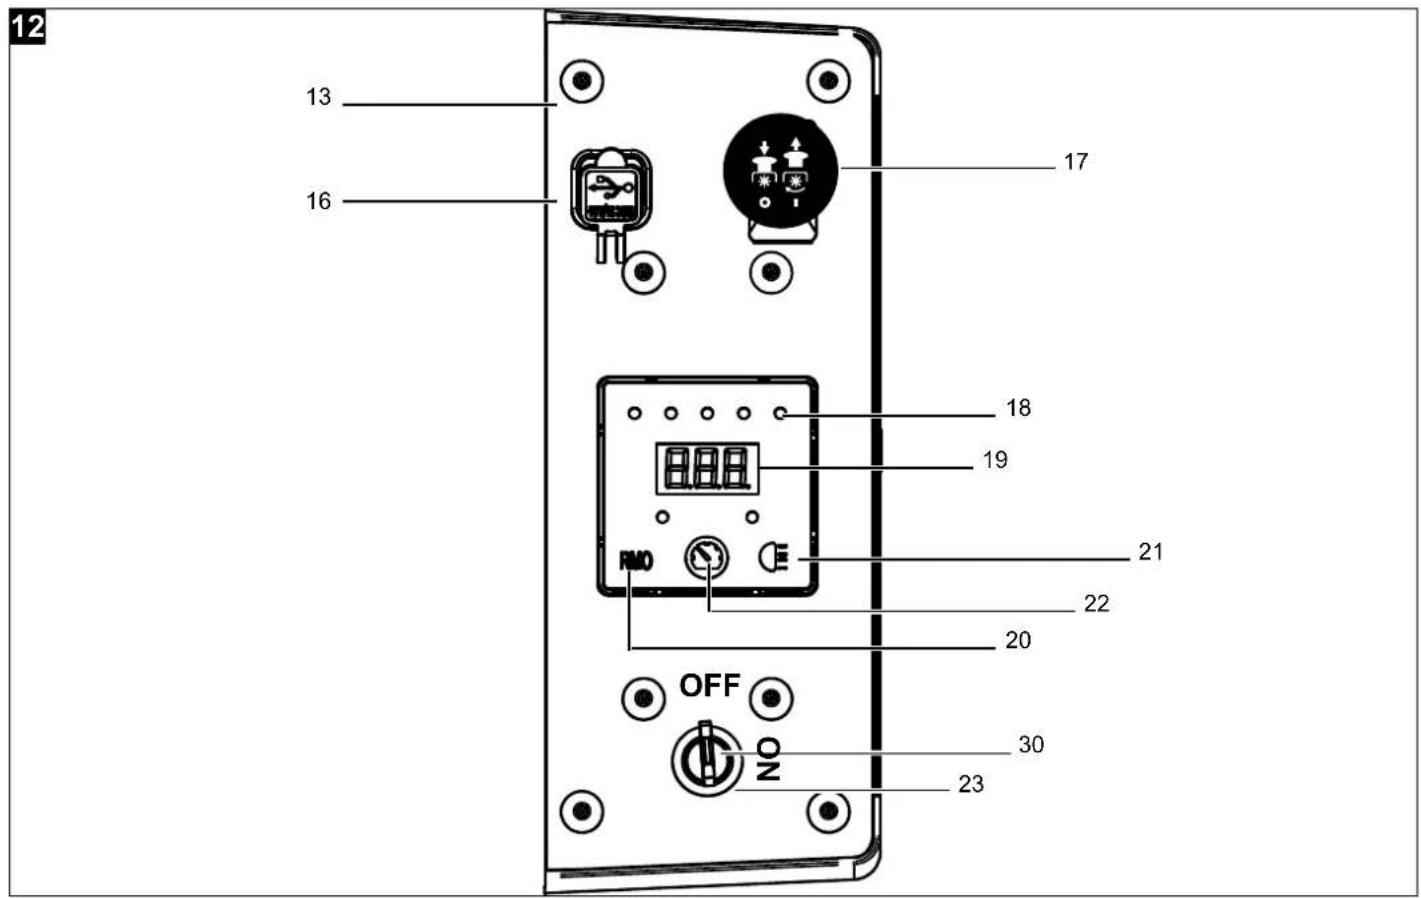
10. Control panel functions
(Fig. 12, Fig. 1)
⚠ WARNING!
Familiarise yourself with the functions of the mower before using it.
10.1 USB sockets (16)
The control panel has two USB sockets.
- Connect your phone to the USB socket using a USB cable (not included in the scope of delivery), for example.
- Stow your phone safely in your pants pocket and ensure that the cable does not sag.
10.2 Mowing unit on/off (17)
- Switch the mowing unit on by pulling the mowing unit on/off switch (17) up.
- Switch the mowing unit off by pushing the switch down.
- The mowing unit switches off automatically if reversing without the reverse mowing option (20) active.
- In this case, the mowing unit switch (17) must be pushed down and can subsequently be reactivated again by pulling it up.
10.3 Charge status display (18)
The charge status display shows you the charge status in 5 levels:
$$ \boxed {0 \% 25 \% 50 \% 75 \% 1 0 0 \%} $$
10.4 Operating hours indicator (19)
The operating hours indicator shows you how many hours the battery-powered ride-on lawnmower was previously in operation for.
10.5 Reverse mowing option (20)
⚠ WARNING!
Only use this option when the terrain does not permit mowing moving forwards!
- Press the "Reverse mowing option on/off" button (20). An LED illuminates.
- Switch the mowing unit (6) on by pulling the mowing unit on/off switch (17) up.
- You can now also mow in reverse.
10.6 Cruise control (22)
Cruise control is used to relieve the legs and keep a constant speed.
10.6.1 Cruise control with the mowing unit switched on
- Switch the mowing unit on as described in point 11.6.2 and drive carefully as described there.
-
Press the "Cruise control on/off" switch (22).
-
The battery-powered ride-on lawnmower controls itself autonomously to a pre-programmed speed in order to achieve the best possible mowing result.
- In order to switch cruise control off again, simply actuate the forward or brake pedal or press the switch again (22).
10.6.2 Cruise control without the mowing unit switched on
- Observe the instructions in point 11.5 and drive carefully.
- Keep your desired speed.
- Now switch the cruise control (22) on by pressing the switch.
- The battery-powered ride-on lawnmower now holds the speed.
- In order to switch cruise control off again, simply actuate the forward or brake pedal or press the switch again (22).
10.7 LED headlights (9)
ATTENTION! Do NOT look directly into the light! Never point the light beam directly into the eyes of people or animals! Danger of injury.
The battery-powered ride-on lawnmower has LED headlights which makes it possible to provide sufficient lighting of the grass to be mowed on dull days or in shaded gardens.
Press the "LED headlights on/off" switch (21).
⚠ WARNING!
Never use the battery-powered ride-on lawnmower at night or when extremely dark.
The LED headlights are only used for illuminating poorly lit areas of your garden.
10.8 Ignition lock (23)
The ignition lock is used to switch the battery-operated ride-on lawnmower on and off.
The device can be switched "ON" or "OFF" by inserting the ignition key (30) into the ignition lock (23).
11. Operation
11.1. Operating times
Please comply with statutory regulations to lawnmower operating times, which may vary from location to location.
Familiarise yourself with the controls and the control parts as well as with the use of the device. In particular, the user must know how to stop the device's working tool and combustion engine quickly.
The device may only be used by persons who have read the user manual and who are familiar with the handling of the device. Prior to initial commissioning, the user must seek expert and practical instruction. The user must be told by the seller or another qualified person how to use the device safely.
During this instruction, the user should be made aware in particular,
- that extreme care and concentration are necessary when working with the device.
- that a battery-operated ride-on lawnmower that slides down a slope cannot be controlled by applying the brake.
The main causes of loss of control of the battery-powered ride-on lawnmower may include:
- lack of wheel grip,
- driving too fast,
- inappropriate braking,
- improper use (sporting events, etc.),
- lack of knowledge about effects related to soil conditions, especially on slopes (see under point 11.6.3 "Working on slopes"),
- incorrect attachment of loads and poor load distribution.
11.2 Preparing the mowing area
- Before mowing, carefully examine the area.
- Remove stones, sticks, bones, wires, toys and other objects that may be ejected.
- Ensure that no other people are present on the surface to be mowed.
11.3 Checking the mowing blade (fig. 9)
⚠ WARNING!
Risk of injury!
After switching off the engine, the mowing blade continues to run for a few seconds. If you touch the rotating parts, you may cut yourself.
- Wait until the mowing blade comes to a standstill.
- Do not stop the cutting tool with your hand.
- Wear protective gloves.
-
Keep the cutting tool away from your feet.
-
Before carrying out any check of the mowing blade, stop the motor and remove the ignition key (30) from the ignition switch (23).
- Lift the mowing unit (6) to the highest level using the cutting height adjustment (4)
- Now support the mower on one side by carefully driving it onto a thin piece of wood. This creates additional clearance between the mowing unit and the floor. Engage the locking brake (14)!
- Now you can check both mowing blades for damage.
- Regularly check that the mowing blade (6a) is properly fastened, in good condition and sharpened.
- If this is not the case, have the mowing blade sharpened or replaced by a specialist workshop.
11.4 Starting the motor (Fig. 12)
- Sit on the driver's seat (2).
- It is activated by fully depressing the brake pedal (8) and pressing the locking brake (14).
- Turn the ignition key (30) in the ignition lock (23) to "ON". The control panel begins to illuminate.
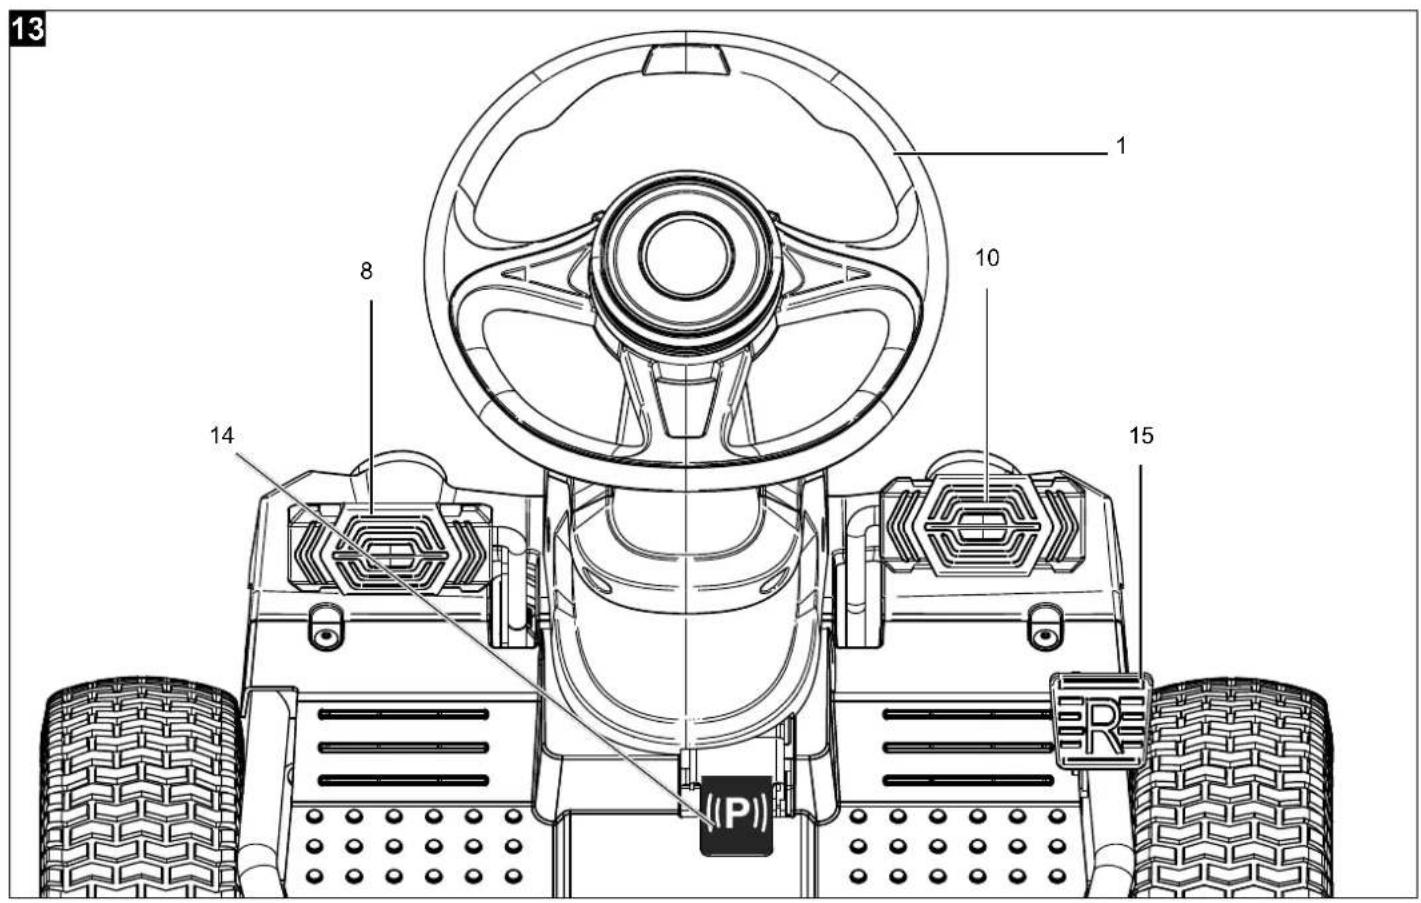
11.5 Driving with the mowing unit switched off (Fig. 13)
- Lift the mowing unit (6) to the highest level.
- Depress the brake pedal (8) to release the locking brake (14).
- The battery-powered ride-on lawnmower moves forward when the forward pedal (10) is pressed carefully.
- In order to stop, step off the forward pedal (10) and press the brake pedal (8).
- The battery-powered ride-on lawnmower moves backwards when the reverse pedal (15) is pressed carefully.
- In order to stop, step off the reverse pedal (15) and press the brake pedal (8).
Note: When the brake pedal is pressed, the device cannot receive signals from the forward or reverse pedal.
11.6 Mowing
⚠ WARNING!
Danger of accident when reversing!
Be aware of the rear environment when reversing!
- Reverse only if necessary!
Hints for mowing
- Before each mowing operation, check that the mowing blade is correctly attached, in good condition and well sharpened. Always wear protective gloves when doing this!
- Check the mower, mowing blade and other parts if you have driven into a foreign object or if the device vibrates more than normal.
- Only mow when there is sufficient light.
- Watch out for traffic on or near a road. Keep the side discharge away from the road.
- Avoid mowing in places where the wheels have trouble gripping or mowing is unsafe in any other way.
- Make sure that there are no persons or animals in the vicinity when reversing.
- Only cut with sharp, flawless mowing blades so that the blades of grass do not fray and the lawn does not turn yellow.
- To achieve a clean cut, guide the lawnmower in the straightest possible paths. These strips should always overlap by a few centimetres so that no patches remain.
- Keep the underside of the mower housing clean and be sure to remove grass debris. Grass deposits make the starting process more difficult, impair cutting quality and grass discharge.
11.6.1 Adjusting the cutting height (fig. 8)
⚠ Attention! The cutting height may only be adjusted when the mower is shut off.
Set the cutting height depending on the actual length of the lawn. Carry out several passes so that a maximum of 4 cm of lawn is removed at a time.
- Engage the cutting height adjustment lever (4) to the desired cutting height.
- 7 different cutting heights can be set.
IMPORTANT: For transport, the cutting tool must always be placed in the highest position (level 7).
11.6.2 Mowing / Starting with the mowing unit switched on
⚠ WARNING!
Risk of injury and damage!
Objects can be ejected and may hit and injure persons. Solid objects can damage the product. In addition, small stones or other objects can be ejected at least 15 meters. This can damage cars, houses, and windows.
- When mowing, keep a distance of 30 metres between bystanders or animals.
- Do not remove objects from footpaths etc. with the product.
NOTE!
Risk of damage!
If the product is not cleaned on a regular basis, grass/weed residues may become trapped below the protection shield and may block the product. This can impair the performance of the product and damage it in the long run.
- Clean the product thoroughly after each use.
- Pull the mowing unit on/off knob (17) up. The mowing unit switches on.
- Release the locking brake (14) by pressing the brake (8)
- Pressing the forward pedal (10) starts the battery-powered ride-on lawnmower with the mowing unit switched on.
- Activating the cruise control (22) moves the mower at a speed set for mowing when the mowing unit is switched on.
- To stop the device, depress the brake pedal (8).
11.6.3 Working on slopes
⚠ WARNING!
Danger due to errors when driving on slopes!
Take special care when driving on slopes! There is no "safe" slope. Pay particular attention to the following safety instructions!
- If the wheels should spin or if the vehicle gets stuck when climbing a slope, disengage the mowing unit and attachment devices. Then slowly descend and leave the slope in a straight direction!
- On slopes, the cutting path should be made perpendicular to the slope. It is possible to prevent the lawnmower from slipping by lifting it upwards at an angle.
- Slopes are one of the main causes of accidents where control of the battery-powered ride-on lawnmower is lost and the device tips over. This can cause serious or even fatal injuries.
- For safety reasons, the device must not be used on slopes steeper than 10^ (17.6%).
- 10^ slope corresponds to a vertical rise of 17.6 cm at 100 cm horizontal length.
- Avoid starting or stopping on a slope.
- Do not use the device in places such as slopes or ditches where it may tip over or slip. The danger of tipping over or slipping is greater if the surface is loose or damp.
- Always drive on slopes in the longitudinal direction. There is an increased risk of tipping over when driving sideways.
- When driving on slopes, do not make abrupt changes in speed or direction. Working in such situations requires careful, calm and steady operation of the battery-powered ride-on lawnmower.
- Avoid changes of direction on slopes. Turn around on slopes only if this is unavoidable; if possible, drive slowly and in a wide arc in the downward direction.
- Do not mow wet grass, especially on slopes, as grip is reduced on wet grass. The battery-powered ride-on lawnmower could slip and therefore no longer be controlled by the user.
- Special care must be taken when operating attachment devices on slopes (altered weight distribution on the device).
- If the wheels should spin or if the vehicle gets stuck when travelling up a slope, disengage the mowing blade or attachment device. Afterwards, the slope is to be left in a slow downward and straight direction.
- Never try to stabilise the battery-powered ride-on lawn-mower by supporting it with your foot on the ground.
11.7 Parking the battery-powered ride-on lawn-mower
⚠ WARNING!
Danger of injury and tipping!
The battery-powered ride-on lawnmower may tip over if it has not been parked on a level surface.
- The danger of tipping over or slipping is greater if the surface is loose or damp.
- When stopping, pay attention to the overrun of the cutting tool, which is a few seconds until it comes to a standstill.
Turn off the device as follows:
- Press the brake pedal (8) down completely and actuate the locking brake (14).
-
Before leaving the driver's seat, switch off the mowing unit (6).
-
Set the cutting height (4) to the lowest position.
- Stop the motor by turning the ignition key (30) in the ignition lock (23) to the "OFF" position. Then remove the ignition key (30) from the ignition lock (23).
- Store the ignition key (30) so that only authorised persons have access to it.
- Make sure that the battery-powered ride-on lawnmower has come to a complete stop before dismounting.
11.8. After mowing
- Remove grass, leaves, grease, and oil before storage. Do not place any other objects on the mower.
- Check all screws and nuts before the next use. Tighten up the loose screws.
- Remove the ignition key (30) from the ignition lock (23).
- Make sure that the battery-powered ride-on lawn-mower is not parked next to a source of danger.
- Interrupt the power circuit by removing the connector if the battery-powered ride-on lawnmower will not be in use for a long period of time (see point 9.4).
12. Charging and storage
NOTE! Make sure to fully charge the battery-powered ride-on lawnmower before long periods not in use. Otherwise it can negatively affect the service life of the battery.
Ensure that the charging unit is complete and undamaged.
12.1 Display (f) on the charging unit (Fig.10)
The charging unit has three different displays: Charging voltage (V), charging current (A) and charging status display (%).
You can switch between the three different displays with the button below.
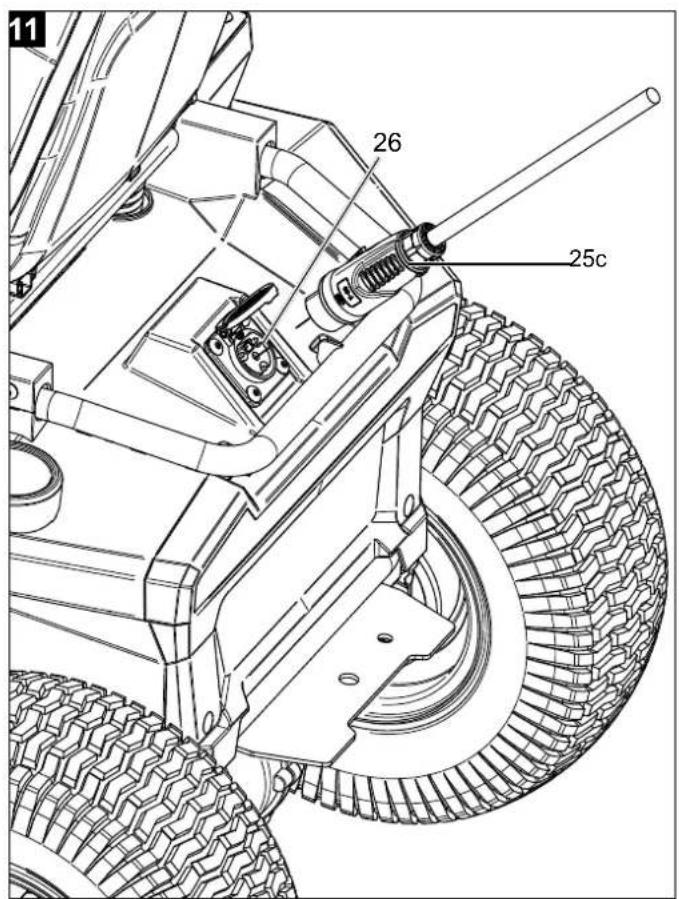
12.2 Connecting and charging the battery-powered ride-on lawnmower (Fig. 11)
- Insert the charging plug (25c) into the battery charging socket (26).
- Then connect the power supply cable (25a) of the charging unit to your mains connection cable.
- The battery-powered ride-on lawnmower now charges.
NOTE!
Make sure that the battery-powered ride-on lawnmower charges in dry conditions, otherwise the charging unit or the battery-powered ride-on lawnmower could be damaged.
12.3 Storage of the battery-powered ride-on lawn-mower
- Store the ride-on lawnmower in a dry, enclosed space.
- Ensure that the rechargeable battery of the device is charged if not in use for a long period of time.
- Interrupt the power circuit by removing the connector if the battery-powered ride-on lawnmower will not be in use for a long period of time (see point 9.4)
13. Transport
⚠ WARNING!
Risk of injury!
Unintended and unexpected start-up of the product may lead to injuries.
- After charging, switch the motor off and interrupt the power circuit by removing the connector underneath the seat (Fig. 7).
- The product can cause severe crushing injuries due to its own weight.
Special care must be taken when loading and unloading the battery-powered ride-on lawnmower for transport in a vehicle or trailer.
Always engage the locking brake (8).
When transporting the battery-powered ride-on lawnmower, observe regional legal regulations, especially with regard to load safety and the transport of objects on loading areas.
This battery-powered ride-on lawnmower must not be towed. A suitable vehicle or trailer must be used for transport on public roads. When transporting, ensure that the transport device has sufficient payload-bearing capacity and that the battery-powered ride-on lawnmower is suitably safeguarded.
14. Cleaning and maintenance
⚠ WARNING!
- Switch off the motor before carrying out any cleaning or maintenance work.
NOTE!
Risk of damage!
Water entering the housing can cause engine damages. In addition, the jet of a high-pressure cleaner can damage parts of the product.
- Clean the product with a cloth, a hand brush, etc.
- Do not immerse the product in water or any other liquid and do not wash it with a high-pressure cleaner.
| Maintenance plan | |||
| After each use | After 25 operating hours | Every 100 operating hours | |
| Mowing blade | Check Check Replace | ||
| Mowing unit | Check Check | Check | |
| Tyres Check | Check Check | ||
| Brake Check | Check Check | ||
Expert inspection required:
- when the battery-powered ride-on lawnmower passes over a large object, the device may be damaged,
- if the engine suddenly stops.
- if the cutting blade is bent (do not repair it yourself!),
- if the transmission is damaged.
14.1 Cleaning work:
⚠ WARNING!
Risk of injury!
Unintended and unexpected start-up of the product may lead to injuries.
- Switch the motor off before carrying out any cleaning or maintenance work.
NOTE!
Risk of damage!
If the product and its attachment devices are not cleaned regularly, grass/weed debris may become trapped underneath the battery-powered ride-on lawnmower. This can impair the performance of the product and damage it in the long run.
- Clean the product with a cloth or a hand brush, etc.
- Do not immerse the product in water or any other liquid and do not wash it with a high-pressure cleaner.
- Keep the handles free of oil so that you always have a secure grip.
Note: It is easiest to remove the dirt and grass immediately after mowing. Grass residues and dirt that have dried on can impair mowing. Check that the grass ejection channel is clear of grass residues and remove these if necessary.
Never clean the mower with a water jet or high pressure cleaner. The motor should remain dry.
Do not use aggressive cleaning products such as cold cleaners or white spirit.
Never drive close to an edge or ditch for cleaning work (e.g. on the frame of the battery-powered ride-on lawnmower).
To avoid fire hazard, keep combustion engine, cooling fins, battery compartment, area around fuel tank and exhaust pipe free from grass, leaves or leaking oil (grease).
Always clean the catch basket.
14.2 Maintenance work
Only maintenance work described in this operating manual may be carried out; have all other work carried out by a specialist dealer. If you lack the necessary knowledge and tools, always consult a specialist dealer.
We recommend that maintenance work and repairs be carried out only by a specialist dealer.
Only use tools, accessories or attachment devices which are permitted by the manufacturer of this device or technically similar parts, otherwise there may be a danger of accidents resulting in personal injury or damage to the device. If you have any questions, you should contact a specialist dealer.
Original tools, accessories and spare parts are optimally matched to the device and the user's requirements.
The battery-powered ride-on lawnmower should be checked by the specialist dealer once a year.
Keep warning and instruction labels clean and legible at all times. Damaged or lost stickers must be replaced with new original ones. If a component is replaced by a new part, make sure that the new part has the same stickers.
Before starting work on or near electrical components, disconnect the battery connection cable (24) from the engine connection cable (24a).
The device is equipped with numerous safety features. These devices must not be removed or modified (bypassed, etc.) and must be checked at regular intervals. Work on the safety devices may only be carried out by a specialist.
Keep all nuts, pins and screws, especially the blade fixing screw, firmly tightened so that the device is in a safe operating status.
Worn or damaged parts must be replaced immediately for safety reasons.
Working under the machine requires special care due to the weight of the battery-powered ride-on lawn-mower. Contact your specialist dealer for this.
Check that the front and rear wheels are secured.
Always keep the battery-powered ride-on lawnmower and attachment devices in good working order; all safety devices must be in place and in good working order.
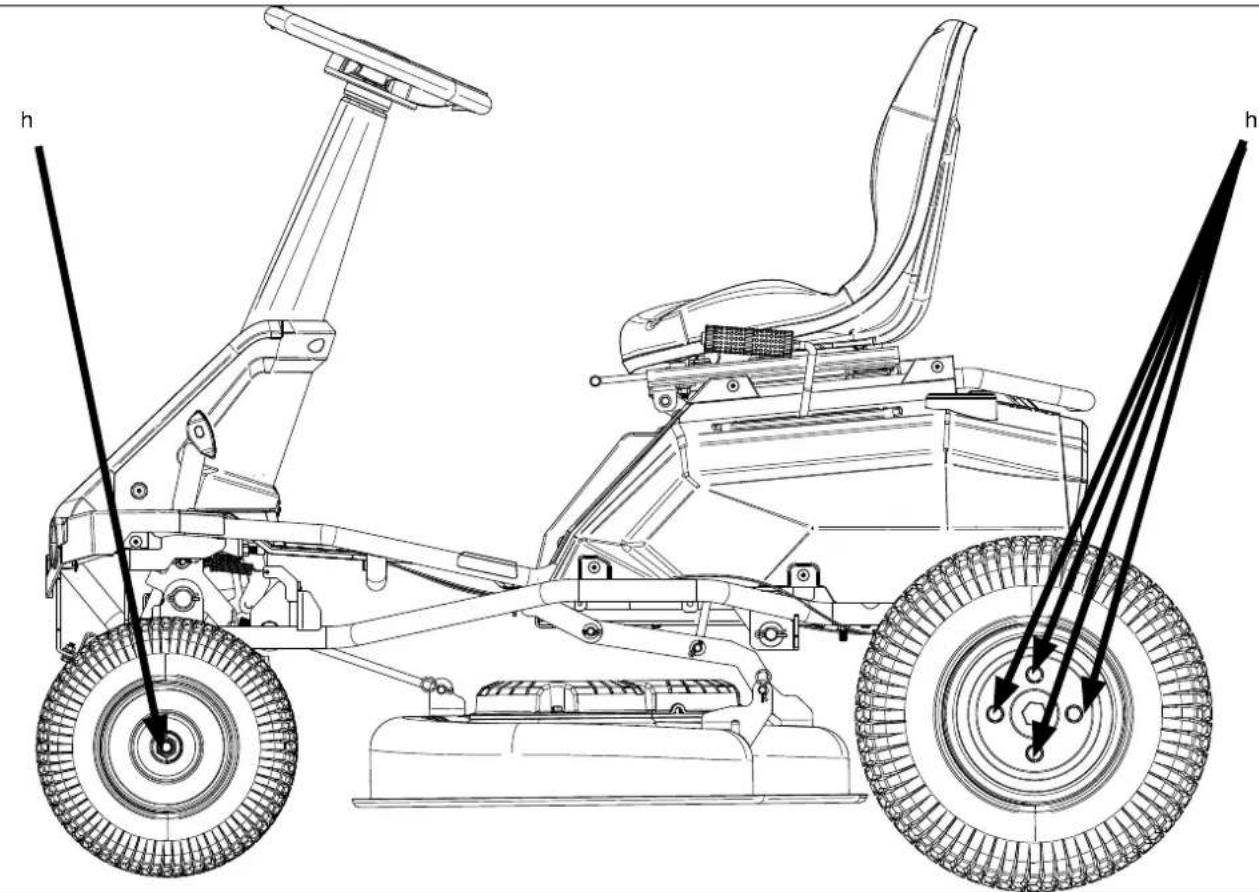
14.3.1 Wheel axles and hubs (Fig.16)
To ensure the smooth running of the wheels, we recommend cleaning and lightly greasing the wheel axles and wheel hubs at least once per season. Always check that the screws (h) are screwed tight.
NOTE:
The front and rear wheels (7 + 5) must be disassembled to grease the axles and hubs. (Fig. 16)
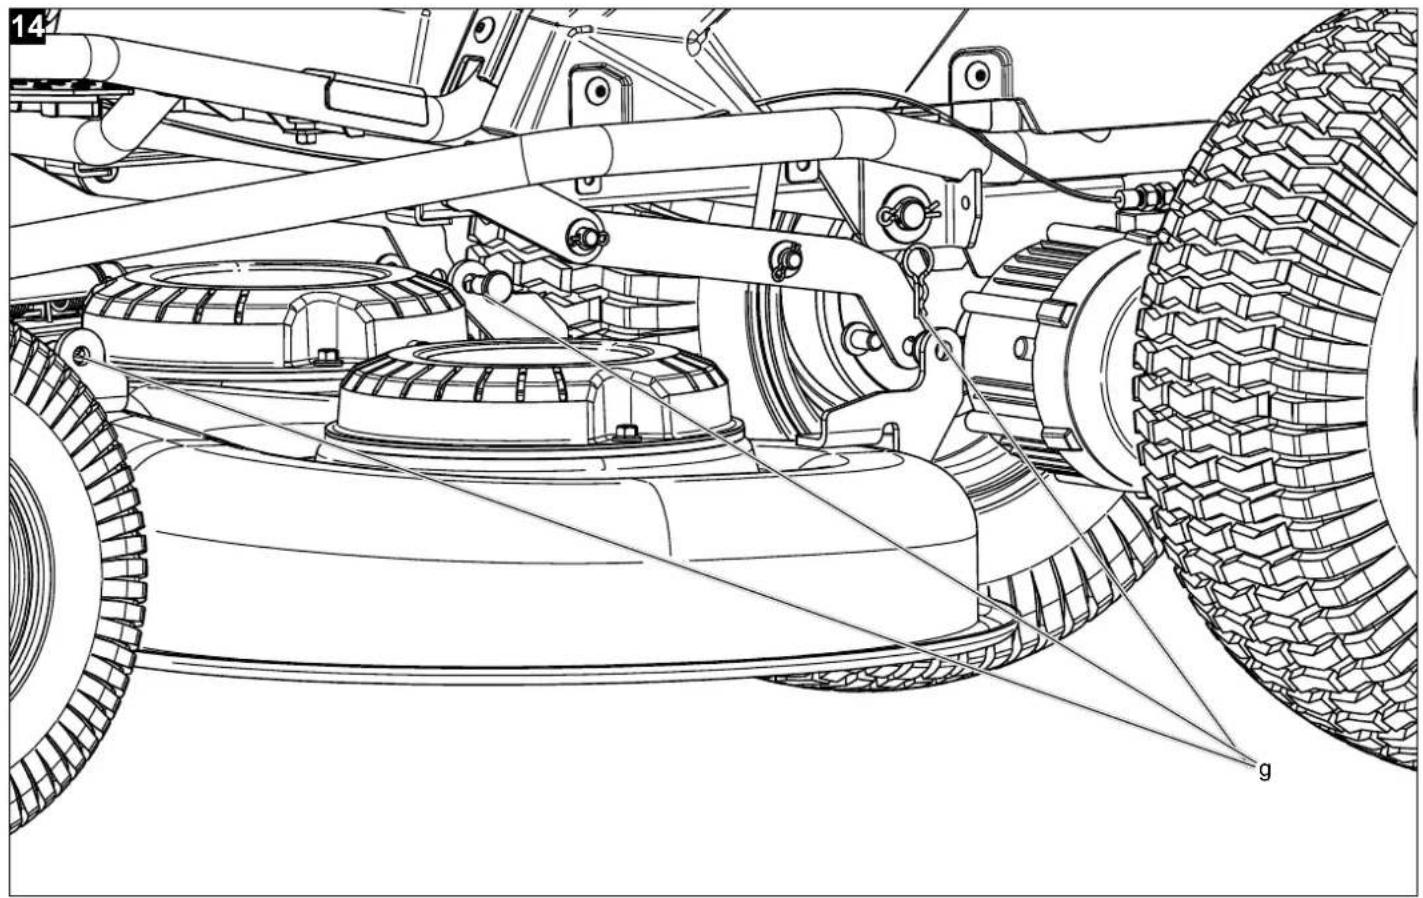
14.3.2 Removing of the mowing unit (Fig.14, 15) NOTE!
2 people are required to remove the mowing unit!
NOTE!
Removing the mowing unit is only recommended when one of the mowing blades needs to be replaced or the mowing unit needs to be transported or sent for maintenance!
- Place the battery-powered ride-on lawnmower on a level surface and secure it by engaging the locking brake (14).
- Switch the battery-powered ride-on lawnmower off and remove the ignition key (30) from the ignition lock (23).
- Lower the cutting height adjustment (4) to the lowest level. Support the mowing unit with wooden slats on which it can rest.
- Carefully pull the three safety splints (g) (Fig. 14) out.
- First remove the required front suspension of the mowing unit by pulling out the locking pin.
- Now the mowing unit must be held on both sides.
- Now pull out the locking pin on the left and right side at the same time.
- Now remove the connector plugs that connect the motors of the individual mowing blades to the battery-powered ride-on lawnmower.
- You can now carry out the mowing unit on the right side of the device.
- In order to install the mowing unit again, follow steps 1-9 in reverse order.
14.3.3 Changing the mowing blade (Fig. 15)
For safety reasons, only have your mowing blade replaced, sharpened, balanced and fitted by an authorised specialist workshop. To achieve an optimal working result, it is recommended to have the mowing blade checked once a year. Changing the mowing blades every 100 operating hours is for safety and to achieve a perfect cutting result.
14.3.4 Checking the tyre pressure
- Check the tyre pressure prior to starting.
-
Check the tyre pressure with a commercially available foot pump (not included in the scope of delivery) at regular intervals.
-
If necessary, top up with air using a commercially available foot air pump (not included in the scope of delivery) by first removing the wheel caps (4a
+ 7a) and the cap of the valve. The correct tyre pressure is 2.7 bar in the front wheels (7) and 1.9 bar in the rear wheels (5).
- Important: If the tyre pressure is too low, the risk of damage to the valves and therefore the hoses increases.
Note: If you notice that the tyres or wheels are damaged, please contact the customer service or a specialist workshop.
14.3.5 Repairs
After any repair or maintenance work, check that all safety-related parts are in place and in perfect condition. All parts which may cause injury must be kept where they are inaccessible to children or others.
Attention: According to the German Product Liability Act, no liability is accepted for damage caused by improper repairs or by not using original spare parts.
Such work should be performed by a customer service centre or an authorised specialist. The same applies to accessory parts.
14.3.6 Ordering spare parts
Please provide the following information when ordering replacement parts:
- Device type
• Device article number
Spare parts / accessories
Lawnmower - Article no.: 7911200640
Rechargeable battery - Article no.: 5911410013
Charging unit - Article no.: 7911401702
Front wheel - Article no.: 5911410029
Rear wheel - Article no.: 5911410030
Side discharge - Article no.: 5911410045
Mulching insert - Article no.: 5911410044
14.3.7 Service information
With this product, it is necessary to note that the following parts are subject to natural or usage-related wear, or that the following parts are required as consumables.
Spare parts / wear parts*: Rechargeable battery, mowing blade, tyres. Mulching insert, side discharge, charging unit
* may not be included in the scope of supply!
Spare parts and accessories can be obtained from our service centre. To do this, scan the QR code on the cover page.
15. Disposal and recycling
Notes for packaging


The packaging materials are recyclable. Please dispose of packaging in an environmentally friendly manner.
Notes on the electrical and electronic equipment act [ElektroG]
![SCHEPPACH MR760-E - Notes on the electrical and electronic equipment act [ElektroG] - 1](/content/2026/05/755720/images/a90bbc6f9c50ac451e855ce9ef1c3e6e920b15c8216ff4f8522c631da481c5a7.jpg)
Waste electrical and electronic equipment does not belong in household waste, but must be collected and disposed of separately!
- Used batteries or rechargeable batteries that are not installed permanently in the old appliance must be removed non-destructively before disposal. Their disposal is regulated by the battery law.
- Owners or users of electrical and electronic devices are legally obliged to return them after use.
- The end user is responsible for deleting their personal data from the old device being disposed of!
- The symbol of the crossed-out dustbin means that waste electrical and electronic equipment must not be disposed of with household waste.
-
Waste electrical and electronic equipment can be handed in free of charge at the following places:
-
Public disposal or collection points (e.g. municipal works yards)
- Points of sale of electrical appliances (stationary and online), provided that dealers are obliged to take them back or offer to do so voluntarily.
- Up to three waste electrical devices per type of device, with an edge length of no more than 25 centimetres, can be returned free of charge to the manufacturer without prior purchase of a new device from the manufacturer or taken to another authorised collection point in your vicinity.
- Further supplementary take-back conditions of the manufacturers and distributors can be obtained from the respective customer service.
- If the manufacturer delivers a new electrical appliance to a private household, the manufacturer can arrange for the free collection of the old electrical appliance upon request from the end user. Please contact the manufacturer's customer service for this.
- These statements only apply to devices installed and sold in the countries of the European Union and which are subject to the European Directive 2012/19/EU. In countries outside the European Union, different regulations may apply to the disposal of waste electrical and electronic equipment.
Information on the battery act [BattG]
![SCHEPPACH MR760-E - Information on the battery act [BattG] - 1](/content/2026/05/755720/images/c8ec1e6cce928fa29e89fd1afebaaff8bfbd53f2d828f05a6c00f7107c13f706.jpg)
Old batteries and rechargeable batteries do not belong in household waste, but must be collected or disposed of separately!
- For safe removal of primary batteries or rechargeable batteries from the electrical appliance and for information on their type or chemical system, please refer to the additional information in the operating or assembly instructions.
- Owners or users of primary batteries and rechargeable batteries are legally obliged to return them after use. The return is limited to household quantities.
- Old batteries may contain pollutants or heavy metals that can harm the environment or human health. Recycling old batteries and using the resources they contain helps to protect these two important issues.
- The symbol of the crossed-out dustbin means that primary batteries and rechargeable batteries must not be disposed of with household waste.
-
If the signs Hg, Cd or Pb are also located below the dustbin symbol, this stands for the following:
-
Hg: Battery contains more than 0.0005% mercury
- Cd: Battery contains more than 0.002% cadmium
- Pb: Battery contains more than 0.004% lead
- Rechargeable batteries and primary batteries can be returned free of charge to the following places:
- Public disposal or collection points (e.g. municipal works yards)
- Sales points for primary batteries and rechargeable batteries
- Take-back points of the common take-back system for old device batteries
- Take-back point of the manufacturer (if not a member of the common take-back system)
- These statements are only valid for rechargeable batteries and primary batteries sold in the countries of the European Union and subject to the European Directive 2006/66/EC. In countries outside the European Union, different regulations may apply to the disposal of rechargeable batteries and primary batteries.
Removing the rechargeable battery before disposing of the appliance
- The integrated rechargeable battery must be removed before disposal of the appliance and disposed of separately in an environmentally friendly manner.
- Mask off the contacts and package the rechargeable battery such that it cannot move in the packaging. Please observe any additional national regulations.
16. Troubleshooting
Troubleshooting
The table shows potential failures, their possible cause and solutions. However, if you are unable to solve the problem, contact a professional to assist you.
⚠️ CAUTION!
First switch the motor off and remove the connector plug under the seat!
| Fault Possible cause Remedy | ||
| Unsteady running, strong vibration of the device | Screws are looseMowing blade attachment looseMowing blade not balanced | Check screwsCheck mowing blade attachmentReplace mowing blade by specialist workshop |
| Motor does not run | Control unit defectiveEngine defectiveBattery defectiveBattery empty | Contact authorised customer serviceContact authorised customer serviceContact authorised customer serviceCharge the rechargeable battery of the device |
| Device does not move | Seat contact switch defectiveControl unit defective | Contact authorised customer serviceContact authorised customer service |
| Lawn turns yellow, uneven mowing results | Mowing blade is not sharpCutting height is too low | Sharpen the mowing bladeSet the correct height |
| The discharge of grass clippings is unclean | Cutting height is too lowMowing blade worn outGrass too wetDriving speed too high | Set heightReplace the mowing bladeMow during dry weatherMow with the cruise control switched on |
| Motor output drops during mowing | The driving speed in relation to the cutting height is too high | Reduce the driving speed and increase the cutting height |
| Braking power insufficient | The brake is no longer set correctly | Contact the specialist merchant/ customer service |
Günzburger Straße 69
D-89335 Ichenhausen
CHER CLIENT,
Vibration a_b (corps) = 1,128 m/s
Günzburger Straße 69
89335 Ichenhausen, Germania
GENTILE CLIENTE,
Günzburger Straße 69
D-89335 Ichenhausen
CIJENJENI KUPČE,
Günzburger Straße 69
D-89335 Ichenhausen
SPOŠTOVANI KUPEC,
želimo vam veliko veselja in uspeha pri delu z vašo novo napravo.
NAPOTEK:
Merilna negotovost K = 3 dB
Moč zvoka L _WA = 99,4 dB
v skladu z ISO 5395-3
Merilna negotovost K = 1,08 dB
flowchart
graph TD
    A["Motor control unit 2"] --> B["MOVING control unit 1"]
    B --> C["MOVING control unit 2"]
    C --> D["Power module"]
    D --> E["Charging panel"]
    E --> F["USB port"]
    F --> G["Headlight signal"]
    G --> H["Headlight signal"]
    H --> I["Headlight signal"]
    I --> J["Headlight signal"]
    J --> K["Headlight signal"]
    K --> L["Headlight signal"]
    L --> M["Headlight signal"]
    M --> N["Headlight signal"]
    N --> O["Headlight signal"]
    O --> P["Headlight signal"]
    P --> Q["Headlight signal"]
    Q --> R["Headlight signal"]
    R --> S["Headlight signal"]
    S --> T["Headlight signal"]
    T --> U["Headlight signal"]
    U --> V["Headlight signal"]
    V --> W["Headlight signal"]
    W --> X["Headlight signal"]
    X --> Y["Headlight signal"]
    Y --> Z["Headlight signal"]
    Z --> AA["Headlight signal"]
    AA --> AB["Headlight signal"]
    AB --> AC["Headlight signal"]
    AC --> AD["Headlight signal"]
    AD --> AE["Headlight signal"]
    AE --> AF["Headlight signal"]
    AF --> AG["Headlight signal"]
    AG --> AH["Headlight signal"]
    AH --> AI["Headlight signal"]
    AI --> AJ["Headlight signal"]
    AJ --> AK["Headlight signal"]
    AK --> AL["Headlight signal"]
    AL --> AM["Headlight signal"]
    AM --> AN["Headlight signal"]
    AN --> AO["Headlight signal"]
    AO --> AP["Headlight signal"]
    AP --> AQ["Headlight signal"]
    AQ --> AR["Headlight signal"]
    AR --> AS["Headlight signal"]
    AS --> AT["Headlight signal"]
    AT --> AU["Headlight signal"]
    AU --> AV["Headlight signal"]
    AV --> AW["Headlight signal"]
    AW --> AX["Headlight signal"]
    AX --> AY["Headlight signal"]
    AY --> AZ["Headlight signal"]
    AZ --> BA["Headlight signal"]
    BA --> BB["Headlight signal"]
    BB --> BC["Headlight signal"]
    BC --> BD["Headlight signal"]
    BD --> BE["Headlight signal"]
    BE --> BF["Headlight signal"]
    BF --> BG["Headlight signal"]
    BG --> BH["Headlight signal"]
    BH --> BI["Headlight signal"]
    BI --> BJ["Headlight signal"]
    BJ --> BK["Headlight signal"]
    BK --> BL["Headlight signal"]
    BL --> BM["Headlight signal"]
    BM --> BN["Headlight signal"]
    BN --> BO["Headlight signal"]
    BO --> BP["Headlight signal"]
    BP --> BQ["Headlight signal"]
    BQ --> BR["Headlight signal"]
    BR --> BS["Headlight signal"]
    BS --> BT["Headlight signal"]
    BT --> BU["BUX+ Signal out GND"]
    BU --> BV["BUX- Signal out GND"]
    BV --> BW["BUX+ Signal out GND"]
    BW --> BX["BUX- Signal out GND"]
    BX --> BY["BUX+ Signal out GND"]
    BY --> BZ["BUX- Signal out GND"]
    BZ --> CA["BUX+ Signal out GND"]
    CA --> CB["BUX- Signal out GND"]
EC Declaration of Conformity
Article name: BATTERY-POWERED LAWN TRACTOR-MR760-E
Nom d'article:
Standard references:
EN IEC 55014-1:2021; EN IEC 55014-2:2021; EN IEC 61000-3-2:2019+A1; EN 61000-3-3:2013+A1; EN ISO 12100:2010; EN 62841-1:2015
This declaration of conformity is issued under the sole responsibility of the manufacturer.
Apparent defects must be notified within 8 days from the receipt of the goods. Otherwise, the buyeris rights of claim due to such defects are invalidated. We guarantee for our machines in case of proper treatment for the time of the statutory warranty period from delivery in such a way that we replace any machine part free of charge which provably becomes unusable due to faulty material
or defects of fabrication within such period of time. With respect to parts not manufactured by us we only warrant insofar as we are entitled to warranty claims against the upstream suppliers. The costs for the installation of the new parts shall be borne by the buyer. The cancellation of sale or the reduction of purchase price as well as any other claims for damages shall be excluded.