
AT-5457 - Air Conditioning TRISTAR - Free user manual and instructions
Find the device manual for free AT-5457 TRISTAR in PDF.

| Product type | Air cooler |
| Brand | TriStar |
| Model | AT-5457 |
| Color | White |
| Power supply | 220-240V ~ 50-60Hz |
| Power | 65 W |
| Water tank capacity | 5 L |
| Dimensions (L x D x H) | 30 x 30 x 70 cm |
| Weight | 5 kg |
| Fan speeds | 3 speeds (high, medium, low) |
| Airflow modes | Normal, Natural, Sleep |
| Cooling function | Yes, by evaporation + ice packs |
| Oscillation | Yes, horizontal |
| Timer | 1 to 12 hours |
| Remote control | Yes, with CR2025 battery |
| Lighted display | Yes, with sleep function |
| Air filter | Washable, clean regularly |
| Swivel casters | Yes, for easy movement |
| Insulation class | Class II (double insulation) |
| Use | Indoor, domestic |
Frequently Asked Questions - AT-5457 TRISTAR
User questions about AT-5457 TRISTAR
0 question about this device. Answer the ones you know or ask your own.
Ask a new question about this device
Download the instructions for your Air Conditioning in PDF format for free! Find your manual AT-5457 - TRISTAR and take your electronic device back in hand. On this page are published all the documents necessary for the use of your device. AT-5457 by TRISTAR.
USER MANUAL AT-5457 TRISTAR
natural_image
White industrial air conditioner unit with digital display and wheels (no visible text or symbols)Air Cooler AT-5457

FSC
www.fsc.org
MIX
Paper | Supporting responsible forestry
FSC® C188124
EN User manual 4
NL Gebruiksaanwijzing 10
FR Manuel de l'utilisateur 18
DE Benutzerhandbuch 25
PL Instrukcja obsługi 33
cs Uživatelská příručka 40
Main parts (see image A)
1 Control buttons
2 Air outlet
3 Water level indicator
4 Water tank
5 Caster wheel
6 Ice boxes
7 Remote control
8 On/ Off button
9 Speed button
10 Swing button
11 Mode button
12 Timer button
13 Light button
14 Cooling button
SAFETY
Safety precautions
- By ignoring the safety instructions the manufacturer cannot be held responsible for the damage.
- If the supply cord is damaged, it must be replaced by the manufacturer, its service agent or similarly qualified persons in order to avoid a hazard.
- Never move the appliance by pulling the cord and make sure the cord cannot become entangled.
- To protect yourself against an electric shock, do not immerse the cord, plug or appliance in the water or any other liquid.
- Always place the appliance on a stable, flat, heat, and moisture resistant surface.
- The user must not leave the appliance unattended while it is connected to the power supply.
- This appliance is only to be used for household purposes and only for the purpose it is made for.
- This appliance shall not be used by children aged less than 8 years. This appliance can be used by children aged from 8 years and above and persons with reduced physical, sensory or mental capabilities or lack of experience and knowledge if they have been given supervision or instruction concerning use of the appliance in a safe way and understand the hazards involved. Children shall not play with the appliance. Keep the appliance and its cord out of reach of children aged less than 8 years. Cleaning and user maintenance shall not be made by children unless older than 8 and supervised.
- Empty the tank and refill every third day. Before refilling, clean it with fresh tap water or cleaning agents if required by the manufacturer. Remove any scale, deposits, or film that has formed on the sides of the tank or on interior surfaces, and wipe all surfaces dry.
-
Clean the filter regularly.
-
Be aware that high humidity levels may encourage the growth of biological organisms in the environment.
- Unplug the appliance during filling and cleaning.
- Never leave water in the reservoir when the appliance is not in use.
- Empty and clean the air cooler before storage. Clean the air cooler before next use.
WARNING
- Microorganisms can grow in the water reservoir and be blown in the air causing serious health risks when the water is not renewed and the tank is not cleaned regularly and properly.
FOREWORD
About this document
This user manual contains all the information for correct, safe, and efficient use of the appliance.
Ensure you have fully read and understood the instructions in this user manual before you use the appliance.
Always store this user manual in a safe place near the appliance for future reference.
This manual is originally written in English. All other languages are translated documents.
General symbols
| Symbol Description | |
 | This product complies with conformity requirements of the applicable European regulations or directives. |
 | Applicable in France:The product or packaging can be recycled and components must be disposed of separately.Follow the local regulations. |
 | Applicable in Italy:The product or packaging can be recycled and components must be disposed of separately.Follow the local regulations. |
 | The universal recycling symbol, logo, or icon is an internationally recognized symbol used to designate recyclable materials. The recycling symbol is in the public domain and is not a trademark. |
 | The Green Dot is the registered trademark of Der Grüne Punkt – Duales System Deutschland GmbH and is protected as a trademark worldwide. The logo may only be used by customers of DSD GmbH holding a valid trademark usage contract or by engaged waste management companies within the Federal Republic of Germany. This also applies to reproduction of the logo by third parties in a dictionary, an encyclopaedia or an electronic database containing a reference manual. |
 | In a double-insulated appliance, two insulation systems are provided instead of an earth wire. No earthing means is provided on a double-insulated appliance, nor should a means for earthing be added to the appliance. Servicing a double-insulated appliance requires extreme care and knowledge of the system, and should only be done by qualified service personnel. The replacement parts for a double-insulated appliance must be identical to the parts they replace. A double-insulated appliance is labelled with the words 'CLASS II' or 'DOUBLE INSULATED". It can also be identified with the double insulation symbol. |
 | FSC® logo indicates the paper used is from responsible forestry. |
APPLIANCE DESCRIPTION
Intended use
This appliance is intended for indoor use only.
This appliance is intended exclusively for domestic, non-commercial use.
This appliance is intended to be used in household and similar applications such as:
- staff kitchen areas in shops, offices and other working environments;
- farmhouses;
- by clients in hotels, motels, and other residential type environments;
- bed and breakfast type environments.
Any use of the appliance other than described in this user manual is regarded as misuse and may cause injury or damage to the appliance and void the warranty.
Technical specifications
| Appliance name Air Cooler | |
| Article number AT-5457 | |
| Power supply 220-240V~ 50-60Hz | |
| Power 65W |
BEFORE FIRST USE
- Take the appliance and accessories out the box. Remove the stickers, protective foil or plastic from the device.
- Place the device on a flat stable surface and ensure a minimum of 10 cm free space around the device. This device is not suitable for installation in a cabinet or for outside use.
- Put the power cable into the socket. (Note: Make sure the voltage which is indicated on the device matches the local voltage before connecting the device. Voltage 220-240V\~50-60Hz).
- FillthewatertankA 4.
• To increase the cooling effect, you can put the frozen ice boxes in the water tank A④.
USE
- PresstheOn/OffbuttonA 8 to turn the fan on or off.
- PressthespeedbuttonA ⑨ to select the desired airflow speed. There are three levels to choose from (high, medium and low speed).
- UsetheswingbuttonA 10 to turn on the oscillation mode. The airflow will now move from side to side. Press the button again to turn it off.
- When the unit is on, press the timer button A ^12 to cycle through the numbers of hours from 1 to 12 hours.
- PressthecoolbuttonA 14 to turn on the cooling function. The unit will act as a evaporator now. If combined with the ice boxes, this unit can lower its surrounding temperature even more.
- UsethemodebuttonA 11 to select a type of airflow. You can choose between normal airflow, a natural mode and a sleep mode. The natural mode will try to simulate natural wind, while the sleep mode provides a more constant airflow. Experiment with these functions to see what you prefer.
- PressthelightbuttonA 13 , to turn the display on or off. If you hold this button for a few seconds, the beeping sound will be turned off. Please note: these changes will revert when the device turns off and on again.
Note: If you want to use the ice boxes A⑥, remember to put it in the freezer beforehand. Use them when they are completely frozen.
Remote control
You can start using the remote control A7 after switching on the appliance. When using the remote control, make sure:
- You are less than 3 meters away from the appliance.
- You point the remote control at the appliance.
- There is a clear line of sight between the appliance and the remote control. The remote control is powered by a CR2025 battery (not included). Follow the steps below to insert or replace it.
- Turn the remote control over so that you can see the back.
- Pull the battery compartment out of the remote control.
- If you are replacing the battery, remove the dead battery from the battery compartment.
- Insert the CR2025 battery (not included) into the battery compartment, making sure that the positive(+) side of the battery faces upwards.

flowchart
graph LR
    A["Front Panel"] --> B["Arrow to Top"]
    B --> C["Arrow to Left Panel"]
    C --> D["Switch"]
    D --> E["Arrow to Right Panel"]
    E --> F["Device with Sn, CR2025"]
CLEANING AND MAINTENANCE
• Always disconnect the power cord from the socket before any cleaning.
- Clean the outside with a damp cloth. Never use harsh and abrasive cleaners, steel wool or a scouring pad as this will damage the device. Do not immerse in water or other liquid.
• If the fan will not be used for a long period of time, drain the condensate water and store it in a dry place.
- This electrical appliance was manufactured in accordance with the relevant safety requirements. Repairs should only be carried out by qualified persons using original spare parts, otherwise this may result in considerable danger to the user.
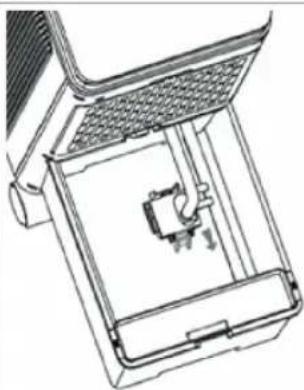
Cleaning dust filters
- Turn the latch at the top of the filter upwards and then remove the air filter from the appliance. Use a vacuum cleaner to remove dust accumulations from the filter. If the filter is very dirty, immerse it in warm water and rinse a number of times. The water should never be hotter than 40 °C.
- Before putting the dust filter back into the cover grill, allow it to dry out well after washing.
- Reinstall the clean, dry filter before next use or storage.
Caution: Never use the appliance without a filter because dirt and lint will clog it and reduce performance.
natural_image
Technical line drawing of a mechanical component with a central circular feature and fluid flow direction (no text or symbols)
natural_image
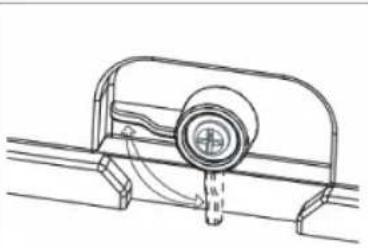
Technical line drawing of a mechanical device with internal components and mounting brackets (no text or symbols)Emptying the water tank
- Pull the mains plug from the socket.
- Loosen the button fixing the water pump, take out the water tank A④, and pour the water.
- Once the tank has been completely emptied, reinstall the clips at 2 ends of the water pump.
natural_image
Technical line drawing of a mechanical device with internal components (no text or symbols)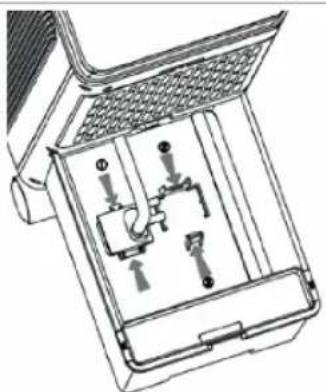
natural_image
Technical line drawing of a mechanical device with internal components (no text or symbols)DISPOSAL

This appliance should not be put into the domestic garbage at the end of its durability, but must be offered at a central point for the recycling of electric and electronic domestic appliances. This symbol on the appliance, instruction manual and packaging puts your attention to this important issue. The materials used in this appliance can be recycled. By recycling of used domestic appliances you contribute an important push to the protection of our environment. Ask your local authorities for information regarding the point of recollection.
Support
You can find all available information and spare parts at www.tristar.eu!
Luchtkoeler
BESCHRIJVING APPARAAT
Beoogd gebruik
REINIGING EN ONDERHOUD
natural_image
Technical line drawing of a mechanical component with a central shaft and mounting bracket (no text or symbols)
natural_image
Technical line drawing of a server rack unit with ventilation grilles and mounting brackets (no text or symbols)De watertank legen
natural_image
Technical line drawing of a mechanical device with internal components (no text or symbols)
natural_image
Technical line drawing of a mechanical device with internal components (no text or symbols)VERWIJDERING

NETTOYAGE ET ENTRETIEN
natural_image
Technical line drawing of a mechanical component with a central shaft and curved base (no text or symbols)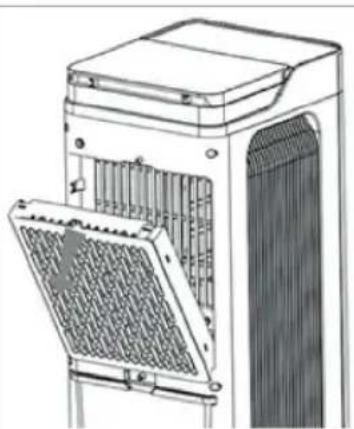
natural_image
Technical line drawing of a mechanical device with internal components (no text or symbols)natural_image
Technical line drawing of a mechanical device with internal components (no text or symbols)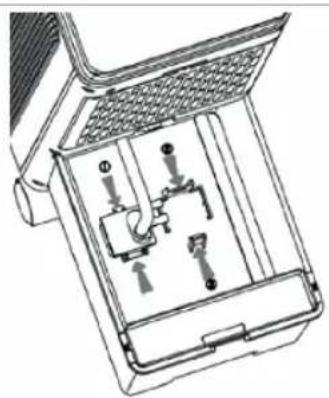
natural_image
Technical line drawing of a mechanical device with internal components (no text or symbols)ÉLIMINATION

flowchart
graph LR
    A["Front Panel"] --> B["Arrow"]
    B --> C["Arrow"]
    C --> D["Switch"]
    D --> E["Device with Top Left"]
    E --> F["Device with Bottom Right"]
    F --> G["Device with Bottom Left"]
    G --> H["Device with Top Right"]
    H --> I["Device with Top Left"]
    I --> J["Device with Top Right"]
natural_image
Technical line drawing of a mechanical component with a central circular feature and curved supports (no text or symbols)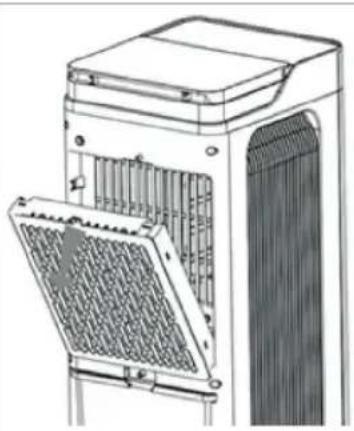
natural_image
Technical line drawing of a mechanical device with internal components (no text or symbols)natural_image
Technical line drawing of a mechanical device with internal components (no text or symbols)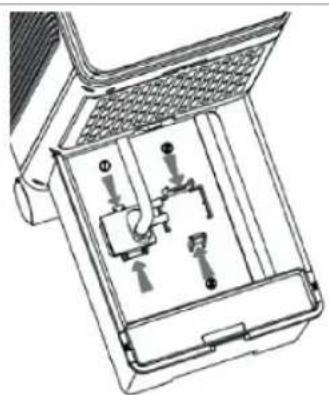
natural_image
Technical line drawing of a mechanical device with internal components (no text or symbols)ENTSORGUNG

LIMPIEZA Y MANTENIMIENTO
natural_image
Technical line drawing of a mechanical component with a central circular feature and dashed lines indicating motion (no text or symbols)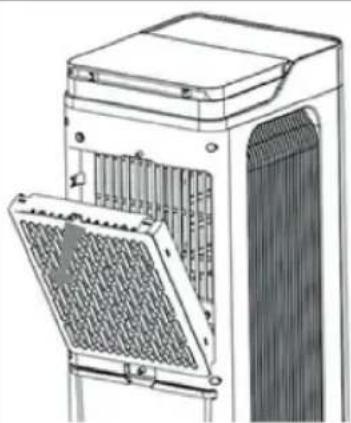
natural_image
Technical line drawing of a server rack unit with ventilation grilles and mounting bracket (no text or symbols)natural_image
Technical line drawing of a mechanical device with internal components (no text or symbols)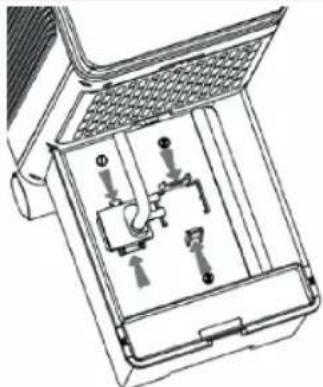
natural_image
Technical line drawing of a mechanical device with internal components (no text or symbols)DESECHO

natural_image
Technical line drawing of a mechanical component with a central circular feature and dashed lines indicating motion (no text or symbols)
natural_image
Technical line drawing of a server rack unit with ventilation grilles and mounting bracket (no text or symbols)natural_image
Technical line drawing of a mechanical device with internal components (no text or symbols)
natural_image
Technical line drawing of a mechanical device with internal components (no text or symbols)ELIMINAÇÃO

natural_image
Technical line drawing of a mechanical component with a central hub and curved supports (no text or symbols)
natural_image
Technical line drawing of a mechanical device with internal components and mounting brackets (no text or symbols)natural_image
Technical line drawing of a mechanical device with internal components (no text or symbols)
natural_image
Technical line drawing of a mechanical device with internal components (no text or symbols)SMALTIMENTO

RENGÖRING OCH UNDERHÅLL
natural_image
Technical line drawing of a mechanical component with a central circular feature and curved arrows indicating motion (no text or symbols)
natural_image
Technical line drawing of a mechanical device with internal components and mounting brackets (no text or symbols)Tömma vattentanken
natural_image
Technical line drawing of a mechanical device with internal components (no text or symbols)
natural_image
Technical line drawing of a mechanical device with internal components (no text or symbols)KASSERING

flowchart
graph LR
    A["Front Panel"] --> B["Arrow to Next Panel"]
    B --> C["Internal Component 1"]
    C --> D["Arrow to Next Panel"]
    D --> E["Internal Component 2"]
    E --> F["External Component 3"]
    F --> G["Product: SN CR2025"]
CZYSZCZENIE I KONSERWACJA
natural_image
Technical line drawing of a mechanical component with a central circular feature and curved arrows indicating motion (no text or symbols)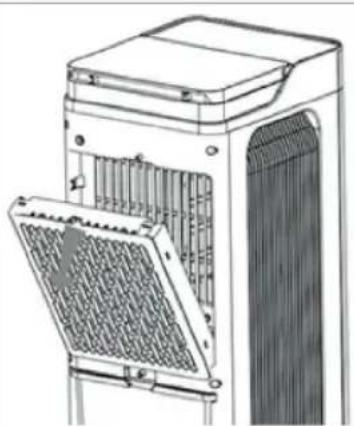
natural_image
Technical line drawing of a mechanical device with internal components and mounting brackets (no text or symbols)natural_image
Technical line drawing of a mechanical device with internal components (no text or symbols)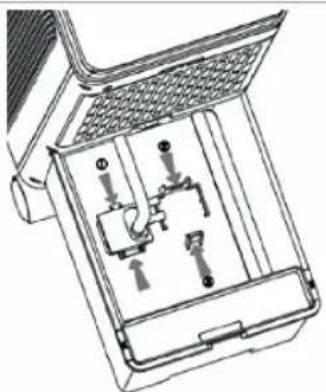
natural_image
Technical line drawing of a mechanical device with internal components (no text or symbols)UTYLIZACJA

natural_image
Technical line drawing of a mechanical component with a central circular feature and dashed lines indicating motion (no text or symbols)
natural_image
Technical line drawing of a server rack unit with ventilation grilles and mounting bracket (no text or symbols)natural_image
Technical line drawing of a mechanical device with internal components and mounting bracket (no text or symbols)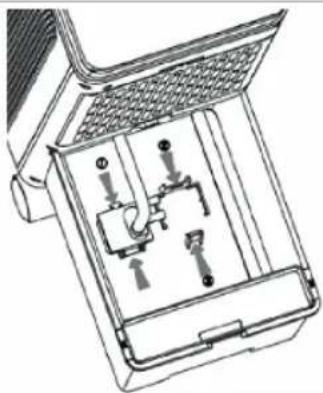
natural_image
Technical line drawing of a mechanical device with internal components (no text or symbols)LIKVIDACE

natural_image
Technical line drawing of a mechanical component with a central circular feature and fluid flow direction (no text or symbols)
natural_image
Technical line drawing of a mechanical device with internal components and mounting brackets (no text or symbols)natural_image
Technical line drawing of a mechanical device with internal components (no text or symbols)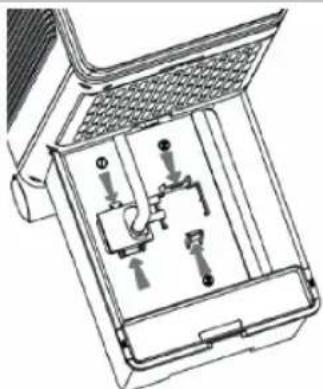
natural_image
Technical line drawing of a mechanical device with internal components (no text or symbols)LIKVIDÁCIA

natural_image
Technical line drawing of a mechanical assembly with no visible text or symbols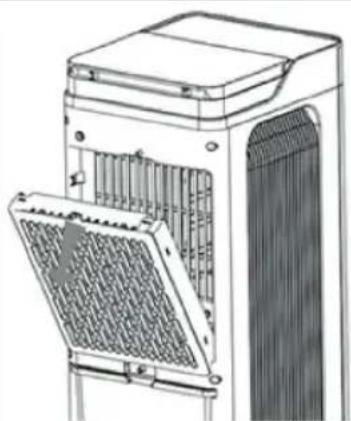
natural_image
Technical line drawing of a mechanical device with a grating or ventilation cover (no text or symbols)natural_image
Technical line drawing of a mechanical device with internal components (no text or symbols)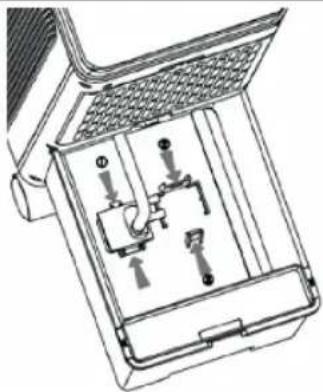
natural_image
Technical line drawing of a mechanical device with internal components (no text or symbols)BORTSKAFFELSE

PUHDISTUS JA HUOLTO
natural_image
Technical line drawing of a mechanical component with fluid flow direction (no text or symbols)
natural_image
Technical line drawing of a server rack unit with internal components (no text or symbols)natural_image
Technical line drawing of a mechanical device with internal components (no text or symbols)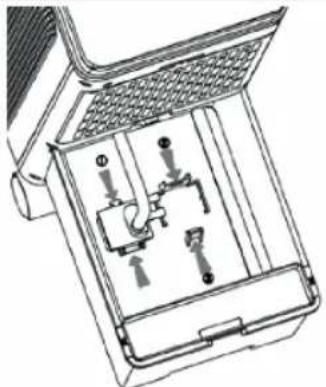
natural_image
Technical line drawing of a mechanical device with internal components (no text or symbols)HÄVITTÄMINEN

natural_image
Technical line drawing of a mechanical component with no visible text or symbols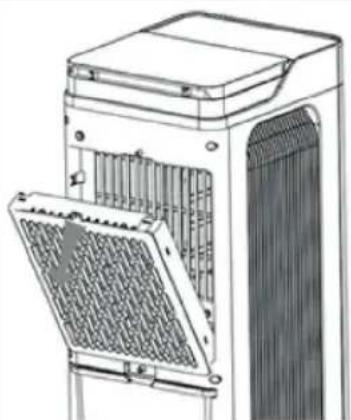
natural_image
Technical line drawing of a server rack unit with ventilation grilles and mounting brackets (no text or symbols)natural_image
Technical line drawing of a mechanical device with internal components (no text or symbols)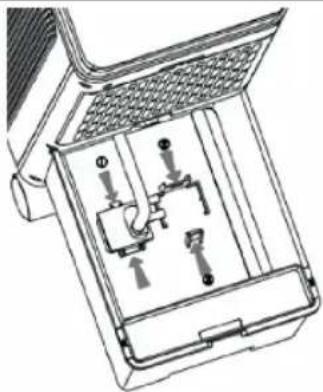
natural_image
Technical line drawing of a mechanical device with internal components (no text or symbols)AVHENDING


- Main parts (see image A)
- SAFETY
- Safety precautions
- WARNING
- FOREWORD
- About this document
- APPLIANCE DESCRIPTION
- Intended use
- BEFORE FIRST USE
- USE
- Remote control
- CLEANING AND MAINTENANCE
- Cleaning dust filters
- Emptying the water tank
- DISPOSAL
- Support
- Luchtkoeler
- BESCHRIJVING APPARAAT
- Beoogd gebruik
- REINIGING EN ONDERHOUD
- De watertank legen
- VERWIJDERING
- NETTOYAGE ET ENTRETIEN
- ÉLIMINATION
- ENTSORGUNG
- LIMPIEZA Y MANTENIMIENTO
- DESECHO
- ELIMINAÇÃO
- SMALTIMENTO
- RENGÖRING OCH UNDERHÅLL
- Tömma vattentanken
- KASSERING
- CZYSZCZENIE I KONSERWACJA
- UTYLIZACJA
- LIKVIDACE
- LIKVIDÁCIA
- BORTSKAFFELSE
- PUHDISTUS JA HUOLTO
- HÄVITTÄMINEN
- AVHENDING
Brand : TRISTAR
Model : AT-5457
Category : Air Conditioning