WF-310 - Oral irrigator Waterpik - Free user manual and instructions
Find the device manual for free WF-310 Waterpik in PDF.


User questions about WF-310 Waterpik
0 question about this device. Answer the ones you know or ask your own.
Ask a new question about this device
Download the instructions for your Oral irrigator in PDF format for free! Find your manual WF-310 - Waterpik and take your electronic device back in hand. On this page are published all the documents necessary for the use of your device. WF-310 by Waterpik.
USER MANUAL WF-310 Waterpik
natural_image
Illustration of a waterflosser with control panel and water dropper (no text or symbols on device)Waterpik™ Water Flosser Model WF-310 Series
Mundusche Waterpik™
Modell WF-310 Serie
LANGUAGES: 7(Eng/Ger/Fr/Ital/Sp/Dut/Russ)
FILE TYPE: Adobe Illustrator CC
SCD JOB# / PREPARED BY: 24WPOH8150 / JS
CLIENT ROUND: 5
DO NOT PRINT
SCALE: 100%
UPC: N/A
SIZE: Flat: 11.5" x 4.5"; Folded: 5.75" x 4.5"
FORM NUMBER: 20033673-F AA
INK: Process Black
NOTES:
IMPORTANT SAFEGUARDS
IMPORTANT SAFEGUARDS
READ ALL INSTRUCTIONS BEFORE USING.
- This product is for household use. When using electrical products, especially when children are present, basic safety precautions should always be followed, including the following
DANGER:
To reduce the risk of electrocution:
· Always unplug product after using
- Do not use while bathing.
Do not place or store product where it can fall or be pulled into a tub or sink.
- Do not place in or drop the product or external power supply into water or other liquid.
Do not reach for a product that has fallen into water. Unplug immediately.
Do not handle the external power supply with wet hands.
Check the supply cord and external power supply for damage before the first use and during the life of the product.
WARNING:
To reduce the risk of burns, electrocution, fire, or injury
to persons:
This appliance is not intended for use by persons (including children) with reduced physical, sensory or mental capabilities, or lack of experience and knowledge, unless they have been given supervision or instruction concerning use of the appliance by a person responsible for their safety.
Children should be supervised to ensure that they do not play with the appliance
Use this product only for its intended use as described in this instruction Manual or as recommended by your dental professional. Never operate this product if it has a damaged cord or external power supply, if it is not working properly, if it has been dropped or damaged, or dropped into any liquid. Contact your local distributor, which can be found at www.wateroik.com/intl
Do not plug this device into a voltage system that is different from the voltage system specified on the device or external power supply.
- Keep electrical cord away from heated surfaces
When unplugging the external power supply, be sure to pull the power supply itself. Do not pull the cord to unplug
Never drop or insert any object into any hose or opening.
Do not use outdoors or operate where aerosol (spray) products are being used or where oxygen is being administered
Remove water flosser reservoir to fill. Fill reservoir with warm water or other dental professional recommended solutions only.
Only use tips and accessories recommended by Water Pik, Inc. and as identified in this Instruction manual.
The supply cord and external power supply cannot be replaced. If the cord or external power supply are damaged, the appliance must be scrapped.
Do not use iodine, saline (salt solution), or water insoluble concentrated essential oils in this
product Use of these can reduce product performance and will shorten the life of the product.
Do not direct water from the water flosser under the tongue into the ear, nose or other delicate areas. This product is capable of producing pressures that may cause serious damage in these areas.
Do not direct water into the nose or ear. The potentially deadly amoeba, Naegleria fowleri, may be present in some too water or unchlorinated well water and may be fatal if directed into these areas.
If your physician or cardiologist has advised you to receive antibiotic premedication before dental procedures, you should consult your dentist and/or medical professional before using the water flosser or any other oral hygiene aid.
Remove any oral jewelry prior to use of this product
Do not use if you have an open wound on your tongue or in your mouth.
Do not use this product for more than five minutes in each two-hour period.
4
5
If the Pik Pocket ^™ tip (not included in all models) separates from the shaft for any reason, discard tip and shaft and replace with new Pik Pocket ^™ tip.
This product does not contain any user serviceable electrical parts and it does not require maintenance. Do not attempt to open the product.
This product complies with the safety standards for electromagnetic devices. If you have a pacemaker or other implanted device containing magnets or electronics, contact your physician or the device manufacturer prior to using the appliance.
SAVE THESE INSTRUCTIONS
TABLE OF CONTENTS
7
PRODUCT DESCRIPTION
Product Description 7
Getting Started 8
Cleaning and Troubleshooting Your Waterpix™ Water Flosser 10
Warranty information 11
| SYMBOLS GLOSSARY (Note of symbols apply to a product) | |||||||
| Explanation of symbols used on Almer Air line product labels and packaging Applicable symbols for a specific product are found on that product's labels and packaging. | |||||||
| Symbol | Definition | Symbol | Definition | Symbol | Definition | Symbol | Definition |
| Refer to remission removal | Definition to Power supply | In our use provides the proof, bearing the fact that the material is able to be used. | Regulatory Compensation | ||||
| Manufacture | Direct Current DCV stage | Established Programs in the project (Lemonia) | Standard collection for the electrical circuit or electrical equipment | ||||
| PAC#al spot | Ingles Protection Code | Attaining Current ACh/Varhood | Cell marking of conformity | Contains a microlides DCs and batteries | |||
| AC Close Equipment | Extricate the device in any topic | UK CCR | Contains a microlides DCs and batteries | ||||
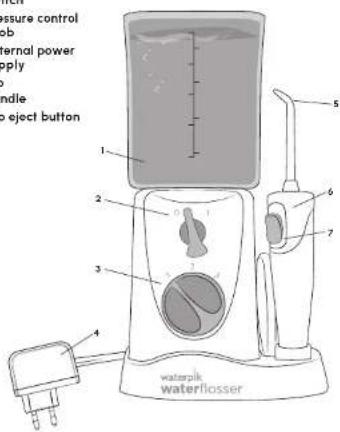
- Reservoir
- Power ON/OFF
switch - Pressure control knob
- External power supply
- Tip
- Handle
- Tip eject button
text_image
pressure control Internal power Apply Handle Elect button waterpik waterflosserTIPS
A. Orthodontic Tip*
- Broces/General use
B. Pik Pocket ^TM Tip*
Penochinal pocketers/Furcar
C. Plaque Seeker W Tint
C. Plaque Seeker ... Tip - Implants/Covers/Fridgesi
In millions of dollars, 2013
D. Classic Jet Tip**
D. Classic de Generalus
E. Tongue Cleaner**
Fresher breath
NOT ALL TIPS INCLUDED IN ALL MODELS
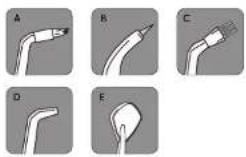
"Replace Every 3 months." "Replace Every 6 months. Replacement tips can be purchased from your loca information, which can be found at www.warepok.com/mt
GETTING STARTED
flowchart
graph TD
    A["Remove"] --> B["Insert"]
    B --> C["Rectal"]
    C --> D["LOA"]
    D --> E["Check for dental care"]
    style A fill:#f9f,stroke:#333
    style B fill:#ccf,stroke:#333
    style C fill:#cfc,stroke:#333
    style D fill:#fcc,stroke:#333
    style E fill:#ffc,stroke:#333
PREPARING THE UNIT
Powering the Unit
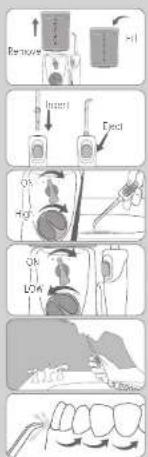
Plug the external power supply into an electric outlet. If the outlet is controlled by a wall switch, be sure it is turned ON (I).
Preparing the Reservoir
Remove the reservoir and fill with lukeworm water. Replace the reservoir over the base and press down firmly.
Inserting and Removing Tips
Insert tip into the center of the water floser handle, pressing down tinny until the tip clicks into place. The colored ring will be flush with the top of the handle if the tip is correctly locked into place. To remove tip from the handles push the tip a dot button on the handle.
Caution: Do not eject tip while unit is running.
Prime Unit (First Time Use Only)
Set pressure control do or base to high to pressure setting No.3, point the handle and tip into sink. Turn power Oh (I) until water flows from the tip. Turn unit OFF (O):
Adjusting the Pressure Setting
Turn the pressure control on the base of the unit to the lowest setting pressure setting No. 9 for first time use. Gradually increase pressure over time to the setting you prefer - or as instructed by your doctor professional
Using the Water Flosser
Always place the tip in your mouth before turning the unit ON (1). Leon over sink and slightly close tips enough to prevent splashing while still blowing water to flow from mouth into the sink. Turn power switch to ON (1) when finished, turn power switch to OFF (1).
Recommended Technique
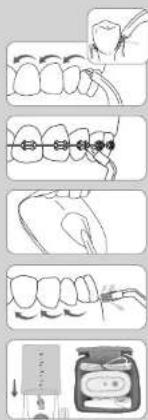
Lean low over a ring and pace tip in mouth. Direct the et stream at a 90 degree angle to your gumine. For best results, start with the deck teeth and work toward the front teeth. Glide tip along gumine one pause briefly between teeth. Continue until you have cleaned the inside one outside of both the upper and lower teeth. Slightly close lips to avoid splicing out glow we or to flow freely from mouth into the sink.
Tip: LOOK INTO SINK. not in mirror. to reduce splashing.
text_image
Diagram illustrating dental procedure steps with labeled illustrations and instructions for each stepWhen Finished
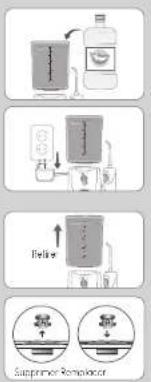
Turn the unit CFF (Q). Empty any liquid left in the reservoir. Unding the unit
NOTE: If you used a mouthwash or other solution besides water, see Using Mouthwash or Other Solutions section
NOTE: Not all tips or travel bag included with all models.
SPECIALTY TIP USAGE
Pik Pocket™ Tip
The Pik Pocket™ tip is specifically designed to deliver water or anti-bacterial solvents deep into periodontal pockets. To use the Pik Pocket™ tip set the unit to the lowest pressure setting. Pass the soft tip agcer a tooth at 0.45-degree angle and gently pass the tip under the gumine into the pocket. Turn the unit on and continue tracing along the gumline.
Orthodontic Tip
To use the orthodontic tip, gently glide tip along gumline, causing briefly to lightly brush crest between teeth and all around orthodontic bracket, before proceeding to the next foot.
Tongue Cleaner Tip
To use the tongue cleaner, ita, set to lowest pressure selling, place lip in the center/middle of your tongue about half-way back and start the water floser. Pull forward with light pressure increase pressure as you prefer.
Plaque Seeker™ Tip
To use the Ploque Seeker™ tip, place the tip close to the teeth so that the brushes are gently touching the teeth. Centry glide tip along gumline, pausing briefly between teeth to gently brush and allow the water to flow between the teeth
Travel Bag Usage
When packing for travel remove handle from cradle and place on top of hose coil.
CLEANING AND TROUBLESHOOTING YOUR WATERPIK™ WATER FLOSSER
1110
WARRANTY INFORMATION
flowchart
graph TD
    A["Bottle with liquid"] --> B["Reabsorption"]
    B --> C["Water absorption"]
    C --> D["Water filtration"]
Using Mouthwash and Other Solutions
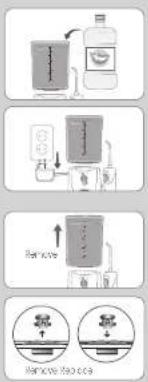
Your Wafopk, "We or Iosser can be used to deliver mouthwash and antibacterial solutions. After using any special solution, rinse unit to prevent clogging by partially filing reservoir with warm water and running unit with lip pointed into sink until unit is empty.
Cleaning
Never immerse unit in water. Before cleaning, unplug from the electrical outlet. Clean the product when necessary by using a soft cloth and mid non-obtrasive cleanser to wise exterior. The wore reservoir is removable for easy cleaning. It is top rack dishwasher safe with heat cycle OFF it's recommended that the reservoir is removed and cleaned weekly.
NOTE: Remove reservoir valve by pulling up from outlet of reservoir before placing reservoir in dishwasher
Removing Hard Water Deposits / General Cleaning
Hard water deposits may build up in your unit depending on the mineral content of your water. If left unaltered, it can hinder performance. Clearing interra parts, add I port while vinegar and 2 ports worm water inside reservoir. Paint the handle and tip into sink. Turn until CK and run until reservoir is empty. Rise by reporting with a full reservoir of clean worm water. This process should be done every 1 to 3 months to ensure optimal performance. If using mouthwash or other solutions, more frequent cleaning recommended.
Leakage
If looking due to a damaged hose replacement hoses and handles are available from your local distributor which can be found at www.waterplk.comint.
Note: Ensure you are not storing any leftover water in your reservoir- this may cause leaking.
Service Maintenance
We are a water flossers have no consumer-service electrical items and do not require routine service maintenance. For all parts and accessories go to www.waterpik.com/int. Before the serial and more numbers in correspondence. These numbers are located on the bottom of your unit. Still have questions? Go to www.waterpik.com/int.
Water ^2 k, Inc. warrants to the original consumer of this new product that it is free from defects in materials and workmanship for 2 years from the date of purchase (Spain Only: 3 years
Consumer will be required to submit the original purchase receipt as proof of purchase date and if requested, the entire product, to support a warranty claim. Water Fie, no will replace the product, provided the product has not been accused, misused, altered or damaged other purchase, was used according to
instructors, and was used only with accessories or consumable parts approved by Water Park, Inc. installation is the responsibility of the consumer and is not covered by the warranty. This limited warranty excludes accessories or consumable parts such as tips, etc. Use with improper voltage will damage product and VOID warranty. This warranty gives you specific legal rights. You may also have other rights that vary, depending on the law in your place of residence.
WATER PK DISCLAIMS ALL OTHER EXPRESS OR INFLIED WARRANTIES TO THE EXTENT PERMITTED BY LAW INCLUDING BUT NOT LIMITED TO ALL WARRANTIES OF MERCHANTABILITY AND FITNESS FOR A PARTICULAR PURPOSE. ALL IMPLIED WARRANTIES ARE LIMITED TO THE DURATION OF THIS LIMITED WARRANTY SOME STATES OF PROVINCE'S MAY NOT A LOW LIMITATIONS ON HOW LONG AN INFLIED WARRANTY LASTS, SO THE ABOVE MAY NOT APPLY TO YOU.
text_image
Diagram illustrating dental procedure steps with labeled illustrations and a medical device illustrationNach Gebrauch
In the 2019-2020 period,
text_image
Diagram illustrating dental procedure steps with labeled steps and instructions for using a device.Après utilisation
Embout Plaque Seeker™
INFORMATIONS DE GARANTIE
text_image
Diagram illustrating a chemical process with labeled steps: preparation, reaction, filtration, and cleaning.text_image
Diagram illustrating dental procedure steps with labeled illustrations and instructions for each stepAl termine
flowchart
graph TD
    A["Reinfection"] --> B["Add water"]
    B --> C["Discharge into bottle"]
    C --> D["Reinfection with filter"]
    D --> E["Add water"]
    E --> F["Discharge into bottle"]
- French / uso general
B. Boquilla Pik Pocket
C. Reguilla Plague Cooker™
text_image
Sensil Insula Excuse Excuse tool Mall sanging Ally Oil Box Beavertext_image
Diagram illustrating dental procedure steps with labeled instructions and tool iconstext_image
Diagram illustrating a chemical experiment setup with labeled steps: adding liquid, adding water, adding an object, and adding a separate container.text_image
Diagram illustrating dental procedure steps with labeled steps and corresponding iconsflowchart
graph TD
    A["Raw Material: 1 unit mixed"] --> B["Reaction: 1 unit mixed with a bottle"]
    B --> C["Separation: 1 unit mixed with a glass tube"]
    C --> D["Final Product: Final product with two separate steps"]
text_image
Diagram illustrating dental procedure steps with labeled steps and instructions for using a deviceКогда закончите
Water Pik, Inc., a subsidiary of Church & Dwight Co., Inc.
1730 East Prospect Road Fort Collins, CO 80553-0001 USA 800-525-2774 www.waterpik.com


EU Representative
SOFIBEL SAS
Designed and Tested in the USA. Made in China.
Form No. 20033673-F AA
©2024 Water Pik. Inc.