
MC3092CU - Oven Atag - Free user manual and instructions
Find the device manual for free MC3092CU Atag in PDF.

User questions about MC3092CU Atag
0 question about this device. Answer the ones you know or ask your own.
Ask a new question about this device
Download the instructions for your Oven in PDF format for free! Find your manual MC3092CU - Atag and take your electronic device back in hand. On this page are published all the documents necessary for the use of your device. MC3092CU by Atag.
USER MANUAL MC3092CU Atag
natural_image
Exterior view of a stainless steel oven with digital display (no visible text or symbols)gebruiksaanwijzing
combi magnetron en oven
mode d'emploi
four combi micro-ondes
Bedienungsanleitung
Kombi- Mikrowellenherd
instructions for use
combination microwave oven
MC3011C
MC3092C
Geachte mevrouw,
Geachte heer,
The Ground Truth image displays a single, solid horizontal line. According to Rule 2 (UNDERSCORE & LINE RULES), this is a stylistic or background line, not a placeholder underscore. Therefore, the OCR result must ignore it and output nothing or only meaningful text. The provided OCR content is "____", which consists of four underscores. This is an incorrect interpretation of the line as a placeholder, violating the rule that stylistic lines must be ignored. The OCR has hallucinated underscores where none should exist based on the GT's visual context. Hence, the OCR result is inconsistent with the Ground Truth.
text_image
00:00 ① - + tw ② G ③
- Kies functie
SELECT toets

HOE ZET IK DE DISPLAY "STANDBY"?
natural_image
Technical line drawing of a metal grate or rack structure (no text or symbols)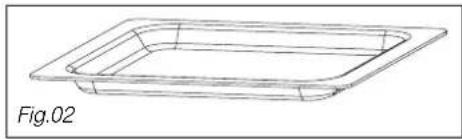
natural_image
Line drawing of a rectangular container or tray with a flat top, labeled Fig.02 (no text or symbols on the diagram itself)
natural_image
Technical line drawing of a structural support frame with an inset detail showing internal components (no text or symbols)natural_image
Technical line drawing of a rectangular metal frame structure (no text or symbols)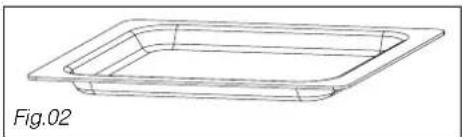
natural_image
Line drawing of a rectangular container or tray with a flat top, labeled Fig.02 (no text or symbols on the diagram itself)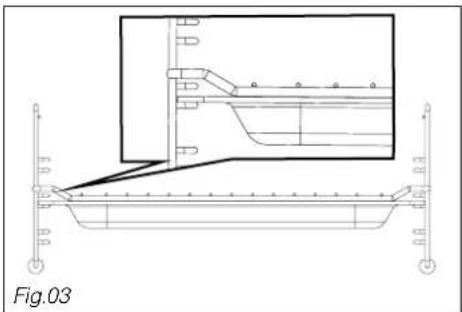
natural_image
Technical line drawing of a boat hull with structural supports and a highlighted section (no text or symbols)text_image
05:22 ① - + c^w ② ③ ④natural_image
Technical line drawing of a rectangular metal grate or rack structure (no text or symbols)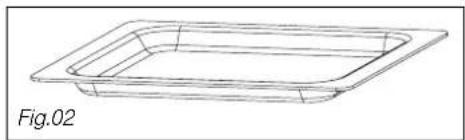
natural_image
Line drawing of a rectangular container or tray with a flat top, labeled Fig.02 (no text or symbols on the diagram itself)
natural_image
Technical line drawing of a structural support frame with an inset detail showing internal components (no text or symbols)Thank you for choosing an Atag oven. You have made the right choice.
To get the most out of your new cooking aid we suggest you read and follow the advice contained in this manual.
Atag is continually improving its technology so that it can provide the best oven there is and the one you have chosen has the most innovative features. By combining the various functions and accessories you will get the greatest use out of your oven and produce the best results from your favourite recipes.
We hope you will find cooking with our oven an enjoyable experience that brings pleasure to all.
combination microwave oven
environmental protection
— This appliance's packaging material is recyclable. Help recycle it and protect the environment by dropping it off in the municipal receptacles provided for this purpose.
— Your appliance also contains a great amount of recyclable material. It is mar-

ked with this label to indicate the used appliances that should not be mixed with other waste. This way, the appliance recycling organised by your manufacturer will be done under the best possible conditions, in compliance with European Directive 2002/96/EC on Waste Electrical and Electronic Equipment. Contact your town hall or your retailer for the used appliance collection points closest to
your home.
— We thank you doing your part to protect the environment.
combination microwave oven
Recommendations: Important safety instructions Read carefully and keep for future reference.
- Your apparatus is designed solely for household use - cooking, heating or defrosting foodstuffs. The manufacturer accepts no responsibility for any other inappropriate use of the oven.
- Before you use your microwave oven, make sure that all the recipients and accessories are suitable for use with it (e.g. flameproof glass, porcelain, etc.).
- To avoid damaging your unit never turn it on when it is empty or the support plate is not in place.
- Do not touch the openings in the locks on the front; this may create damage to the oven requiring outside repair.
- Keep a close eye on the oven when products to be heated or cooked are in containers made of throwaway plastic, paper or any other combustible material. They may be subject to spontaneous bur-ning.
- We do not recommend using metal recipients, knives, forks or spoons or metal staples used on defrosting sachets.
However, it is possible to heat up food in covered aluminium trays provided they are fairly shallow (no more than 4 cm high). They will take slightly longer to heat. Make sure the tray is in the middle on the bottom and there is a gap of at least 1 cm between the sides of the tray and the metal walls and the door.
- For babies:
- Baby bottles must be heated without the teat, the liquid must be shaken and its temperature checked with the back of the hand before being given to the child.
- Baby food must be mixed and its temperature checked before being given to the child for avoiding any risks of possibly serious internal burning.
WARNING: Do not let children use the oven unwatched unless they have received appropriate instructions and you are sure the child can use the oven correctly and that he understands the dangers of not using the oven as it should be.
- We recommend you to cover your food in most cases; it will be tastier and your unit will remain clean. However, before cooking food or heating drinks in a bottle or any hermetically closed container, remo-ve the cork or lid to avoid any risks of explosion.
- Never heat or cook eggs in the microwave in their shells, a dish or on a plate. They are liable to explode even after the cooking has finished and risk causing serious burns and/or irreparable damage to your microwave oven.
- Microwave heating of beverages can result in delayed eruptive boiling, therefore care must be taken when handling the container.
- For small quantities (sausages, croissants, etc.) place a glass of water beside the food.
- Cooking times that are too long will dry out the food and burn it. To avoid this, never use the same cooking times as you use for your traditional oven.
- If you see any smoke coming out, keep the oven door closed, turn the oven off and disconnect it.
- Do not clean the appliance with a steam cleaner.
your oven, how it works
explanation of controls 5
how to use your oven
setting the time 6
using the microwave 7
automatic thawing 7-8
using as a combination oven 9
using as a conventional oven 10
customising the cooking temperature 11-12
programming the cooking 13
delaying the cooking 13
using the timer 14
using the child safety feature 14
setting the display to stand-by mode 15
different cooking methods
description of features 16
oven accessories
accessories 17
installer's information
connecting up 18
technical details 18
housing 19
general maintenance 20
troubleshooting 21
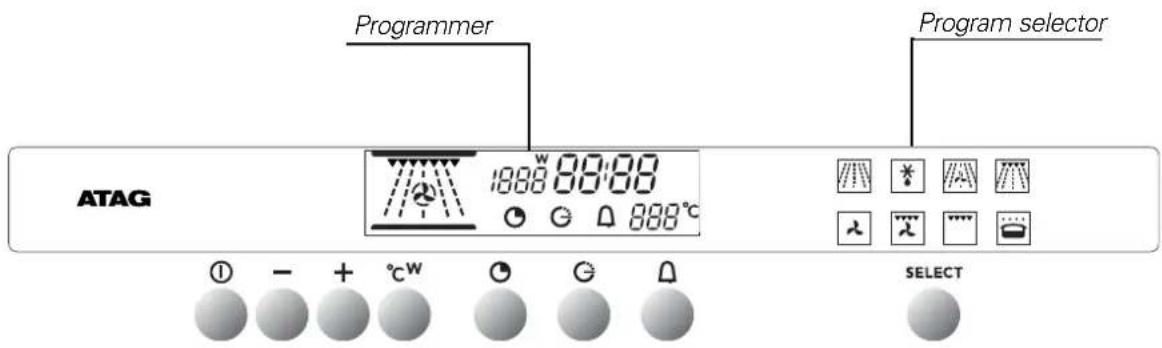
your oven, how it works explanation of controls
text_image
Programmer Program selector ATAG 1998 00:00 888°C SELECT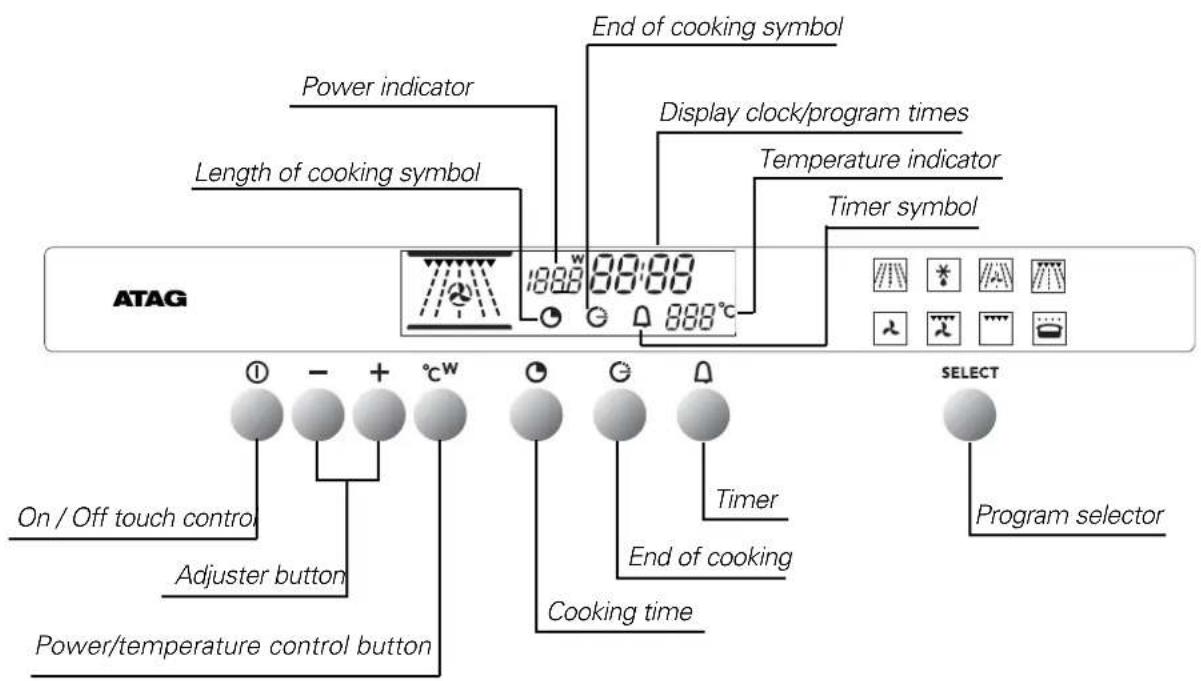
text_image
ATAG Power indicator Length of cooking symbol End of cooking symbol Display clock/program times Temperature indicator Timer symbol ON / Off touch control Adjuster button Power/temperature control button End of cooking Cooking time Timer End of cooking SELECT Program selector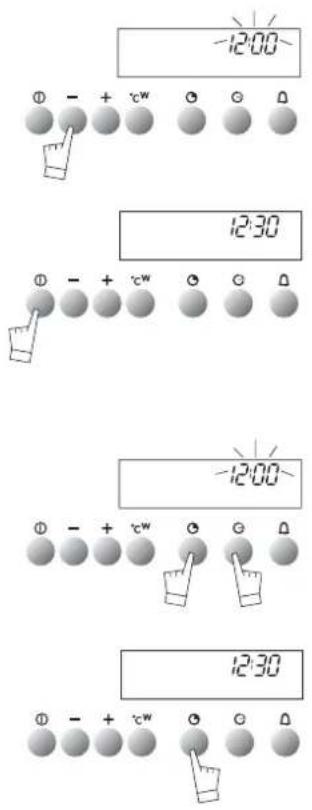
text_image
-12:00 12:30 -12:00 12:30When the oven is installed
The time display flashes.
Set the time using + or - (holding the touch control down makes the numbers move on more quickly).
Example: 12:30.
Press the START/STOP touch control to confirm your setting.
NOTE: If the time is not confirmed using the START/STOP control within a few seconds, it is automatically memorized.
Resetting the time on the clock
Press touch controls and at the same time for a few seconds until the time display flashes.
Set the time using the + or - touch controls.
Press the touch control to memorize.
NOTE: If the time is not confirmed using the touch control within a
few seconds, it is automatically memorized.
using your oven in the microwave mode
Your oven has 2 microwave cooking modes:

Warning: Do not turn your oven on under any circumstances in either of these two modes if it is empty.
- With touch control, select your cooking mode

- Setting the cooking time:
-Press control which will start flashing.
- Set the time by pressing the + or - controls.
E.g. 30 seconds
- Setting the power:
- Press control ^ C ^W 1000W which will start flashing.
- Set the power by pressing the + or - controls. Example : 800W
- Make sure the door is shut correctly. Confirm your setting with the START/STOP button.
Your oven will then start up and count down the cooking time second by second.
If needs be, cooking can be stopped by pressing the START/STOP button for a second.
NOTE : OPENING THE DOOR DURING COOKING
If you open the oven door when cooking, the cooking cycle will be stopped. To re-start cooking, close the door and press the START/STOP button.
The mode does not require its power to be reset.
how to use your oven
using the Microwave for automatic defrosting
The hours of waiting for your food to defrost are finished with your microwave oven! The microwave is the deep-freeze's best
ally, as it enables you to defrost your frozen food up to ten times quicker than by just leaving it in the open air.
Recommendations:
- Defrosting times vary depending on the type of apparatus. They also depend on the size, shape, initial temperature and quality of the food.
- Make sure that you remove any metallic attachments on food packaging when defrosting.
- If there are any ice crystals on the food, scrape them off beforehand with a knife. Otherwise the ice will create a screen and slow down defrosting.
- Put meat or fish on an overturned saucer for defrosting. This enables any juice liable to trigger off a cooking process by being in contact with the food to drip away.
- To make your defrosting as homogeneous as possible, separate chicken escalope, fish fillets, or pieces of meat as soon as you can.
- Turn the food over or mix it up when it is half-defrosted.
- Leave food to rest after defrosting it. Normally the rest time = defrosting time.
- Never refreeze any defrosted food before it has been cooked.
using the Microwave for automatic defrosting
| Defrosting-bread and pastry | Food | Quantity | Time |
| pain baguette | 100g | 45 s to 55 s | |
| round loaves | 200g | 1 to 1 min 30 s | |
| crusty and puff pastry | 400g | 2 min to 2 min 30 s | |
| 300g | 1 min | ||
| Defrosting sea food | Food | Quantity | Time |
| scallops | 500g | 5 min | |
| peeled shrimps | 100g | 1 min 30 s to 2 min | |
| whole shrimps | 200g | 5 to 7 min | |
| gambas (10) | 500g | 11 to 13 min | |
| prawns | 1000g | 10 to 11 min | |
| Defrosting fish | Food | Quantity | Time |
| cod or haddock fillets | 400g | 3 to 4 min | |
| whiting, codling | 500g | 3 to 4 min | |
| sole, plaice (2) | 300g | 2 min to 2 min 30 s | |
| fish steaks | 1 at a time | 1 min 30 s to 2 min | |
| hake salmon | 4 at a time | 4 to 5 min | |
| trout (3) | 540g | 4 to 5 min | |
| Defrosting meat | Food | Quantity | Time |
| small cockerel, pigeon | 500g to 600g | 5 to 7 min | |
| chicken escalope (2) | 200g | 3 to 4 min | |
| legs of chicken (4) | 1000g | 7 to 9 min...... | |
| whole chicken, | 1000g | 11 to 13 min | |
| veal chops | 600g | 5 min | |
| roast beef | 1000g | 10 min | |
| minced steaks (4) | 360g | 3 to 4 min | |
| meat in pieces | 600g | 6 to 7 min | |
| Defrosting fruit | Food | Quantity | Time |
| strawberries | 250g | 2 to 3 min | |
| raspberries, cherries | 250g | 2 to 3 min | |
| red currants, myrtle berries, black currants | 250g | 2 min 3 s to 4 min |
using as a combination oven
text_image
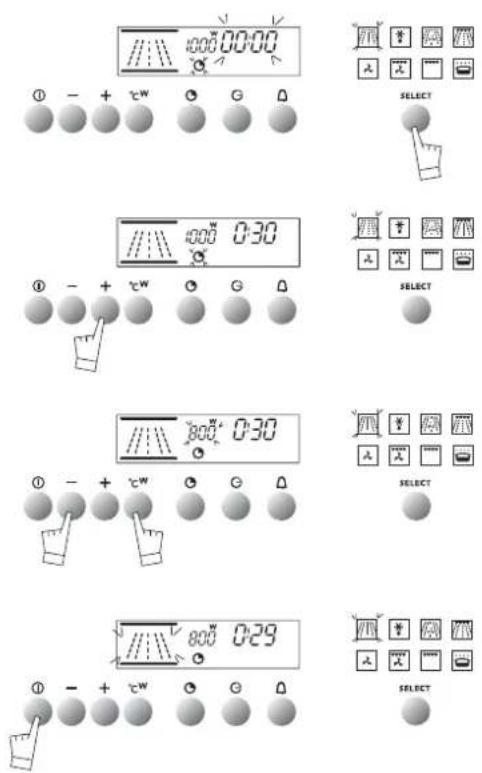
//φ\ 200.00-00 190°C ① - + cw ○ ○ G △ //φ\ 200.00-30 190°C ① - + cw ○ ○ G △ //φ\ 100.00-30 190°C ① - + cw ○ ○ G △ //φ\ 100.00-30 200°C ① - + cw ○ ○ G △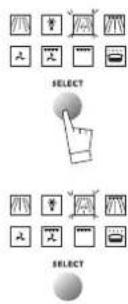
Your oven has two modes that combine traditional and microwave cooking:
Warning: Do not use your oven under any circumstances in any of these two cooking modes if it is empty.
- With touch control, select your cooking mode

Setting the cooking time:
-Press control which will start flashing.
- Set the time by pressing the + or - controls.
E.g. 30 seconds
- Setting the power:
- Press control °C ^W 200W which will start flashing.
- Set the power by pressing the + or - controls. Example : 100W
- Make sure the door is shut correctly. Confirm your setting with the START/STOP button. Your oven will then start up and count down the cooking time second by second.
You can alter the time settings, power rating and cooking temperature while the oven is cooking.
If needs be, cooking can be stopped by pressing the START/STOP button for a second.
OPENING THE DOOR DURING COOKING
If you open the oven door when cooking, the cooking cycle will be stopped.
To re-start cooking, close the door and press the START/STOP button.
how to use your oven using as a conventional oven
text_image
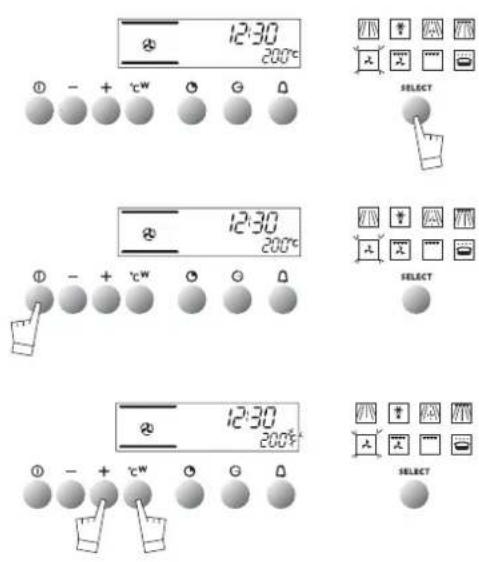
12:30 200°C ① - + °C W G △ 12:30 200°C ① - + °C W G △ 12:30 200°C ① - + °C W G △ SELECT SELECT SELECTThe resistors are the only source of energy in this mode; MODES:

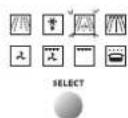
Select the cooking mode
Select the program of your choice with the SELECT, touch control:
Example: position
You can scroll through the cooking programs by keeping your
finger on the touch control SELECT
The proposed temperature is displayed:
Example: 200°C.
Push the START/STOP touch control to start cooking.
Your oven proposes the most frequently used temperature.
You may nevertheless adjust this temperature yourself.
- Press the °C/w touch control,
The°C symbol flashes.
- Adjust the temperature using the + or - touch controls.
- Confirm your choice by pressing the°C touch control.
The oven start.
Even if pressing°C/w, does not confirm your choice immediately, your programme will be validated automatically a few seconds later.
During cooking, the chosen temperature blinks. When the oven is hot enough the display glows steadily and a beep sounds for 3 seconds.
Exception: Variable power grill:
Power level proposed: Turbo gril = 66%
- Can be adjusted from - 1 - = 50% to - 4 - = 100%
- Cooking can be stopped by pressing the START/STOP button for a second.
IN THE TRADITIONAL COOKING MODE YOU DO NOT NEED TO SPECIFY A COOKING TIME.
customising the cooking temperature
Traditional cooking
text_image
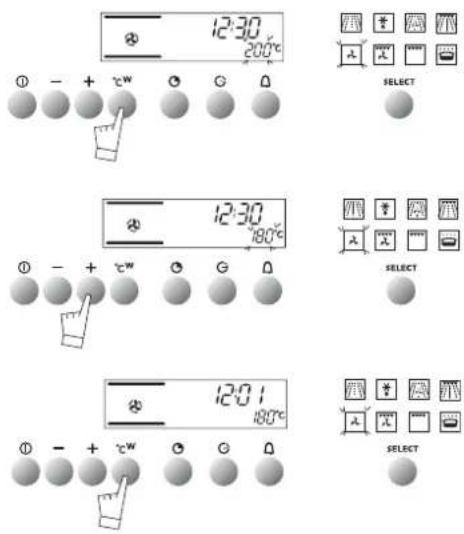
12:30 200°C SELECT 12:30 180°C SELECT 12:01 180°C SELECTYou can change the temperature for traditional cooking, either when you select your cooking mode or during cooking:
Press control °C w (for about 2 seconds) until the temperature readout starts to flash.
Set the temperature you want to memorize using the +or - controls.
Confirm your choice by pressing °C w.
Your programme will be kept in memory for subsequent cooking sessions. You can re-programme your cooking temperatures whenever you want.
Microwave cooking
You can change the temperature for traditional cooking, either when you select your cooking mode or during
cooking:
Press control °C w (for about 2 seconds) until the temperature readout starts to flash.
Set the temperature you want to memorize using the +or - controls.
Confirm your choice by pressing °C w.
Your programme will be kept in memory for subsequent cooking sessions. You can re-programme your cooking temperatures whenever you want.
text_image
//00:00:00 ① - + cw ○ ○ △ SELECT Moz : 12345678 Moz : 12345678 Moz : 12345678 Moz : 12345678 Moz : 12345678 Moz : 12345678 Moz : 12345678 Moz : 12345678 Moz : 12345678 Moz :
text_image
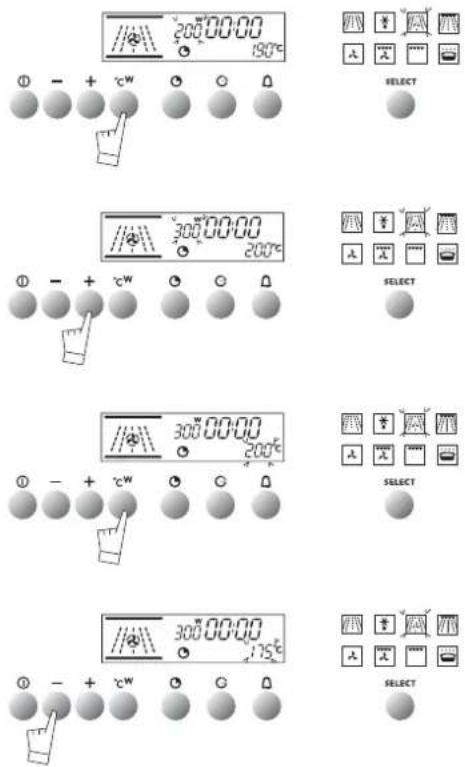
200 00:00 190°C ① - + cw SELECT 300 00:00 200°C ① - + cw SELECT 300 00:00 200°C ① - + cw SELECT 300 00:00 175°C ① - + cw SELECTCombined traditional and microwave cooking
You can change temperatures and power for combined traditional and microwave cooking, either when you select your cooking
mode or during cooking:
Press control °C w (for about 2 seconds) until the power readout starts to flash.
Set the power you want to memorize using the +or - controls. Confirm your choice by pressing °C w.
You can then pass onto individual temperature setting. The temperature readout flashes.
- Adjust the programmable temperature setting with the +or - controls.
- Confirm all your power and temperature settings by pressing the START/STOP button.
Your temperature and power programme will be kept in memory for subsequent cooking sessions.
You can re-programme your personal settings whenever you wish.
NOTE: Individual settings are not possible in mode
Select the cooking mode you require and adjust the temperature if needs be.
text_image
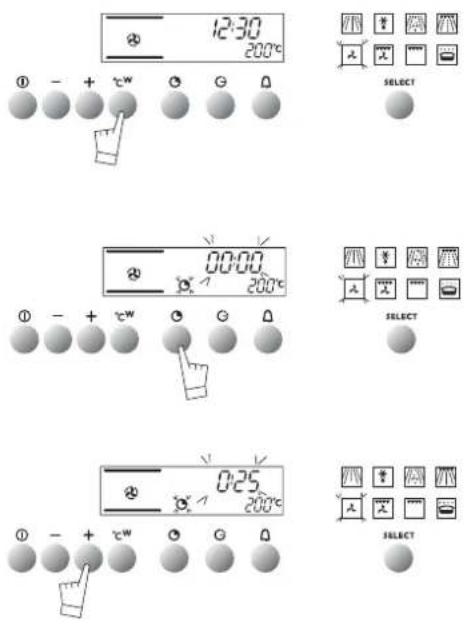
12:30 200°C SELECT 00:00 200°C SELECT 0:25 200°C SELECT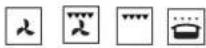
E.g.: Fan oven position temperature at 200°C.
Press the cooking time button
The cooking time reads 0:00 and it flashes together with the symbol to show that the cooking time can be reset.
Set the cooking time to the length you require with the + or - controls. E.g. 25 min. cooking.
The new time is memorized automatically after a few seconds or it can be confirmed by pressing the control.
The readout then gives normal time and the bole symbol stops flashing. The oven will now start heating.
When cooking is finished, the oven will give out a series of bleeps for several minutes and the symbol will flash.
You can stop the bleeps by pressing the START/STOP control for a second.
Cooking times can be checked or changed whenever you wish, simply by pressing the control.
You can cancel your programme by pressing the START/STOP control...
how to use your oven
delaying the cooking
text_image
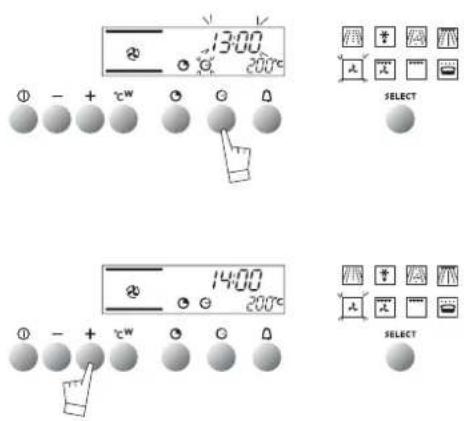
13:00 200°C SELECT 14:00 200°C SELECTThis can only be done in the cooking modes. Follow the same procedures as for programming your cooking. Then, when you have set the cooking time,
Press the "End of cooking" control, the "end of cooking" time will appear on the readout and flash with the symbol to show that the end of cooking time can be reset.
E.g.: It is 12.30 p.m.
You have set 30 minutes of cooking time. The end of cooking time reads 13.00.
Reset the end of cooking time with the +or - control.
E.g.: End of cooking 14.00
Once the end of cooking time has been re-programmed, normal time reappears on the display.
The oven will now start heating at the appropriate time to finish cooking at 14.00.
When cooking is finished, the oven will give out a series of bleeps for several minutes and the symbol will flash. You can
stop the bleeps by pressing the START/STOP control for a second.
NOTE : Cooking times can be checked or changed whenever you wish, simply by pressing the Ⓗ.
You can cancel your programme by pressing the
START/STOP control.
how to use your oven
using the timer
text_image
00:00 p ① - + c^w ② ③ ④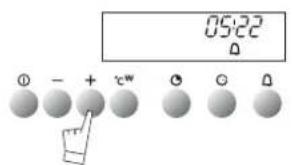
text_image
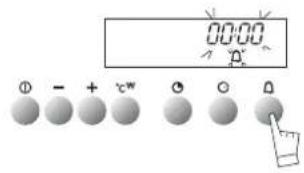
05:22 ① - + cw ② ③ ④Your oven is fitted with an electronic timer for your use other than in conjunction with the oven.
ATTENTION: This program is separate from the oven. It cannot be used to stop automatic cooking. This program may never-theless be used even when the oven is in use. In this case, the timer display takes priority over the clock display.
Press the timer touch △. The display flashes and the timer symbol appears and flashes.
Press the + or - touch controls to obtain the length of time required (up to 59 minutes and 59 seconds).
The display stops flashing after a few seconds and the timer starts, counting down the time in seconds. When the time is up, the timer bleeps to warn you and the symbol flashes.
Stop the bleeping by pressing the 🔒 touch control or START/STOP. Normal time is now displayed.
NOTE: You may change the remaining time at any point by pressing the 🔒 touch control and using the + or - touch controls. To cancel the timer program, set the time at 0.00 and press START/STOP.
how to use your oven
using the child safety feature
text_image
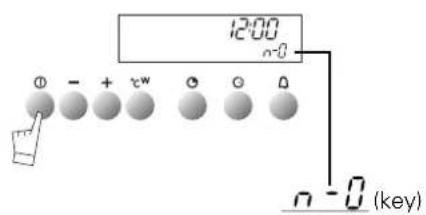
12:00 n-0- + tw o o o
n - 0 (key)In order to prevent your oven being turned on unintentionally, you may lock the controls.
To do this:
- Press on the START/STOP touch control until it bleeps.
Keep pressing on the touch control until the bleep stops and a key appears on the indicator panel.
NOTE: Only the "separate timer" program remains operational.
-To unlock the controls, repeat the operation.
-Press the START/STOP touch control until you hear a long bleep. Keep your finger on the touch control until the bleep stops and
the key disappears from the display panel.
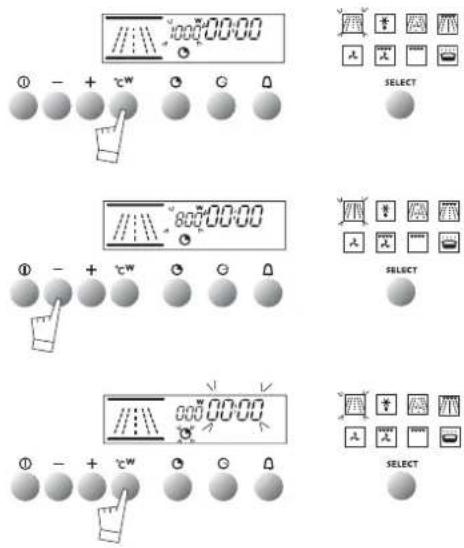
setting the display to stand-by mode
text_image
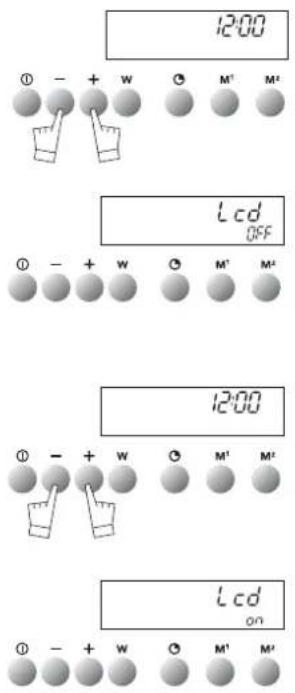
12:00 ① - + W ○ M¹ M² Lcd OFF ① - + W ○ M¹ M² 12:00 ① - + W ○ M¹ M² Lcd ON ① - + W ○ M¹ M²To reduce your oven's power consumption to a minimum when it is not in use, you can put your readout system in STANDBY MODE.
To carry out this operation, proceed as follows:
GOING INTO STANDBY MODE:
- Your oven must be in normal time readout mode.
- Press both the + and - controls for five seconds at the same time.
- The display reads "Lcd off".
- Take your fingers off the two controls.
- 30 seconds later your readout will switch off.
Your oven is now in standby mode; whenever you are in the normal time readout mode, it will turn off automatically after 30 seconds.
COMING OUT OF STANDBY MODE:
- Your oven must be in the normal time readout mode.
- Press the + and - controls for five seconds at the same time.
- The display will then read "Lcd on".
- Take your fingers off the two controls.
- You are now out of the STANDBY MODE; the readout is now permanently lit.
| PROGRAMS | Parts of the oven in operation | DESCRIPTION OF FEATURES | |
PowerMin./ Preset / max100w / 1000w / 1000w Microwave Microwave | Cooking Heating Heating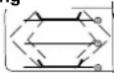 | Energy is supplied by the microwave system and is distributed by the upper and lower generators | |
| Automatic defrost | KK8H] | This position optimises defrosting | |
TemperatureMin./ Preset / max40° / 190° / 210°Power 100w / 200w / 350w Combined microwave Combined microwave |  | This position combines the microwave with ventilated heating. Hot air cooks the outside and the microwave goes to the heart of the dish | |
| 1 to 4100w / 200w / 500wCombined grill | 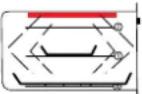 | This position combines grill and microwave. The grill browns the food on the outside and the microwave goes to the heart of your dish. | |
TemperatureMin./ Preset / max40° / 200° / 250° Fan oven Fan oven | 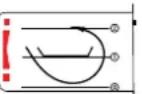 | Heat comes from a resistor at the bottom of the oven; the centrally placed fan sucks up the hot air and redistributes it on all sides of the oven. Preheating is unnecessary except for dishes with very short cooking times (shortbread) or for dishes that need to be seared (roast beef).The ventilated heat system is especially suitable for:- Keeping white meat tender.- Cooking vegetables and fish | |
| 1 to 4[Turbo Grill] | 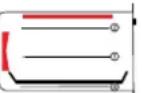 | This position combines the fan and the grill: The grill sends infrared rays onto the food and the air blown by the fan moderates their effect. This position enables you to grill and roast without using a rotisserie. | |
1 to 4 Grill Grill |  | This position is for grilling toast, chops, thick grills, sausages etc. | |
Temperature Preset35° Keeping warm Keeping warm |  | Hot air is blown around your dishes by the fan. | |
oven accessories accessories
natural_image
Technical line drawing of a rectangular metal grate or rack structure (no text or symbols)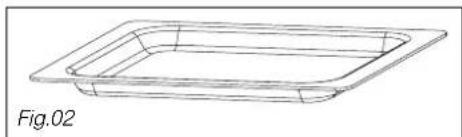
natural_image
Line drawing of a rectangular container or tray with a flat top, labeled Fig.02 (no text or symbols on the diagram itself)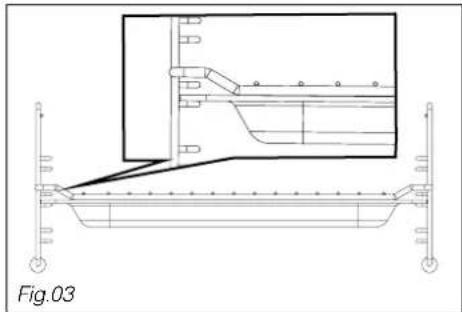
natural_image
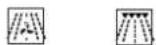
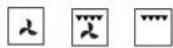
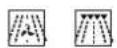
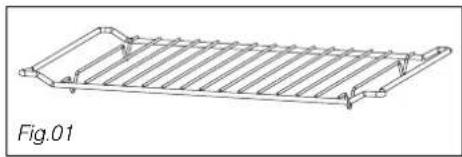
Technical line drawing of a structural support frame with an inset showing a mechanical assembly (no text or symbols)- The grill (Fig.01): may be used to toast, brown or grill. The grill must under no circumstances be used with other metal containers in the microwave, grill + microwave or fan cooking + microwave functions. However, you may heat food in an aluminium tray by using a plate to separate it from the grill.
- The glass drip tray (Fig.02): It may be used half filled with water for "bain marie" cooking or fan cooking. It may be used as a cooking dish.
Comments:
Ensure that the drip tray is correctly centred on the side grills so that air circulation is not altered.
- The grill + the glass drip tray: for roasting and to recover cooking juices, place the grill on the drip tray (Fig.03).
Electrical connection should be done before installing the appliance in the cabinet, in compliance with the assembly instructions and with local regulations.
When the appliance is connected to the power grid, an all-pole cutoff device (with a contact opening of at least 3 mm) must be installed on the power side in order to respect safety recommendations.
NOTE: When powering up your appliance, your oven's electronic system will switch on. Lighting will be deactivated for a few seconds.
We cannot be held responsible for any accident resulting from an inexistent, defective or incorrect ground lead.
If the power supply cable is damaged, it must be replaced by the manufacturer or its after-sales service department to prevent hazards.
The safety wire (green-yellow) is connected to the appliance's ground terminal and must be connected to the ground lead of the electrical set-up.
installer's information
technical details
| network voltage | connection | min.diameter of cable | fuse |
| 220-240V~50Hz | 1 Ph + N | 1,5 mm ^2 | 16 A* |
Operating voltage....220-240 V \~ 50 Hz
Nominal power of grill....1,5 kW
Total power used in cooking....3,56 kW
Power output in microwaves....1000W
Energy consumption
- while heating to 175°C....0,29 kWh
- to maintain175°C for 1 hour....0,78 kWh
Total....1,07 kWh
Microwaves 1 hour at 1000W....2,06 kWh
Effective volume....32 litres
text_image
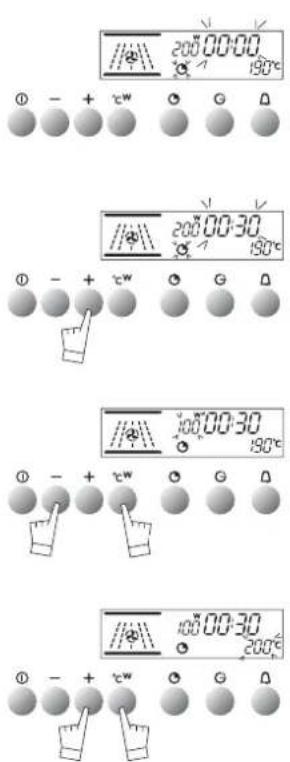
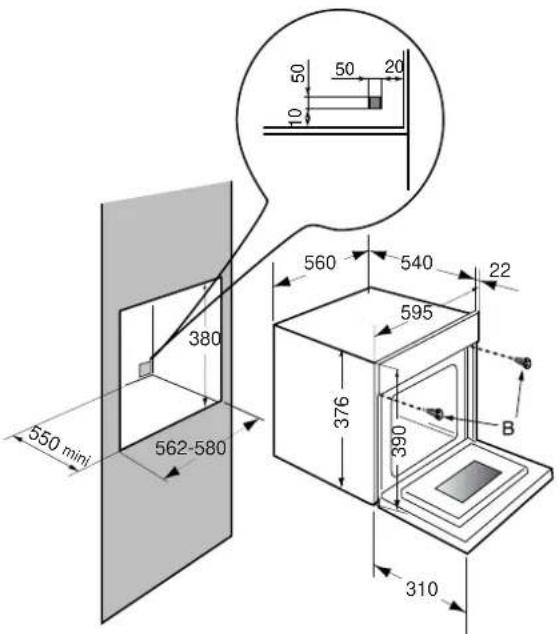
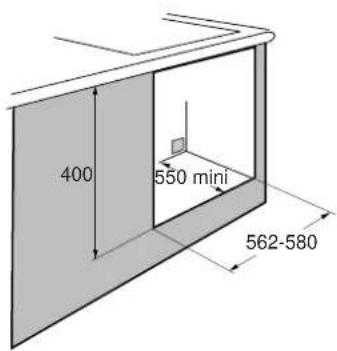
550 min 380 562-580 560 540 22 595 376 390 B 310Your oven is for built in.
The oven has an high-performance air circulation system which gives remarkable results for cooking, as long as the following points are applied:
- The oven may be fitted either underneath a work surface or in a suitable sized column unit. Cut a hole measuring 50 ~mm × 50 ~mm in the back wall of the insert space for the electric cable to pass through (See diagram, left).
- Centre the oven in the unit, and make that it is at least 2 mm from any other unit beside it.
- The unit must be heat-resistant (or covered with heat-resistant material).
- The oven must be disconnected from the power supply while it is being installed in the unit.
- The oven has an high-performance air circulation system which gives remarkable results for cooking, as long as the following points are applied:
Leave the oven to cool down before cleaning it manually.
In general, don't use any type of scouring powder or metal-backed sponge, or any sharp objects for cleaning.
If the appliance is not cleaned regularly, its surface could become damaged, affecting the appliance's lifespan and possibly causing a safety hazard.
- Turning over the grill unit:
The grill can be turned over for cleaning the top of the oven.
a) Pull the grill gently forward
b) Turn the grill over
c) The top surface of the oven can now be reached
Proceed in reverse order to put the grill back in place.
Warning: Never turn on the grill when it is not in the correct position.
Removing the racks:
The racks may be removed for cleaning:
a) Rotate without forcing.
b) Raise slightly.
c) Rake the rack out.
- The surrounds to the door and the oven must always be kept clean. If these surfaces become damaged by excessive dirt, call in a specialist before using your unit.
- If your oven smells or is dirty inside, boil a cup of water containing some lemon juice or vinegar for two minutes and then wipe the inside walls clean using a few drops of washing-up liquid.
| IFYOU REALIZETHAT | POSSIBLE CAUSES | WHAT SHOULD YOU DO? |
| The oven isn't heating | The temperature selected is too low.The oven isn't connected to the power supply.The fuse has blown.Other causes. | -Raise the temperature setting.-Connect to power supply-Change the fuse, checking that it is 16A-Contact the After-Sales Service. |
| The light inside the oven isn't working. | The lamp is unusable.The oven isn't connected to the power supply or the fuse has blown. | -Change the bulb.-Connect to power supply or change fuse. |
| The cooling fan keeps working after the oven is turned off. | The fan stops three minutes at the most after using the microwave, or when the oven temperature has dropped below about 120°C, if it has been used for traditional or combined cooking..If it has not stopped | -Nothing.-Contact the After-Sales Service. |
| The oven light stays on even when the oven is switched off | 1. The oven door is not closed correctly.2. There is a faulty component in the microwave circuit. | 1. Check that the door is completely closed.2. Call the After-Sales Service |
| The oven smokes during cooking | Cooking temperature too high. | Lower the cooking temperature (see enclosed cooking guide) |
| The oven makes noises after cooking is finished. | The fan in the top of the oven (invisible) works even when the oven has stopped. | -This is normal. Your oven is fitted with a fan that continues to run until the oven has cooled down. |
| The oven gives off sparks. | There is a metallic element too near a wall or the rack | -Remove all metal elements from close to the walls.-Never use a metal element with the rack |
| The food does not get hot when in microwave mode. | Microwaves are not reaching the foodThe door is not shut correctly. | -Check that your utensils are compatible with microwave ovens.-Check that door shuts correctly. |
In all cases, if you are unable to solve the problem yourself, please contact the After-Sales Service without delay.