HI4071P - Cooker Atag - Free user manual and instructions
Find the device manual for free HI4071P Atag in PDF.

User questions about HI4071P Atag
0 question about this device. Answer the ones you know or ask your own.
Ask a new question about this device
Download the instructions for your Cooker in PDF format for free! Find your manual HI4071P - Atag and take your electronic device back in hand. On this page are published all the documents necessary for the use of your device. HI4071P by Atag.
USER MANUAL HI4071P Atag
text_image
Diagram of a cooking pot with labeled parts, showing a pan on a stove and heating setup with numbered arrows.natural_image
Simple diagram of a circular object with diagonal stripes and an arc above it, no text or symbols present.natural_image
A single white diamond-shaped symbol on a black background, no text or symbols present.natural_image
Two white circular shapes on a black background, resembling abstract or minimalist elements (no text or symbols)natural_image
Four circular diagrams with shaded regions and curved arrows, no text or symbols presentKinderslot inschakelen
natural_image
Four circular diagrams showing different patterns of striped and curved lines, no text or symbols presentnatural_image
Four circular diagrams showing different charge states or reactions, with no visible text or symbols.natural_image
Four circular diagrams with diagonal stripes, each showing a curved line above it (no text or symbols)Geluid ssignaal ui tschakelen.
natural_image
Illustration of a metallic cooking pot with lid and side handles, placed on a dark surface (no text or symbols)natural_image
Illustration of a cooking pot on a stove with upward arrows indicating heating (no text or symbols)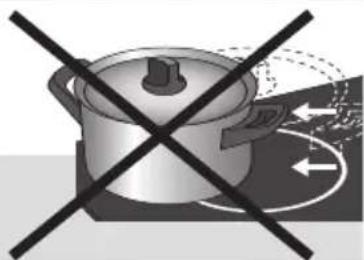
natural_image
Illustration of a cooking pot with crossed black lines indicating prohibition or resistance (no text or symbols)natural_image
Simple diagram of a rectangular frame with two circular cutouts and downward arrows at the bottom (no text or symbols)natural_image
Pure technical diagram of a mechanical or electrical component with directional arrows, no text or symbols presentnatural_image
Pure electrical circuit lines without any symbolsnatural_image
Isometric line drawing of a rectangular frame with two inner rectangular cutouts (no text or symbols)natural_image
Isometric line drawing of a device with internal components and a cable, enclosed in a transparent enclosure (no text or symbols)natural_image
Diagram showing a component being inserted into a corner with a magnified inset highlighting the detail (no text or symbols present)text_image
Diagram showing a microwave oven setup with four circular lamps and an attached power strip connected to a box, plus a separate view of the oven.natural_image
Line drawing of an electrical outlet plug with a cable (no text or symbols)natural_image
Symbol of a trash bin with crossed lines indicating no waste or discharge (no text or numbers present)text_image
Diagram of a cooking pot with labeled parts, showing a pan on a stove and heating setup.natural_image
Pure electrical circuit lines without any symbolsnatural_image
Simple line drawing of a right angle with a square and number 7 above it (no text or symbols)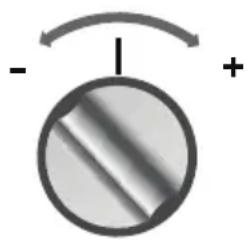
natural_image
Simple diagram of a circular object with an arrow and plus sign, no text or symbols presentnatural_image
A small white diamond-shaped object centered on a dark background, with no visible text or symbols.natural_image
Two white abstract shapes on a black background, resembling stylized arrows or dots (no text or symbols)natural_image
Four circular diagrams with shaded regions and curved arrows, no text or symbols presentnatural_image
Four circular diagrams with diagonal stripes, no text or symbols presentchemical
Diagram showing electron spin states in a semiconductor device, with positive and negative spin orientations indicated by curved arrows.Activer le signal sonore
natural_image
Illustration of a cooking pot on a stove (no text or symbols)text_image
Diagram illustrating cooking process with a pot and lightbulb icon, showing heating and cooling stepsnatural_image
Simple line drawing of a rectangular frame with two circular cutouts and downward arrows at the bottom (no text or symbols)natural_image
Diagram of a mechanical or electrical enclosure with directional arrows indicating movement or force (no text or symbols present)natural_image
Pure electrical circuit lines without any symbolsnatural_image
Isometric line drawing of a rectangular frame with two inner rectangular cutouts (no text or symbols)natural_image
Isometric line drawing of a rectangular frame with a pencil labeled 'VERNIS' inserted, showing internal geometric lines (no text or symbols beyond label)natural_image
Isometric line drawing of a device with a central platform and surrounding components, enclosed in a transparent enclosure (no text or symbols)natural_image
Diagram showing a component being inserted into a corner with a magnified inset highlighting the detail (no text or symbols present)natural_image
Diagram showing a kitchen appliance with four circular ovens and an open oven, connected to a power strip (no text or symbols present)natural_image
Line drawing of an electrical outlet plug with a cable, no text or symbols presentnatural_image
Symbol of a trash bin with crossed x-marks and a blank base (no text or numbers)text_image
Diagram of a cooking pot with labeled parts, showing a pan on a stove and heating setup.natural_image
Simple white line drawing of a square block and horizontal line on black background (no text or symbols)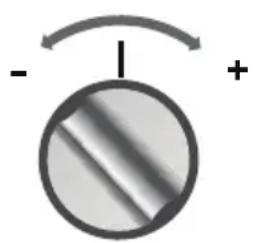
text_image
- +natural_image
A single white diamond-shaped object centered on a dark background, with no visible text or symbols.natural_image
Two white circular shapes on a black background, resembling abstract or minimalist elements (no text or symbols)natural_image
Four circular diagrams with shaded regions and plus/minus signs, no text or symbols presentnatural_image
Four circular diagrams with diagonal stripes, no text or symbols presenttext_image
Diagram showing alternating positive and negative charge states with striped patterns, possibly representing a semiconductor or electrochemical process.natural_image
Illustration of a metallic cooking pot with lid and side handles, placed on a dark surface (no text or symbols)natural_image
Illustration of a cooking pot on a stove with upward arrows indicating heating (no text or symbols)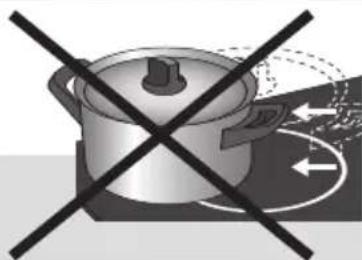
natural_image
Illustration of a cooking pot with crossed lines indicating prohibition (no text or symbols)natural_image
Simple line drawing of a rectangular frame with two circular cutouts and downward arrows at the bottom (no text or symbols)natural_image
Diagram of a cabinet or enclosure with directional arrows indicating movement, no text or symbols presentnatural_image
Pure electrical circuit lines without any symbolsElektro Anschluss
natural_image
Isometric line drawing of a rectangular frame with two inner rectangular cutouts (no text or symbols)natural_image
Isometric line drawing of a rectangular frame with a VERNIS container and a tool inserted, no text or symbols present.natural_image
Isometric line drawing of a device with a central panel and base platform, no text or symbols presentnatural_image
Diagram showing a component being inserted into a layered structure with a magnified inset highlighting the detail (no text or symbols present)text_image
Diagram showing a kitchen appliance with four circular lamps and an open oven, connected to a power outlet.natural_image
Line drawing of an electrical outlet plug with a cable, no text or symbols presentnatural_image
Symbol of a trash bin with crossed lines indicating no waste or discharge (no text or numbers present)text_image
Diagram of a cooking pot with labeled parts, showing a pan on a stove and heating setup with numbered rays.The coil (1) in the hob (2) induces a magnetic field (3). When an iron-based pan (4) is placed on the coil an induction current is generated in the base of the pan.
Quick and Easy
Cooking on an induction hob is easy. The zones have a wide range and can be adjusted accurately. At the lowest setting you can even melt chocolate directly in the pan, while the highest setting brings things to the boil very rapidly.
Safe and clean
During induction cooking heat is generated directly in the base of the pan. The glass top is therefore never hotter than the base-of the pan. This is not only safer than a gas or ceramic hob it is also easier to clean as spills do not burn onto the surface.
Pans
Not all pans are suitable for induction cooking. Because induction cooking uses a magnetic field to generate heat, the base of the pan must contain iron. Use pans that are suitable for induction cooking, as indicated by the “Class Induction” quality mark. (see page 12)
This manual describes how you can make optimal use of your induction hob. Please keep this manual for future reference.
Happy cooking!
Pictograms used in this manual
important information

tip
conseil
Tipp
tip
text_image
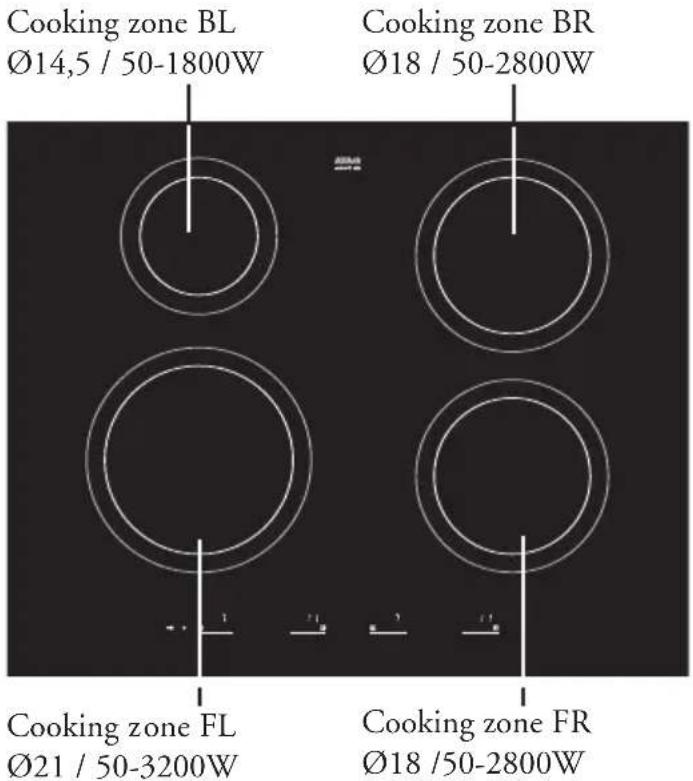
Cooking zone BL Ø14,5 / 50-1800W Cooking zone BR Ø18 / 50-2800W Cooking zone FL Ø21 / 50-3200W Cooking zone FR Ø18 /50-2800W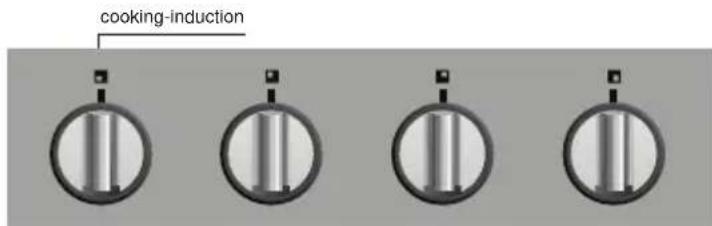
text_image
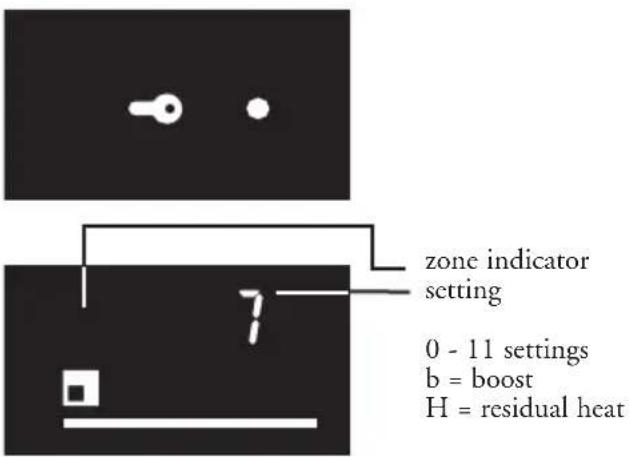
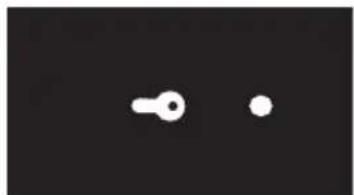
cooking-inductioncontrol-knob
Childproof lock (page 9)
Display (page 8)
text_image
zone indicator setting 0 - 11 settings b = boost H = residual heatInduction cooking is extremely safe. Various safety devices have been incorporated in the hob such as a residual heat indicator and a cooking time limiter. There are nevertheless a number of precautions you should take.
Connection and repair
- This appliance may only be connected by a qualified installer.
- Never open the casing. The casing may only be opened by the service technician.
- Disconnect the electricity from the appliance before starting any repair work. Preferably unplug the appliance, switch the (automatic) fuse(s) off or, in the event of a permanent connection, set the switch in the power supply lead to zero.
- Do not use the hob in temperatures below 5^ C.
During use

- This cooking appliance is designed for household use. It is to be used for food preparation only.
- When you use the hob for the first time you will notice a “new smell”. This is normal. If the kitchen is well ventilated the smell will soon disappear.
- Remember that if the hob is used on a high setting the heating time will be incredibly short. Do not leave the hob unattended if you are using a zone on a high setting.
- Ensure there is adequate ventilation while the hob is in use. Keep all natural ventilation openings open.
- Do not allow pans to boil dry. The hob itself is protected against overheating but the pan will get very hot indeed and could be damaged. The guarantee does not cover any damage caused by a pan boiling dry.
-
Do not use the cooking area as storage space.
-
Make sure that flexes of electrical appliances, such as a mixer, cannot touch the hot cooking zone.
- The zones heat up during use and stay hot for a while afterwards. Keep young children away from the hob during and immediately after cooking.
- Grease and oil are inflammable when overheated. Do not stand too close to the pan. Should oil catch fire, never try to extinguish the fire with water. Put a lid on the pan immediately and switch the cooking zone off.
- Never flambé food under the cooker hood. The high flames could cause a fire, even if the cooker hood is switched off.
- The ceramic top is extremely strong, but not unbreakable. A spice jar or pointed utensil falling on it, for example, could cause it to break.
- Stop using the hob if a break or crack appears. Switch the appliance off immediately, unplug it to avoid electric shocks, and call the service department.
- Never put any metal objects such as baking trays, biscuit tins, saucepan lids or cutlery on the cooking zone. These can heat up extremely quickly and cause burns.
- Keep magnetizable objects (credit cards, bank cards, floppy disks, etc.) away from the appliance. We advise anyone with a pacemaker to consult their cardiologist before using an induction hob.
- Never use a pressure cleaner or steam cleaner to clean the hob.
Switching on and adjusting the setting

text_image
7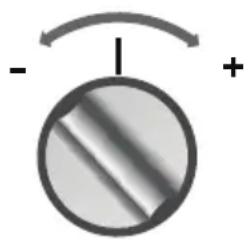
natural_image
Simple diagram with a shaded circle and curved arrow, no text or symbols present-
Put a pan on a cooking zone.
-
Turn the control knob to + or - to switch the zone on. Now let the knob spring back to its original position and then turn the knob again, (+) or (-), to set the required power level. The appropriate setting will appear in the display on the hob
-
To set a higher or lower power level, hold the knob in the + or - position a little longer.
Switching off

natural_image
A small white diamond-shaped object centered on a dark background, with no visible text or symbols.Turn the appropriat knob to the - position and hold until “-” appears in the display. The hob will then switch itself off.
Residual heat indicator

text_image
8If a cooking zone has been used intensively it will retain heat for several minutes afterwards. As long as the cooking zone is still hot an “H” will be visible in the display.
Special settings
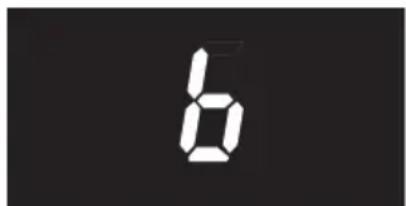
text_image
6Setting 11 (wok)
This setting is ideal for frying meat or wok cooking.
Setting b (boost)
The boost setting is intended to boil water rapidly. This setting is too high for heating butter or milk.
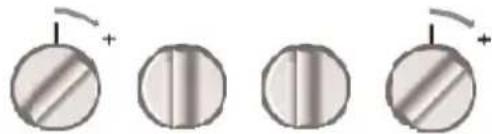
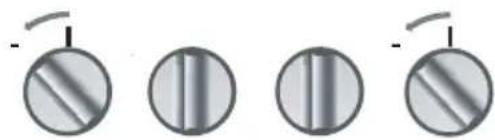
Childproof lock
natural_image
Two white circular shapes on a black background, resembling abstract or minimalist elements (no text or symbols)The childproof lock enables you to lock the hob when it is switched off. This prevents it being switched on unintentionally during maintenance or children switching it on.
natural_image
Four circular diagrams with shaded regions and curved arrows, no text or symbols presentActivating the childproof lock:
-
Switch all the zones off completely.
-
Turn the outer two control knobs full right (+) and hold for at least 3 seconds. The LED next to the key symbol shows that the hob is locked.
natural_image
Four circular diagrams showing different patterns of striped and curved lines, no text or symbols presentDeactivating the childproof lock
Turn the outer two control knobs full left (-) and hold for at least 3 seconds. The LED will go off and the hob is ready for use.
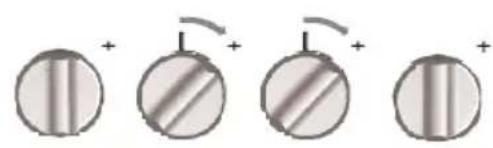
Switching the tone on and off
natural_image
Four circular diagrams showing different configurations of a striped pattern, possibly representing molecular or structural states (no text or symbols present)Switching the tone on
To switch the tone on, turn the middle two control knobs full right (+) and hold for 3 seconds.
natural_image
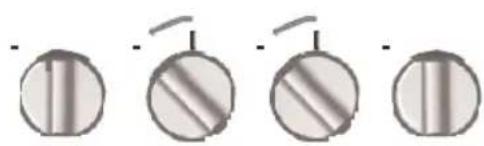
Four circular diagrams showing different patterns of shading and line segments, no text or symbols presentSwitching the tone off
Turn the middle two control knobs full left (-) and hold for 3 seconds.
A tone will confirm the change.
natural_image
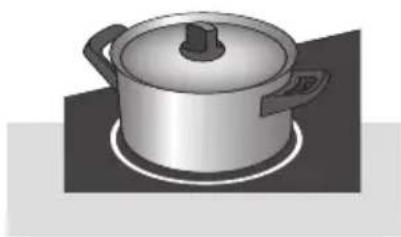
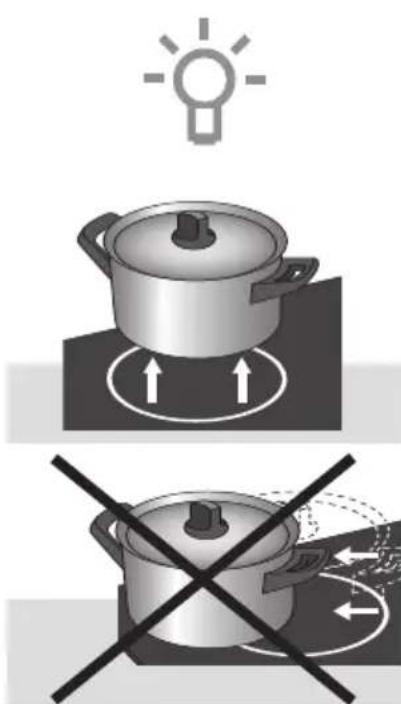
Illustration of a cooking pot on a stove (no text or symbols)No heat loss and the handles stay cool during induction cooking.
text_image
Diagram illustrating cooking process with a pot and lightbulb icon, showing heating and cooling stepsAlways pick pans up; never slide them.
Induction cooking is fast
To start with you will be surprised by the speed of induction cooking. Especially at higher settings, foods and liquids will boil very rapidly. It is best not to leave pans unattended to avoid them boiling over or boiling dry.
The power level adjusts itself
During induction cooking, only that part of the zone the pan is on is actually used. If you use a small pan on a large zone, the power level will automatically adjust to the diameter of the pan. The power level will therefore be lower so it will take longer for the contents of the pan to come to the boil.
Minimum pan diameter
The minimum pan diameter varies according to the size of the zone (see table). You will achieve the best results by using a pan with the same diameter as the zone. If a pan is too small the zone will not work.
Table size of the zone:
min. pan diameter
ø145 9 cm
ø180 12 cm
ø210 13,5 cm
NB:
- Grains of sand can cause permanent scratch marks. Always make sure the base of the pan is clean before use and don't slide pans across the top, lift them up.
- Do not use the hob as a worktop.
- Always use a lid on the pan to avoid wasting energy.

Induction cooking requires a particular quality of pan.
Pans previously used to cook on a gas hob are no longer suitable for induction cooking.
Pans should only be used if they are suitable for cooking on electric and induction hobs and have a base which is:
- at least 2.5 mm thick;
- flat.
The best pans are those with the “Class Induction” quality mark. You can test whether or not your pans are suitable with a magnet. If the magnet is attracted to the pan it is suitable for
| Suitable | Unsuitable |
| Special stainless steel pans | Earthenware |
| Class Induction | Stainless steel |
| Hard-wearing enamelled pans | Porcelain |
| Enamelled cast iron pans | CopperPlasticAluminium |

induction cooking.
NB:
Be careful with thin, enamelled steel pans:
- at higher setting the enamel can break off if the pan gets too dry;
- the high power level can cause the base of the pan to deform.
NB:
Never use pans with a deformed base. A convex or concave base can impair the function of the overheating protection. The hob would get too hot, as a result of which the glass top could crack and the base of the pan could melt. Damage caused by the use of unsuitable pans or pans boiling dry is not covered by the guarantee.
Pressure cookers
Induction cooking is ideal for cooking in a pressure cooker. The cooking zone reacts extremely quickly, so that the pressure cooker comes up to pressure quickly too.
Because the settings depend on the quantity and composition of the contents of the pan, the table below is intended as a guideline only.
Use the highest setting to:
- bring the food or liquid to the boil quickly;
- 'shrink' greens;
- blanch vegetables;
- heat oil and fat;
- fry steak (rare, underdone);
- bring a pressure cooker up to pressure.
Use a slightly lower setting to:
- sear meats;
- fry flatfish, thin slices or filet;
- fry boiled potatoes;
- cook blended soups and sauces;
- fry omelettes;
- fry steak (medium);
- deep fry foods (depending on the temperature and quantity).
- make custards.
Use a setting slightly above medium to:
- fry thick pancakes;
- fry thick slices of breaded meat;
- fry thin cuts of meat until cooked;
- pot roast large cuts of meat;
- fry bacon (fat);
- fry raw potatoes;
- fry French toast;
- fry breaded fish;
- fry thin slices of breaded meat;
- fry omelettes.
Use the medium setting to:
- thoroughly cook large quantities;
- defrost hard vegetables such as French beans.
Use the lowest settings to:
- make stock;
- stew fruit;
- stew meats;
- thoroughly cook foods;
- simmer vegetables.
Daily cleaning
Although food spills cannot burn into the glass, we nevertheless recommend you clean the hob immediately after use. Best for daily cleaning is a damp cloth with a mild cleaning agent. Dry with kitchen paper or a dry teacloth.
Stubborn stains
Stubborn stains can also be removed with a mild cleaning agent such as washing-up liquid.
Remove water marks and lime scale with vinegar.
Metal marks (caused by sliding pans) can be difficult to remove.
Special cleaning products are available.
Use a glass scraper to remove food spills.
Melted plastic and sugar is also best removed with a glass scraper.
Never...
Never use abrasives. They leave scratches in which dirt and lime scale can accumulate.
Never use anything sharp such as steel wool or scourers.

ATAG has developed a range of cleaning agents called Atag Shine. These are available via the website www.hps.nl The site also has various use and care tips.

The service department telephone number can be found on the guarantee card provided or on www.hps.nl
If you notice a crack in the glass top (however small), switch the hob off immediately, unplug the hob, turn off the (automatic) fuse switch(es) in the meter cupboard or, in the event of a permanent connection, set the switch in the power supply lead to zero.) Contact the service department.
Noise in the base of the pan
While cooking, you might hear a rattling noise in the base of the pan. This is harmless. The noise is caused by the effect the high power of the cooking zone has on the base of the pan. This noise can be reduced by selecting a lower setting.
| Symptom | Possible cause | Solution |
| Text appears in the displays when the appliance is first connected. | This is the standard set-up routine. | Normal operation. |
| The fan runs on for several minutes after the hob has been switched off. | The hob is cooling. | Normal operation. |
| A slight smell is noticeable the first few times the hob is used. | The new appliance heating up. | This is normal and will disappear once it has been used a few times. Ventilate the kitchen. |
| You can hear a ticking sound in your hob. | Ticking can also occur at lower settings. | Normal operation. |
| The pans make a noise while cooking. | This is caused by the energy flowing from the hob to the saucepan. | At high settings this is perfectly normal for some pans. It will not damage either the pans or the hob. |
| You have switched a cooking zone on but the display keeps flashing. | The pan you are using is not suitable for induction cooking or has a diameter of less than 12 cm. | Use a suitable pan, see page 12. |
| The hob is not working and nothing appears in the display. | There is no power supply due to a defective cable or a faulty connection. | Check the fuses or the electric switch (if there is no plug). |
| A fuse blows as soon as the hob is switched on. | The hob has been wrongly connected.. | Check the electrical connections. |
| Faultcode 1E03; 1E09. | The hob has been wrongly connected or the mains voltage is too low. | Check the connection. Contact your electricity supplier if the problem continues |
| Other faultcodes. | Defective generator. | Contact the service department. |
| Faultcode 1E01; 2E01; 3E01; 4E01 | The hob has overheated. | The hob has been switched off due to overheating. Let the hob cool down and then use a lower setting. |
| Faultcode 1E10 | The hob has been wrongly connected or the mains voltage is too high. | Have the connection changed. Contact the service department. |
| Continuous bleep. | The hob has been wrongly connected or the main voltage is too high. | Have the connection changed. |
| Faultcode F11; F42. | A control has been held for too long. | Do not hold the control knobs full left or full right for to long. If the fault-code is still displayed, contact the service department. |
| Faultcode F99 | You pressed two buttons at once. | Press 1 button at a time. |
General
- The connection must comply with national and local regulations.
- The appliance must always be earthed.
- This appliance may only be connected by a competent electrical installer.
- The connection cable must hang freely and is not to be fed through a drawer.
- The worktop the hob is built into must be flat.
- The walls and the worktop surrounding the appliance must be heat resistant up to at least 85 °C. Even though the appliance itself does not get hot, the heat of the hot pan could discolour or deform the wall.
- Damage caused by incorrect connection, installation or use, will not be covered by the guarantee.
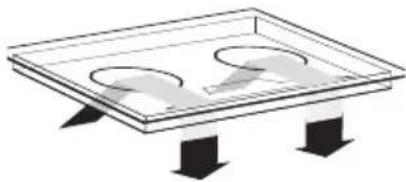
Clearance
Sufficient all-round clearance is essential to the safe use of the hob. Check that there is enough clearance.
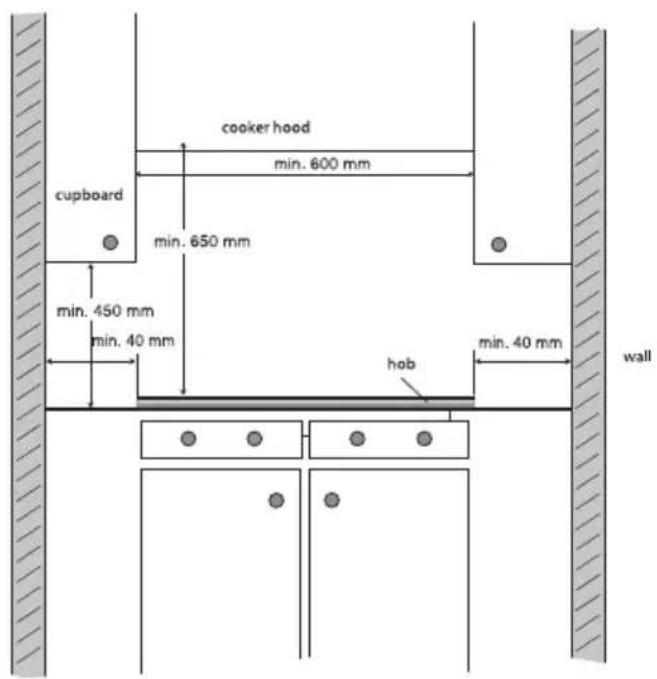
The dimensions and recesses are shown in the illustrations above.
If you are using a 600 mm wide cupboard with a worktop less than 500 mm thick, saw a cut-out "C" in both sides of the cupboard.
Ventilation
natural_image
Simple line drawing of a rectangular frame with two circular cutouts and downward arrows at the bottom (no text or symbols)The electronics in the appliance need cooling. The appliance will automatically switch off if there is insufficient air circulation. There are ventilation openings on the underside of the appliance. It must be possible for cool air to be drawn in through these openings. There are outlet openings on the underside and at the front of the appliance.
Several alterations must be made to the kitchen unit to allow optimal ventilation of the hob.
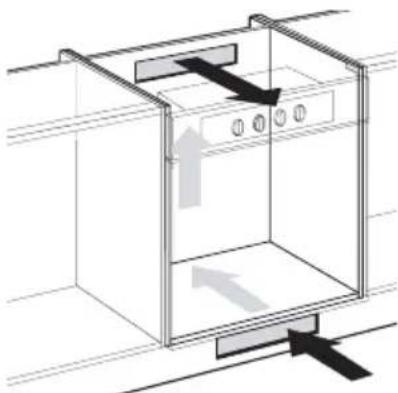
Above a control panel or an ATAG oven
natural_image
Diagram of a cabinet or enclosure with directional arrows indicating movement or flow, no text or symbols present.Ventilation occurs through the plinth and back of the oven. The niche should be at least 600 mm high.
Make an opening of at least 560 x 6 mm at the front and back.
text_image
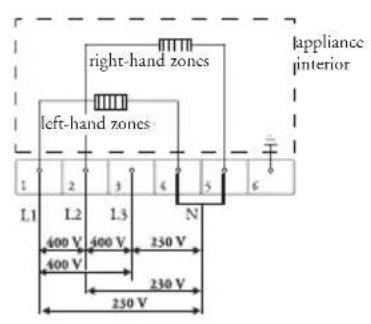
right-hand zones left-hand zones L1 L2 L3 N 400 V 400 V 230 V 400 V 230 V 230 V appliance interiorCommon connection:
3 phase with 1 zero connection (3 1N a.c. 400V / 50 Hz):
The voltage between the phases and the zero is 230 V a.c. The voltage between the two phases is 400 V. Fit a connecting bridge between connecting pointsmiddle zones left-hand zones 1 - 2 and 4 - 5. Phase 3 is not used. The groups must have fuses of at least 16 A (3x). The core diameter of the connecting cable must be at least 2.5 mm2.
text_image
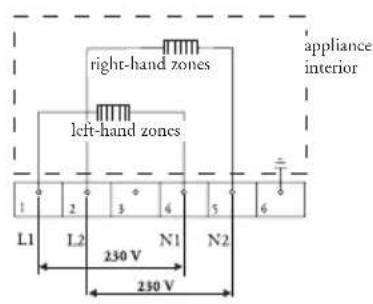
right-hand zones left-hand zones L1 L2 N1 N2 230 V 230 V appliance interior2 phase and 2 zero connection (2 2N a.c. 230V / 50 Hz):
The voltage between the phases and the zero is 230 V a.c.
The group must have fuses of at least 16 A (2x). The core diameter of the connecting cable must be at least 2.5 mm ^2 .
text_image
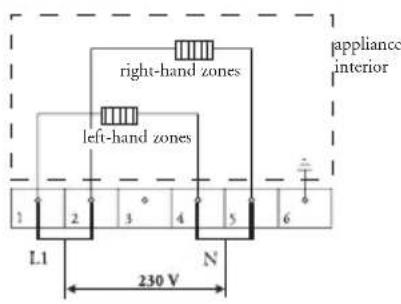
right-hand zones left-hand zones L1 230 V N appliance interiorSpecial connections:
Single phase connection (1 1N a.c. 230V / 50 Hz):
The voltage between the phase and the zero is 230 V a.c.
The group must have a fuse of at least 32 A. The core diameter of the connecting should be at least 6 mm2.
text_image
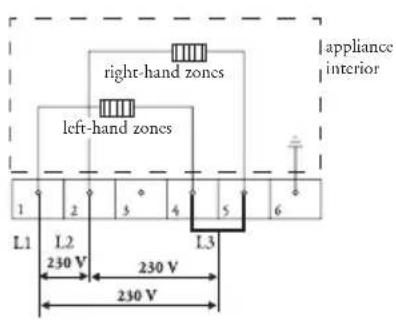
right-hand zones left-hand zones L1 L2 230 V 230 V 230 V L3 1 2 3 4 5 6 appliance interior3 phase, no zero connection (3 a.c. 230V/50 Hz):
The voltage between the phases is 230V a.c.
Fit connecting bridges between connecting points
4 and 5. The group must have fuses of at least 16 A (3x). The corediameter of the connecting cable must be at least 2.5 mm ^2 .
natural_image
Pure electrical circuit lines without any symbolsElectrical connection
The bridges on the connecting block can be used to create the required connections, as indicated in the illustrations on the previous page.
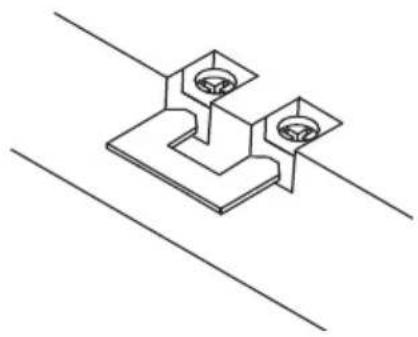
Fix the cable with a pull relief and close the cover. Ensure the connecting point remains easily accessible.
natural_image
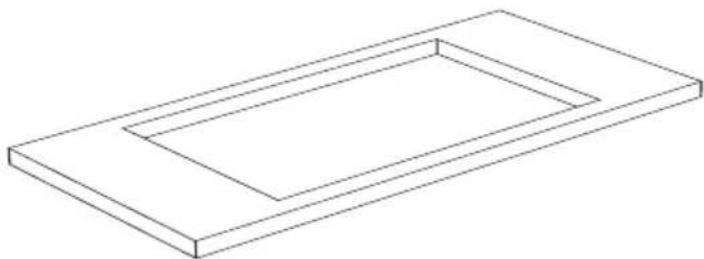
Isometric line drawing of a rectangular frame with two inner rectangular cutouts (no text or symbols)- Check that the cabinet and the cut-out meet the dimension and ventilation requirements.
natural_image
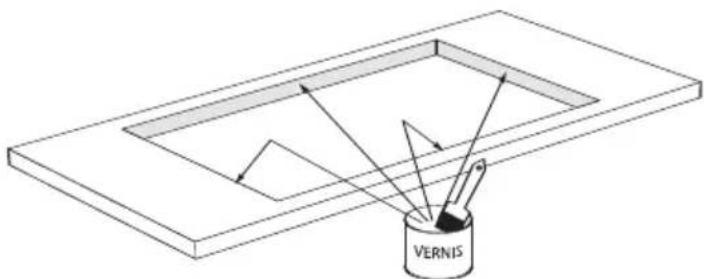
Isometric line drawing of a paintbrush touching a VERNIS container (no text or symbols on the diagram itself)- Treat the sawn ends of wooden or synthetic worktops with sealing varnish if necessary, to prevent moisture causing the worktop to swell.
natural_image
Isometric line drawing of a device with a central top and base, showing internal components and wiring (no text or symbols)-
Lay the hob upside down on the worktop.
-
Fit the connecting cable to the appliance in compliance with requirements (see page 20).
natural_image
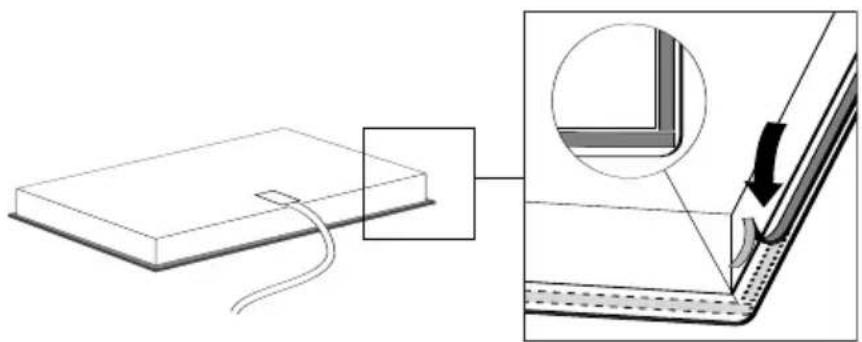
Diagram showing a cable being inserted into a rectangular block, with an inset close-up of the detail (no text or symbols present)- Remove the protective layer from the sealing tape and apply the tape in the groove of the aluminium profile or on the edge of the glass plate. Do not stick tape round the corners, but cut 4 separate pieces to seal the corners well.
- Turn the hob over.
natural_image
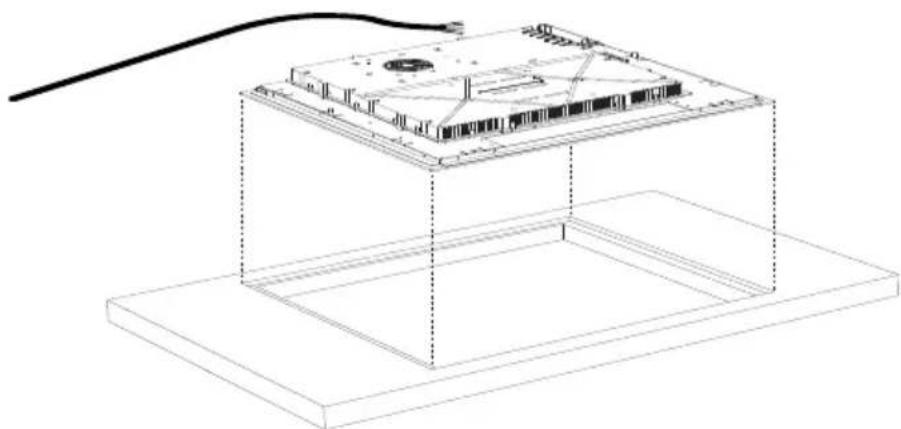
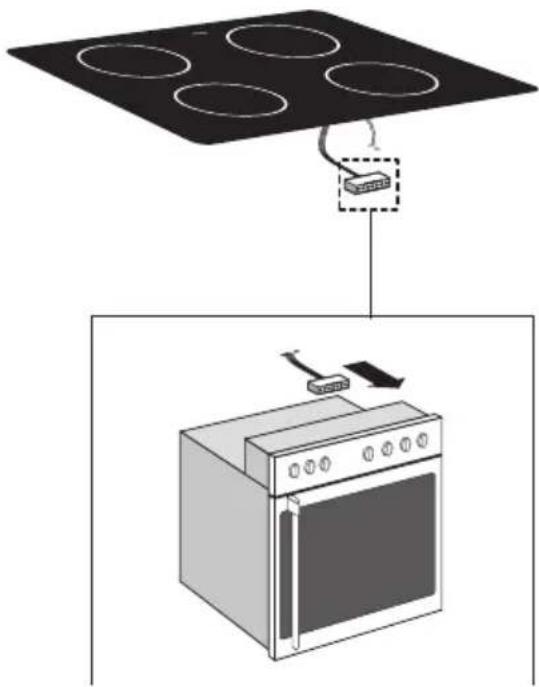
Diagram showing a microwave oven connected to a power strip and a mounted appliance (no text or symbols present)- Plug the multipolar connector of the hob into the coupling socket of the oven or control panel.
natural_image
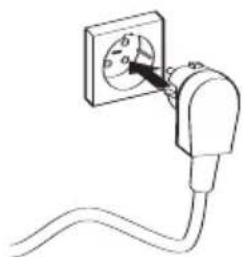
Simple line drawing of an electrical outlet with a plug and cable (no text or symbols)- Connect the appliance to the mains. A shortbleep will be heard and all the displays will light up briefly. The appliance is ready for use.
- Turn the hob over and lay it in the recess.
- Check that it works properly. If the appliance has been wrongly connected either a bleep will sound or nothing will appear in the displays, depending on the error.
- Keep the manual within easy r each of the hob.
As soon as the hob is switched on the fan will run briefly and the appliance will test itself for a few seconds.
natural_image
Symbol of a trash bin with crossed lines indicating no waste or discharge (no text or numbers present)The packaging of this appliance is recyclable and could be made of:
- cardboard;
- polythene (PE) film;
- CFC-free polystyrene (PS - hard foam).
These materials are to be disposed of responsibly and in accordance with government regulations.
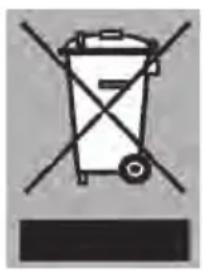
To draw attention to the obligation to process electrical household appliances separately, the product carries the symbol of a dustbin with a cross through it.
This means that at the end of its working life the product may not be disposed of as household waste, but must be taken to a segregated waste collection centre run by the local authorities or to a dealer providing this service.
Processing household appliances such as this hob separately prevents negative impacts on the environment and public health, which might otherwise result from inappropriate processing. It also enables the recovery of materials used in the production of the appliance, thus realising considerable savings in terms of both raw materials and energy.
Safety of the hob
- A sensor continuously monitors the temperature of the hob components. Should any temperature rise too high, the power level of the hob will be reduced automatically.
- As soon as you remove the pan from the hob, cooking activity stops automatically. You are nevertheless advised to accustom yourself to turning the hob or zone off immediately after use, to avoid unintentional use.
- Each cooking zone has a sensor that continuously monitors the temperature of the base of the pan to avoid the risk of overheating should a pan boil dry.
- The hob will not recognise a small object, such as a small pan (see table page11), fork or spoon, as a pan. The zone display will flash 0 and the hob will not switch on.
Cooking time limiter
The cooking time limiter is another safety function incorporated in your hob. This cut-out function is automatically activated if you forget to switch the hob off after use.
| Setting The zone will switch off automatically after: | |
| 1 and 2 9 hours | |
| 3, 4 and 5 5 hours | |
| 6, 7 and 8 | 4 hours |
| 9 3 hours | |
| 10 2 hours | |
| 11 and b(oost) 1 hour | |
Capacity and dimensions table
| Hob type | HI4071M |
| Induction | x |
| Connection | |
| 230V - 50Hz | x |
| Maximum capacity of cooking zones | |
| Back left | 1800W |
| Front left | 3200W |
| Back right | 2800W |
| Front right | 2800W |
| Connected load | |
| L1 | 3700W |
| L2 | 3700W |
| Total connected load | 7400W |
| Hob type | |
| Appliance width x depth | 644 x522 |
| Build-in height from top of worktop | 43 mm |
| Cut-out width x depth | 560 x 490 |
| Distance cut-out to back wall | Minimum 50 mm |
| Distance cut-out to side-wall | Minimum 50 mm |
This appliance complies with all relevant CE directives.

natural_image
Warning symbol with exclamation mark inside a triangle (no text or numbers)plak hier het toestel-identificatieplaatje placez ici la plaque d'identification de l'appareil kleben Sie hier das Gerätetypenschild ein stick the appliance identification card here
This card is located on the top of the appliance.
When contacting the service department, have the production code (PCODE) and complete item number (ITEMNR) to hand.