YT-82799 - Screwdriver Yato - Free user manual and instructions
Find the device manual for free YT-82799 Yato in PDF.

| Product Type | Cordless Impact Driver |
| Brand / Model | Yato YT-82799 |
| Rated Voltage | 18 V DC |
| No-load Speed (4 speeds) | 0-1200 / 0-1900 / 0-2500 / 0-3200 rpm |
| Maximum Torque | 230 Nm |
| Tool Holder | Hexagonal 1/4" (6.35 mm) |
| Weight | 1.0 kg |
| Battery Type | Li-Ion (not included) |
| Recommended Battery Capacity | 4 Ah |
| Charger | Not included (compatible with YATO chargers YT-828498 to YT-828504) |
| Sound Pressure Level | 99.0 dB(A) |
| Sound Power Level | 107.0 dB(A) |
| Vibration Level | 12.9 m/s² |
| Protection Degree | IPX0 |
| Main Functions | Speed variator, rotation direction selector, control panel with LED indicators, 4 speeds, 3 screwing modes (wood, thin sheet, thick sheet), intermittent/continuous mode |
| Safety | Insulated handles, overload protection, automatic stop in case of blockage |
| Maintenance and Cleaning | Clean with compressed air (max 0.3 MPa), brush or dry cloth; do not use chemicals |
| Spare Parts and Repairability | Repairs exclusively at authorized center; use of original parts mandatory under warranty |
| General Information | Tool intended for DIY for tightening/loosening screws and nuts; requires compatible YATO 18 V battery and charger |
Frequently Asked Questions - YT-82799 Yato
User questions about YT-82799 Yato
0 question about this device. Answer the ones you know or ask your own.
Ask a new question about this device
Download the instructions for your Screwdriver in PDF format for free! Find your manual YT-82799 - Yato and take your electronic device back in hand. On this page are published all the documents necessary for the use of your device. YT-82799 by Yato.
USER MANUAL YT-82799 Yato
natural_image
Black YATO 18V power tool with attached base (no visible text or symbols on body)CE
PL EN DE RU UA LT LV CZ SK HU RO ES FR IT NL GR BG PT HR AR
natural_image
Close-up of a black and white RAVO3 battery with labeled parts, showing internal components and a close-up of its grip (no text or symbols visible)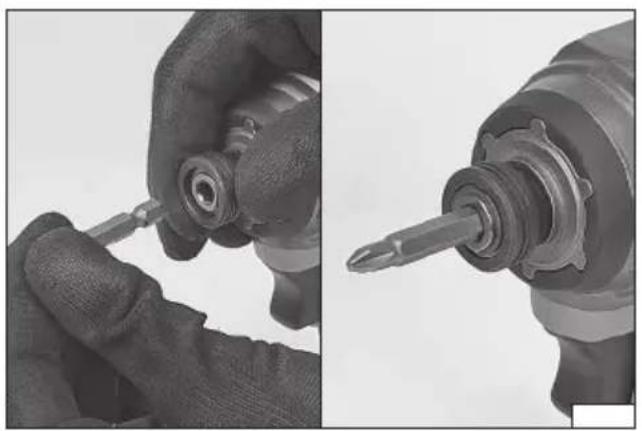
natural_image
Close-up of hands using a screwdriver to adjust the mechanical component (no text or symbols visible)
natural_image
Close-up of a handheld electric drill bit with visible mechanical components and grip (no text or symbols)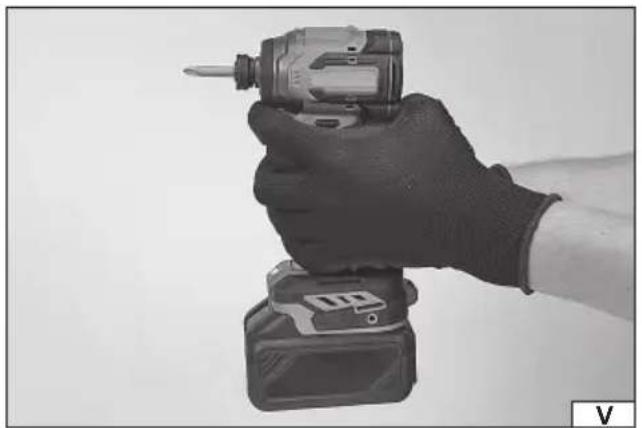
natural_image
Hand in gloves holding a screwdriver and battery (no visible text or symbols)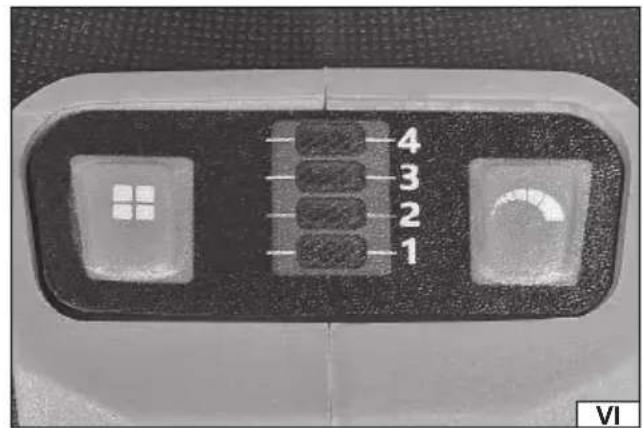
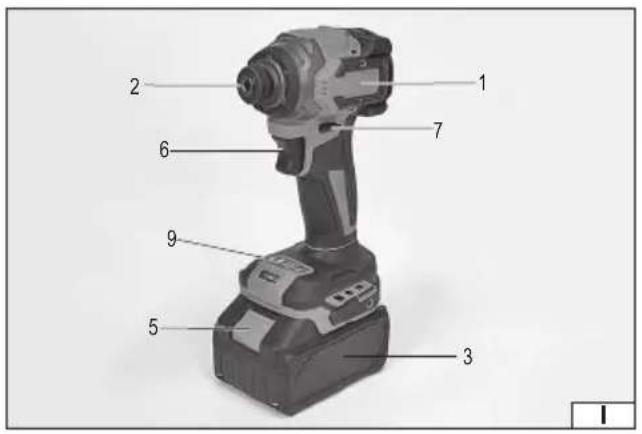
- driver
- tool chuck
- battery
- battery charger
- battery latch
- power switch
- rotation direction switch
- battery charge indicator
- control panel
DE
Read the operating instruction
Wear protective goggles
Wear hearing protectors
This symbol indicates that waste electrical and electronic equipment (including batteries and storage cells) cannot be disposed of with other types of waste. Waste equipment should be collected and handed over separately to a collection point for recycling and recovery, in order to reduce the amount of waste and the use of natural resources. Uncontrolled release of hazardous components contained in electrical and electronic equipment may pose a risk to human health and have adverse effects for the environment. The household plays an important role in contributing to reuse and recovery, including recycling of waste equipment. For more information about the appropriate recycling methods, contact your local authority or retailer.
CHARAKTERYSTYKA WYROBU
PRODUCT CHARACTERISTICS
The impact driver is a versatile portable tool that does not require an external power source designed for DIY enthusiasts only for screwing and unscrewing screws and nuts with left-hand and right-hand thread using a variety of screwdriver bits. Thanks to its impact mechanism, the driver provides significantly higher torque than a typical cordless drill driver. Its specific advantages will be appreciated by DIY enthusiasts performing various assembly and finishing works. Proper, reliable and safe operation of the power tool depends on appropriate use, that is why you should:
Read the entire manual before the first use of the tool and keep it for future reference.
The supplier is not liable for any damage resulting from failure to observe the safety instructions and recommendations contained in this manual.
EQUIPMENT
The product is supplied complete and does not require assembly. The following are supplied with the YT-82798 model: battery, charging station (charger).
CAUTION! The YT-82799 product does not have a battery pack and a charging station.
TECHNICAL DATA
| Parameter Unit Value | ||
| Part No. YT-82798, YT-82799 | ||
| Operating voltage [V] 18 DC | ||
| Revolutions (idle speed) [min | ^-1 ] 0-1200 / 0-1900 / 0-2500 | / 0-3200 |
| Max. torque [Nm] 230 | ||
| Noise level | ||
| - sound pressure [dB] 99.0 ± 3.0 | ||
| - power L_WA | [dB] 107.0 ± 3.0 | |
| Protection rating | IPX0 | |
| Vibration level | [m/s2] | 12.9 ± 1.5 |
| Weight | [kg] | 1.0 |
| Tool chuck | ["/mm] | 1/4 / 6.35 |
| Battery type | Li-Ion | |
| Battery capacity | [Ah] | 4 |
| Charger* | ||
| Input voltage | [V] | 200 – 240 ~ |
| Mains frequency | [Hz] | 50/60 |
| Rated current | [A] | 1.5 |
| Output voltage | [V] | 21.5 DC |
| Output current | [A] | 2.2 |
| Charging time** | [h] | 2 |
* only for models equipped with a charger.
** the specified charging time applies only to the battery with the capacity listed in the table
The declared noise emission value has been measured using the standard test method and can be used to compare one tool to another. The declared noise emission value can be used in the preliminary exposure assessment.
The declared total vibration value has been measured using the standard test method and can be used to compare one tool to another. The declared total vibration value can be used in the initial exposure assessment.
Note! The vibration emission during tool operation may differ from the declared value, depending on the manner the tool is used. Note! Safety measures to protect the operator, which are based on an assessment of exposure under actual conditions of use (including all parts of the work cycle, such as the time when the tool is switched off or idle and the activation time), must be specified.
GENERAL WARNINGS FOR THE SAFETY OF POWER TOOLS
Warning! Read all safety warnings, illustrations and specifications provided with this power tool. Failure to do so may result in electric shock, fire or serious injury.
Keep all warnings and instructions for future reference.
EN
The term “power tool” used in warnings applies to all tools driven by power both wired and wireless.
Workplace safety
Keep the workplace well-lit and clean. Disorder and poor lighting can be causes of accidents.
Do not work with power tools in an environment with an increased risk of explosion, containing flammable liquids, gases or vapors. Power tools generate sparks that can ignite dust or fumes.
Children and third persons should not be allowed to enter the workplace. Loss of concentration can result in loss of control.
Electrical safety
The plug of the electric cable must match the power socket. You must not modify the plug in any way. Do not use any plug adapters with earthed power tools. An unmodified plug that fits the outlet reduces the risk of electric shock.
Avoid contact with earthed surfaces such as pipes, radiators and coolers. Grounding the body increases the risk of electric shock.
Do not expose power tools to contact with atmospheric precipitation or moisture. Water and moisture that gets inside the power tool increases the risk of electric shock.
Do not overload the power cable. Do not use the power cord to carry, pull or unplug the power plug from the power outlet.
Avoid contact of the power cable with heat, oils, sharp edges and moving parts. Damage or entanglement of the power cord increases the risk of electric shock.
In the case of working outside closed rooms, use extension cords intended for work outside closed rooms. The use of an extension cord adapted for outdoor use reduces the risk of electric shock.
When using a power tool in a humid environment is unavoidable as a protection against supply voltage use a residual current device (RCD). The use of RCD reduces the risk of electric shock.
Personal safety
Stay alert, pay attention to what you do and keep common sense while working with the power tool. Do not use a power tool when you are tired or under the influence of alcohol or medication. Even a moment of inattention while working can lead to serious personal injury.
Use personal protective equipment. Always wear eye protection. The use of personal protective equipment such as dust masks, anti-slip safety shoes, helmets and hearing protection reduce the risk of serious personal injury.
Prevent accidental operation. Make sure that the electric switch is in the “off” position before connecting to the power supply and / or battery, lifting or moving the power tool. Moving the power tool with the finger on the switch or powering the power tool, when the switch is in the “on” position can lead to serious injuries.
Before turning on the power tool remove any keys and other tools that were used to adjust it. The key left on the rotating parts of the power tool can lead to serious injuries.
Do not reach and do not lean too far. Keep the right attitude and balance all the time. This will allow easier control over the power tool in case of unexpected work situations.
Dress accordingly. Do not wear loose clothing or jewelry. Keep your hair and clothing away from moving parts of the power tool. Loose clothing, jewelry or long hair can be caught by moving parts.
If the devices are fitted for the connection of dust extraction or dust collection, make sure that they are connected and used properly. The use of dust extraction reduces the risk of dust hazards.
Do not let the experience acquired from frequent use of the tool resulted in carelessness and ignoring safety rules.
Carefree action can cause serious injuries in a fraction of a second.
Use and care of the power tool
Do not overload the power tool. Use the power tool appropriate for the selected application. The right power tool will provide a better and safer job if used according to the designed load.
Do not use the power tool, if the electric switch does not allow switching on and off. Power tool, which cannot be controlled by means of a power switch is dangerous and must be returned for repair.
Disconnect the plug from the power socket and / or remove the battery if it is detachable from the power tool before adjusting, changing accessories or storing the tool. Such preventive measures will allow you to avoid accidentally turning on the power tool.
Keep the tool out of the reach of children, do not let people who do not know how to operate the power tool or these instructions use a power tool. Power tools are dangerous in the hands of untrained users.
Maintain power tools and accessories. Check the tool for mismatches or jams of moving parts, damage to parts and any other conditions that may affect the operation of the power tool. Damage must be repaired before using the power tool. Many accidents are caused by incorrectly maintained tools.
Keep cutting tools sharp and clean. Properly maintained cutting tools with sharp edges are less prone to jamming and are easier to control when working.
Use power tools, accessories and inserted tools etc. in accordance with these instructions, taking into account the type and conditions of work. The use of tools for work other than designed is likely to result in a dangerous situation.
Handles and gripping surfaces must be dry, clean and free from oil and grease. Slippery handles and gripping surfaces do not allow for safe operation and control of the tool in dangerous situations.
EN
Repairs
Repair the power tool only in authorized facilities using only original spare parts. This ensures proper operation safety of the power tool.
SAFETY WARNINGS FOR SCREWDRIVERS
Hold the tool by the insulated handles when working as the fastener may come into contact with the concealed wire or power cord. A fastener coming into contact with a live wire can cause the metal parts of the tool to become “live” and give an electric shock to the operator.
Safety instructions for battery charging
Caution! Before starting charging, make sure that the power unit body, cable and plug are not cracked or damaged. It is forbidden to use a defective or damaged charging station and power unit! Use only the supplied charging station and power unit to charge the batteries. The use of another power unit may result in fire or damage to the tool. The battery should only be charged in a closed, dry room, protected against unauthorised access, especially by children. Do not use the charging station and power unit without the constant supervision of an adult! If you need to leave the room where the product is being charged, disconnect the charger from the mains by removing the power unit's plug from the mains socket. If smoke, suspicious odours, etc. are escaping from the charger, remove the charger plug from the mains socket immediately! The device is supplied with an uncharged battery and should therefore be charged according to the procedure described below with the included power unit and charging station before use. Li-ion (lithium-ion) batteries do not have the so-called "memory effect", which means they can be recharged at any time. However, it is recommended to discharge the battery during normal operation and then charge it to full capacity. If, due to the nature of work, it is not possible to use the battery in such a manner every time, it should be done at least every several work cycles. Never discharge any batteries by short-circuiting the battery plates, as this will cause irreparable damage! In addition, do not check the battery charge status by short-circuiting the electrodes and checking their sparking.
Storing the battery
Ensure proper storage conditions to extend the battery's life. The battery can last for approximately 500 charge-discharge cycles. Store the battery at a temperature ranging from 0^ C to 30^ C at a relative air humidity of 50%. Charge the battery to approx. 70% of its total capacity to store it for a longer period of time. In case of prolonged storage, the battery should be periodically charged once a year. Do not over-discharge the battery as this will shorten its life and may cause irreparable damage. During storage, the battery will gradually discharge due to leakage. The self-discharge process depends on the storage temperature – the higher the temperature is, the faster the discharge process is. If the batteries are stored incorrectly, the electrolyte may leak. In case of leakage, secure the leak with a neutralising agent. In the case of electrolyte contact with eyes, rinse eyes thoroughly with water, and immediately seek medical attention. It is not allowed to use the tool with a damaged battery. If the battery is completely worn, return it to a specialist waste disposal centre.
Transporting the batteries
Lithium-ion batteries are treated as hazardous goods according to legal regulations. The user of the tool can transport the product together with the battery and the batteries alone by land. In that case, no additional conditions have to be met. If you entrust transport to third parties (e.g. a courier company), follow the regulations regarding the transport of hazardous goods. Before shipping, please contact a properly qualified person. It is not allowed to transport damaged batteries. For the duration of transport, remove the demountable batteries from the product and secure the exposed contacts, e.g. by covering them with insulation tape. Protect the batteries in the packaging in such a way that they do not move inside the packaging during transport. National regulations for the transport of hazardous materials must also be observed.
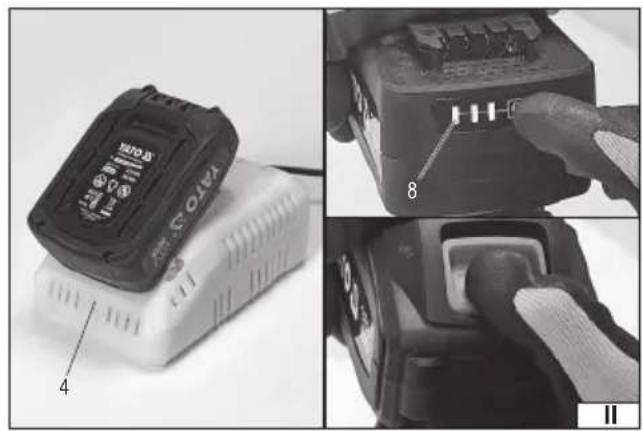
Charging the battery
Slide the battery into the charger socket (II).
Plug the charger into a mains socket.
There is an indicator light near the battery socket to indicate charger operation as described in the table "Charging status indication". When charging is complete, unplug the power adapter from the mains socket. Slide the battery out of the charging station by pressing and holding the battery latch button, then slide the battery out of the charger socket.
CHARGING STATUS INDICATION
| Green colour Yellow colour* | Red colour Operating status | ||
| waiting to be charged | |||
| blinking charging | |||
| continuous light battery charged | |||
| blinking battery overheated | |||
| continuous light battery defective | |||
| blinking charger overheated | |||
| continuous light charger defective | |||
*only for model no. YT-828502
EN
Rechargeable battery
Only one of the following YATO Li-Ion 18 V batteries can be used to power the tool: YT-828461, YT-828462, YT-828463, YT-82845, YT-828464, YT-828465, which can only be charged with YATO YT-828498, YT-828499, YT-828500, YT-828501, YT-828502, YT-828503, YT-828504 chargers. It is forbidden to use other batteries with a different rated voltage and not matching the device battery socket. It is forbidden to modify the socket or battery to make them match.
Slide the battery into the socket with the contacts facing inside the tool until the battery latch engages. Make sure that the battery will not slide out on its own during operation. Disconnect the battery by pressing and holding the latch and then pulling the battery out of the tool housing.
TOOL OPERATION
CAUTION! Only install the accessories when the supply voltage is disconnected. Disconnect the battery from the tool!
Working with ratchets
Install the bolt or nut by hand onto the thread (at least two turns) before you start to screw in the bolt or nut with a ratchet.
Make sure that the size of the ratchet has been chosen correctly in relation to the component to be unscrewed or tightened. Improper sizing can result in damage to both the ratchet and the nut or bolt.
Installing screwdriver bits in the driver's chuck (III)
CAUTION! It is recommended to use the bits designed for tools with impact with greater or equivalent torque than the tool torque as the tool features an impact mechanism.
Caution! Due to the impact mechanism, it is not allowed to install drill bits and work with them. If the drill bit is blocked in the hole, the impact mechanism may cause the drill bit to break, which may lead to injuries.
Caution! Install the bits with the battery disconnected – this will prevent accidental start-up of the tool.
The driver's chuck is intended for using hexagonal i.e. the so-called "long" bits and adapters with a length of approx. 50 mm equipped with a groove ensuring that the bit is locked in the chuck. It is not allowed to use bits shorter than 50 mm and those that do not have a groove.
Pull the ring of the tool chuck forward, then insert the bit into the chuck and release the ring – the ring should return to its initial position. Check that the bit has been correctly locked in the chuck; if it cannot be pulled out, this indicates correct fixing.
To remove the bit, follow the above procedure in reverse order.
Tightening and unscrewing
Install the appropriate bit (III) in the tool chuck.
Select the correct direction of rotation by pressing the switch (IV). Arrows on the switch indicate the movement directions of screws with the most common right-hand thread. In the case of screws with left-hand threads, the movement of the screw should be opposite to the direction indicated by the arrow.
Grip the tool with both hands (V).
The bit should be inserted into the bolt seat or placed on the nut. This will prevent damage to the fasteners or the tip. It will also reduce the risk of injury.
Press and hold the switch. By changing the pressure on the switch, the torque speed can be adjusted. The greater the pressure on the switch, the higher the torque speed.
In case of tightening, when the maximum torque is reached, the overload clutch engages and the jaw clutch drive is disengaged.
Release the switch and wait for the motor to stop completely.
When unscrewing, make sure that the torque of the nut does not exceed the maximum wrench torque. In this case, the overload clutch will also engage and it may not be possible to unscrew the nut.
After unscrewing, release the pressure on the tool switch and wait until the motor revolutions stop completely.
After finishing work, disconnect the tool from the power supply and proceed with maintenance.
Control panel (VI)
The tool allows electronic control using buttons and LEDs. Different functions are available depending on the rotation direction. Setting clockwise rotation of the driver enables the speed or screwing-in mode to be set. The function can only be selected when any control panel LEDs are illuminated.
The speed level is selected by pressing the button marked with the speed symbol located on the control panel. It is possible to set one of four speed levels. The first level means low speed and low torque, while the fourth level means high speed and high torque. One green LED will light up indicating that the first speed level is set. Two green LEDs will light up indicating that the second speed level is set. Three green LEDs will light up indicating that the third speed level is set. Four green LEDs will light up indicating that the fourth speed level is set.
The screwing-in mode is selected by pressing the button marked with the four squares symbol located on the control panel. When the red LED marked "1" lights up, it allows operation in wood screwing mode. When the red LED marked "2" lights up, it allows operation in thin sheet metal screwing mode. When the red LED marked "3" lights up, it allows operation in thick sheet metal screwing mode.
EN
With the anticlockwise setting of the jaw clutch rotation, it is possible to use the wrench in intermittent or continuous operation mode. The setting is selected by pressing the button marked with the four squares symbol. When the red LED marked "4" lights up, it allows intermittent operation, while when the LED marked "4" is not lit, this indicates continuous operation. Intermittent operation is designed to loosen bolts or nuts. In this mode, pressing the switch results in only a brief actuation of the jaw clutch rotations. After this, release the pressure on the switch and press it again to start the jaw clutch rotation.
Tool operation
Speed and torque are adjusted according to the switch depression depth. The tool cannot be set to a specific speed and torque. Insert the tip into the bolt socket or place it on the nut, and only then start the tool. This will prevent damage to the fasteners or the tip. It will also reduce the risk of injury.
It is recommended to make a guide hole with the diameter of the bolt core if bolts are to be screwed into a surface. This will prevent damage to the material when screwing in. However, it is also possible to screw in without making a guide hole. Screwing should start at a low RPM rate and, if needed, increased during work for both types of operation.
In the case of threaded connections, for example, when screwing screws into threaded holes or screwing nuts onto threaded studs, the first few turns should be done with a hand, spanner or hand screwdriver. Proceed with the driver operation only after you have made sure that one component is screwed correctly into the other. When screwing threaded components, it is recommended not to exert too much pressure on the driver. This can lead to destruction of the thread.
Once the elements have been tightened, the impact mechanism will operate, which will be indicated by “thumping” of the rotary mechanism, in which case the pressure on the switch should be released and further tightening of the elements should cease. Further tightening may lead to the destruction of fasteners.
Using attachments
The tool must not be used to drive work attachments.
Additional notes
When working, do not exert too much pressure on the workpiece and do not make sudden movements so as not to damage the bit and the wrench.
Take regular breaks during work.
Do not overload the tool, the temperature of the external surface must never exceed 60°C.
After finishing work, turn off the wrench, disconnect the battery and perform maintenance and inspection.
MAINTENANCE AND INSPECTIONS
CAUTION! Before carrying out any adjustment, servicing or maintenance work, unplug the tool from the mains socket. Having finished working, inspect the power tool for damage by visually checking the exterior and the body and the handles. Check the power cord with plug and its rubber gland, the action of the electric power switch, the ventilation openings for clogging, the motor brushes for sparking, the noise level of the bearings and the drive transmission, and how the power tool starts and runs. During the warranty period, the user is not allowed to install any power tools or replace any components or parts, as this will void the warranty rights. Any irregularities found during the inspection or the operation signal the need for repair to be done at the service centre. After finishing work, the housing, ventilation openings, switches, auxiliary handle and covers should be cleaned e.g. with an air jet (with a pressure not exceeding 0.3 MPa), paintbrush or dry cloth without the use of chemicals and cleaning agents. Clean the tools and handles with a clean and dry cloth.
DE
PRODUKTBESCHREIBUNG
CARACTÉRISTIQUES DU PRODUIT
Batterie rechargeable
VEILIGHEIDSWAARSCHUWINGEN VOOR SCHROEVENDRAAIERS
Transport van accu's
Transport akumulatora
DECLARATION OF CONFORMITY
0125/YT-82798/EC/2025
We declare and guarantee with full responsibility that the following products:
Cordless impact screwdriver; item no. YT-82798, YT-82799
18 V d.c., HEX 6,35 mm, 0-1200 / 0-1900 / 0-2500 / 0-3200 min ^-1 ; 230 Nm
meet requirements of the following European Standards / Technical Specifications:
EN 62841-1:2015 + A11:2022
EN 62841-2-2:2014
EN IEC 55014-1:2021
EN IEC 55014-2:2021
and fulfill requirements of the following European Directives:
2006/42/EC Machinery and safety elements
2014/30/EU Electromagnetic compatibility (EMC) Directive
2011/65/EU Restriction of the Use of Certain Hazardous Substances
Serial number: concern all serials numbers of item(s) mentioned in this declaration
The person authorized to compile the technical file:
Agnieszka Rędziak
(Place and date of issue)
V-CE PREZES ZARZADU
JAN SZMIDT
(Name and signature of authorized person)
TOYA S.A.