HL6011C - Cooker Atag - Free user manual and instructions
Find the device manual for free HL6011C Atag in PDF.

User questions about HL6011C Atag
0 question about this device. Answer the ones you know or ask your own.
Ask a new question about this device
Download the instructions for your Cooker in PDF format for free! Find your manual HL6011C - Atag and take your electronic device back in hand. On this page are published all the documents necessary for the use of your device. HL6011C by Atag.
USER MANUAL HL6011C Atag
natural_image
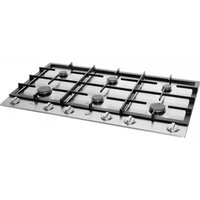
Black electrical stove with four circular ovens and a control panel (no text or symbols visible)gebruiksaanwijzing
instructions for use
ceramic hob
gbo 70.00.00.081001
natural_image
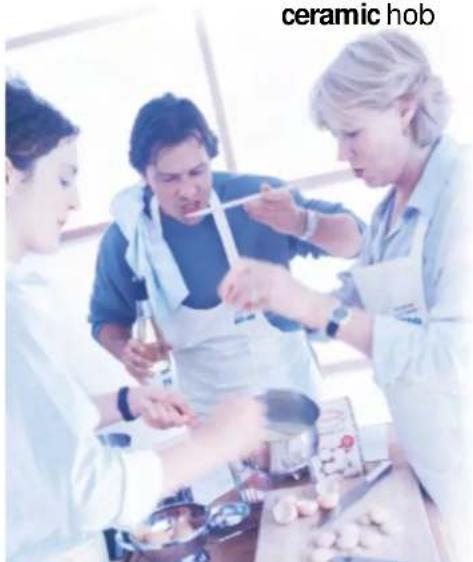
Three people preparing food in a kitchen, one holding a spoon and serving food from a bowl (no visible text or symbols)ATAG
ATAG
natural_image
Two illustrations of cooking pots with a crossed-out black cross symbol (no text or labels)natural_image
Two identical cooking pots with black cross symbols crossed out, one white and one black (no text or labels)natural_image
Two cooking pots with steam rising, one crossed out by a black X (no text or symbols)your ceramic hob
description
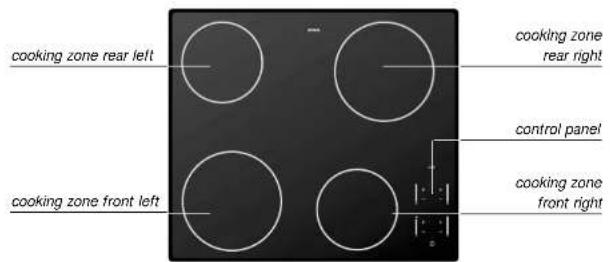
text_image
cooking zone rear left cooking zone front left cooking zone rear right control panel cooking zone front rightyour ceramic hob
description
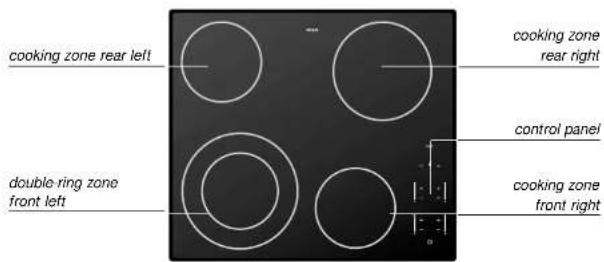
text_image
cooking zone rear left double ring zone front left cooking zone rear right control panel cooking zone front rightcontrol panel
text_image
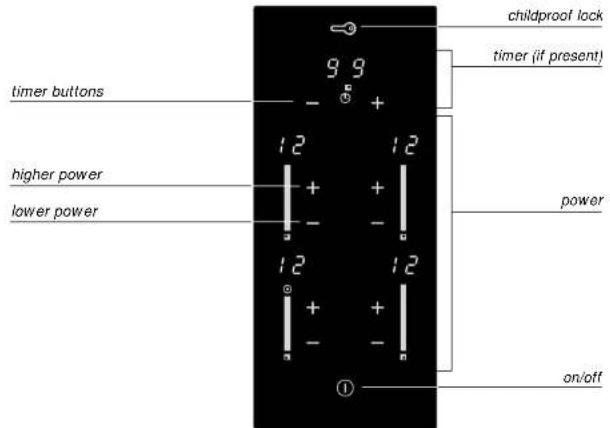
childproof lock timer (if present) 9 9 - + 12 12 higher power + + lower power - - 12 12 - + - ① power on/offyour ceramic hob foreword
This manual describes how you can make the best use possible of your ceramic hob. You can find information in it about the controls and background information about how the appliance works. You will also find cooking tables and maintenance tips.
The safety instructions that are important during the installation are included in the installation guide, which is supplied separately and is meant for the installer.
Please keep this manual carefully, since any subsequent user will also find it very useful.
We wish you much pleasure with your ceramic hob!
your ceramic hob introduction
your ceramic hob contents
This Atag ceramic hob has been designed for the real lover of cooking. The generous separation of the cooking zones makes for ease of cooking.
Where applicable, the hob has a double cooking zone. This cooking zone is especially suitable for large pans. The cooking zones can be controlled accurately (9 settings) using soft touch controls.
The appliance (HL60..C) is equipped with synchro-start. If you have an extractor hood that is also equipped with synchro-start, it will start up automatically when you use the controls on the hob.
The ceramic hob is fitted with a childproof lock and a cooking-time limiter for optimum safety.
safety
what you should pay attention to 4 - 5
operation
switching on 6 - 8
cooking information
cooking settings 9
maintenance
cleaning 10
faults
what should I do if... 11
protective devices
extra security 12
environmental aspects
disposal of packaging and appliance 13
safety
what you should pay attention to
safety
what you should pay attention to
when installing the appliance
This appliance should only be connected up by registered installer.
Never open the casing of the appliance.
during use
Watch out with young children; the appliance is hot during and after use.
This appliance has been designed for domestic use. You should only use it for cooking food.
The appliance is hot both during and after use. Bear this in mind if young children come anywhere near the appliance.
Do not place any objects on the touch controls. Doing so will cause the hob to switch off and an error code will appear.
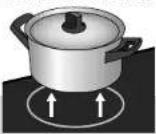
Never leave an empty pan on a cooking zone that is switched on. Do not allow the pan to boil dry, either. Although the hob is protected against overheating, the pan will get very hot, which may damage it.
Do not use pans that are smaller than the cooking zone. This will prevent food remains ending up on the red-hot cooking zone. Burnt-on food remains are difficult to remove.
Do not use pans that are smaller than the cooking zone.
natural_image
Two identical illustrations of cooking pots with a crossed-out black-and-white line indicating heating (no text or symbols)Grease and oil are flammable when overheated. Stay near the cooker when preparing dishes.
Damage arising from the use of unsuitable pans or from boiling dry is excluded from the guarantee.
The ceramic cooking surface is very strong but not unbreakable. It may be cracked if, for example, a spice jar or pointed object falls on it.
Do not use the appliance if there are any cracks or splits in it. Switch the appliance off immediately. Take the plug out of the socket and phone the service department.
Do not use aluminium foil, such as the trays from ready-made meals, for cooking food in.
If aluminium foil melts on the cooking surface, it cannot be removed.
Grains of sand may cause scratches that cannot be removed.
- Only put pans with a clean and dry base on the cooking surface. This prevents lime stains or other stains that are difficult to remove.
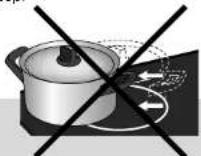
• Always pick pans up to move them. - Do not use the hob as a worktop.
When you first connect the appliance to the mains it will test itself automatically and the displays will light briefly.
If you do not select a setting within 5 seconds the zone will switch itself off automatically.
Cords to electrical appliances – e.g. a mixer – may accidentally touch the cooking zones.
introduction
The ceramic hob is fitted with a residual heat indicator, a timer (if present), a childproof lock, an automatic cooking-time limiter and a double cooking zone (if present). On this page and the following ones, you can read how to use these facilities.

on/off button
1 Put a pan on a cooking zone.
2 Press the on/off button.
The light above the button lights up.
The hob is now in the stand-by setting. The cooking zones can now be operated. If you do not operate the hob within 5 seconds, the hob will switch itself off again. The light goes out. During the cooking process the on/off button can be used as an emergency switch-off. Press the button and the appliance will switch off immediately.
setting the power level
higher
lower
The hob has 9 settings.
1 Press the + button for the cooking zone concerned. The hob goes directly to setting 6. Press the – button for the cooking zone concerned. The hob goes directly to setting 1.
2 Select a higher or lower setting by pressing the + or - buttons again.
The display shows the setting selected. You can see which setting to select in the cooking tables on page 9.
switching on double-ring zone (if present)
switching on
Once the zone has been switched on at setting 9, press the
+ button again.
The light above the button lights up. The outer ring is switched on.
You cannot use the outer ring on its own.
switching off
Switch back to 0 with the - button.
The cooking zone is switched off.
residual-heat indicator
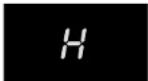
residual-heat indicator
The indicator shows that the cooking zone is still hot, and goes out as soon as the glass top reaches a safe temperature.
Residual heat is indicated by an H in the display of the appropriate cooking zone.
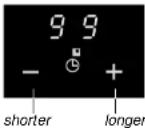
timer (if present)
You can have the rear right cooking zone switched off by the cooking timer. You are then using the timer as an automatic cooking device.
1 Put a pan on the rear right cooking zone.
2 Press the on/off button.
3 Set the power level required.
4 Set the timer.
The cooking time is set using the + and - buttons (max.
99 minutes).
The number of minutes selected is shown in the display.
A blinking dot indicates that the timer has been activated.
At the end of the cooking time, you hear a beep.
The zone switches off.
Switch the beep off at the end of the cooking time by pressing the clock's - button.
Press the clock's + button to set a new cooking time.
The other zones cannot be switched off by the cooking timer. You can use the cooking timer as an egg timer. In this case, the cooking timer only gives a sound signal at the end of the cooking time.
Switch the cooking timer off by pressing the - button for a few seconds (in the '0' minute setting).
operation
switching on
cooking information
cooking settings
childproof lock

childproof lock
During the cooking process it is possible to fix the current settings by using the lock. The light above the button lights up.
The lock can also be used as a childproof lock.
locking
Switch the appliance off. Press the button with the key symbol once.
The light above the button lights up.
unlocking
Press the key symbol ( ± three seconds) until the light above the button goes out.
The appliance's controls will now respond again.
The on/off button continues to work (emergency switch-off) even when other settings have been fixed using the locking function.
ssettings 1 - 3
- simmering bouillon
- stewing meat
- completing the cooking of dishes
settings 3 - 5
- completing the cooking of large quantities
- thawing hard vegetables, for example green beans
setting 6
- cooking of thick pancakes
- frying thick pieces of meat in breadcrumbs
- cooking through thin pieces of meat
- broiling large pieces of meat
- frying blocks of ham or bacon
- frying raw potatoes
- frying beef olives
- frying thin pieces of meat in breadcrumbs
settings 7 - 9
- searing meat
- frying cooked potatoes
- deep frying (depending on the temperature and the quantity)
setting 9
- bringing to the boil quickly
- shrinking down leaf vegetables
- frying steak (rare, red)
note
The settings indicated are averages, and depend on the type of pan etc. Adjust as necessary.
maintenance
cleaning
faults
what should I do if...
daily cleaning
Clean the glass top after each use. You can use a mild cleaning agent for this - for example, washing-up liquid. Switch the childproof lock on before cleaning the control panel.
stubborn stains
| water marks; lime stains; traces of metal. | Stubborn stains can also be removed with a mild cleaning agent - for example, washing-up liquid.Remove water marks and lime stains with vinegar.Traces of metals (due to sliding pans) can be difficult to remove.Remove traces of metals with a proprietary cleaning agent.Remains of food that has boiled over are best removed with a glass scraper. Melted plastic and sugar can also be removed with a glass scraper. |
never use
| You should never use scouring agents. These cause scratches in which lime deposits and dirt can accumulate. |
| Never use sharp objects such as steel wool and scourers. |
tip
| Before you start cleaning, turn the childproof lock on. |
If the appliance does not work properly, this does not always mean that it is defective. Try to deal with the problem yourself first. Phone the service department if the advice given below does not help.
| fault | cause | solution |
| Cooking zones do not get hot. | Plug is not in socket. | Put the plug into the socket. |
| Fuse(s) in the meter cupboard defective. | Check the meter cupboard. | |
| Error codes F00-F18 in the display. | A button is defective or dirty or there is an object on top of it. Each button has its own number, from 00 to 18. The number associated with the button appears in the display. | Clean the appliance or have it repaired.Do not place any objects on the control panel. |
| Error code F3 appears. | Transistors overheated.It is possible that too large a pan has been placed on the front-right zone. | Allow the appliance to cool down until the code disappears. |
| Error code F99 appears. | Two or more buttons were operated for a long time. | Do not operate more than one button at the same time. |
| Metal-like marks on the ceramic hob. | Incorrect cleaning material used. | Remove with a cleaning material like Stahlfix. |
| Scratches on the ceramic hob. | Sliding pans across the hob is the usual cause. | Do not slide pans across the ceramic hob. |
protective devices extra security
environmental aspects
disposal of packaging and appliance
cooking-time limiter
For reasons of safety, the appliance has been fitted with a cooking-time limiter. The cooking-time limiter switches the cooking zones off after a certain time, depending on the setting.
In the table below, you can see after how long the cooking-time limiter switches the appliance off for the various settings.
setting time setting time
1 - 2 - 3 12 hours 8 2 hours
4 - 5 6 hours 9 1 hour
6 - 7 4 hours
The appliance's packaging is recyclable. The following may be used:
- cardboard;
• polyethylene film (PE);
• CFC-free polystyrene (PS rigid foam).
Dispose of these materials responsibly and in accordance with government regulations.
The government can also provide information about the responsible disposal of discarded domestic appliances.