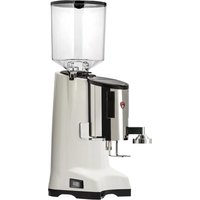
Ares 80 - Coffee grinder EUREKA - Free user manual and instructions
Find the device manual for free Ares 80 EUREKA in PDF.


| Product type | Professional coffee grinder |
| Brand | Eureka |
| Model | Ares 80 |
| Use | Commercial (restaurants, cafeterias, hospitals, etc.) |
| Power supply | 220-240 V, 50/60 Hz, 460 W |
| Dimensions (L x D x H) | 222 x 305 x 590 mm |
| Weight | 16.4 kg |
| Productivity | 6.5 - 8.0 g/s |
| Motor speed | 1500 rpm |
| Grind adjustment | Rotary knob (fine to coarse) |
| Dose adjustment | Rotary knob (gram dosage) |
| Distribution | Manual by lever (doser) |
| Hopper capacity | Approximately 1.5 kg (estimated) |
| Material | Steel and plastic |
| Cleaning | Weekly: hopper, doser, spout |
| Burr maintenance | Replacement every 500-700 kg of coffee |
| Safety | Automatic shutoff, thermal protection, do not immerse |
| Spare parts | Burrs, switch, knobs, lever |
| Repairability | By specialized personnel only |
| General information | User manual provided, manufacturer's warranty |
Frequently Asked Questions - Ares 80 EUREKA
User questions about Ares 80 EUREKA
0 question about this device. Answer the ones you know or ask your own.
Ask a new question about this device
Download the instructions for your Coffee grinder in PDF format for free! Find your manual Ares 80 - EUREKA and take your electronic device back in hand. On this page are published all the documents necessary for the use of your device. Ares 80 by EUREKA.
USER MANUAL Ares 80 EUREKA
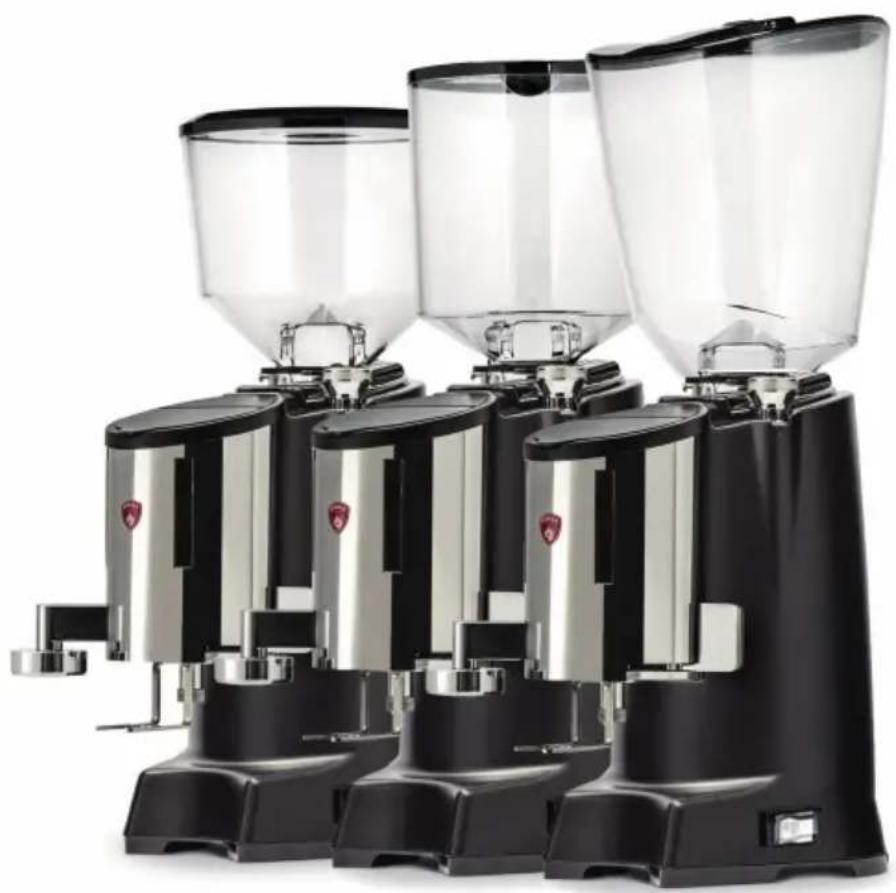
ARES 65 ARES 80 ARES KR
natural_image
Row of modern black and silver coffee grilles with clear glass lids, no visible text or labelsLIBRETTO ISTRUZIONI
The producer has reasonably considered every precaution possible,
EN
so to assure user's safety. Anyway, in installing and using the grinder,
various conditions may create uncontrollable and unpredictable events; so, it's always necessary to evaluate any risks and consider what follows:
- Before connecting the grinder, it's necessary to verify that plate data match with electric net ones.
- Both installation and repair must respect safety instructions and the inforce rules of
the country in which the grinder is installed.
- The grounding wire is necessary, like the installation. Both must respect the inforce rules of the country in which the grinder is installed.
- Adaptors, multiple outlets and extension cables are not suggested.
- Do not use this grinder if it is damaged on the cable. In case of malfunctioning, switch off the grinder and take it to the closest authorised service center.
- Do not immerse the grinder, the cable or the plug into water or other liquids. It's necessary to avoid that internal parts enter in contact with other liquids.
- Do not use any water jets, unsuitable detergents or steam-cleaners to clean.
- During its use, install the grinder on a flat and stable surface being able to sustain the weight of the grinder.
- The grinder is intended to be used only to grind roasted coffee beans. A different use is considered unsuitable and dangerous. The producer cannot be considered responsible for possible damages related to misuse or erroneous and unreasonable actions.
- The grinder cannot be used in extreme environmental conditions. In any case, use the grinder just between -5^ C ÷ +30^ C degrees.
- This grinder has been conceived for commercial use, like restaurant kitchen, cantines, hospitals and shops, like bakeries and butchers. It is not suitable for continuous food production.
- Do not allow children or untrained people to use the grinder.
- The grinder can be used by children being 8 years old or above and by people with reduced physical, sensory or mental capabilities; by people without adequate experience just when monitored and if these have received user instruction on the grinder. Cleaning cannot be performed by unmonitored children.
IMPORTANT WARNINGS
- Do not pull the cable or the grinder itself to disconnect its power cable.
- Do not use the grinder with wet or damp hands.
- Do not use the grinder when you are barefoot.
- Before cleaning or servicing, unplug the grinder from the electric net.
- Do not leave the grinder switched on when not necessary. When it is not working, unplug the grinder.
- Do not obstruct the fan or heat elimination systems. Do not enter any water or liquids.
- While the grinder is working, do not enter spoons, forks or other utensils in the spout or the coffee container to perform anything.
• To solve any blockage in the spout, always switch off the grinder before.
- In case of failure of the motor, switch off the grinder and contact an authorised service center.
- Prevent the grinder to be used under any weather conditions (sun, rain, ecc.).
• Children must be monitored to prevent they play with the grinder.
- The owner is responsible for monitoring the installation of the grinder, so to assure it has been installed in environmental conditions that will not create a safety or health
danger for the users.
- If you decide not to use anymore this grinder, we suggest to make it inoperative. After having it unplugged, cut the cable. In case of failure, switch it off and do not tamper with.
CONSERVATION OF THE MANUAL
This manual must always be at any user disposal. The user must be informed on the correct use of the grinder and on potential risks. It must be conserved in a dry, clean and heat-protected place. Use the manual so to avoid any damage to itself. Do not remove, rip or write on any manual parts. In case you cannot find the manual, take contact with the re-seller or the producer for further information.
UNPACKING THE GRINDER
- It's necessary to check out that there is not any damage on the grinder, looking at the external packaging
• After having removed the packing, check out there are no damages on the grinder. - Check out the entirety of all components. In case of defects or damages, inform immediately the authorised reseller.
- The packing (box, cellophane, metallic parts, styrofoam, etc.) can cut, wound or be dangerous if mismanaged. Prevent children or non-responsible people entering in contact with the packing.
- This symbol on the grinder or on the packing informs that the grinder cannot be
considered like a usual home waste ; it must be delivered to a suitable waste collection facility that recycle electric and electronic devices. If this grinder is correctly disposed of, you will prevent potential damages to both environment and health; these damages may occur in case the grinder is not correctly disposed of. Waste recycling protects natural
sources. For further information on the recycling of this product, you can contact your local authority, local recycling center or the reseller you purchased the grinder from.
IMPORTANCE OF THE MANUAL
This manual is addressed to the user of the grinder and it is considered part of this product. It shares information on its correct use and maintenance, including information on user's safety. This manual must be held during all the grinder's lifespan and must be transmitted to any user or future owner. All information in this manual do not replace safety rules and technical data on the installation and functioning of the grinder and its packing. This manual reflects the nowadays state of the art and it cannot be considered inadequate just because revised on the base of new technologies. The producer may modify the manual without revising previous editions, except in special cases. A misuse of the grinder, or a different use than the one described on the manual, will invalidate any warranty or responsibility of the producer. The grinder can be used just by a
responsible adult. It's necessary to preserve the manual, as the producer cannot be held responsible for any damage on people or things, or any damage on the grinder in case it is misused or in case safety and maintenance rules are not respected.
DE
WARNUNGEN UND
CONSERVATION DU MANUEL
IMPORTANCE DU MANUEL
ARES 65
natural_image
Line drawing of a coffee maker with funnel and side-mounted stand (no text or symbols)ARES KR
natural_image
Technical diagram of a mechanical device with a cylindrical component and a dial indicator (no text or symbols)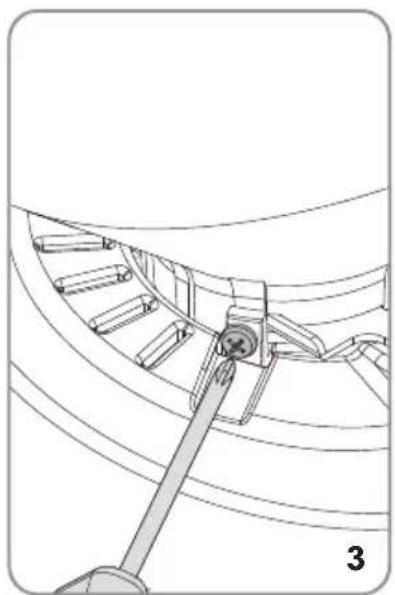
natural_image
Technical line drawing of a mechanical component with a lever and curved parts (no text or symbols)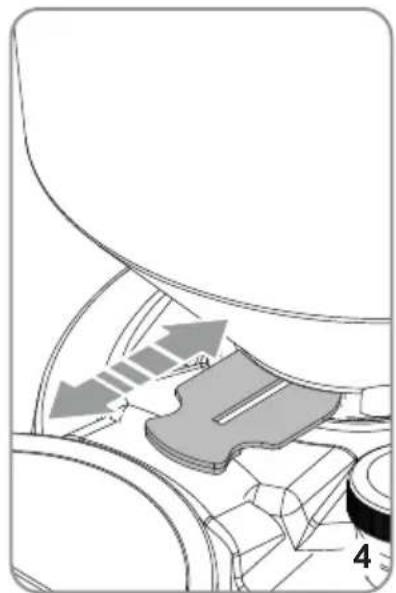
natural_image
Diagram of a mechanical component with directional arrows indicating motion or movement (no text or symbols)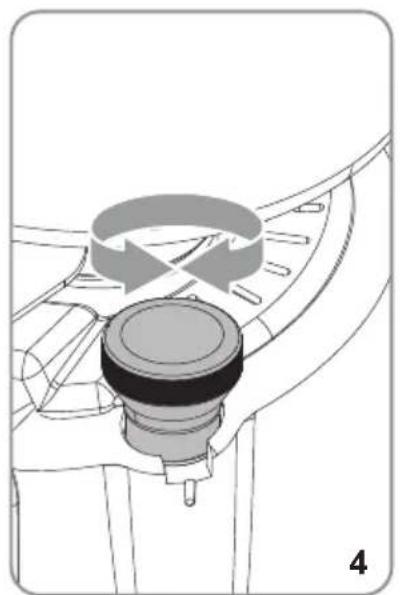
natural_image
Diagram of a mechanical component with circular motion arrows indicating rotation (no text or symbols)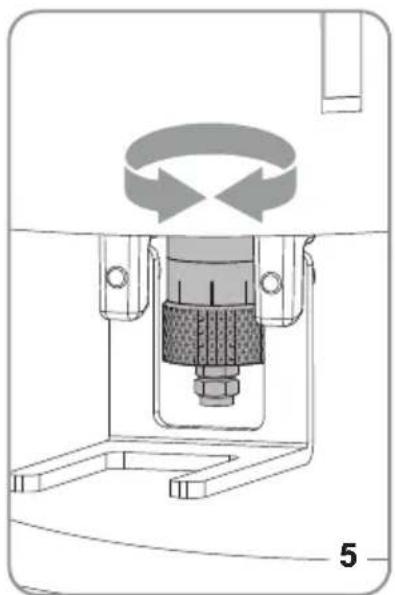
natural_image
Mechanical assembly diagram showing a rotating component with a ring and base, labeled with number 5 (no text or symbols on the diagram itself)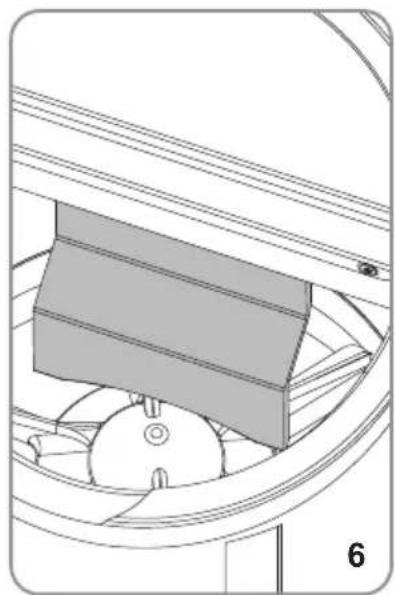
natural_image
Technical line drawing of a mechanical component with no visible text or symbols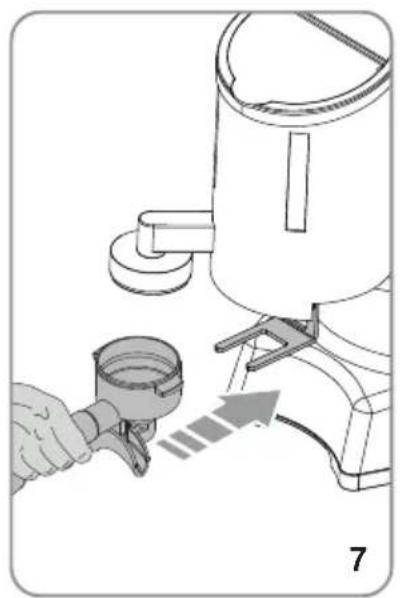
natural_image
Illustration of a hand using a tool to adjust or install a device, with no visible text or symbols.
natural_image
Illustration of a hand using a belt buckle to lift a piece of material (no text or symbols)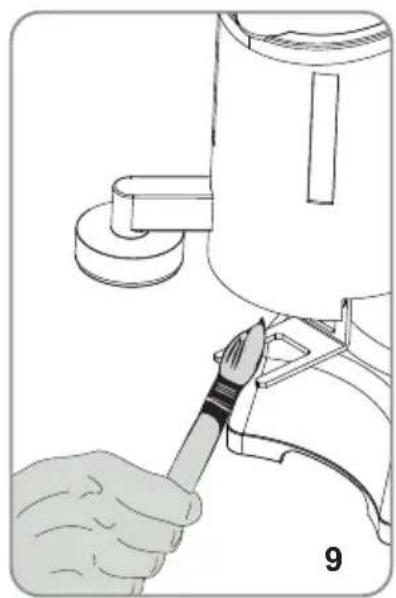
natural_image
Illustration of a hand using a tool to adjust or install a device component (no text or symbols visible)DICHIARAZIONE DI CONFORMITÀ CE / EC DECLARATION OF CONFORMITY
CE
2014/30/EU (EMC Direttive/EMC Directive)
2011/65/EU (RoHS Direttive/RoHS Directive)
Sesto Fiorentino, 4 September 2024
Filippo Conti, Legal Representative
CONTI VALERIO SRL
Via Luigi tongo, 39/41
Tel. +39 0554208011 - Fax +89 0554200910
50019.8FSTO FIORENTINO FI-
P IVA e Cod. Fisc. 03894860487

• ITALIANO 20
• ENGLISH 24
• DEUTSCH 28
• FRANÇAIS 32
- ESPAÑOL 36
*The value indicated to refer to the effective effect of the machine
ARES 65
- Ton: 30 ~s
- Toff: 270 s
ARES 80
- Ton: 30 s
- Toff: 160 s
ARES KR
- Ton: 60 s
- Toff: 900 s
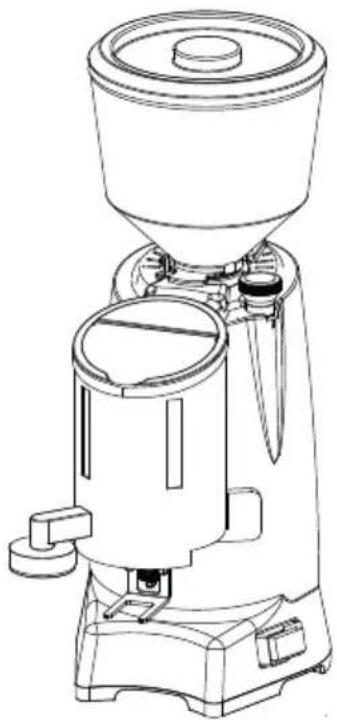
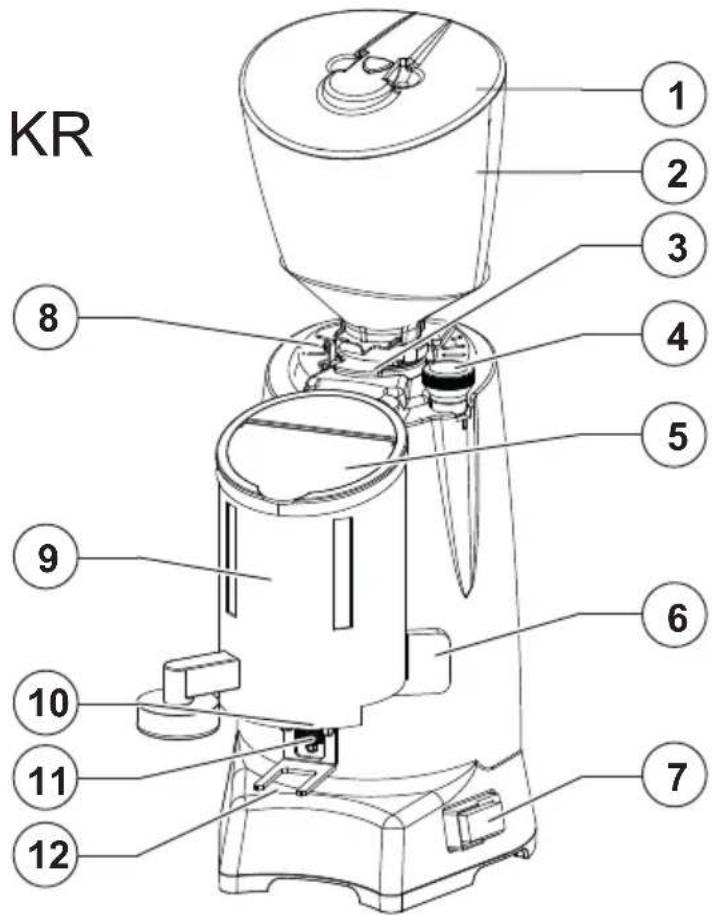
3 DESCRIPTION OF THE APPLIANCE
- Container lid
- Coffee bean container
- Coffee bean container opening/closing tab
- Grinding adjustment knob
- Doser lid
-
Doser lever
-
Switch-on button
- Coffee bean container fixing screw
- Doser unit
- Dispensing nozzle
- Dose adjustment knob
- Portafilter fork
4 LOCKING THE CONTAINER
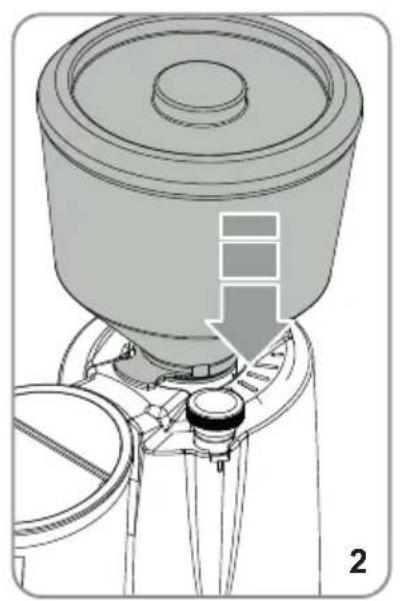
Before activating the grinder, it is necessary to fit the coffee bean container (2).
- Insert the container (2) in its seat (Fig.2), positioning it so the hole is in line with the screw (8) on the back of the appliance.
- Tighten the locking screw (Fig. 3).
5 USER INSTRUCTIONS
• After plugging the appliance in, close the coffee bean container (2) by pushing the tab at the bottom of it (3) (Fig.4).
- Remove the lid (1) from the container (2), then fill the container with coffee beans.
- Turn the appliance on by pressing the switch (7), then pull the tab (3) to let the beans pass through. If the level of ground coffee in the doser unit is low, the appliance will automatically begin grinding.
- The ground coffee enters the doser unit (9) and the flag switch inside gradually moves upwards (Fig. 6). When the level reaches the maximum, grinding stops.
• Always make sure the doser unit is half full, then sit the portafilter basket on the fork (12) and press the dosing lever (6) (Fig. 7-8). Each stroke of the lever corresponds to a single dose of ground coffee.
- The appliance reactivates automatic grinding every time the level of ground coffee in the doser unit falls too low.

ATTENTION
Do not put the ground coffee back into the doser as this may block the flag switch.

ATTENTION
To avoid injury or damage, do not insert your fingers or any other objects in the nozzle under the doser while ground coffee is being dispensed.
5.1 GRINDING AND DOSE ADJUSTMENT
To adjust the degree of grinding, turn the adjustment knob (4) clockwise to obtain a finer grind or anti-clockwise for a coarser grind, as indicated on the knob itself (Fig.4).
To regulate the weight of the dose, turn the knob (11) behind the portafilter fork (12) clockwise to increase the dose or
anti-clockwise to reduce it (Fig.5).
6 CLEANING AND MAINTENANCE

ATTENTION
Disconnect the appliance from the mains before carrying out any cleaning or maintenance work. Do not pull the power cable or the appliance itself to detach the plug from the mains.

ATTENTION
Cleaning and maintenance work must only be carried out by specialised personnel authorised by the manufacturer.

ATTENTION
Do not make provisional or makeshift repairs, nor use non-original spare parts.
6.2 CLEANING
Cleaning is fundamental for the grinder to work properly. A neglected grinder may have a negative impact on the coffee dispensing process or the accuracy of the dose and the grinding. Before cleaning, make sure the appliance is disconnected from the mains.
6.3 CLEANING THE BELL
Remove the bell from the appliance then wash the inside of it with water and a neutral soap to eliminate the oily layer left by the coffee beans. Rinse it and then dry it thoroughly. Repeat the process for the plastic lid. Do not clean in a dishwasher.
Clean these elements at least once a week.
6.4 CLEANING THE DOSER
The new doser needs to be run in. It is necessary, however, to lift the lid (5) and clean the inside of the doser with a brush at least once a week.
The dispensing nozzle must also be cleaned frequently (even several times a day) with the aid of a brush (Fig.9).
6.5 CLEANING THE GRINDING SYSTEM
Disconnect the appliance from the mains and remove the coffee bean container. Loosen the screws underneath, that hold the upper burr-holder. Clean the burrs with the aid of a brush or a dry cloth. If necessary, use a vacuum cleaner or a jet of compressed air.
ATTENTION
All cleaning and sanitisation tasks must be carried out using products approved for alimentary use.
6.6 MAINTENANCE
Check the burrs every 500-700 kg of coffee beans (and replace them if necessary). For deep-down sanitisation, use grinder cleaning tablets (available on the market).
ATTENTION
Maintenance work must only be carried out by specialised personnel authorised by the manufacturer.
ATTENTION
Do not make provisional or makeshift repairs, nor use non-original spare parts.
7 TROUBLESHOOTING
Contact specialised personnel.
1 ALLGEMEINE INFORMATIONEN
HERSTELLER:
CONTI VALERIO - Via Luigi Longo, 39/41 - 50019 Sesto Fiorentino (FI) – ITALY
MODELL:
ARES - ARES 65 - ARES 80 - ARES KR - ZT65A - OL75A
2 TECHNISCHE DATEN

- ARES 65 ARES 80 ARES KR
- LIBRETTO ISTRUZIONI
- EN
- IMPORTANT WARNINGS
- CONSERVATION OF THE MANUAL
- UNPACKING THE GRINDER
- IMPORTANCE OF THE MANUAL
- DE
- WARNUNGEN UND
- CONSERVATION DU MANUEL
- IMPORTANCE DU MANUEL
- CE
- DESCRIPTION OF THE APPLIANCE
- LOCKING THE CONTAINER
- USER INSTRUCTIONS
- ATTENTION
- GRINDING AND DOSE ADJUSTMENT
- CLEANING AND MAINTENANCE
- CLEANING
- CLEANING THE BELL
- CLEANING THE DOSER
- CLEANING THE GRINDING SYSTEM
- MAINTENANCE
- TROUBLESHOOTING
- ALLGEMEINE INFORMATIONEN
- HERSTELLER:
Brand : EUREKA
Model : Ares 80
Category : Coffee grinder