Advanced VX 6" RASA - Telescope CELESTRON - Free user manual and instructions
Find the device manual for free Advanced VX 6" RASA CELESTRON in PDF.

User questions about Advanced VX 6" RASA CELESTRON
0 question about this device. Answer the ones you know or ask your own.
Ask a new question about this device
Download the instructions for your Telescope in PDF format for free! Find your manual Advanced VX 6" RASA - CELESTRON and take your electronic device back in hand. On this page are published all the documents necessary for the use of your device. Advanced VX 6" RASA by CELESTRON.
USER MANUAL Advanced VX 6" RASA CELESTRON
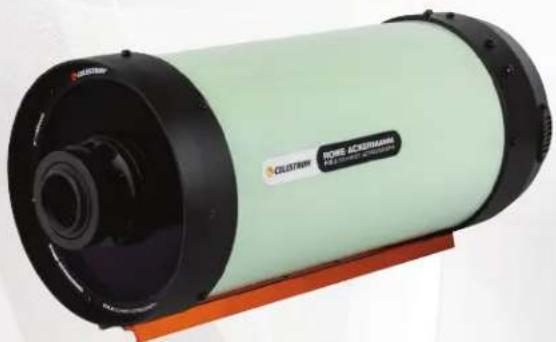
F/2.2 SCHMIDT ASTROGRAPH
6" OPTICAL TUBE ASSEMBLY
Instruction Manual
Model: 91071
natural_image
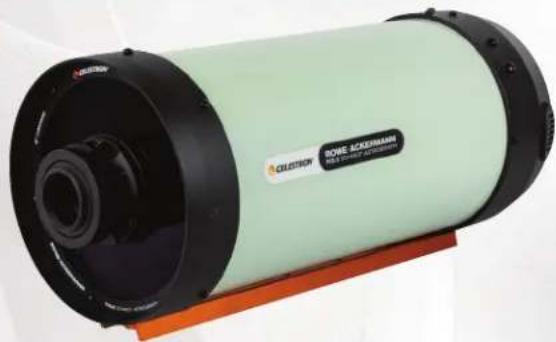
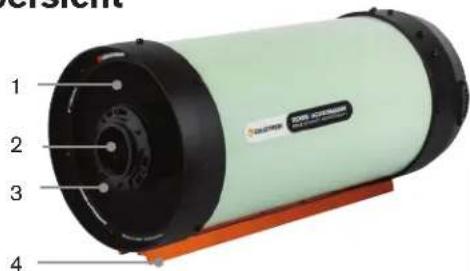
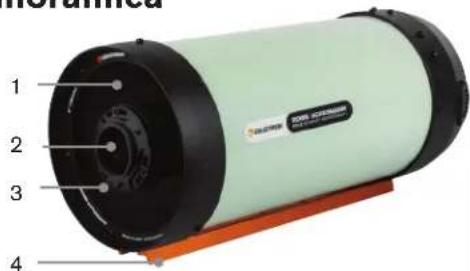
Exterior view of a cylindrical scientific instrument (no visible text or symbols on body)Overview
text_image
1 2 3 4
text_image
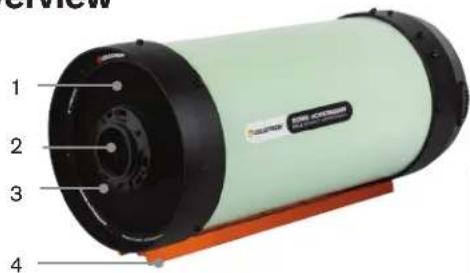
Labeled diagram of a cylindrical device with numbered parts, showing internal components and part numbers.8
9
10

11

12

13

14

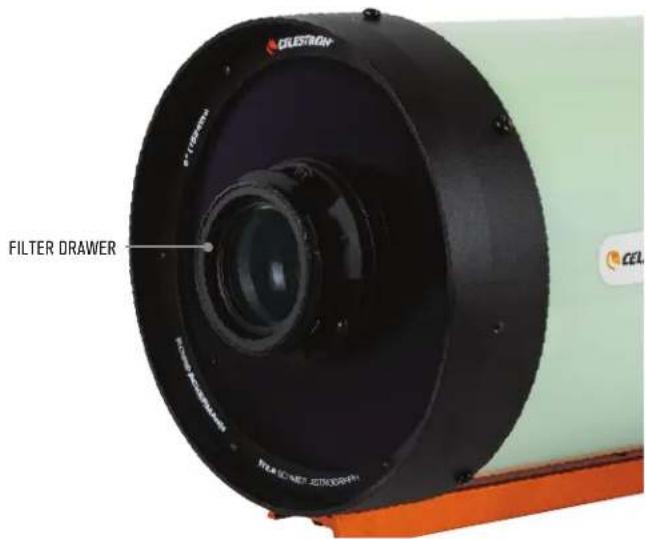
1 Schmidt Corrector 8 Dust Cover
2 Lers Group 9 Battery Pack (Batteries not included)
3 Lens Group Cell 10 Filter Drawer
4 Dovetail Mounting Bar 11 Filter Holder with 2" Clear Filter (comes installed in Filter Drawer)
5 Cooling Fan 12 1.25" Filter Adapter
6 12 DC Jack for Cooling Fan 13 Camera Adapter (comes connected to Filter Drawer)
7 Focus Knob
14 Retaining Ring (comes connected to Filter Drawer)
The Rowe-Ackermann Schmidt Astrograph 6 (RASA 6) is an incredibly fast (f/2.2) 6" aperture optical system that delivers a flat field without optical aberrations. It is capable of capturing stunning deep-sky astronomical images without the difficulties presented by slower and longer focal length telescopes. The astrograph can only be used with a camera.
Mounting the Astrograph
The RASA 6 has a CG-5 dovetail mounting bar. This is compatible with mounts that accept a CG-5 or Vixen dovetail. The astrograph weighs 8.4 lb. Choose a mount with enough load capacity to accommodate the astrograph, your camera, and any additional accessories you want to use.
Choosing a Camera
When selecting a camera to use with the RASA 6, there are several things to keep in mind.
- Sensor size - The optical design is optimized for use with sensors that have a diagonal size up to 16mm . It will still perform well with up to 22mm -diagonal sensors, but field illumination in the corners will be reduced.
- Pixel size - The RASA 6 works effectively with a wide range of sensor pixel sizes. Unlike many telescopes, it can work well with smaller pixels (e.g., less than 3 m^2 ) due to its fast focal ratio (f/2.2) and 6'' aperture.
-
Obstruction - Since it mounts in front of the optics, select a camera that blocks as little of the aperture as possible. Cylindrical cameras with an outer diameter measuring less than 75mm work best. Many astronomical and "HyperStar-compatible" CMOS cameras are especially well-suited to the RASA 6.
-
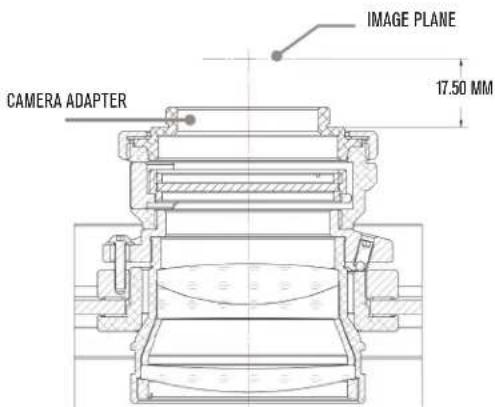
Backfocus - Backfocus, also known as flange focal distance, is the distance between a camera's sensor and the point where the camera body connects mechanically to a lens or telescope. For flat-field astrographs like the RASA 6, it's essential to position the camera's sensor precisely to match the required backfocus, ensuring the telescope's focal plane aligns with the sensor. Failure to do so may result in degraded performance at the edges of the sensor, particularly with larger sensors. For the RASA 6, the correct backfocus distance is 17.5mm from the top flat surface of the camera adapter (see drawing below). Cameras with sensors recessed more than 17.5mm into their bodies are incompatible with the RASA 6, as their sensors cannot be positioned at the proper focal plane.
Due to their large obstruction and long backfocus, DSLR cameras are not compatible with the RASA 6.
text_image
CAMERA ADAPTER IMAGE PLANE 17.50 MMInstalling a Camera
The RASA 6's camera adapter is compatible with M42 camera mounting threads. The required backfocus distance is 17.5mm. If your camera's backfocus is shorter than this, use optional M42 extension rings to place the camera's sensor at the proper location. If your camera's backfocus is longer than this, it is not compatible with the RASA 6. For the best results with larger sensors, get the backfocus within 1mm of the required distance.
To attach your camera:
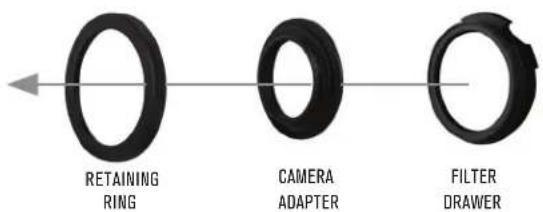
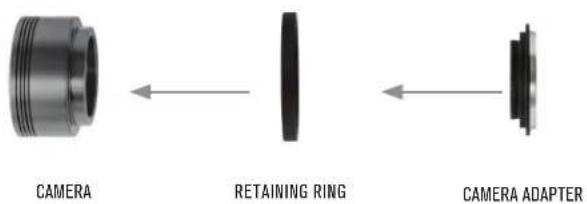
- Remove the retaining ring and camera adapter from the filter drawer by first rotating the retaining ring counterclockwise. Once loosened, detach it along with the camera adapter from the front of the filter drawer assembly. The 2" Clear Filter can remain installed in the filter drawer.
text_image
RETAINING RING CAMERA ADAPTER FILTER DRAWER- Connect the filter drawer (with 2" Clear Filter installed) to the front lens assembly of the RASA 6. It threads clockwise onto the lens housing.
text_image
FILTER DRAWER- Connect the camera adapter through the retaining ring and onto your camera's M42 threads as shown below. Rotate the camera adapter clockwise until it is securely threaded onto the camera.
text_image
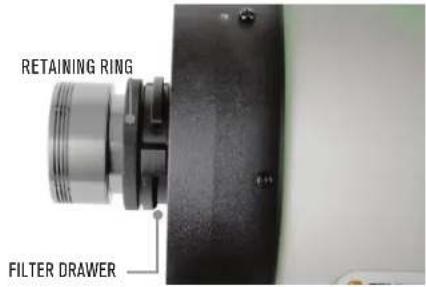
CAMERA RETAINING RING CAMERA ADAPTER- Connect the retaining ring back onto the filter drawer and rotate the ring clockwise just until the point where it stops rotating. Do not overtighten the retaining ring! The camera is now properly attached to the RASA 6.
text_image
RETAINING RING FILTER DRAWERCAUTION: Overtightening the retaining ring can cause the lens group cell to rotate relative to the Schmidt corrector, which may affect optical alignment. Keep the camera adapter snug against the filter drawer, but do not overtighten the ring.
Once the camera is installed, you can adjust its orientation by slightly loosening the retaining ring. Loosen the ring no more than 1/8th turn, rotate the camera as desired, and retighten the ring. Remember not to overtighten the ring.
NOTE: To install the included dust cover, you must first remove the camera adapter, retaining ring, and filter drawer. We recommend placing these items inside an accessory case. The 2" Clear Filter can remain in the filter drawer. Be sure to keep the glass surfaces free from dust and debris.
Cooling Down and Fan Operation
The RASA 6 performs best when it has reached thermal equilibrium with the outside air. The greater the temperature difference between the astrograph and the outdoors, the longer it will take to cool down. It is a good idea to store the astrograph in a cool area and keep it outside for an hour or so before imaging.
The RASA 6's rear cell features an air cooling system that uses a fan to cool the optics to the ambient temperature. The fan pulls air through the mesh vents on the perimeter of the rear cell. The mesh prevents dust from entering the astrograph. The supplied battery pack powers the fan. It requires 8x AA batteries (not included). Install the batteries as indicated in the plastic mold of the battery holder. Plug the battery pack into the jack near the fan to turn it on. When you are ready to image, unplug the battery pack to turn the fan off.
You can also run the fan using a 12V DC power source supplying at least 100mA. Connect to the fan jack with a 5.5mm/2.1mm tip positive DC power plug.
Focusing
The focuser moves the primary mirror forward and backward within the rear cell. To focus, turn the focus knob until the image appears sharp in your camera. If the knob will no longer turn, the focuser has reached the end of its mechanical travel. In this case, rotate the knob in the opposite direction until focus is achieved. A single turn of the focusing knob does not move the primary mirror much; it takes about 30 turns to go through the entire range of focus. If you are trying to focus on a dim object and you turn the focus knob too quickly, you could go right through focus without seeing the image. To avoid this problem, try first focusing on a bright star.
Celestron offers a focus motor that is compatible with the RASA 6. A focus motor offers great convenience for astroimaging, allowing you to adjust focus directly from the same computer controlling your camera.
Attaching Accessories
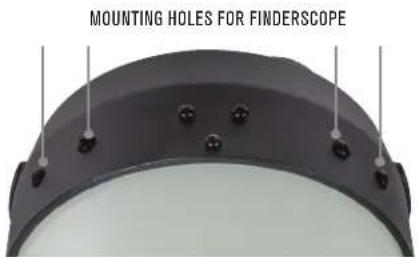
A Celestron finderscope can be attached using the pairs of threaded holes in the rear cell of the astrograph. These holes have Phillips-head screws in them when not in use.
text_image
MOUNTING HOLES FOR FINDERSCOPEThere is also an optional Dovetail Accessory Bar available for the RASA 6. This is the same as the included CG-5 dovetail bar on the bottom of the RASA 6 (i.e., the one used for connection to a mount) but connects to the top of the RASA 6. You can use this dovetail bar as a platform for connecting other accessories, such as a guidescope or a Celestron Smart DewHeater Controller.
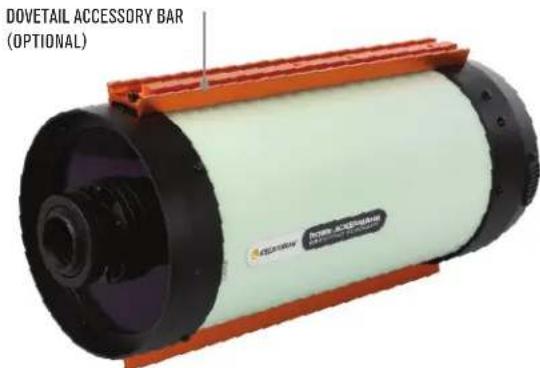
text_image
DOVETAIL ACCESSORY BAR (OPTIONAL)Using Filters
The RASA 6 includes a filter holder designed for 2" format filters. You can also use 1.25" filters by installing the 1.25" filter adapter in the filter holder. A clear 2" filter is pre-installed in the drawer and should remain in place when no other filters are being used. This clear filter is essential to maintaining the optical performance of the telescope's fast f/2.2 system. When you remove the clear filter and install an optional filter, no glass is added to the optical path and performance remains consistent.
If you wish to use an optional filter:
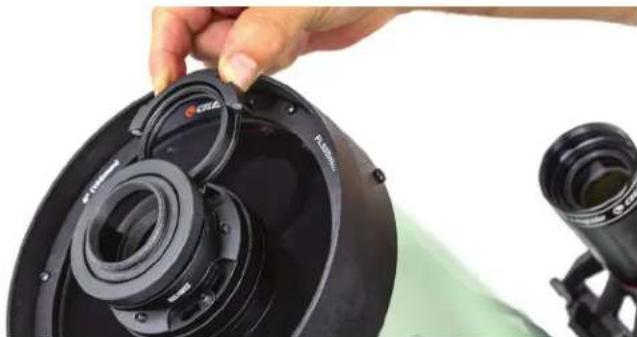
- Carefully remove the filter holder by grasping its handle with your fingers, then pulling it to dislodge it from the magnets which keep it in place.
natural_image
Close-up of a hand adjusting a black camera lens component, with another camera visible in the background (no text or symbols)-
Carefully unthread and remove the clear filter from the filter holder, avoiding contact with the glass surfaces. Store the clear filter in a safe location to keep it from getting lost, damaged, or dirty.
-
Thread the 2" filter you wish to use into the filter holder. Again, be careful not to touch the glass!
- To use 1.25" filters, first thread the 1.25" filter adapter into the filter holder. NOTE: Only use 1.25" filters with smaller camera sensors that have a diagonal size of less than 10mm. Otherwise the filter may cause vignetting.
-
Replace the filter holder into the filter drawer until the magnets connect and it seats properly.
-
Refocus the telescope as needed.
Dew Prevention
The Schmidt corrector is highly prone to condensation because it is directly exposed to the night sky. When the astrograph's temperature drops below the dew point, dew can form on the corrector in minutes. To prevent this, use an optional 6" dew shield, which slows radiant cooling by shrouding the corrector. A dew shield also acts as a lens shade, blocking stray light and improving image contrast. For more severe conditions, add a Celestron Dew Heater Ring to gently warm the corrector and keep it dry throughout the night.
Always allow the astrograph to dry completely before storage if covered in dew. Leave the dust cover off while drying to prevent mold growth on the optical surfaces.
Cleaning of the Optics
For the most part, dust, debris, and fingerprints on the optics have minimal impact on imaging with the RASA 6. However, if the external surfaces of the Schmidt corrector or lens group become excessively dirty, you should clean them. Remove dust with a blower bulb or optical cleaning brush. For remaining debris or stains, use optical cleaning solution and lens cleaning tissue. Apply the solution to the tissue, then gently clean the lens using light strokes. Avoid rubbing in circles. When cleaning the corrector, make strokes from the center outward, using a new tissue for each stroke to prevent spreading oils or debris.
To reduce the need for cleaning, always keep the dust cover on the astrograph when not in use.
Only the the Celestron Repair Department should clean your RASA's internal optical surfaces. If your RASA 6 needs internal cleaning, contact Celestron for a return authorization number and price quote.
Collimation
The RASA 6 optics are factory-aligned and generally do not require collimation. The primary mirror and corrector are permanently set during manufacturing and cannot be adjusted. However, if needed, the tilt of the lens group can be adjusted to collimate the entire optical system.
Collimate the astrograph with a camera installed. Choose a camera that does not obstruct the aperture of the Schmidt corrector or one with a cylindrical body, as this makes it easier to observe the concentricity of the defocused star's diffraction pattern.
You will need:
- A 2mm hex key (using two can make adjustments easier)
- Your RASA, mount, and camera fully set up and ready for imaging
-
Point the astrograph at a bright star and focus the camera. Center the star in the camera's field of view.
-
Defocus the star by about one turn of the focus knob.
-
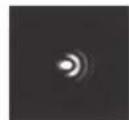
Inspect the defocused star diffraction pattern. When collimated, the pattern should look like a concentric donut. If the pattern is concentric, no adjustment is necessary. If the "donut hole" is not centered within the pattern, then some adjustment is needed.
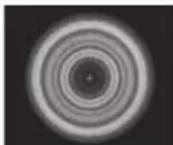
OUT-OF-FOCUS STAR IMAGE FOR COLLIMATED TELESCOPE
- There are two sets of three collimation screws that adjust the tilt of the lens group. The setscrews act as push screws, while the button head screws act as pull screws. The screw sets work together as a push-pull tilt adjustment. Using a hex key, adjust the collimation by slightly loosening two of the button head screws and tightening the setscrew located between them. Alternatively, you can loosen two of the setscrews and tighten the button head screw between them to tilt the lens group in the opposite direction. Always loosen two of the button head screws or setscrews first, then tighten the screw located between them.

natural_image
Close-up of a mechanical device with cylindrical components and mounting features (no visible text or symbols)SETSCREWBUTTON HEAD SCREW
- If the defocused star pattern is thin on one side, adjust the collimation screws so the star moves towards the thin side, then adjust the position of the astrograph to re-center the star. Repeat this until the defocused star image is concentric.
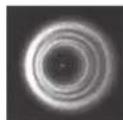

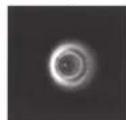
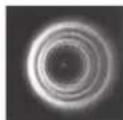
OUT-OF-FOCUS STAR IMAGES FOR TELESCOPE NEEDING COLLIMATION
Specifications
| Optical Design | Rowe-Ackermann Schmidt Astrograph | Camera Mounting Threads | M42 |
| Aperture 152mm Dovetail Mounting Bar CC-5 | |||
| Focal Length | 335 mm | Tube Dimensions | 24" length, 7" diameter |
| Focal Ratio | f/2.2 | Tube Weight | 8.4 lb |
| Central Obstruction 77mm (51 16 of aperture diameter) | Backfocus(with M42 camera adapter) | 17.5mm | |
| Optical Coatings | Enhanced aluminum, Starbright XLT multi-coatings | Spot size | < 1.5 μm RMS across the image circle |
| Filter Drawer | Accepts 2" format filters, includes 1.25" filter adapter | Wavelength Range | 400 - 700 nm |
| Clear Filter | 2" filter, removable, AR coatings. 2.0mm glass thickness | Off-axis Illumination | 91 12 at 8mm off-axis |
| Focuser | Standard SCT focuser | Image Circle | 16.0mm diameter, 2.74° |
| Cooling Fan 12V DC, Magl.ev Usable Field | 22.0mm diameter, 3.76 degrees, only minimal performance loss at edge of FOV | ||
FCC Note: This equipment has been tested and found to comply with the limits for a Class B digital device, pursuant to part 15 of the FCC Rules. These limits are designed to provide reasonable protection against harmful interference in a residential installation. This equipment generates, uses, and can radiate radio frequency energy and, if not installed and used in accordance with the instructions, may cause harmful interference to radio communications. However, there is no guarantee that interference will not occur in a particular installation. If this equipment does cause harmful interference to radio or television reception, which can be determined by turning the equipment off and on, the user is encouraged to try to correct the interference by one or more of the following measures:
- Reorient or relocate the receiving antenna.
- Increase the separation between the equipment and receiver.
- Connect the equipment into an outlet on a circuit different from that to which the receiver is connected.
- Consult the dealer or an experienced radio/TV technician for help.
NEED ASSISTANCE? Contact Celestron Technical Support
celestron.com/pages/technical-support

CELESTRON
©2024 Celestron. Celestron and Symbol are trademarks of Celestron, LLC. All rights reserved. Celestron.com
US: 2835 Columbia Street, Torrance, CA 90503 USA
UK: Unit 2 Transigo, Gables Way, Thatcham RG19 4JZ, United Kingdom
This product is designed and intended for use by those 14 years of age and older.


Made in China | 12-24

CELESTRON®
ROWE-ACKERMANN
F/2,2 SCHMIDT ASTROGRAPH
TUBE OPTIQUE 6"
Mode d'emploi
Modèle : 91071

natural_image
Exterior view of a cylindrical scientific instrument with black and light green casing, mounted on an orange base (no visible text or symbols)natural_image
Exterior view of a cylindrical industrial device with numbered components (no visible text or symbols)8
9
10

11

12

13

14

natural_image
Close-up of a black dome-shaped object with evenly spaced small black dots and vertical lines, no visible text or symbols.natural_image
Exterior view of a cylindrical industrial device with orange frame and black casing (no visible text or symbols)natural_image
Close-up of a black speaker cover with a camera lens assembly, no visible text or symbolsF/2.2 SCHMIDT ASTROGRAPH
6" TUBUS
Bedienungsanleitung
Modell: 91071
natural_image
Exterior view of a cylindrical scientific instrument (no visible text or symbols on body)Übersicht
text_image
1 2 3 4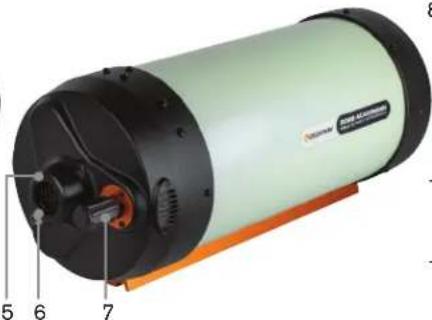
natural_image
Exterior view of a cylindrical industrial device with labeled parts (no readable text or symbols beyond numbers)8
9
10

11

12

13

14

text_image
CLESTRON FILTERSCHUB- LADEtext_image
SICHERUNGSRING FILTERSCHUBLADEnatural_image
Close-up of a hand adjusting a black speaker component with lens assembly (no visible text or symbols)USA: 2835 Columbia Street, Torrance, CA 90503, USA
F/2.2 SCHMIDT ASTROGRAPH
GRUPPO TUBO OTTICO 6"
natural_image
Exterior view of a cylindrical scientific instrument with black and light green casing (no visible text or symbols)Panoramica
text_image
1 2 3 4
natural_image
Exterior view of a cylindrical industrial device with numbered components (no visible text or symbols)8

9
10

11

12

13

14

natural_image
Close-up of a black dome-shaped object with evenly spaced small black dots and vertical lines, no visible text or symbols.natural_image
Exterior view of a cylindrical industrial device with orange frame and white casing (no visible text or symbols)Utilizzo dei filtri
natural_image
Close-up of a hand holding a black camera lens assembly with visible lens and frame (no text or symbols)natural_image
Close-up of a mechanical device with cylindrical components and a transparent housing (no visible text or symbols)VITE A TESTA TONDA
VITE DI FISSAGGIO
natural_image
Exterior view of a cylindrical scientific instrument with black and light green casing (no visible text or symbols)Resumen
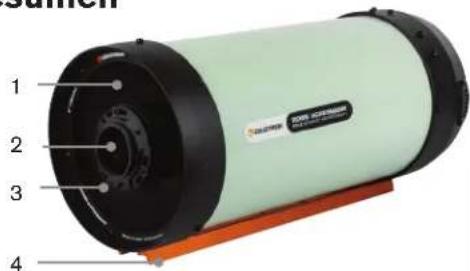
text_image
1 2 3 4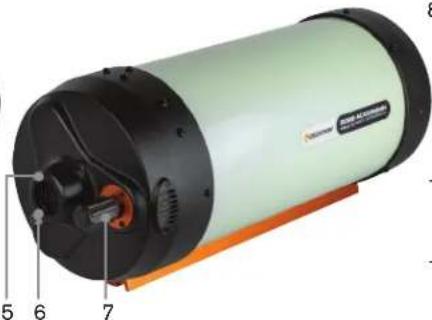
natural_image
Cross-sectional diagram of a cylindrical industrial device with numbered components (no text or symbols visible)8

9

10

11

12

13

14