60LCM Computerized - Telescope CELESTRON - Free user manual and instructions
Find the device manual for free 60LCM Computerized CELESTRON in PDF.

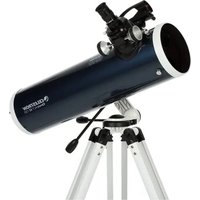
| Device type | Celestron 60LCM computerised 60 mm refractor astronomical telescope, motorised altazimuth GoTo mount, ideal as a beginner instrument for the Moon, planets and bright deep-sky objects. |
|---|---|
| Optics | Achromatic refractor tube. Aperture 60 mm, focal length 700 mm, focal ratio f/11.6. Compact, lightweight tube, easy to handle. |
| Motorised GoTo mount | Altazimuth mount with NexStar+ computerised hand control. SkyAlign procedure: point any 3 bright objects in the sky and the hand control aligns the base on its own — no need to know any star names. |
| Hand controller | Database of more than 4 000 celestial objects (planets, stars, clusters, galaxies, Messier and NGC nebulae). Automatic GoTo, sidereal tracking, Sky Tour function according to date and location. |
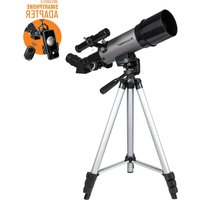
| Bundled eyepieces | Two 1.25" Kellner eyepieces: 25 mm (low power 28×, wide field for searching) and 9 mm (high power 78×, narrower field for detail). Built-in 90° star diagonal for comfortable viewing. |
| Calculating magnification | Magnification = telescope focal length (700 mm) ÷ eyepiece focal length. With the 25 mm eyepiece = 28×, with the 9 mm = 78×. A 2× Barlow lens (sold separately) doubles those values. Practical useful limit on a 60 mm aperture: about 120 to 140×. |
| Tripod and base | Pre-assembled aluminium tripod, height adjustable. Bubble level built into the motorised base for levelling before alignment. Accessory tray on the lower triangle. |
| Power supply | 8 AA batteries (not included) or external 12 V power input. Battery operation is not advised for long observing sessions because the motors drain them; an external 12 V battery pack is recommended for a full evening. |
| Solar safety | ⚠ Never use a screw-on solar eyepiece filter or a Herschel wedge: heat focused by the objective can crack the accessory and cause severe eye injury. To observe the Sun, you must use a full-aperture filter mounted on the front of the tube (sold separately). |
| Typical observing targets | Moon (craters, maria, terminator), planets (Venus, Jupiter and the Galilean moons, Saturn and its rings, Mars, Mercury), double stars, main clusters (M13, M45 Pleiades, M44), bright nebulae (M42 Orion). Faint galaxies and nebulae remain limited by the aperture. |
| Target audience | Beginners and supervised children, entry level. Not suited to serious astrophotography (altazimuth mount, field rotation). Excellent for discovering the sky without having to learn manual star-hopping. |
Frequently Asked Questions - 60LCM Computerized CELESTRON
User questions about 60LCM Computerized CELESTRON
0 question about this device. Answer the ones you know or ask your own.
Ask a new question about this device
Download the instructions for your Telescope in PDF format for free! Find your manual 60LCM Computerized - CELESTRON and take your electronic device back in hand. On this page are published all the documents necessary for the use of your device. 60LCM Computerized by CELESTRON.
USER MANUAL 60LCM Computerized CELESTRON
natural_image
Three identical telescope tripods arranged side by side, no visible text or symbols on the devices themselves.60LCM
80LCM
114LCM
LCM
TELESCOPES SERIES
INSTRUCTION MANUAL
MODELS #22050, 22051, 31150
ENGLISH
(60LCM, 80LCM, 114LCM)
CONTENTS
SOLAR WARNING 6
WHAT'S IN THE BOX. 7
ASSEMBLING YOUR TELESCOPE. 8
The Tripod 8
The Computerized Mount 8
The Telescope Tube....9
The Star Diagonal (Refracting Telescopes Only). 9
The Eyepiece 10
The StarPointer Finderscope 10
The Hand Control 11
Powering the Telescope....11
Moving the Telescope....12
Aligning the Finderscope 12
OPERATING THE TELESCOPE 13
The Hand Control 13
Hand Control Operation 14
Alignment Menu. 14
Sky Align 14
Auto Two-Star Align 16
Two-Star Alignment. 16
One-Star Align 17
Solar System Align 17
Re-Alignment....18
Object Catalogs....18
Selecting an Object 18
For Planets 18
For Stars 18
For Deep-Sky Objects 19
Viewing Object Info. 19
Sky Tour Mode 19
Direction Buttons....19
Motor Speed Button 20
MAIN MENU 20
Tracking Menu 20
Tracking Mode 20
Tracking Rate 20
View Time-Site. 21
Hand Control Menu 21
Lights Control. 21
Scrolling Menu 21
Toggle Bold Font 21
Set Contrast 21
Set Language 21
Scope Setup Menu 21
Setup Time-Site 21
Anti-backlash 21
Slew Limits 22
Filter Limits 22
Direction Buttons 22
GoTo Approach....22
Cordwrap 22
Utility Menu 22
GPS On/Of. 22
Factory Setting 22
Version 23
Get Axis Position 23
GoTo Axis Position 23
Hibernate 23
Sun Menu....23
Calibrate GoTo 23
Set Mount Position 23
User Defined Objects 24
Get RA-DEC 24
GoTo RA-DEC. 24
Identify 24
LCM SERIES MENU TREE 25
YOUR FIRST ASTRONOMICAL OBSERVING SESSION 26
The Moon 26
CELESTIAL OBSERVING TIPS 26
Magnification. 26
Field of View 26
The Planets 27
Deep-Sky Objects. 27
Sky Conditions 27
Selecting an Observing Site 28
Choosing the Best Time to Observe 28
Cooling the Telescope 28
Adapting your Eyes 28
Astroimaging. 29
Deep-Sky Observing Equipment 29
Star Hopping 30
CARE AND CLEANING OF THE TELESCOPE 30
COLLIMATION OF A NEWTONIAN TELESCOPE. 30
Aligning the Secondary Mirror 31
Aligning the Primary Mirror 31
CELESTRON TWO YEAR LIMITED WARRANTY. 32
⚠️SOLAR WARNING
- Never look directly at the Sun with the naked eye or with a telescope unless you have the proper solar filter. Permanent and irreversible eye damage may result.
- Never use your telescope to project an image of the Sun onto any surface. Internal heat build-up can damage the telescope and any accessories attached to it.
- Never use an eyepiece solar filter or a Herschel wedge. Internal heat build-up inside the telescope can cause these devices to crack or break, allowing unfiltered sunlight to pass through to the eye.
- Do not leave the telescope unsupervised, either when children are present or adults unfamiliar with the correct operating procedures of your telescope are present.
WHAT'S IN THE BOX
We recommend saving your telescope box so it can be used to store the telescope when it is not in use. Unpack the box carefully as some parts are small. Use the parts list below to verify that all parts and accessories are present.
PARTS LIST
text_image
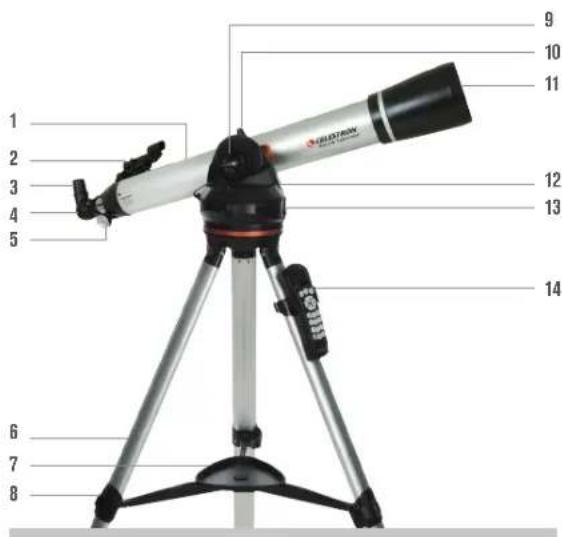
1 2 3 4 5 6 7 8 9 10 11 12 13 14(80LCM Refractor shown)
- Telescope Tube
- StarPointer® Finderscope
- Eyepiece
- Star Diagonal
- Focus Knob
- Tripod
- Accessory Tray
- Tripod Leg Clamp
- Altitude Clutch Knob
- Telescope Mounting Knob
- Objective Lens
- Computerized Mount
- On/Off Switch
- Hand Control & Hand Control Holder

text_image
1 2 3 4 5 6 7 8 9 10 11 12 13(114LCM Newtonian shown)
- Telescope Tube
- Telescope Mounting Knob
- Altitude Clutch Knob
- Primary Mirror
- Computerized Mount
- Tripod
- Accessory Tray
- Tripod Leg Clamp
- StarPointer® Finderscope
- Eyepiece
- Focus Knob
- On/Off Switch
- Hand Control & Hand Control Holder
ASSEMBLING YOUR TELESCOPE
THE TRIPOD
The LCM tripod comes fully assembled, so setting it up is easy. To setup the tripod:
- Remove the tripod from the box.
- Loosen the clamps on the bottom of each leg by flipping the lever outward. Extend the inner section of the leg to the desired length. Tighten the leg clamp by flipping the lever inward to secure the legs.
- Stand the tripod upright and pull the tripod legs apart until the center brace snaps into place.
- Place the accessory tray on top of the center brace line up the keyed hole in the center. Rotate the tray until the tabs at the three points of the tray snap into the locking clips on each arm of the tripod's center brace.
- Attach the hand control holder by positioning the holder with the square plastic tab facing up and push against the tripod leg until it snaps in to place.
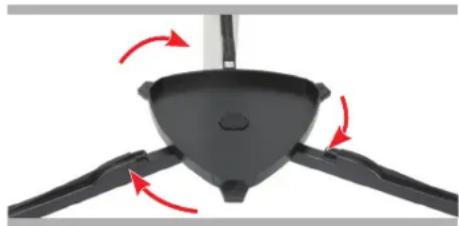
natural_image
Close-up of a black plastic fan with red directional arrows indicating rotation or movement (no text or symbols)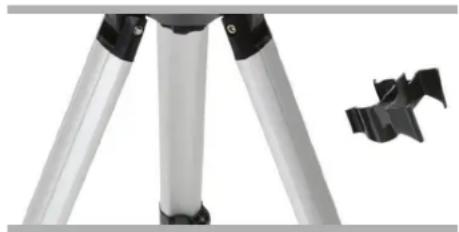
natural_image
Close-up of a tripod-mounted camera with a black clip attached (no text or symbols visible)THE COMPUTERIZED MOUNT
To attach the computerized mount to the tripod:
- Place the motorized base on top of the tripod making sure that the three round feet rest on the round flat pads on the inside of the tripod head.
- Thread the mounting screw located under the tripod head into the hole at the bottom of the motorized base and hand tighten to secure the mount in place.
Now that the base is attached to the tripod, it is a good idea to use the included bubble level to more accurately level the telescope:
- Place the bubble level on the top of the motorized base.
- Adjust the tripod legs until the bubble level shows the base to be leveled.
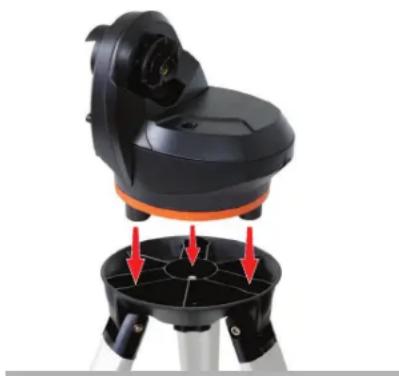
natural_image
Top-down view of a black-and-orange scientific instrument mounted on a tripod, with red arrows pointing to its base (no text or symbols visible)THE TELESCOPE TUBE
To attach the telescope tube to the mount:
- Losen the altitude clutch by turning the knob counter-clockwise. Rotate the tube mounting clamp so that the mounting knob is positioned on the top of the base. Retighten the altitude clutch knob by turning it clockwise until it is snug. Do not overtighten.
- Loosen the telescope mounting knob by turning the knob counter-clockwise.
- Slide the telescope tube's dovetail mounting bar into the tube clamp. Make sure the printing on the telescope tube is right side up when the tube is attached to the base.
- Tighten the telescope mounting knob by turning the tube mounting knob clockwise to secure the tube to the base.
Your telescope is fully assembled and is ready to attach the accessories.
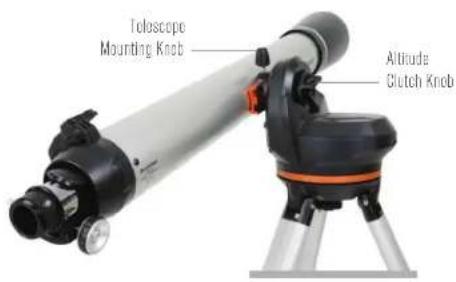
text_image
Telescope Mounting Knob Altitude Clutch KnobTHE STAR DIAGONAL (Refracting Telescopes Only)
The erect image diagonal attaches to the back of a refracting telescope and contains a small prism that reflects light at a 90^ angle, providing a more comfortable viewing position. Most astronomical telescopes will give a view that is either inverted or reversed left-to-right. The erect image diagonal corrects the image so that you will have a 100% correctly oriented image, making your telescope perfect for daytime terrestrial observing.
To insert the diagonal:
- Remove the caps from both sides of the diagonal.
- Loosen the setscrews on the back of the focuser and pull out the small dust cap.
- Insert the smaller tube on the diagonal into the back of the focuser and secure it by tightening the setscrews. You can adjust the angle of the star diagonal to any desired direction before tightening the screws.
NOTE: An erect image diagonal is not able to reach focus on a Newtonian telescope. The image in a Newtonian telescope will always appear upside-down.
natural_image
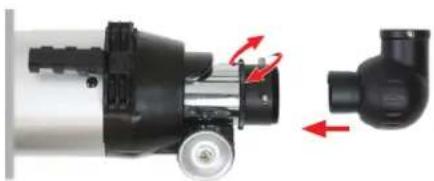
Mechanical component diagram showing a motor and pump assembly with red directional arrows indicating motion (no text or symbols)THE EYEPIECE
Your telescope comes with two eyepieces. The 25 mm which will give low magnification with a moderately wide field of view. The 9 mm will give you higher magnification, but a narrower field of view. Additional eyepieces can be purchased to increase or decrease the magnification to your desired level. When first locating an object, it is best to use the 25 mm eyepiece, then, once the object is centered, change to the 9 mm eyepiece to "zoom in" on it.
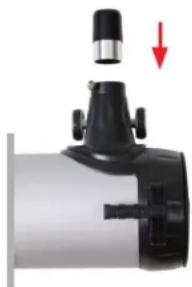
To install the eyepiece on a 60LCM and 80LCM refracting telescopes:
- Loosen the setscrew on the open end of the star diagonal.
- Insert the silver barrel of the 25 mm eyepiece into the star diagonal.
- Tighten the setscrews to secure the eyepiece in pace.
- To see the sharpest image possible, focus by looking through the eyepiece and slowly turning the focusing knobs until the image comes into sharp focus.
To install the eyepiece on a 114LCM Newtonian telescope:
- Loosen the setscrews on the end of the focuser and remove the dust cap.
- Insert the silver barrel of the 25 mm eyepiece directly into the focuser.
- Tighten the setscrew to secure the eyepiece in place.
- To see the sharpest image possible, focus by looking through the eyepiece and slowly turning the focusing knobs until the image comes into sharp focus.

natural_image
Mechanical component with a red arrow indicating direction, no visible text or symbolsRefractor
natural_image
Close-up of a mechanical device with a black component and red arrow indicating direction (no text or symbols)Newtonian
THE STARPOINTER® FINDERSCOPE
Your telescope comes with a StarPointer ^® red-dot fi nderscope that you will use as a sighting tool when aiming the telescope at a target.
To install the finderscope:
- Loosen the two Philips-head screws on the side of the fi nderscope and slide the clamp over the dovetail bracket near the telescope focuser. The large window on the fi nder should be facing the front of the telescope.
- Secure the fi nderscope in place by tightening the two Philipshead screws. Do not over tighten these screws, just make the connection snug.
- Remove the small plastic tab under the battery cover by pulling it straight out. This is installed to prevent the battery from accidentally discharging during transportation.
text_image
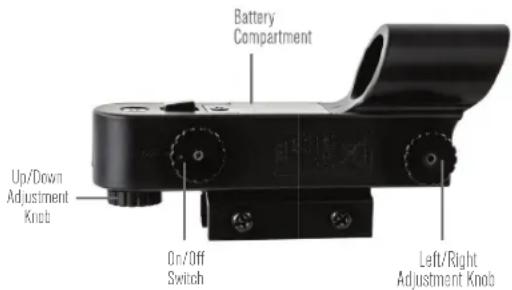
Battery Compartment Up/Down Adjustment Knob On/Off Switch Left/Right Adjustment KnobTHE HAND CONTROL
The LCM hand control has a phone jack type connector at the end of its cord.
To connect to the scope:
- Locate the hand control port on the top of the computerized mount.
- Push the plug at the end of the hand control cord into the port until it clicks into place.
- Slide the hand control downward into its holder on the tripod leg. To remove it, lift straight up.

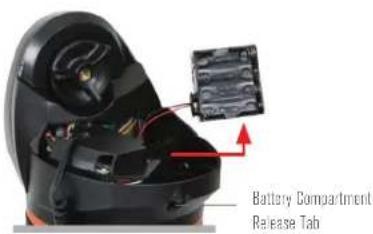
text_image
Hand Control Port Battery Compartment Release Tab Power Switch 12v OutletPOWERING THE TELESCOPE
The LCM can be powered by 8 user supplied AA size alkaline batteries or an optional 12V AC adapter.
To install batteries into the LCM:
- Press the tab on the front of the battery compartment and remove the cover.
- Gently remove the battery holder from inside the battery compartment.
- Place 8-AA batteries (user supplied) inside the battery holder, taking care to match the battery polarity with the notations on the battery holder.
- Return the battery holder back inside the base and replace the cover.
- Flip the power switch to the "On" position. The light on the power button and hand control should come on.
NOTE: When replacing the batteries, be sure to replace all 8 batteries with fresh ones at the same time. Never mix old and new batteries.
text_image
Battery Compartment Release Tab
natural_image
Close-up of a black ergonomic device with attached hardware and a red arrow indicating a downward motion (no text or symbols visible)MOVING THE TELESCOPE
The LCM computerized mount was designed to be moved using the hand control. With the power on, this can be done by pressing the four directional buttons on the hand control. You can change the speed of the motors by pressing the MOTOR SPEED button, then selecting a number from 1 to 9. For initial setup you should keep the rate above Motor Speed 5. When using the hand control to slew the telescope, the altitude clutch should be tightened.
The scope can be moved by hand in the altitude axis, but only when the altitude clutch has been loosened. Failure to loosen this clutch and forcing the telescope to move up or down can result in damage to the motor or gears. The mount does not have a clutch in the azimuth (or right and left direction). It is never safe to move the scope by hand left and right.
ALIGNING THE RED DOT FINDERSCOPE

natural_image
Close-up of a telescope mounted on a tripod, showing mechanical components and a close-up inset (no text or symbols visible)The fi nder is one of the most important parts of your telescope. It helps you locate objects and center them in the eyepiece. The fi rst time you assemble your telescope, you need to align the fi nder to the telescope's main optics. It's best to do this during the day*.

* SOLAR WARNING! Never attempt to view the Sun through any telescope without a proper solar fi Iter!
natural_image
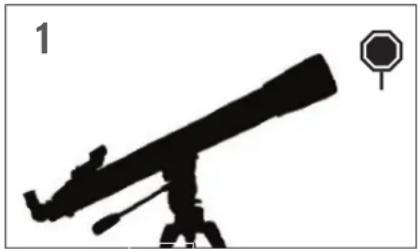
Silhouette of a telescope with an octagonal target symbol (no text or labels)CHOOSE A TARGET
Take the telescope outside during the day and find an easily recognizable object, such as a streetlight, car license plate or sign. The object should be as far away as possible, but at least a quarter mile away.
text_image
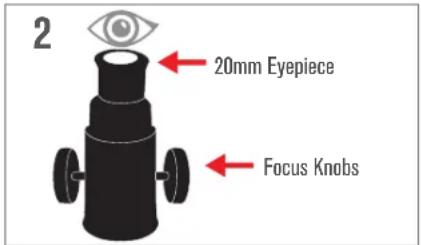
2 20mm Eyepiece Focus KnobsCENTER THE TARGET IN THE EYEPIECE
Look through the telescope using your lower powered eyepiece. Move the telescope until the object you chose lies in the center of the view. If the image is blurry, gently turn the focus knobs on either side of the telescope until it comes into sharp focus.
NOTE: The image in your telescope may appear inverted. This is perfectly normal in astronomical telescopes.

natural_image
Simple black-and-white diagram of a target with a red dot and concentric circles, no text or symbols present.LOOK THROUGH FINDERSCOPE
Once the object is centered in your 20mm eyepiece, look through the finderscope and locate the red dot.

text_image
4 adjustment knob (side-to-side) adjustment knob (up-and-down)ADJUST THE FINDERSCOPE
Without moving the telescope, use the two adjustment knobs to move the fi nder around until the red dot appears over the same object you are observing in the telescope's 20mm eyepiece.
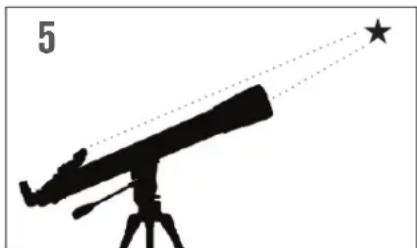
natural_image
Silhouette of a telescope on a tripod with a star and dotted lines indicating direction (no text or symbols)YOUR FINDERSCOPE IS NOWALIGNED!
It should not require realignment unless it is bumped or dropped.
OPERATING THE TELESCOPE
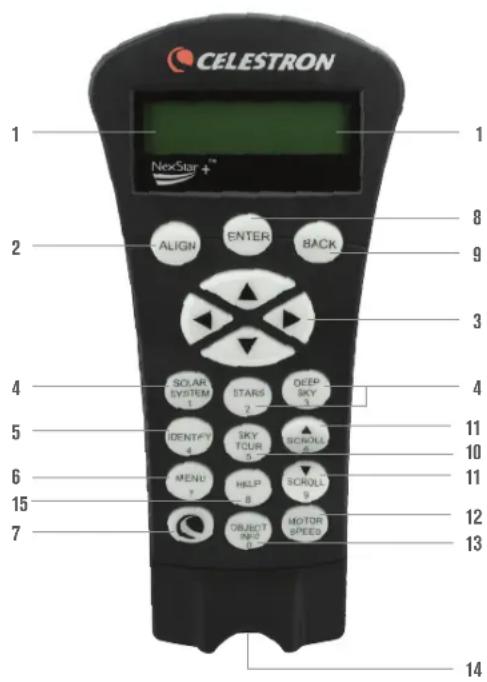
THE HAND CONTROL
The LCM's hand controller is designed to give you instant access to all the functions the telescope has to offer. With automatic slewing to over 4,000 objects, and common sense menu descriptions, even a beginner can master its variety of features in just a few observing sessions. Below is a brief description of the individual components of the LCM hand controller:
- LIQUID CRYSTAL DISPLAY (LCD) WINDOW- Has a four-line, 18-character display screen that has red backlighting for comfortable viewing of telescope information and scrolling text.
- ALIGN- Instructs the hand control to begin the process of aligning your telescope.
- DIRECTION KEYS- Allows complete control of the mount in any direction. Use the direction keys to center objects in the eyepiece or manually slew telescope.
-
CATALOG KEYS- The mount has a key on the hand control to allow direct access to each of the main catalogs in its 40,000+ object database. Your mount contains the following catalogs in its database:
-
SOLAR SYSTEM- All 7 planets in our Solar System plus the Moon, Sun and Pluto.
- STARS- Custom lists of all the brightest stars, double stars, variable stars and asterisms.
-
DEEP SKY- Custom lists of all the best galaxies, nebulae and clusters as well as the complete Messier and select NGC objects.
-
IDENTIFY- Searches the databases and displays the name and offset distances to the nearest matching objects.
- MENU- Displays the many setup and utilities functions, such as tracking rate and user defined objects and many others.
- OPTION (CELESTRON LOGO)- Can be used in combination with other keys to access more advanced features and functions.
- ENTER- Pressing ENTER allows you to select any of the functions, accept entered parameters and slew the telescope to displayed objects.
- BACK- Pressing BACK will take you out of the current menu and display the previous level of the menu path. Press BACK repeatedly to get back to a main menu or use to erase data entered by mistake.
- SKY TOUR- Activates the tour mode, which lists all the best objects in the sky and lets you slew the telescope to those objects.
- SCROLL KEYS- Scrolls up and down within any of the menu lists. A double arrow symbol on the right side of the LCD indicates that the scroll keys can be used to view additional information.
- MOTOR SPEED- Slews the telescope faster or slower when the direction buttons are pressed.
- OBJECT INFO- Displays coordinates and useful information about objects selected from the database.
- INPUT JACK- Allows you to connect your telescope to a computer, for use with software programs for point-and click slewing capability and updating firmware via PC.
text_image
CELESTRON 1 NexStar™ 2 ALIGN ENTER BACK 3 4 SOLAR SYSTEM STARS DEEP SKY 4 5 IDENTIFY SKY SCROLL 5 6 MENU HILP SCROLL 9 7 OBJECT INFO MOTOR SPEED 0 8 9 10 11 11 12 13 14This section describes the basic hand control procedures needed to operate the LCM.
ALIGNMENT MENU
In order for the LCM to accurately point to objects in the sky, it must first be aligned to known positions (stars) in the sky. With this information, the telescope can create a model of the sky, which it uses to locate any object with known coordinates. There are many ways to align the LCM with the sky depending on what information the user is able to provide:
- SkyAlign works by aligning on any three bright stars or planets in the sky.
- Auto Two Star Align will display a list of visible daytime objects (planets and the Moon) available to align the telescope.
- Two Star Align uses the entered time/location information and allows the user to select which two alignment stars the telescope will automatically slew to.
- One Star Align uses the entered time/location information and allows the user to select one alignment star. Provides a fast alignment, at the expense of less pointing accuracy.
- Solar System Align will display a list of visible daytime objects (planets and the Moon) available to align the telescope.
NOTE: There are two other methods of alignment shown in the hand control – EQ North and EQ South – but these only apply to alt-azimuth mounts capable of attaching to an equatorial wedge. The LCM mount does not have this ability.
SKYALIGN
SkyAlign is the easiest way to get your telescope aligned and ready to observe. Even if you do not know a single star in the sky, the LCM will have you aligned in minutes by asking for basic information like the date, time and location. Then you simply need to aim the telescope to any three bright celestial objects in the sky. Since SkyAlign requires no knowledge of the night sky, it is not necessary to know the name of the stars at which you are aiming. You may even select a planet or the Moon. The LCM is then ready to start finding and tracking any of the objects in its 4,000+ object database. Before the telescope is ready to be aligned, it should be set up in an outside location with all accessories (eyepiece, diagonal and finderscope) attached and lens cover removed as described in the Assembly section of the manual. To begin SkyAlign:
- Power on the LCM by flipping the switch located on the side of the base, to the "on" position. Once turned on the hand control display will say LCM Ready. Press ENTER to choose SkyAlign. Pressing the ALIGN key will bypass the other alignment options and the scrolling text and automatically begins SkyAlign.
- Once SkyAlign has been selected, the hand control will display "Enter if OK", "Undo to edit" and "Saved Site." The bottom line of the LCD will display either the current time or the time when you last used the telescope. Since this is your first time using the LCM, press UNDO to enter current time/site information.
The hand control display will then ask for the following information:
- Location- The hand control will display a list of cities to choose from. Choose the city from the database that is closest to your current observing site. The city you choose will be remembered in the hand control's memory so that it will be automatically displayed the next time an alignment is done. Alternatively, if you know the exact longitude and latitude of your observing site, it can be entered directly into the hand control and remembered for future use as well. To choose a location city:
- Use the Up and Down scroll keys to choose between "City Database" and "Custom Site". "City Database" will allow you to select the closest city to your observing site from a list of either international or U.S. location. "Custom Site" allows you to enter the exact longitude and latitude of your observing site. Select "City Database" and press ENTER.
- The hand control will allow you to choose from either U.S. or international locations. For a listing of U.S. locations by state and then by city, press ENTER while United States is displayed. For international locations, use the Up or Down scroll key to select International and press ENTER.
- Use the Up and Down Scroll buttons to choose your current state (or country if International locations was selected) from the alphabetical listing and press ENTER.
-
Use the Up and Down Scroll buttons to choose the closest city to your location from the displayed list and press ENTER.
-
Time- Enter the current time for your area. You can enter either the local time (i.e. 8:00), or you can enter military time (i.e. 20:00).
- Select PM or AM. If military time was entered, the hand control will bypass this step.
- Choose between Standard time or Daylight Savings time. Use the Up and Down scroll buttons (Keypad #6 or #9) to toggle between options.
- Select the time zone that you are observing from. Again, use the Up and Down buttons (Keypad #6 or #9) to scroll through the choices. For time zone information, refer to the Time Zone map in the appendix of this manual.
- Date- Enter the month, day and year of your observing session. The display will read: mm/dd/yy.
- If the wrong information has been input into the hand control, the UNDO button will act as a backspace allowing the user to re-enter information.
- The next time that your telescope is aligned, the hand control will automatically display the last location (either a city or longitude/latitude) that was entered. Press ENTER to accept these parameters if they still apply. Pressing the UNDO button will allow you to go back and select a new city location or longitude/latitude.
- Use the arrow buttons on the hand control to slew (move) the telescope towards any bright celestial object in the sky. Align the object with the red dot of the finderscope and press ENTER.
- If the finderscope has been properly aligned with the telescope tube, the alignment star should now be visible inside the field of view of the eyepiece. The hand control will ask that you center the bright alignment star in the center of the eyepiece and press the ALIGN button. This will accept the star as the first alignment position. (There is no need to adjust the slewing rate of the motors after each alignment step. The LCM automatically selects the best slewing rate for aligning objects in both the finderscope and the eyepiece).
- For the second alignment object, choose a bright star or planet as far as possible from the first alignment object. Once again use the arrow button to center the object in the finderscope and press ENTER. Then once centered in the eyepiece press the ALIGN button.
- Repeat the process for the third alignment star. When the telescope has been aligned to the final stars, the display will read "Match Confirmed." Press UNDO to display the names of the three bright objects you aligned to, or press ENTER to accept these three objects for alignment. You are now ready to find your first object.
TIPS FOR USING SKYALIGN
Remember the following alignment guidelines to make using SkyAlign as simple and accurate as possible.
- Be sure to level the tripod before you begin alignment. The time/site information along with a level tripod will help the telescope better predict the available bright stars and planets that are above the horizon.
- Remember to select alignment stars that are as far apart in the sky as possible. For best results make sure that the third alignment star does not lie in a straight line between the first two stars. This may result in a failed alignment.
- Don't worry about confusing planets for stars when selecting alignment objects. SkyAlign works with the four brightest planets (Venus, Jupiter, Saturn and Mars) as well as the Moon. In addition to the planets, the hand control has over 80 bright alignment stars to choose from (down to 2.5 magnitude).
- Rarely SkyAlign may not be able to determine what three alignment objects were centered. This sometime happens when a bright planet or the Moon passes near one of the brighter stars. In situations like these, it is best to try to avoid aligning to either object if possible.
- Be sure to center the objects with the same final movements as the direction of the GoTo approach. For example, if the scope normally finishes a GoTo with the front of the scope moving right and up, you should center all three alignment objects in the eyepiece using the right and up arrow buttons (the up/down arrows reverse at slew rates of 6 or lower). Approaching the star from this direction when looking through the eyepiece will eliminate much of the backlash between the gears and assure the most accurate alignment possible.
AUTO TWO-STAR ALIGN
As with Sky Align, Auto Two-Star Align requires you to enter all the necessary time/site information as before. Once this information is entered, the hand control will prompt you to select and point the telescope at one known star in the sky. The LCM now has all the information it needs to automatically choose a second star that will assure the best possible alignment. Once selected, the telescope will automatically slew to that second alignment star to complete the alignment. With the LCM set up outside with all accessories attached and the tripod leveled, follow the steps below to align the telescope:
- Once the LCM is powered on, Press ENTER to begin alignment.
- Use the Up and Down scroll keys (Keypad #6 or #9) to select Auto Two-Star Align and press ENTER.
- The hand control will display the last time and location information that was entered into the hand control. Use the Up and Down buttons to scroll through the information. Press ENTER to accept the current information or press UNDO to manually edit the information (see SkyAlign section for detailed instruction on entering time/site information).
- The display will now prompt you to select a bright star from the displayed list on the hand control. Use Up and Down buttons to scroll to the desired star and then press ENTER.
- Use the arrow buttons to slew the telescope to the star you selected. Center the star in the finderscope and press ENTER. Finally, center the star in the eyepiece and press ALIGN.
- Based on this information, the LCM will automatically display the most suitable second alignment star that is above the horizon. Press ENTER to automatically slew the telescope to the displayed star. If for some reason you do not wish to select this star (perhaps it is behind a tree or building), you can either:
- Press the UNDO button to display the next most suitable star for alignment.
- Use the up and down scroll buttons to manually select any star you wish from the entire list of available stars.
Once finished slewing, the display will ask you to use the arrow buttons to align the selected star with the red dot of the finderscope. Once centered in the finder, press ENTER. The display will then instruct you to center the star in the field of view of the eyepiece. When the star is centered, press ALIGN to accept this star as your second alignment star. When the telescope has been aligned to both stars the display will read "Align Success", and you are now ready to find your first object.
TWO-STAR ALIGN
With the Two-Star Align method, the LCM requires the user to know the names and positions of two bright stars in order to accurately align the telescope with the sky and begin finding objects. Here is an overview of the Two-Star Align procedure:
- Once the LCM is powered on, use the Up and Down scroll keys to select Two-Star Align, and press ENTER.
- Press ENTER to accept the time/site information displayed on the screen, or press UNDO to enter new information.
- The SELECT STAR 1 message will appear in the top row of the display. Use the Up and Down scroll keys to select the star you wish to use for the first alignment star. Press ENTER.
- The LCM then asks you to center in the eyepiece the alignment star you selected. Use the direction arrow buttons to slew the telescope to the alignment star and carefully center the star in the finderscope. Press ENTER when centered.
- Then, center the star in the eyepiece and press ALIGN. In order to accurately center the alignment star in the eyepiece, you may wish to decrease the slew rate of the motors for fine centering. This is done by pressing the MOTOR SPEED key on the hand controller then selecting the number that corresponds to the speed you desire. (9 = fastest, 1 = slowest).
- The LCM will then ask you to select and center a second alignment star and press the ALIGN key. It is best to choose alignment stars that are a good distance away from one another. Stars that are at least 40^ to 60^ apart from each other will give you a more accurate alignment than stars that are close to each other.
Once the second star alignment is completed properly, the display will read "Align Successful", and you should hear the tracking motors turn on and begin to track.
ONE-STAR ALIGN
One-Star Align requires you to input all the same information as you would for the Two-Star Align procedure. However, instead of slewing to two alignment stars for centering and alignment, the LCM uses only one star to model the sky based on the information given. This will allow you to roughly slew to the coordinates of bright objects like the Moon and planets and gives the LCM the information needed to track objects in altazimuth in any part of the sky. One-Star Align is not meant to be used to accurately locate small or faint deep-sky objects or to track objects accurately for photography. To use One-Star Align:
- Select One-Star Align from the alignment options.
- Press ENTER to accept the time/site information displayed on the screen, or press UNDO to enter new information.
- The SELECT STAR 1 message will appear in the top row of the display. Use the Up and Down scroll keys to select the star you wish to use for the first alignment star. Press ENTER.
- The LCM then asks you to center in the eyepiece the alignment star you selected. Use the direction arrow buttons to slew the telescope to the alignment star and carefully center the star in the finderscope. Press ENTER when centered.
- Then, center the star in the eyepiece and press ALIGN.
- Once in position, the LCM will model the sky based on this information and display "Align Successful".
NOTE: Once a One-Star Alignment has been done, you can use the Re-alignment feature (later in this section) to improve your telescope's pointing accuracy.
SOLAR SYSTEM ALIGN
Solar System Align is designed to provide excellent tracking and GoTo performance by using solar system objects (Sun, Moon and planets) to align the telescope with the sky. Solar System Align is a great way to align your telescope for daytime viewing as well as a quick way to align the telescope for night time observing.

Never look directly at the sun with the naked eye or with a telescope (unless you have the proper solar filter). Permanent and irreversible eye damage may result.
- Select Solar System Align from the alignment options.
- Press ENTER to accept the time/site information displayed on the display, or press UNDO to enter new information.
- The SELECT OBJECT message will appear in the top row of the display. Use the Up and Down scroll keys to select the daytime object (planet, Moon or Sun) you wish to align. Press ENTER.
- The LCM then asks you to center in the eyepiece the alignment object you selected. Use the direction arrow buttons to slew the telescope to the alignment object and carefully center it in the finderscope. Press ENTER when centered.
- Then, center the object in the eyepiece and press ALIGN.
Once in position, the LCM will model the sky based on this information and display "Align Successful".
Selecting the Sun
For safety purposes, the Sun will not be displayed in any of the hand control's customer object lists unless it is enabled from the Utilities Menu. To allow the Sun to be displayed on the hand control, do the following:
- Press the UNDO button until the display reads "LCM Ready."
- Press the MENU button and use the Up and Down keys to select the Utilities Menu. Press ENTER.
- Use the UP and Down keys to select Sun Menu and press ENTER.
- Press ENTER again to allow the Sun to appear on the hand control display.
The Sun can be removed from the display by using the same procedure as above.
To improve the telescope pointing accuracy, you can use the Re-Align feature as described below.
RE-ALIGNMENT
The LCM has a re-alignment feature which allows you to replace either of the original alignment stars with a new star or celestial object. This can be useful in several situations:
- If you are observing over a period of a few hours, you may notice that your original two alignment stars have drifted towards the west considerably. (Remember that the stars are moving at a rate of 15 degrees of arc every hour). Aligning on a new star that is in the eastern part of the sky will improve your pointing accuracy, especially on objects in that part of the sky.
- If you have aligned your telescope using the One-star align method, you can use re-align to an additional object in the sky. This will improve the pointing accuracy of your telescope without having to re-enter additional information.
To replace an existing alignment star with a new alignment star:
- Select the desired star (or object) from the database and slew to it.
- Carefully center the object in the eyepiece.
- Once centered, press the UNDO button until you are at the main menu.
- With "LCM Ready" displayed, press the ALIGN key on the hand control.
- The display will then ask you which alignment star you want to replace.
- Use the UP and Down scroll keys to select the alignment star to be replaced, and press ENTER. It is usually best to replace the star closest to the new object. This will space out your alignment stars across the sky. If you have used one of the single object alignment methods then it is always best to replace the object that is "unassigned" with an actual object.
- Press ALIGN to make the change.
OBJECT CATALOGS
SELECTING AN OBJECT
Now that the telescope is properly aligned, you can choose an object from any of the catalogs in the LCM's database. The hand control has a key designated for each of the catalogs in its database.
FOR PLANETS
- Press the SOLAR SYSTEM button (Keypad #1).
- Use the up and down SCROLL buttons (Keypad #6 or #9, not the up and down directional buttons) to scroll through the list of solar system objects until the one you want is displayed on the screen.
- Press ENTER and the scope will slew to the object.
FOR STARS
- Press the STAR S button (Keypad #2).
- Use the up and down SCROLL buttons (Keypad #6 or #9, not the up and down directional buttons) to scroll through the list of categories that contains the object you want to see and press ENTER. For stars, you have the choice of Named Stars, SAO catalog, Variable Stars, Asterisms, Constellations, and Double Stars.
- Use the up and down SCROLL buttons to select the object you want to see and press ENTER. The scope will slew to the object.
- For the SAO catalog, you are only required to enter the first four digits of the object's six digit SAO number. Once the first four digits are entered, the hand control will automatically list all the available SAO objects beginning with those numbers. Use the scroll buttons to navigate the list of available SAO objects using this prefix and select the desired object by pressing ENTER.
FOR DEEP-SKY OBJECTS
- Press the DEEP SKY button (Keypad #3).
- Use the up and down SCROLL buttons (Keypad #6 or #9, not the up and down directional buttons) to scroll through the list of categories that contains the object you want to see and press ENTER. You have the choice of Named Objects, NGC catalog, Caldwell catalog, and Messier catalog.
- For Named Objects, use the up and down SCROLL buttons to select the object you want to see and press ENTER. The scope will slew to the object.
- If you selected the NGC, Caldwell, or Messier catalogs, you will now enter the catalog number using the number keypad and press ENTER to slew to your target.
NOTE: The hand control will only display objects that are above your horizon. Object that are below the horizon are filtered out of the lists so you do not waste your time trying to search for objects where the scope would point downward at the ground. You can change this operation and allow pointing below the horizon by changing the settings in the Slew Limit and Filter Limit menus covered later in the manual.
VIEWING OBJECT INFO
Once the desired object is displayed on the hand control screen, you can also press the OBJECT INFO key. This will give you useful information about the selected object such as magnitude, constellation, and fascinating facts about many of the brighter and more popular objects in the database.
Object information can be obtained without having to do a star alignment. After the telescope is powered on, pressing any of the catalog keys allows you to scroll through object lists or enter catalog numbers and view the information about the object as described above.
SKY TOUR MODE
If you are not sure what objects to look for, the LCM includes a sky tour feature which will display a list of the night's highlights of the brightest and most interesting objects above your horizon.
- Press the SKY TOUR button (Keypad #5) to open the menu.
- Use the up and down SCROLL buttons to select the object you want to see and press ENTER. The scope will slew to the object.
DIRECTION BUTTONS
The LCM has four direction buttons in the center of the hand control which controls the telescope motion in altitude (up and down) and azimuth (left and right). The telescope can be controlled at nine different speed rates.
MOTOR SPEED BUTTON
Pressing the Motor Speed key allows you to instantly change the speed of the motors from high speed slew rate to precise guiding rate or anywhere in between. Each rate corresponds to a number on the hand controller key pad with speed 9 being the fastest and speed 1 being the slowest.
Speeds 1-4 are good for centering objects in an eyepiece. Speeds 5-6 are good for centering objects in the finderscope. Speeds 7-9 are good for slewing long distances across the sky.
To change the motor speed:
The hand control has a "double button" feature that allows you to instantly speed up the motors without having to choose a speed rate. To use this feature, simply press the arrow button that corresponds to the direction that you want to move the telescope. While holding that button down, press the opposite directional button. This will increase the speed to the maximum slew rate.
NOTE: Sidereal rate is the speed at which the Earth rotates and objects appear to drift across the sky. This is equivalent to 15 arc seconds per second.
| MOTOR SPEED RATE | |
| 1 0.5x Sidereal | |
| 2 1x Sidereal | |
| 3 4x Sidereal | |
| 4 8x Sidereal | |
| 5 16x Sidereal | |
| 6 64x Sidereal | |
| 7 | 1^ / Second |
| 8 | 1.75^ / Second |
| 9 | 2.75^ / Second |
MAIN MENU
The LCM contains many user defined setup functions designed to give the user control over the telescope's many advanced features. All of the set up and utility features can be accessed by pressing the MENU key (Keypad #7) and scrolling through the options.
TRACKING MENU
Tracking Mode
Once the LCM is aligned, the tracking motors will automatically turn on and begin tracking the sky. However, the tracking can be turned off for terrestrial use:
- Off- When using the telescope for terrestrial (land) observation the tracking can be turned off so that the telescope never moves.
- Alt-Az- This is the default tracking rate and is used when the telescope has been properly aligned.
NOTE: EQ North & EQ South tracking modes are only used with telescopes that are equatorially mounted. LCM telescopes use Alt-Azimuth mounts and cannot utilize the two EQ tracking modes.
Tracking Rate
In addition to being able to move the telescope with the hand control buttons, the LCM will continually track a celestial object as it moves across the night sky. The tracking rate can be changed depending on what type of object is being observed:
- Sidereal- This rate compensates for the rotation of the earth by moving the telescope at the same rate as the rotation of the earth, but in the opposite direction. When tracking in Alt-Az mode, the telescope must make corrections in both altitude and azimuth.
- Lunar- Used for tracking the Moon when observing the lunar landscape.
- Solar- Used for tracking the Sun when solar observing using a proper solar filter.
VIEW TIME-SITE
View Time-Site will display the last saved time and longitude/latitude entered in the hand control.
HAND CONTROL MENU
Lights Control
This menu option lets you adjust the brightness of the lighting on the hand control lights.
- Keypad Level- Adjusts the brightens of the backlight on the keypad buttons.
- Display Level- Adjusts the brightness of the backlight on the LCD panel.
Scrolling Menu
This menu allows you to change the rate of speed that the text scrolls across the hand control display.
- Press the UP (Keypad #6) button to increase the speed of the text.
- Press the DOWN (Keypad #9n) button to decrease the speed of the text.
Toggle Bold Font
This allows you to change the text on the LCD to bold face which can make it easier to read.
Set Contrast
This allows you to choose how dark the text appears on the LCD panel.
Set Language
This allows you to choose the native language of the hand control. Press the number corresponding to the language you desire.
SCOPE SETUP MENU
Setup Time-Site
Allows the user to customize the hand control display by changing time and location parameters (such as time zone and daylight savings).
Anti-backlash
All mechanical gears have a certain amount of backlash or play between the gears. This play is evident by how long it takes for a star to move in the eyepiece when the hand control arrow buttons are pressed (especially when changing directions). The LCM's anti-backlash features allows the user to compensate for backlash by inputting a value which quickly rewinds the motors just enough to eliminate the play between gears. The amount of compensation needed depends on the slewing rate selected; the slower the slewing rate the longer it will take for the star to appear to move in the eyepiece. Therefore, the anti-backlash compensation will have to be set higher. You will need to experiment with different values; a value between 20 and 50 is usually best for most visual observing, whereas a higher value may be necessary for photographic guiding. Positive backlash compensation is applied when the mount changes its direction of movement from backwards to forwards. Similarly, negative backlash compensation is applied when the mount changes its direction of movement from forwards to backwards. When tracking is enabled, the mount will be moving in one or both axes in either the positive or negative direction, so backlash compensation will always be applied when a direction button is released and the direction moved is opposite to the direction of travel.
To set the anti-backlash value, scroll down to the anti-backlash option and press ENTER. Enter a value from 0-100 for both azimuth and altitude directions and press ENTER after each one to save these values. The LCM will remember these values and use them each time it is turned on until they are changed.
Slew Limits
Sets the limits in altitude that the telescope can slew without displaying a warning message. The slew limits prevent the telescope tube from slewing to an object below the horizon or slewing to an object that is high enough that the tube might hit one of the tripod legs. However, the slew limits can be customized depending on your needs. For example, if you would like to slew to an object that is close to the zenith and are certain that the tube will not hit the tripod legs, you can set the slew limits to 90^ in altitude. This will allow the telescope to slew to any object above the horizon without warning.
Filter Limits
When an alignment is complete, the LCM automatically knows which celestial objects are above the horizon. As a result, when scrolling through the database lists (or selecting the SKY TOUR function), the LCM hand control will display only those objects that are known to be above the horizon when you are observing. You can customize the object database by selecting altitude limits that are appropriate for your location and situation. For example, if you are observing from a mountainous location where the horizon is partially obscured, you can set your minimum altitude limit to read +20°. This will make sure that the hand control only displays objects that are higher in altitude than 20°.
If you want to explore the entire object database, set the maximum altitude limit to 90^ and the minimum limit to -90^ . This will display every object in the database lists regardless of whether it is visible in the sky from your location or not.
Direction Buttons
The direction a star moves in the eyepiece varies depending on the accessories being used. This can create confusion when guiding on a star using an off-axis guider versus a straight through guide scope. To compensate for this, the direction of the drive control keys can be changed. To reverse the button logic of the hand control, press the MENU button and select Direction Buttons from the Utilities menu. Use the Up/Down arrow keys to select either the Azimuth buttons (left and right) or Altitude buttons (up and down) and press ENTER. Pressing ENTER again will reverse the direction of the hand control buttons from their current state. Direction Buttons will only change the eyepiece rates (rate 1-6) and will not affect the slew rates (rate 7-9).
GoTo Approach
This lets the user define the direction that the telescope will approach when slewing to an object. This allows the user the ability to minimize the effects of backlash For example, if your telescope is back heavy from using heavy optical or photographic accessories attached to the back, you would want to set your altitude approach to the negative direction. This would ensure that the telescope always approaches an object from the opposite direction as the load pulling on the scope.
To change the GoTo approach direction, simply choose GoTo Approach from the Scope Setup menu, select either Altitude or Azimuth approach, choose positive or negative and press ENTER.
Cord Wrap
Cordwrap safeguards against the telescope slewing more than 360 degrees in azimuth and wrapping accessory cables around the base of the telescope. This is useful any time that the telescope is powered using an external power supply. By default, the cord wrap feature is turned off when the telescope is aligned in altazimuth and turn on when aligned on a wedge.
UTILITY MENU
Scrolling through the MENU options will also provide access to several advanced utility functions.
GPS On/Off
This feature is only available when using your telescope in conjunction with the optional GPS accessory. It allows you to turn off the GPS module. If you want to use the LCM database to find the coordinates of a celestial object for a future date you would need to turn the GPS module off in order to manually enter a date and time other than the present.
Factory Setting
Returns the LCM hand control to its original factory setting. Parameters such as backlash compensation values, initial date and time, longitude/ latitude along with slew and filter limits will be reset. However, stored parameters such as PEC and user defined objects will remain saved even when Factory Settings is selected. The hand control will ask you to press the "0" key before returning to the factory default setting.
Version
Selecting this option will allow you to see the current version number of the hand control and motor control software. The first set of numbers indicate the hand control software version. For the motor control, the hand control will display two sets of numbers; the first numbers are for azimuth and the second set are for altitude.
Get Axis Position
Displays the relative altitude and azimuth for the current position of the telescope.
GoTo Axis Position
Allows you to enter a specific altitude and azimuth position and slew to it.
Hibernate
Hibernate allows the LCM to be completely powered down and still retain its alignment when turned back on. This not only saves power, but is ideal for those that have their telescopes permanently mounted or leave their telescope in one location for long periods of time. To place your telescope in Hibernate mode:
- Select Hibernate from the Utility Menu.
- Move the telescope to a desire position and press ENTER.
- Power off the telescope. Remember to never move your telescope manually while in Hibernate mode.
Once the telescope is powered on again, the display will read Wake Up. After pressing ENTER, you have the option of scrolling through the time/site information to confirm the current setting. Press ENTER to wake up the telescope.
Pressing UNDO at the Wake Up screen allows you to explore many of the features of the hand control without waking the telescope up from hibernate mode. To wake up the telescope after UNDO has been pressed, select Hibernate from the Utility menu and press ENTER. Do not use the direction buttons to move the telescope while in hibernate mode.
Sun Menu
For safety purposes the Sun will not be displayed as a database object unless it is first enabled. The enable the Sun, go to the Sun Menu and press ENTER. The Sun will now be displayed in the Planets catalog and can be used as an alignment object when using the Solar System Alignment method. To remove the Sun from displaying on the hand control, once again select the Sun Menu from the Utilities Menu and press ENTER.
Calibrate GoTo
GoTo calibration is a useful tool when attaching heavy visual or photographic accessories to the telescope. GoTo calibration calculates the amount of distance and time it takes for the mount to complete its final slow GoTo when slewing to an object. Changing the balance of the telescope can prolong the time it takes to complete the final slew. GoTo Calibration takes into account any slight imbalances and changes the final GoTo distance to compensate.
Set Mount Position
The Set Mount Position menu can be used to recover an alignment in cases where the telescope or tripod has been manually moved. For instance, you might use this feature if you needed to adjust the level of the tripod by raising or lowering the tripod legs. After the mount has been moved, simply slew to a bright star and center it up in the eyepiece, then select "Set Mount Position" from the Utilities menu. Since the telescope has been moved, the pointing accuracy will be diminished. But now you can slew to a new set of alignment stars and replace any of the original alignment stars with the new stars. This will help you to avoid having to start the alignment process over from the beginning.
USER DEFINED OBJECTS
The LCM can store up to 50 different user defined objects in its memory. The objects can be daytime land objects or an interesting celestial object that you discover that is not included in the regular database. There are several ways to save an object to memory depending on what type of object it is:
- Save Sky Object- The LCM stores celestial objects to its database by saving its right ascension and declination in the sky. This way the same object can be found each time the telescope is aligned. Once a desired object is centered in the eyepiece, simply scroll to the "Save Sky Obj" command and press ENTER. The display will ask you to enter a number between 1-25 to identify the object. Press ENTER again to save this object to the database. These objects then can be accessed by selecting GoTo Sky Object.
- Save Database (Db) Object- This feature allows you to create your own custom tour of database objects by allowing you to record the current position of the telescope and save the name of the object by selecting it from any one of the database catalogs.
- Enter RA - DEC- You can also store a specific set of coordinates for an object just by entering the RA and Dec coordinates for that object. Scroll to the "Enter RA-DEC" command and press ENTER. The display will then ask you to enter first the RA and then the Declination of the desired object.
- Save Land Object- The LCM can also be used as a spotting scope on terrestrial objects. Fixed land objects can be stored by saving their altitude and azimuth relative to the location of the telescope at the time of observing. Since these objects are relative to the location of the telescope, they are only valid for that exact location. To save land objects, once again center the desired object in the eyepiece. Scroll down to the "Save Land Obj" command and press ENTER. The display will ask you to enter a number between 1-25 to identify the object. Press ENTER again to save this object to the database. These objects then can be accessed by selecting GoTo Land Object.
To replace the contents of any of the user defined objects, simply save a new object using one of the existing identification numbers; LCM will replace the previous user defined object with the current one.
GET RA-DEC
Displays the right ascension and declination for the current position of the telescope.
GOTO RA-DEC
Allows you to input a specific RA and declination and slew to it.
IDENTIFY
Identify mode will search any of the LCM database catalogs or lists and display the name and offset distances to the nearest matching objects. This feature can serve two purposes. First, it can be used to identify an unknown object in the field of view of your eyepiece. Additionally, Identify Mode can be used to find other celestial objects that are close to the objects you are currently observing. For example, if your telescope is pointed at the brightest star in the constellation Lyra, choosing Identify and then searching the Named Star catalog will no doubt return the star Vega as the star you are observing. However, by selecting Identify and searching by the Named Object or Messier catalogs, the hand control will let you know that the Ring Nebula (M57) is approximately 6° from your current position. Searching the Double Star catalog will reveal that Epsilon Lyrae is only 1° away from Vega.
To use the Identify feature:
- Press the IDENTIFY button (Keypad #4) and select the Identify option.
- Press the Up/Down scroll keys to select the catalog that you would like to search.
- Press ENTER to begin the search.
NOTE: Some of the databases contain thousands of objects, and can therefore take a minute or two to return the closest object.
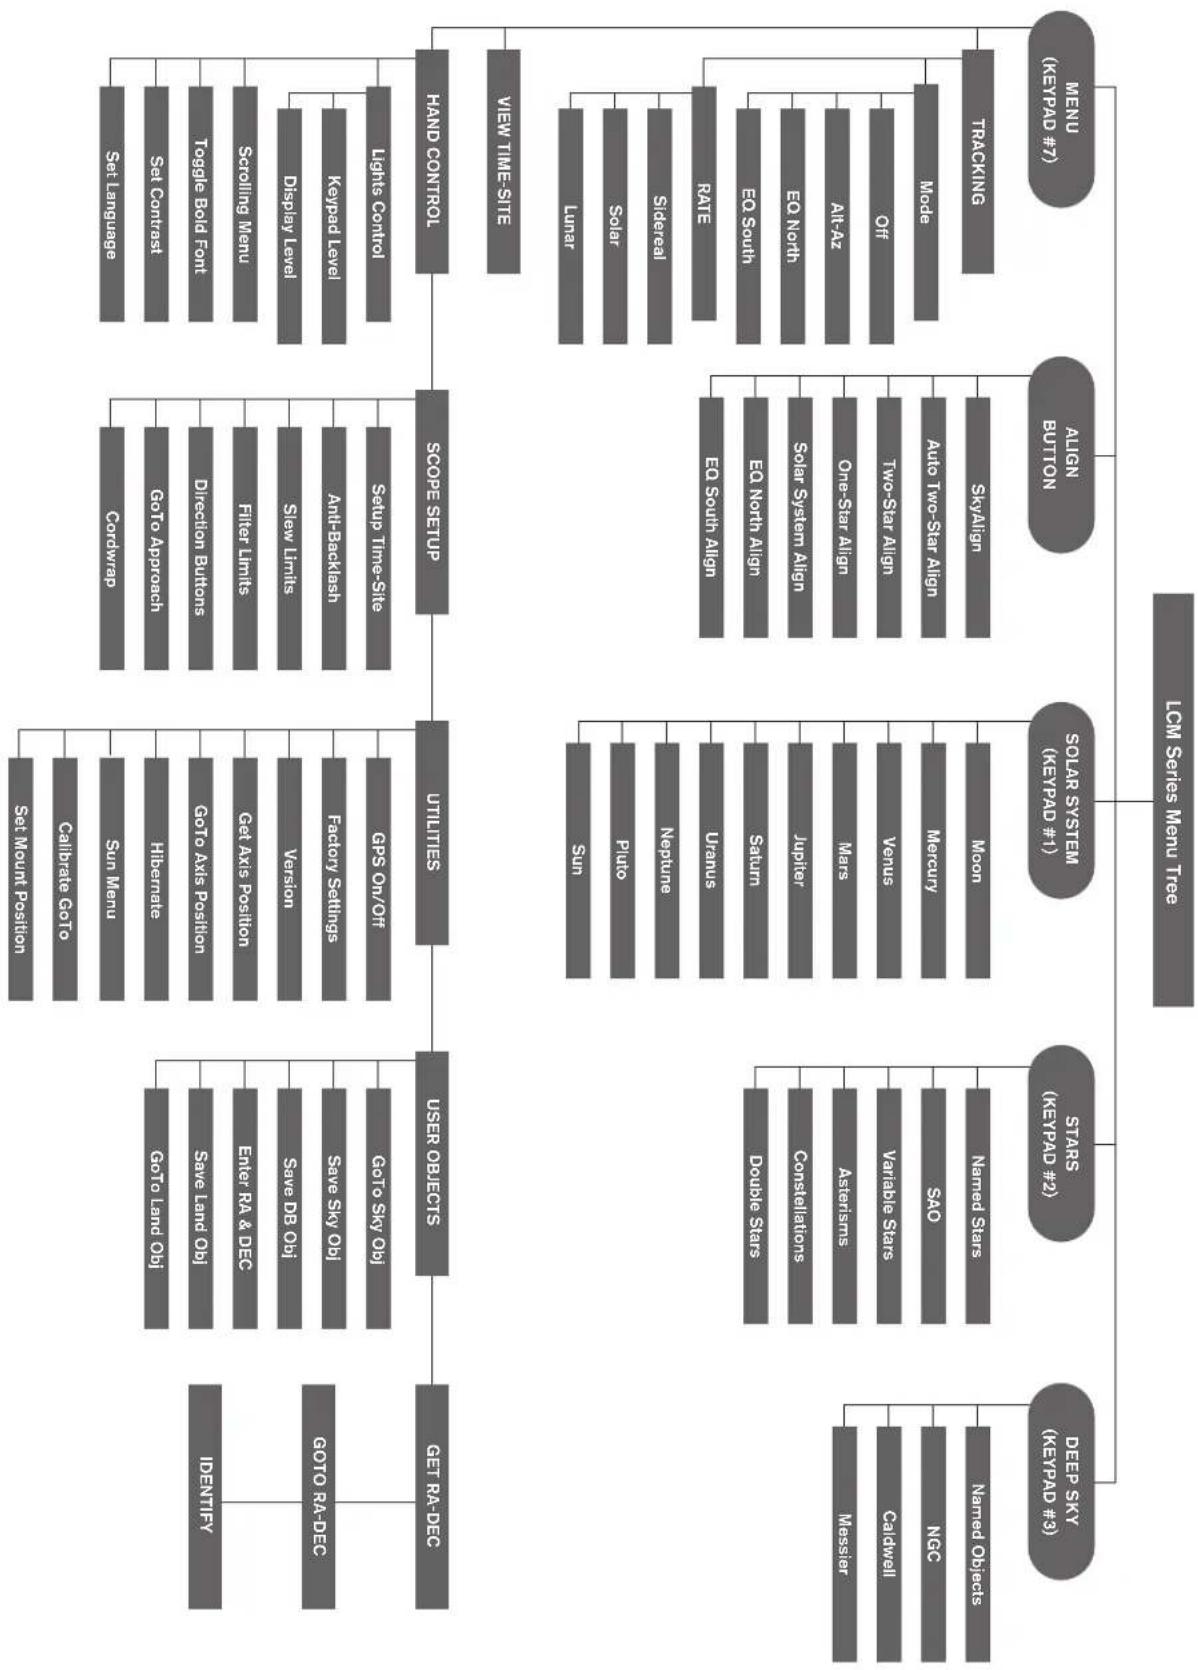
flowchart
graph TD
    A["LECM SERIES MENU TREE"] --> B["STARS (KEVPAD #2)"]
    A --> C["SOLAR SYSTEM (KEVPAD #1)"]
    A --> D["SYALIAG"]
    A --> E["MOON"]
    A --> F["MYCURY"]
    A --> G["VARIALE STARS"]
    A --> H["ASTERSMS"]
    A --> I["CONCTLATIONS"]
    A --> J["Constellations"]
    A --> K["Double StARS"]
    A --> L["Double StARS"]
    A --> M["Messenger"]
    A --> N["Messier"]
    A --> O["CalDWELL"]
    A --> P["Caldwell"]
    A --> Q["SAD"]
    A --> R["NGC"]
    A --> S["Named Objects"]
    A --> T["Named Stars"]
    A --> U["SAS0"]
    A --> V["SOAO"]
    A --> W["Named Objects"]
    A --> X["Deep Sky (KEVPAD #3)"]
    A --> Y["Deep Sky (KEVPAD #3)"]
    A --> Z["Dee Sky (KEVPAD #3)"]
    A --> AA["Dee Sky (KEVPAD #3)"]
    A --> AB["Dee Sky (KEVPAD #3)"]
    A --> AC["Dee Sky (KEVPAD #3)"]
    A --> AD["Dee Sky (KEVPAD #3)"]
    A --> AE["Dee Sky (KEVPAD #3)"]
    A --> AF["Dee Sky (KEVPAD #3)"]
    A --> AG["Dee Sky (KEVPAD #3)"]
    A --> AH["Dee Sky (KEVPAD #3)"]
    A --> AI["Dee Sky (KEVPAD #3)"]
    A --> AJ["Dee Sky (KEVPAD #3)"]
    A --> AK["Dee Sky (KEVPAD #3)"]
    A --> AL["Dee Sky (KEVPAD #3)"]
    A --> AM["Dee Sky (KEVPAD #3)"]
    A --> AN["Dee Sky (KEVPAD #3)"]
    A --> AO["Dee Sky (KEVPAD #3)"]
    A --> AP["Dee Sky (KEVPAD #3)"]
    A --> AQ["Dee Sky (KEVPAD #3)"]
    A --> AR["Dee Sky (KEVPAD #3)"]
    A --> AS["Dee Sky (KEVPAD #3)"]
    A --> AT["Dee Sky (KEVPAD #3)"]
    A --> AU["Dee Sky (KEVPAD #3)"]
    A --> AV["Dee Sky (KEVPAD #3)"]
    A --> AW["Dee Sky (KEVPAD #3)"]
    A --> AX["Dee Sky (KEVPAD #3)"]
    A --> AY["Dee Sky (KEVPAD #3)"]
    A --> AZ["Dee Sky (KEVPAD #3)"]
    A --> BA["Dee Sky (KEVPAD #3)"]
    A --> BB["Dee Sky (KEVPAD #3)"]
    A --> BC["Dee Sky (KEVPAD #3)"]
    A --> BD["Dee Sky (KEVPAD #3)"]
    A --> BE["Dee Sky (KEVPAD #3)"]
    A --> BF["Dee Sky (KEVPAD #3)"]
    A --> BG["Dee Sky (KEVPAD #3)"]
    A --> BH["Dee Sky (KEVPAD #3)"]
    A --> BI["Dee Sky (KEVPAD #3)"]
    A --> BJ["Dee Sky (KEVPAD #3)"]
    A --> BK["Dee Sky (KEVPAD #3)"]
    A --> BL["Dee Sky (KEVPAD #3)"]
    A --> BM["Dee Sky (KEVPAD #3)"]
    A --> BN["Dee Sky (KEVPAD #3)"]
    A --> BO["Dee Sky (KEVPAD #3)"]
    A --> BP["Dee Sky (KEVPAD #3)"]
    A --> BQ["Dee Sky (KEVPAD #3)"]
    A --> BR["Dee Sky (KEVPAD #3)"]
    A --> BS["Dee Sky (KEVPAD #3)"]
    A --> BT["Dee Sky (KEVPAD #3)"]
    A --> BU["Dee Sky (KEVPAD #3)"]
    A --> BV["Dee Sky (KEVPAD #3)"]
    A --> BW["Dee Sky (KEVPAD #3)"]
    A --> BX["Dee Sky (KEVPAD #3)"]
    A --> BY["Dee Sky (KEVPAD #3)"]
    A --> BZ["Dee Sky (KEVPAD #3)"]
    A --> CA["Dee Sky (KEVPAD #3)"]
    A --> CB["Dee Sky (KEVPAD #3)"]
    A --> CC["Dee Sky (KEVPAD #3)"]
    A --> CD["Dee Sky (KEVPAD #3)"]
    A --> CE["Dee Sky (KEVPAD #3)"]
    A --> CF["Dee Sky (KEVPAD #3)"]
    A --> CG["Dee Sky (KEVPAD #3)"]
    A --> CH["Dee Sky (KEVPAD #3)"]
    A --> CI["Dee Sky (KEVPAD #3)"]
    A --> CJ["Dee Sky (KEVPAD #3)"]
    A --> CK["Dee Sky (KEVPAD #3)"]
    A --> CL["Dee Sky (KEVPAD #3)"]
    A --> CD
    A --> CD
    A --> CD
    A --> CD
    A --> CD
    A --> CD
    A --> CD
    A --> CD
    A --> CD
    A --> CD
    A --> CD
    A --> CD
    A --> CD
The best and easiest target for you to try to view first is the Moon. Try observing the Moon at different points in its phase cycle. The best time to view the Moon is from two days after a New Moon up to a few days before a Full Moon. During this period, you will be able to see the most detail in the craters and lunar mountain ranges.
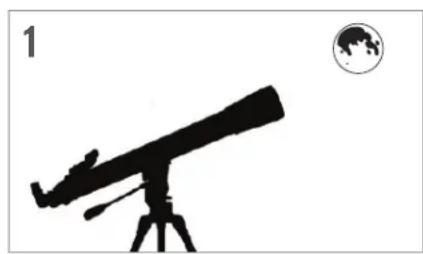
natural_image
Silhouette of a telescope on a tripod with Earth globe icon (no text or symbols)With the Moon visible in the sky, set up your telescope with the 20mm eyepiece installed.
natural_image
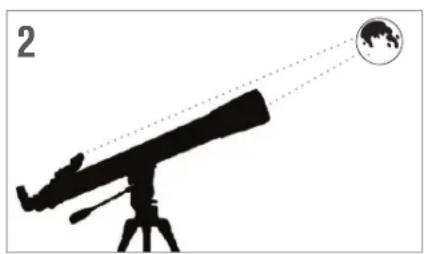
Silhouette of a telescope with Earth visible through its lens (no text or symbols)Move the telescope so that it is roughly pointing toward the Moon.
natural_image
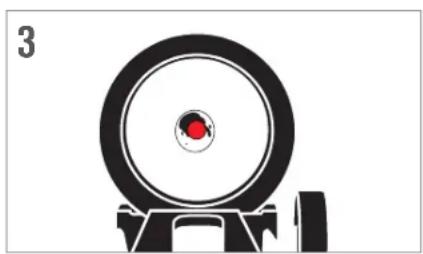
Simple black-and-white diagram of a target with a red dot on the bullseye, no text or symbols present.Look through the finderscope and locate the red dot. Continue moving the telescope until the red dot appears over the Moon.
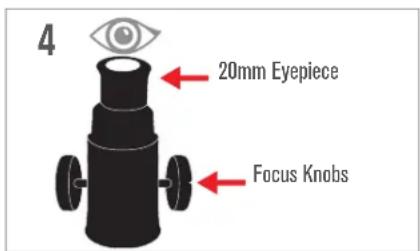
text_image
4 20mm Eyepiece Focus KnobsLook through the telescope's 20mm eyepiece. Gently turn the focus knobs to adjust the sharpness of the image.
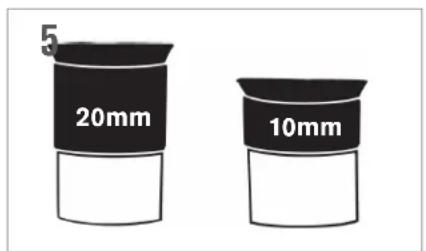
text_image
5 20mm 10mmCONGRATULATIONS!
YOU HAVE NOW OBSERVED YOUR FIRST CELESTIAL OBJECT!

natural_image
Illustration of a planet with rings and stars, no text or symbols presentYou can view many other celestial objects, such as planets, star clusters and nebulae using this same technique if you know where to find them in the night sky.
To get a closer view of the Moon, loosen the thumbscrews on the focuser and remove the 20mm eyepiece. Replace it with your 10mm eyepiece and tighten the thumbscrews to secure it in place. The 10mm eyepiece will give you significantly more magnification, making the Moon appear much larger.
NOTE: You may need to adjust the focus knobs when you change eyepieces to make sure you are getting the sharpest image possible.
CELESTIAL OBSERVING TIPS
This section covers visual observing hints for both solar system and deep-sky objects as well as general observing conditions which will affect your ability to observe.
MAGNIFICATION
You can change the magnification of your telescope by simply changing eyepieces. Both telescopes and eyepieces have focal lengths that are measured in millimeters. To calculate the magnification of a given telescope and eyepiece combination, take the focal length of the telescope and divide it by the focal length of the eyepiece. The resulting number is the magnification factor.
For example, the 80LCM has a focal length of 900 mm. Using the 25 mm eyepiece:
$$ \text { Magnification } = \frac {\text { Focal Length of Telescope }}{\text { Focal Length of Eyepiece }} = \frac {9 0 0 \mathrm{mm}}{2 5 \mathrm{mm}} = 3 6 \mathrm{x} $$
FIELD OF VIEW
Determining the field of view is important if you want to get an idea of the angular size of the object you are observing. To calculate the actual field of view, divide the apparent field of the eyepiece (supplied by the eyepiece manufacturer) by the magnification it gives you in the scope you are using. Using the example in the previous section, we can determine the field of view using the same telescope and 25 mm eyepiece.
$$ \text { Actual Field Of View } = \frac {\text { Apparent Field of View of Eyepiece }}{\text { Magnification }} = \frac {4 5 ^ {\circ}}{3 6} = 1. 2 5 \text { degrees of arc } $$
THE PLANETS
In addition to the Moon, your telescope is capable of observing the 5 brightest planets. Since planets change their positions against the background stars, you will need to consult sources on the web or use a planetarium app on a smart device to help you locate where these are. Here are some things to look for:
- Mercury and Venus- Just like the Moon, the two inner planets will go through phases ranging from thin crescents to gibbous.
- Mars- When it is near opposition (the point in its orbit where it is closest to Earth) you should be able to discern the polar cap and possibly some larger surface features that appear as dark markings on the surface.
- Jupiter- Look for the darker methane cloud bands that circle the planet just above and below the equator. If the Great Red Spot is facing the Earth, you may be able to catch a glimpse of it. You will also see the four brightest moons of Jupiter – Io, Europa, Ganymede, and Callisto. These moons are fun to watch because they can move appreciably over just a couple of hours. Occasionally they will travel behind Jupiter or into its shadow and disappear for periods of time. They can also cross the face of Jupiter and you may even see a shadow of the moon crossing with it. There are some useful apps for your smart devise that will help you predict when the Great Red Spot can be seen as well as when any interesting events are going to occur with Jupiter's moons.
- Saturn- The rings! Saturn is arguably one of the most beautiful objects to look at in a telescope. If seeing conditions are stable enough, you may even catch the shadow of the rings on the planet and the shadow of the planet on the rings. You should be able to see Titan, the brightest moon of Saturn.
DEEP-SKY OBJECTS
Deep-sky objects are all of those celestial objects that are outside of our solar system. They include star clusters, planetary nebulae, diffuse nebulae, double stars and other galaxies outside our own Milky Way. Objects such as nebulae and galaxies can be quite large, but they are also very faint. In order to get the best view, you will need to make sure you are in the darkest skies possible. The farther you are away from city lights, the better you will see these objects in the eyepiece. In photographs of nebulae and galaxies, you will see vivid reds and blues. These colors are not visible when you look through the eyepiece. The colorful images were very long exposure images taken over 15 – 60 minutes or more, where your eye only records data on an instant by instant basis. Digital sensors are much more sensitive to reds and blues than the human eye is which is most sensitive in the green part of the spectrum. Still, you will be able to see the soft glow of the Andromeda galaxy and the expanse of the Orion Nebula.
SKY CONDITIONS
Sky conditions can significantly affect the performance of your telescope in three ways.
- Steadiness of the air- On windy days, images of the Moon and planets will appear to wave or jump around in the eyepiece; as if you are looking at them through moving water. Nights where winds are calm will offer the best higher magnification views of the planets and the Moon. The best way to judge the stability of the atmosphere is to look at bright stars with the naked eye. If they are "twinkling" or rapidly changing colors, the air is unstable and you are better off using lower powers and looking for deep sky objects. If the stars are sharp and not twinkling, the air is stable and should offer great high magnification planetary views.
- Transparency- How clear is the air you are looking through? If there is a high amount of humidity in the air, the faint light from galaxies and nebulae can be scattered and diffused before reaching your telescope, causing a loss of brightness in your image. Debris in the air from local forest fires or even distant volcanic eruptions can contribute to large loss of brightness. Sometimes this humidity or debris can help stabilize the air, making for good planetary and lunar images, but the loss of light would make it difficult to see fainter deep-sky objects.
- Sky Brightness- The amount of ambient light in the atmosphere can also effect deep-sky observing. How dark the sky is can depend on your local surroundings. In the middle of a city, sky-glow caused by city lights being reflected back to earth from the sky can overpower the faint light from distant galaxies. Getting away from the bright lights of a major city can make the difference between seeing a faint deep-sky object and missing it altogether. Planets and the Moon are plenty bright enough on their own so the effect on observing them is minimal.
SELECTING AN OBSERVING SITE
If you are going to be observing deep-sky objects, such as galaxies and nebulae, you should consider traveling to a dark sky site that is reasonably accessible. It should be away from city lights, a relatively unobstructed view of the horizon, and upwind of any major source of air pollution. Always choose as high an elevation as possible as this can lower the effects of atmospheric instability and can ensure that you are above any ground fog. While it can be desirable to take your telescope to a dark sky site, it is not always necessary. If you plan to view the planets, the Moon or even some of the brighter deep-sky objects, you can do this from any location, such as your own backyard. Try to setup the scope in a location that is out of the direct path of streetlights or house lights to help protect your night vision. Try to avoid observing anything that lies within 5 to 10 degrees over the roof of a building. Rooftops absorb heat during the day and radiate this heat out at night. This can cause a layer of turbulent air directly over the building that can degrade your image. It is best if you set your telescope up directly on a dirt or grassy surface. Setting up on any raised platform such as a wooden deck or a hard surface like concrete or a sidewalk should be avoided as they transmit vibrations easily that can be transferred to the telescope.
Observing through a window is not recommended because the window glass will distort images considerably. And an open window can be even worse, because warmer indoor air will escape out the window, causing turbulence which also affects images. Astronomy is an outdoor activity.
CHOOSING THE BEST TIME TO OBSERVE
Try not to view immediately after sunset. After the sun goes down, the Earth is still cooling, causing air turbulence. As the night goes on, not only will seeing improve, but air pollution and ground lights will often diminish. Some of the best observing time is often in the early morning hours before dawn. Objects are best observed as they cross the meridian, the imaginary line that runs from north to south through a point directly over your head. This is the point at which objects reach their highest points in the sky and your telescope is looking through the least amount of atmosphere possible. Objects that are rising or setting near the horizon will suffer more atmospheric turbulence since you are looking through a much longer column of air. It is not always necessary to have cloud-free skies if you are looking at planets or the Moon. Often broken cloud conditions provide excellent seeing.
COOLING THE TELESCOPE
Telescopes require at least 10 minutes to cool down to outside air temperature. This may take longer if there is a big difference between the temperature of the telescope and the outside air. This minimizes heat wave distortion inside the telescope tube (tube currents).
ADAPTING YOUR EYES
If you are planning to observe deep sky objects at a dark sky site, it is best if you allow your eyes to fully adapt to the dark by avoiding exposure to white light sources such as flashlights, car headlights, streetlights, etc. It will take your pupils about 30 minutes to expand to their maximum diameter and build up the levels of optical pigments to help your eyes see the faint light from a distant target. If you need light to help setup your telescope in the dark, try using a red LED flashlight at as low a brightness setting as possible and avoid looking straight at the light source. This will give you the best chance of capturing those faint deep sky objects.
When observing, it is important to observe with both eyes open. This avoids eye fatigue at the eyepiece. If you find this too distracting, cover the unused eye with your hand or an eye patch. The center of your eye works well in bright daylight, but is the least sensitive part of the eye when trying to see subtle detail at low light levels. When looking in the eyepiece for a faint target, don't look directly at it. Instead look toward the edge of the field of view and the object will appear brighter.
ASTROIMAGING
One of the first questions most people have about their new telescope is "How can I take images with it?". Your telescope is capable of imaging the Moon and planets, but deep-sky objects would require a more advanced telescope and mount with finely geared motorized tracking. There are a few different methods for using your telescope for imaging:
- Smart Devices or Point-and-Shoot Cameras- This is the easiest and most straight forward method and works well for images of the Moon and planets. Simply hold your device's camera up to the eyepiece and take the image. While you can use this with any eyepiece, it is generally easier to get an image using a lower power (longer focal length) eyepiece. You will need a steady hand to hold the phone to the eyepiece but you can get good results.
- DSLR- Celestron offers adapters that will allow you to attach a Canon or Nikon DSLR body to the telescope in place of the eyepiece. You would be effectively using your telescope as a telephoto lens. This will require a T-adapter for the telescope and a T-ring for the camera body. For more information on the adapters for your specific model of telescope, please go to www.celestron.com.
- CMOS Planetary Imagers- These are specialized cameras that replace the eyepiece in your telescope. It would connect to your laptop via a USB port. The camera records video of the planet, then the included software breaks up the video file into individual still frames. The software then combines the individual frames into a single image that contains more detail than was visible in any single frame. This method will provide you the best possible lunar and planetary images, but does require that you have a laptop at the scope. For more information on the planetary camera, please go to www.celestron.com.
DEEP-SKY OBSERVING EQUIPMENT
There are some tools that will be indispensable to you for identifying and locating deep-sky objects:
- Red Flashlight- This is an essential tool for deep-sky astronomy for reading finder charts or star atlases. In order to see the faint light coming from distant objects like nebulae or galaxies, your eyes must be fully dark adapted with your irises open to the fullest extent to let the most light from your telescope into them. White light from a standard flashlight will causes your eye's irises to close down and it can take up to a half-hour for your eyes to return to full dark adaptation. Red lights do not have the same effect. We recommend any red LED flashlight that has adjustable brightness output, because even red light, if excessively bright can affect your night vision. These are available through most telescope retailers but can also be found in camping and hardware stores.
- Planisphere- A planisphere is a special circular star map that will show you the rough placement of constellations over your head, so you can navigate your way across the sky. Unlike charts you can print online, planispheres are good for any time of year, not just the date or month you printed it for. The planisphere consists of two round disks joined at the center. The bottom disk has a map of the constellations while the top disk has a window cut into it out showing a portion of the sky map. By turning the inner and outer disks to match your specific date and time, the map will display only those constellations visible to you at that time. This is handy for finding rough locations of bright stars and constellations. Planispheres are available through book stores and are available for a number of geographical latitudes in the Northern or Southern Hemispheres. Be sure to pick one that is designed for your location. To get more detailed information on where deep-sky objects reside within constellations you will need a Star Atlas.
- Star Atlas- Star atlases are the roadmaps of the sky. Once you have located a constellation with your planisphere, the Star Atlas will show you a detailed, close-up view of that region of sky showing the stars and deep-sky objects that reside in it. These are available through many telescope retailers or bookstores.
- Apps and Programs- There are many applications available for a smartphone or tablet that can take the place of the planisphere and star maps. These will give digital representations of the night sky on your device, allowing you to go from a wide view to a zoomed-in view with a touch of the screen. These can be downloaded or purchased from your application store, depending on your platform. There are also some great astronomical sky simulation programs available for your computer that will show you very detailed star maps on screen and can help you plan an observing session before you get outside with printable star maps customized for your date, location and time.
STAR HOPPING
The easiest way to find your way around the sky is by a technique called star hopping. The first thing you will need to do is measure the field of view of your finderscope. Look in the sky and locate a constellation with bright stars. You can use your planisphere or astronomy app to help identify it. Now find the map in your star atlas that shows this constellation. Center your finderscope on any bright star that you can recognize on the star map. Hold your head 12 inches behind the reflective window of your StarPointer finderscope and move the telescope so that the bright star is at the edge of the field if view of the window (it does not matter which direction you pick). Without moving the telescope, look through the finderscope window and locate another star near the opposite edge of the field of view. Locate this second star on the chart. Measure the distance between these two stars on the chart using a ruler. This distance is represents one finderscope field of view on your atlas. You can now use this measurement to locate celestial objects.
CARE AND CLEANING OF THE TELESCOPE
While your telescope requires little maintenance, there are a few things to remember that will ensure your telescope performs at its best. Occasionally, dust and/or moisture may build up on the objective lens. Special care should be taken when cleaning any instrument so as not to damage the optics.
If dust has built up on the optics, follow these steps, in order, to clean your scope:
- Use a camel hair brush to gently remove the larger particles.
- Use a photographer's squeeze bulb to blow away any loose debris. You can also use a can of compressed air, such as those sold for cleaning computer keyboards, but you need to be careful. Avoid using cans that are almost empty and be sure to hold the air can vertically. Failure to do this can result in the can spitting propellant out onto the optics. Hold the optical surface at an angle to the spray from the can for approximately two to four seconds.
- Use an optical cleaning solution of over-the-counter isopropyl alcohol and distilled water in a 50/50 mixture. Apply this solution to a white unscented tissue, then apply the tissue paper to the optics. Low pressure strokes should go from the center of the lens (or mirror) to the outer portion in straight lines like spokes on a wheel. Do not rub in circles!
You may experience dew build-up on the optics of your telescope during an observing session. If you want to continue observing, the dew must be removed, either with a hair dryer (on low setting) or by pointing the telescope at the ground until the dew has evaporated. If moisture condenses on the inside of the optics, remove the accessories from the telescope. Place the telescope in a dust-free environment and point it downward until the moisture evaporates.
To minimize the need to clean your telescope, replace all lens covers once you have finished using it. Since the telescope tubes are not sealed, the covers should be placed over the openings when not in use. This will prevent contaminants from entering the tubes. Internal adjustments and cleaning should be done only by the Celestron repair department. If your telescope is in need of internal cleaning, please call the factory for a return authorization number and price quote.
COLLIMATION OF A NEWTONIAN TELESCOPE
While your telescope requires little maintenance, there are a few things to remember that will ensure your telescope performs at its Collimation is the process of aligning the mirrors of your telescope so that they work in concert with each other to deliver properly focused light to your eyepiece. By observing out-of-focus star images, you can test whether your telescope's optics are aligned. Place a star in the center of the field of view and move the focuser so that the image is slightly out of focus. If the seeing conditions are good, you will see a central circle of light (the Airy disc) surrounded by a number of diffraction rings. If the rings are symmetrical about the Airy disc, the telescope's optics are correctly collimated.
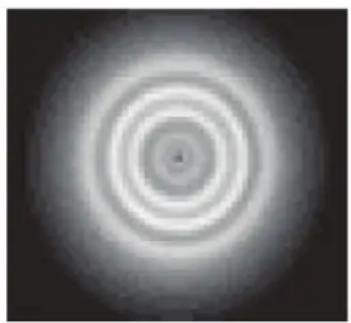
natural_image
Concentric circular gradient pattern with no text or symbolsCorrectly Aligned Needs Collimation
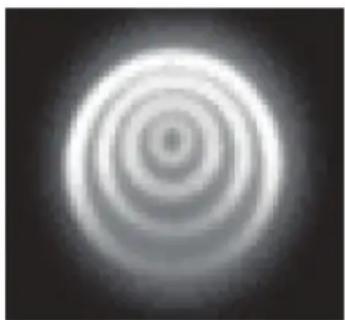
natural_image
Concentric circular gradient pattern with no text or symbolsCollimation is a painless process and works like this:
Pull off the lens cap which covers the front of the telescope and look down the optical tube. At the bottom you will see the primary mirror held in place by three clips 120° apart, and at the top the small oval secondary mirror held in a support and tilted 45° toward the focuser outside the tube wall.
The secondary mirror is aligned by adjusting the three smaller screws surrounding the central bolt. The primary mirror is adjusted by the three adjusting screws at the back of your scope. The three locking screws beside them serve to hold the mirror in place after collimation.
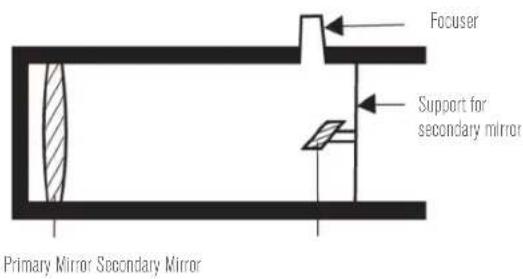
text_image
Focuser Support for secondary mirror Primary Mirror Secondary MirrorALIGNING THE SECONDARY MIRROR
Point the telescope at a lit wall look into the focuser without the eyepiece installed. You may have to twist the focus knob a few turns until the reflected image of the focuser is out of your view. Keep your eye against the back of and centered in the focus tube. Look for the three clips holding the primary mirror in place. If you can't see them, it means that you will have to adjust the three bolts on the top of the secondary mirror holder, using either an Allen wrench or Phillip's screwdriver. You will have to alternately loosen one and then compensate for the slack by tightening the other two. Stop when you see all three mirror clips. Make sure that all three small alignment screws are tightened to secure the secondary mirror in place.
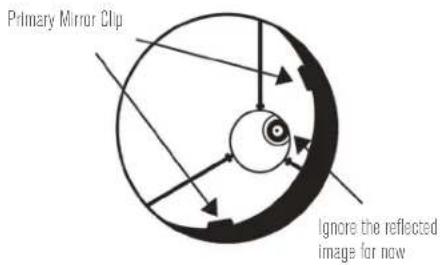
text_image
Primary Mirror Clip Ignore the reflected image for now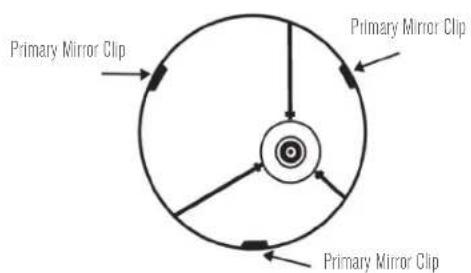
text_image
Primary Mirror Clip Primary Mirror Clip Primary Mirror ClipALIGNING THE PRIMARY MIRROR
There are 3 large bolts and 3 small screws at the back of your telescope. The large bolts are the adjusting screws and the small screws are the locking screws. Loosen the large bolts by a few turns. Now run your hand around the front of your telescope keeping your eye to the focuser, you will see the reflected image of your hand. The idea here being to see which way the primary mirror is defected; you do this by stopping at the point where the reflected image of the secondary mirror is closest to the primary mirror's edge.
When you get to that point, stop and keep your hand there while looking at the back end of your telescope- is there an adjusting screw there? If there is you will want to loosen it (turn the screw to the left) to bring the mirror away from that point. If there isn't an adjusting screw there, then go across to the other side and tighten the adjusting screw on the other side. This will gradually bring the mirror into alignment. (It helps to have a friend to help for primary mirror collimation. Have your partner adjust the adjusting screws according to your directions while you look in the focuser).
After dark, go out and point your telescope at Polaris, the North Star. With an eyepiece in the focuser, take the image out of focus. You will see the same image only now, it will be illuminated by starlight. If necessary, repeat the collimating process only keep the star centered while tweaking the mirror.
text_image
Secondary Mirror Primary Mirror Stop and keep your hand here
text_image
Both mirrors aligned with eye looking in focuserBONUS SOFTWARE
Your purchase includes software for your computer. You don't need to download this software to use your telescope, but it can enhance your experience.

Starry Night
Celestron Starry Night Astronomy Software
Celestron Starry Night, the premier astronomy software on the market, takes you on a guided tour of our Solar System's past, present, and future. It can help you learn about the night sky and plan your next observing session. Use Starry Night to model exactly how the night sky will appear from your backyard, a neighboring town, or anywhere on Earth.
MINIMUM SYSTEM REQUIREMENTS
Windows:
- Windows 7 or higher
- 500MHz or higher processor
- 128 MB RAM
- 850 MB hard disk space
- 32 MB OpenGL-capable graphics card
- Monitor with 1024x768 pixel resolution (recommended)
Mac:
■ Universal binary (PPC/Intel-compatible)
- OS X 10.4 or higher (10.5 or higher for Elementary)
- G3 450 MHz or higher processor
- 128 MB RAM
- 850 MB hard disk space
- 32 MB OpenGL-capable graphics card
- Monitor with 1024x768 pixel resolution (recommended)
SAFETY INSTRUCTIONS
- There is a risk of explosion if the battery is replaced with an incorrect type.
- The included battery is not rechargeable.
- Only use the battery as originally intended to avoid a short circuit. Connecting the conductive material directly to the battery's positive and negative sides will cause a short circuit.
- Do not use a damaged battery.
- Do not store the battery in an extremely cold or hot environment. Doing so can reduce battery life.
- Remove batteries if drained or if product is to be left unused for a long time.
- When replacing the battery, refer to the instruction manual and ensure the positive and negative sides are oriented correctly.
- Do not put the battery in fire.
- Dispose of the battery according to local regulations.
FCC NOTICE: This device complies with Part 15 of the FCC Rules. Operation is subject to the following two conditions: (1) This device may not cause harmful interference, and (2) this device must accept any interference received, including interference that may cause undesired operation.

text_image
BATTERY WARNING • INGESTION HAZARD: This product contains a button cell or coin battery. • DEATH or serious injury can occur if ingested. • A swallowed button cell or coin battery can cause Internal Chemical Burns in as little as 2 hours. • KEEP new and used batteries OUT OF REACH OF CHILDREN • SEEK IMMEDIATE MEDICAL ATTENTION if a battery is suspected to be swallowed or inserted inside any part of the body.

SOLAR WARNING: Never attempt to view the sun through any telescope.
NEED ASSISTANCE? Contact Celestron Technical Support
celestron.com/pages/technical-support
Product design and specifications are subject to change without prior notification. This product is designed and intended for use by those 14 years of age and older.

CELESTRON
©2024 Celestron. Celestron and Symbol are trademarks of Celestron, LLC.
All rights reserved. • Celestron.com
US: Celestron, 2835 Columbia Street, Torrance, CA 90503 USA
UK: Celestron Global Ltd., Unit 2 Transigo, Gables Way, Thatcham RG19 4JZ, United Kingdom
Made in China | 09-24
celestron.com/pages/warranty

text_image
FR +
Separate waste collection. Check your local municipal guidelines.
natural_image
Three identical telescope tripods arranged side by side, no visible text or labels60LCM
80LCM
114LCM
LCM
SÉRIE DE TÉLESCOPES
MODE D'EMPLOI
MODÈLES #22050, 22051, 31150
(60LCM, 80LCM, 114LCM)
FRANÇAIS
SOMMAIRE
AVERTISSEMENT AU SUJET DES RAYONS DU SOLEIL. 6
VOUS TROUVEREZ DANS LA BOÎTE. 7
ASSEMBLAGE DE VOTRE TÉLESCOPE 8
Le trépied 8
natural_image
Close-up of a black-and-white astronomical instrument with orange base and red arrows indicating components (no text or symbols visible)LE TUBE DU TÉLESCOPE
natural_image
Close-up of a mechanical device with red directional arrows indicating rotation or movement (no text or symbols visible)L'OCULAIRE
natural_image
Mechanical assembly diagram showing a valve or pump component with a red arrow indicating direction (no text or symbols present)Réfracteur
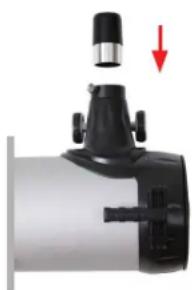
natural_image
Close-up of a mechanical device with a red arrow pointing to a component (no visible text or symbols)Newtonien
LE CHERCHEUR STARPOINTER®
natural_image
Close-up of a camera lens mounted on a tripod, showing mechanical components and a magnified inset (no text or symbols visible)natural_image
Silhouette of a telescope with an octagonal target symbol (no text or labels)CHOISIR UNE CIBLE
natural_image
Abstract black-and-white graphic of a target with concentric circles and a red dot, no text or symbols present.REGARDEZ DANS LE CHERCHEUR
natural_image
Silhouette of a telescope on a tripod with a star and dotted lines indicating direction (no text or symbols)VOTRE CHERCHEUR EST MAINTENANT ALIGNÉ !
natural_image
Silhouette of a telescope on a tripod with a globe icon nearby (no text or symbols)natural_image
Silhouette of a telescope with a globe and dotted lines indicating light rays (no text or symbols)natural_image
Abstract black-and-white graphic with a red circular target and vertical lines, no text or symbols present.text_image
5 20mm 10mmFÉLICITATIONS !
VOUS AVEZ MAINTENANT OBSERVÉ VOTRE PREMIER OBJET CÉLESTE!
natural_image
Illustration of a planet with rings and stars, no text or symbols presentnatural_image
Concentric circular gradient pattern with no text or symbolsnatural_image
Concentric circular gradient pattern with no text or symbolsnatural_image
Three identical telescope tripods arranged side by side, no visible text or symbols on the instruments themselves.60LCM
80LCM
114LCM
LCM
TELESKOP SERIES
BEDIENUNGSANLEITUNG
MODELLE #22050, 22051, 31150
DEUTSCH
(60LCM, 80LCM, 114LCM)
INHALTSVERZEICHNIS
natural_image
Close-up of a black plastic fan with red directional arrows indicating rotation or movement (no text or symbols)
natural_image
Close-up of a tripod-mounted camera with a black clip attached (no text or symbols visible)natural_image
Close-up of a black-and-white photoelectric instrument mounted on a tripod, with red arrows indicating force or movement (no text or symbols visible)DER TELESKOPTUBUS
natural_image
Mechanical assembly diagram showing a motor and pump components with red directional arrows indicating motion (no text or labels)DAS OKULAR
natural_image
Mechanical assembly diagram showing a valve with a red arrow indicating direction (no text or symbols present)Refraktor
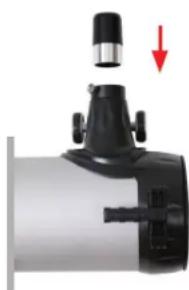
natural_image
Close-up of a mechanical device with a red arrow pointing to a component (no visible text or symbols)Newton
STARPOINTER®-SUCHERFERNROHR
natural_image
Close-up of a black robotic vacuum cleaner with attached wiring and orange base (no visible text or symbols)DAS TELESKOP SCHWENKEN
natural_image
Close-up of a blue telescope mounted on a tripod with a close-up inset showing the camera (no text or symbols visible)natural_image
Silhouette of a telescope with an octagonal target symbol (no text or labels)WÄHLEN SIE EIN ZIEL
natural_image
Silhouette of a target with a red dot on the eye and black outline (no text or symbols)DURCH DAS SUCHERFERNROHR SCHAUEN
natural_image
Silhouette of a telescope on a tripod with a star and dotted line indicating light direction (no text or symbols)IHR SUCHERFERNROHR IST JETZTAUSGERICHTET!
natural_image
Silhouette of a telescope on a tripod with Earth globe icon (no text or symbols)natural_image
Silhouette of a telescope with Earth visible through its lens (no text or symbols)natural_image
Black and white illustration of a target with a red circular target and a scale (no text or symbols)text_image
20mm 10mmHERZLICHEN GLÜCKWUNSCH!
SIE HABEN GERADE IHR
natural_image
Illustration of a planet with rings and stars, no text or symbols presentnatural_image
Concentric circular gradient pattern with no text or symbolsnatural_image
Concentric circular light pattern with radial gradient (no text or symbols)natural_image
Three identical telescope tripods arranged side by side, no visible text or labels60LCM
80LCM
114LCM
LCM
SERIE DE TELESCOPIO
natural_image
Close-up of a black plastic fan with red directional arrows indicating rotation or movement (no text or symbols)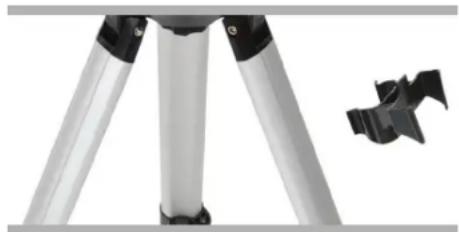
natural_image
Close-up of a tripod-mounted camera with black adjustment knobs and a small black clip attached (no text or symbols visible)SOPORTE INFORMATIZADO
natural_image
Top-down view of a black and orange scientific instrument mounted on a tripod, with red arrows pointing to its base (no text or symbols visible)TUBO DEL TELESCOPIO
natural_image
Mechanical assembly diagram showing a motor and pump component with red directional arrows indicating rotation (no text or labels)OCULAR
natural_image
Close-up of a mechanical component with a red arrow indicating direction (no text or symbols visible)Refractor
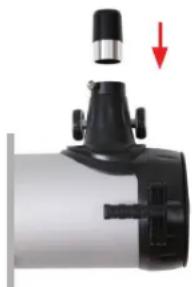
natural_image
Close-up of a mechanical device with a black lever and red arrow indicating direction (no text or symbols)Newtoniano
natural_image
Close-up of a telescope mounted on a tripod with a close-up inset showing the camera (no text or symbols visible)natural_image
Silhouette of a telescope with an octagonal lens nearby (no text or symbols)ELEGIR UN OBJETO
natural_image
Abstract black-and-white graphic of a target with a red dot and concentric circles, no text or symbols present.natural_image
Silhouette of a telescope on a tripod with a star and dotted lines indicating light rays (no text or symbols)natural_image
Silhouette of a telescope on a tripod with a globe icon nearby (no text or symbols)natural_image
Silhouette of a telescope with Earth visible through its lens (no text or symbols)natural_image
Black and white illustration of a target with a red circular target and a circular target (no text or symbols)text_image
20mm 10mmnatural_image
Illustration of a planet with rings and stars, no text or symbols presentnatural_image
Concentric circular gradient pattern with no text or symbolsnatural_image
Concentric circular gradient pattern with no text or symbolsnatural_image
Three identical telescope tripods arranged side by side, no visible text or symbols on the instruments themselves.60LCM
80LCM
114LCM
LCM
SERIE DE TELESCOPIO
MANUALE D'USO
MODELLI #22050, 22051, 31150
ITALIANO
(60LCM, 80LCM, 114LCM)
INDICE
natural_image
Close-up of a black plastic fan with red directional arrows indicating rotation or movement (no text or symbols)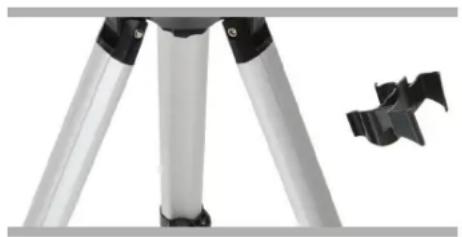
natural_image
Close-up of a tripod-mounted camera with a black clip attached (no text or symbols visible)MONTATURA COMPUTERIZZATA
natural_image
Close-up of a black and orange robotic device mounted on a tripod, with red arrows pointing to its base panel (no text or symbols visible)TUBO DEL TELESCOPIO
natural_image
Close-up of a mechanical device with red directional arrows indicating rotation or movement (no text or symbols visible)OCULARE
natural_image
Mechanical component with a red arrow indicating direction, no visible text or symbolsRifrattore
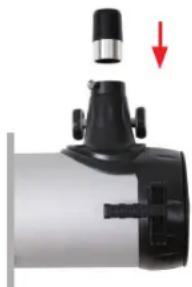
natural_image
Close-up of a mechanical device with a black lever and red arrow indicating direction (no text or symbols)Newtoniano