 — Hi-fi system — Mode d'emploi PDF")
LIFE E66877 (MD 43877) - Hi-fi system MEDION - Free user manual and instructions
Find the device manual for free LIFE E66877 (MD 43877) MEDION in PDF.

| Product type | Job site radio (portable HIFI system) |
| Brand | Medion |
| Model | LIFE E66877 (MD 43877) |
| Dimensions (W x H x D) | Approx. 282 x 235 x 180 mm |
| Weight | Approx. 1.94 kg |
| Mains power supply | Mains adapter 100-240 V ~ 50/60 Hz, output 9 V DC 1 A |
| Battery power | Built-in lithium-ion battery 7.4 V, 2000 mAh (14.8 Wh) |
| Audio output power | 2 x 5 W RMS |
| Radio reception | DAB/DAB+ (band III 174-240 MHz), FM (87.5-108 MHz) |
| Wireless connectivity | Bluetooth 5.0 (2402-2480 MHz, max power < 8.52 dBm) |
| Auxiliary input | AUX IN socket (3.5 mm jack) |
| Main functions | DAB/FM radio, Bluetooth player, hands-free calling, equalizer, LED work light, sleep timer, countdown timer, screen brightness dimmer |
| Protection | IP44 (resistant to water splashes and dust) |
| Package contents | Job site radio, DAB antenna, audio cable (3.5 mm), mains adapter, quick start guide |
| Cleaning and maintenance | Unplug before cleaning; use a soft, dry cloth; avoid solvents and chemicals |
| Safety instructions | Do not expose to rain/humidity; avoid prolonged high volume; do not open the battery; keep out of reach of children |
| Repairability | Built-in battery not user-replaceable; factory reset possible; contact customer service |
| General information | User manual included, downloadable at medionservice.com; customer service: see contact details in manual |
Frequently Asked Questions - LIFE E66877 (MD 43877) MEDION
User questions about LIFE E66877 (MD 43877) MEDION
0 question about this device. Answer the ones you know or ask your own.
Ask a new question about this device
Download the instructions for your Hi-fi system in PDF format for free! Find your manual LIFE E66877 (MD 43877) - MEDION and take your electronic device back in hand. On this page are published all the documents necessary for the use of your device. LIFE E66877 (MD 43877) by MEDION.
USER MANUAL LIFE E66877 (MD 43877) MEDION
natural_image
Technical line drawing of a mechanical device with internal components and directional arrows (no text or symbols)natural_image
Technical line drawing of a device interior with a curved arrow indicator (no text or symbols)natural_image
Technical line drawing of a device interior with no visible text or symbolsnatural_image
Technical line drawing of a device interior with a curved arrow indicator (no text or symbols)natural_image
Technical line drawing of a mechanical device with internal components and directional arrows (no text or symbols)natural_image
Technical line drawing of a device interior with a curved arrow indicator (no text or symbols)natural_image
Technical line drawing of a device interior with no visible text or symbols▶ Abra la puerta del compartimento.
natural_image
Technical line drawing of a device interior with a curved arrow indicator (no text or symbols)natural_image
Technical line drawing of a device interior with no visible text or symbolsnatural_image
Technical line drawing of a device interior with a curved arrow indicator (no text or symbols)1. Information about this user manual ....163
1.1. Explanation of symbols ...... 163
FR
2. Proper use ....16
NL
3. General safety instructions ....164
4. General safety instructions for batteries ....166
ES
5. Package contents ......ES16
6. Device parts
6.1. Front....167
IT
6.2. Rear 169
EN
7. Getting started
7.1. Mains operation....170
7.2. Battery operation/charging the device....170
7.3. Switching the device on/off....171
7.4. Setting the language 171
7.5. Setting the time/date 171
8. Using the device 173
8.1. Standby mode....173
8.2. Switching off energy-saving mode on the device .....173
8.3. Selecting the mode....174
8.4. Setting the volume....174
9. DAB mode.... 175
9.1. Starting the DAB station search for the first time....175
9.2. Starting the station search....175
9.3. Selecting a station ....176
9.4. Displaying station information ....176
9.5. Storing a radio station....176
9.6. Playing a stored station....177
9.7. Setting the DRC function .....177
9.8. Deleting inactive stations ....177
9.9. Setting the TA function....177
10. FM mode.... 178
10.1. Selecting the signal quality for the station search....178
10.2. Starting the station search....178
10.3. Displaying station information ....178
10.4. Storing a radio station....178
10.5. Playing a stored station....179
11. Bluetooth® mode 179
11.1. Pairing Bluetooth ^® devices for the first time....179
11.2. Start/pause playback....180
11.3. Managing calls....180
- AUX mode 181
12.1. Connecting an external playback device ....181
- Convenience functions 182
13.1. Equaliser 182
13.2. Using the sleep timer 182
13.3. Using the NAP timer 183
13.4. Using the work light....184
13.5. Dimming the display lighting ....184
13.6. Battery charge level....184
- Service functions 185
14.1. Resetting the device to factory settings 185
14.2. Displaying the software version 185
-
Cleaning 185
-
Troubleshooting 186
-
Disposal 186
-
Technical specifications .... 187
-
EU Declaration of Conformity....188
-
Trademark information....188
-
Service information....188
-
Legal Notice ....189
1. Information about this user manual

Thank you for choosing our product. We hope you enjoy using this device.
Please read the safety instructions and the user manual carefully before using the device for the first time. Note the warnings on the device and in the user manual.
Always keep the user manual close to hand. If you sell the device or give it away, please ensure that you also pass on this user manual. It is an essential component of the product.
1.1. Explanation of symbols
If a block of text is marked with one of the warning symbols listed below, the hazard described in that text must be avoided to prevent the potential consequences described there from occurring.

DANGER!
Warning: risk of fatal injury!

WARNING!
Warning: risk of possible fatal injury and/or serious irreversible injuries!

NOTICE!
Follow these instructions to prevent damage to the device!

More detailed information about using the device

Follow the instructions in the user manual!
2. Proper use
The site radio is used to play audio material which can be played via Bluetooth or AUX. In addition, radio stations can be played. The specified reception frequency range represents the technical possibilities of the device. Information received outside this range may not be used or further distributed. The respective national laws must be observed.
Please note that we shall not be liable in cases of improper use. Any other use is considered improper and can cause personal injury or property damage.
3. General safety instructions
KEEP THIS USER MANUAL IN A SAFE PLACE
■ Comply with all the information in this user manual, especially the safety instructions.
■ Only use replacement parts or accessories that we have supplied or approved.
■ Do not modify the device without our consent and do not use any auxiliary equipment that we have not approved or supplied.
■ Unplug the device during a thunderstorm or if you are not going to use it for a long period of time.
■ A battery-operated radio with integrated batteries may only be charged with the specified charger. A charger intended for a specific battery type can cause a fire if it is used for other batteries.
■ Follow all charging instructions and do not charge the battery outside the specified temperature range. If you charge the battery incorrectly or outside the correct temperature, there is an increased risk of fire.
■ The mains adapter is the separating device and must always be accessible.
■ Do not use the product at high volumes for long periods of time. Select a moderate volume setting to avoid hearing damage.
■ LCD screens contain liquid that can cause skin irritation and poisoning. If the liquid gets into your eyes, mouth or on your skin, rinse the affected areas with water and consult a doctor.
■ Protect the product from rain or moisture. Water ingress can increase the risk of electric shock.
This product is not suitable for use by persons (including children) with reduced physical, sensory or mental capabilities, or lack of experience and knowledge, unless they are supervised or have received instruction concerning use of the product by a person responsible for their safety. Children must be supervised to ensure that they do not play with the product. Store the product out of reach of children.
■ Do not use the device in potentially explosive atmospheres. This includes petrol stations, fuel storage areas and areas where solvents are processed. This device must also not be used in areas with particle-laden air (for example, flour or wood dust).
■ Protect the radio from heat and fire. Do not leave it in a hot place, e.g. in the immediate vicinity of a heat source, in direct sunlight or inside a vehicle parked in direct sunlight. Otherwise there is a risk of fire, explosion and injuries.
4. General safety instructions for batteries
The site radio is powered by a built-in rechargeable battery and users cannot simply replace it themselves. Never attempt to replace the battery yourself. Please note the following:

WARNING!
Risk of explosion!
There is a risk of explosion if the rechargeable battery is replaced incorrectly. Replace batteries only with the same or equivalent type.
■ Do not throw the device into a fire, and do not short-circuit it or dismantle it.
■ The site radio should not be left unattended while it is being charged.
5. Package contents

DANGER!
Risk of choking and suffocation!
Packaging film can be swallowed or used improperly, creating a risk of choking and suffocation.
- Keep all packaging materials used (bags, pieces of polystyrene etc.) out of reach of children.
■ Do not let children play with the packaging material.
Remove the product from the packaging and remove all packaging materials.
▶ Check your purchase to ensure that all items are included and in perfect condition. If anything is missing or damaged, please contact us within 14 days of purchase. In the event of damage, only use the device after consultation with customer services.
The following items are supplied with your product:
- Site radio
- DAB antenna
• Audio cable (3.5 mm) - Mains adapter
- Short manual
6. Device parts
6.1. Front
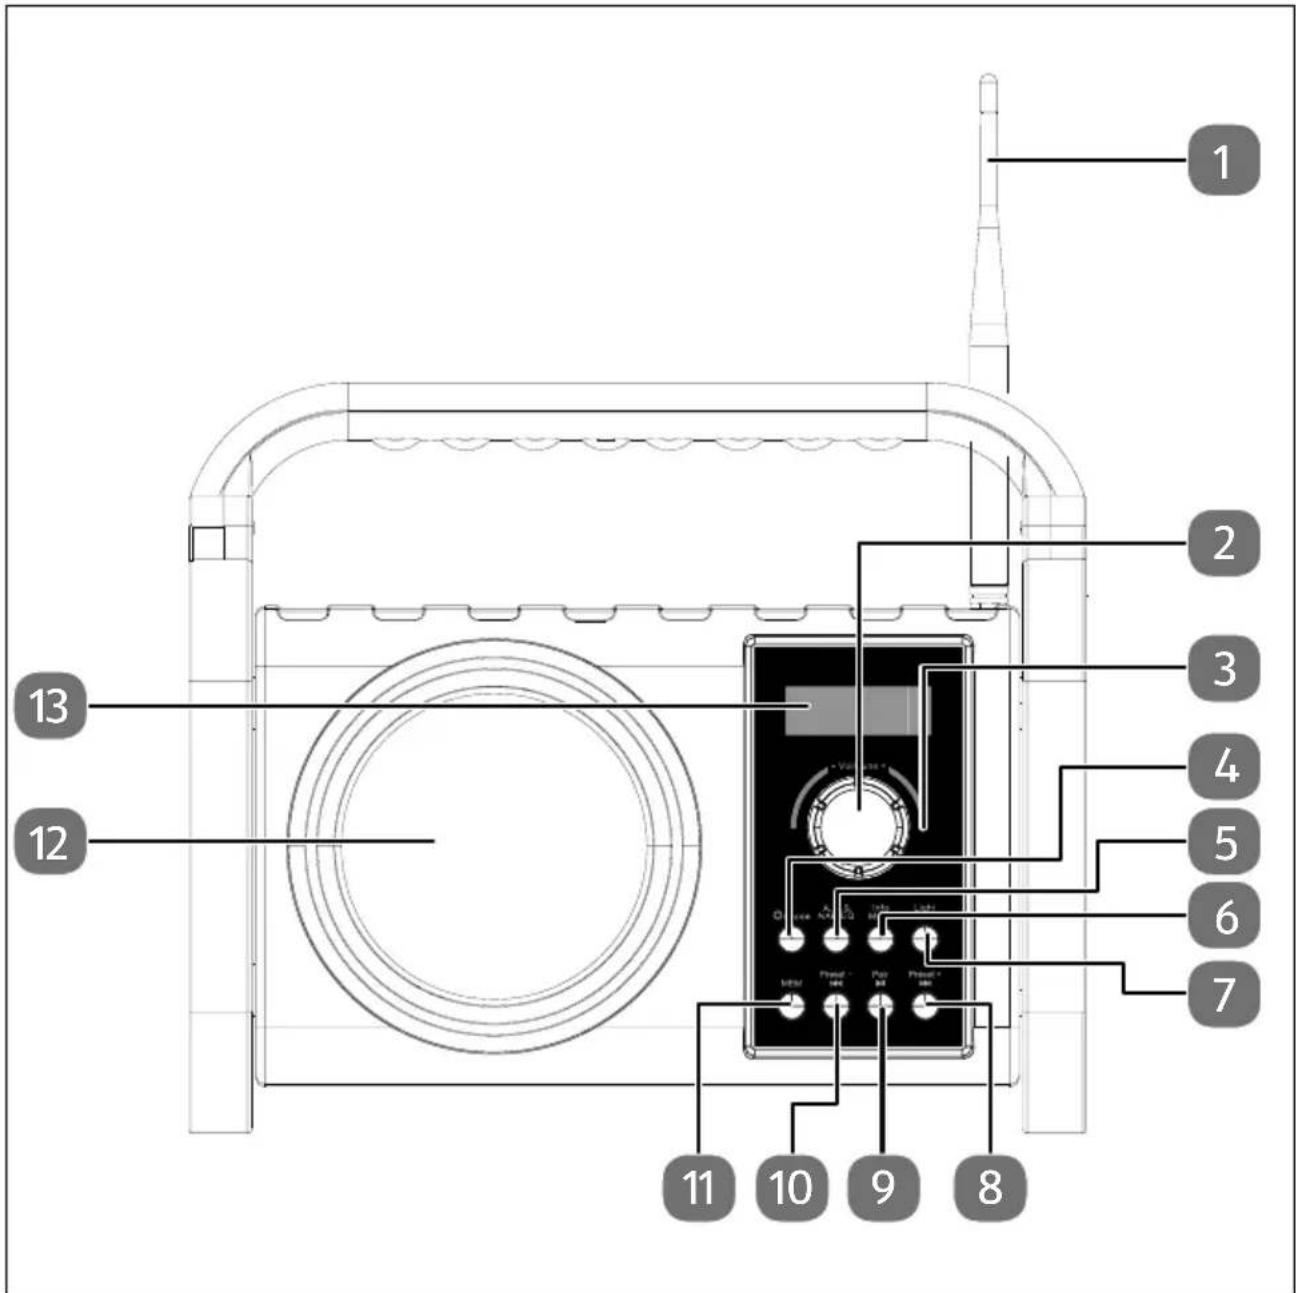
1 Antenna

Decrease/increase volume/frequency Accept/end call, confirm menu selection
3 Microphone

Switch device on/off, select operating mode

Perform station search Set NAP timer, select equaliser setting

Information about the current station, Call up system settings, Select higher-level menu level, Battery charge level, Sleep timer

Switch light on/off Set dimmer for display lighting

Navigate in the menu, next track/station

Start/pause playback, open menu

Navigate in the menu, previous track/station Store/call up a station
11 MEM.
12 Speaker
13 Display
6.2. Rear
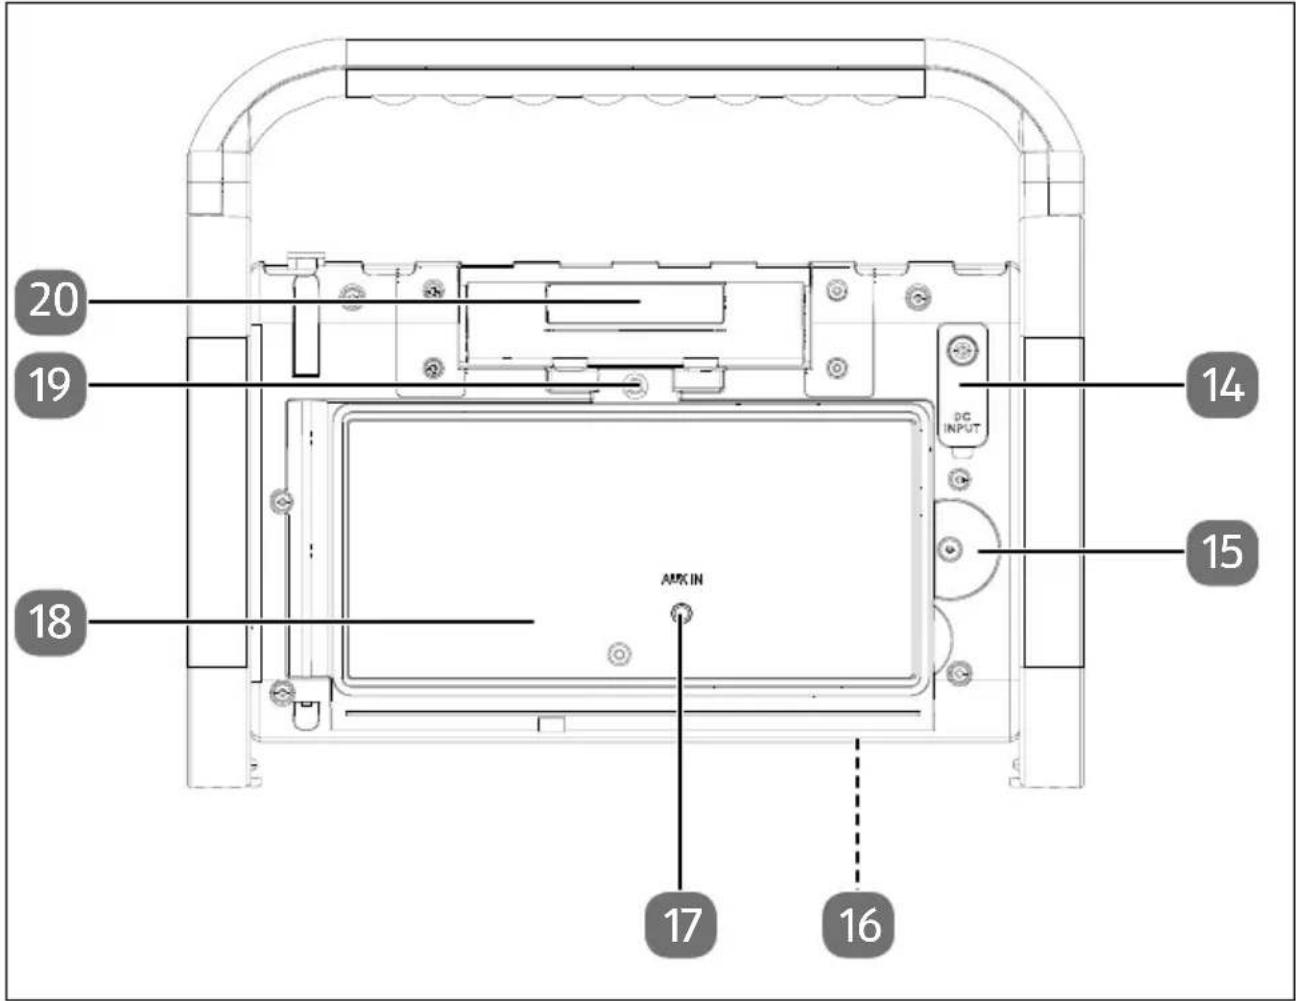
14 DC IN 9V Connection for mains adapter
15 Storage compartment lock
16 Type plate (underneath)
17 AUX IN Audio connection for external device (in storage compartment)
18 Storage compartment for external devices
19 Knurled screw for storage compartment lock
20 LED work light
7. Getting started
7.1. Mains operation
Only use the supplied mains adapter to connect the radio. The mains adapter has a type plate with the corresponding information on it.
Connect the mains adapter plug to the device's
DC IN 9V power cable connection.
▶ Plug the mains adapter into an easily accessible 100–240 V \~ 50–60 Hz mains socket.

If you do not need to use the device for a long period of time, please take it out of operation. Unplug the mains adapter from the wall socket.
7.2. Battery operation/charging the device
The device can also be operated without an external power source via the integrated rechargeable battery.
Low charge and power off:
- As soon as the battery reaches a low charge level, the indicator on the display begins to flash.
- If the device remains in operation with a low charge level, BATTERY LOW is shown on the display and the device switches off automatically once the threshold has been reached.

Only charge the device when it is dry and indoors. Ensure that the device is completely dry before charging.
▶ To charge the battery, connect the mains adapter as described in the previous chapter.
During charging, lights up on the display. To extend the battery life, disconnect the device from the external power source when the battery is fully charged.

If the device is in standby mode, it switches to energy-saving mode after approx. 30 seconds. The display switches off.
7.3. Switching the device on/off
▶ Press the ⏻ button to switch on the radio.
▶ Press and hold the button to switch it to standby mode.
The time and date are shown on the display.
7.4. Setting the language

The language is set to "English" when the device is used for the first time or after it has been reset to factory conditions.
The device is switched on or in standby mode.
▶ Press and hold the MENU button until the SYSTEM menu item appears on the display.
▶ Press the OK button to call up menu item.
▶ Press the ◀◀ or ▶◀ button several times to switch to the LANGUAGE menu item.
▶ Press OK to confirm your selection.
▶ Press the ◀◀ or ▶◀ button several times to select the language.
▶ Press the OK button to confirm the selection.
The language is now set.
7.5. Setting the time/date
7.5.1. Setting the time/date automatically

The time and date are set automatically when the AUTO UPDATE function is enabled and DAB/FM stations are received.
▶ Press and hold the MENU button until the SYSTEM menu item appears on the display.
▶ Press the OK button to call up menu item.
▶ If necessary, press the ◀ or ▶ button several times to switch to the TIME menu item.
▶ Press OK to confirm your selection.
▶ If necessary, press the ◀ or ▶ button several times to switch to the AUTO UPDATE menu item.
▶ Press OK to confirm your selection.
▶ Select UPDATE FROM RADIO, UPDATE FROM DAB or UPDATE FROM FM if the time and date is to be set automatically.
▶ Select NO UPDATE if the time and date are not to be set automatically.
The time and date are set automatically according to your selection when DAB or FM mode is switched on.
7.5.2. Setting the time/date manually
The device is switched on or in standby mode.
▶ Press and hold the MENU button until the SYSTEM menu item appears on the display.
▶ Press the OK button to call up menu item.
▶ If necessary, press the ◀◀ or ▶▶ button several times to switch to the TIME menu item.
▶ Press OK to confirm your selection.
▶ If necessary, press the ◀ or ▶ button several times to switch to the SET TIME/DATE menu item.
▶ Press OK to confirm your selection.
The display for the day flashes.
▶ If necessary, press the ◀◀ or ▶◀ button several times to set the day.
▶ Press OK to confirm your selection.
Now set the month, year, hour and minute in the same way.
▶ Press OK to confirm your selection.
The time and date have been set.
7.5.3. Setting the time format
▶ Press and hold the MENU button until the SYSTEM menu item appears on the display.
▶ Press the OK button to call up menu item.
▶ If necessary, press the ◀◀ or ▶▶ button several times to switch to the TIME menu item.
▶ Press OK to confirm your selection.
▶ If necessary, press the ◀ or ▶ button several times to switch to the SET CLOCK FORMAT menu item.
▶ Press OK to confirm your selection.
▶ Use the ◀ or ▶ buttons to select whether you want the 12 or 24 hour format.
▶ Press OK to confirm your selection.
7.5.4. Setting the date format
▶ Press and hold the MENU button until the SYSTEM menu item appears on the display.
▶ Press the OK button to call up menu item.
▶ If necessary, press the ◀ or ▶ button several times to switch to the TIME menu item.
▶ Press OK to confirm your selection.
▶ If necessary, press the ◀ or ▶ button several times to switch to the SET DATE FORMAT menu item.
▶ Press OK to confirm your selection.
▶ Use the ◀◀ or ▶◀ buttons to select the desired date format.
You can choose from the following date formats:
- Day-month-year
- Month-day-year
- Year-month-day
▶ Press OK to confirm your selection.
8. Using the device
8.1. Standby mode
The device can only be set to standby mode during mains operation. The time and date are shown on the display permanently.
8.1.1. Switching the device out of standby mode
▶ Press the button.
The operating mode that was set before standby mode is shown on the display.
8.1.2. Switching the device to standby mode
▶ Press and hold the ⏻ button until STANDBY is shown on the display. The time and date are displayed.
8.2. Switching off energy-saving mode on the device
In battery mode, the device switches from standby mode to energy-saving mode if no input is made for 30 seconds.
▶ Press the button again to return the device to standby mode.
The welcome text, time and date are displayed. If no further entries are made, the device switches back to energy-saving mode after 30 seconds.
8.3. Selecting the mode
▶ Press the MODE button several times in succession until the desired operating mode is shown on the display.
The following operating modes can be set:
| Mode Description | |
| DAB Digital radio station playback | |
| FM Analogue radio station playback | |
| Aux Playback of an external audio source via the AUX connection | |
| Bluetooth | Playback of an audio source from an external Bluetooth-enabled deviceCall control for a Bluetooth-enabled mobile phone |
8.4. Setting the volume
- When the device is in use, turn the - VOL + controller towards - to decrease the volume.
When the device is in use, turn the - VOL + controller towards + to increase the volume.
The volume set is shown on the display for approx. 6 seconds.
9. DAB mode
9.1. Starting the DAB station search for the first time
Press the button to switch on the device.
▶ If necessary, press the MODE button several times until the DAB operating mode is shown on the display.
The DAB station search starts.
Once the search has ended
- the number of stored stations is displayed;
- the stations are sorted alphabetically in the station list;
- the first DAB station from the station list is played automatically;
- the station name is displayed;
- the current track is displayed as scrolling text.
9.2. Starting the station search

If the automatic station search does not work the first time you switch on the DAB mode or if a new station search is required at a later time, you can also start this manually.
9.2.1. Automatic station search
Automatic station search can be performed in two ways.
▶ Press and hold the A.M.S. button until the complete station search starts.
▶ Alternatively, press and hold the MENU button until the DAB menu is shown on the display.
▶ Confirm the FULL SCAN selection with the OK button.
The DAB station search starts.
Once the search has ended
- the number of stored stations is displayed;
- the stations in the station list are sorted alphabetically;
- the first DAB station from the station list is played automatically;
• the station name is displayed; - the current track is displayed as scrolling text.
9.2.2. Manual station search
▶ Press and hold the MENU button.
The DAB menu opens and FULL SCAN is shown on the display.
▶ Press the ◀ or ▶ button several times until MANUAL TUNE is shown on the display.
▶ Press OK to confirm your selection.
The MANUAL TUNE menu and the current DAB frequency are shown on the display.
▶ Press the ◀◀ or ▶◀ button several times to set the desired DAB frequency.
▶ Press OK to confirm your selection.
9.3. Selecting a station
▶ Select DAB mode.
The last DAB station used is played.
▶ Press the ◀◀ or ▶◀ button to retrieve the station list.
▶ Press the ◀◀ or ▶◀ button again until the desired DAB station is shown on the display.
▶ Press OK to confirm your selection.
The desired DAB station is played.
9.4. Displaying station information
▶ Press the INFO button several times to display the following information:
- Transmission power, station type, transmission area, transmission frequency
- Signal fault
– Transmission speed/DAB standard, battery charge level/AB - Time/date
- Current track
9.5. Storing a radio station
You can store up to 30 DAB stations.
▶ Select the DAB station you want to store.
▶ Press and hold the MEM. button until PRESET STORE and the 1st memory slot are displayed.
▶ Press the PRESET - or PRESET + button several times until a free memory slot is shown on the display.
▶ Press the OK button.
The DAB station is stored under the numbered memory slot.

If you want to overwrite a station which is already stored, select an occupied memory slot as described above and confirm the selection.
9.6. Playing a stored station
▶ Press the MEM. button to call up the list of saved stations.
▶ Use the PRESET - or PRESET + button to select the desired DAB station.
▶ Press OK to confirm your selection.
9.7. Setting the DRC function
DRC (Dynamic Range Compression) is a function that reduces the volume of louder sounds and boosts the volume of quieter sounds.
▶ Press and hold the MENU button until the DAB menu is shown on the display.
▶ Press the ◀◀ or ▶◀ button several times until DRC is shown on the display.
▶ Press the OK button to navigate to the menu.
▶ Use the ◀ or ▶ buttons to select one of the DRC HIGH or DRC LOW options.
▶ Select DRC OFF to switch off the DRC function.
▶ Press the OK button to set the DRC function.
9.8. Deleting inactive stations
The device features the option to delete DAB stations from the station list that are no longer transmitting or that have changed frequency.
▶ Press and hold the MENU button until the DAB menu is shown on the display.
▶ Press the ◀◀ or ▶▶ button several times until PRUNE is shown on the display.
▶ Press the OK button.
▶ Select the ◀ or ▶ buttons to select the JA option.
▶ Press OK to confirm your selection.
The inactive DAB stations are deleted from the station list.
9.9. Setting the TA function
The device features the option to receive automatic updates on traffic conditions.
▶ Press and hold the MENU button.
▶ Press the ◀◀ or ▶◀ button several times until TA is shown on the display.
▶ Press the OK button.
▶ Select OFF to switch off the TA function.
▶ Select ON to switch on the TA function.
▶ Press OK to confirm your selection.
10. FM mode
10.1. Selecting the signal quality for the station search
▶ Press and hold the MENU button to open the FM menu.
▶ Press the OK button to open the search settings.
In the menu, select ALL STATIONS to search for all FM stations with weak and strong signals.
In the menu, select STRONG STATIONS to search for only FM stations with a strong signal.
10.2. Starting the station search
▶ Press and hold the A.M.S button.
The FM station search starts and the stations found are saved in the station list.
Once the search has ended
- the number of stored stations is displayed;
- the transmission frequencies are stored in the station memory in ascending numerical order
- the first FM station from the station memory is played automatically;
- the station frequency and, for certain stations, the station name are displayed;
- the current track is displayed as scrolling text for certain stations.
10.3. Displaying station information
▶ Press the INFO button several times to display the following information:
– Station type/transmission frequency/current track
- Time/date
10.4. Storing a radio station

The preset station list can be reordered at a later date. Up to 30 memory slots are available for this purpose.
▶ Press and hold the ◀◀ or ▶◀I buttons to select the station to be stored.
▶ Alternatively, use the PRESET - or PRESET + buttons to select the station you want to reorder.
▶ Press and hold the MEM. button until the PRESET STORE menu is shown on the display.
▶ Press the PRESET - or PRESET + button several times until a free or occupied and numbered memory slot is shown on the display.
▶ Press the OK button.
The DAB station is stored under the numbered memory slot.

If you want to overwrite a station which is already stored, select an occupied memory slot as described above and confirm the selection.
10.5. Playing a stored station
▶ Press the MEM. button to call up the list of saved stations.
▶ Use the PRESET - or PRESET + button to select the desired FM station.
▶ Press OK to confirm your selection.
11. Bluetooth® mode
You can use Bluetooth to play tracks from external devices (e.g. MP3 players with Bluetooth or mobile phones) on this site radio.
When the site radio is connected to a mobile phone via Bluetooth you can take incoming calls and use the site radio as a hands-free system.
11.1. Pairing Bluetooth ^® devices for the first time

Known external devices, which have already been paired once, will be connected again automatically in the future. It is not necessary to pair the devices again. To reconnect, simply activate Bluetooth mode on both devices.
▶ Select the BLUETOOTH operating mode.
▶ Activate the device search on your Bluetooth device.
The site radio has been detected if it is listed on your Bluetooth device with the ID MD 43877.
▶ Set the appropriate settings on your Bluetooth device to pair it with the site radio.
Your Bluetooth device has been paired successfully with the site radio when BLUE-TOOTH CONNECTED is shown on the display. Audio playback begins automatically.
11.1.1. Ending Bluetooth playback
▶ Press the MODE button and switch to a different mode.
▶ Alternatively, you can also terminate the Bluetooth connection on the external device.
11.2. Start/pause playback
▶ Press the button briefly to start playing tracks.
▶ To pause playback, press the button again.
Playback pauses.
▶ Press the button again to resume playback.
11.2.1. Track selection
▶ Press the ◀ button to return to the previous track.
▶ Press the ▶ button to skip to the next track.
11.3. Managing calls

Incoming calls are announced by an acoustic signal from the site radio and interrupt audio playback.
11.3.1. Accepting a call
▶ Press the button. Voice transmission takes place via the microphone and speaker.
11.3.2. Ending a call
▶ Press and hold the button. The call is ended and audio playback resumes.
11.3.3. Rejecting a call
▶ Press and hold the button while the acoustic signal sounds. The call is rejected and audio playback resumes.
12. AUX mode
You can use the AUX IN jack with a cable connection to an external playback device (for example a smartphone or MP3 player).
12.1. Connecting an external playback device
▶ Switch the site radio to standby mode.
▶ Switch off your external device.
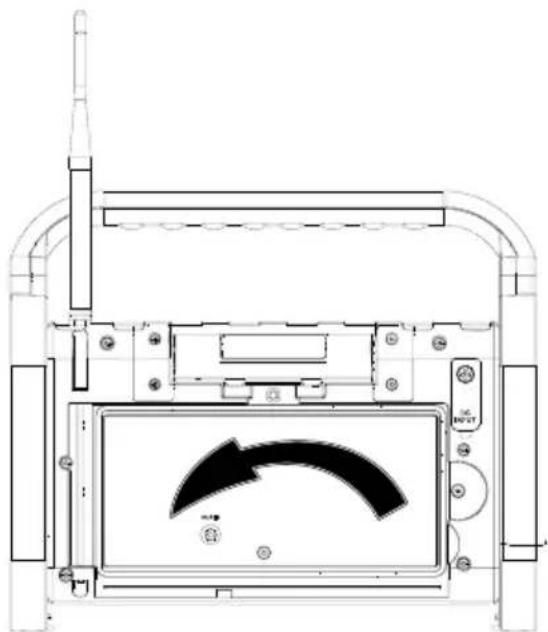
▶ Unlock the storage compartment door on the back of the site radio. To do this, loosen the knurled nut and twist the catch.
natural_image
Technical line drawing of a mechanical device with internal components and directional arrows (no text or symbols)▶ Open the storage compartment door.

natural_image
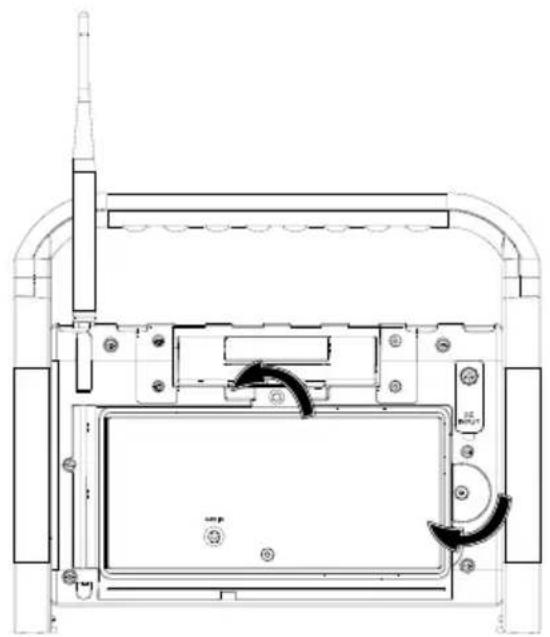
Technical line drawing of a device with a curved arrow indicator (no text or symbols present)Insert a 3.5 mm jack cable into the AUX IN jack on the site radio.
Insert the other connector on the jack cable into the AUX output on your external device.
▶ Switch on the external device.
▶ Start audio playback on your external device.
Place the external device inside the storage compartment door.
▶ Close the storage compartment door.
- Lock the storage compartment door.
To do this, twist the catch and tighten the knurled screw.
▶ Switch on the site radio.
▶ Press the MODE button and select the AUX mode.
▶ Start playback on your playback device.
13. Convenience functions
13.1. Equaliser
▶ During operation, press the EQ button.
The current sound effect (e.g. FLAT) is shown on the display.
▶ Press the ◀ or ▶ button until the desired sound effect NORMAL, CLASSIC, POP, JAZZ, ROCK, BASS, FLAT, or MY EQ... is shown on the display.
▶ Press the OK button to store the set sound effect.
The set sound effect remains stored even when the device is switched off and back on.
13.1.1. Equaliser settings
You can use the MY EQ... menu option to customise the bass and treble.
As described in the previous chapter, select the My EQ... option and confirm your selection with OK.
▶ Now use the ◀ or ▶ buttons to select which setting (bass or treble) you want to change.
▶ Press OK to confirm your selection.
▶ Use the ◀ or ▶I buttons to set the desired value and confirm with the OK button.
13.2. Using the sleep timer
The device features a delay timer that you can enable in the respective modes DAB, FM, BLUETOOTH and AUX. The device is switched to standby mode once the set time has elapsed (Off, 15 min., 30 min., 45 min., 60 min., 75 min. or 90 min.).
▶ Press and hold the MENU button.
The respective menu for the operating mode in use is shown on the display.
▶ If necessary, press the ◀ or ▶ button several times until the SYSTEM menu item is shown on the display.
▶ Press the OK button.
▶ If necessary, press the ◀ or ▶ button several times until the SLEEP menu option is shown on the display.
▶ Press the OK button.
▶ Press the ◀◀ or ▶◀ button until the desired time is shown on the display.
▶ Press the OK button.
The device is switched to standby mode once the set time has elapsed, regardless which mode is set.
13.3. Using the NAP timer
The device has a countdown timer (e.g. as an alarm clock) which emits an acoustic signal after the set time has elapsed (Off, 10 min., 15 min., 30 min., 45 min., 60 min., 90 min. or 120 min.); this acoustic signal becomes louder intermittently.

The NAP timer can only be set in standby mode.
▶ Ensure that the device is in standby mode.
▶ Press the NAP button repeatedly until the desired time is shown on the display.
▶ Press OK to confirm your selection.
An intermittent acoustic signal sounds once the set time has elapsed.
▶ Press any button to switch off the acoustic signal.

While the NAP timer is switched on, you can operate the device as normal. The acoustic signal is also emitted during operation.
13.4. Using the work light

WARNING!
Risk of damage to the eyes!
Do not look directly into the light source for a longer period of time during operation. This can damage your eyes.
■ Do not look directly into the light source.
■ Switch off the work light when it is not being used.
13.4.1. Switching on the work light
▶ Turn the work light so that it is pointing away from the device.
▶ Press and hold the LIGHT button until the work light is switched on.
13.4.2. Switching off the work light
▶ Press and hold the LIGHT button until the work light is switched off.
▶ Turn the work light so that it is pointing towards the device.
13.5. Dimming the display lighting
You can set the display lighting to "bright" and "dim" and switch it off.
▶ Press the DIMMER button repeatedly to set the display lighting.
13.6. Battery charge level

The battery charge level can only be viewed during battery operation.
▶ Ensure that the device is powered by the battery.
In any operating mode, press the INFO button several times in succession to display the battery charge level.
The display shows the BATTERY indicator and a numerical value for the percentage battery charge level.
14. Service functions
14.1. Resetting the device to factory settings
The current device settings can be reset to the factory settings. The following settings are reset:
- Language
- Time and date
• DAB/FM station and station memory
The device can be reset to the factory settings in all operating modes.
▶ Press and hold the MENU button.
▶ Press the ◀◀ or ▶◀ button several times until SYSTEM is shown on the display.
▶ Press the OK button.
▶ Press the ◀◀ or ▶◀ button several times until FACTORY RESET is shown on the display.
▶ Press the OK button.
▶ Press the ▶ button to select the entry JA.
▶ Press the OK button.
The device is restarted and reset to factory settings.
▶ Carry out initial setup again.
14.2. Displaying the software version
If the device malfunctions, information regarding the device's software version is extremely useful for our Customer Service team. The software version can be called up from all modes.
▶ Press and hold the MENU button.
▶ Press the ◀◀ or ▶◀ button several times until SYSTEM is shown on the display.
▶ Press the OK button.
▶ Press the ◀ or ▶ button several times until SW VERSION is shown on the display.
▶ Press the OK button.
The software version is shown on the display.
15. Cleaning
Before cleaning, pull the plug out of the mains socket. Use a soft, dry cloth to clean the device. Avoid the use of chemical solutions and cleaning products because these may damage the device surface and/or the labels on it.
16. Troubleshooting
| PROBLEM POSSIBLE CAUSE REMEDY | ||
| The device cannot be switched on. | · The battery may be dead.· The mains adapter is not connected properly. | ▸ Ensure that the mains adapter is properly connected. |
| Incorrect display of time and date | · The time/date is set incorrectly. | ▸ Set the desired time.▸ In the settings, select automatic time synchronisation. |
| The device switches off when it is in use. | · The battery may be dead. | ▸ Operate the device via the mains adapter or charge the battery.▸ Change the sleep timer settings. |
| No or poor radio reception | · The transmission signals are too weak. | ▸ Adjust the frequency of the stations.▸ If necessary, change the location of the device. |
| No sound. | · The volume is set too low. | ▸ Increase the volume as required. |
17. Disposal

PACKAGING
Your device has been packaged to protect it from damage in transit. The packaging is made of materials that can be recycled in an environmentally friendly manner.

DEVICE
The device is fitted with an integrated rechargeable battery. At the end of its service life, do not dispose of the device in the normal household rubbish. Instead, contact your local authority to find out how to dispose of it in an environmentally friendly manner at collection points for electrical and electronic scrap.
18. Technical specifications
Mains adapter
| BUREAU VERITAS geprüfte Sicherheit | |
| Manufacturer | Hung KayImporter:MEDION AGAm Zehnthof 7745307 EssenGermanyHR number: HRB 13274 |
| Model name HKP15-0901000dV | |
| Input voltage / current / input AC frequency | AC 100–240 V ~ 50/60 Hz 0.4 A MAX |
| Output voltage/current | DC 9 V— — — 1A, |
| Output power | 9 W◇●◇ |
| Average efficiency during operation 83.04% | |
| Power consumption with zero load 0.069 W | |
Rechargeable battery
| Manufacturer Huizhou Huiyi New Energy Co., Ltd | |
| Model HY-FY18650-7.4V 2INR19/66 | |
| Output voltage DC 7.4 V | --- 2000 mAh, 14.8 Wh |
Radio
| Power supply DC 9 V 1 A | --- |
| Output power 1x 5 W RMS | |
| DAB/DAB+ frequency band Band III 174–240 MHz | |
| FM frequency band 87.5–108 MHz | |
| Radio | |
| Bluetooth operating frequency Version | 5.0/2402–2480 MHz |
| Bluetooth max. transmission power -8.52 dBm | |
| Environmental conditions | In operation: 10°C ~ +45°C < 90%HumidityNot in operation: -10°C ~ +55°C < 90%Humidity |
| Protection class IP44 | |
| Dimensions (W x H x D) Approx. 282 x 235 x 180 mm | |
| Weight Approx. 1.94 kg | |
19. EU Declaration of Conformity

MEDION AG hereby declares that the radio equipment type MD 43877 complies with the directive 2014/53/EU [(RE directive), as well as the directive 2009/125/EC (ecodesign directive) and the directive 2011/65/EU
(RoHS directive)]. The complete EU declaration of conformity is available at: www.medion.com/conformity.
20. Trademark information
The Bluetooth ^® word mark and logos are registered trademarks of Bluetooth SIG, Inc. and are used by MEDION under licence.
Other trademarks are the property of their respective owners.
21. Service information
Please contact our Customer Service team if your device ever stops working the way you want or expect it to. There are several ways for you to contact us:
- In our Service-Community, you can meet other users, as well as our staff, and you can exchange your experiences and pass on your knowledge there.
You will find our Service-Community at community.medion.com.
• Alternatively, use our contact form at www.medion.com/contact.
- You can also contact our Service team via our hotline or by post.
| Opening times Hotline number UK | |
| Mon – Fri: 08.00 – 20.00Sat – Sun: 10.00 – 16.00 | 0333 3213106 |
| Service address | |
| MEDION Electronics Ltd.120 Faraday Park, Faraday Road, DorcanSwindon SN3 5JF, WiltshireUnited Kingdom | |

You can download this and many other sets of operating instructions from our service portal at www.medionservice.com.
We have stopped providing printed copies of our warranty terms and conditions as part of our commitment to sustainability, but you can access the warranty terms and conditions on our service portal.
You can also scan the QR code on the side of the screen, to download the operating instructions onto your mobile device from the service portal.
22. Legal Notice
Copyright © 2024
Date: 06. February 2024
All rights reserved.
These operating instructions are protected by copyright.
Mechanical, electronic and any other forms of reproduction are prohibited without the written permission of the manufacturer.
Copyright is owned by the company:
MEDION AG
Am Zehnthof 77
45307 Essen
Germany
Please note that you cannot use the address above for returns. Please always contact our Customer Service team first.
- Information about this user manual ....163
- Proper use ....16
- General safety instructions ....164
- General safety instructions for batteries ....166
- Package contents ......ES16
- Device parts
- Getting started
- Using the device 173
- DAB mode.... 175
- FM mode.... 178
- Bluetooth® mode 179
- Information about this user manual
- Explanation of symbols
- DANGER!
- WARNING!
- NOTICE!
- Proper use
- General safety instructions
- KEEP THIS USER MANUAL IN A SAFE PLACE
- General safety instructions for batteries
- Risk of explosion!
- Package contents
- Risk of choking and suffocation!
- Front
- Rear
- Mains operation
- Battery operation/charging the device
- Switching the device on/off
- Setting the language
- Setting the time/date
- Setting the time/date automatically
- Setting the time/date manually
- Setting the time format
- Setting the date format
- Using the device
- Standby mode
- Switching the device out of standby mode
- Switching the device to standby mode
- Switching off energy-saving mode on the device
- Selecting the mode
- Setting the volume
- DAB mode
- Starting the DAB station search for the first time
- Starting the station search
- Automatic station search
- Manual station search
- Selecting a station
- Displaying station information
- Storing a radio station
- Playing a stored station
- Setting the DRC function
- Deleting inactive stations
- Setting the TA function
- FM mode
- Selecting the signal quality for the station search
- Starting the station search
- Displaying station information
- Storing a radio station
- Playing a stored station
- Bluetooth® mode
- Pairing Bluetooth ® devices for the first time
- Ending Bluetooth playback
- Start/pause playback
- Track selection
- Managing calls
- Accepting a call
- Ending a call
- Rejecting a call
- AUX mode
- Connecting an external playback device
- Convenience functions
- Equaliser
- Equaliser settings
- Using the sleep timer
- Using the NAP timer
- Using the work light
- Risk of damage to the eyes!
- Switching on the work light
- Switching off the work light
- Dimming the display lighting
- Battery charge level
- Service functions
- Resetting the device to factory settings
- Displaying the software version
- Cleaning
- Troubleshooting
- Disposal
- PACKAGING
- DEVICE
- Technical specifications
- EU Declaration of Conformity
- Trademark information
- Service information
- Legal Notice
Brand : MEDION
Model : LIFE E66877 (MD 43877)
Category : Hi-fi system