
Cecomixer Compact - Food Processor CECOTEC - Free user manual and instructions
Find the device manual for free Cecomixer Compact CECOTEC in PDF.

| Product type | Food processor |
| Brand | Cecotec |
| Model | Cecomixer Compact |
| Nominal power consumption | 1000 W |
| Voltage/Frequency | 220-240 V / 50 Hz |
| Maximum bowl capacity | 2.5 kg |
| Number of speeds | 4 speeds |
| Maximum continuous operating time | 10 minutes (thick dough: 3 min max) |
| Supplied accessories | Dough hook, mixing paddle, whisk, protective disc, splash guard |
| Main material | Plastic and metal |
| Dimensions (approx.) | Not specified in the manual |
| Weight | Not specified |
| Safety | Safety switch on the pivot arm, overload protection, automatic stop if arm is raised |
| Cleaning | Damp cloth for exterior; accessories not dishwasher safe |
| Warranty | 2 years |
| Model number | 04019 |
| Energy class | II |
| Noise level | 75-85 dB (A) |
| Country of origin | Made in China, designed in Spain |
Frequently Asked Questions - Cecomixer Compact CECOTEC
User questions about Cecomixer Compact CECOTEC
0 question about this device. Answer the ones you know or ask your own.
Ask a new question about this device
Download the instructions for your Food Processor in PDF format for free! Find your manual Cecomixer Compact - CECOTEC and take your electronic device back in hand. On this page are published all the documents necessary for the use of your device. Cecomixer Compact by CECOTEC.
USER MANUAL Cecomixer Compact CECOTEC
natural_image
Exterior view of a modern black CECOMIXER COMPACT stand mixer with control panel (no visible text or symbols on the device itself)natural_image
Abstract geometric design with overlapping light blue triangles (no text or symbols)
ÍNDICE
- Parts and components
- Safety instructions
- Product assembly
- Recommended recipes
- Cleaning and maintenance
- Technical specifications
- Disposal of old electrical appliances
- Technical support service and warranty
05
14
16
18
19
19
20
20
INDICE
ES
- Control panel
- Swivelling arm
- Swivelling arm adjustment
- Base
- Inner pot
- Inner pot splash guard
- Protection disc
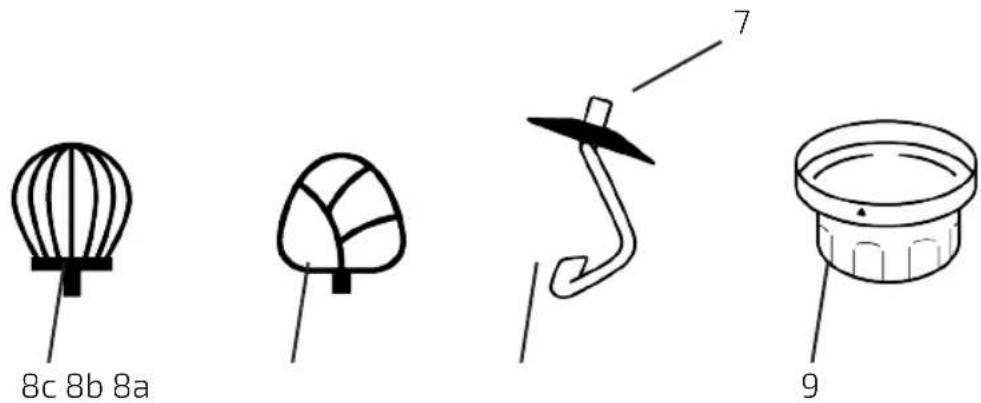
8a. Kneading hook
8b. Mixing blade
8c. Whisk - Shaft guard
FR
2. SAFETY INSTRUCTIONS
Read these instructions thoroughly before using the appliance. Keep this instruction manual for future reference or new users.
- This appliance must not be used by children under the age of 8. This product can be used by children aged 8 or over, as long as they are given continuous supervision.
- This appliance can be used by persons with reduced physical, sensitive, or mental capabilities, or lack of experience or knowledge, as long as they have been given supervision or instruction concerning the use of the appliance in a safe way and understands the risks involved.
- Keep this appliance and its power cord out of reach of children under the age of 8.
- Cleaning and maintenance tasks must not be carried out by children.
- The appliance is not intended to be operated by means of an external timer or remote-control system.
- Use the appliance for its intended purpose only. The product is designed for domestic use only, do not use it for commercial purposes.
- Do not use the appliance outdoors. Protect it from heat, direct sunlight, humidity (do not immerse it in liquids under any circumstance), and sharp edges. Do not use the device with wet hands. If the device gets wet, unplug it immediately.
- Always switch off and unplug the device (pull the plug, not the cable) when not in use, to change accessories, before cleaning it or when it malfunctions.
- Do not leave the device unattended while in use. Always switch off and unplug the appliance if you leave the room.
- Regularly check the device and cable for signs of damage. Do not continue to operate the device if it shows damages.
- Do not repair the appliance by yourself. Please contact the
ENGLISH

official Technical Support Service of Cecotec in case of need for repairs. In order to avoid hazards, a damaged power cord must be replaced with an equivalent cable by our professionals.
- Use only original parts.
- Please observe the following "Special safety instructions".
- For the safety reasons, keep any packaging items (plastic bags, styrofoam etc.) out of the reach of children.
WARNING SYMBOLS
Pay attention to these symbols to avoid accidents and damage to the device:

Warning:
Warnings of dangers for your health and potential risks of injury.

△ Caution:
Indicates potential dangers to the device or other objects.
i Note:
Recommendations and information for you.
SPECIAL SAFETY PRECAUTIONS FOR THIS APPLIANCE
- Place the device on a flat, even, and firm surface.
- Do not connect the device to the mains power supply before attaching all necessary accessories.
- Do not touch any moving part. Wait until the appliance stops completely before handling it.
- Do not insert utensils such as spoons or spatulas in the rotating accessories, nor try to grab them with bare hands! Danger of injury!

ENGLISH
- Turn the appliance off and disconnect it from the mains supply before changing accessories!
- Use this appliance only to process foods.
- Do not operate the appliance for more than 10 minutes without pauses. Let it cool down for approx. 10 minutes before using it again.
- Do not move the appliance while in use; always turn it off first and disconnect it from the mains supply. Always carry the appliance with both hands!
Electric Connection
Make sure that the rated power of the mains supply matches the one specified on the rating plate of the appliance.
3. COMPONENTS
OPERATION
- Turn the swivelling arm adjustment following the arrow direction (3) to lift the machine's arm.
- To use the whisk (8c) attach the splash guard first (6): hold the splash guard with the collar upward.

Note:
At the bottom of the arm you can see two grooves on the left and right side.
Slide the splash guard into these grooves and turn it clockwise to lock.

Note:
The splash guard is not necessary when preparing dough with the kneading hook or the mixing blade. This allows you to add ingredients during the process.
- Attach the protection disc (7) when using the kneading hook (8a). It stops the rising dough from touching the driveshaft.
- Hold the disc like you would hold a inner pot. Insert the kneading hook from below through the opening in the disc and fix it turning it approximately 90^ .
- At the upper end of the accessory, you can find a groove for the driveshaft. Attach the desired accessory by inserting its upper end into the driveshaft and turning it
ENGLISH

counterclockwise to lock the pins of the driveshaft into the accessory.
- Place the inner pot in its position and turn it clockwise until it stops.
- Now add the ingredients.
Caution:
Do not overfill the inner pot, the maximum amount of ingredients is 2.5 kg.
- Press the arm down until it locks in place.
- Plug the appliance into a properly installed 230 V / 50 Hz wall outlet. The light under the OFF button indicates standby mode.
- Press one of the speed buttons (buttons 1/2/3/4) on the control panel (1) to turn the appliance on. A blue LED shows the selected speed.
Select the accessories and speed according to the following table:
| Product/ preparation Max. | amount | Accessory Speed | setting | Max. operating time |
| Heavy dough (e.g. yeast dough, pastry) | 2 kg Kneading | hook 1 -2 3 min | ||
| Medium dough (e.g. waffles dough or cake mixture) | 2 kg Mixing blade | 2 -3 5 min | ||
| Light dough (e.g. sponge mixture, crêpe, egg whites, cream, custard) | 2 kg or 1.5 litres | Whisk 3 -4 5 min |
When selecting the speed also observe the references in the recipes.
i Note:
- For better mixing of heavy doughs, the appliance starts at speed 1. After approximately 1.5 min it automatically changes to speed 2. Return to speed 1 if you do not want speed to change.
- The electronic speed control avoids motor overloads. When there is too much load, the rpm are automatically reduced within a speed setting. The LED keeps showing the selected speed.
- Short-term operation: do not use the appliance with heavy dough for more than 10 minutes. Allow it to cool down for 10 minutes before using it again.
- Use the splash guard for liquid mixes.
CECOMIXER COMPACT

ENGLISH
- Press the OFF button to turn the appliance off as soon as the dough has formed. Disconnect it from the mains supply.
- Turn the swivelling arm adjustment (3) to lift the arm of the machine.
iNote
The arm is equipped with a safety switch. The motor turns off if the arm is lifted while in use. Operation will only resume once the arm is lowered and the speed button is pressed again.
- Remove the inner pot by turning it counterclockwise.
- Detach the dough form the inner pot with a spatula and take it out.
- To remove the accessory from the driveshaft press it upward and turn it clockwise.
- Clean the used parts as described in "Cleaning".
4. RECOMMENDED RECIPES
Spongy mixture (Basic Recipe) Speed setting 2 - 3
Ingredients:
250 g soft butter or margarine, 250 g sugar, 1 sachet vanilla sugar or 1 sachet Citro-Back, 1 pinch of salt, 4 eggs, 500 g wheat flour, 1 sachet baking powder, approx. 1/8 litre milk.
Preparation:
Place wheat flour with the other ingredients in the inner pot, mix with the mixing hook for 30 seconds at speed 2, then approx. 3 minutes at speed 3. Grease the baking try or cover it with baking paper, pour in the mix and bake. Before the cake is removed from the oven, test to see if it is done. Prick the centre of the cake with a sharp wooden stick. If no mixture sticks to it, the cake is cooked. Take it out of the oven and allow it to cool.
Conventional Oven:
Slide: 2
Heat: Electric oven: top and bottom heat 175-200 °C, gas oven: setting 2-3
Baking time: 50–60 minutes
You can modify this recipe according to taste, e.g. with 100 g raisins or 100 g nuts or 100 g grated chocolate. Nothing limits your imagination.
Linseed Rolls Speed setting 1 - 2
Ingredients:
500-550 g wheat flour, 50 g linseed, 3/8 litre water, 1 cube yeast (40 g), 100 g low-fat curd, well drained, 1 teaspoon salt.
For brushing: 2 tablespoons water
ENGLISH

Preparation:
Soak linseed in 1/8 litre of lukewarm water. Place the remaining lukewarm water (1/4 litre) in the inner pot, crumble the yeast into it, add curd and mix with kneading hook at speed 1. The yeast must be completely dissolved. Add the flour and salt to the soaked linseed and place it in the inner pot. Knead with speed 1, then change to speed 2 and knead another 3-5 minutes. Cover the dough and let it sit in a warm place for 45-60 minutes. Knead it again, take it out of inner pot and shape 16 bread rolls from it. Cover the baking tray with a wet baking paper. Place rolls on it, let it rest for 15 minutes, brush with lukewarm water and bake.
Conventional Oven:
Slide: 2
Heat: Electric oven: top and bottom heat 200-220 °C (preheat for 5 minutes), gas oven: setting 2-3
Baking time: 30-40 minutes
5. CLEANING AND MAINTENANCE

Warning:
- Disconnect from the mains power supply before cleaning.
- Do not immerse the appliance in water. This may lead to electric shock or fire.
Caution:
- Do not use scourers or other abrasive utensils for cleaning.
- Do not use aggressive or abrasive cleaning agents.
- Use a wet cloth to clean the casing.
- Clean all detachable accessories with water.
Caution:
The accessories are not suitable for the dishwasher. Heat and aggressive cleaning agents may warp or discolour them.
6. TECHNICAL SPECIFICATIONS
Model: 04019
Rated voltage/frequency: 220 - 240 V/50 Hz
Power consumption: 1000 W
Protection class: II
Maximum non-stop operation time:: 10 minutes
Made in China | Designed in Spain
CECOMIXER COMPACT

ENGLISH
Subject to change without prior notice!
This device complies with all current CE directives, such as electromagnetic compatibility and low voltage directive and is manufactured according to the latest safety regulations.
NOISE EMISSION
The sound pressure level was measured in compliance with DIN EN ISO 3744.
Determined sound pressure level: 75 - 85 dB(A) (no limit).
7. DISPOSAL OF OLD ELECTRICAL APPLIANCES
The European directive 2002/96/EC on Waste Electrical and Electronic Equipment (WEEE), specifies that old household electrical appliances must not be disposed of with the normal
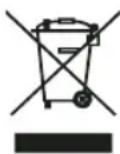
unsorted municipal waste. Old appliances must be collected separately, in order to optimize the recovery and recycling of the materials they contain, and reduce the impact on human health and the environment.
The crossed out “wheeled bin” symbol on the product reminds you of your obligation to dispose of the appliance correctly.
Consumers should contact their local authority or retailer for information concerning the correct disposal of their old appliances.
8. TECHNICAL SUPPORT SERVICE AND WARRANTY
This product is under warranty for 2 years from the date of purchase, as long as the proof of purchase is submitted, the product is in perfect physical condition, and it has been given proper use, as explained in this instruction manual.
The warranty will not cover the following situations:
- The product has been used for purposes other than those intended for it, misused, beaten, exposed to moisture, immersed in liquid or corrosive substances, as well as any other fault attributable to the customer.
- The product has been disassembled, modified, or repaired by persons, not authorised by the official Technical Support Service of Cecotec.
- Faults deriving from the normal wear and tear of its parts, due to use.
The warranty service covers every manufacturing defects of your appliance for 2 years, based on current legislation, except consumable parts. In the event of misuse, the warranty will not apply.
If at any moment you detect any problem with your product or have any doubt, do not hesitate to contact Cecotec Technical Support Service at +34 96 321 07 28.
2. INSTRUCTIONS DE SÉCURITÉ
natural_image
Abstract geometric design with overlapping light blue triangles (no text or symbols)


natural_image
Abstract geometric design with overlapping light blue triangles (no text or symbols)www.cecotec.es
- ÍNDICE
- INDICE
- ES
- FR
- SAFETY INSTRUCTIONS
- ENGLISH
- WARNING SYMBOLS
- Warning:
- △ Caution:
- i Note:
- SPECIAL SAFETY PRECAUTIONS FOR THIS APPLIANCE
- Electric Connection
- COMPONENTS
- OPERATION
- Note:
- Caution:
- iNote
- RECOMMENDED RECIPES
- Spongy mixture (Basic Recipe) Speed setting 2 - 3
- Ingredients:
- Preparation:
- Conventional Oven:
- Linseed Rolls Speed setting 1 - 2
- CLEANING AND MAINTENANCE
- TECHNICAL SPECIFICATIONS
- NOISE EMISSION
- DISPOSAL OF OLD ELECTRICAL APPLIANCES
- TECHNICAL SUPPORT SERVICE AND WARRANTY
- INSTRUCTIONS DE SÉCURITÉ
Brand : CECOTEC
Model : Cecomixer Compact
Category : Food Processor