
BL142A42 - Blender TEFAL - Free user manual and instructions
Find the device manual for free BL142A42 TEFAL in PDF.

| Product type | Blender |
| Brand | Tefal |
| Model | BL142A42 |
| Blender bowl capacity (thick preparations) | 0,6 L |
| Blender bowl capacity (liquid preparations) | 0,5 L |
| Maximum ingredient temperature | 60 °C |
| Number of speeds | 2 (slow and fast) |
| Maximum continuous operating time | 60 seconds |
| Included accessories (depending on model) | Blender bowl, mini chopper, spice grinder |
| Bowl material | Plastic (SAN) |
| Blade material | Stainless steel |
| Power supply | 220-240 V ~ 50/60 Hz |
| Power | Not specified (estimated 400 W) |
| Weight | Not specified (estimated 1,5 kg) |
| Safety | Safety lock: the appliance operates only if the components are correctly assembled and positioned |
| Cleaning the bowl and accessories | Dishwasher safe (top rack, ECO or light wash program) |
| Cleaning the motor unit | Damp cloth, do not immerse |
| Warranty | 2 years (standard estimation) |
| Functions | Mix, chop, grind |
Frequently Asked Questions - BL142A42 TEFAL
User questions about BL142A42 TEFAL
0 question about this device. Answer the ones you know or ask your own.
Ask a new question about this device
Download the instructions for your Blender in PDF format for free! Find your manual BL142A42 - TEFAL and take your electronic device back in hand. On this page are published all the documents necessary for the use of your device. BL142A42 by TEFAL.
USER MANUAL BL142A42 TEFAL
natural_image
Illustration of a white cylindrical device with control buttons and a speaker, no text or symbols present.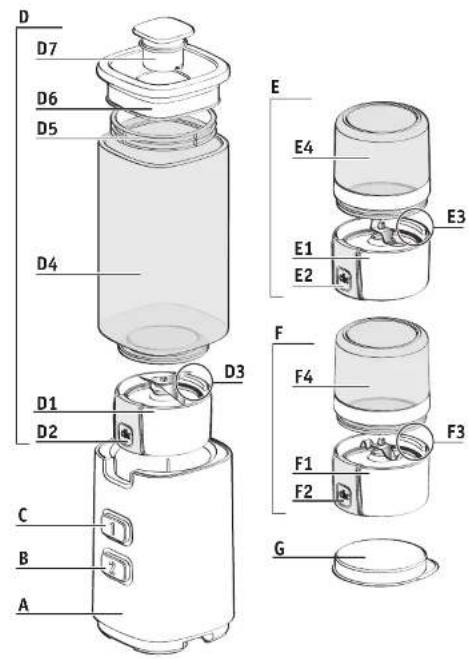
natural_image
Illustration of a hand using a tool to press or install a container, no text or symbols present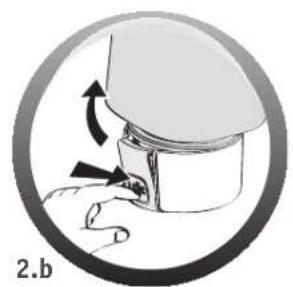
natural_image
Illustration of a hand pressing a button into a container with an arrow indicating rotation (no text or symbols)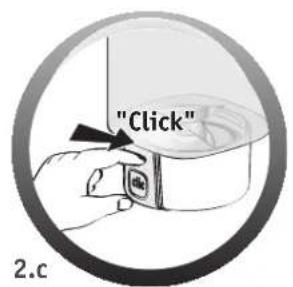

natural_image
Diagram of a mechanical device with directional arrows indicating movement or force (no text or symbols)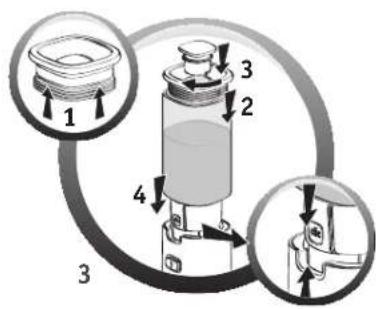
natural_image
Illustration of a hand holding a cylindrical container with liquid, enclosed in a circular frame (no text or symbols)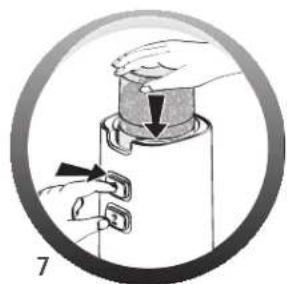
natural_image
Illustration of hands using a tool to adjust a component, enclosed in a circular frame (no text or symbols)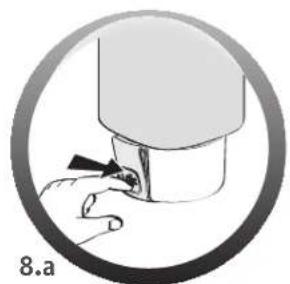
natural_image
Illustration of a hand using a tool to insert or install a small object, enclosed in a circular frame (no text or symbols)
natural_image
Illustration of a hand pressing down on a mechanical component, enclosed in a circular frame (no text or symbols)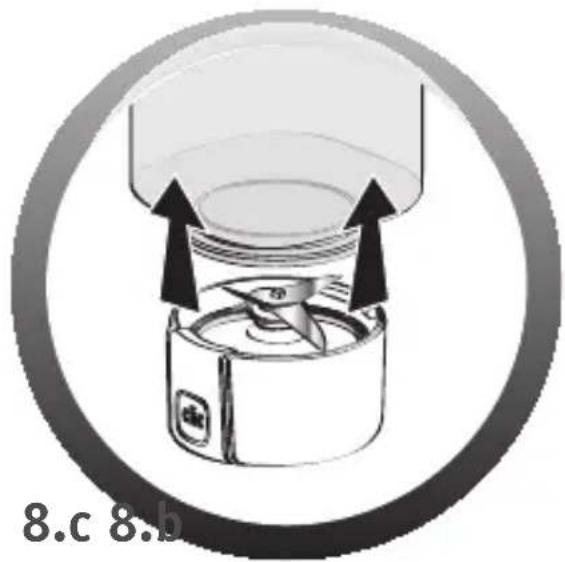
CAUTION: the safety precautions are part of the appliance. Read them carefully before using your new appliance for the first time. Keep them in a place where you can find and refer to them later on.
DESCRIPTION
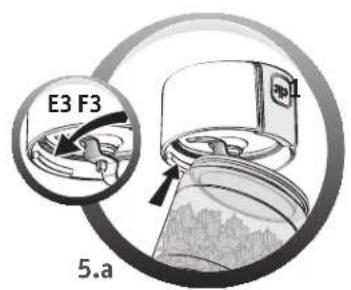
A Motor unit
B Button 2: fast speed
C Button 1: slow speed
D Bowl blender assembly
D1 Blade unit with seal
D2 Blade unit unlocking button
D3 Positioning ridge
D4 Blender bowl
D5 Lid seal
D6 Lid
D7 Cap
E Mini chopper (*accessory depending on model)
E1 Blade unit with seal
E2 Blade unit unlocking button
E3 Positioning ridge
E4 Bowl
F Spice mill (*accessory depending on model)
F1 Blade unit with seal
F2 Blade unit unlocking button
F3 Positioning ridge
F4 Bowl
G Lid for accessory
The accessories contained in the model that you have just purchased are represented on the packaging.
SAFETY LOCKING SYSTEM
The appliance will not operate if the blender bowl assembly (D) or the accessories (E) or (F) are not correctly assembled and correctly positioned on the motor unit (A).
The bowls (E4) (F4) are marked with a coloured line on their base and should be assembled with the blade units whose release buttons (E2)(F2) are the same colour.
The blender bowl (D4) is not marked with a colour, it should be assembled with the blade unit that has a yellow release button (D2).
BEFORE USING FOR THE FIRST TIME
Before using for the first time wash all accessories (D, E, F, G) in warm water and a little washing-up liquid but not the motor unit (A).
WARNING: The cutter blades are extremely sharp, handle them with caution during use, cleaning or on emptying the bowls.
Make sure that all packaging has been removed before operating the appliance.
Important: Make sure that the motor unit has come to a complete stop, with buttons (B) and (C) released before fitting the blender assembly or accessories to the motor unit.
Never operate the appliance if the lid fitted (D6) with the seal (D5) has not been placed on the assembled bowl (D).
INTRODUCTION
Fruit sensation is a blender which will allow you to discover a new world of textures: liquids, chopped fruits and finely ground powders for culinary success. Using it, you can blend some simple ingredients to obtain sophisticated recipes.
SETTING UP
Blender :
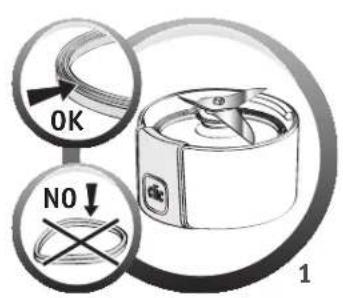
With the “click” button (D2) of the blade unit (D1) in front of you, place the base of the bowl (D4) under the rib (D3) (fig. 2a) and then bring back the blade unit (D1) onto the bowl (fig. 2b), lock by pressing the “click” button (D2) and then release it. Make sure that the bowl (D4) and the blade unit (D1) are well connected (fig. 2c).
Add the ingredients in the bowl without exceeding the maximum level indicated.
0.6 l for the thick preparations
0.5 l for the liquid preparations
Do not put liquid or any ingredients in the blender bowl where the temperature exceeds 60^ C ( 140^ F) in the blender bowl.
Put the lid (D6) on the bowl (D4), lock the cap (D7) in its housing situated on the lid.
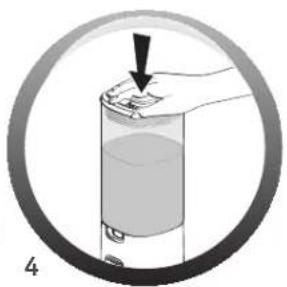
Fit the assembled bowl (D) on the motor unit (A), with click button (D2) of the blade unit aligned with the notch situated on the front of the motor unit (A) (fig. 3). The bowl (D) must be pushed down far enough on the motor unit (A) or the appliance will not work (fig. 4).
Accessories:
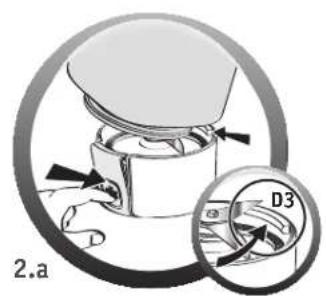
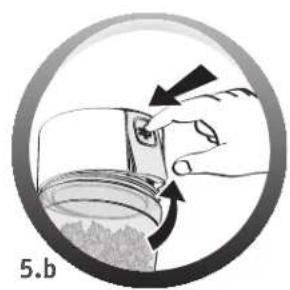
With the "click" button (E2) or (F2) of the blade unit (E1) or (F1) in front of you, place the base of the bowl (E4) or (F4) under the rib (E3) or (F3) (fig. 5a) and then bring back the blade unit (E1) or (F1) to the bowl (fig. 5b), lock by pressing the "click" button (E2) or (F2) and then release it. . Make sure that the bowl (E4) or (F4) and the blade unit (E1) or (F1) are well connected (fig 5c).
Check whether there is no error in the assembly of the accessories (E) and (F): the colour of the click button (E2 or F2) must correspond to the colour of the line on the base of the bowl (E4 or F4).
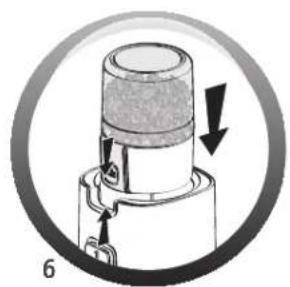
Place the assembled accessory (E) or (F) on the motor unit (A). The click button (E2) or (F2) must be in front of you. Push it until the marking is no longer visible, otherwise the appliance will not work (fig. 6).
USING YOUR APPLIANCE
Blender:
Plug in the appliance and press on the button 1 (C) or 2 (B), depending on the required speed, pressing several times for pulse operation or holding down for continuous operation. Do not run for more than 60 seconds.
To stop the appliance, release the pressure on the button (B) or (C) unplug the appliance.
Remove the bowl (D) from the motor unit (A).
Accessories:
Plug in the appliance. Put the ingredients into the bowl (E4) or (F4).
Keep your hand supporting the bowl (E4) or (F4) and during operation press on button (B) or (C) several times in short pulses (fig 7).
To stop the appliance, release button (B) or (C). Unplug the appliance.
Remove the accessory (E) or (F) from the motor unit (A), turn over the accessory on the work surface and release the blade unit (E1) or (F1) by pressing on the "click" button (E2) or (F2).
You can then take out your preparation.
The lid (G) can be fitted on the bowl (E4) or (F4) to avoid preparations from drying out and also allows them to be kept in the refrigerator for later use.
USING THE ACCESSORIES
Blender :
The Blender (D) in yellow colour allows you to make liquid preparations in a few moments. In order to facilitate the mixing, make sure to add the liquid properly.
| Ingredients Quantity (max) functioning time | ||
| Apple juice : apple + water 300 g + 100 g 10 | sec speed 2 | |
| Banana juice : banana + water 300 g + 100 g | 10 sec speed 2 | |
| Crushed ice 5 cubes 10 pulses speed 2 | ||
| Vegetable soup: cooked vegetables + water 300 g + 100 g 10 sec speed 2 | ||
| Fruit Smoothie: Fruits + Milk 300 g + 200 g 10 sec speed 2 | ||
Mini-chopper:
The mini-chopper (E) in red colour allows you to chop any fruits or herbs in a few seconds. Do not use the mini-chopper for liquid preparations (fruit juice...).
Remember to hold your hand on the accessory during the use.
| Ingredients Quantity (max) functioning time | ||
| Apple 1/4 of apple 8 pulses speed 1 | ||
| Pear (not too ripe) 1/4 of pear 5 pulses speed 1 | ||
| Dried apricots 40 g | 4 sec speed 2 | |
| Breadcrumbs | 1 rusk | 10 pulses speed 2 and 15 sec speed 2 to continuous |
| Onions/garlic/shallot 30 g | 10 pulses speed | 1 |
| Ham | 20 g (1/2 slice rolled up and quartered) | 5 pulses speed 1 |
| Diced raw meat (1cm max cubes) with sinew and gristle removed | 40 g | 10 pulses speed 1 and 15 sec speed 1 to continuous |
| Parsley | 5 g | 10 pulses speed 1 |
| Mint | 10 leaves | 4 pulses speed 1 |
| Lemon zest | 15 g | 6 x 5 sec speed 1 |
Spice grinder: \*dependent on model
The Spice grinder (F) in brown colour allows you to reduce any hard ingredients into powder in a few seconds.
Do not use the spice grinder for liquid preparations (fruit juice...).
Remember to hold your hand on the accessory during the use.
| Ingredients Quantity (max) functioning time | ||
| Coffee beans 40 g 20 sec speed 2 | ||
| Coriander seeds 25 g 15 sec speed 2 | ||
| Coconut / Almonds / Nuts 20 g 10 pulses speed 2 | ||
| Pistachio 40 g 10 pulses speed 1 |
The mixing of certain very hard spices (cloves, cinnamon...) is not recommended because these can discolour the bowl.
Do not mix soybeans or any chocolate in the spice grinder.
CLEANING YOUR APPLIANCE
Unplug the appliance and remove the bowl or accessories.
Handle them with care because the blade and accessory blades are sharp.
Rinse the bowls and lids immediately after use under running water and also the detachable parts in warm water and a little washing-up liquid.
To facilitate cleaning, the blade unit (D1) can be detached from the bowl (D4) by pressing on the click button (D2) (fig 8a 8b 8c).
The bowl (D) the accessories (E) and (F) can be washed in the top basket of the dishwasher using the "ECO" or "LIGHT WASH" programme.
To clean the motor unit (A), use a damp cloth and dry it carefully.
Never immerse the motor unit (A) in water or any other liquid.
WHAT TO DO IF YOUR APPLIANCE DOES NOT WORK
| Problems Causes Solutions | |
| The appliance does not work. | It is not plugged in. Plug the |
| The bowl (D) or the accessories (E) and (F) are not correctly assembled or positioned on the motor unit (A). | |
| Check that the bowl or accessories are correctly assembled; dismantle and start to assemble again (Fig 2.a, 2.b and 2.c) and check that they are far down enough on the motor unit. | |
| Maintain pressure on the accessory lid (E) or (F) during operation. |
Is your appliance still not working?
Contact customer service (see contact details in the booklet).
| Problems Causes Solutions | ||
| Excessive vibration. | The appliance is not on a flat, stable surface. | Put the appliance on a flat stable surface. |
| Volume of ingredients is too high. | Reduce the quantity of ingredients processed. | |
| Error in assembling the accessories. | Check that the bowls (E4) (F4) are correctly assembled with the blade units (E2) (F2) associated with them, the coloured markers should be identical. | |
| Leak through lid. Volume of ingredients is too high. | Reduce the quantity of ingredients processed. | |
| The lid is not fitted correctly. | Check that the seal is in place (D5) on the lid (D6). Correctly position the lid (D6) on the bowl (D). Lock the button (D7). | |
| Leak from the bowl or accessories | Incorrect positioning of the seal on the blade unit (D1) (E1) (F1). | Make sure that the seal is correctly positioned, the lips of the seal should be visible and it should not be buckled (fig1). Handle the blade units (D1), (E1), (F1) with care because the blades are sharp. |
| The blade unit (D1) (E1) (F1) is insufficiently or incorrectly locked on the bowl (D4) (E4) (F4). | Make sure that the blade unit and the bowl are fitted together correctly be pressing at the top of the button (D2) (fig2c) or on the buttons (E2) (F2) (fig5c) | |
| The blade does not rotate easily. | Pieces of food that are too big or too hard. | Reduce the size or quantity of the ingredients processed. |
| Add liquid to the bowl mix without exceeding the maximum level. | ||
HET APPARAAT SCHOONMAKEN
NL
UW APPARAAT WERKT NIET. WAT NU?
RENG∅RING AF APPARATET
- لل manufacturers lightweightة
(E2) (E1) (F1) (5a) (E3) (F3) (A0) (E2) (5b) (A0) (E1) (5a) (E3)
