
BL3001 - Blender TEFAL - Free user manual and instructions
Find the device manual for free BL3001 TEFAL in PDF.


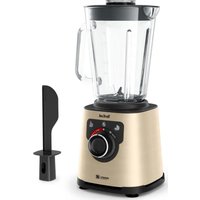
| Product Type | Blender |
| Brand | Tefal |
| Model | BL3001 |
| Motor Power | 700 W |
| Voltage | 220-240 V, 50-60 Hz |
| Capacity | 1.5 L |
| Jug Material | Glass |
| Blade Material | Stainless Steel |
| Number of Speed Settings | 2 + Pulse |
| Main Functions | Blending, Crushing Ice, Mixing, Pureeing |
| Safety Features | Lid Lock, Non-Slip Feet, Overload Protection |
| Cleaning | Removable Blades, Dishwasher Safe Jug |
| Dimensions (HxWxD) | 40 x 18 x 18 cm |
| Weight | 2.8 kg |
| Cord Length | 1.0 m |
| Spare Parts Availability | Jug, Blade Assembly, Lid, Seal Ring |
| Repairability Index | 8/10 |
| Warranty | 2 Years |
Frequently Asked Questions - BL3001 TEFAL
User questions about BL3001 TEFAL
0 question about this device. Answer the ones you know or ask your own.
Ask a new question about this device
Download the instructions for your Blender in PDF format for free! Find your manual BL3001 - TEFAL and take your electronic device back in hand. On this page are published all the documents necessary for the use of your device. BL3001 by TEFAL.
USER MANUAL BL3001 TEFAL
natural_image
Line drawing of two blender units with no visible text or symbols on the devices themselves400W
• Biotr octonates ciepea modele.• Biotr sevte zavistro od modele.• Biotr nizzi podle modele.• Viozionan a modeltali fuggion.• Biotr de cujite in func mode of Cognic bloku, vavistro od modele.• Ero Fli rejti da revsta od modele.• Biotr sevte zavistro od modele.• Biotr stica prema modele.• Teraedaklok vastaal modelle.• Ameru blioks ablatstosi modele.• Airmes, blikas, prieklausari ruo modelo. Nozy w raksmoto os modele.• Blade uniti depending on modis.• Soreseheli alfankelijia van het modelo.• Kredhadi alt otter model.• Kredhader, afengg au model.• Skartabidock align model.• Teryssildok on matlikohainen.• Modele gireb baski.• Conjuntc de curilitas segur e modelo.

SM_BLENDERFORCE_FACICLIC_400W_EE_8080013651_8080013651 26/05/14 16:44 PageC4


ОПИСАНИЕ НА УРЕДА
DESCRIPTION OF THE APPLIANCE
EN
A Motor unit
B Speed selector
C Blender unit:
- c1 Blade unit
- c2 Gasket
- c3 Graduated blender jug
- c4 Lid
- c5 Measuring cup
D Herb chopper
(*accessory depending on model)
-d1 Gasket
- d2 Herb chopper blade unit
E Spice grinder
(*accessory depending on model)
- e1 Gasket
- e2 Spice blade unit
F Herb chopper and Spice grinder bowl
The accessories contained in the model you have bought are represented on the label on the top of the packaging.
CAUTION: the safety precautions are part of the appliance. Read them carefully before using your new appliance for the first time. Keep them in a place where you can find and refer to them later on.
SAFETY LOCKING
The appliance can run only when the jug (C) or accessories (D or E) are
correctly positioned and locked on the motor unit (A).
USING FOR THE FIRST TIME
- Before using your appliance for the first time, clean all the accessories (C, D, E, F) in warm soapy water, except for the motor unit (A).
CAUTION: The blades are extremely sharp; handle them with caution when using or cleaning the appliance. -
Make sure all the packaging has been removed before operating the appliance.
-
Important note: Turn the speed selector (B) to "0" before placing the blender jug or accessories on the motor unit.
- The appliance starts only if the jug or accessory is correctly positioned and locked on its body.
- Do not operate the blender if the lid is not in place.
USING YOUR APPLIANCE
- Moisten the gasket (c2) and position it correctly on the blade unit (c1): the 3 folds of the gasket must be visible once it is in place. If it is
positioned in the other direction, you will not be able to lock the blade unit on the jug. (Fig. 1).
- Place the assembly (c1+c2) on the
base of the jug (c3). Lock it by rotating the blade unit through a quarter turn in the anticlockwise direction. (Fig. 2).
- Introduce the ingredients into the assembled jug without exceeding the maximum level indicated:
* 1.25L for thick mixtures
* 1L for liquid preparations.
- Lock the lid (c4) on the jug. Place the measuring cup (c5) in its recess on the lid.
- Place the blender jug assembly (C) on the motor unit (A). The red lock (open 5 aligned in the slot on the motor unit. (Fig. 3 - position 1))
- Then rotate the blender jug (C) through a quarter turn until the green lock (closed) Appears. (Fig. 3 - position 2).
2 jug positions are possible: handle on the right or left of the motor unit.
- Do not use the blender for more than three minutes at a time.
- With the herb chopper (D) you can chop ingredients like onions, garlic, meat (cut into pieces) and dry fruits in a few seconds, make crumbs (rusk).
Do not use the herb chopper for liquid preparations (fruit juices, etc.)
- With the spice grinder (E) you can grind spices in a few seconds: coriander seeds, pepper, etc.
• These accessories are equipped with a bowl (F) that prevents access to the blades during use.
1- Rotate the bowl (F) and pour the ingredients.
2- Position the gasket (d1) or (e1) in its recess on the blade unit (d2 or e2). (Fig. 4). Position the blade unit on the bowl aligning both the marks on the bowl and the blade unit. Lock the accessory by rotating the blade unit through a quarter turn in the anticlockwise direction. (Fig. 5).
Caution: leaks can occur if the accessory is not locked correctly.
3- Rotate the assembled assembly (D or E) and position it on the motor unit. The red lock (open) is aligned in the slot on the motor unit. (Fig 6 - position 1)
4- Then rotate the assembled accessory (D or E) through a quarter turn clockwise until the green lock (closed) appears. (Fig. 6 - position 2).
5- Plug in the appliance and turn the speed selector (B) to the desired position or apply a few pulses. Hold the bowl (F) when the appliance is running. To stop the appliance, turn the speed selector (B) back to position "0".
6- Unlock the accessory by rotating it through a quarter turn in the anticlockwise direction, until the red lock (open) appears. Remove the assembled accessory (D, E) from the motor unit.
Turn it over on the worktop before unlocking the blade unit (d2, e2) from the bowl (F) in the reverse order of the assembly. The blades are very sharp: handle them with caution to avoid injury. You can then collect the preparation in the bowl.
* The colour of the bowl may change after blending certain very hard ingredients: (cloves, cinnamon, etc.).
| Ingredients | Quantities (max.) | Operating time Accessory |
| Apricots / figs 40 g 3 s / speed 2 | D | |
| Crumbs 1 rusk 10 seconds per pulse | D | |
| Onions 60 g 6 sec / speed 1 | D | |
| Shelled almonds / hazelnuts 60 g | 30 seconds per pulse | D |
| Parsley / fresh coriander 10 g In pulses | D | |
| Coriander seeds 40 g 30 sec / speed 2 | E |
CLEANING YOUR APPLIANCE
- Unplug the appliance and remove the accessories
- Handle them with caution: the blades on the blender jug and accessories are sharp.
- Remove the jug and rinse it and its lid under running water.
- To clean the motor unit (A), use a moist cloth. Dry it carefully.
- Never immerse the motor unit (A) in running water.
- For easy cleaning, be sure to wash the removable parts in water and a little washing-up liquid immediately after use.
-
To clean the blender jug (C) easily, unlock the blade unit (c1) by rotating it through a quarter turn in the anticlockwise direction. Remove the gasket (c2) and clean them under running water or in the dishwasher.
-
GLASS BOWL VERSION (depending on model):
The glass bowl (C) can be cleaned in the dishwasher on the upper rack - use the 'ECO' or 'LOW SALT' programme.
The accessories (D, E) cannot be cleaned in the dishwasher. - PLASTIC BOWL VERSION (depending on model):
The plastic bowl (C) and the accessories (D, E) cannot be cleaned in the dishwasher.
WHAT TO DO IF YOUR APPLIANCE DOES NOT WORK?
| Problems Causes | Solutions | |
| Product does not work. | The plug is not fitted correctly into the socket. | Plug the appliance into a socket and switch on. |
| The jug or accessory is not correctly positioned or locked on the motor unit. | Check that the jug or accessories are correctly positioned and locked onto the motor unit as shown in the figure in the manual. | |
| Excessive vibrations. | The product is not placed on a flat, stable, heat-resistant surface. | Place the product on a flat surface. |
| Volume of ingredients is too high. | Reduce the quantity of ingredients processed. | |
| Leak from the lid. | Volume of ingredients is too high. | Reduce the quantity of ingredients processed. |
| The lid is not correctly positioned. | Lock the lid correctly on the blender jug. | |
| Leak from the base of the blender jug. | The blender jug gasket (c2) is not positioned correctly or is missing. | Reposition the gasket and lock the blade holder correctly. |
| Leak from the base of the accessories. | The gasket on the blade unit (d2) or (e2) is not positioned correctly or is missing. | Reposition the gasket on the blade unit (d2) or (e2) and lock it correctly onto the bowl (F). |
| The blade does not turn easily. | Pieces of food too large or too hard. | Reduce the size or quantity of ingredients processed.Add liquid |
| Impossible to lock the blade unit with the gasket (c1+c2) on the jug (c3). | The gasket (c2) is not positioned correctly. | Reposition the gasket, the 3 folds should be visible as shown in Fig. 1. |
Your blender still does not work?
Contact an approved service centre (see list in service booklet).
You can customise your blender and obtain the following accessories from your usual dealer or from an approved
service centre: Herb chopper accessory (D), Spice grinder accessory (E), or an additional blender jug (C).
BESCHRIJVING VAN HET APPARAAT
NL
WERKEN MET HET APPARAAT
RENG∅RING AF APPARATET
servicesenter: Urtekvern (D),


- ОПИСАНИЕ НА УРЕДА
- DESCRIPTION OF THE APPLIANCE
- EN
- SAFETY LOCKING
- USING FOR THE FIRST TIME
- USING YOUR APPLIANCE
- Caution: leaks can occur if the accessory is not locked correctly.
- CLEANING YOUR APPLIANCE
- WHAT TO DO IF YOUR APPLIANCE DOES NOT WORK?
- Your blender still does not work?
- BESCHRIJVING VAN HET APPARAAT
- NL
- WERKEN MET HET APPARAAT
- RENG∅RING AF APPARATET
Brand : TEFAL
Model : BL3001
Category : Blender