81801 - Multimeter VOREL - Free user manual and instructions
Find the device manual for free 81801 VOREL in PDF.


User questions about 81801 VOREL
0 question about this device. Answer the ones you know or ask your own.
Ask a new question about this device
Download the instructions for your Multimeter in PDF format for free! Find your manual 81801 - VOREL and take your electronic device back in hand. On this page are published all the documents necessary for the use of your device. 81801 by VOREL.
USER MANUAL 81801 VOREL
text_image
VOREL BY TOYAPL CĘGOWY MIERNIK UNIWERSALNY
EN CLAMP UNIVERSAL MULTIMETER
DE UNIVERSELL KLEMME MESSGERAT
RU УНИВЕРСАЛЬНЫЙ ЦИФРОВОЙ ИЗМЕРИТЕЛЬ
UA УНІВЕРСАЛЬНИЙ ЦИФРОВИЙ ВИМІРЮВАЧ
LT SKAITMENINIS UNIVERSALUS MATUOKLIS
LV UNIVERSÃLS DIGITÃLU TESTERIS
cz DIGITÁLNÍ MULTIMETR - UNIVERZÁLNÍ
SK UNIVERZÁLNY DIGITÁLNY MULTIMETER
HU DIGITÁLIS MULTIMÉTER
RO MULTIMETRU DIGITAL UNIVERSAL
ES MANÓMETOR DIGITAL UNIVERSAL
FR PINCE MULTIMETRE UNIVERSEL
IT PINZA AMPEROMETRICA UNIVERSALE
NL UNIVERSELE STROOMTANG
GR ΑΜΠΕΡΟΤΣΙΜΠΙΔΕΣ ΠΟΛΛΩΝ ΧΡΗΣΕΩΝ
INSTRUKCJA ORYGINALNA
CE
PL EN DE RU UA LT LV CZ SK HU RO ES FR IT NL GR
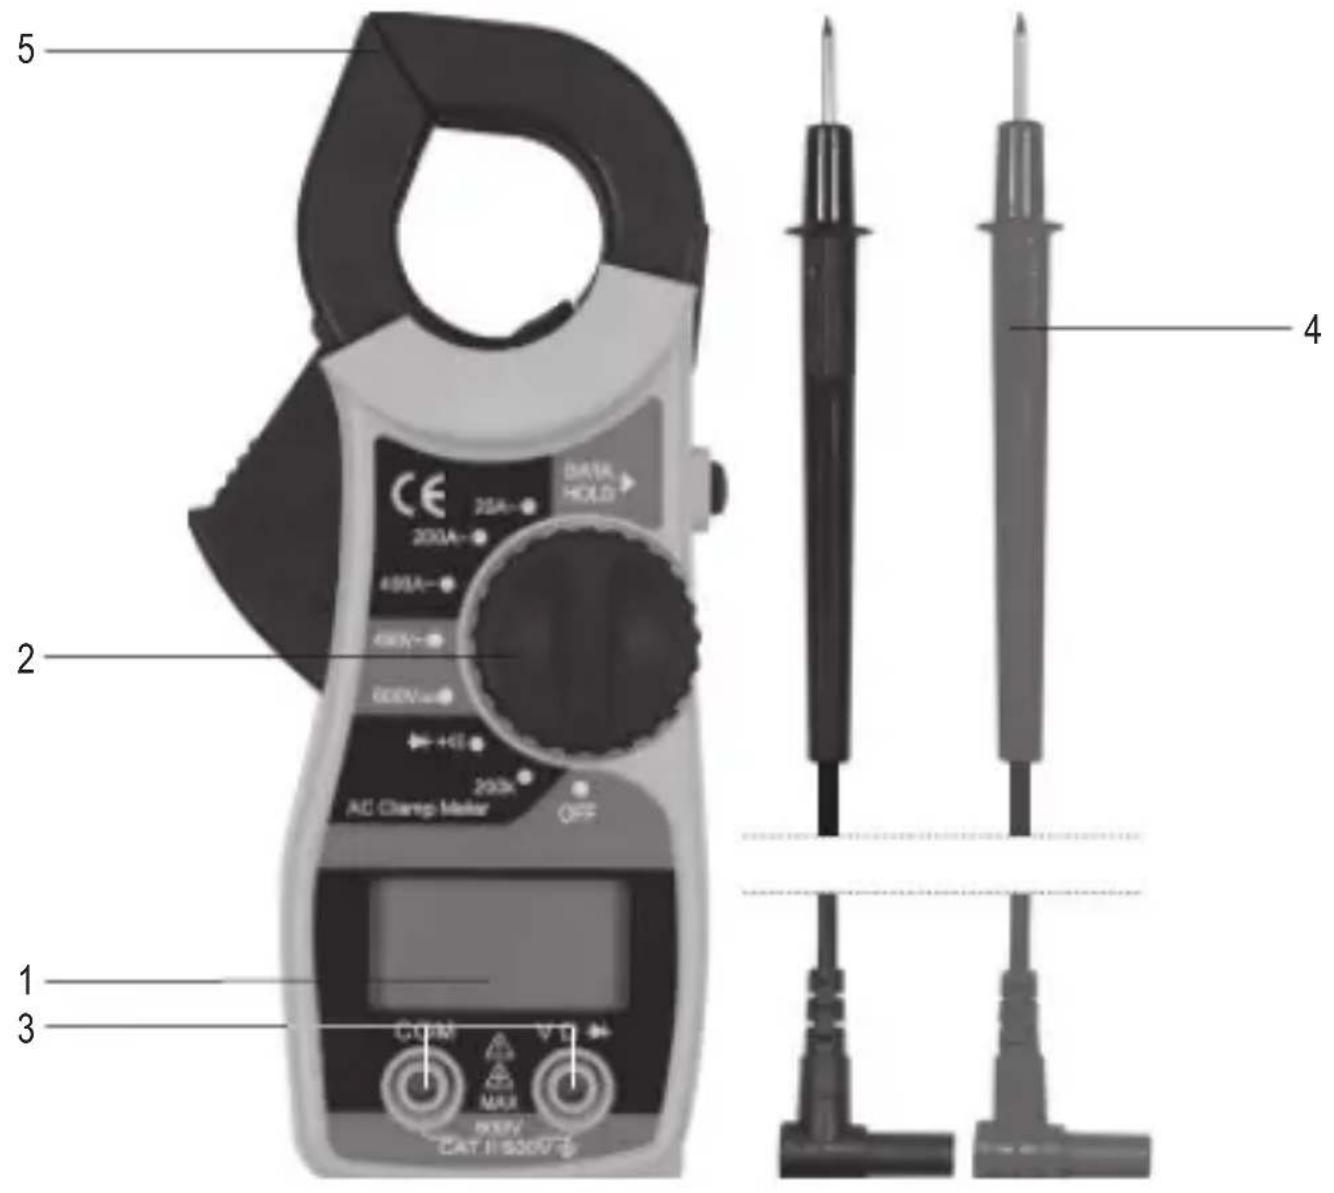
text_image
5 2 1 3 4 DATR HOLD 200A 400A 600V 600V AC Clamp Meter CAT 11:500V C:50V MAX V:10 MAX BAT 11:500VPL
- LCD screen
- measurement switch
- measurement jack
- test leads
- measuring clamp
DE
This symbol indicates that waste electrical and electronic equipment (including batteries and storage cells) cannot be disposed of with other types of waste. Waste equipment should be collected and handed over separately to a collection point for recycling and recovery, in order to reduce the amount of waste and the use of natural resources. Uncontrolled release of hazardous components contained in electrical and electronic equipment may pose a risk to human health and have adverse effects for the environment. The household plays an important role in contributing to reuse and recovery, including recycling of waste equipment. For more information about the appropriate recycling methods, contact your local authority or retailer.
The universal clamp meter is a digital measuring instrument designed to measure various electrical quantities. In the case of some measurement quantities, the meter can select the range depending on the measurement result. The meter is fitted with a measuring clamp allowing the measurement of AC current in a single wire using an inductive method.
Before using the meter, read the instruction manual in its entirety and keep it for later use.
The meter has a plastic casing, liquid crystal display, and a measuring range switch. The casing has measurement jacks fitted. The meter comes with test leads terminated with plugs. The meter is sold without a battery.
CAUTION! This meter is not a measuring instrument within the meaning of the Metrological Act.
TECHNICAL DATA
Display: 3 1/2 digits LCD – greatest displayed result: 1999
Sampling rate: approx. 3 times per second
Overload marking: "1" sign displayed
Polarity marking: “—” sign displayed before the result
Maximum clamp gap: 25 mm
Maximum diameter of the tested cable using the clamp: 19 mm
Battery: AAA, 2 x 1.5 V
Working temperature range: 0 to 40 °C at relative air humidity <75%
Storage temperature: -10 to +50°C at relative air humidity <85%
Outer dimensions: 150 x 70 x 32 mm
Weight (without batteries): 100 g
CAUTION! It is forbidden to measure electrical values exceeding the maximum measuring range of the meter.
| Parameter | DC voltage AC voltage | |||||
| R_IN = 10 M RIN = 10 MΩ; f IN = 40 ÷ 400 Hz | ||||||
| Catalogue No. | Range Resolution Accuracy Range Resolution Accuracy | |||||
| 81001 600 V | 1 V ±(1.2% + 3) 600 V | 1 V ±(1.2% +3) | ||||
| Notes | Overload protection: 600 V DC; Input impedance 10 MΩ | Overload protection: 600 V AC RMS; Input impedance 10 MΩ | ||||
EN
| Alternating current using clamp | ||
| fIN = 50 ÷ 60 Hz | ||
| Range Resolution Accuracy | ||
| 20 A 10 mA | ≤0.5 A: ±(3% +20) >0.5 A: ±(2.5% + 10) | |
| 200 A 0.1 A | ±(2.5% +10) | |
| 400 A 1 A | ||
| Overload protection: 1200 V AC RMS for max. 60 sec | ||
| Parameter Resistance (meter measured) Diode test | |||||
| Catalogue No. Range Resolution Accuracy Range Resolution | |||||
| 81001 200 kΩ 0.1 kΩ | ±(1.2% +2) IF = 1 | mA UR = 1 V | |||
| Notes | Overload protection: 600 V AC RMS | ||||
Accuracy: ± (% of indication + weight of the least significant digit)
OPERATION
CAUTION! To avoid the risk of electric shock, disconnect the test leads and switch off the meter before opening the casing.
Safety instructions
Do not operate the meter in an atmosphere with excessive humidity or in the presence of toxic or flammable vapours, or in an explosive atmosphere. Before each use, check the condition of the meter and the test leads. If you notice any faults, do not start its operation. Replace damaged cables with new ones, devoid of defects. In the case of any doubts, you should contact the manufacturer. During measurement the test leads should be held by the insulated parts. Do not touch the measurement points or unused measuring jacks of the meter. Disconnect the test leads before changing the measured quantity. Never carry out maintenance work without ensuring that the test leads have been disconnected from the meter and that the meter itself has been switched off.
Replacing the battery
The multimeter requires batteries, the number and type of which are specified in the technical specifications. It is recommended to use alkaline batteries. To install a battery, open the instrument casing or the battery compartment cover on the underside of the meter. Before accessing the battery compartment it may be necessary to slide off the cover of the meter casing. Connect the battery
EN
according to its terminal marking, close the casing or battery compartment cover. If a battery symbol appears on the screen, the battery must be replaced. For the sake of measurement accuracy, it is recommended to replace the battery as soon as possible after the battery symbol appears.
HOLD button
The button is used to retain the measured value on the display. When pressed, the button will ensure that the currently displayed value remains on the display, even after the measurement is over. Press the button again to go back to the measurement mode. The operation of the function is indicated on the meter display with the HOLD sign.
Connecting test leads
If the test lead plugs are capped, the caps must be removed before plugging the leads into the jacks. Connect the leads in accordance with the instructions in the manual. Now remove the covers (if any) of the measuring parts and proceed with the measurements.
MEASUREMENT PROCEDURE
Depending on the current position of the range switch, the display will show three digits. If the battery needs to be replaced, the multimeter indicates this by showing the battery symbol on the display. If the sign “—” appears on the display before the measured value, it means that it has a reversed polarity relative to the meter's connection. If an overload symbol appears on the display, it means that the measuring range has been exceeded and the measuring range must be changed to a higher one. If the scale of the measured value is not known, set the highest measuring range and reduce it after reading the measured value. The measurement of small quantities with a high measuring range involves the greatest measurement error. If you select the highest voltage measuring range, the display will show “HV” or a lightning symbol. Special care should be taken when measuring quantities within the highest voltage range to avoid electric shock.
CAUTION! Never allow the measuring range of the meter to be smaller than the measured value. This can damage the meter and cause electric shock.
The correct connection of the leads is:
The red lead goes in the jack marked "VΩ".
The black lead goes in the jack marked "COM".
In order to achieve the highest possible measurement accuracy, optimal measurement conditions should be ensured. The ambient working temperature should be in the range from 18 to 28°C and relative air humidity <75%.
Example of accuracy determination
EN
Accuracy: ± (% of indication + weight of the least significant digit)
Measurement of DC voltage: 1.396 V
Accuracy: ±(0.8% +5)
Calculation of error: 1.396 x 0.8% + 5 x 0.001 = 0.011168 + 0.005 = 0.016168
Measurement result: 1.396 V ± 0.016 V
Voltage measurement
Connect the test leads to the jacks marked "VΩ" and "COM". Set the range switch to the DC or AC voltage measurement position. Connect the test leads in parallel to an electrical circuit and read the resultant voltage. Never measure a voltage which is higher than the maximum measuring range. This can damage the meter and cause electric shock.
Measurement of AC current using a clamp
Use the selector to set the appropriate measuring range. Open the measuring clamp by pressing the lever. Place a single wire through which alternating current is flowing within the clamp and close it. Make sure that the jaws of the clamps adhere exactly to each other. For the most accurate measurement it is necessary to make sure that the cable is held centrally between the jaws. The error due to the non-central location of the wire is 1% of the measured value, but it can be avoided by placing the wire centrally inside the jaws. Read the result. Do not touch exposed conductive surfaces during measurement. This may cause electric shock.
Resistance measurement
Connect the test leads to the jacks marked "VΩ" and "COM" and set the range switch to the resistance measurement position. Touch the probes to the terminals of the measured element and read the measurement result. In order to obtain more accurate measurement results, change the measuring range if necessary. It is absolutely forbidden to measure the resistance of elements through which electric current is flowing. For measurements greater than 1 MΩ, the measurement may take a few seconds before the readout becomes stable, which is the normal response for high resistance measurements.
Before touching the probes to the terminals of the workpiece, an overload symbol is shown on the display.
Diode test
Connect the test leads to the jacks marked "VΩ" and "COM" and set the knob to the LED symbol. The probes are now touched to the diode terminals: once in the forward and then in the reverse direction. If the diode is working, it will show a voltage drop in its forward direction expressed in mV. If connected in the reverse direction, the display will show the overload symbol. Working diodes are characterized by a low resistance in the forward direction and a high resistance in the reverse direction. It is absolutely forbidden to test diodes through which electric current is flowing. Conduction t est
EN
Connect the test leads to the jacks marked "VΩ" and "COM". Set the selector to the buzzer symbol. If the meter is used to measure conduction, the built-in buzzer will sound whenever the measured resistance drops below 30 Ω. The buzzer can also be heard in the range from 30 Ω to 100 Ω. It is absolutely forbidden to test conductivity in circuits through which electric current is flowing.
MAINTENANCE AND STORAGE
Wipe the meter with a soft cloth. Larger amounts of dirt should be removed with a slightly damp cloth. Do not immerse the product in water or any other liquid. Do not use solvents, corrosive or abrasive agents for cleaning. Care should be taken to keep the contacts of the meter and the test leads clean. Clean the contacts of the test leads with a cloth slightly soaked in isopropyl alcohol. In order to clean the contacts of the meter, turn off the meter and remove the battery. Turn the meter over and shake it gently so that larger pieces of dirt fall out of the meter connectors. Lightly soak a cotton stick with isopropyl alcohol and clean each contact. Wait until the alcohol evaporates, then install the battery. The meter should be stored in a dry room in the supplied unit packaging.