
LH55 - Electric pyrography pen Vevor - Free user manual and instructions
Find the device manual for free LH55 Vevor in PDF.
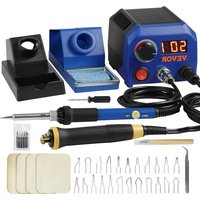


| Product Type | Electric Pyrography Pen |
| Brand | Vevor |
| Model | LH55 |
| Power Supply | 120 V ~ 60 Hz (US) or 220-240 V ~ 50 Hz (EU/AU) |
| Power | 70 W |
| Temperature Range (internal heating pen) | 200 °C - 450 °C |
| Temperature Range (hot wire pen) | Up to approx. 600 °C |
| Pen Types Included | Hot wire pen and internal heating pen |
| Interchangeable Tips | Yes, multiple shapes (curved wire, flat, pointed, etc.) |
| Temperature Display | Digital Screen |
| Temperature Adjustment | Knob on main unit and separate knob on internal heating pen |
| Pen Holder | Yes, with cleaning sponge |
| Protection Class | II (double insulation) |
| Compliance | FCC Part 15, European Directive 2012/19/EC (WEEE) |
| Safety | Automatic shutdown in standby, avoid contact with hot tip |
| Cleaning | Use the moistened blue sponge to wipe the tip |
| Power Cord Replacement | By a professional only (type Y attachment) |
| Warranty | Technical support and electronic warranty certificate at vevor.com/support |
Frequently Asked Questions - LH55 Vevor
User questions about LH55 Vevor
0 question about this device. Answer the ones you know or ask your own.
Ask a new question about this device
Download the instructions for your Electric pyrography pen in PDF format for free! Find your manual LH55 - Vevor and take your electronic device back in hand. On this page are published all the documents necessary for the use of your device. LH55 by Vevor.
USER MANUAL LH55 Vevor
Technical Support and E-Warranty Certificate www.vevor.com/support
PYROGRAPHY MACHINE
We continue to be committed to providing you with tools at competitive prices.
"Save Half", "Half Price", or any other similar expressions used by us only represent an estimated savings you might benefit from buying certain tools with us compared to the major top brands, and do not necessarily mean to cover all categories of tools offered by us. You are kindly reminded to carefully consider whether you are actually saving half in comparison to major brands when placing an order with us.
VEVOR®
TOUGH TOOLS, HALF PRICE
PYROGRAPHY MACHINE
MODEL: LH55
NEED HELP? CONTACT US!
Have product questions? Need technical support? Please feel free to contact us:
Technical Support and E-Warranty Certificate www.vevor.com/support
This is the original instruction. Please read all manual instructions carefully before operating. VEVOR reserves the right to interpret the user manual. The appearance of the product shall be subject to the product you received. Please forgive us that we won't inform you of any technology or software updates on our product.
 | Warning - To reduce the risk of injury, user must rea instructions manual carefully. |
 | CORRECT DISPOSALThis product is subject to the provision of European Directive 2012/19/EC. The symbol showing a wheelie bin crossed through indicates that the product requires separate refuse collection in European Union. This applies to the product and all accesso marked with this symbol. Products marked as such may not discarded with normal domestic waste, but must be taken to collection point for recycling electrical and electronic devices |
 | This symbol, placed before a safety comment, indicates a kir precaution, warning, or danger. Ignoring this warning may lead to an accident. Please always follow the recommendation below to the risk of injury, fire, or electrocution. |
 | This product is of protection class II. That means it is equipped with enhanced or double insulation. |
FCC INFORMATION
CAUTION: Changes or modifications not expressly approved by the party responsible for compliance could void the user's authority to operate the equipment!
This device complies with Part 15 of the FCC Rules. Operation is subject to the following two conditions:
1) This product may cause harmful interference. 2) This product must accept any interference received, including interference that may cause undesired operation.
WARNING: Changes or modifications to this product not expressly approved by the party responsible for compliance could void the user's authority to operate the product.
Note: This product has been tested and found to comply with the limits for a Class B digital device, pursuant to Part 15 of the FCC Rules. These limits are designed to provide reasonable protection against harmful interference in a residential installation.
This product generates, uses, and can radiate radio frequency energy, and if not installed and used in accordance with the instructions, may cause harmful interference to radio communications. However, there is no guarantee that interference will not occur in a particular installation. If this product does cause harmful interference to radio or television reception, which can be determined by turning the product off and on, the user is encouraged to try to correct the interference by one or more of the following measures.
- Reorient or relocate the receiving antenna.
- Increase the distance between the product and the receiver.
- Connect the product to an outlet on a circuit different from that to which the receiver is connected.
- Consult the dealer or an experienced radio/TV technician for assistance.
IMPORTANT SAFEGUARDS
WARNING:
- Warnings must be followed carefully to avoid bodily injury. Improper use may result in electric shock, fire, personal injury, and other damage:
1) Keep unplugged when moving the machine. 2) Keep unplugged when installing accessories. 3) Place on a flat and stable platform and operate under ventilated conditions. 4) Wear special protective equipment when operating the machine. 5) Do not use this machine in a hazardous location. 6) Only use it when the machine is working correctly. 7) Do not disassemble and repair this machine. 8) Do not use an unsuitable AC outlet.
9) Do not touch the heating plate when the machine is heating. 10) Do not use in humid environments or in contact with water. Also, do not let liquid infiltrate the machine to prevent fire or electric shock caused by a short circuit. 11) Do not use a power supply that does not meet the rated voltage. A power supply that does not meet the specified voltage may cause fire or electric shock. 12) Ensure that the machine is grounded to avoid harm to the body. 13) Do not touch the rotating rod or bearing parts with your fingers during use to avoid injuries. 14) If the machine is not in use for a long time, unplug the power cord from the socket. 15) Do not use the machine during thunderstorms or lightning to avoid damage to the machine. 16) Place the machine smoothly on a flame-retardant table and keep it away from flammable and explosive items. 17) Please stop using it if the machine smokes, emits a peculiar smell, or becomes noisy or shows other abnormal conditions. 18) This appliance can be used by children aged 8 years and above and persons with reduced physical, sensory or mental capabilities or lack of experience and knowledge if they have been given supervision or instruction concerning use of the appliance in a safe way and understand the hazards involved. Children shall not play with the appliance. Cleaning and user maintenance shall not be made by children without supervision. 2. Type Y attachment: if the supply cord is damaged, it must be replaced by the manufacturer, its service agent or similarly qualified persons in order to avoid a hazard. 3. In order to avoid a hazard due to inadvertent resetting of the thermal cutout, this appliance must not be supplied through an external switching device, such as a timer, or connected to a circuit that is regularly switched on and off by the utility. 4. In the process of temperature adjustment, there will be a slight delay in the digital temperature display, which is a normal phenomenon. Please wait a moment.
SAVE THESE INSTRUCTIONS
LH55 Pyrography machine instructions for use
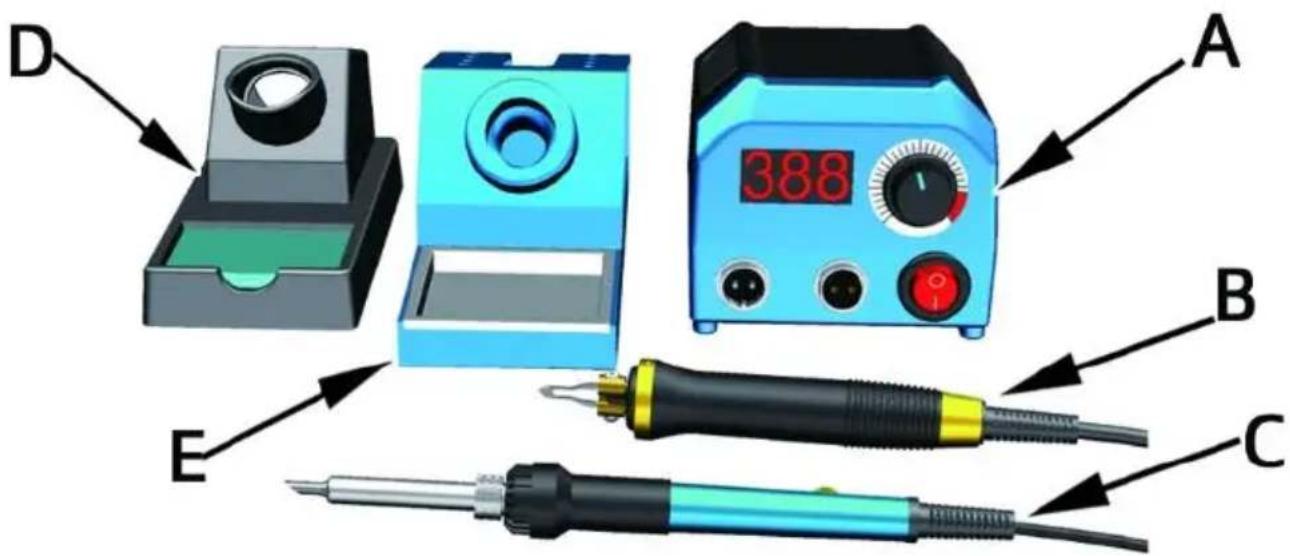
A) Mainframe: see the second page for detailed instructions for use. B) Heating wire pen of pyrography: used to depict fine lines and render small areas, fine painting, detail painting. The temperature is controlled through the temperature knob on the (A) host to adjust the temperature. C) Internal heating pen of pyrography: because it is a solid internal heating element with larger volume, it can better store heat and has more power. It is used to portray thicker and large surface rendering. Adjust the temperature using the temperature knob in the middle of the pen body. The adjustable temperature range is between 200 degrees Celsius and 450 degrees Celsius. D) Heating wire pen of pyrography special pen holder. E) Internal heating pen of pyrography special pen holder.
Blue wipe pen sponge: used to wipe the pen point for branding. This blue sponge must be saturated with water before use. When the pen point is hot, wipe it clean on the sponge.
Pen placement demonstration for pyrography:
Figure 1 shows the placement of the pen when not in use. Figure 2 shows how to hold the pen during branding to place the pyrography pen.
The black pen holder below the square is for the pen sponge, and the blue metal holder below the square is for the pyrography pen tip.
Figure 1, Figure 2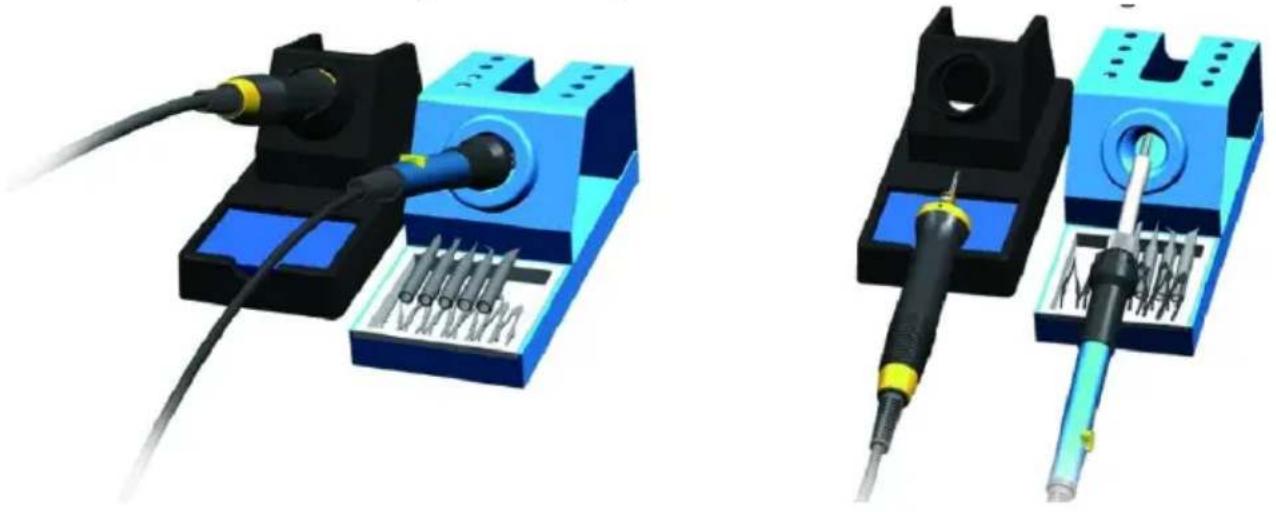
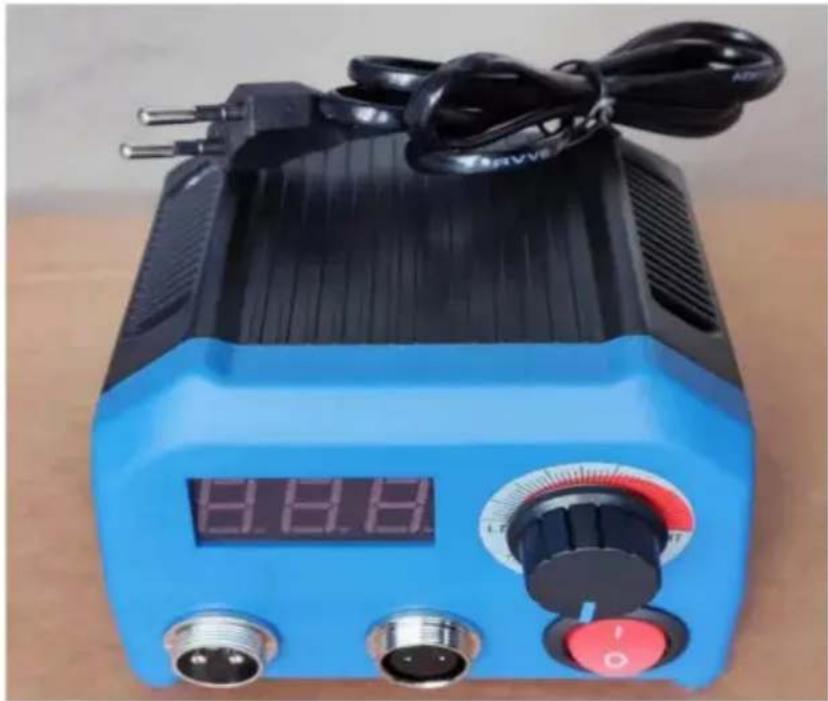
LH55 Pyrography Machine Host Panel Instruction Manual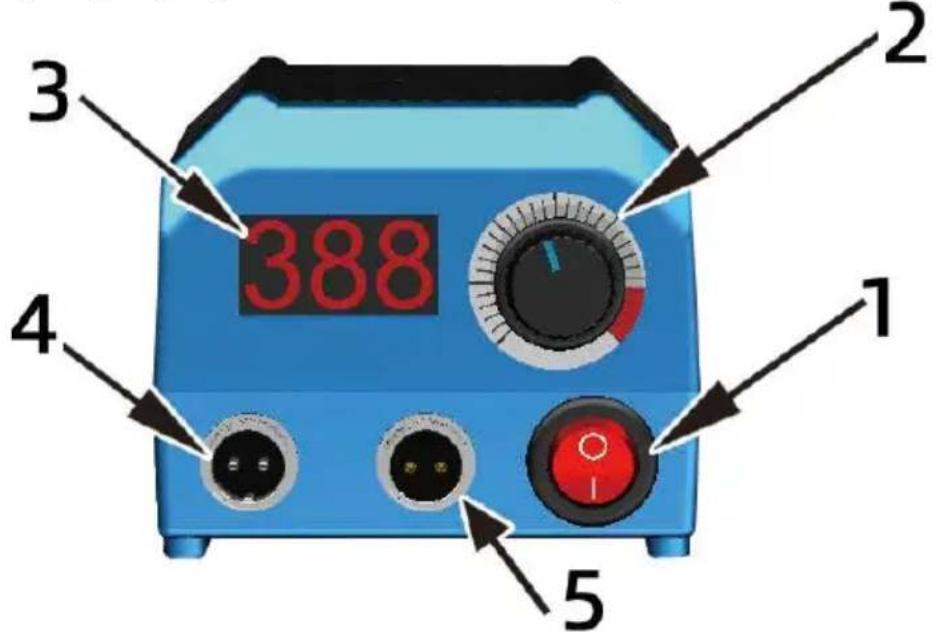
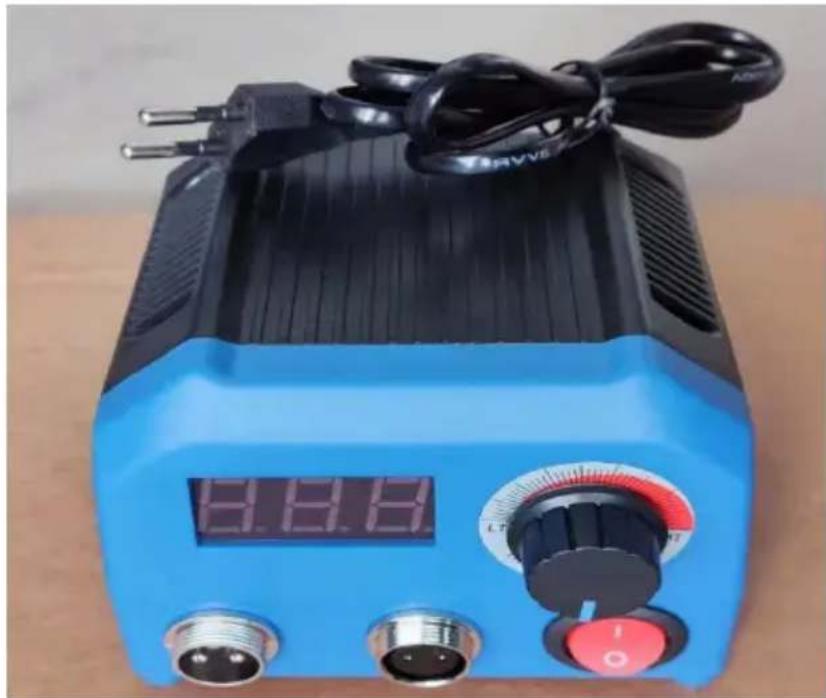
(1) Switch: When using, press key (1). After the temperature gauge (3) lights up, the machine begins to stand by. When staff leave or it is not in use, please press (0) to turn off the switch to avoid burns and fire hazards. (2) Temperature regulator: This adjusts the temperature of the heating wire of the pyrography tip on socket (4) (cannot adjust the internal heating pen on socket (5); the internal heating pen has a separate temperature knob on the pen bar). The low-temperature rendering adjustment temperature is in the light grey area, the red area is the high-temperature area, and the high-temperature area is mainly for tracing lines. The temperature of the pyrography tip is adjusted slowly through the thermostat, first to about 600 degrees Celsius and then slowly to a lower
temperature. The most suitable temperature is about 300-500 degrees Celsius. Low-temperature rendering is most suitable in the range of 250-350 degrees Celsius. The temperature for tracing lines is best at 350-500 degrees Celsius. When adjusting the rendering temperature, watch the pyrography tip on the material; the color slightly changing is most suitable (different material densities and humidity require different optimal temperatures, so the user should be patient in debugging). You can deepen the color and render shades through multiple rubbing levels. If the temperature is too high, it is very difficult to render delicate picture effects. When tracing lines, you can adjust the temperature appropriately high; according to your own situation, you can draw smooth lines. For good branding lines, learn low-temperature slow pen strokes; high-temperature fast pen strokes will cause uneven shades. The pen is red when it is most difficult to use for branding temperature, so to brand well, first learn low-temperature branding. Low temperature and slower pen strokes give better branding effects. (3) Temperature gauge: The temperature gauge lights up to display numbers after the switch is turned on, and the current temperature is displayed. (4) Heater wire pen socket: This is dedicated to the heater wire pen. (5) Internal heating pen socket: This is dedicated to the internal heating pen.
Notes on the Pyrography machine:
(1) In the pen point, press to the foot of the pen point, and tighten to avoid poor contact between the pen point and the terminals, so that the pen is not hot, and the terminals overheating burned accessories. If the pen is not tightened and the terminal is too hot, it is to be tightened in time with a set (2) to use the company to provide special nibs, do not choose other materials the machine to do the nib, which is very dangerous, easy to burn all the accessories in the movement, and very easy to electrocution and fire.
Correct installation of pen point of pyrography
The pen point of pyrography is not hot, and the temperature is sudden high, and suddenly low. There are sparks coming from the pen point a
the penholder is hot to grasp. What are the reasons? it's because the incorrect installation of the pen point.
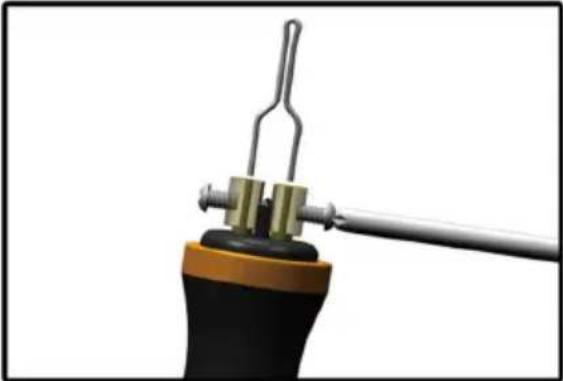 | Unscrew both screws on the pen detach them from the hole where pen head is installed, making it e for the pen head to be inserted smoothly to the bottom. The effect shown in the above picture. |
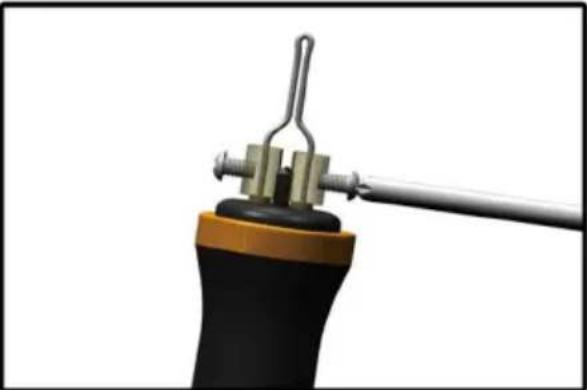 | The picture above correctly shows effect by inserting the two pins of pen tip into the bottom of the ho inside |
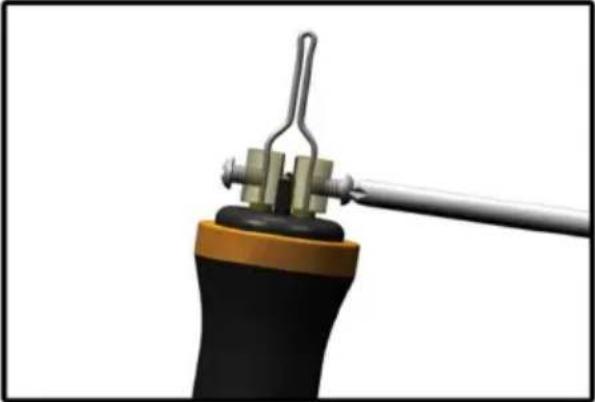 | Finally, tighten the two screws with appropriate torque, be sure to tigh |
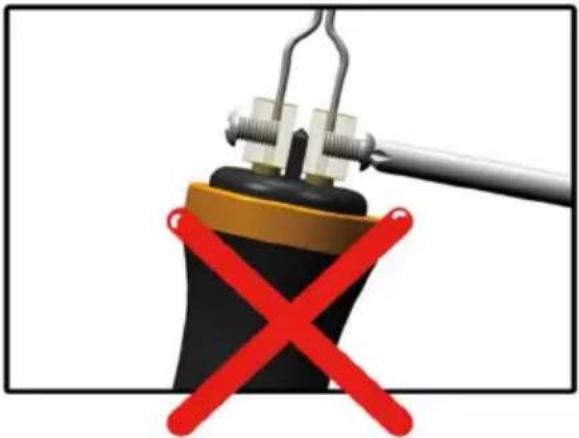 | Screw does not hold pen tip two pins,error! The pen tip does not h up properly. |
there are some symptoms of the incorrect installation of pen point, we are the abnormal heat of pen point , unstable temperature of pen po sparks generating from the pen point, the heating of copper column at the burning hot of pen holder.
Correct installation of pen point of pyrography
- Figure : The function of internal heating pyrography pen to adjust the temperature can be adjusted by the thermostat knob in the middle of the pen. The temperature can be adjusted between 200 degrees and 450 degrees. The temperature number on the thermostat corresponds to the triangle arrow on the pen rod.
- Figure: Schematic diagram of pen tip installation procedure.
- Figure: The installation result.
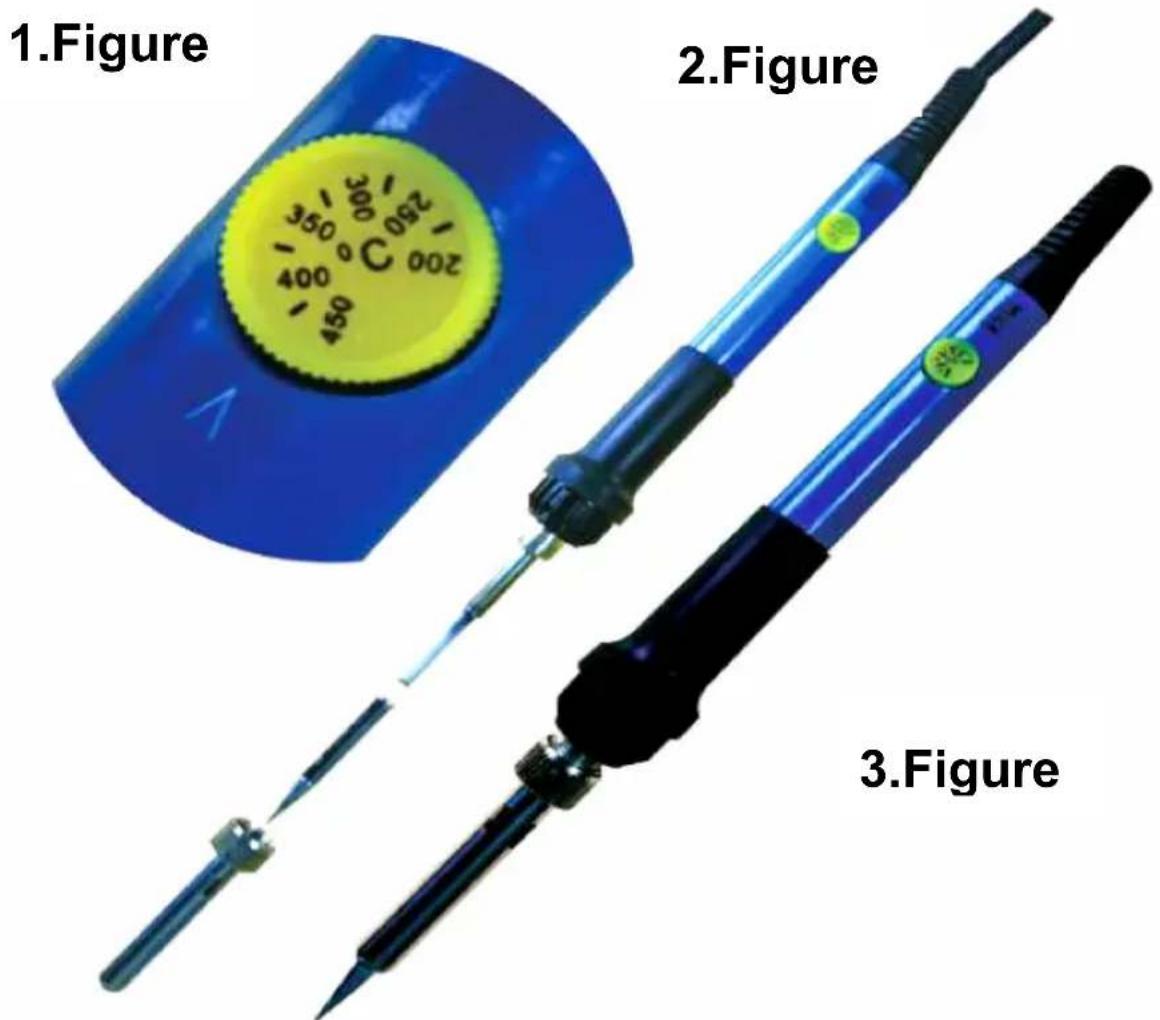
Instructions for using the wood burning wire tip
1) The function of the bent shape wire pen tip is introduce
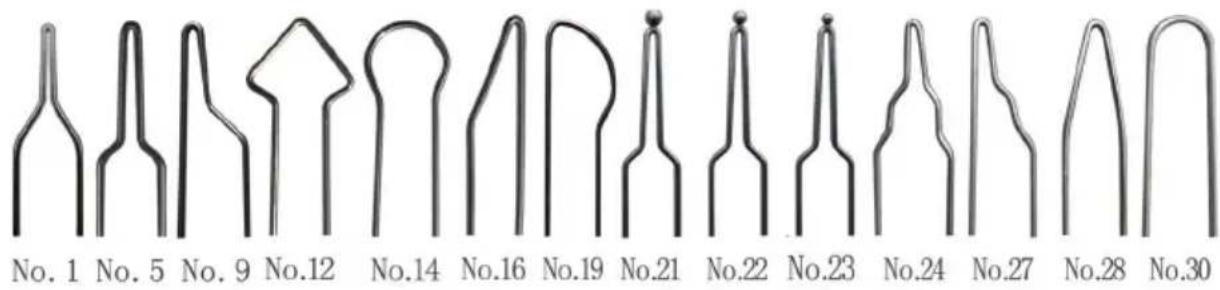
Tips for using a bent metal wire pen tip. The main function of a bent is to trace lines and render small areas of silk hair. When tracing line blue indicator on the temperature control knob points towards around 250°C-350°C. Slowly move the pen and do not move too fast. Look at smooth edges of the line color, and the entire line color should be up and just right. When rendering, adjust the temperature to around 220°C-300°C, and draw hair fine lines at a temperature of around 250°C-350°C.
2) Introduction to the pointed flat metal wire pen tip
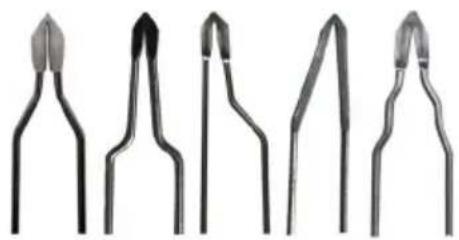
No. 2 No. 7 No. 11 No. 18 No. 26
Tips for using pointed metal wire pen tips: Pointed pen tips are mainly used for drawing fine lines and rendering fine details. The temperature for drawing fine lines is 220-250°C, and for rendering fine details it is 220-230°C. When rendering, it is best to watch the color change slightly on the gourd and wooden board, and gradually deepen the color so that the color is delicate and rich. Dark color rendering is best at around 300°C.
3) Introduction to the flat wire pen tip
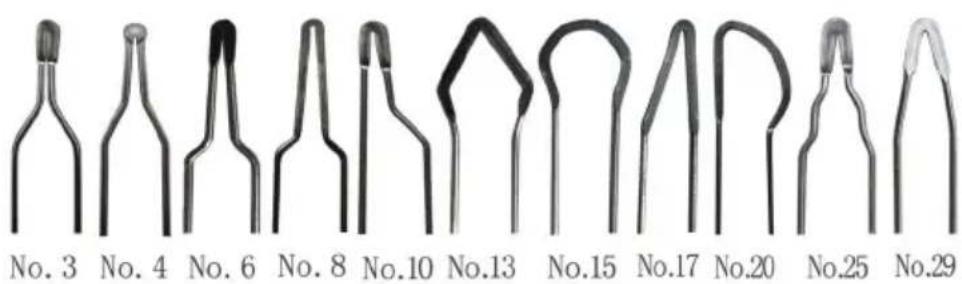
The flat metal wire pen head is mainly used for flat rendering and line drawing. The temperature for flat rendering is around 220°C - 290°C for light colors, and 300°C - 400°C for dark colors.
Summary: The temperatures of the pen heads introduced earlier should not be taken too dogmatically or rigidly. Depending on the density, humidity, and hardness of the material used for soldering, the required temperature may vary. You can learn from and adjust the experiment to find the most suitable temperature for yourself. Whether it's writing, tracing, or rendering, if you want good results, you would rather use the pen slowly at low temperatures to deepen layer by layer, never use it quickly at high temperatures. It is difficult to avoid works with uneven lines, uneven rendering colors, uneven depth, and rough or delicate images.
Tips for using wood burning pen tips
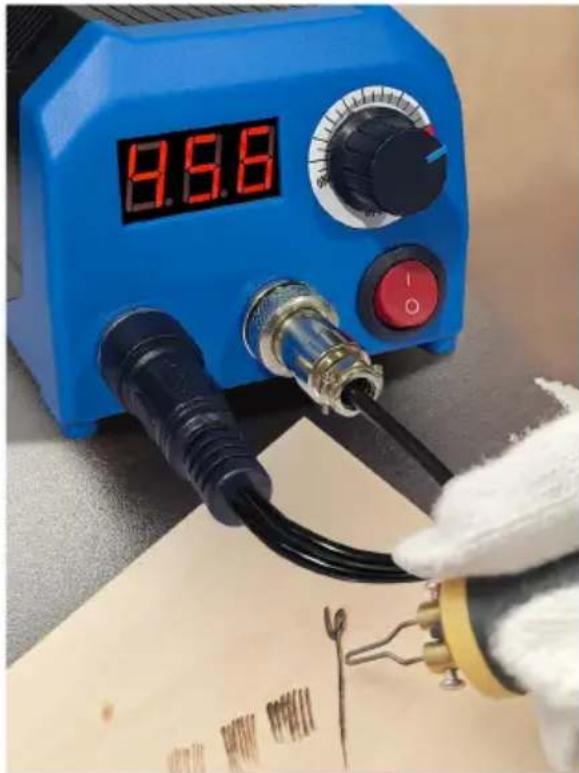
Adjust the temperature to the temperature range shown in the diagram, try lifting the pen and applying gentle pressure. Move the pen faster, and it will burn out light color lines. Slow down the speed of the pen, and a greater downward pressure will burn out wide and dark lines. Use this method to try different techniques and effects.
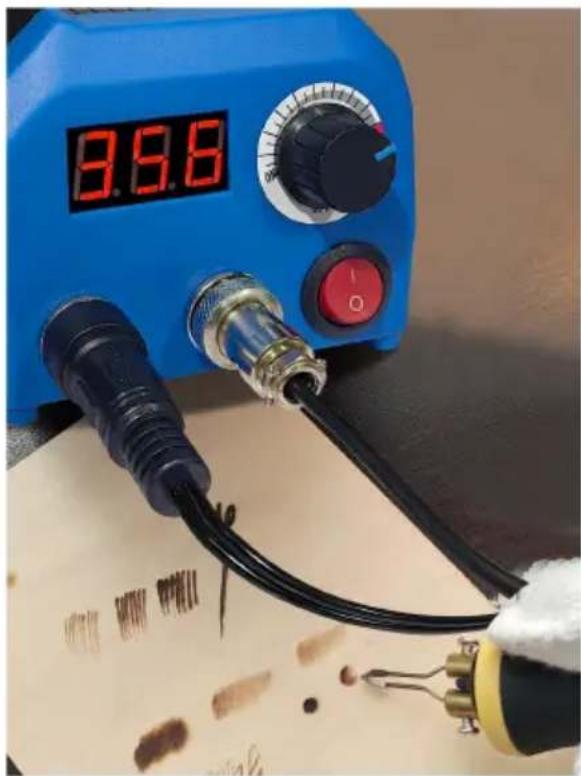
Adjust the temperature to different temperature ranges between 350 and 550°C. Using the pen tip shown in the picture, try to lift the pen gently and apply pressure to move faster. Draw an elliptical path back and forth on the left and right of the pen path, which will create a uniform light gray effect. Similarly, if the pen moves slowly, a greater downward pressure will create a darker effect. Use this method to differentiate techniques and effects by varying the speed, direction, and pressure of writing.
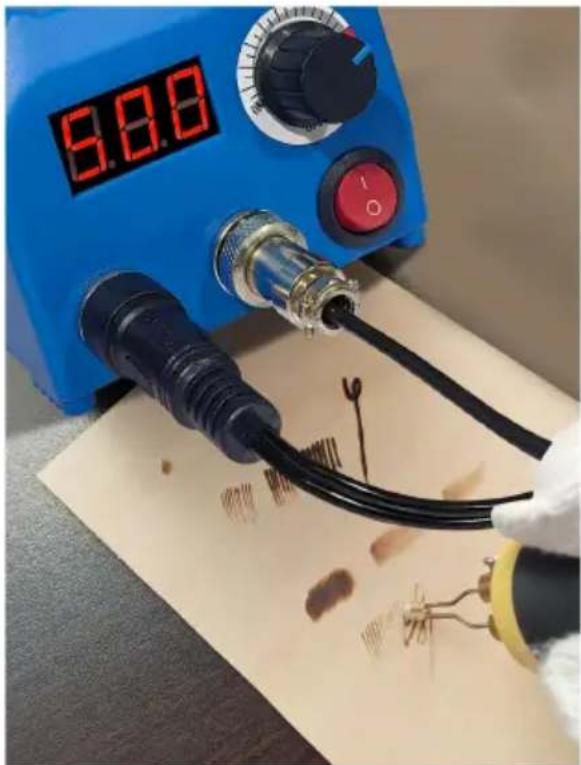
Adjust the temperature to the temperature range on the graph and use this type of pen tip. Try lifting the pen with gentle pressure and moving it faster, which will burn fine and light color lines. Slow down the speed of the pen, and a greater downward pressure will burn out wide and dark lines. Use this method to try different techniques and effects by varying the speed, direction, and pressure of writing.
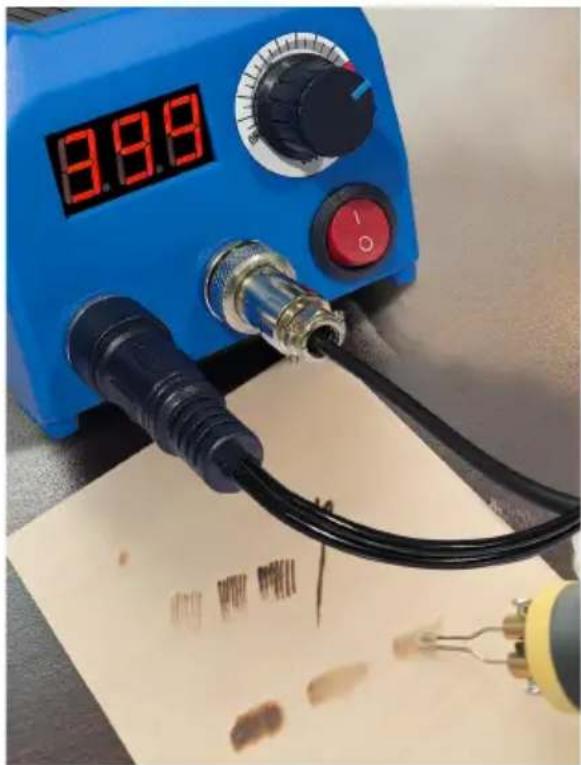
Adjust the temperature to different ranges between 400 and 600°C. Using the pen tip shown in the picture, try to lift the pen gently and apply pressure to move faster. Draw an elliptical path back and forth on the left and right of the pen path, which will create a uniform light gray effect. Similarly, if the pen moves slowly, a greater downward pressure will create a darker effect. Use this method to achieve different techniques and effects by varying the speed, direction, and pressure of writing.
Tips for using wood burning tools and knives
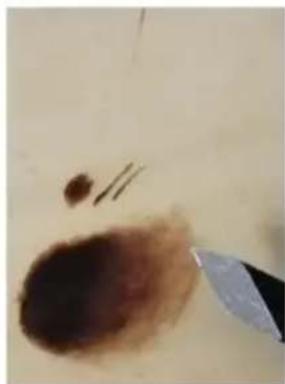
This is a rendering of the wood burning just now. Later, we will demonstrate usage techniques with a carving knife.
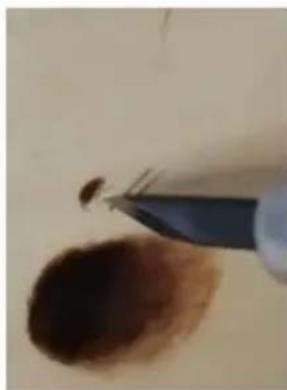
Use a carving knife to scrape off unwanted images or defects. When scraping, gently scrape and try to make it as flat and smooth as possible.
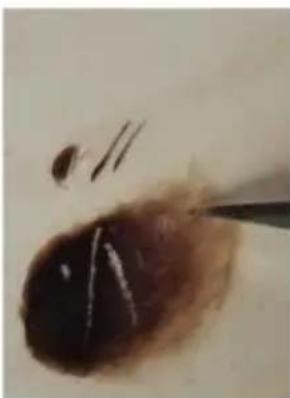
Techniques such as using a carving knife to scrape out highlights, fine lines, and increase the brightness of local color tones in the image.
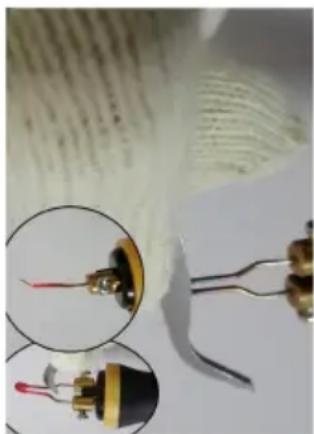
1) Use tweezers to clamp and adjust the angle of the pen head. The default factory-made pen head is relatively small. When increasing the angle of the pen head, first set the temperature to the highest. When the pen head turns red and has good plasticity, use tweezers to clamp and bend the angle of the pen head.
2) When replacing the pen tip, it is hot and can easily burn the skin. It is safer to replace it with tweezers.
Precautions for using a pyrography pen holder
When using a pyrography pen, the temperature of the pen tip is very high. When placing the pen in the holder, it is important to avoid the high-temperature pen tip coming into contact with the holder to avoid burning it out. When placing the pen on the holder, use the pen holder to contact and fix the pyrography brush. It is forbidden for the high-temperature pen tip to come into contact with any part of the holder.
Technical data
| Model | LH55 | |
| Rated voltage | 120V~ 60Hz For US | 220-240V~ 50Hz For EU or A |
| Power | 70W | |
Manufacturer: Shanghai Muxin Muye Youxiangongsi
Address: Shuangchenglu 803nong11hao1602A-1609shi, Baoshanqu, Shanghai 200000 CN.
Imported to AUS: SIHAO PTY LTD. 1 ROKEVA STREET EASTWOOD NSW 2122 Australia
Imported to USA: Sanven Technology Ltd. Suite 250, 9166 Anaheim Place, Rancho Cucamonga, CA 91730
| UK | REP |
YH CONSULTING LIMITED. C/O YH Consulting
Limited Office 147, Centurion House, London
Road, Staines-upon-Thames, Surrey, TW18 4AX
| EC | REP |
E-CrossStu GmbH
Mainzer Landstr.69,
60329 Frankfurt am Main.
VEVOR®
TOUGH TOOLS, HALF PRICE
Technical Support and E-Warranty Certificate www.vevor.com/suppo
VEVOR®
TOUGH TOOLS, HALF PRICE
NEED HELP? CONTACT US!
No. 2 No. 7 No. 11 No. 18 No. 26
YH CONSULTING LIMITED. C/O YH Consulting Limited Office 147, Centurion House, London Road, Staines-upon-Thames, Surrey, TW18 4AX
| Przedstawiciel WE |
E-CrossStu GmbH Mainzer Landstr.69, 60329 Frankfurt am Main.
VEVOR®
TOUGH TOOLS, HALF PRICE
NEED HELP? CONTACT US!
No. 2 No. 7 No. 11 No. 18 No. 26
Imported in AUS: SIHAO PTY LTD. 1 ROKEVA STREET EASTWOOD NSW 2122 Australia
Imported in USA: Sanven Technology Ltd. Suite 250, 9166 Anaheim Place, Rancho Cucamonga, CA 91730
YH CONSULTING LIMITED. C/O YH Consulting
Limited Office 147, Centurion House, London
Road, Staines-upon-Thames, Surrey, TW18 4AX
No. 2 No. 7 No. 11 No. 18 No. 26
YH CONSULTING LIMITED. C/O YH Consulting
Limited Office 147, Centurion House, London
Road, Staines-upon-Thames, Surrey, TW18 4AX
NEED HELP? CONTACT US!
No. 2 No. 7 No. 11 No. 18 No. 26
YH CONSULTING LIMITED. C/O YH Consulting Limited Office 147, Centurion House, London Road, Staines-upon-Thames, Surrey, TW18 4AX
| EG-representant |
E-CrossStu GmbH Mainzer Landstr. 69, 60329 Frankfurt am Main.
VEVOR®
TOUGH TOOLS, HALF PRICE
NEED HELP? CONTACT US!
No. 2 No. 7 No. 11 No. 18 No. 26
Limited Office 147, Centurion House, London
Road, Staines-upon-Thames, Surrey, TW18 4AX
| EC | REP |
E-CrossStu GmbH
Mainzer Landstr.69,
60329 Frankfurt am Main.
VEVOR®
TOUGH TOOLS, HALF PRICE
Technical support and e-warranty certificate www.vevor.com/support
VEVOR®
TOUGH TOOLS, HALF PRICE
PYROGRAPHY MACHINE
MODEL: LH55
NEED HELP? CONTACT US!
No. 2 No. 7 No. 11 No. 18 No. 26
Road, Staines-upon-Thames, Surrey, TW18 4AX
| REPRÉSENTANT DE LA CE |
E-CrossStu GmbH
Mainzer Landstr.69,
No. 2 No. 7 No. 11 No. 18 No. 26
Road, Staines-upon-Thames, Surrey, TW18 4AX
| EG-Vertreter |
E-CrossStu GmbH
Mainzer Landstr.69,
60329 Frankfurt am Main.
VEVOR®
TOUGH TOOLS, HALF PRICE
- PYROGRAPHY MACHINE
- VEVOR®
- NEED HELP? CONTACT US
- FCC INFORMATION
- IMPORTANT SAFEGUARDS
- WARNING
- SAVE THESE INSTRUCTIONS
- LH55 PYROGRAPHY MACHINE INSTRUCTIONS FOR USE
- CORRECT INSTALLATION OF PEN POINT OF PYROGRAPHY
- INSTRUCTIONS FOR USING THE WOOD BURNING WIRE TIP
- TIPS FOR USING WOOD BURNING PEN TIPS
- TIPS FOR USING WOOD BURNING TOOLS AND KNIVES
- PRECAUTIONS FOR USING A PYROGRAPHY PEN HOLDER
- TOUGH TOOLS, HALF PRICE
Brand : Vevor
Model : LH55
Category : Electric pyrography pen