
Jam Session - Other kitchen appliances Klarstein - Free user manual and instructions
Find the device manual for free Jam Session Klarstein in PDF.

| Product type | Jam and jelly maker |
| Brand | Klarstein |
| Model | Jam Session |
| Article number | 10034109 |
| Power supply | 220-240 V ~ 50/60 Hz |
| Programs | Jam (21 min) and Jelly (25 min), adjustable time |
| Control panel | Buttons: Cancel, Enter, Jam, Jelly, +/-, LED display |
| Bowl capacity | Approximately 1.5 L (estimated) |
| Bowl material | Non-stick coating (estimated) |
| Lid | Glass |
| Mixer | Integrated stirring blades, removable |
| Cooling function | Automatic (30 min), display "CO" |
| Auto shut-off | Yes, at end of program |
| Cleaning | Bowl, mixer and lid dishwasher-safe; base wipe clean |
| Safety | Risk of burns: hot surfaces; do not immerse base |
| Package contents | Base, bowl, mixer, glass lid |
| Manufacturer | Chal-Tec GmbH, Germany |
Frequently Asked Questions - Jam Session Klarstein
User questions about Jam Session Klarstein
0 question about this device. Answer the ones you know or ask your own.
Ask a new question about this device
Download the instructions for your Other kitchen appliances in PDF format for free! Find your manual Jam Session - Klarstein and take your electronic device back in hand. On this page are published all the documents necessary for the use of your device. Jam Session by Klarstein.
USER MANUAL Jam Session Klarstein
INHALTSVERZEICHNIS
natural_image
Circular mechanical component with four bolt holes and a central slot (no text or symbols visible)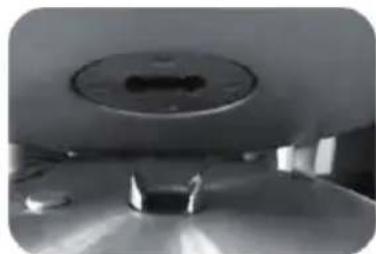
natural_image
Close-up of a circular metallic object with a central hole, possibly a knob or dial, placed on a reflective surface (no visible text or symbols)natural_image
Close-up of a hand operating a mechanical component with a cylindrical shaft and circular base (no visible text or symbols)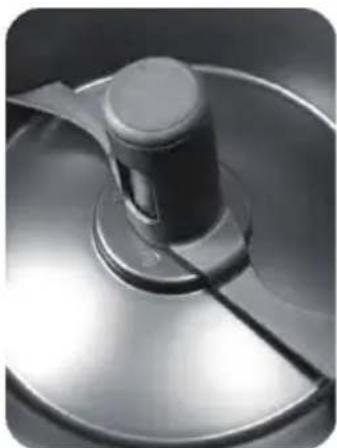
natural_image
Close-up of a metallic kitchen pan with a central knob and handle (no visible text or symbols)natural_image
Symbol of a trash bin crossed with a diagonal line, no text or numbers presentBerlin Brands Group UK Ltd
PO Box 1145
Oxford, OX1 9UW
United Kingdom
Dear Customer,
Congratulations on purchasing this device. Please read the following instructions carefully and follow them to prevent possible damages. We assume no liability for damage caused by disregard of the instructions and improper use. Scan the QR code to get access to the latest user manual and more product information.

CONTENTS
Safety Instructions 18
Device Overview 19
Control Panel 20
Installation 20
Operation 22
Cleaning and Care 25
Disposal Considerations 26
Manufacturer & Importer (UK) 26
TECHNICAL DATA
| Item number 10034109 | |
| Power supply 220-240 V ~ 50/60 Hz |
SAFETY INSTRUCTIONS

CAUTION
Risk of burns! The appliance becomes hot during use. Only touch the controls and handles so that you do not burn yourself.
- Check the appliance and the power cord regularly for damage. Do not use the appliance if the power cord or the appliance is damaged. Do not attempt to repair the appliance yourself. Repairs may only be carried out by qualified specialists.
- If the power cord is damaged, it must be replaced by the manufacturer, an authorized service center, or a similarly qualified person.
- Only use the appliance indoors and not outdoors.
- Only use accessories that have been expressly approved for the appliance by the manufacturer.
- Only connect the appliance to earthed sockets which correspond to the voltage of the appliance.
- Make sure that the power cord does not hang over the work surface or touch hot surfaces.
- Make sure that the power cord never gets wet or humid during use. Route the cable so that it does not become a trip hazard.
- Do not place the appliance near gas or electric cookers or heated ovens.
- Do not use the appliance for any purpose other than that specified. This equipment is not intended for commercial use and is intended for domestic and similar environments only.
- Always plug the power cord into the appliance first and then plug it into the wall outlet. Always turn off the power before unplugging the appliance.
- Do not use the appliance with remote or timer-controlled sockets.
- Do not move the appliance while it is in operation. Be very careful when moving equipment with hot liquids.
- When not in use, turn off the power and unplug the appliance. Allow the appliance to cool completely before cleaning and storing.
- Place the appliance on a stable, level and heat-resistant surface. Allow at least 20 cm of space around the appliance to walls and other equipment.
- Never completely immerse the appliance in water or other liquids, as this may damage the electrical parts.
- This device may be only used by children 8 years old or older and persons with limited physical, sensory and mental capabilities and / or lack of experience and knowledge, provided that they have been instructed in use of the device by a responsible person who understands the associated risks.
- Ensure that children do not play with the device.
DEVICE OVERVIEW

1 Glass lid
2 Stirrer
3 Pot
4 Heater
5 Base
6 Control panel
CONTROL PANEL
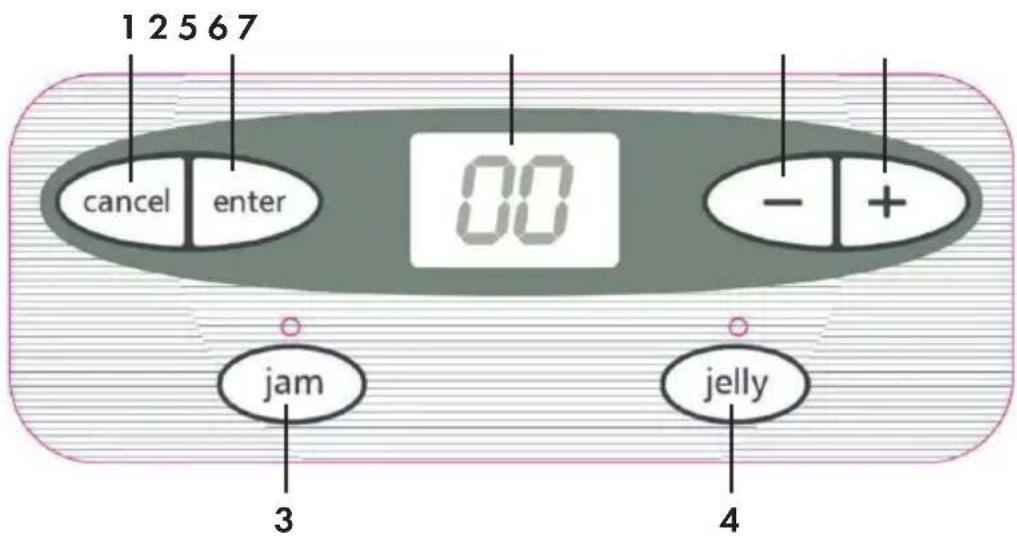
1 Cancel button 5 LED display
2 Enter button 6 „+“ button, increase time
3 Jam button 7 „-” button, decrease time
4 Jelly button
INSTALLATION
Scope of delivery:
The following (accessory) parts are required for the production of jam/jelly:
- Base
- Pot
- Stirrer
• Glas lid
Cleaning before first use
Carefully clean your jam and jelly maker before its first use. Just follow these simple steps:
- Wash the glass lid, stirrer and pot in warm soapy water, rinse with clear water and dry thoroughly.
- Base may be wiped down with a slightly damp cloth. Make certain it is not plugged.
Assembly
- For better results, the appliance should stand straight and stable. Therefore place the appliance base on a level surface, such as a countertop or sturdy table.
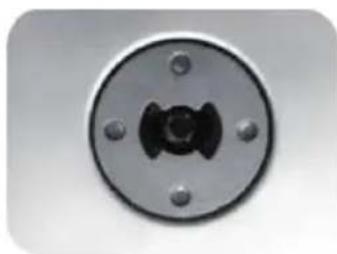
- Hold the pot by the handles. Place the pot on the base with the handles aligned with sides of base, aligning the hole in the bottom of the pot (figure 1) with the metal prongs in the center of the base (figure 2). Make certain that the pot is firmly seated on the base before proceeding.
Figure 1 Figure 2
natural_image
Circular mechanical component with central knob and four bolt holes (no text or symbols)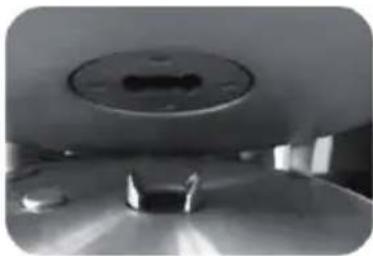
natural_image
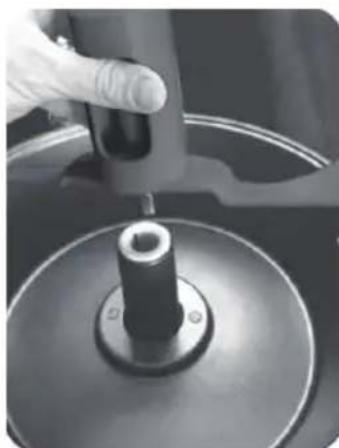
Interior view of a ceiling-mounted electronic device with a circular component and two small components (no visible text or symbols)- Insert the stirrer in the pot with the blades towards the bottom (figure 3). The post in the center of the stirrer should align with the hole in the bottom of the pot. Rotate and press the stirrer until it reaches the bottom of the pot. It must be in the position shown (figure 4).
Figure 3 Figure 4
natural_image
Close-up of a hand operating a mechanical component with a circular base (no visible text or symbols)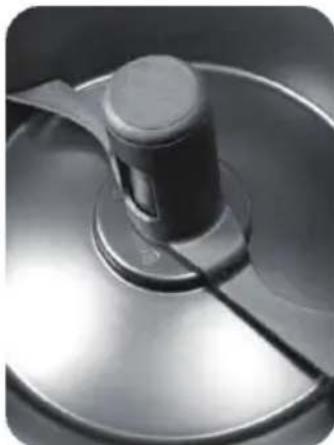
natural_image
Close-up of a kitchen pot with a central knob and circular base (no text or symbols visible)Note: If the stirrer is not positioned correctly, it will not rotate properly and could damage the pot. Make sure the stirrer reaches the bottom of the pot (as shown in figure 4) before switching on the device.
OPERATION
NOTES ON OPERATION
Observe the following instructions before operating the device:
- Do not use a metal spatula or other sharp objects to stir food in the pot so as not to damage the non-stick coating. You can use a wooden, plastic or rubber spatula instead.
- Make sure that the stirrer is mounted correctly, otherwise the functionality of the device may be impaired. Rotate and press the stirrer until it reaches the bottom of the pot.
About cooking jams and jellies
Jams are made by cooking crushed or finely chopped fruit combined with pectin and sugar. The end products is firm yet spreadable and contains fruit pieces.
Jellies are made by using fruit juice. This juice is used in place of Crushed or finely chopped fruit which is then combined with pectin and sugar to make jelly. Jelly is a bit firmer than jam and does not contain fruit pieces.
Pectin is a natural gelling ingredient derived from apple and citrus fruits. When used in the preparation of homemade jams and jellies, pectin produces a more natural fresh fruit flavor. Using pectin also makes the process of preparing home made jams and jellies easier because less cooking is required to achieve the proper set.
Gelling sugar is a mixture of sugar, pectin and an acidifier (e.g. citric acid or tartaric acid), is suitable for the production of jam and jelly and is offered for different mixing ratios of fruit to gelling sugar (1:1, 2:1 and 3:1).
How to make jam
- Prepare the required ingredients (e.g. selected fruits and preserving sugar in a suitable mixing ratio).
- As described in the section „Assembly“ (p. 17, figures 3 and 4), insert the stirrer into the pot with the blades towards the bottom. The post in the center of stirrer should align with the hole in the bottom of the pot. Rotate and press the stirrer until it reaches the bottom of the pot.
Note: To protect the internal motor, always be sure to insert the stirrer before adding any liquids. This ensures that essential parts of the appliance are protected from damage.
-
Plug in the appliance.
-
Fill the pot with the required ingredients (e.g. selected fruit). (The sugar will be added at a later time!)
- Press the jam button (3). The cook time will automatically default to 21 minutes. If necessary, use the +/- buttons (6/7) to increase or decrease cooking time in one-minute intervals. Press the enter button (2) and the jam and jelly maker will now start stirring.
- Stay close to the appliance. At 4 minutes, the jam and jelly maker will sound 4 short beeps indicating that it is time to add sugar. Gradually add sugar while the stirrer continues running. Place the glass lid on the pot after adding sugar.
NOTE: Adding sugar at this specific time is important for yielding best results.

CAUTION
Risk of burns! To avoid the risk of serious burns, e.g. from jam splashes, the glass lid must be in place from the time the sugar is added until the appliance shuts off.
- The jam and jelly maker will continue to automatically stir your ingredients while it cooks. Stay within earshot of the jam and jelly maker so you can hear the beep that indicates the jam making process is complete.
- At the end of the cooking process, the jam and jelly maker will beep again to indicate the process is complete. After the beep, press the cancel button (1) and unplug the power cord to turn off the appliance.
- Remove the stirrer, taking care not to touch any metal parts or glass surfaces. Set aside either in the sink or on an oven-safe plate, as the metal rod inside the stirrer will be hot.

CAUTION
Risk of burns! In order to reduce the risk of serious burns, exercise extreme caution when handling the appliance parts even after switching off. As with any cooking appliance, metal parts, glass surfaces and even certain plastic parts can become very hot. Oven mitts should be used when handling the appliance immediately after or during use.
- If necessary, skim foam from top of jam. Never attempt to pour jam from the pot into another container. Always use a non-metal spoon or ladle (such as wood, bamboo, plastic or silicone) to remove the jam from the pot.
- Wait 30 minutes before making a new portion of jam or jelly with the appliance.
NOTE: If a mistake is made in programming or if you need to stop the entire jam process, pressing the cancel button (1) allows you to clear the recipe program and to restart from "00".
Cooling time
- The appliance is programmed to cool for 30 minutes between boils. The display will show "CO" when in the cooling mode and the appliance is not ready to produce a new portion of jam or jelly. When the display „--“ appears on the screen a new cooking process can be started.
How to make jelly
- Prepare the required ingredients (e.g. fruit juice and gelling sugar in the appropriate mixing ratio).
- As described in the section "Assembly" (p. 17, figures 3 and 4), insert the stirrer into the pot with the blades towards the bottom. The post in the center of the stirrer should align with the hole in the bottom of the pot. Rotate and press the stirrer until it reaches the bottom of the pot.
Note: To protect the internal motor, always be sure to insert the stirrer before adding any liquids. This ensures that essential parts of the appliance are protected from damage.
-
Fill the pot with the required ingredients (e.g. fruit juice). (The sugar will be added at a later time!)
-
Press the "jelly" button (3). The cook time will automatically default to 25 minutes. If necessary, use the +/- buttons (6/7) to increase or decrease cooking time in one-minute intervals. Press the enter button (2) and the jam and jelly maker will now start stirring.
-
Stay close to the appliance. At 4 minutes, the jam and jelly maker will sound 4 short beeps indicating that it is time to add sugar. Gradually add sugar while the stirrer continues running. Place the glass lid on the pot after adding sugar.
NOTE: Adding sugar at this specific time is important for yielding best results.

CAUTION
Risk of burns! To avoid the risk of serious burns, e.g. from jelly splashes, the glass lid must be in place from the time the sugar is added until the appliance shuts off.
- The jam and jelly maker will continue to automatically stir your ingredients while it cooks. Stay within earshot of the jam and jelly maker so you can hear the beep that indicates the jam making process is complete.
- At the end of the cooking process, the jam and jelly maker will beep again to indicate the process is complete. After the beep, press the cancel button (1) and unplug the power cord to turn off the appliance.
- Remove the stirrer, taking care not to touch any metal parts or glass surfaces. Set aside either in the sink or on an oven-safe plate, as the metal rod inside the stirrer will be hot.

CAUTION
Risk of burns! In order to reduce the risk of serious burns, exercise extreme caution when handling the appliance parts even after switching off. As with any cooking appliance, metal parts, glass surfaces and even certain plastic parts can become very hot. Oven mitts should be used when handling the appliance immediately after or during use.
- If necessary, skim foam from top of jelly. Never attempt to pour jelly from the pot into another container. Always use a non-metal spoon or ladle (such as wood, bamboo, plastic or silicone) to remove the jam from the pot.
- Wait 30 minutes before making a new portion of jam or jelly with the appliance.
NOTE: If a mistake is made in programming or if you need to stop the entire jelly process, pressing the cancel button (1) allows you to clear the recipe program and to restart from "00".
Cooling time
- The appliance is programmed to cool for 30 minutes between boils. The display will show "CO" when in the cooling mode and the appliance is not ready to produce a new portion of jam or jelly. When the display „--“ appears on the screen a new cooking process can be started.
CLEANING AND CARE
Note: It is recommended that you clean the appliance in between uses.
- For the care of the parts of the appliance we recommend cleaning by hand with warm soapy water. Do not use abrasive cleaners.
- Do not immerse the underside of the pot in liquid.

CAUTION
Risk of burns! As with any cooking appliance, metal parts and even some plastic parts can become extremely hot. Always let the appliance completely cool down before cleaning – usually it takes 20-30 minutes.
- Always turn your jam and jelly maker off by pressing the cancel button (1), unplugging the mains plug from the socket and allowing the appliance to cool down completely before cleaning
-
The glass lid, stirrer and pot can all be washed in the dishwasher or with hot soapy water.
-
Do not use abrasive cleaning compounds or scouring pads. A cloth, sponge or rubber spatula will usually remove much stubborn residue.
- The glass lid will not withstand sudden temperature changes. Do not wash a hot lid in cold water.
- The appliance base may be cleaned with a soft cloth and warm soapy water. Wipe dry. Do not use abrasive cleaners.

CAUTION
Risk of electric shock! Never immerse the appliance base in water or other liquids and do not use a dishwasher to clean the appliance base.
DISPOSAL CONSIDERATIONS

natural_image
Symbol of a trash bin crossed with a diagonal line, representing no waste or discharge (no text or labels)If there is a legal regulation for the disposal of electrical and electronic devices in your country, this symbol on the product or on the packaging indicates that this product must not be disposed of with household waste. Instead, it must be taken to a collection point for the recycling of electrical and electronic equipment. By disposing of it in accordance with the rules, you are protecting the environment and the health of your fellow human beings from negative consequences. For information about the recycling and disposal of this product, please contact your local authority or your household waste disposal service.
MANUFACTURER & IMPORTER (UK)
Manufacturer:
Chal-Tec GmbH, Wallstrasse 16, 10179 Berlin, Germany.
Importer for Great Britain:
Berlin Brands Group UK Ltd
PO Box 1145
Oxford, OX1 9UW
United Kingdom
Chère cliente, cher client,
SOMMAIRE
natural_image
Circular mechanical component with central knob and four mounting holes (no text or symbols visible)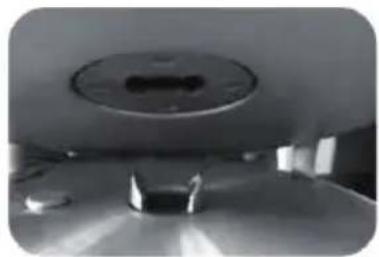
natural_image
Interior view of a ceiling-mounted device with a circular vent and a small mechanical component (no visible text or symbols)natural_image
Close-up of a hand operating a mechanical component with a cylindrical shaft and circular base (no visible text or symbols)
natural_image
Close-up of a kitchen pot with a handle and circular base (no text or symbols visible)natural_image
Symbol of a trash bin crossed with a diagonal line, no text or numbers presentBerlin Brands Group UK Ltd
PO Box 1145
Oxford, OX1 9UW
United Kingdom
Estimado cliente:
ÍNDICE
1 Tapa de cristal
2 Removedor
3 Recipiente
4 Placa calefactora
5 Base
6 Panel de control
PANEL DE CONTROL

natural_image
Circular mechanical component with central knob and four bolt holes (no text or symbols)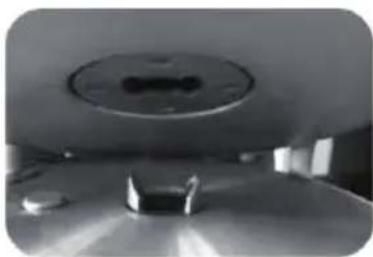
natural_image
Close-up of a metallic surface with a circular opening and small rectangular cutout, no visible text or symbolsnatural_image
Close-up of a hand operating a mechanical component with a cylindrical shaft and circular base (no visible text or symbols)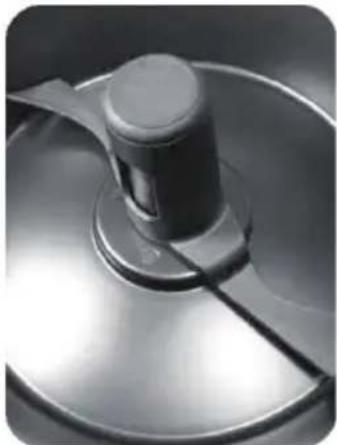
natural_image
Close-up of a kitchen pot with a handle and circular base (no text or symbols visible)natural_image
Symbol of a trash bin crossed with a diagonal line, no text or numbers presentBerlin Brands Group UK Ltd
PO Box 1145
Oxford, OX1 9UW
United Kingdom
Gentile Cliente,
INDICE
natural_image
Circular mechanical component with four bolt holes and a central slot (no text or symbols visible)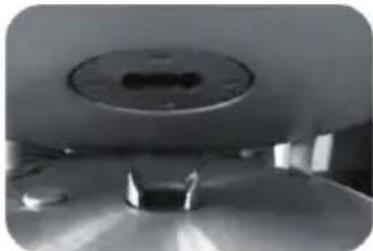
natural_image
Close-up of a circular mechanical component with a central knob, possibly a knob or dial, mounted on a surface (no visible text or symbols)natural_image
Close-up of a hand operating a mechanical component with a cylindrical shaft and circular base (no visible text or symbols)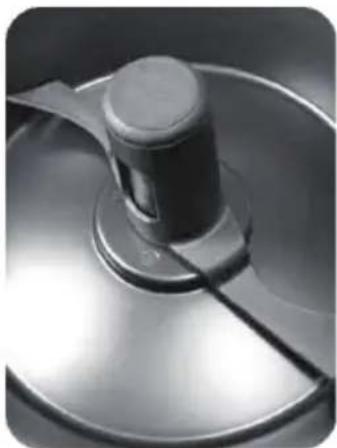
natural_image
Close-up of a metallic kitchen pot with a central knob and handle (no text or symbols visible)natural_image
Symbol of a trash bin crossed with a diagonal line, no text or numbers presentPRODUTTORE E IMPORTATORE (UK)
Produttore:
Chal-Tec GmbH, Wallstraße 16, 10179 Berlino, Germania.
Berlin Brands Group UK Ltd
PO Box 1145
Oxford, OX1 9UW
United Kingdom

area
| Category | Value | |---|---| | 1 | 100 | | 2 | 100 | | 3 | 100 | | 4 | 100 | | 5 | 100 | | 6 | 100 | | 7 | 100 | | 8 | 100 | | 9 | 100 | | 10 | 100 | | 11 | 100 | | 12 | 100 | | 13 | 100 | | 14 | 100 | | 15 | 100 | | 16 | 100 | | 17 | 100 | | 18 | 100 | | 19 | 100 | | 20 | 100 | | 21 | 100 | | 22 | 100 | | 23 | 100 | | 24 | 100 | | 25 | 100 | | 26 | 100 | | 27 | 100 | | 28 | 100 | | 29 | 100 | | 30 | 100 | | 31 | 100 | | 32 | 100 | | 33 | 100 | | 34 | 100 | | 35 | 100 | | 36 | 100 | | 37 | 100 | | 38 | 100 | | 39 | 100 | | 40 | 100 | | 41 | 100 | | 42 | 100 | | 43 | 100 | | 44 | 100 | | 45 | 100 | | 46 | 100 | | 47 | 100 | | 48 | 100 | | 49 | 100 | | 50 | 100 | | 51 | 100 | | 52 | 100 | | 53 | 100 | | 54 | 100 | | 55 | 100 | | 56 | 100 | | 57 | 100 | | 58 | 100 | | 59 | 100 | | 60 | 100 | | 61 | 100 | | 62 | 100 | | 63 | 100 | | 64 | 100 | | 65 | 100 | | 66 | 100 | | 67 | 100 | | 68 | 100 | | 69 | 100 | | 70 | 100 | | 71 | 100 | | 72 | 100 | | 73 | 100 | | 74 | 100 | | 75 | 100 | | 76 | 100 | | 77 | 100 | | 78 | 100 | | 79 | 100 | | 80 | 100 | | 81 | 100 | | 82 | 100 | | 83 | 100 | | 84 | 100 | | 85 | 100 | | 86 | 100 | | 87 | 100 | | 88 | 100 | | 89 | 100 | | 90 | 100 | | 91 | 100 | | 92 | 100 | | 93 | 100 | | 94 | 100 | | 95 | 100 | | 96 | 100 | | 97 | 100 | | 98 | 100 | | 99 | 100 | | Note: The actual values in the 'Value' column are not provided in the code. I have used the label 'The Region' to represent the 'Region'. The values are estimated based on the provided code.
KLARSTEIN


- INHALTSVERZEICHNIS
- Dear Customer,
- CONTENTS
- SAFETY INSTRUCTIONS
- CAUTION
- DEVICE OVERVIEW
- CONTROL PANEL
- INSTALLATION
- Scope of delivery:
- Cleaning before first use
- Assembly
- OPERATION
- NOTES ON OPERATION
- About cooking jams and jellies
- How to make jam
- Cooling time
- How to make jelly
- CLEANING AND CARE
- DISPOSAL CONSIDERATIONS
- MANUFACTURER & IMPORTER (UK)
- Manufacturer:
- Importer for Great Britain:
- Chère cliente, cher client,
- SOMMAIRE
- Estimado cliente:
- ÍNDICE
- PANEL DE CONTROL
- Gentile Cliente,
- INDICE
- PRODUTTORE E IMPORTATORE (UK)
- Produttore:
- KLARSTEIN
Brand : Klarstein
Model : Jam Session
Category : Other kitchen appliances