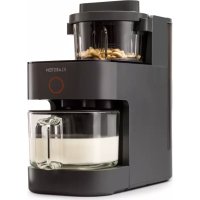
Marcia - Other kitchen appliances Klarstein - Free user manual and instructions
Find the device manual for free Marcia Klarstein in PDF.


| Product type | Multifunctional kitchen appliance for plant milks, juices, soups, milkshakes |
| Brand | Klarstein |
| Model | Marcia |
| Item number | 10036344 |
| Power supply | 220-240 V ~ 50 Hz |
| Motor power | 300 W |
| Heating power | 1250 W |
| Rotation speed | 30 000 rpm |
| Capacity | 300 ml, 600 ml, 900 ml, 1 200 ml |
| Default capacity | 600 ml |
| Programs | Dry soy, soaked soy, nuts, cereals, juice, milkshake, soup, taste+ |
| Timer / delayed start function | Yes, adjustable from 30 min to 24 h (in 30 min intervals) |
| Cleaning function | Self-cleaning, quick wash (3 min), gentle wash, hot drying |
| Water tank | Yes, removable |
| Milk container | Yes, glass with handle |
| Mixing container | Integrated with lid |
| Water level indicator | Yes, electrodes |
| Recommended maintenance | Descaling every 50 preparations with baking soda |
| Safety | Automatic shutdown, lid position detection, overload protection |
| Error codes | E01 to E18 (details in the manual) |
| Spare parts available | Water tank, milk container, lids, steam cap, filter, mixing container |
| Repairability | Have it checked by a professional; contact customer service |
| Included accessories | Water tank, milk container, mixing container, steam cap, power cord |
| Use | Household use only |
Frequently Asked Questions - Marcia Klarstein
User questions about Marcia Klarstein
0 question about this device. Answer the ones you know or ask your own.
Ask a new question about this device
Download the instructions for your Other kitchen appliances in PDF format for free! Find your manual Marcia - Klarstein and take your electronic device back in hand. On this page are published all the documents necessary for the use of your device. Marcia by Klarstein.
USER MANUAL Marcia Klarstein
area
| Category | Value | | -------- | ----- | | 1 | 100 | | 2 | 100 | | 3 | 100 | | 4 | 100 | | 5 | 100 | | 6 | 100 | | 7 | 100 | | 8 | 100 | | 9 | 100 | | 10 | 100 | | 11 | 100 | | 12 | 100 | | 13 | 100 | | 14 | 100 | | 15 | 100 | | 16 | 100 | | 17 | 100 | | 18 | 100 | | 19 | 100 | | 20 | 100 | | 21 | 100 | | 22 | 100 | | 23 | 100 | | 24 | 100 | | 25 | 100 | | 26 | 100 | | 27 | 100 | | 28 | 100 | | 29 | 100 | | 30 | 100 | | 31 | 100 | | 32 | 100 | | 33 | 100 | | 34 | 100 | | 35 | 100 | | 36 | 100 | | 37 | 100 | | 38 | 100 | | 39 | 100 | | 40 | 100 | | 41 | 100 | | 42 | 100 | | 43 | 100 | | 44 | 100 | | 45 | 100 | | 46 | 100 | | 47 | 100 | | 48 | 100 | | 49 | 100 | | 50 | 100 | | 51 | 100 | | 52 | 100 | | 53 | 100 | | 54 | 100 | | 55 | 100 | | 56 | 100 | | 57 | 100 | | 58 | 100 | | 59 | 100 | | 60 | 100 | | 61 | 100 | | 62 | 100 | | 63 | 100 | | 64 | 100 | | 65 | 100 | | 66 | 100 | | 67 | 100 | | 68 | 100 | | 69 | 100 | | 70 | 100 | | 71 | 100 | | 72 | 100 | | 73 | 100 | | 74 | 100 | | 75 | 100 | | 76 | 100 | | 77 | 100 | | 78 | 100 | | 79 | 100 | | 80 | 100 | | Note: The actual values are not provided in the code. I have used the label 'Value' as a placeholder for the value detection. You would need to run the code to get the actual values from the code list. Please note that the actual values would be the result of this example. You would need to run the code to get the actual values from the code list. You would need to run the code to get the actual values from the code list. You would need to run the code to get the actual values from the code list. You would need to run the code to get the actual values from the code list. You would need to run the code to get the actual values from the code list. You would need to run the code to get the actual values from the code list. You would need to run the code to get the actual values from you would need to run the code.INHALTSVERZEICHNIS
natural_image
Five different types of electronic components or devices, including a capacitor, mug, cylinder, and stacker (no text or symbols visible)natural_image
Symbol of a trash bin crossed with a diagonal line, no text or numbers presentUnit 6 Riverside Business Centre
Brighton Road
Shoreham-by-Sea
BN43 6RE
United Kingdom
Dear customer,
Congratulations on the purchase of your appliance. Please read the following instructions carefully and follow them to prevent potential damage. We accept no liability for damage caused by disregarding the instructions and improper use. Please scan the QR code to access the latest operating instructions and further information about the product.

CONTENTS
Safety instructions 18
Appliance overview 19
Control panel 20
Before first use 20
Warnings / Tips 20
Use 21
Functions 22
Basic recipes 23
Cleaning 24
Troubleshooting 26
Error codes 28
Disposal instructions 30
Manufacturer & Importer (UK) 30
TECHNICAL INFORMATION
| Product code 10036344 | |
| Power supply 220-240 V ~ 50 Hz | |
| Motor output 300 W | |
| Heating output 1250 W | |
| Speed 30,000 RPM | |
| Capacity 300-1200 ml |
SAFETY INSTRUCTIONS
- Ensure to only connect the appliance to sockets with the appropriate voltage.
- Do not leave the appliance unattended while it is plugged in. Unplug the appliance from the socket after each use.
- Children from the age of 8 as well as physically, sensory and mentally impaired persons may only use the appliance if they have been familiarised by a responsible person with its functions and understand the safety precautions in place as well as any associated risks.
- Make sure that children do not play with the appliance.
- Do not expose the appliance to rain or direct sunlight.
- Make sure that the power cord does not come into contact with hot surfaces.
- Do not immerse the appliance, plug or power cord in water or other liquids.
- Do not touch any moving parts during operation.
- Place the appliance on a level, stable surface.
- The appliance only works when the cup is in the correct position.
- Do not add ingredients while the appliance is in operation.
- Do not use the appliance if defective.
- Switch off and unplug the appliance before moving the cup.
- Always unplug the appliance when not in use and when cleaning, assembling or removing accessories.
- Do not pull the plug out of the socket by the cable and always hold it with your hand.
- Do not use the appliance if the plug or the power cord is damaged or if the appliance is malfunctioning. Have the appliance checked by a specialist.
- If the power cord is damaged, it must be replaced by the manufacturer or a qualified service technician to prevent electric shock and injury.
- The appliance is intended for use in the home and similar environments only. It is not intended for commercial use.
- If you dispose of the appliance, cut off the power cord and remove all dangerous parts so that children cannot injure themselves if they play with it.
- Keep the packaging material out of reach of children so that they do not injure themselves.
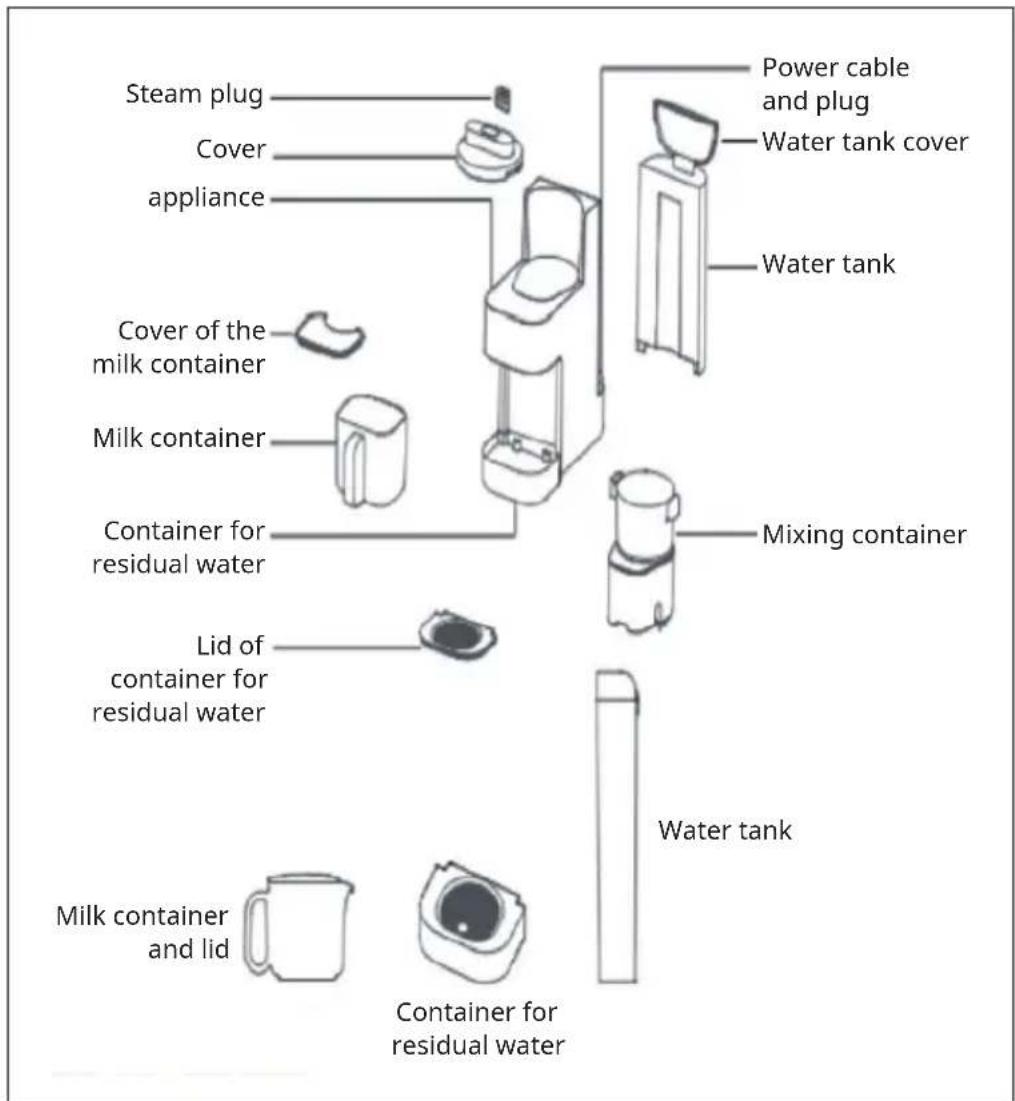
APPLIANCE OVERVIEW
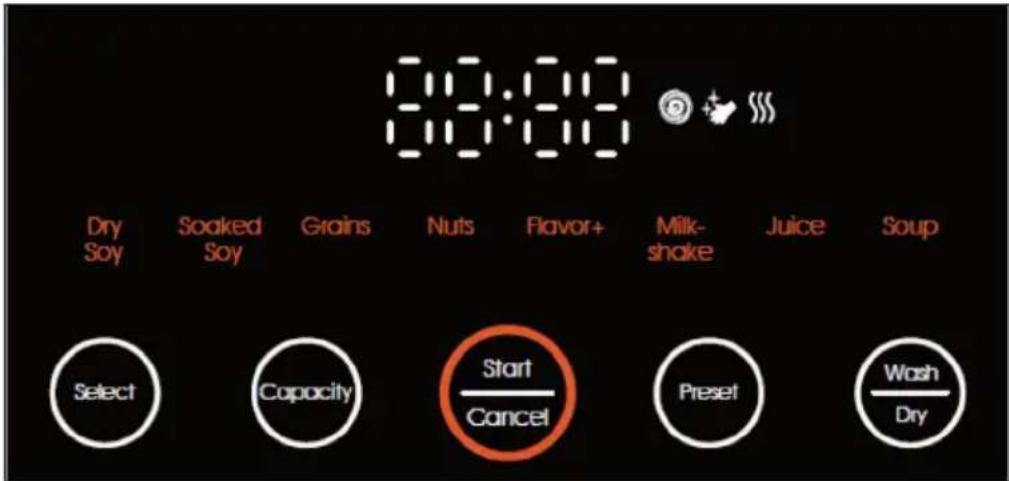
CONTROL PANEL
BEFORE FIRST USE
Press Wash/Dry button 2 times to enter Deep Clean mode. When closing the mixing container, make sure that the markings on the lid and on the unit are in line.
WARNINGS / TIPS
- Add the ingredients according to the instructions to avoid milk overflow, outlet clogging and poor mixing.
- When using the milkshake and juice functions, do not add too many foods containing fibre, otherwise the milk nozzle may become blocked.
- Do not add solid ingredients (such as sugar cubes, ice, etc.) to avoid damaging the appliance.
USE
Preparation of a drink
- Connect the appliance to the power supply.
- Turn on the appliance by tapping the Start/Cancel button. The display now lights up.
- You can select the various programmes with the Select button. Press the button several times to do this.
- Press the Capacity button repeatedly to select the quantity. You can prepare 300 ml, 600 ml, 900 ml or 1,200 ml. The standard capacity is 600 ml. The appliance processes large quantities in two cycles. However, all ingredients must be poured into the mixing container at the beginning.
- Fill the water tank with filtered water.
- Pour all ingredients into the mixing container.
- Press the Start/Cancel button to start the programme.
- Press the Start/Cancel button again during the first minute to stop the programme.
- The machine pours your drink into the glass container. Warning! The drink and the glass container are very hot. Hold the glass by the handle only. After the mixing process is completed, the appliance automatically switches to standby mode. Now you can remove the milk container. The system automatically enters the self-cleaning function and the self-cleaning function light comes on. Empty the residual water tank after cleaning.
Timer / delay function
You can set the machine to prepare the drink at a later time.
- To do this, select the programme and the capacity
- Press the Timer button. By pressing the button several times, you can increase the preset time in 30-minute increments, from 30 minutes to a maximum of 24 hours. The preset time is 8 hours. The programme is then finished after 8 hours.
- Select the programme. For safety reasons, the Soaked Soy, Juice, Milkshake and Soup programmes are not included.
- Add the ingredients and press Start/Cancel.
- You can stop the programme and the delay time by pressing the Start/Cancel button again during the first minute. Now you can make a new selection. After pressing and holding the Preset button for 5 seconds, the time on the display will increase and you can release the button when the desired time is reached.
Note: For your health and safety - if the room temperature is higher than 30^ C, do not set the timer to over 12 hours to avoid germ formation.
FUNCTIONS
Note for the soup
function: The
blending jug can
be dyed by carrot.
Chunky soups will not be able to extrude through the machine, so if soup is too chunky please unplug the device and pour soup by hand from the mixing jug.
| Programme Description | Ingredients | |
| Dry Soy / Soaked Soy | For dry or soaked soy and other vegetables | Dried soybeansSoybeans soaked for 12 hours |
| Nuts For nuts, seeds and kernels | Almonds and hazelnuts | (roasted, blanched or natural)****CashewsDesiccated coconut**Lupine flour*Macadamia nuts |
| Grains For grains and grain substitutes | Rice*** | Oats and spelt (regular, harvested or instant)Buckwheat*Hulled hemp seedsMillet |
| Juice For about 500 g of fruit /fruit nectar from washed and chopped berries and soft fruits. Fill with a maximum of 250 g of fruit. | BananasBerriesPeachApricotNectarines | |
| Milkshake For creamy ice cream drinks | Milk | Ice creamFruits or flavourings |
| Soup For warm, mixed soups | Vegetables | Cream or brothSpicesRice, grains |
| Flavour+ For non-dairy products with added flavourings | FruitsChocolate | |
| * Soaked | |
| ** Grated. Second round quick wash or hand wash is needed because the desiccated coconut is adhesiv | |
| *** | Washed and cooked |
| **** Best to use peeled nuts as skins may stain the jug | |
BASIC RECIPES
| Drink Ingredients Mode | ||
| Soy milk 300 ml: 30 g | 600 ml: 50 g soaked soybeans | Dry soySoaked soy |
| Cashew, almond,hazelnut ormacadamia milk | 300 ml: 25 g600 ml: 40 g nuts | Nuts |
| Banana milk 300 ml: 25 g | almonds, 1⁄2 banana600 ml: 50 g almonds, 1 banana | +Flavour |
| Chocolate milk 300 ml: 25 g | almonds, a little sugar,a little cocoa or chocolate syrup600 ml: 50 g almonds, a little sugar,a little cocoa or chocolate syrup | +Flavour |
| Oat milk 300 ml: 20 g | 600 ml: 40 g oats | Grains |
| Hemp milk 300 ml: 25 g | 600 ml: 50 g hemp seed | Grains |
| Buckwheat milk 300 ml: 20 g | 600 ml: 40 g buckwheat | Grains |
| Spelt milk 300 ml: 15 g | 600 ml: 24 g spelt | Grains |
| Rice milk 300 ml: 25 g | 600 ml: 40 g rice | Grains |
| Coconut milk 300 ml: 25 g | 600 ml: 40 g desiccated coconut | Grains |
| Watermelon,strawberry, mango juice | 350 g fruit Juice |
Note: Download the Klarstein app for more recipes:
CLEANING
Do not put the individual components of the appliance in the dishwasher. After each programme, the appliance automatically switches to self-cleaning mode. The cleaning takes 7 minutes. Only water is needed for self-cleaning. At the end of the self-cleaning programme, open the lid to allow the mixing container to dry. 2. You can also select the cleaning mode directly using the display, e.g. if the appliance has not been used for an extended period, after preparing a sweet drink (with sugar, syrup or fruit) or whenever basic cleaning is required:
- Select the menu and press the Wash/Dry button (remove the milk container before cleaning) and the LED screen will display the time required for the corresponding function.
- Press the button 4 times for a quick wash cycle and 2 times for a fine wash cycle. Press the button 3 times for a hot drying cycle (open the lid of the mixing container during hot drying).
• After the end of the self-cleaning cycle, open the lid to allow the mixing container to dry.
Quick Wash: Press the Wash/Dry button 1 time and then press the Start/Cancel button to start the cycle. To stop cleaning, press the Start/Cancel button at any time during the cleaning cycle.
Fine wash: If the mixing bowl has become stained over time, use the "Fine wash" option. Add a drop of mild detergent to the mixing bowl before starting the programme. When using it for the first time, make sure that the cleaning agent is not too concentrated to avoid excessive foaming in the mixing container. Press the Wash/Dry button twice in succession and then press the Start/Cancel button to start a fine cleaning cycle. If there is still foam residue once the programme has concluded, rinse the appliance on the 3-minute rinse cycle. After the end of the self-cleaning cycle, open the lid to allow the mixing container to dry.
- Also, you should regularly clean the metal pins pointing into the mixing container, the silicone valve through which water flows into the mixing container as well as the silicone spout with a damp cloth.
- Clean the water tank regularly to keep it clean.
- Clean the appliance's exterior with a soft, damp cloth and then dry it thoroughly.
- Do not disconnect the power supply to the appliance during or interrupt the cleaning programme.

CAUTION
Risk of injury! If you want to clean the blades by hand, switch off the appliance and disconnect the mains plug. Be careful, the blades are very sharp.
Remove residue from the mixing container
Follow the steps below if you want to remove residue or milk left in the mixing container (due to a power failure or other reasons):
- Connect the appliance to a power supply.
- As soon as all symbols are shown on the display, you can remove the residue by pressing and holding the Wash/Dry button.
- Then start a manual cleaning programme with the Wash/Dry button
natural_image
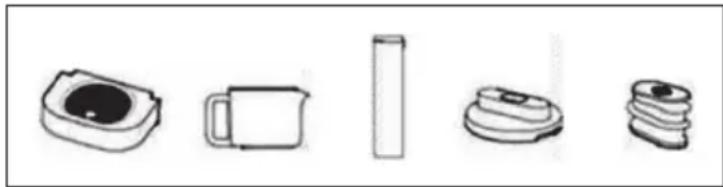
Five different types of mechanical components or devices, including a pot, mug, cylinder, lid, and stacker (no text or symbols visible)The accessories shown above can be removed from the machine and washed by hand: Residual water tank, milk tank, milk tank cover and lid, water tank, steam plug. After all accessories have been cleaned, it is recommended that they be allowed to air dry and are then stored in a dry and well ventilated area.
Decalcifi cation
Handle the appliance with care and only use fi Itered water. Note that you should decalcify the appliance regularly. It is recommended that you decalcify after every 50th use or whenever you notice signifi cant limescale deposits on or in the appliance. Proceed as follows to descale:
- Add 3 tsp of baking soda to the water container and fill it with water.
- Run a preparation programme for 300 ml without adding ingredients.
- Stop the preparation by removing the water container. Drain the remaining water with baking soda. Wait 1 hour and replace the water in the water tank with fresh water. Now let the programme fi nish its cycle.
- Then run through two preparation programmes without using ingredients, each for 1,000 ml. Repeat the procedure if necessary.
TROUBLESHOOTING
| Problem Potential cause Solution | ||
| The indicator light does not work. | The power cord has not been plugged in. | Plug in the power cord. |
| Display board defective Contact a dealer for repair and maintenance. | ||
| The indicator light is on but the appliance is not working | A programme has not been selected. | Select a programme. |
| The water tank has not been filled with water or is not attached to the appliance. | Fill the water tank with water up to the mark and attach it to the appliance. | |
| The temperature or water level sensor is defective. | Contact a dealer for repair and maintenance. | |
| The water does not flow into the mixing container. | Defective water pump. Contact a dealer for repair and maintenance. | |
| The filter at the bottom of the water tank is blocked. | Remove the filter, clean it and then reinsert it into the water tank. | |
| The motor runs without stopping. | Water in the engine. Contact a dealer for repair and maintenance. | |
| The heater keeps turning off and on. | Defective temperature sensor. | Contact a dealer for repair and maintenance. |
| The appliance does not respond to button pushing. | The switch-off time was too quick and the appliance could not be reset. | After a power failure, wait 2 minutes before switching the unit back on. |
| Defective display board. Send the appliance to the local service department for repair and maintenance. | ||
| Food cannot be processed. | Too much or too little food. Add the ingredients according to the instructions in the manual. | |
| Appliance error. Send the appliance to the local service department for repair and maintenance. | ||
| Wrong programme selected. | Select the correct programme. | |
ERROR CODES
| Code Description | Potential solution | |
| E01 The milk | cup or its lid is not inserted correctly or the milk cup or its lid is not removed before self-cleaning. | Check that the milk cup and its lid are well positioned and that the milk cup and its lid are removed before a self-cleaning cycle. |
| E02 No water | in the water tank or the filter in the bottom of the water tank is clogged. | Fill up with water after the clogging has been rectified. |
| E03 The lid of the mixing container is not well positioned. | Position the cover correctly. | |
| E05 Too many ingredients overload the engine. | Use fewer ingredients, clean the appliance and try again. | |
| E06 The upper | water level electrode is blocked or there are too many ingredients in the appliance. | Clean the electrode or reduce the amount of food used. |
| E07 Abnormal | voltage. Make sure that the current voltage is lower than 160 V and higher than 260 V. Use a regulated power supply. | |
| E08 Abnormal | communication between main controller and driver. | Send the appliance to the local service department for repair and maintenance. |
| E09 Mixing | container is missing or not the correct container is placed. | Ensure the mixing container is installed on device. Use a dry grinding mixing container for the grinding function. |
| E10 Outlet valve | is blocked or blockage caused by foreign body. | Clean the outlet valve or turn off the appliance and send it to the local service department for repair and maintenance. |
| E11 Defective | temperature sensor. Send the appliance to the local service department for repair and maintenance. | |
| E12 Electric circuit of temperature sensor for mixing container defective. | Send the appliance to the local service department for repair and maintenance. | |
| E13 Failure of flow detection. Send the appliance to the local service department for repair and maintenance. | ||
| E14 Zero crossing signal loss Send the appliance to the local service department for repair and maintenance. | ||
| E15 Heating | time switch-off of the mixing vessel | Send the appliance to the local service department for repair and maintenance. |
| E16 Abnormal height detection Send the appliance to the local service department for repair and maintenance. | ||
| E17 Lower water electrode defective Send the appliance to the local service department for repair and maintenance. | ||
| E18 Upper water electrode defective Send the appliance to the local service department for repair and maintenance. | ||
DISPOSAL INSTRUCTIONS
natural_image
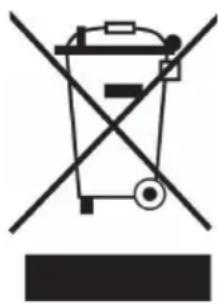
Symbol of a trash bin crossed with a diagonal line, no text or numbers presentIf there is a legal regulation in your country regarding the disposal of electrical and electronic equipment, this symbol on the product or on the packaging indicates that this product must not be disposed of with household waste. Instead, it must be taken to a collection point for the recycling of electrical and electronic equipment. By disposing of this product in accordance with the regulations, you protect the environment and the health of those around you from negative consequences. For information on recycling and disposal of this product, contact your local government or household waste disposal service.
MANUFACTURER & IMPORTER (UK)
Manufacturer:
Chal-Tec GmbH, Wallstraße 16, 10179 Berlin, Germany.
Importer for Great Britain:
Chal-Tec UK limited
Unit 6 Riverside Business Centre
Brighton Road
Shoreham-by-Sea
BN43 6RE
United Kingdom
Estimado cliente:
ÍNDICE
natural_image
Illustration of five different mechanical components or parts, including a pot, mug, cylinder, lid, and stacker (no text or symbols present)natural_image
Symbol of a trash bin crossed with a diagonal line, no text or numbers presentChal-Tec UK limited.
Unit 6 Riverside Business Centre
Brighton Road
Shoreham-by-Sea
BN43 6RE
Reino Unido
Cher client, chère cliente,
SOMMAIRE
natural_image
Five different types of electronic components or devices, including a capacitor, mug, cylinder, and stacker (no text or symbols visible)natural_image
Symbol of a trash bin crossed with a diagonal line, no text or numbers presentUnit 6 Riverside Business Centre
Brighton Road
Shoreham-by-Sea
BN43 6RE
Royaume Uni
Gentile Cliente,
INDICE
natural_image
Illustration of five different electronic components or devices, including a battery, mug, cylinder, lid, and stacker (no text or symbols present)natural_image
Symbol of a trash bin crossed with a diagonal line, no text or numbers presentPRODUTTORE E IMPORTATORE (UK)
Produttore:
Chal-Tec GmbH, Wallstraße 16, 10179 Berlino, Germania.
Unit 6 Riverside Business Centre
Brighton Road
Shoreham-by-Sea
BN43 6RE
Regno Unito

area
| Category | Value | |---|---| | 1 | 100 | | 2 | 100 | | 3 | 100 | | 4 | 100 | | 5 | 100 | | 6 | 100 | | 7 | 100 | | 8 | 100 | | 9 | 100 | | 10 | 100 | | 11 | 100 | | 12 | 100 | | 13 | 100 | | 14 | 100 | | 15 | 100 | | 16 | 100 | | 17 | 100 | | 18 | 100 | | 19 | 100 | | 20 | 100 | | 21 | 100 | | 22 | 100 | | 23 | 100 | | 24 | 100 | | 25 | 100 | | 26 | 100 | | 27 | 100 | | 28 | 100 | | 29 | 100 | | 30 | 100 | | 31 | 100 | | 32 | 100 | | 33 | 100 | | 34 | 100 | | 35 | 100 | | 36 | 100 | | 37 | 100 | | 38 | 100 | | 39 | 100 | | 40 | 100 | | 41 | 100 | | 42 | 100 | | 43 | 100 | | 44 | 100 | | 45 | 100 | | 46 | 100 | | 47 | 100 | | 48 | 100 | | 49 | 100 | | 50 | 100 | | 51 | 100 | | 52 | 100 | | 53 | 100 | | 54 | 100 | | 55 | 100 | | 56 | 100 | | 57 | 100 | | 58 | 100 | | 59 | 100 | | 60 | 100 | | 61 | 100 | | 62 | 100 | | 63 | 100 | | 64 | 100 | | 65 | 100 | | 66 | 100 | | 67 | 100 | | 68 | 100 | | 69 | 100 | | 70 | 100 | | 71 | 100 | | 72 | 100 | | 73 | 100 | | 74 | 100 | | 75 | 100 | | 76 | 100 | | 77 | 100 | | 78 | 100 | | 79 | 100 | | 80 | 100 | | 81 | 100 | | 82 | 100 | | 83 | 100 | | 84 | 100 | | 85 | 100 | | 86 | 100 | | 87 | 100 | | 88 | 100 | | 89 | 100 | | 90 | 100 | | 91 | 100 | | 92 | 100 | | 93 | 100 | | 94 | 100 | | 95 | 100 | | 96 | 100 | | 97 | 100 | | 98 | 100 | | 99 | 100 | | Note: The actual values in the 'Value' column are not provided in the code. I have used the label 'The Region' to represent the 'Region'. The values are estimated based on the provided code.
KLARSTEIN
- INHALTSVERZEICHNIS
- Dear customer,
- CONTENTS
- SAFETY INSTRUCTIONS
- APPLIANCE OVERVIEW
- CONTROL PANEL
- BEFORE FIRST USE
- WARNINGS / TIPS
- USE
- Preparation of a drink
- Timer / delay function
- FUNCTIONS
- Note for the soup
- BASIC RECIPES
- CLEANING
- CAUTION
- Remove residue from the mixing container
- Decalcifi cation
- DISPOSAL INSTRUCTIONS
- MANUFACTURER & IMPORTER (UK)
- Manufacturer:
- Importer for Great Britain:
- Estimado cliente:
- ÍNDICE
- Cher client, chère cliente,
- SOMMAIRE
- Gentile Cliente,
- INDICE
- PRODUTTORE E IMPORTATORE (UK)
- Produttore:
- KLARSTEIN
Brand : Klarstein
Model : Marcia
Category : Other kitchen appliances