
Master Jerky 32 - Other kitchen appliances Klarstein - Free user manual and instructions
Find the device manual for free Master Jerky 32 Klarstein in PDF.

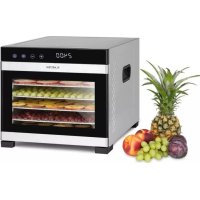
| Product Type | Food Dehydrator |
| Brand | Klarstein |
| Model | Master Jerky 32 |
| Article Number | 100 33212 |
| Power Supply | 220-240 V ~ 50/60 Hz |
| Temperature Range | 30-70 °C (estimated) |
| Timer | Yes, adjustable |
| Number of Trays | 32 (as per model name) |
| Tray Material | Food-grade plastic |
| Main Functions | Dehydration of meat, fruits, vegetables, flowers |
| Safety | Automatic shut-off, hot surface indicator, non-slip feet |
| Cleaning and Maintenance | Trays washable with soapy water, base wiped with a damp cloth |
| Spare Parts | Trays, door, power cable |
| Repairability | Repairs by qualified professional only |
| Dimensions (W x D x H) | Approx. 40 x 30 x 30 cm (estimated) |
| Weight | Approx. 5 kg (estimated) |
| General Information | Indoor use only, well-ventilated |
Frequently Asked Questions - Master Jerky 32 Klarstein
User questions about Master Jerky 32 Klarstein
0 question about this device. Answer the ones you know or ask your own.
Ask a new question about this device
Download the instructions for your Other kitchen appliances in PDF format for free! Find your manual Master Jerky 32 - Klarstein and take your electronic device back in hand. On this page are published all the documents necessary for the use of your device. Master Jerky 32 by Klarstein.
USER MANUAL Master Jerky 32 Klarstein
Congratulations on purchasing this equipment. Please read this manual carefully and take care of the following hints to avoid damages. Any failure caused by ignoring the items and cautions mentioned in the instruction manual is not covered by our warranty and any liability. Scan the QR code to get access to the latest user manual and other information about the product

CONTENT
Safety Instructions 22
Product Overview 24
General Operation 25
Food Safety 27
Recipes and Drying Methods 29
Tips 34
Cleaning and Care 36
Troubleshooting 36
Hints on Disposal 38
TECHNICAL DATA
| Item number 10033213 | |
| Power supply 220-240 V ~ 50/60 Hz |
DECLARATION OF CONFORMITY

Producer:
Chal-Tec GmbH, Wallstraße 16, 10179 Berlin, Germany.
This product is conform to the following European Directives:
2014/30/EU (EMC)
2014/35/EU (LVD)
2011/65/EU (RoHS)
2009/125/EC (ErP)
SAFETY INSTRUCTIONS
- Read all the safety and operating instructions carefully and retain them for future reference.
- Do not operate this appliance on a flammable material such as a wood surface or on any tablecloth.
- Do not use the appliance on a heat-sensitive ceramic hob or cutting board. Use the unit only on a heat-resistant surface that is at least as large as the unit. This prevents the pad from being damaged by heat generated during operation.
- Before using the dehydrator, check that all parts are operating properly and perform their intended functions. Check for any conditions that may affect the unit operation. Do not use if the power cord is damaged or frayed.
- Always disconnect dehydrator from power source before servicing, changing accessories, displacing or cleaning unit. Unplug dehydrator when not in use.
- Keep children away. Never leave the appliance unattended. Monitor dehydrators while in use.
- Manufacturer declines any responsibility in case of improper use of dehydrator. Improper use of dehydrator will void warranty.
- Electrical repair must be done by authorized service centre. Use only factory original parts and accessories. Modification of dehydrator voids warranty. Never open rear panel of dehydrator. Never remove back screen from dehydrator.
- Dehydrator. If extension cord is used be sure the marked electrical rating is at least as great as the electrical rating of this appliance.
- Be sure dehydrator is stable during use. All four feet should be secure on a level surface. Dehydrator should not move during operation.
- Do not operate dehydrator outdoors or near any flammable or combustible materials. Indoor use only. Not for commercial use.
- Use in a well ventilated location. Do not block air vents on door or at rear of dehydrator. Keep dehydrator at least (30~cm) away from any wall to allow for proper air circulation.
- Do not operate dehydrator on flammable surfaces such as carpeting.
- To prevent electric shock. Do not immerse unit and control panel in water or liquid. Serious injury from electric shock could result. Do not use appliance with wet hands or bare feet. Do not operate near running water.
- Disconnect from power outlet before cleaning components. Read all instructions before cleaning dehydrator.
-
After cleaning, make sure dehydrator is completely dry before reconnecting to the power outlet - if not; electric shock may result.
-
Do not use appliance for other than intended use.
- If appliance malfunctions during use, shut down unit immediately and discontinue use. Do not attempt to open control panel. This product has no user-serviceable parts. Always contact authorized service centre if unit malfunctions or for service. Only use accessories approved by the manufacturer. All parts for this appliance must be used according to instruction manual. Only use accessories approved by the manufacturer. Other parts may not be used with this unit and will void the warranty.
CAUTION
Risk of burns! Do not place or use the unit or any parts on or near hot gas or electric burner, in a heated oven, or on stove top. Do not let power cord hang over edge of table or counter or touch any hot surfaces.
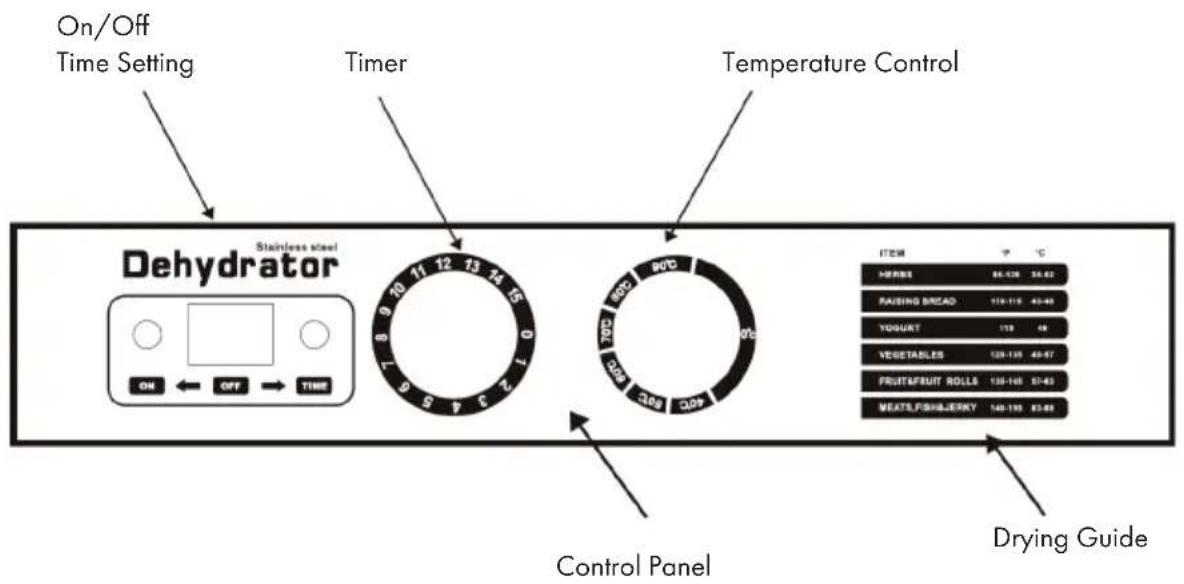
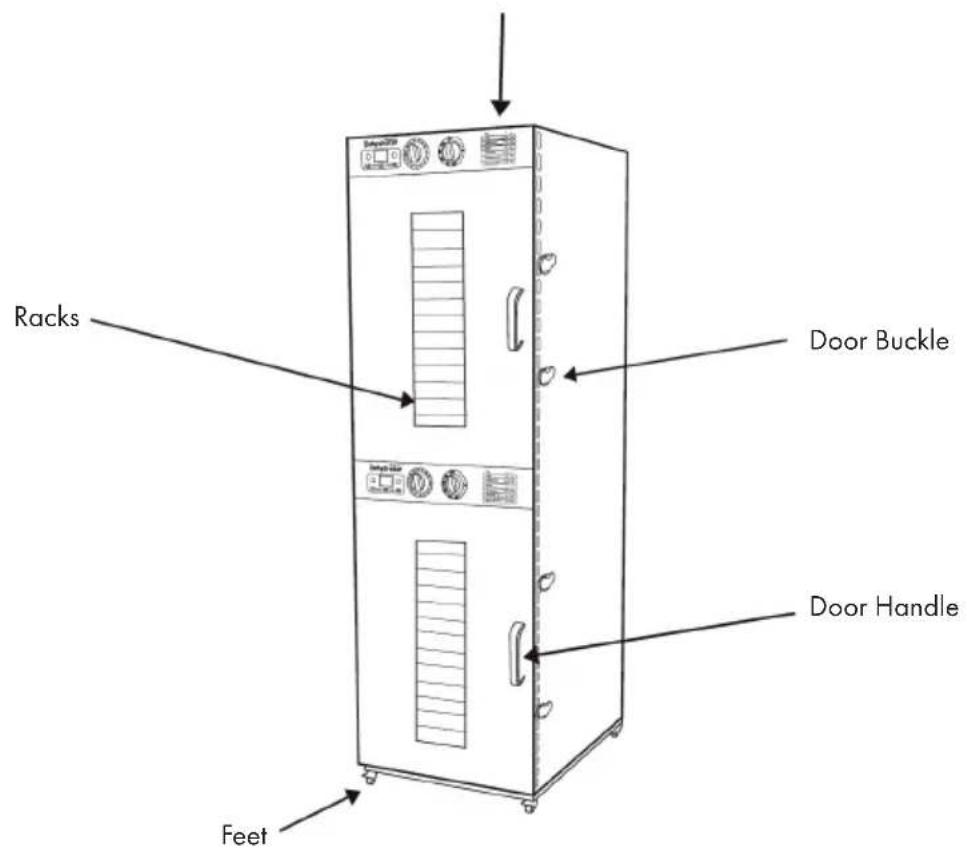
PRODUCT OVERVIEW
GENERAL OPERATION
Preparation
- In a small glass bowl, combine all of the ingredients except the meat /poultry. Mix thoroughly.
- Place a layer of meat /poultry into a glass baking dish, spoon sauce mixture over each layer.
- Repeat until meat/poultry is 3-4 layers deep in the pan.
- Cover tightly and marin ate for 6-12 hours in the refrigerator or overnight. Stir occasionally to keep the meat/poultry coated in marinade. The longer the meat/ poultry stays in the marinade, the more flavor will be absorbed into it.
- Remove the meat /poultry from the marinade, removing excess marinade.
- Lay the meat/poultry evenly onto the dehydrator racks, leaving 1/4'' (0.6 cm) space between each strip of meat/poultry.
- Dry meat/poultry at 145 - 150^ (63-66 °C) for 4-7 hours or until thoroughly dry.
Note: Check the temperature of the automatic dryer with an oven thermometer before drying dried meat. The minimum recommended temperature for drying meat is 63^ . Temperatures below 63^ are not recommended.
Before placing the meat in a dehydrator, it is strongly recommended to heat the meat to 71^ before drying. This step ensures that all bacteria present are destroyed by wet heat. After heating to 70^ , maintain a constant drying temperature of 55 - 60^ during the drying process. You may occasionally need to remove drops of fat from the surface of the meat with a paper towel. Drying times may vary due to many circumstances, including but not limited to: the relative humidity of the room, the temperature of the meat at the beginning of the drying process, the amount of meat in the dryer, the leanness of the meat, etc. Always allow the dried meat to cool before testing the taste.
Start and Operation
Note: It is important to monitor the dehydrating device during operation. Never leave the dehydrator unattended. Read and understand all instructions and warnings before using this appliance. Only use the appliance in well-ventilated rooms. Do not block the ventilation openings on the back or door of the dehydrating appliance.
- Place the automatic dryer on a clean, dry surface.
- Set the on/off switch and the timer button to the desired position.
- Insert the plug into the socket.
4 Place the dryer at least 30.5Cm from a wall to ensure sufficient air circulation. Do not block the ventilation openings on the back or on the door of the dehydrator. 5.
5 Remove the slots from the dehydrator. Load the trays with the products to be dried. Position the individual parts so that they do not touch each other. Do not overlap the food and do not let them touch you. Ensure that there is sufficient clearance between the products to ensure sufficient air circulation. Remove excess water from the food. (This can be done by dabbing the food with a paper towel or napkin). Excess moisture can cause the temperature of the dehydrating appliance to drop. 6. - Set the operating switch to ON or TIME.
7 Turn the temperature control knob to the desired temperature setting. It is recommended that you insert an oven thermometer (not supplied) into the dryer to monitor the temperature setting. Adjust the temperature controller as required. 8.
8 Set the timer button to the desired drying time. If you wish to continue operating the automatic dryer, press the on button. - Preheat the dryer for 5-10 minutes before sliding the grids into the dryer.
- Install the door on the dryer by attaching the door to the tab on the top of the housing. Make sure that the sides of the door are closed and firmly attached to the cabinet.
- Water droplets may form on the surface of some products during drying. These can be removed by dabbing the product with a clean towel or paper towel. Be careful, the drying machine will get hot!
Note: Drying times may depend on various factors including relative humidity, air temperature and product thickness, temperature and fat content. The actual temperature of the dryer is based on the ambient temperature of 21^ . If the dryer is not used at an ambient temperature of 21^ , the temperature displayed on the temperature controller may not be reached or exceeded.
FOOD SAFETY
There are basic rules that must be observed when handling food:
Cooking
It is important to cook certain foods before dehydration in order to destroy the existing bacteria. The safety of hamburgers and other minced meat foods has recently been taken very seriously for good reason. When meat is ground, the bacteria present on the surface are mixed in the entire ground mixture. If this minced meat is not cooked at at least 71^ to 74^ , the bacteria will not be destroyed and there is an increased chance that you will get sick.
Solid pieces of meat such as steaks and chops do not contain any dangerous bacteria inside, so they can be eaten a little more bloody. Nevertheless, each piece of meat should be cooked/roasted at a temperature of at least 63^ . The safe temperature for poultry is 82^ , and solid pieces of pork should be heated to 71^ . Eggs should also be boiled completely. If you are preparing a meringue or other recipe with uncooked eggs, buy special pasteurized eggs or use a meringue powder.
Separating
Food eaten uncooked and food cooked before eating must always be separated. Cross-contamination occurs when raw meat or eggs come into contact with food that is eaten uncooked. This is one of the main causes of food poisoning. Always wrap raw meat twice and place it at the lowest level in the refrigerator to prevent meat juices or blood from dripping on fresh products. Then consume the raw meat within 1-2 days of purchase or freeze it for longer periods of storage. Defrost frozen meat in the refrigerator, not on the countertop.
When grilling or cooking raw meat or fish, make sure that the cooked meat is placed on a clean plate. Do not use the same plates that were used to grill the food. Wash the utensils used for grilling immediately after grilling.
Make sure that you wash your hands after handling raw meat or eggs. Washing your hands with soap and water or using damp antibacterial wipes is essential after touching raw meat or eggs. Unwashed hands and surfaces are a major cause of cross-contamination when cooking.
Cleaning
When cooking, clean hands and work surfaces several times. Wash your hands with soap and warm water for at least 15 seconds, then dry them.
Cooling
Cooling food is very important. The risk areas in which bacteria can multiply are between 4 - 6^ . Your refrigerator should be set to 4^ or lower. The freezer should be set to -17^ or lower. Simple rule: Serve hot food hot, cold food cold. Use a hot plate to keep food warm before serving. Use ice water baths to keep cold food cold. Never leave food at room temperature for more than 2 hours.
Note: Special care must be taken when processing venison or other game, as it can become heavily contaminated during field processing. Game meat is often transported uncooled at temperatures that promote bacterial growth.
Stooring Jerky
Wrap dried meat in aluminium foil and store in a thick plastic bag or in a glass with a solid lid. Avoid storing in plastic containers or bags without wrapping them in aluminium foil or waxed paper. Dried meat should be stored in a dark, dry place at a temperature between 10 - 16^ . You can store dried meat at room temperature for 1 to 2 months. To extend the shelf life up to 6 months, store dried meat in the freezer. Be sure to mark and date all packages.
RECIPES AND DRYING METHODS
Hawaiian Jerky Marinade
| 1 tsp salt 1 tsp ginger \( \frac{1}{4} \) cut | pineapple | |
| 1 tsp brown sugar \( \frac{1}{4} \) tsp pepper | per \( {}^{1/8} \) tsp cayenne pepper | |
| 1 rushed garlic clove \( \frac{1}{4} \) cup | soy sauce | |
| 1 lb. (0.5 kg) lean Meat, sliced into \( {}^{1/8} \) to \( {}^{1/4} \) inch (0.3-0.6 cm) thin strips. | ||
Cajun Jerky Marinade
| 1 cup tomato juice 1/2 tsp garlic powder 1/2 tsp ground black pepper |
| 1-1/2 tsp dried thyme 1-1/2 tsp dried basil 1-1/2 tsp onion pepper |
| 1 tsp white pepper 2 cayenne pepper |
| 1 lb. (0.5 kg) lean Meat, sliced into 1/8 to 1/4 inch (0.3-0.6 cm) thin strips. |
Hot Jerky Marinade
| 1/3 cup teriyaki sauce 2 tsp | brown sugar 2 tsp ground black pepper | |
| 1 tsp ground horseradish 1 | tsp salt 1/2 tsp paprika | |
| 1/2 tsp chili powder 1 tbsp olive oil 1 tbsp minced garlic | ||
| 1/4 tsp tabasco sauce 2 tbsp | seeded & finely chopped jalapeño peppers | |
| 1 lb. (0.5 kg) lean Meat, sliced into 1/8 to 1/4 inch (0.3-0.6 cm) thin strips. | ||
Burgundy Jerky Marinade
Turkey Jerky Marinade
| 2 cups burgundy wine 1/3 cup soy sauce 3 cloves garlic,chopped |
| 3 tbsp molasses syrup 1 tbsp ground black pepper |
| 1 lb. (0.5 kg) lean Meat, sliced into 1/8 to 1/4 inch (0.3-0.6 cm) thin strips. |
| 1/4 cup soy sauce 1 tbsp fresh lemon juice 1/4 tsp powdered garlic |
| 1/4 tsp pepper 1/8 tsp ginger |
| 1 1/2 lb. (0.7 kg) Turkey Breast, sliced into 1/8 to 1/4 inch (0.3-0.6 cm) thin strips. |
Venison Jerky Marinate
| 1/4 cup soy sauce 1 tbsp brown sugar 1 tsp Salt | ||
| 1/2 tsp minced garlic | 1/2 tsp ground black pepper | |
| 1 lb. (0.5 kg) venison, sliced into 1/8 to 1/4 inch (0.3-0.6 cm) thin strips. | ||
Fruit Rolls
- Choose ripe or slightly overripe fruits. Wash and remove blemishes, holes and peelings. 2.
- Puree in a blender. Add yoghurt, sweeteners or spices as desired. The puree should be thick in consistency. 3.
- Place a cling film on the slots of the dehydrator.
- Pour 1 - 12 to 2 cups of puree onto the covered trays. Carefully insert the shelves into the automatic dryer. 5.
- The edges dry faster than the middle of the fruit rolls, pour the puree thinner into the middle of the tray.
- The average drying time for the fruit rolls is 4-6 hours.
- When the fruit rolls are shiny and not sticky, remove them from the dryer and let them cool.
- Remove the fruit roll from the cling film and roll it into cylinders.
Drying Flowers and Handicrafts
The flowers should be dry from the start, preferably after the dew has dried and before moisture enters at night. Dry the flowers as soon as possible after picking.
The best condition for drying flowers is a dry, warm, dark, clean and well ventilated room, which makes a drying machine an ideal tool. Flowers retain their best colour and shape when dried quickly.
- To preserve the natural oils, a low temperature should be used.
- Remove the leaves or keep the leaves. Dispose of brown or damaged leaves.
- Place them in a single layer on a slot of the drying machine and avoid overlapping.
- Drying times vary considerably depending on the size of the flower and the amount of leaf. Drying at 38^ .
- Dough art and pearls can be dried in the drying machine. The temperatures vary.
Selection of food
- Use the highest quality food. Fruit and vegetables in high season have more nutrients and a better taste. Meat, fish and poultry should be lean and fresh.
- Do not use food with bruises or impurities. Bad fruit and vegetables can spoil the entire batch.
- Always use lean meat. Remove as much fat as possible before drying. NOTE: When dehydrating, use a paper towel under the meat to collect fat.
Food Pretreatment
As with most cooking methods, proper preparation is critical to successful results. Adhering to some basic guidelines will greatly improve the quality of your dried food and shorten the time required for drying.
Pre-treated foods often taste better and look better than untreated foods. There are several ways to prepare food to prevent oxidation that discolors apples, pears, peaches and bananas during drying:
- Remove all seeds, shells or branches.
- Crush, slice or dice the food evenly. The slices should be between 0.6cm and 1.9 cm thick. The meat should not be cut thicker than 0.5cm .
- Steam or fry meat at 71^ and poultry at 74^ , where the temperature can be measured with a food thermometer before dehydration.
- The temperature of the drying machine must be maintained at 55 - 60^ throughout the drying process.
- Drying fish into dried meat requires a lot of attention. This must be thoroughly cleaned and deboned and thoroughly rinsed to ensure that all blood is washed out. Steam or bake the fish at 93^ until it is leafy before drying.
- Soak the chopped fruit in lemon or pineapple juice for a few minutes and then place on the trays.
- Use an ascorbic acid mixture that is available in most health food stores or pharmacies. It can be available in both powder and tablet form. Dissolve about 2-3 tablespoons in 1 litre of water. Soak the slices of fruit in the solution for 2-3 minutes, then place them on the slots of the dehydrating device.
-
Fruits with wax coating (figs, peaches, grapes, blueberries, plums, etc.) should be dipped in boiling water to remove the wax. This makes it very easy for moisture to escape during drying.
-
Blanching can pre-treat food for dehydration. Blanching does not destroy helpful enzymes and helps to preserve nutrients. There are two ways to blanch food:
Blanching In water: Use a large pan, fill it halfway with water. Bring water to the boil. Put the food directly into boiling water and cover with a lid. Remove after three minutes. Arrange the food on the trays.
Steam blanching: Bring 5 - 7cm of water to the boil with the steam pot in the lower part. Place the food in the steam basket and steam for 3-5 minutes. Remove steamed food and arrange on the shelves for drying.
Preparation of Dried Meat
Your meat should be as lean as possible. The use of lean meat helps the meat dry faster and facilitates cleaning by reducing grease stains. Minced meat should be 80% to 90% lean. Minced turkey, game, buffalo and elk are other excellent options for dried meat.
Dehydrated meat spices are available for every taste, or you can get creative and make your own. Whenever you prepare dried meat, you should add a hardener (sodium nitrite) to the mixture. This application helps to prevent botulism when drying at low temperatures. Follow the manufacturer's instructions on the packaging.
Keep raw meat and its juices away from other foods. Marinate the meat in the refrigerator. Do not leave the meat unchilled. Prevent cross-contamination by storing dried dried meat separately from raw meat. Always wash your hands thoroughly with soap and water before and after preparing meat products. Use clean appliances and kitchen utensils.
Keep meat and poultry chilled at 5^ or slightly below; use or freeze minced meat and poultry within 2 days; process red meat within 3 to 5 days. Defrost frozen meat in the refrigerator, not on the kitchen worktop.
Special care must be taken when processing venison or other game, as it can be heavily contaminated during field processing. Game meat is often kept at temperatures that could help bacteria to grow, e.g. during transport.
If you are using a dryer, check the temperature of the dryer with a thermometer before drying the meat. The recommended minimum temperature for drying meat is 63^ Temperatures below 63^ are not recommended.
Note: It is strongly recommended to heat the meat to 71^ before placing it in a dehydrator before the drying process. This step ensures that all bacteria present are destroyed by wet heat. After heating to 70^ , maintain a constant drying temperature of 55 - 60^ during the drying process, as the process must be fast enough to dry food before it spoils and remove as much water as possible to prevent microorganisms from growing.
If you use a marinade, shake off excess liquid before placing the meat in evenly distributed individual layers at a distance of approx. 0.64cm from the trays of the dehydrator.
Dry the meat at 63 - 66^ for 4-7 hours. You may occasionally need to remove drops of fat from the surface of the meat with a paper towel. Drying times can vary due to many circumstances, including but not limited to: the relative humidity of the room, the temperature of the meat at the beginning of the drying process, the amount of meat in the dryer, the leanness of the meat, etc. Always allow the dried meat to cool before testing the taste.
TIPS
- Do not overlap the food. Place the food flat on the slots of the drying machine.
- Check the dryness after 6 hours, then every 2 hours until the dried food is crunchy, smooth or leathery, depending on the product.
- Check the foods to make sure they are completely dry before removing them. Open or cut half of some samples to check for internal dryness. If the food is still wet, allow it to dry longer.
- Label each container with the name of the food, the date or drying time and the original weight. Keep a protocol to improve the drying techniques.
-
Proper storage is essential to obtain high quality food. Pack the food after it has cooled down. Food can be stored longer if it is stored in a cool, dark and dry place. The ideal storage temperature is 16^ or lower.
-
Place dried food in plastic freezer bags before storing in metal or glass containers. Remove as much air as possible before sealing.
Vacuum sealing is ideal for storing dried foods. - Remember that foods shrink to their original size and weight during the dehydration process at 14 to 12 for example, so the pieces should not be cut too small. One pound of raw meat makes about 0.2kg of dried meat.
- Use the drying process instructions on the control panel as a guide to the correct temperature setting. If the heat is set too high, food may harden and dry from the outside but be moist from the inside. If the temperature is too low, the drying time will be longer.
Rehydration
Although it is not necessary to rehydrate the dried food before consumption, it can have advantages. Vegetables, for example, can be used well as a side dish or in recipes after it has been prepared in the following way.
- The dried foods can be rehydrated by soaking in cold water for 3-5 minutes. Use 1 cup of water for 1 cup of dried food. After rehydration the food can be cooked normally. Soaking food in warm water accelerates the process, but can lead to a loss of taste.
- Drained fruit and vegetables should be soaked in cold water in the refrigerator for 2-6 hours.
Note: Soaking at room temperature allows harmful bacteria to grow.
- Do not add spices. Adding salt or sugar during rehydration can change the taste of the food.
To make compote or vegetable balls, add 2 cups of water and simmer. - Take dehydrated food as soon as possible after opening the storage container, keep all unused portions in the refrigerator to avoid contamination.
CLEANING AND CARE
Note: Before cleaning or servicing the dehydrator, make sure that the mains plug is disconnected and the mains switch is set to OFF.
- Clean the slots and the inside of the housing before using the dryer for the first time and after each use.
- Turn the power switch and the timer knob to the OFF position. Unplug the power cord from the wall outlet.
- Allow the dryer to cool completely before cleaning.
- Remove the racks from the dryer.
- Wipe the drying cabinet with a damp sponge or washcloth (inside and outside). Be careful, the edges can be sharp! Do not splash water on the heating element (behind the screen in the cabinet on the back). Water can damage the electrical components and increases the risk of electric shock. Do not immerse the unit in water.
- Clean the shelves of the dehydrating device with warm, soapy water. Rinse with clear water and dry immediately.
TROUBLESHOOTING
Moisture In The Container
CAUSE:
Incomplete Drying. Food cut unevenly, thus incomplete drying.
Dried foods left at room temperature too long after cooling, moisture has re-entered the foods.
PREVENTION:
Test food for dryness before removing from the dehydrator. Cut foods evenly. Cool quickly and package immediately.
Mold On Food
CAUSE:
Incomplete dryingre content. Foof not checked for moisture content within a week.
Storage container not air-tight. Storage temperature too warm/ moisture in food. Case hardening may have occurred, meaning the food was dried at too high of temperature and food was dried on the outside but not completed dried on the inside.
PREVENTION:
Test several food pieces for dryness. check the storage container within 1 week for moisture, then redry food if needed. use air-tight containers for storage. Store foods in cool areas that are 70^(21^) or below. Dry foods at appropriate temperatures/use the drying guide for reference.
Brown spots on vegetables
CAUSE:
Too high of drying temperature used. Vegetables were over-dried.
PREVENTION:
Dry foods at appropriate temperatures/use the drying guide for reference. Check foods often for dryness.
Food sticking to the racks
CAUSE:
Food not being turned over.
PREVENTION:
After one hour of dehydrating, use a spatula and flip the foods.
HINTS ON DISPOSAL
According to the European waste regulation 2012/19/EU this symbol on the product or on its packaging indicates that this product may not be treated as household waste. Instead it should be taken to the appropriate collection point for the recycling of electrical and electronic equipment. By ensuring this product is disposed of correctly, you will help prevent potential negative consequences for the environment and human health, which could otherwise be caused by inappropriate waste handling of this product. For more detailed information about recycling of this product, please contact your local council or your household waste disposal service.
Estimado cliente:
Chere cliente, cher client,
- CONTENT
- TECHNICAL DATA
- DECLARATION OF CONFORMITY
- SAFETY INSTRUCTIONS
- CAUTION
- PRODUCT OVERVIEW
- GENERAL OPERATION
- Preparation
- Start and Operation
- FOOD SAFETY
- Cooking
- Separating
- Cleaning
- Cooling
- Stooring Jerky
- RECIPES AND DRYING METHODS
- Hawaiian Jerky Marinade
- Cajun Jerky Marinade
- Fruit Rolls
- Drying Flowers and Handicrafts
- Selection of food
- Food Pretreatment
- Preparation of Dried Meat
- TIPS
- Rehydration
- CLEANING AND CARE
- TROUBLESHOOTING
- Moisture In The Container
- Mold On Food
- Brown spots on vegetables
- Food sticking to the racks
- HINTS ON DISPOSAL
- Estimado cliente:
- Chere cliente, cher client,
Brand : Klarstein
Model : Master Jerky 32
Category : Other kitchen appliances