
Sub Tour 40 - Electric bike SCOTT - Free user manual and instructions
Find the device manual for free Sub Tour 40 SCOTT in PDF.

| Brand | Scott |
| Model | Sub Tour 40 |
| Product Type | Electric bike |
| Category | City / trekking bike |
| Battery | Lithium-Ion, 36 V, capacity from 400 to 800 Wh depending on version (PowerTube / PowerPack) |
| Range | Varies depending on battery capacity and usage conditions |
| Motor | Bosch Drive Unit (smart system generation) |
| Assistance | Multiple modes (Eco, Tour, Sport, Turbo) |
| Weight (approx.) | Approximately 25 kg depending on equipment |
| Charger | Original Bosch charger (smart system generation) |
| Charging time | Approximately 4 to 6 hours depending on capacity |
| Battery operating temperature | -5 °C to +40 °C |
| Charging temperature | 0 °C to +40 °C |
| Battery protection rating | IP55 |
| Frame material | Aluminum (estimate) |
| Transmission | Chain |
| Brakes | Disc brakes (estimate) |
| Suspension | Suspension fork (depending on version) |
| Equipment | Rack, lighting, mudguards (depending on version) |
| Maintenance | Clean with a soft damp cloth, avoid high-pressure cleaner |
| Safety | Do not open the battery, use only original Bosch chargers |
| After-sales service | Contact an authorized Scott or Bosch dealer |
| Warranty | Consult the manual or the dealer |
Frequently Asked Questions - Sub Tour 40 SCOTT
User questions about Sub Tour 40 SCOTT
0 question about this device. Answer the ones you know or ask your own.
Ask a new question about this device
Download the instructions for your Electric bike in PDF format for free! Find your manual Sub Tour 40 - SCOTT and take your electronic device back in hand. On this page are published all the documents necessary for the use of your device. Sub Tour 40 by SCOTT.
USER MANUAL Sub Tour 40 SCOTT
natural_image
Five black rectangular electronic components arranged in a row, no visible text or symbols.natural_image
White electronic device with attached cable and connector, labeled (18) pointing to its body (no text or symbols on the device itself)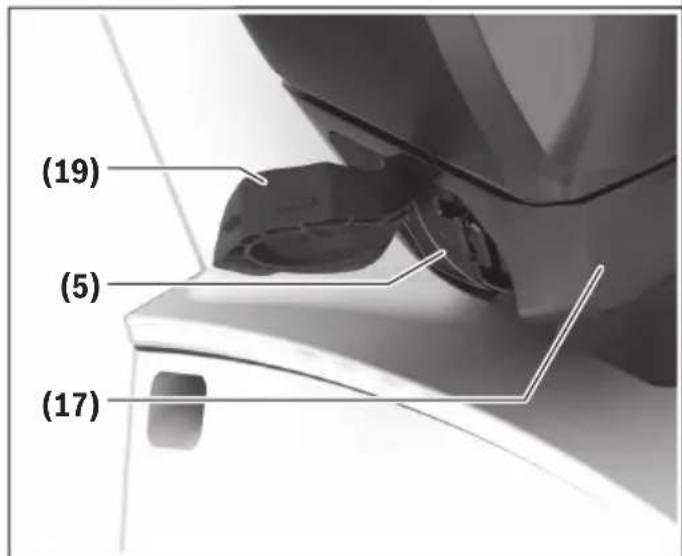


PP400/500

natural_image
Close-up of a mechanical component with a curved base and a circular opening, showing internal features (no text or symbols visible)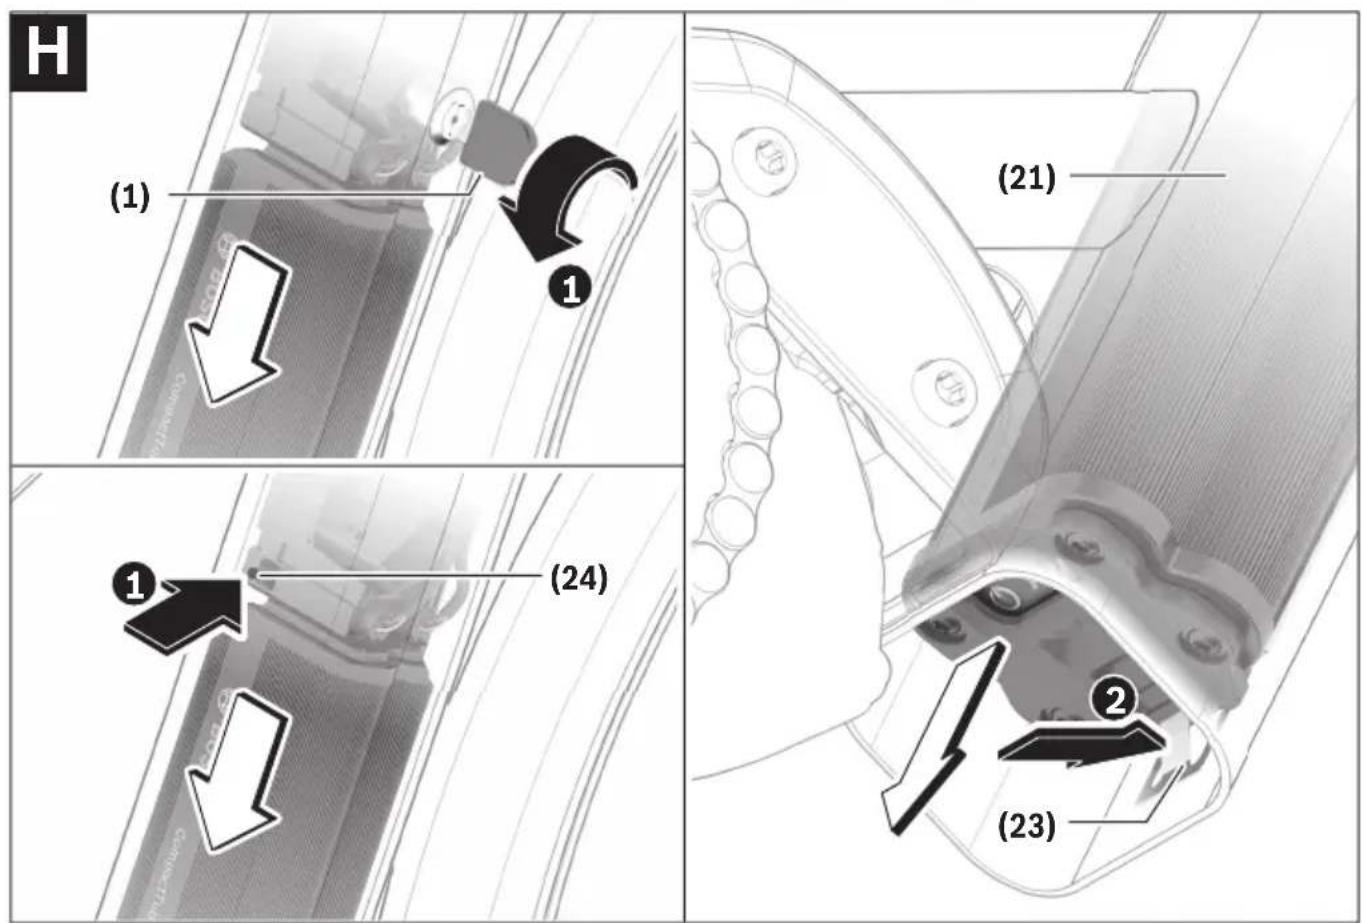
Sicherheitshinweise


Read all the safety and general instructions. Failure to observe the safety and general instructions may result in electric shock,
fire and/or serious injury.
The contents of lithium-ion battery cells are flammable under certain conditions. You must therefore ensure that you have read and understood the rules of conduct set out in these operating instructions.
Save all safety warnings and instructions for future reference.
The term eBike battery is used in these instructions to mean all original Bosch eBike rechargeable battery packs from the system generation the smart system.
The terms drive and drive unit used in these operating instructions refer to the original Bosch drive units from the system generation the smart system.
The term charger is used in these instructions to mean all original Bosch chargers from the system generation the smart system.
Read and observe the safety warnings and instructions contained in all the operating instructions for the eBike components and in the operating instructions of your eBike.
Remove the eBike battery from the eBike before beginning work (e.g. inspection, repair, assembly, maintenance, work on the chain, etc.) on the eBike. With built-in eBike batteries, please take particular precautions so that the eBike cannot be switched on. There is a risk of injury if the eBike is accidentally activated.
▶ You must not remove built-in eBike batteries yourself. Have an authorised bicycle retailer install and remove built-in eBike batteries for you.
▶ Do not open the eBike battery. There is a risk of short-circuiting. Opening the eBike battery voids any and all warranty claims.
▶ Protect the eBike battery against heat (e.g. prolonged sun exposure), fire and from being submerged in water. Do not store or operate the eBike battery near hot or flammable objects. There is a risk of explosion.
When the eBike battery is not in use, keep it away from paper clips, coins, keys, nails, screws or other small metal objects that could make a connection from one terminal to another. A short circuit between the terminals may cause burns or a fire. Short circuit damage which occurs in this instance voids any and all warranty claims against Bosch.
- Avoid mechanical loads and exposure to high temperatures. These can damage the battery cells and cause the flammable contents to leak out.
▶ Do not use the rack-mounted battery as a handle. Lifting the eBike up by the battery can damage the battery.
▶ Do not place the charger or the eBike battery near flammable materials. Ensure the eBike battery is completely dry and placed on a fireproof surface before charging. There is a risk of fire due to the heat generated during charging.
The eBike battery must not be left unattended while charging.
▶ If used incorrectly, the eBike battery may leak fluid; avoid contact. If contact occurs, rinse off with water. If the fluid comes into contact with your eyes, seek medical attention. Fluid ejected from the battery may cause skin irritation or burns.
▶ eBike batteries must not be subjected to mechanical shock. There is a risk of the eBike battery being damaged.
The eBike battery may give off fumes if it becomes damaged or is used incorrectly. Ensure the area is well ventilated and seek medical attention should you experience any adverse effects. The fumes may irritate the respiratory system.
▶ Only charge the eBike battery using an original Bosch charger from the system generation the smart system. When using chargers made by other manufacturers, the risk of fire cannot be excluded.
▶ Do not charge or use eBike batteries if they are damaged. Contact an authorised bicycle dealer.
▶ Use the eBike battery only in conjunction with eBikes from the system generation the smart system. This is the only way in which you can protect the eBike battery against dangerous overload.
▶ Use only original Bosch eBike batteries from the system generation the smart system, which the manufacturer has approved for your eBike. Using other eBike batteries can lead to injuries and pose a fire hazard. Bosch accepts no liability or warranty claims if other eBike batteries are used.
▶ Keep the eBike battery away from children.
The safety of both our customers and our products is important to us. Our eBike batteries are lithium-ion batteries which have been developed and manufactured in accordance with the latest technology. We comply with or exceed the requirements of all relevant safety standards. When charged, lithium-ion batteries contain a high level of energy. If a fault occurs (which may not be detectable from the outside), in very rare cases and under unfavourable conditions, lithium-ion batteries can catch fire.
Privacy notice
When you connect the eBike to the Bosch DiagnosticTool 3 or replace eBike components, technical information about your eBike (e.g. manufacturer, model, bike ID, configuration data) and the eBike usage (e.g. total riding time, energy consumption, temperature) is transferred to Bosch eBike Systems (Robert Bosch GmbH) for the purposes of processing your inquiry, servicing and product improvement. You can find further information about data processing at www.bosch-ebike.com/privacy-full.
Product description and specifications
Intended Use
The Bosch eBike batteries from the system generation the smart system are intended exclusively for the power supply of your drive unit from the system generation the smart system and must not be used for any other purpose.
Product features
The numbering of the components shown refers to the illustrations on the graphics pages at the beginning of the manual.
All representations of bicycle parts, apart from the eBike batteries and their holders, are schematic and may differ from those on your own eBike.
In addition to the functions shown here, changes to software relating to troubleshooting and functional modifications may be introduced at any time.
(1) Key for the battery lock
(2) Battery lock
(3) PowerTube battery safety hook
(4) PowerTube battery (pivot)
(5) Socket for charging connector
(6) Status/battery charge indicator
(7) On/off button
(8) PowerTube battery safety restraint
(9) Locking mechanism
(10) Pull strap
(11) Guide rail
(12) PowerTube battery (axial)
(13) Upper holder for PowerTube (axial)
(14) Upper holder for PowerPack battery
(15) PowerPack battery
(16) Lower holder for PowerPack battery (socket without charging option)
(17) Lower holder for PowerPack battery (socket with charging option)
(18) Charger
(19) Charging socket cover
(20) CompactTube battery (pivot)
(21) CompactTube battery (axial)
(22) Safety restraint
CompactTube battery (pivot)
(23) Safety restraint
CompactTube battery (axial)
(24) CompactTube unlocking element ^a)
(25) CompactTube holding element
(26) Rack-mounted battery holder
(27) Rack-mounted battery
a) Designs may vary
Technical data
| Li-ion battery CompactTube 400 PowerTube 500 PowerTube 600 | ||||
| Product code Hori- | zontal | BBP3240 | BBP3750 | BBP3860 |
| BBP3242 | ||||
| Product code Ver- | tical | BBP3241 | BBP3751 | - |
| BBP3242 | ||||
| Rated voltage V 36 36 36 | ||||
| Nominal capacity Ah 11.1 13.4 16.7 | ||||
| Energy Wh 400 500 600 | ||||
| Operating temperature °C -5 to +40 -5 to +40 -5 to +40 | ||||
| Storage temperature | °C | +10 to +40 | +10 to +40 | +10 to +40 |
| Permitted charging temperature range | °C | 0 to +40 | 0 to +40 | 0 to +40 |
| Weight, approx. kg | 2.0 | 3.0 | 3.0 | |
| Protection rating | IP55 | IP55 | IP55 | |
| Li-ion battery | PowerTube 625 PowerTube 750 PowerTube 800 | |
| Product code Hori- | zontal | BBP3760 BBP3770 BBP3880 |
| Product code Ver- | tical | BBP3761 BBP3771 BBP3881 |
| Rated voltage V 36 36 36 | ||
| Nominal capacity Ah 16.7 20.1 22.2 | ||
Li-ion battery PowerTube 625 PowerTube 750 PowerTube 800
| Energy Wh 625 750 800 | |
| Operating temperature °C -5 to +40 -5 to +40 -5 to +40 | |
| Storage temperature °C +10 to +40 +10 to +40 +10 to +40 | |
| Permitted charging temperature range °C 0 to +40 0 to +40 0 to +40 | |
| Weight, approx. kg 3.6 4.3 3.9 | |
| Protection rating IP55 IP55 IP55 |
| Li-ion battery PowerPack | Frame 400 | PowerPack Frame 545 | PowerPack Frame 725 | PowerPack Frame 800 | |
| Product code | BBP3540 | BBP3551 | BBP3570 | BBP3580 | |
| Rated voltage | V | 36 | 36 | 36 | 36 |
| Nominal capacity | Ah | 11.1 | 14.4 | 19.2 | 22.2 |
| Energy | Wh | 400 | 545 | 725 | 800 |
| Operating temperature | °C | -5 to +40 | -5 to +40 | -5 to +40 | -5 to +40 |
| Storage temperature | °C | +10 to +40 | +10 to +40 | +10 to +40 | +10 to +40 |
| Permitted charging temperature range | °C | 0 to +40 | 0 to +40 | 0 to +40 | 0 to +40 |
| Weight, approx. | kg | 2.2 | 3.0 | 3.8 | 3.9 |
| Protection rating | IP55 | IP55 | IP55 | IP55 | |
| Li-ion battery | PowerPack Rack 400 | PowerPack Rack 500 | |
| Product code | BBP3340 | BBP3350 | |
| Rated voltage | V | 36 | 36 |
| Nominal capacity | Ah | 10.8 | 13.6 |
| Energy | Wh | 400 | 500 |
| Operating temperature | °C | -5 to +40 | -5 to +40 |
| Storage temperature | °C | +10 to +40 | +10 to +40 |
| Permitted charging temperature range | °C | 0 to +40 | 0 to +40 |
| Weight, approx. | kg | 2.7 | 2.8 |
| Protection rating | IP55 | IP55 | |
UKCA
Fitting
▶ Ensure the eBike battery is placed on clean surfaces only. Avoid getting dirt, e.g. sand or soil, in the charging socket and contacts.
Charging the eBike Battery
▶ A Bosch eBike battery from the system generation the smart system must only be charged using an original Bosch charger from the system generation the smart system.
Note: The eBike battery is supplied partially charged. To ensure full capacity of the eBike battery, fully charge the battery in the charger before using it for the first time.
To charge the eBike battery, read and follow the instructions in the operating manual for the charger.
The eBike battery can be charged at any state of charge. Interrupting the charging process does not damage the eBike battery.
The eBike battery has a temperature monitoring function that only allows it to be charged within a temperature range of 0 °C to 40 °C.

If the temperature of the eBike battery is outside this charging range, three of the LEDs on the battery charge indicator (6) will flash. Disconnect the eBike battery from the charger and let it reach the correct temperature range.
Do not reconnect the eBike battery to the charger until it has reached the correct charging temperature.
Note: At temperatures of around 0^ C, the start of the charging process for the eBike battery can be delayed by approximately 5 minutes, once the plug of the charger has been connected to the charging socket on the eBike.
Note: If your eBike has a permanently installed eBike battery, you can receive the messages about the status of the eBike battery on the operating unit or on the on-board computer. To do this, read and follow the operating manuals for the operating unit/on-board computer.
Battery charge indicator outside of the eBike
Note: The eBike battery charge indicator (6) switches back off as soon as the eBike is switched on.
The five LEDs on the battery charge indicator (6) show the battery's state of charge when the eBike battery is switched on.
Each LED represents approximately 20% of the charging capacity. When the eBike battery is fully charged, all five LEDs will be lit.
The eBike battery's state of charge when switched on is also shown on the display of the on-board computer. Read and follow the relevant instructions in the operating manuals for the drive unit and on-board computer.
If the eBike battery's capacity is less than 10%, the last remaining LED will flash.
Once charging is complete, disconnect the eBike battery from the charger and the charger from the mains.
Inserting and Removing the eBike Battery
- When inserting the battery into the holder or removing it from the holder, always switch off the eBike battery and the eBike beforehand.
▶ Once you have inserted the eBike battery, check that it is correctly positioned and secure in all directions.
Removing the PowerTube battery (pivot) (see figure A)
① To remove the PowerTube battery (4), open the battery lock (2) using the key (1). The battery will be unlocked and fall into the safety restraint (8).
Note: When removing the eBike battery, hold it firmly in your hand.
② Hold the battery firmly and press on the safety restraint (8) from above. The battery will be unlocked completely and fall into your hand. Then pull the battery out of the frame.
Note: As a result of varying designs, the battery may need to be inserted and removed using a different method. Read the operating instructions of the eBike manufacturer.
Inserting the PowerTube battery (pivot) (PT500/625/750) (see figure B)
In order for the battery to be inserted, the key (1) must be inserted into the battery lock (2) and the battery lock must be open.
To insert the PowerTube battery (4), place it so that its contacts are in the lower holder of the frame.
② Hold the battery lock open with the key and swivel the battery upwards until it is held by the safety restraint (8).
⑧ Release the key and push the battery upwards until it audibly clicks into place.
④ Always secure the battery by closing the battery lock (2) – otherwise the battery lock may open and the battery may fall out of the holder.
Always remove the key (1) from the battery lock (2) after locking it. This prevents both the key from falling out and the eBike battery from being removed by unauthorised third parties when the eBike is not in use.
Inserting the PowerTube battery (pivot) (PT600/800) (see figure C)
In order for the battery to be inserted, the key (1) must be removed from the battery lock (2).
To insert the PowerTube battery (4), place it so that its contacts are in the lower holder of the frame.
② Swivel the battery upwards until it audibly clicks into place and is held by the safety restraint (8).
⑧ Then push the battery fully into the holder until it audibly clicks into place.
Note: As a result of varying designs, the battery may need to be inserted and removed using a different method. Read the operating instructions of the eBike manufacturer.
Removing the PowerTube battery (axial) (PT500/625/750 only) (see figure D)
① To remove the PowerTube battery (12), open the battery lock (2) using the key (1) and pull out the key (1).
② Use the pull strap (10) to pull the battery (12) out of the frame and keep hold of it so that it does not fall out of the frame.
Note: As a result of varying designs, the battery may need to be inserted and removed using a different method. Read the operating instructions of the eBike manufacturer.
Inserting the PowerTube battery (axial) (PT500/625/750 only) (see figure E)
In order for the battery to be inserted, the locking mechanism (9) must be folded to the side. At this point, the key (1) must not be inserted in the battery lock (2).
To insert the PowerTube battery, insert it into the frame with the socket for the charging connector (5) facing upwards until the battery clicks into place. Ensure that the battery is aligned correctly.
② Close the locking mechanism (9), insert the key (1) into the battery lock (2) and lock the battery. Make sure that the safety hook (3) is correctly hooked in at the opening of the guide rail (11). Otherwise, there is a risk of the battery falling out while riding.
Always remove the key (1) from the battery lock (2) after locking it. This prevents both the key from falling out and the
eBike battery from being removed by unauthorised third parties when the eBike is not in use.
CompactTube battery (built-in)
The eBike batteries built-in to the bicycle frame must only be removed in the event of a fault. Contact an authorised bicycle dealer if this happens.
Removing the CompactTube battery (pivot) (see figure F)
To remove the CompactTube battery (20), open the battery lock (2) with the key (1) or press on the unlocking element (24) with a suitable, non-pointed tool (e.g. a hex key). The battery will be unlocked and fall into the safety restraint (22).
Note: When removing the eBike battery, hold it firmly in your hand.
② Hold the battery firmly, gently slide the battery towards the battery lock (2) and remove it from the safety restraint (22).
Note: The unlocking element may vary from the image and may be a manufacturer-specific solution. Read the operating instructions of the eBike manufacturer.
Note: As a result of varying designs, the battery may need to be inserted and removed using a different method. Read the operating instructions of the eBike manufacturer.
Inserting the CompactTube battery (pivot) (see figure G)
To insert the CompactTube battery (20), place it so that its contacts are in the upper holder of the frame.
② Swivel the battery into the bicycle frame until it is held by the safety restraint (22).
③ Push the battery into the guide rail (11) and slide the battery into the battery lock (2) until you hear it click into place.
④ Then remove the key (1) from the battery lock (2).
Always remove the key (1) from the battery lock (2) after locking it. This prevents both the key from falling out and the eBike battery from being removed by unauthorised third parties when the eBike is not in use.
Removing the CompactTube battery (axial) (see figure H)
To remove the CompactTube battery (21), open the battery lock (2) with the key (1) or press on the unlocking element (24) with a suitable, non-pointed tool (e.g. a hex key). The battery will be unlocked and fall into the safety restraint (23).
Note: When removing the eBike battery, hold it firmly in your hand.
② Press the safety restraint (23). Hold the battery firmly in place if the battery is sliding out of the bicycle frame. Then remove the battery.
Note: The unlocking element may vary from the image and may be a manufacturer-specific solution. Read the operating instructions of the eBike manufacturer.
Note: As a result of varying designs, the battery may need to be inserted and removed using a different method. Read the operating instructions of the eBike manufacturer.
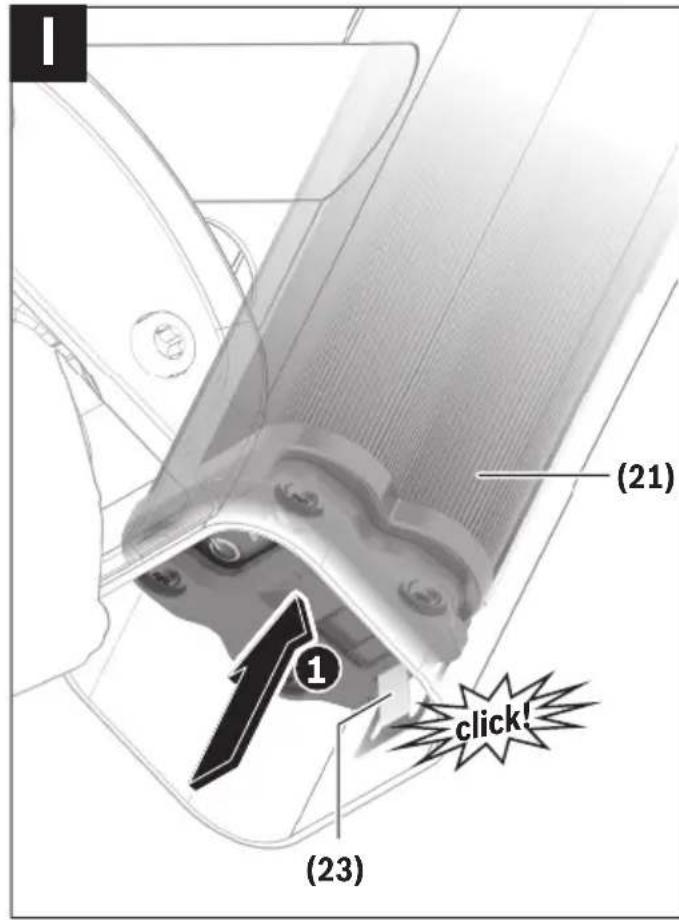
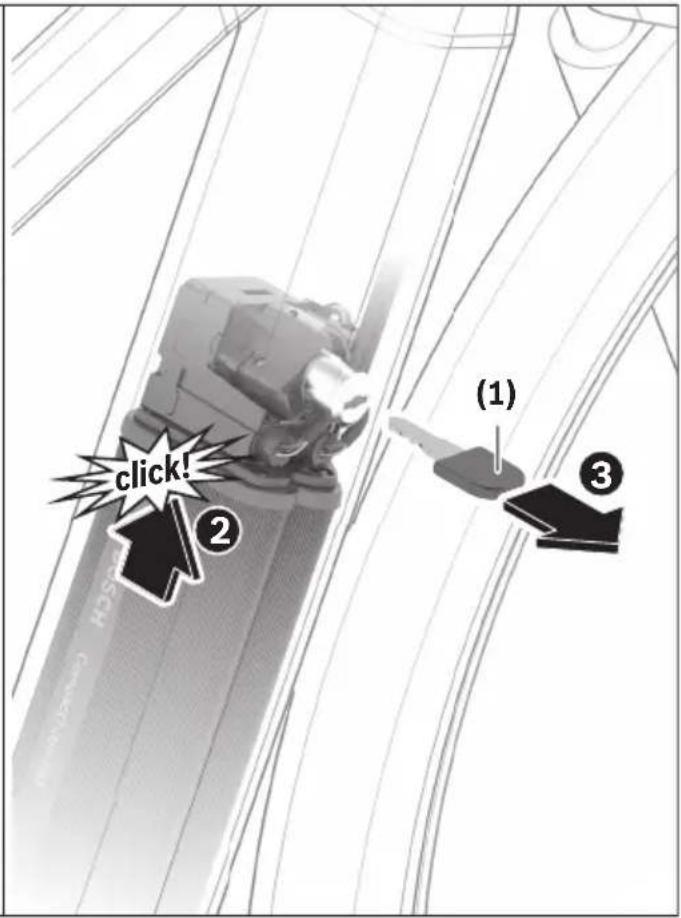
Inserting the CompactTube battery (axial) (see figure I)
To insert the CompactTube battery (21), insert it into the frame with the socket for the charging connector (5) facing upwards until you hear the battery click into place in the safety restraint (23). Ensure that the battery is aligned correctly.
② Slide the battery into the battery lock (2) until you hear it click into place in the battery lock (2).
③ Then remove the key (1) from the battery lock (2).
Always remove the key (1) from the battery lock (2) after locking it. This prevents both the key from falling out and the eBike battery from being removed by unauthorised third parties when the eBike is not in use.
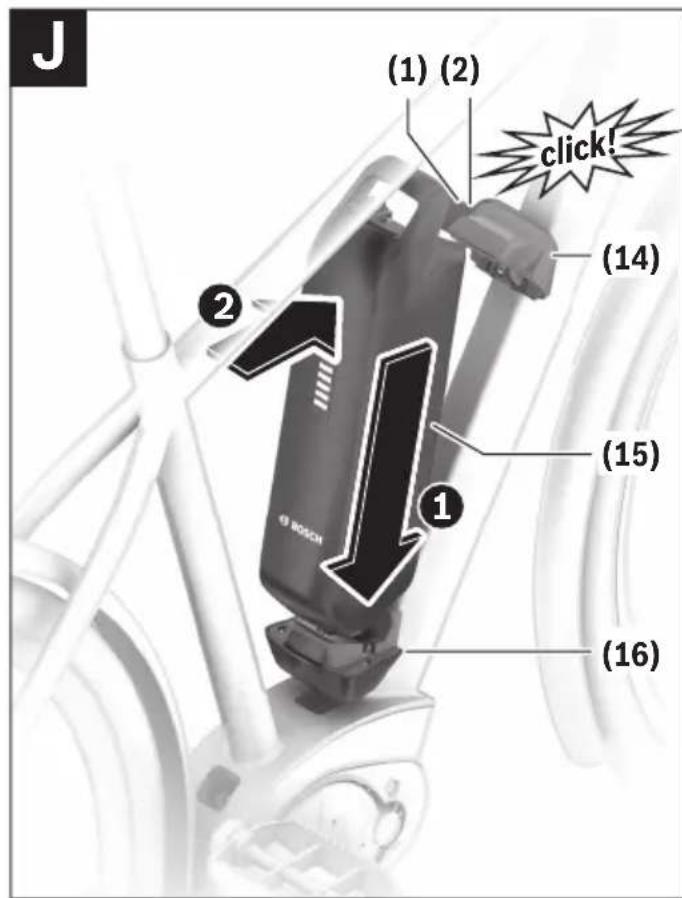
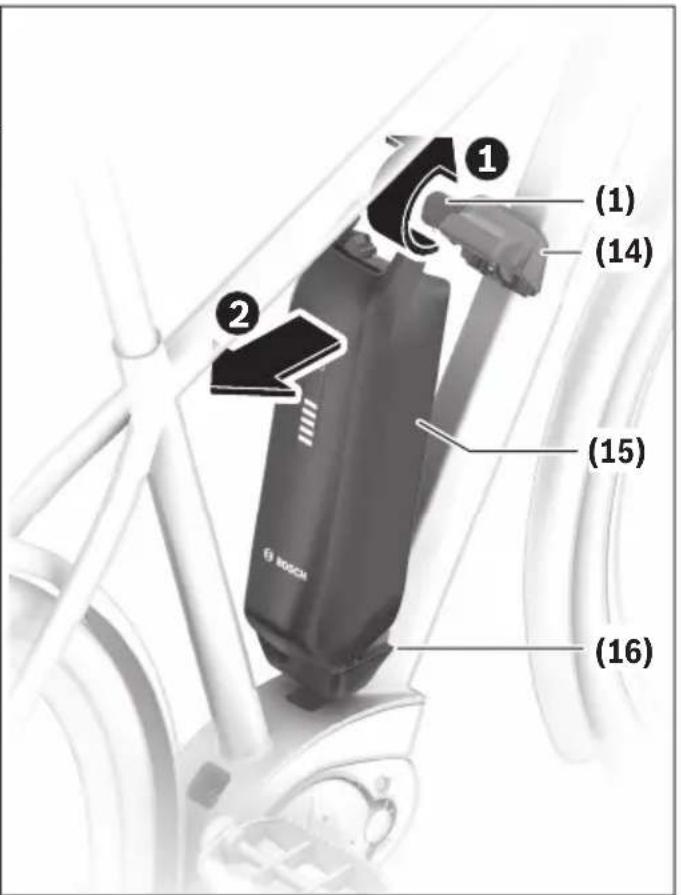
Inserting and Removing the PowerPack Battery (see figure J)
In order to insert the battery, the key (1) must not be inserted in the battery lock (2).
To insert the PowerPack battery (15), place it so that its contacts are in the lower holder (16) on the eBike.
② Twist it into the upper holder (14) as far as possible until you hear it click into place.
Always remove the key (1) from the battery lock (2) after locking it. This prevents both the key from falling out and the eBike battery from being removed by unauthorised third parties when the eBike is not in use.
To remove the PowerPack battery (15), switch it off and open the battery lock (2) using the key (1).
② Twist the battery out of the upper holder (14) and pull it out of the lower holder (16).
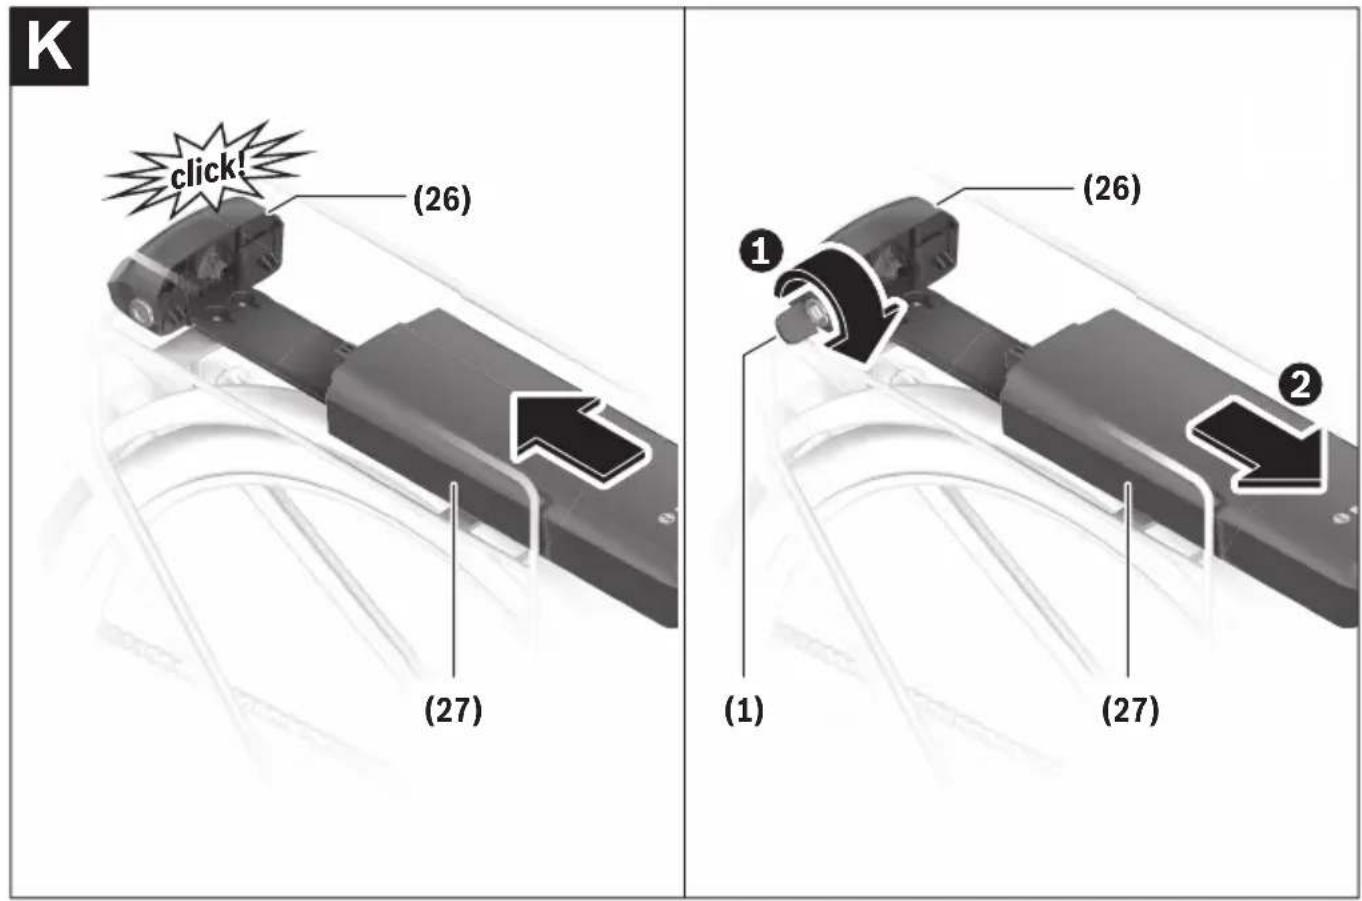
Inserting and removing the rack-mounted battery (see figure K)
In order for the battery to be inserted, the battery lock (2) must be locked. The key (1) must not be inserted in the battery lock (2).
To insert the battery (27), slide its contacts into the holder (26) until you hear it click into place.
To remove the battery (27), switch it off and open the battery lock using the key (1) ①.
Pull the battery out of the holder (26) ②.
Operation
Start-up
Switching on/off
Switching on the eBike battery is one way to switch on the eBike (does not apply to permanently installed eBike batteries). To do this, read and follow the instructions in the operating manuals for the drive unit and operating unit.
Before switching on the eBike battery, i.e. the eBike, make sure that the battery lock (2) is locked.
To switch on the eBike battery, press the on/off button (7).
Do not use any sharp or pointed objects to press the button.
Note: The eBike battery charge indicator (6) switches back off as soon as the eBike battery is switched on.
To switch off the eBike battery, press the on/off button (7) again. This will also switch the eBike off.
If no drive assistance is requested for about 10 minutes (e.g. because the eBike is not moving) and no button is pressed on the on-board computer or the operating unit of the eBike, the eBike will switch off automatically.
The eBike battery is protected against deep discharge, overloading, overheating and short-circuiting by the "Battery Management System (BMS)". In the event of danger, a protective circuit switches the eBike battery off automatically.
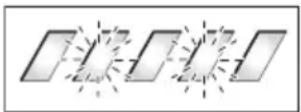
If a fault is detected in the eBike battery, two of the LEDs on the battery charge indicator (6) will flash. Contact an authorised bicycle dealer if this happens.
Recommendations for Optimal Handling of the eBike Battery
The service life of the eBike battery can be extended if it is looked after well and especially if it is stored at the correct temperature.
As it ages, however, the capacity of the eBike battery will diminish, even with good care.
A significantly reduced operating time after charging indicates that the eBike battery has deteriorated. The eBike battery should be replaced.
Recharging the eBike Battery Before and During Storage
When you are not going to use the eBike battery for an extended period (longer than three months), store it at a state of charge of around 30% to 60% (when two to three of the LEDs on the battery charge indicator (6) are lit).
Check the state of charge after six months. If the state of charge is below 30%, recharge the eBike battery to between approximately 30% and 60%.
Check the state of charge of the permanently installed eBike battery on the operating unit or on the on-board computer.
Note: If the eBike battery is stored with no charge for an extended period of time, it may become damaged despite the low self-discharge and the battery capacity could be significantly reduced.
Storage conditions
Note: For permanently installed eBike batteries, the storage conditions specified by the eBike manufacturer apply.
If possible, store the eBike battery in a dry, well-ventilated place. Protect it against moisture and water. When the weather conditions are bad, it is advisable to remove the eBike battery from the eBike and store it in a closed room, for example, until you use it next.
Do not store the eBike battery in the following locations:
- in areas without smoke alarms
- near combustible or easily flammable objects
- near heat sources
– in locked vehicles (especially in the summer)
- in direct sunlight
To ensure an optimum service life, store the eBike batteries at room temperature.
Never store them at temperatures below -10^ or above 60^ .
Make sure that the maximum storage temperature is not exceeded.
It is recommended not to leave the eBike battery on the eBike during storage (does not apply to permanently installed eBike batteries).
Action in the event of a fault
The eBike battery must not be opened, not even for repairs. There is a risk of the eBike battery catching fire, e.g. as a result of a short circuit. This risk continues to apply for any Bosch eBike battery that has ever been opened, even at a later point in time.
In the event of a fault, do not have your eBike battery repaired; instead, have your bicycle retailer replace it with an original Bosch eBike battery from the system generation the smart system.
Maintenance and servicing
Maintenance and cleaning
The eBike battery must not be immersed in water or cleaned with a high-pressure cleaner.
Keep the eBike battery clean and avoid contact with skincare products, sun cream and insect repellant. Clean it carefully with a soft, damp cloth.
Clean and lightly grease the connector pins occasionally. Use medical or technical Vaseline for this purpose.
Please contact an authorised bicycle dealer if the eBike battery is no longer working.
After-sales service and advice on using products
If you have any questions about the eBike batteries, contact an authorised bicycle dealer.
▶ Note down the key manufacturer and number on the key (1). Contact an authorised bicycle dealer if you lose the key. Give them the name of the key manufacturer and the number on the key.
For contact details of authorised bike dealerships, please visit www.bosch-ebike.com.

Further information on the eBike components and their functions can be found in the Bosch eBike Help Center.
Transport
If you transport your eBike attached to the outside of your car, e.g. on a bike rack, remove the on-board computer and the eBike battery (exception: built-in eBike battery) to avoid damaging them.
The eBike batteries are subject to legislation on the transport of dangerous goods. Private users can transport undamaged eBike batteries by road without having to comply with additional requirements.
When batteries are transported by commercial users or third parties (e.g. air transport or forwarding agency), special requirements on packaging and labelling (e.g. ADR regulations) must be met. When preparing items for shipping, a dangerous goods expert can be consulted as required.
Do not ship batteries if the housing is damaged or the eBike battery is not fully functional. Use only the original Bosch eBike battery packaging when transporting the eBike battery. Apply tape over exposed contacts and pack the eBike battery such that it cannot move around inside the packaging. Inform your parcel service that the package contains dangerous goods. Please also observe any additional national regulations should these exist.
If you have any questions about transporting the eBike batteries, contact an authorised bicycle dealer. You can also order suitable transport packaging from the dealer.
Disposal and substances in products
You can find information about substances in products at the following link:
www.bosch-ebike.com/en/material-compliance.

eBike batteries, accessories and packaging should be recycled in an environmentally friendly manner.
Do not dispose of eBike batteries along with
household waste.
Apply tape over the contact surfaces of the battery terminals before disposing of eBike batteries.
Old or defective eBike batteries can be handed in free of charge at any specialist retailer that sorts these for environmentally friendly recycling. Store defective eBike batteries in a safe location outdoors and inform your specialist retailer. Do not touch severely damaged eBike batteries with your bare hands – electrolyte may escape and cause skin irritation.
In accordance with Directive 2012/19/EU and Directive 2006/66/EC respectively, electronic devices that are no longer usable and defective/drained batteries must be collected separately and recycled in an environmentally friendly manner.
Li-ion:
Please observe the information in the section on "Transport" (see "Transport", page English - 7).
Please return eBike batteries that are no longer usable to an authorised bicycle dealer.

Subject to change without notice.


www.bosch-ebike.com/en/material-compliance.

www.bosch-ebike.com/en/material-compliance.

www.bosch-ebike.com/en/material-compliance.

Lade eBike-batteriet
CompactTube-batteri (for permanent montering)
eBike-batteriene som er montert permanent i sykkelrammen må kun tas ut hvis det oppstår feil. Du må da kontakte en autorisert sykkelforhandler.
Ta ut CompactTube-batteriet (Pivot) (se bilde F)
www.bosch-ebike.com/en/material-compliance.

www.bosch-ebike.com/en/material-compliance.

(21) CompactTube-rafhlaða (Axial)
Breytingar áskildar.
www.bosch-ebike.com/en/material-compliance.

- Sicherheitshinweise
- Save all safety warnings and instructions for future reference.
- Privacy notice
- Product description and specifications
- Intended Use
- Product features
- UKCA
- Fitting
- Charging the eBike Battery
- Battery charge indicator outside of the eBike
- Inserting and Removing the eBike Battery
- Removing the PowerTube battery (pivot) (see figure A)
- Inserting the PowerTube battery (pivot) (PT500/625/750) (see figure B)
- Inserting the PowerTube battery (pivot) (PT600/800) (see figure C)
- Removing the PowerTube battery (axial) (PT500/625/750 only) (see figure D)
- Inserting the PowerTube battery (axial) (PT500/625/750 only) (see figure E)
- CompactTube battery (built-in)
- Removing the CompactTube battery (pivot) (see figure F)
- Inserting the CompactTube battery (pivot) (see figure G)
- Removing the CompactTube battery (axial) (see figure H)
- Inserting the CompactTube battery (axial) (see figure I)
- Inserting and Removing the PowerPack Battery (see figure J)
- Inserting and removing the rack-mounted battery (see figure K)
- Operation
- Start-up
- Switching on/off
- Recommendations for Optimal Handling of the eBike Battery
- Recharging the eBike Battery Before and During Storage
- Storage conditions
- Action in the event of a fault
- Maintenance and servicing
- Maintenance and cleaning
- After-sales service and advice on using products
- Transport
- Disposal and substances in products
- Li-ion:
- Lade eBike-batteriet
- CompactTube-batteri (for permanent montering)
- Ta ut CompactTube-batteriet (Pivot) (se bilde F)
Brand : SCOTT
Model : Sub Tour 40
Category : Electric bike