
Coralais K-15162 - Faucet KOHLER - Free user manual and instructions
Find the device manual for free Coralais K-15162 KOHLER in PDF.


User questions about Coralais K-15162 KOHLER
0 question about this device. Answer the ones you know or ask your own.
Ask a new question about this device
Download the instructions for your Faucet in PDF format for free! Find your manual Coralais K-15162 - KOHLER and take your electronic device back in hand. On this page are published all the documents necessary for the use of your device. Coralais K-15162 by KOHLER.
USER MANUAL Coralais K-15162 KOHLER
Single-Control Kitchen Sink Faucets
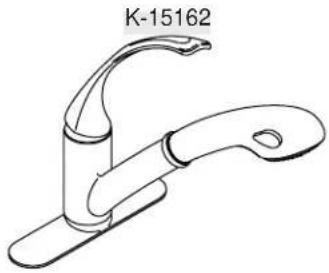
natural_image
Line drawing of a kitchen faucet with no text or symbolsM product numbers are for Mexico (i.e. K-12345M)
Pencil Phillips Screwdriver
Thank You For Choosing Kohler Company
We appreciate your commitment to Kohler quality. Please take a few minutes to review this manual before you start installation. If you encounter any installation or performance problems, please don't hesitate to contact us. Our phone numbers and website are listed on the back cover. Thanks again for choosing Kohler Company.
Before You Begin

CAUTION: Risk of fresh water contamination. This faucet contains important back-siphonage protection. Do not replace the faucet ground joints or remove any components.

CAUTION: Risk of restricted water flow and product damage. Use extreme care when connecting all hoses to avoid kinking and twisting.
□ Observe all local plumbing and building codes.
□ Shut off the water supplies.
Before installation, unpack the new faucet and inspect it for damage. Return the faucet to the carton until you are ready to install it.
□ Carefully inspect waste and supply tubing for any sign of damage and replace if necessary.
☐ For new installations, assemble the faucet to the sink before installing the sink.
Before You Begin (cont.)
☐ The appearance of your faucet may differ from the faucet illustrated. The referenced components in the illustration and the installation instructions still apply.
□ Except for plumbers putty on the undercover, do not use petroleum based products on this faucet.
☐ Kohler Co. reserves the right to make revisions in the design of faucets without notice, as specified in the Price Book.
text_image
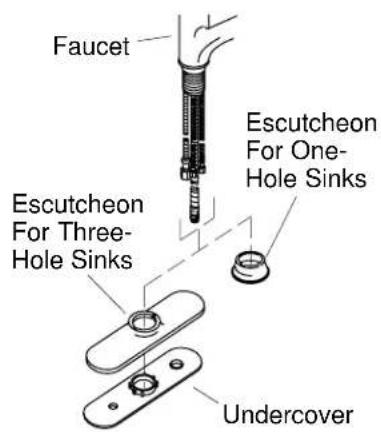
Faucet Escutcheon For Three-Hole Sinks Escutcheon For One-Hole Sinks Undercover1. Install the Escutcheon (Optional)
For 1-hole Installations:
□ Apply a bead of plumbers putty to the underside of the escutcheon according to the manufacturer's instructions.
□ Position the escutcheon over the sink hole, align, then press into place.
□ Remove any excess putty.
For 3-hole Installations:
□ Apply a bead of plumbers putty or other sealant to the bottom edges of the undercover according to the manufacturer's instructions.
☐ Position the undercover over the sink hole, align, then press into place.
□ Remove any excess putty.
□ Place the escutcheon over the undercover.
text_image
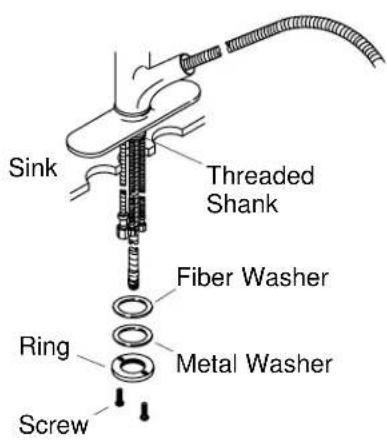
Sink Threaded Shank Fiber Washer Ring Metal Washer Screw2. Install the Faucet
□ Fit the faucet through the sink hole.
□ Position the faucet so the handle faces toward the user.
☐ Partially thread two screws into ring until they barely protrude from the backside of the ring.
☐ Slide the fiber washer, metal washer, and ring to the threaded shank until it is about 1/4" (6 mm) from touching the sink bottom.
□ Turn the ring so the screws are to the front and back of the faucet.
□ Use a Phillips screwdriver to tighten the screws securely and evenly.
text_image
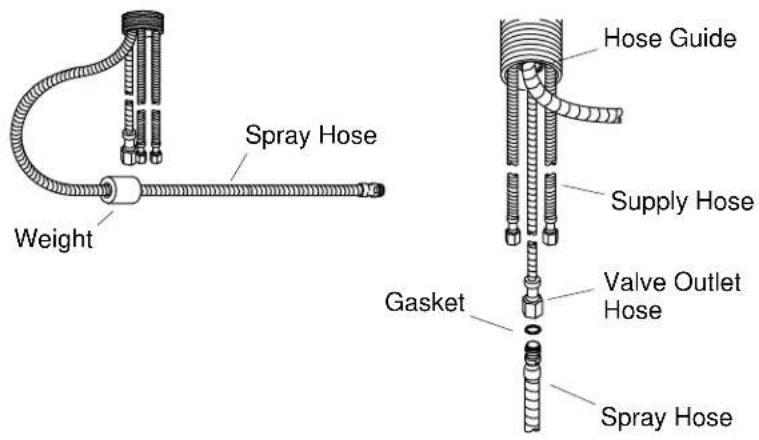
Weight Spray Hose Hose Guide Supply Hose Gasket Valve Outlet Hose Spray Hose3. Connect the Spray Hose
☐ Slide the weight up 23" (58.4 cm) from the unattached end of the spray hose. If necessary, the weight may be moved up or down at this time to adjust the pullout length of the spray hose.
□ Carefully tighten the weight screws on the weight at the desired location. Do not overtighten.
□ Reconnect the unattached end of the spray hose to the hose connector.
text_image
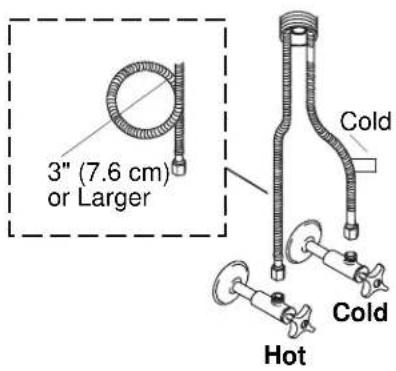
3" (7.6 cm) or Larger Cold Cold Hot4. Connect the Supplies
NOTE: If the sink installation requires that you coil the supply hoses to obtain a good connection, maintain an inside coil diameter of at least 3" (7.6 cm).
□ Carefully position the hot and cold supplies so they will not interfere with the other hoses.
□ Connect the supply hoses to the supply stops. Left is hot, right is cold.
□ Tighten all connections.
text_image
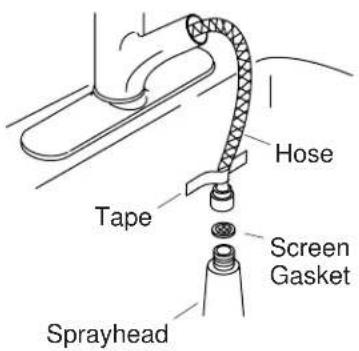
Hose Tape Screen Gasket Sprayhead5. Flush the Supply Lines
☐ Place a stopper in the drain of the sink to ensure the faucet components do not fall down the drain.
☐ Pull the sprayhead out to partially expose the hose.
□ Remove the sprayhead with screen gasket from the spray hose.
☐ Position the hose in the sink. Tie or tape the hose to the sink to prevent it from sliding back into the faucet.
□ Turn on the hot and cold water supplies.
□ Remove the stopper in the drain of the sink.
☐ Turn the faucet handle to the full cold position and lift to the "ON" position.
□ Run the cold water through the faucet for about one minute to remove any debris.
☐ Turn the faucet handle to the full hot position.
□ Run the hot water through the faucet for about one minute to remove any debris.
☐ Push the lever handle down to the "OFF" position.
□ Place a stopper in the drain of the sink.
☐ Reinstall the screen gasket and sprayhead to the spray hose.
□ Remove the stopper in the drain of the sink.
□ Run water through the faucet again and check for leaks.
text_image
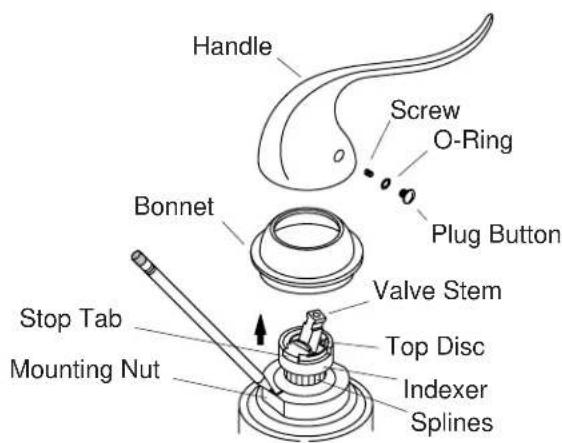
Handle Screw O-Ring Plug Button Bonnet Valve Stem Stop Tab Mounting Nut Top Disc Indexer Splines6. Adjust the Water Temperature
□ Remove the plug button, O-ring, and screw from the handle.
□ Remove the handle and bonnet from the faucet body.
☐ Lift the valve stem up and off the stop tab. The water will turn on.
□ Align the stop tab with the mounting nut to establish the maximum temperature.
☐ Mark the maximum temperature on the mounting nut with a marker or pencil.
□ Lift up the indexer and disk to clear the splines.
NOTE: Each spline notch represents approximately 9.5^ F ( 5.3^ C).
☐ Turn the indexer, disk and valve stem counterclockwise, until the temperature is properly adjusted.
☐ Push down the indexer and disk to cover the splines after the temperature is adjusted. Ensure that the disk is fully snapped into the indexer.
□ Push the valve stem down onto the stop tab. The water will turn off.
☐ Reinstall the bonnet, handle, O-ring, screw, and plug button.




